The Last Warning (April 1944, Normandy) The Finished Dirty Bunch

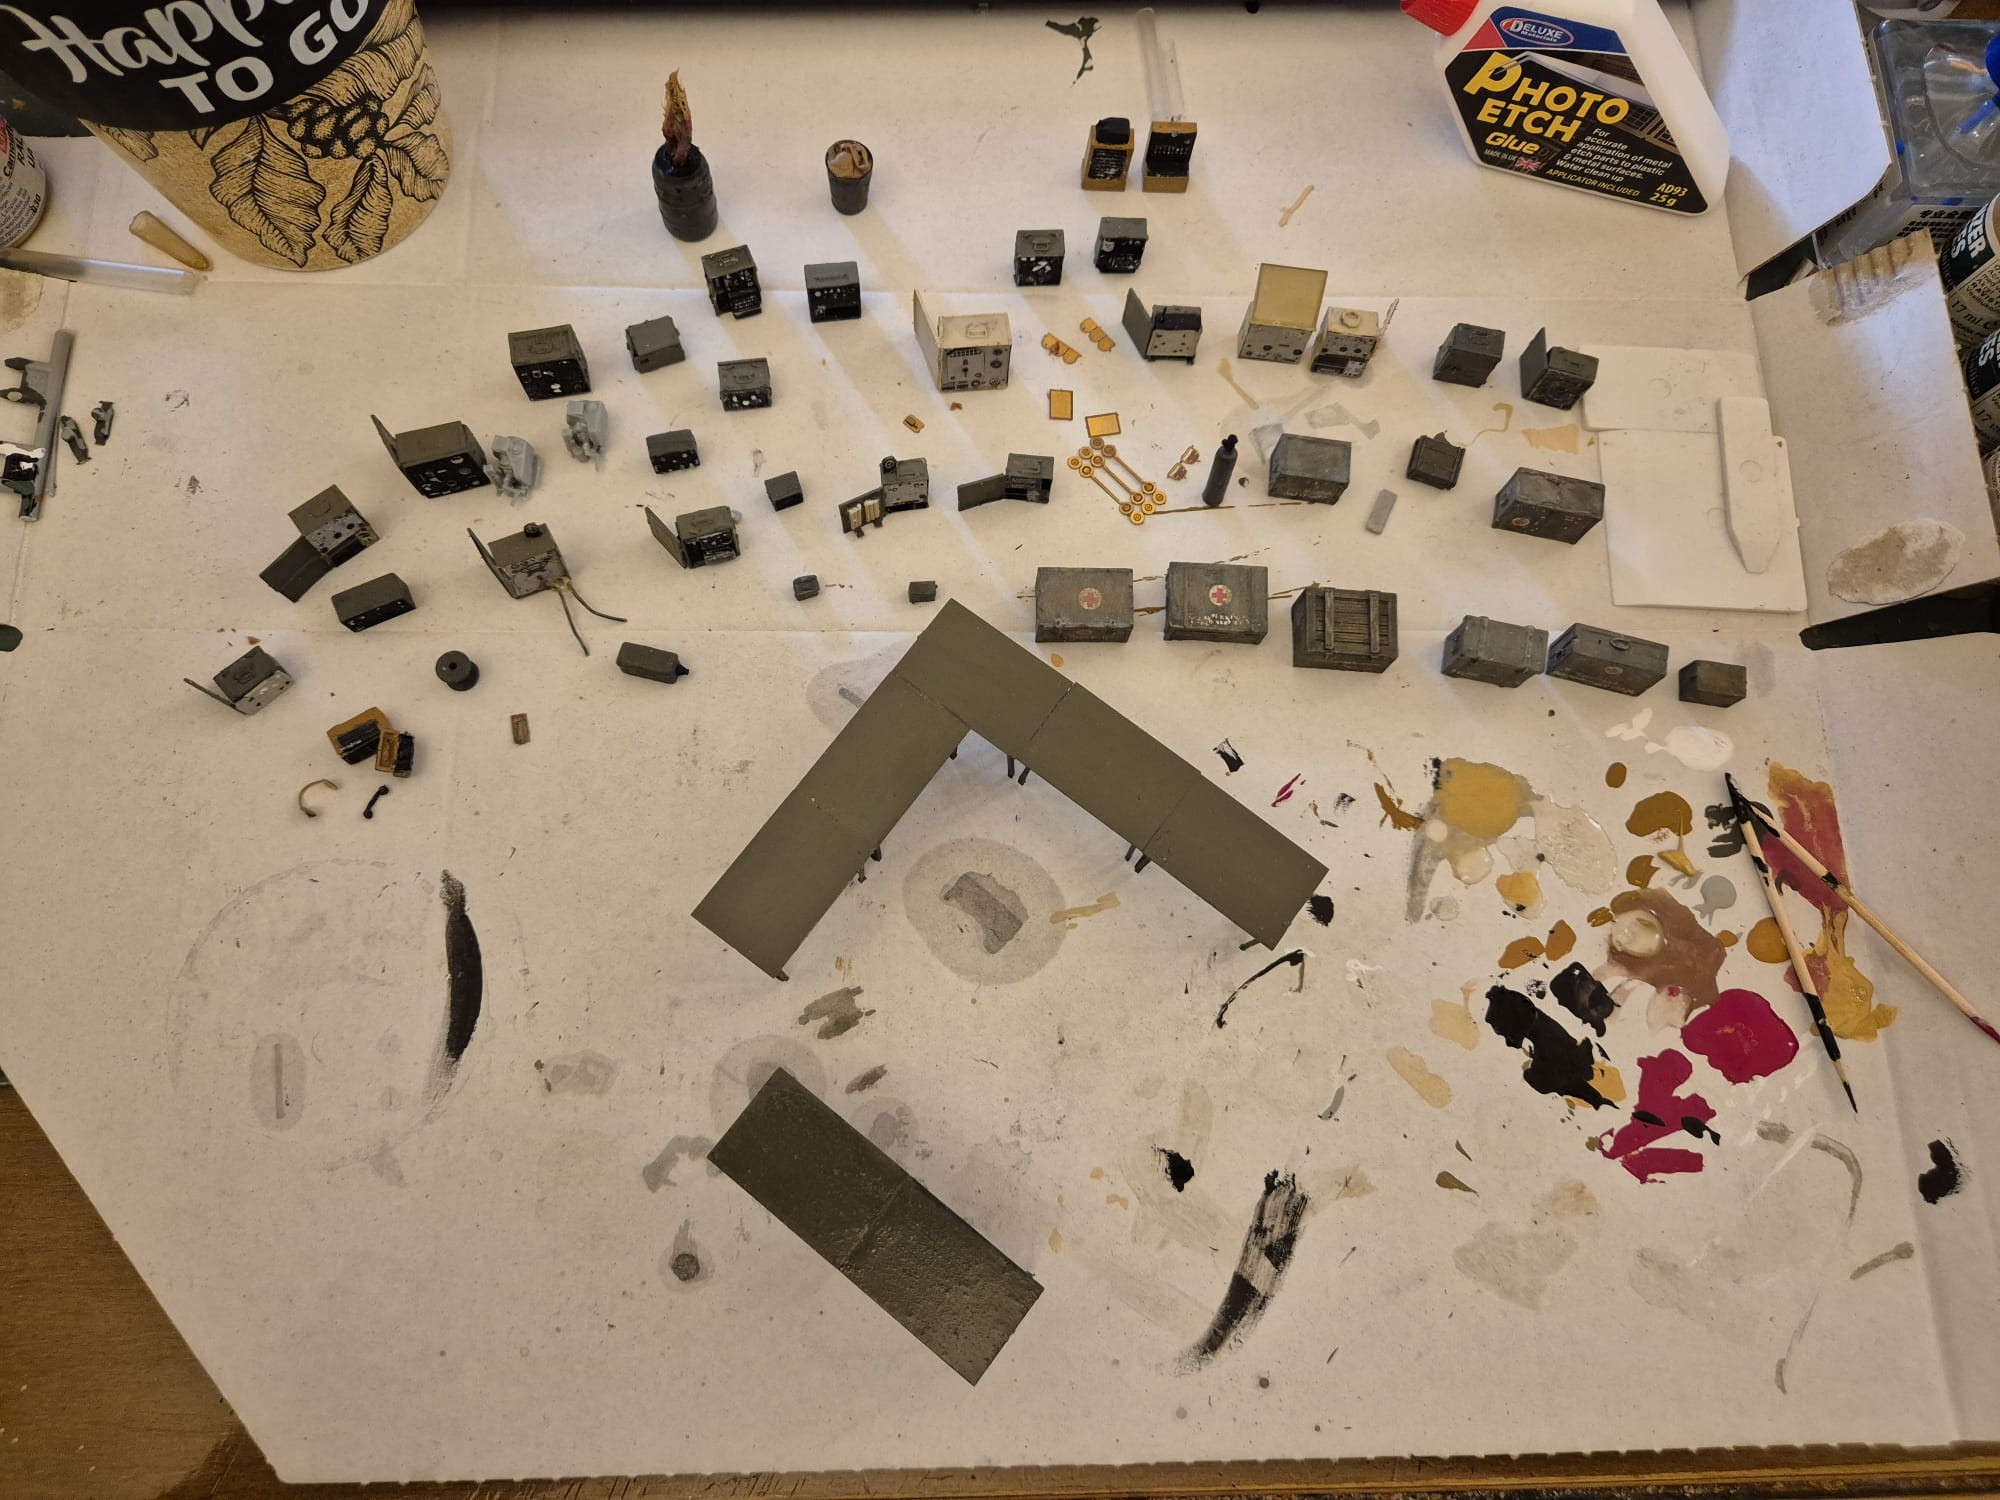
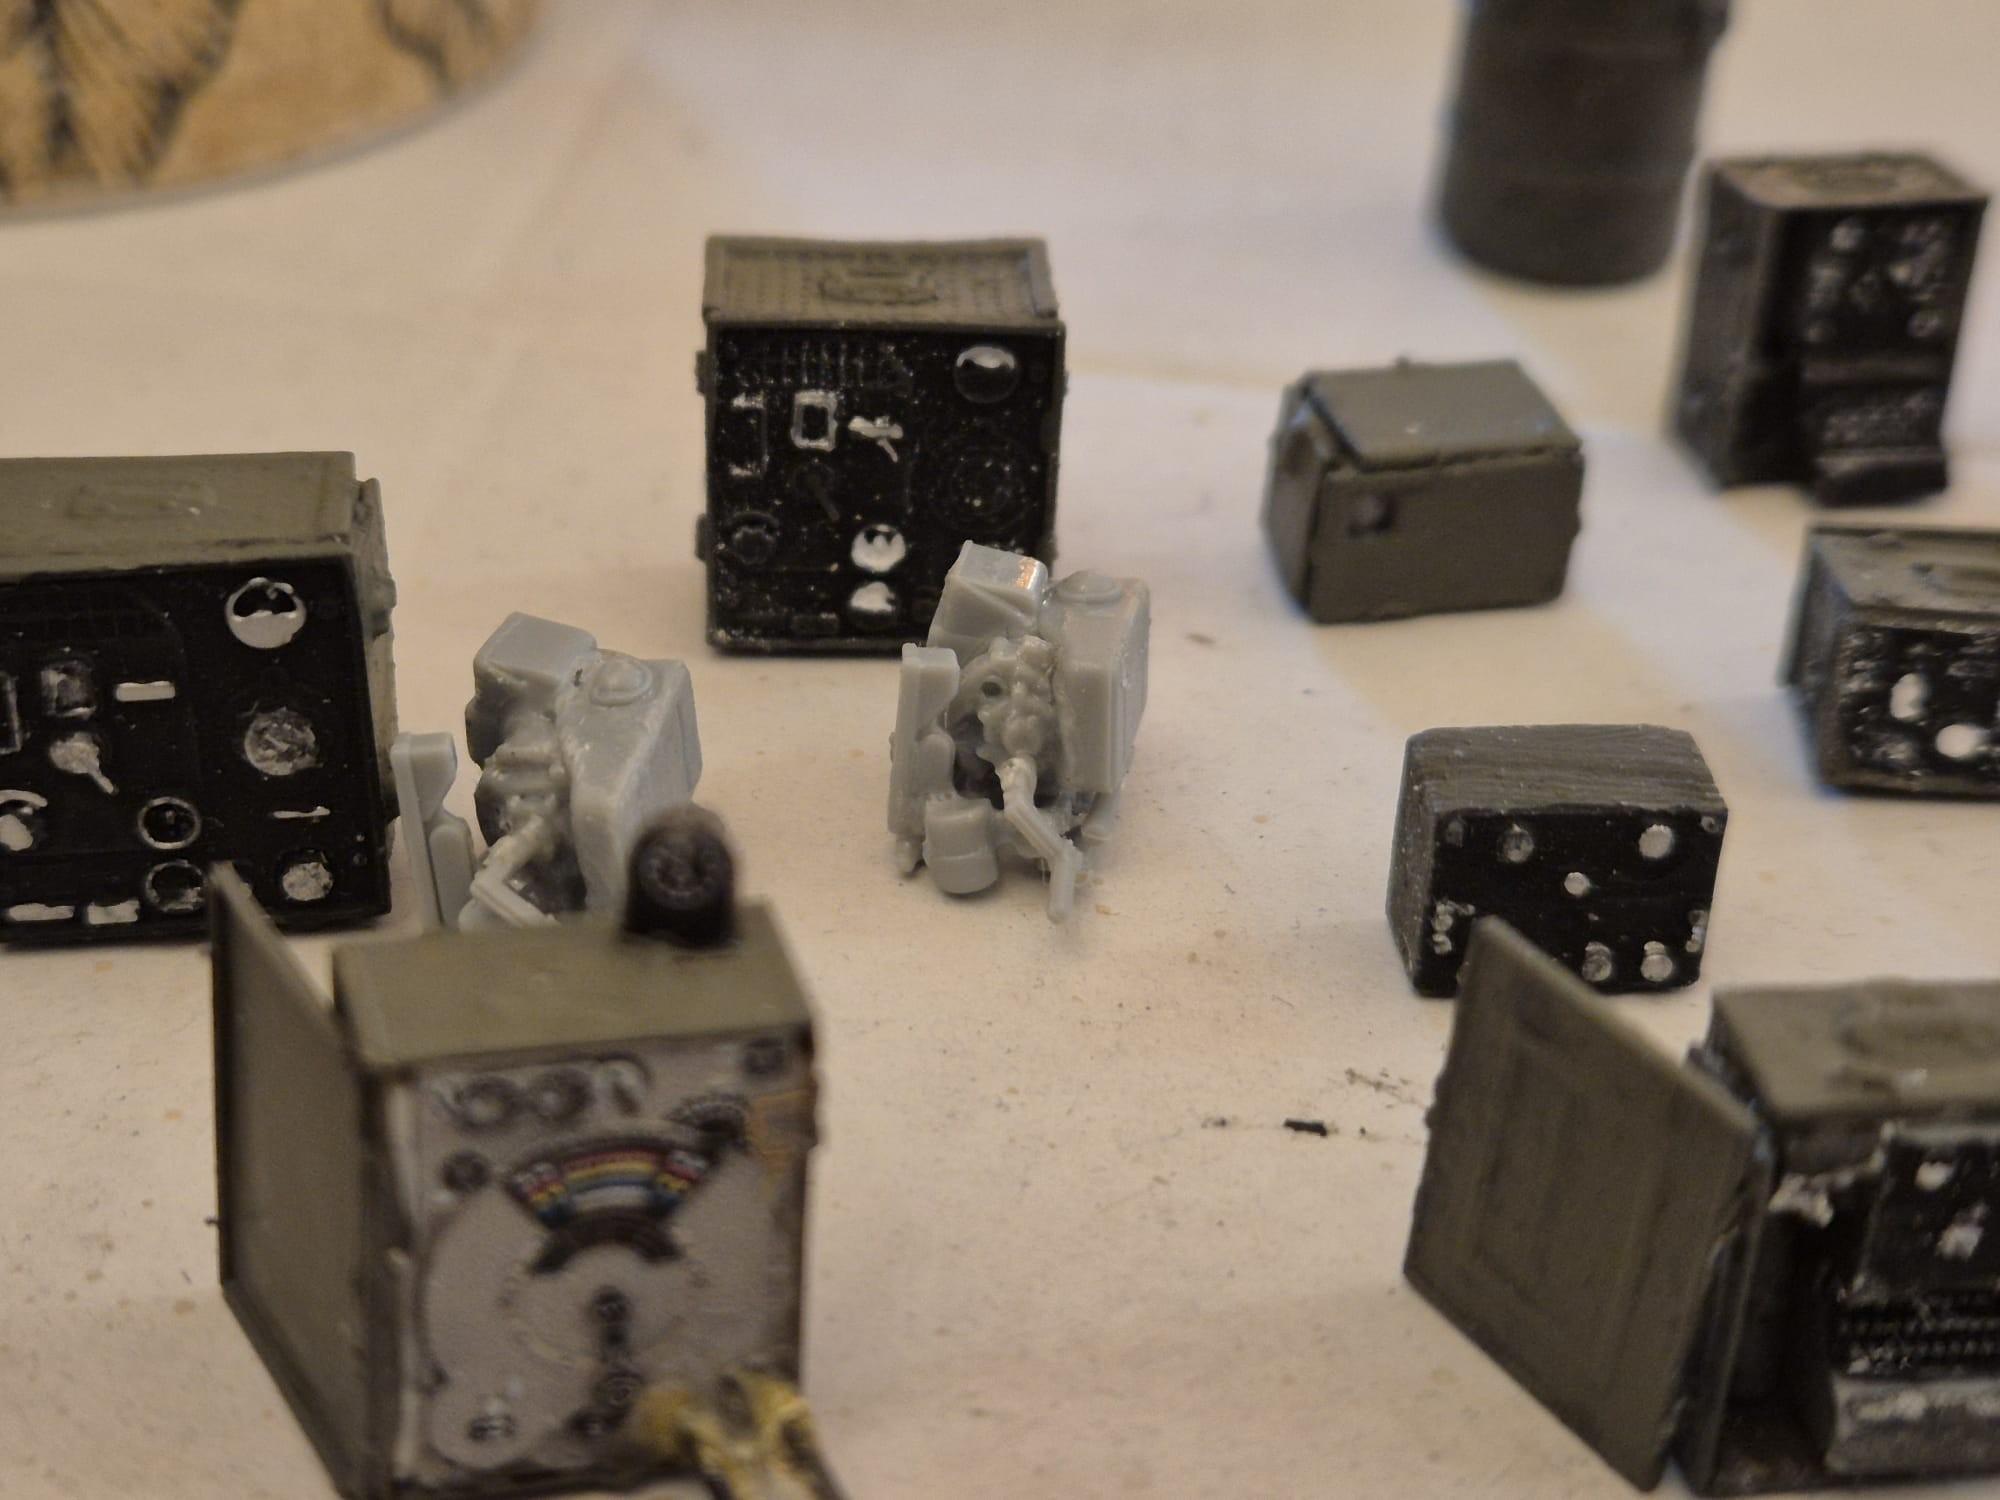
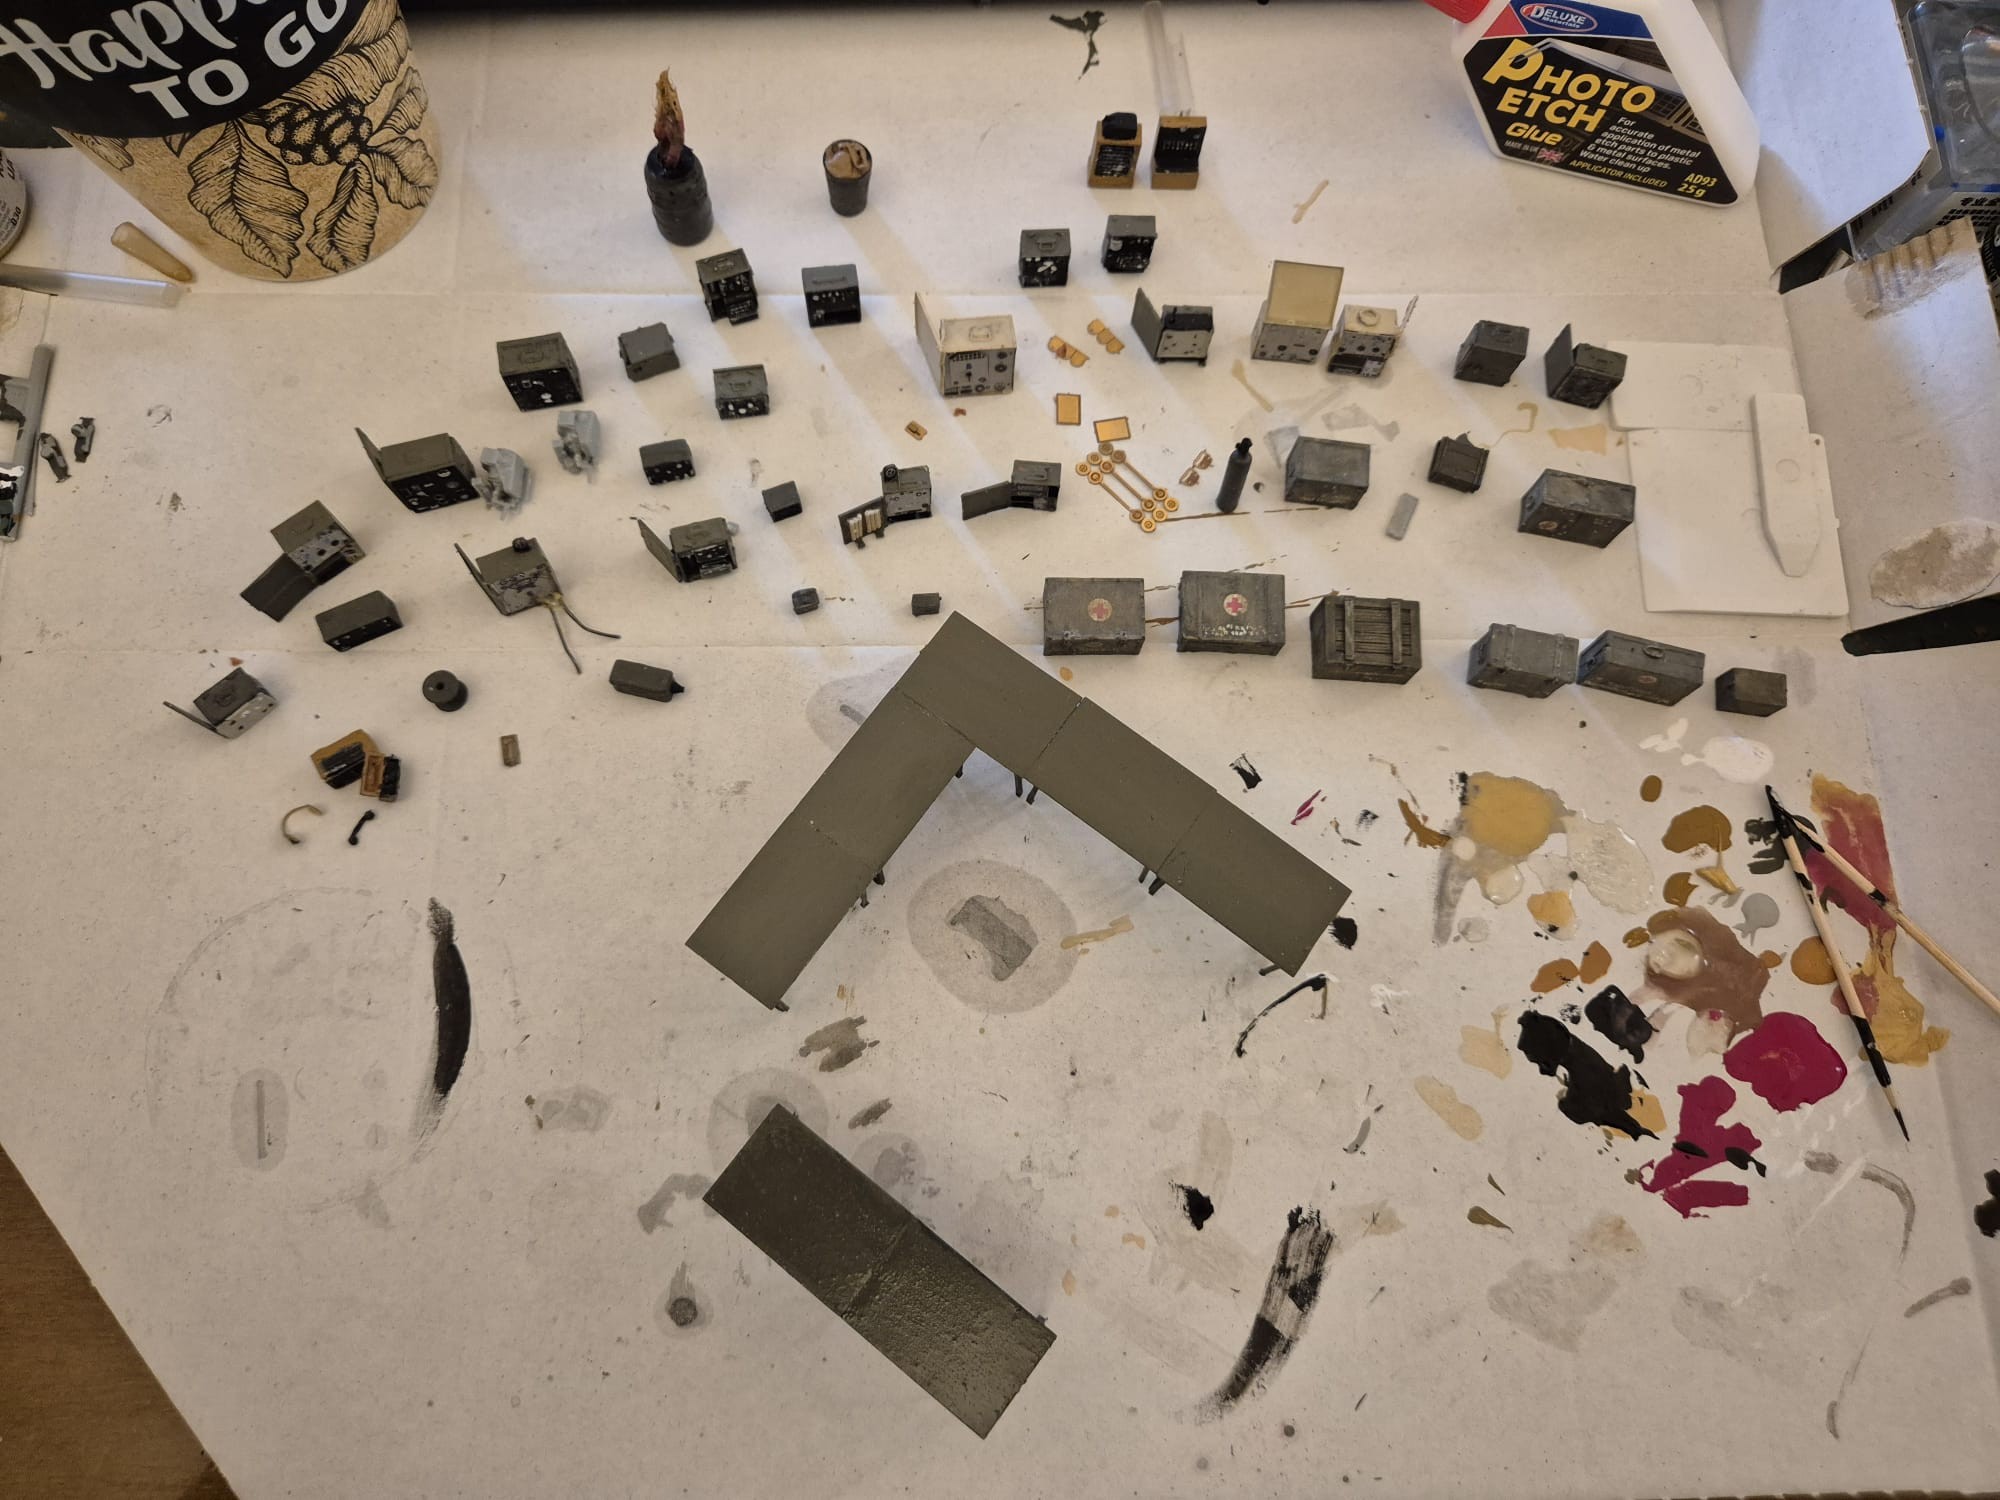
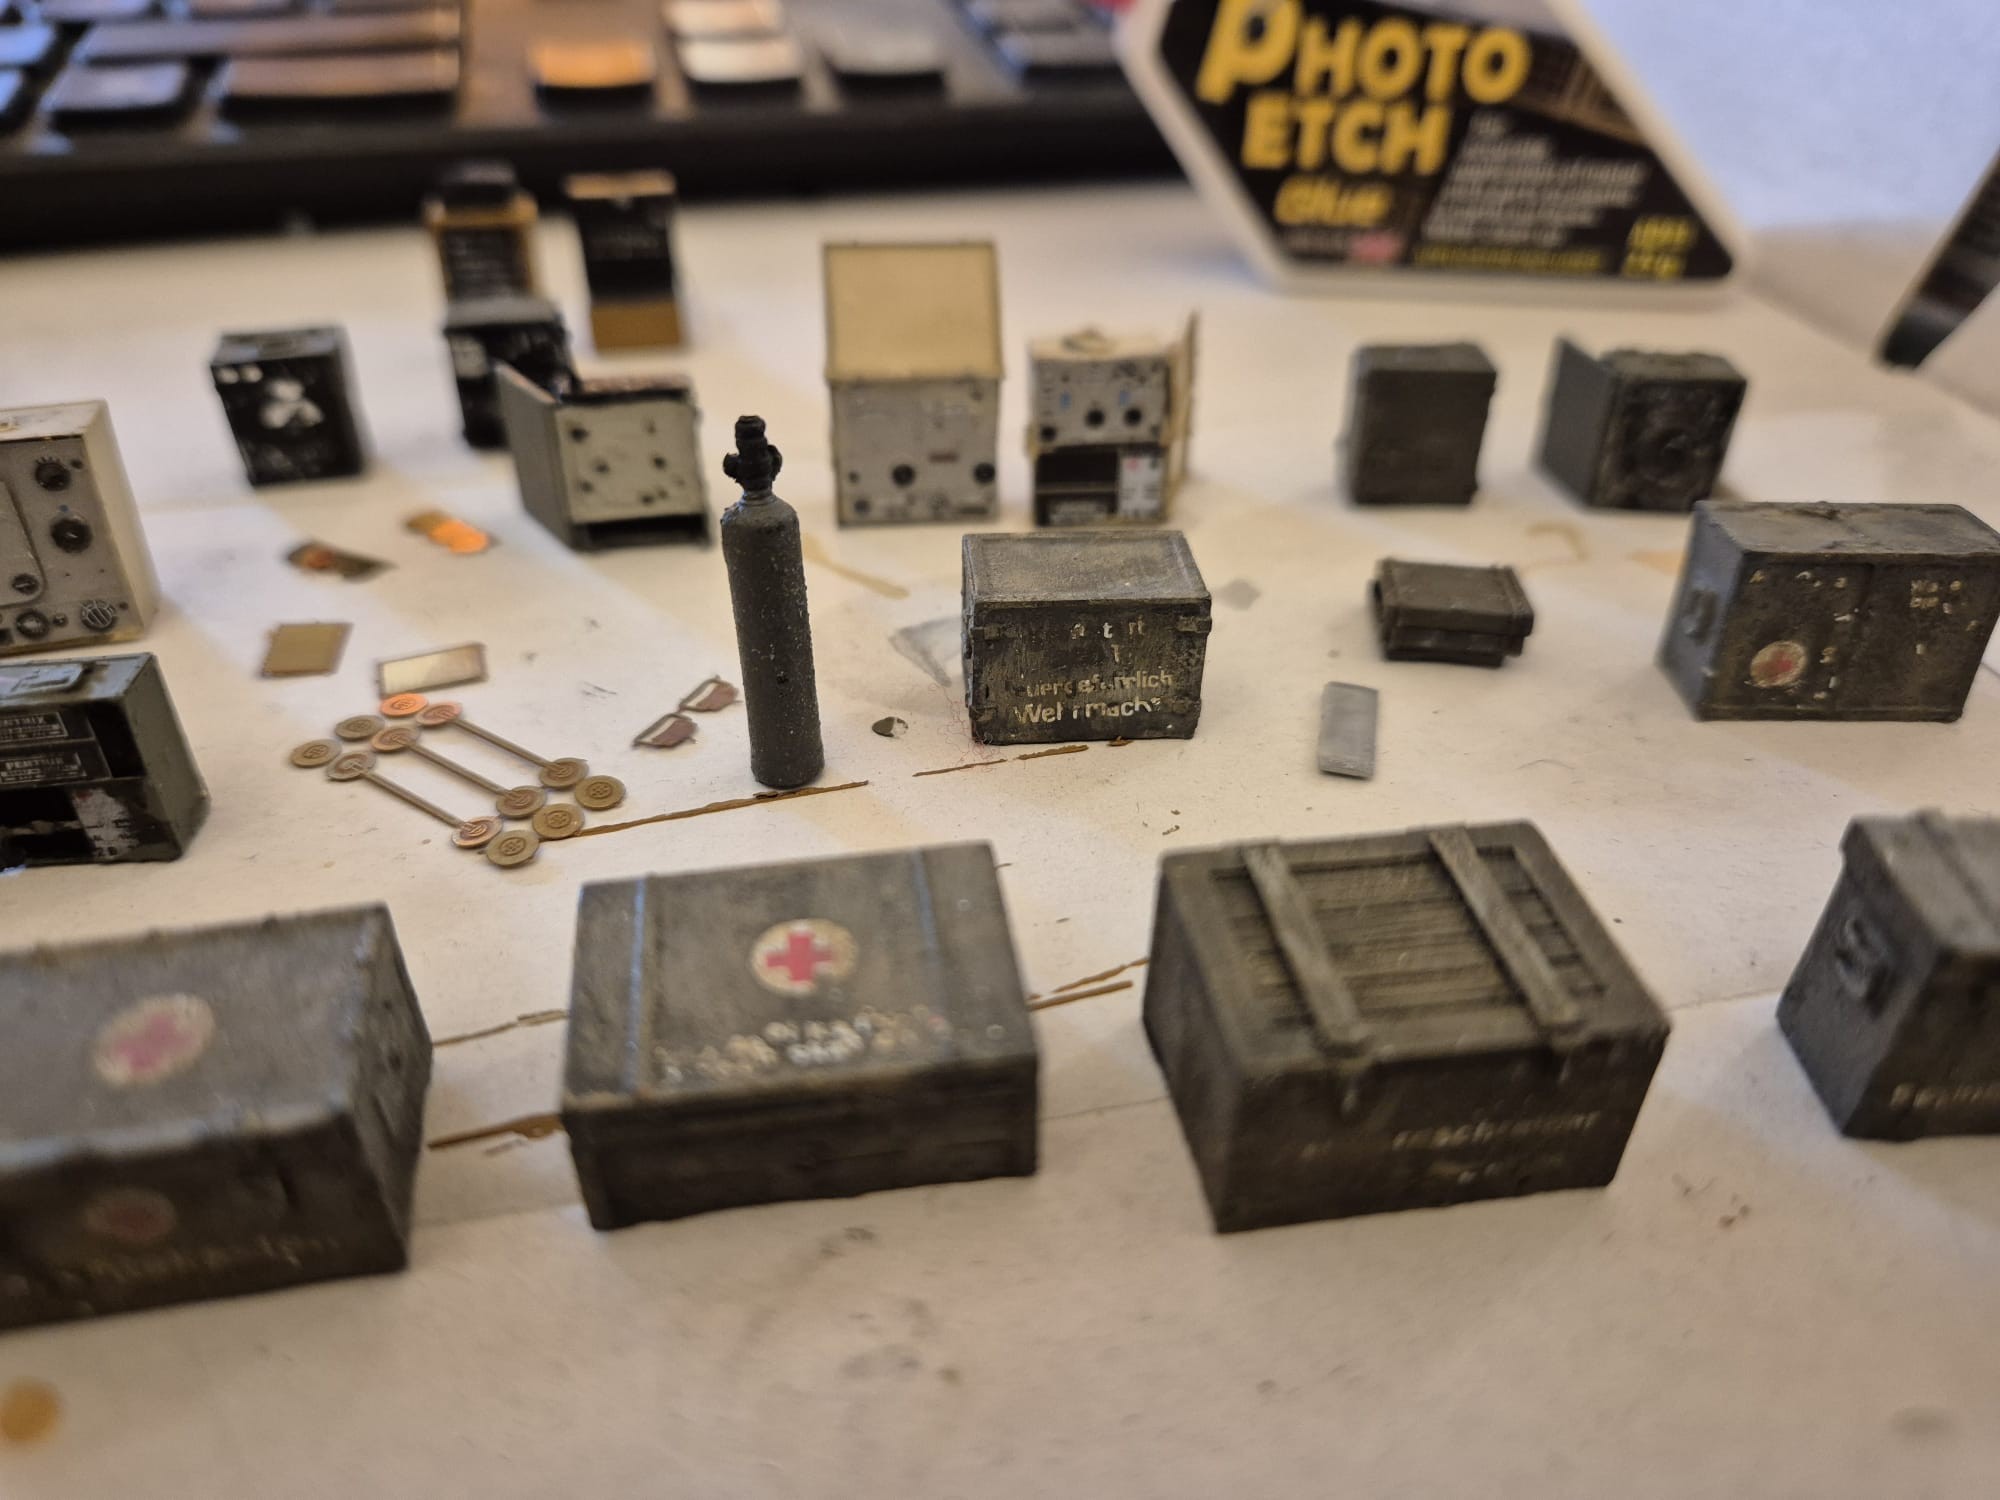
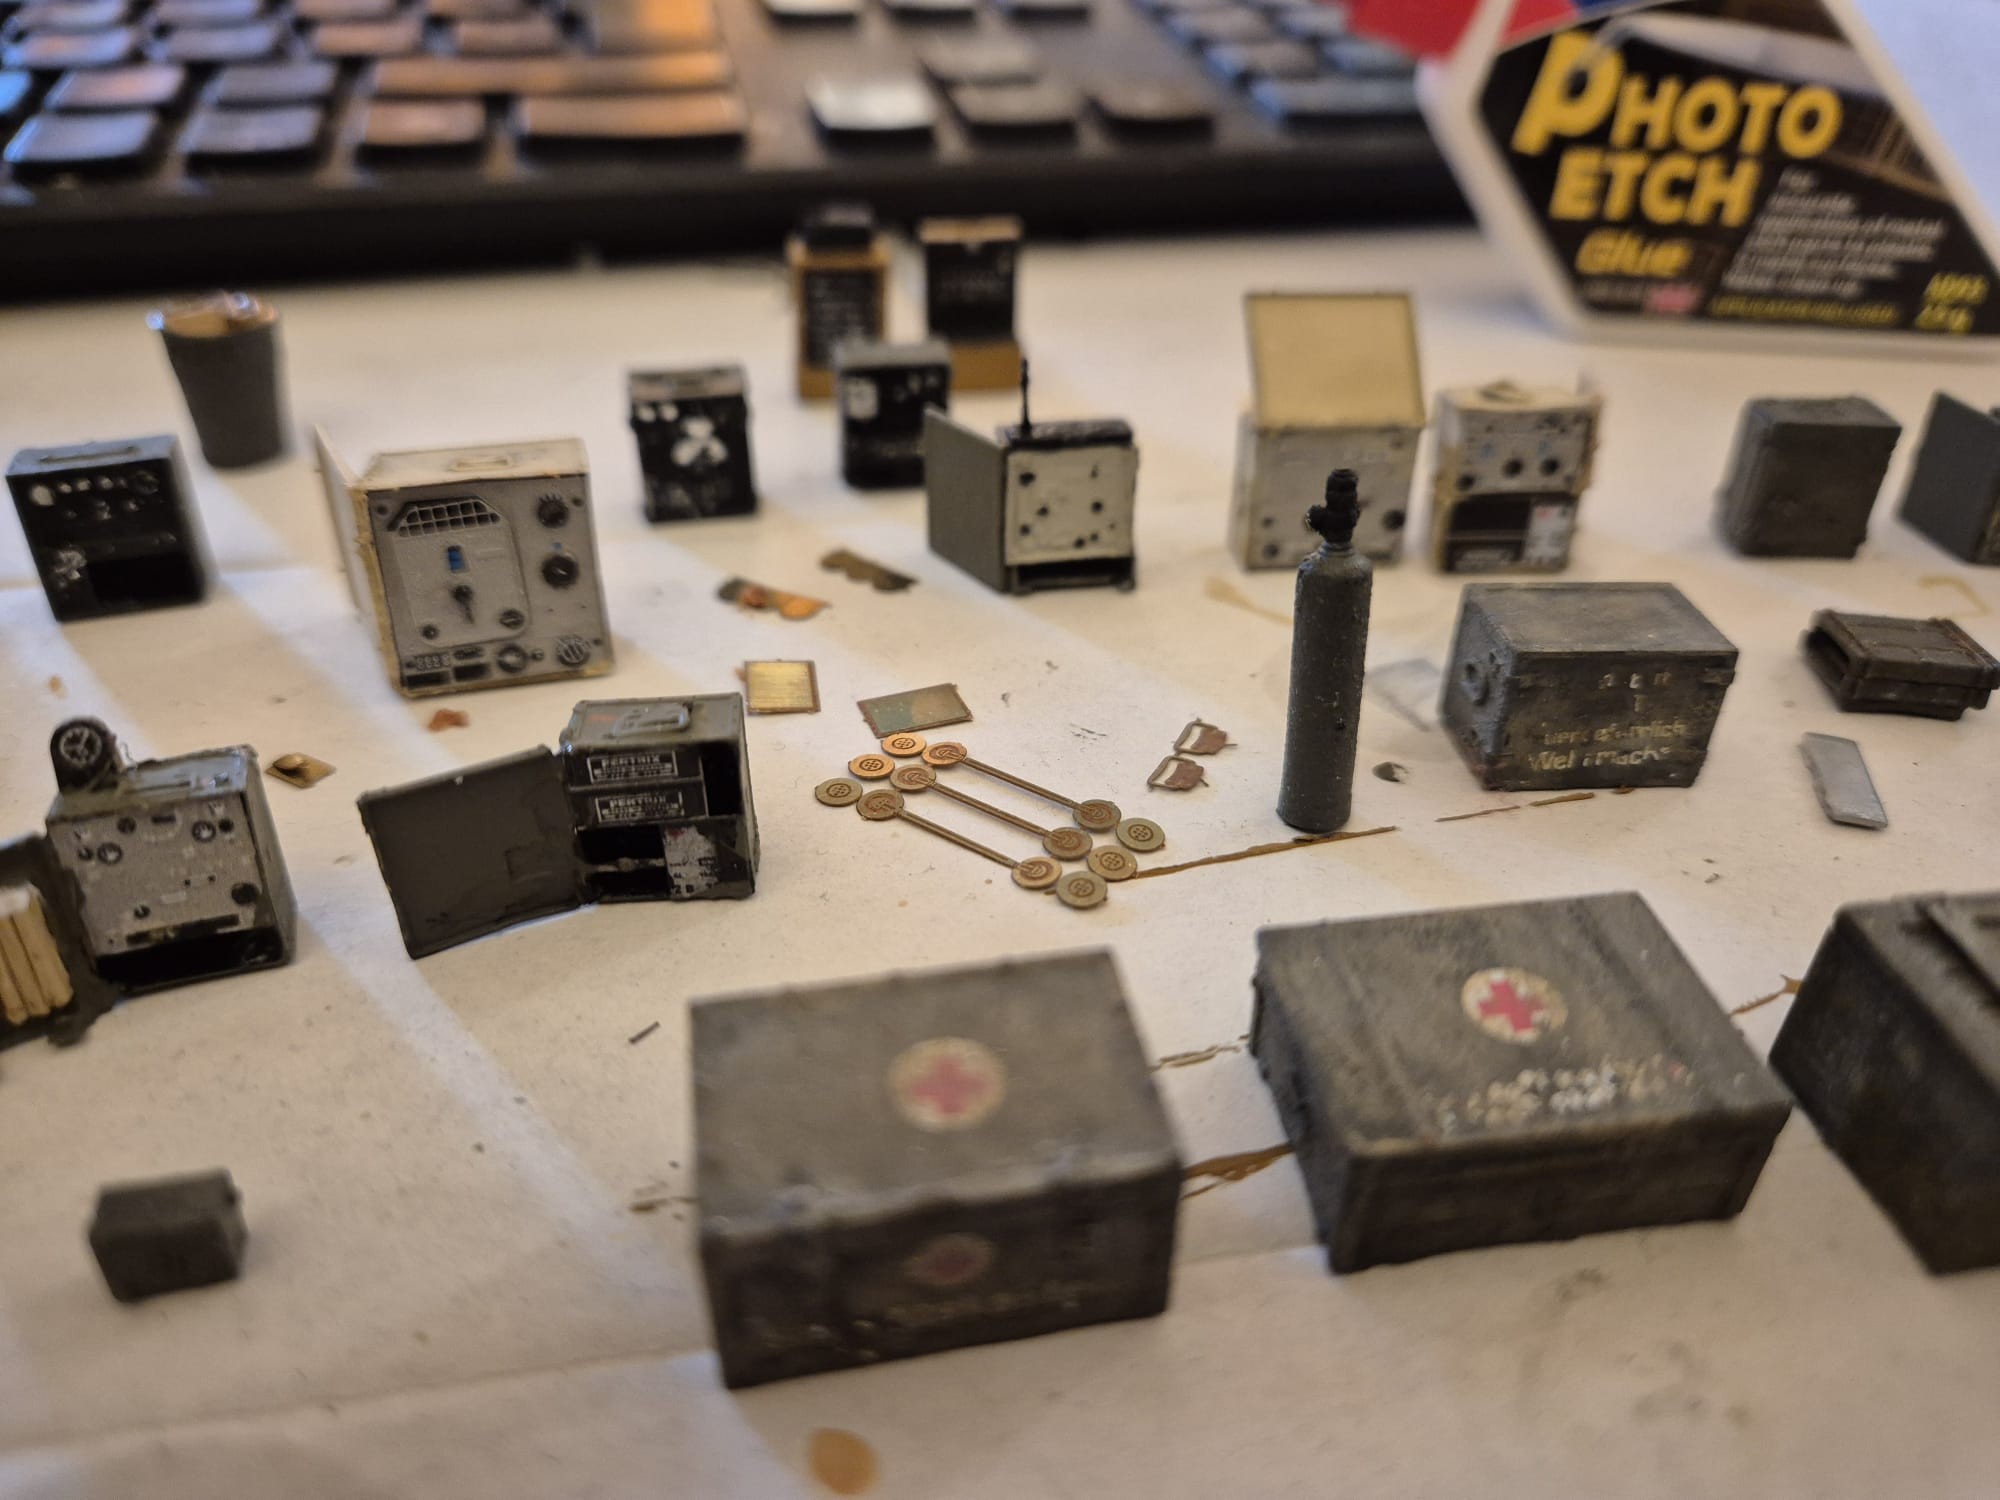
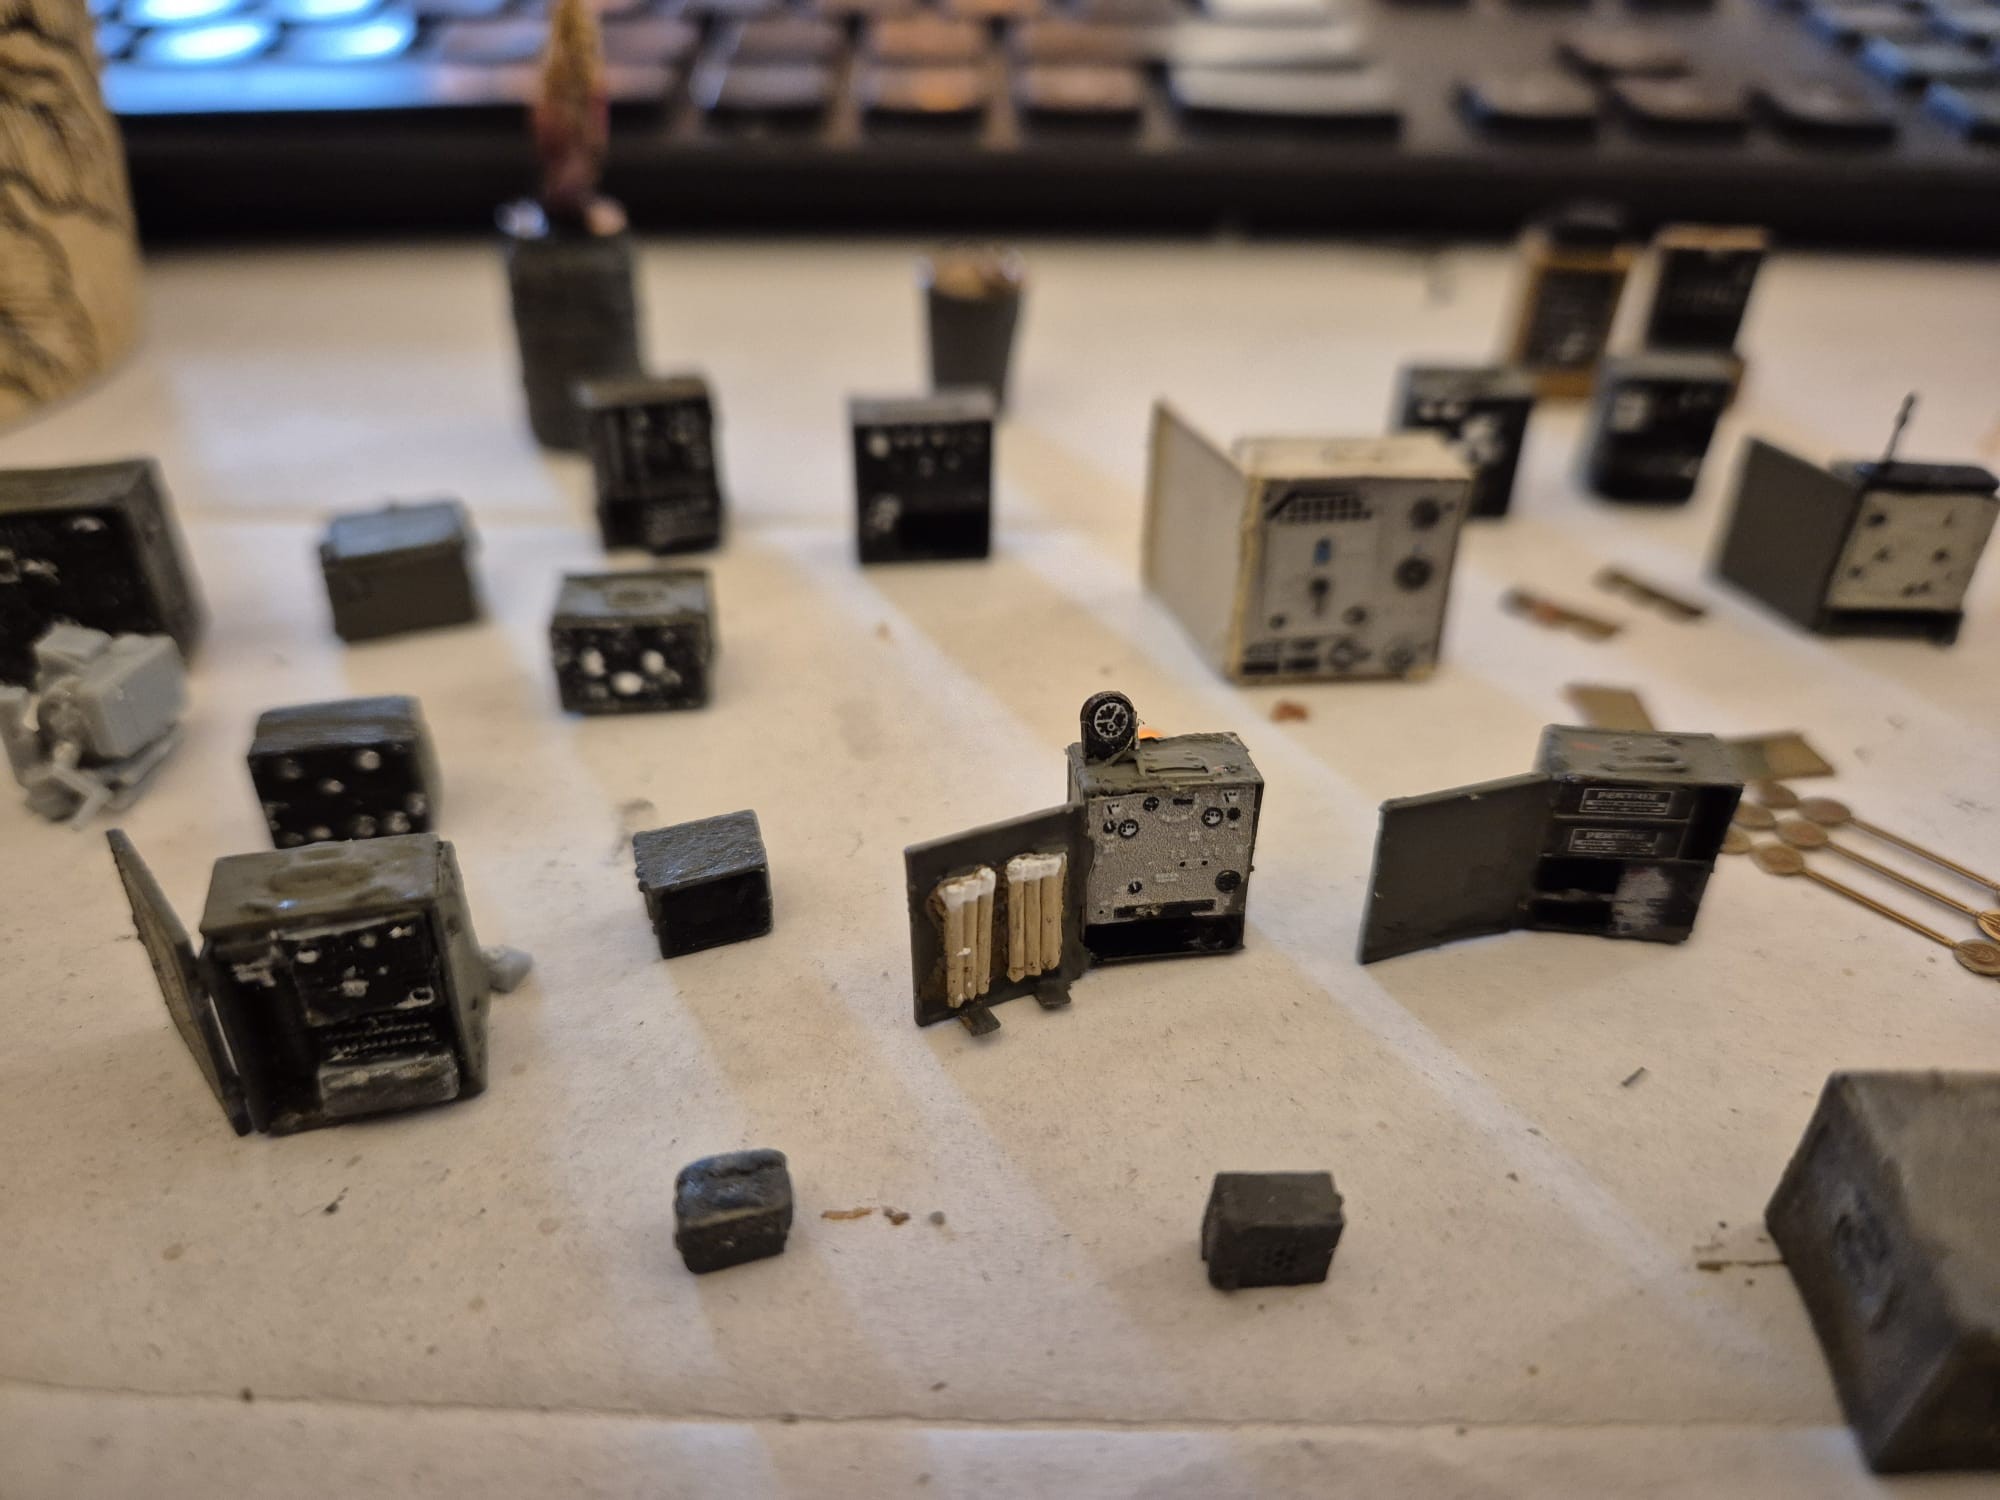
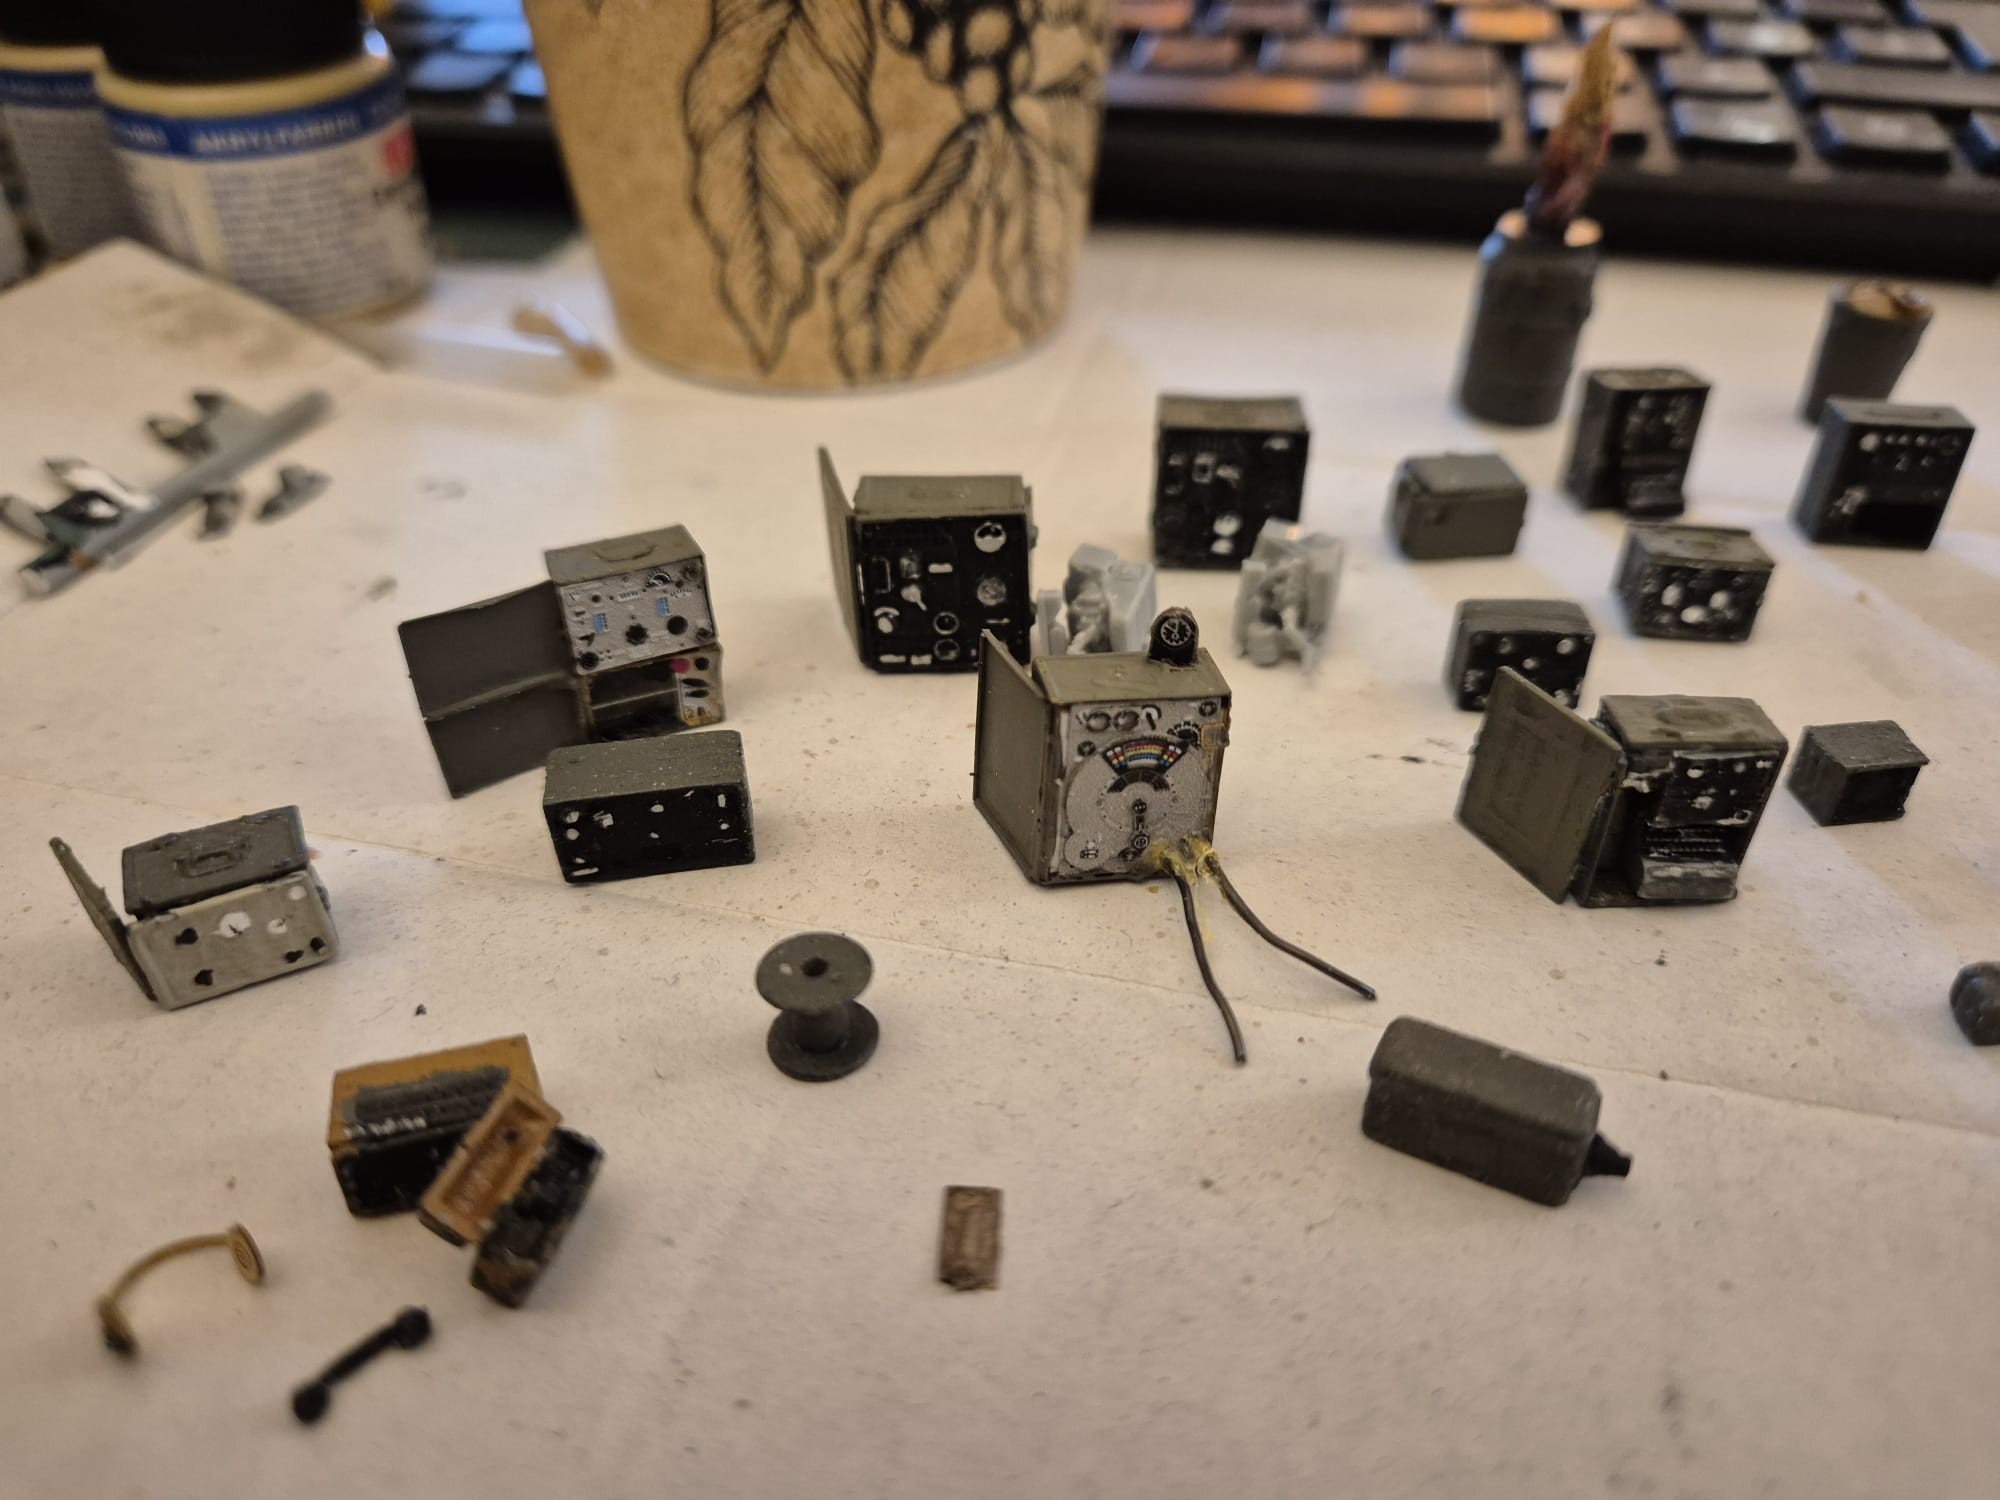
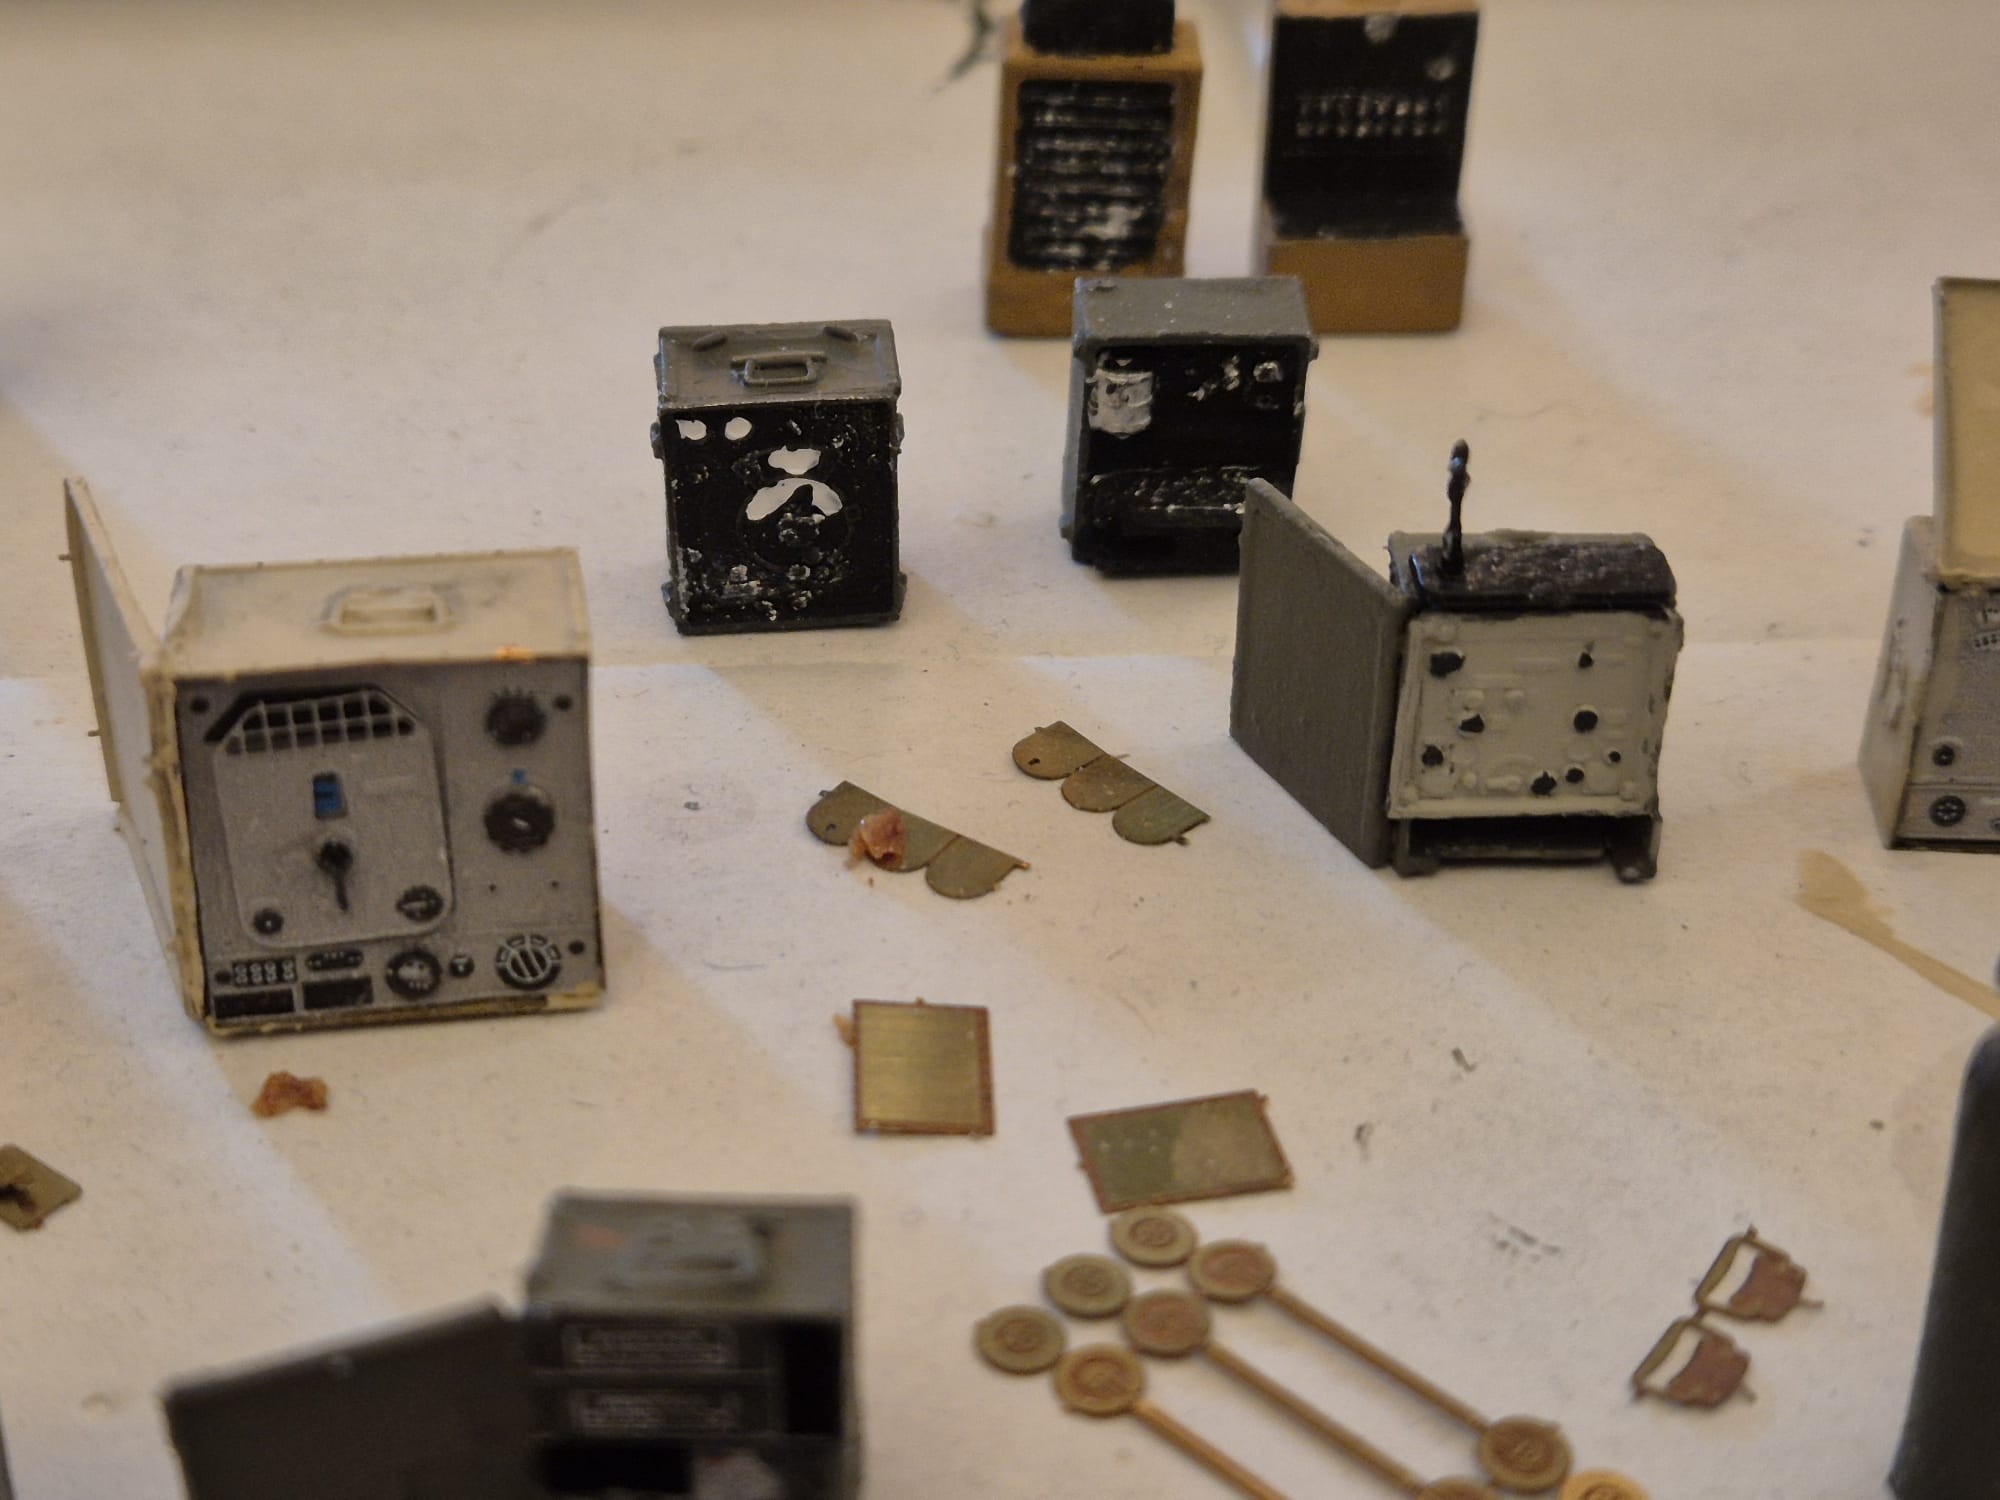
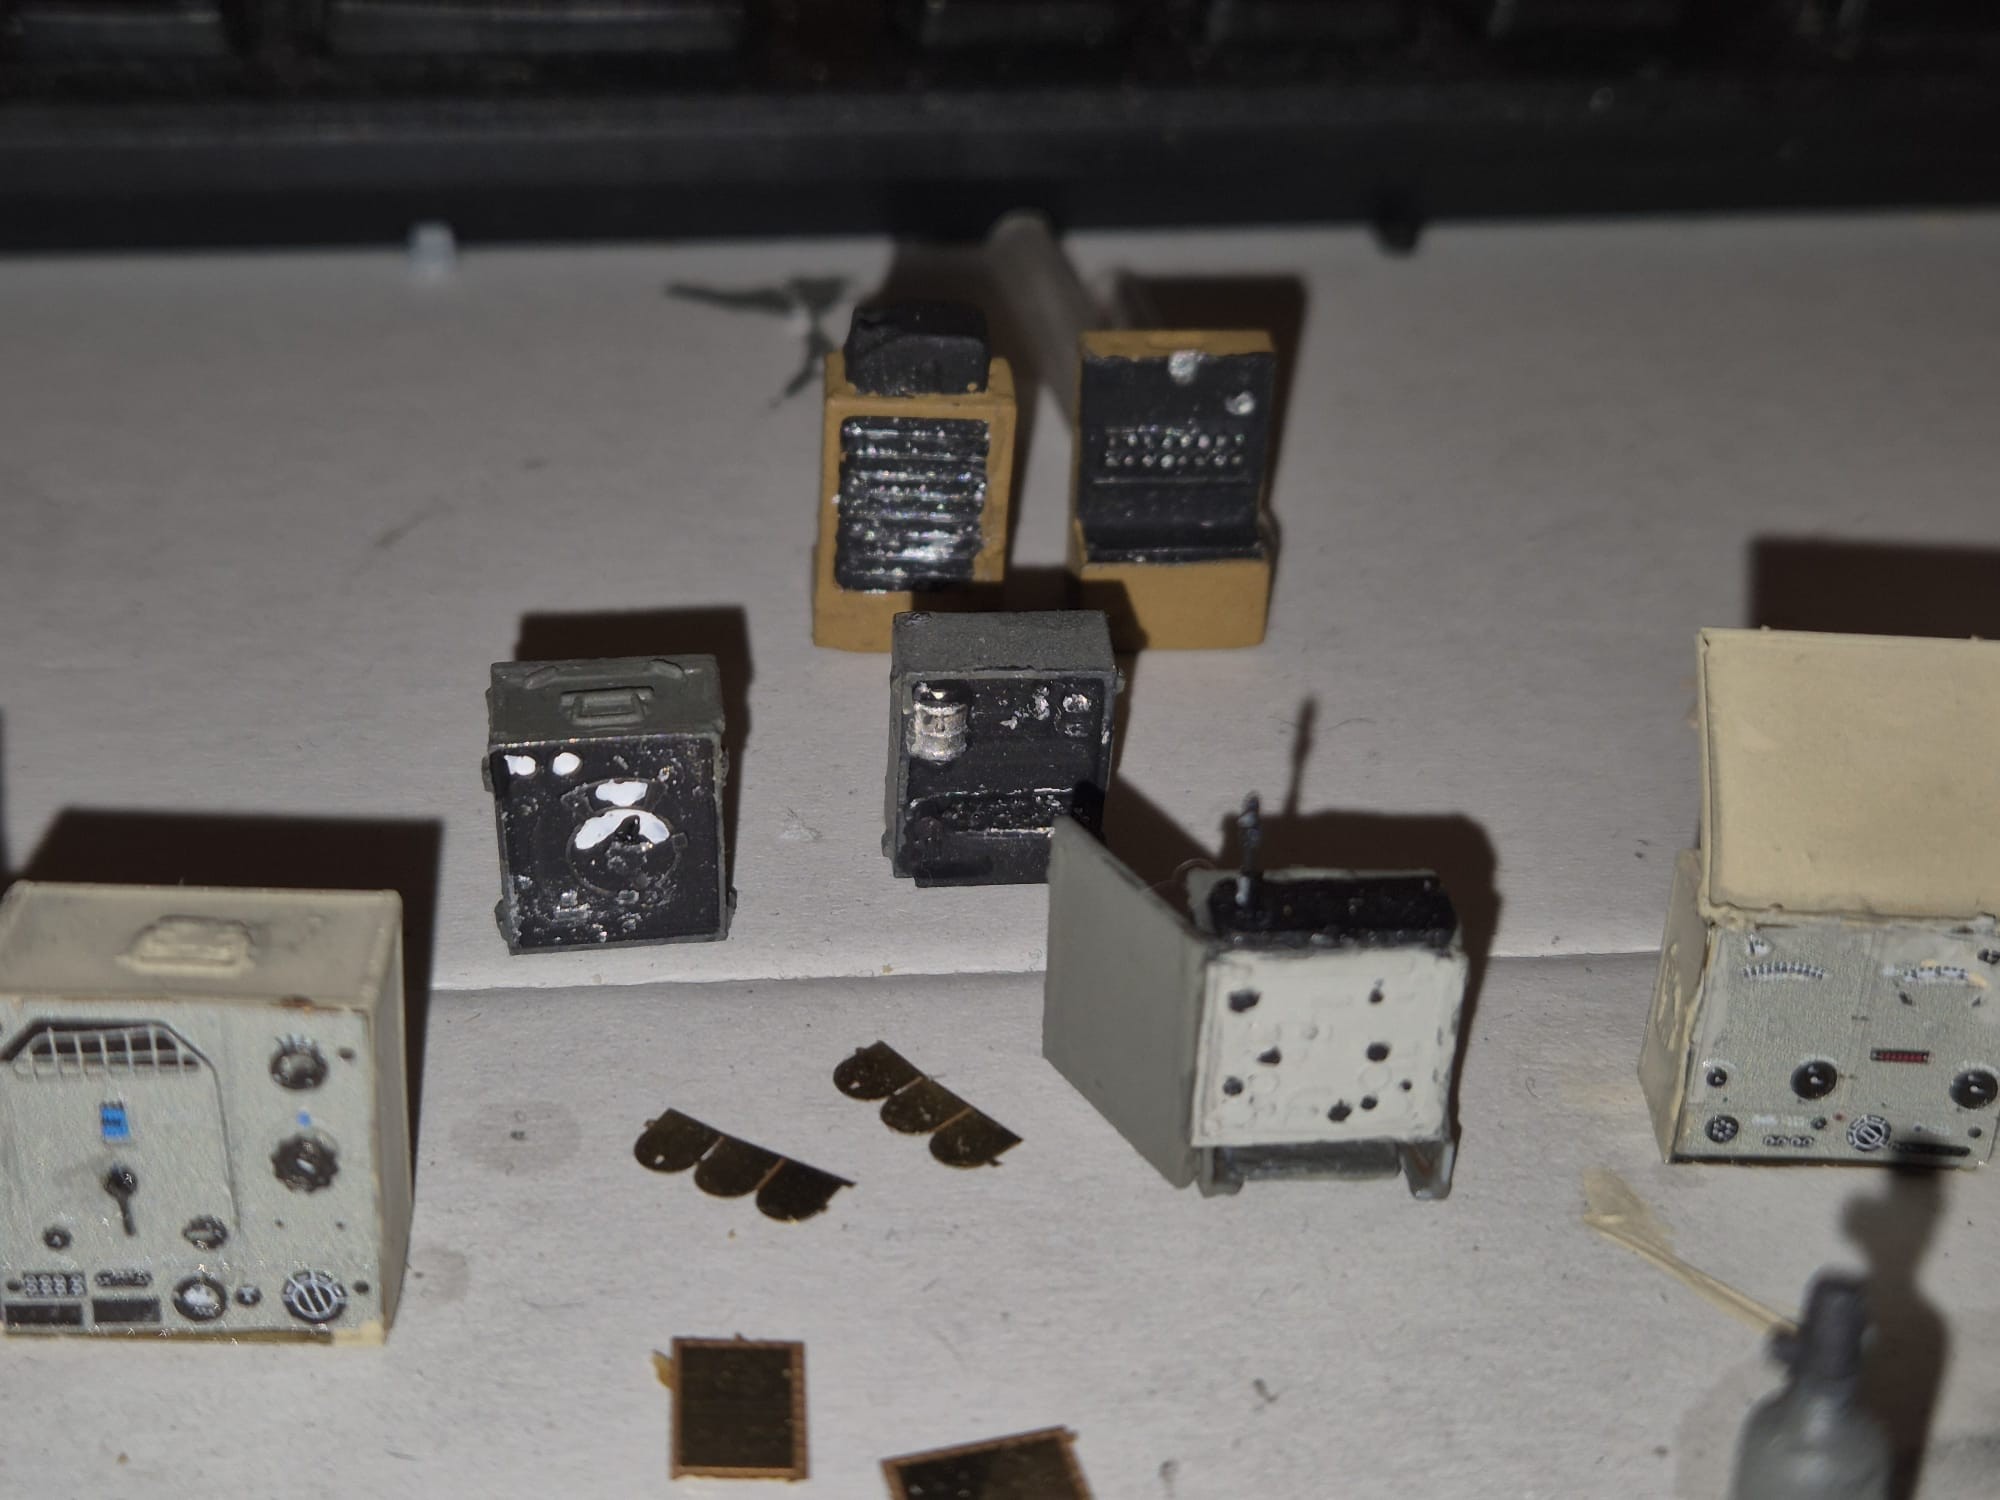
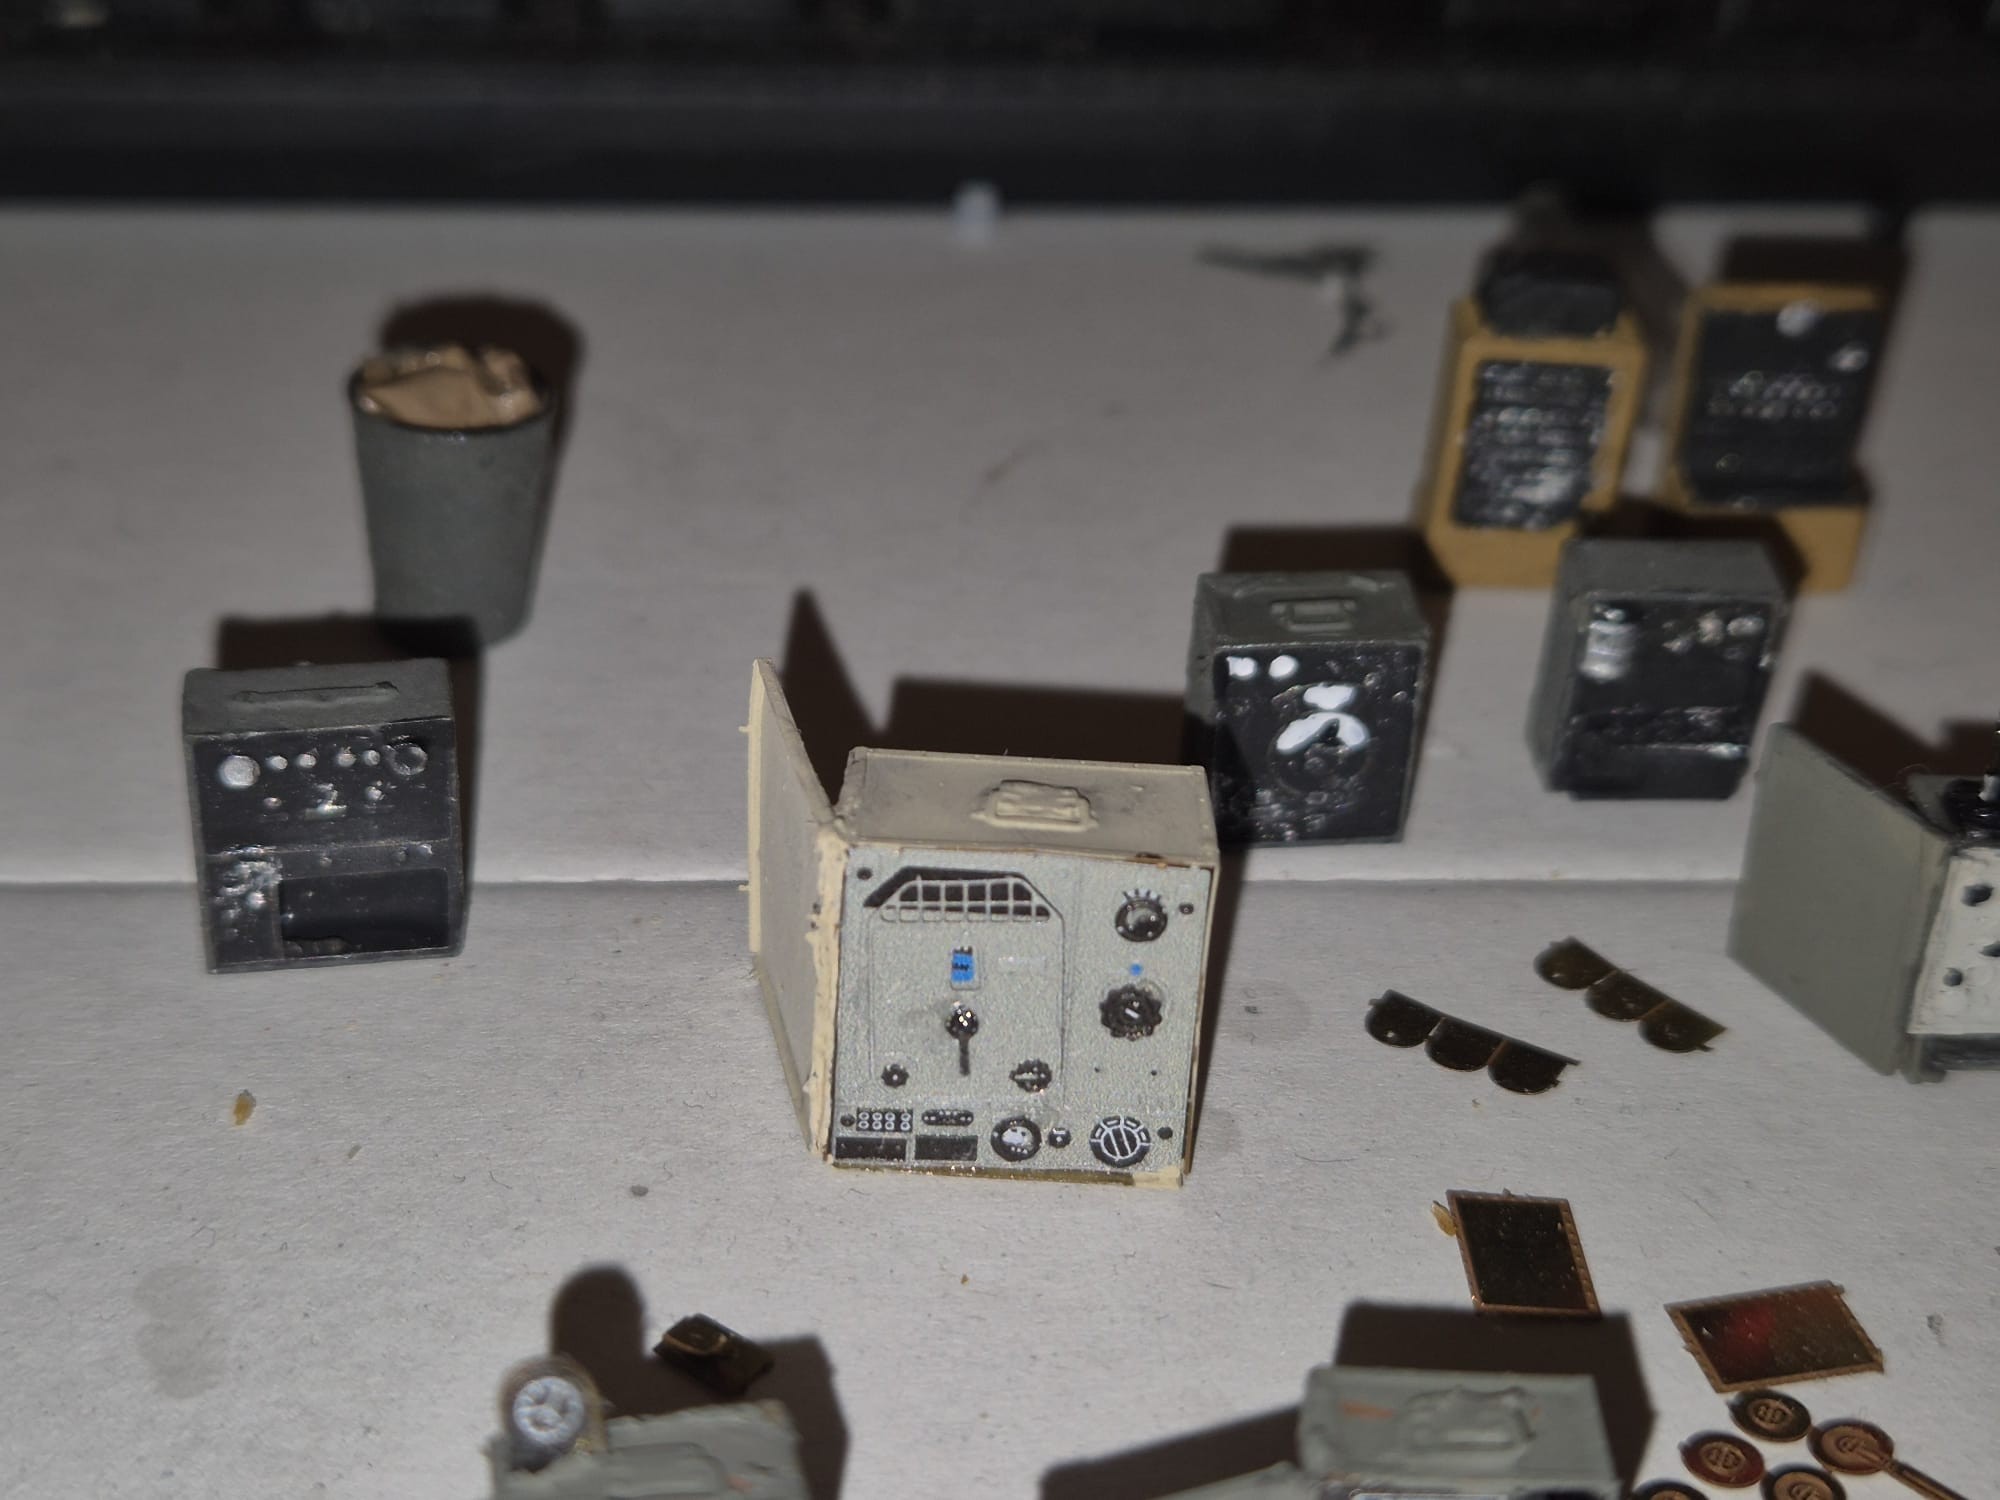
And here I am again with the by now boring subject of communication devices being repainted and somewhat weathered and completed. The only tiny item to still be finished are the generators, which appear here in their natural light grey livery. There are still a few pieces missing, but they will soon be attached to them and then I will paint them both in German Dark Yellow including some necessary weathering and detail painting as well.

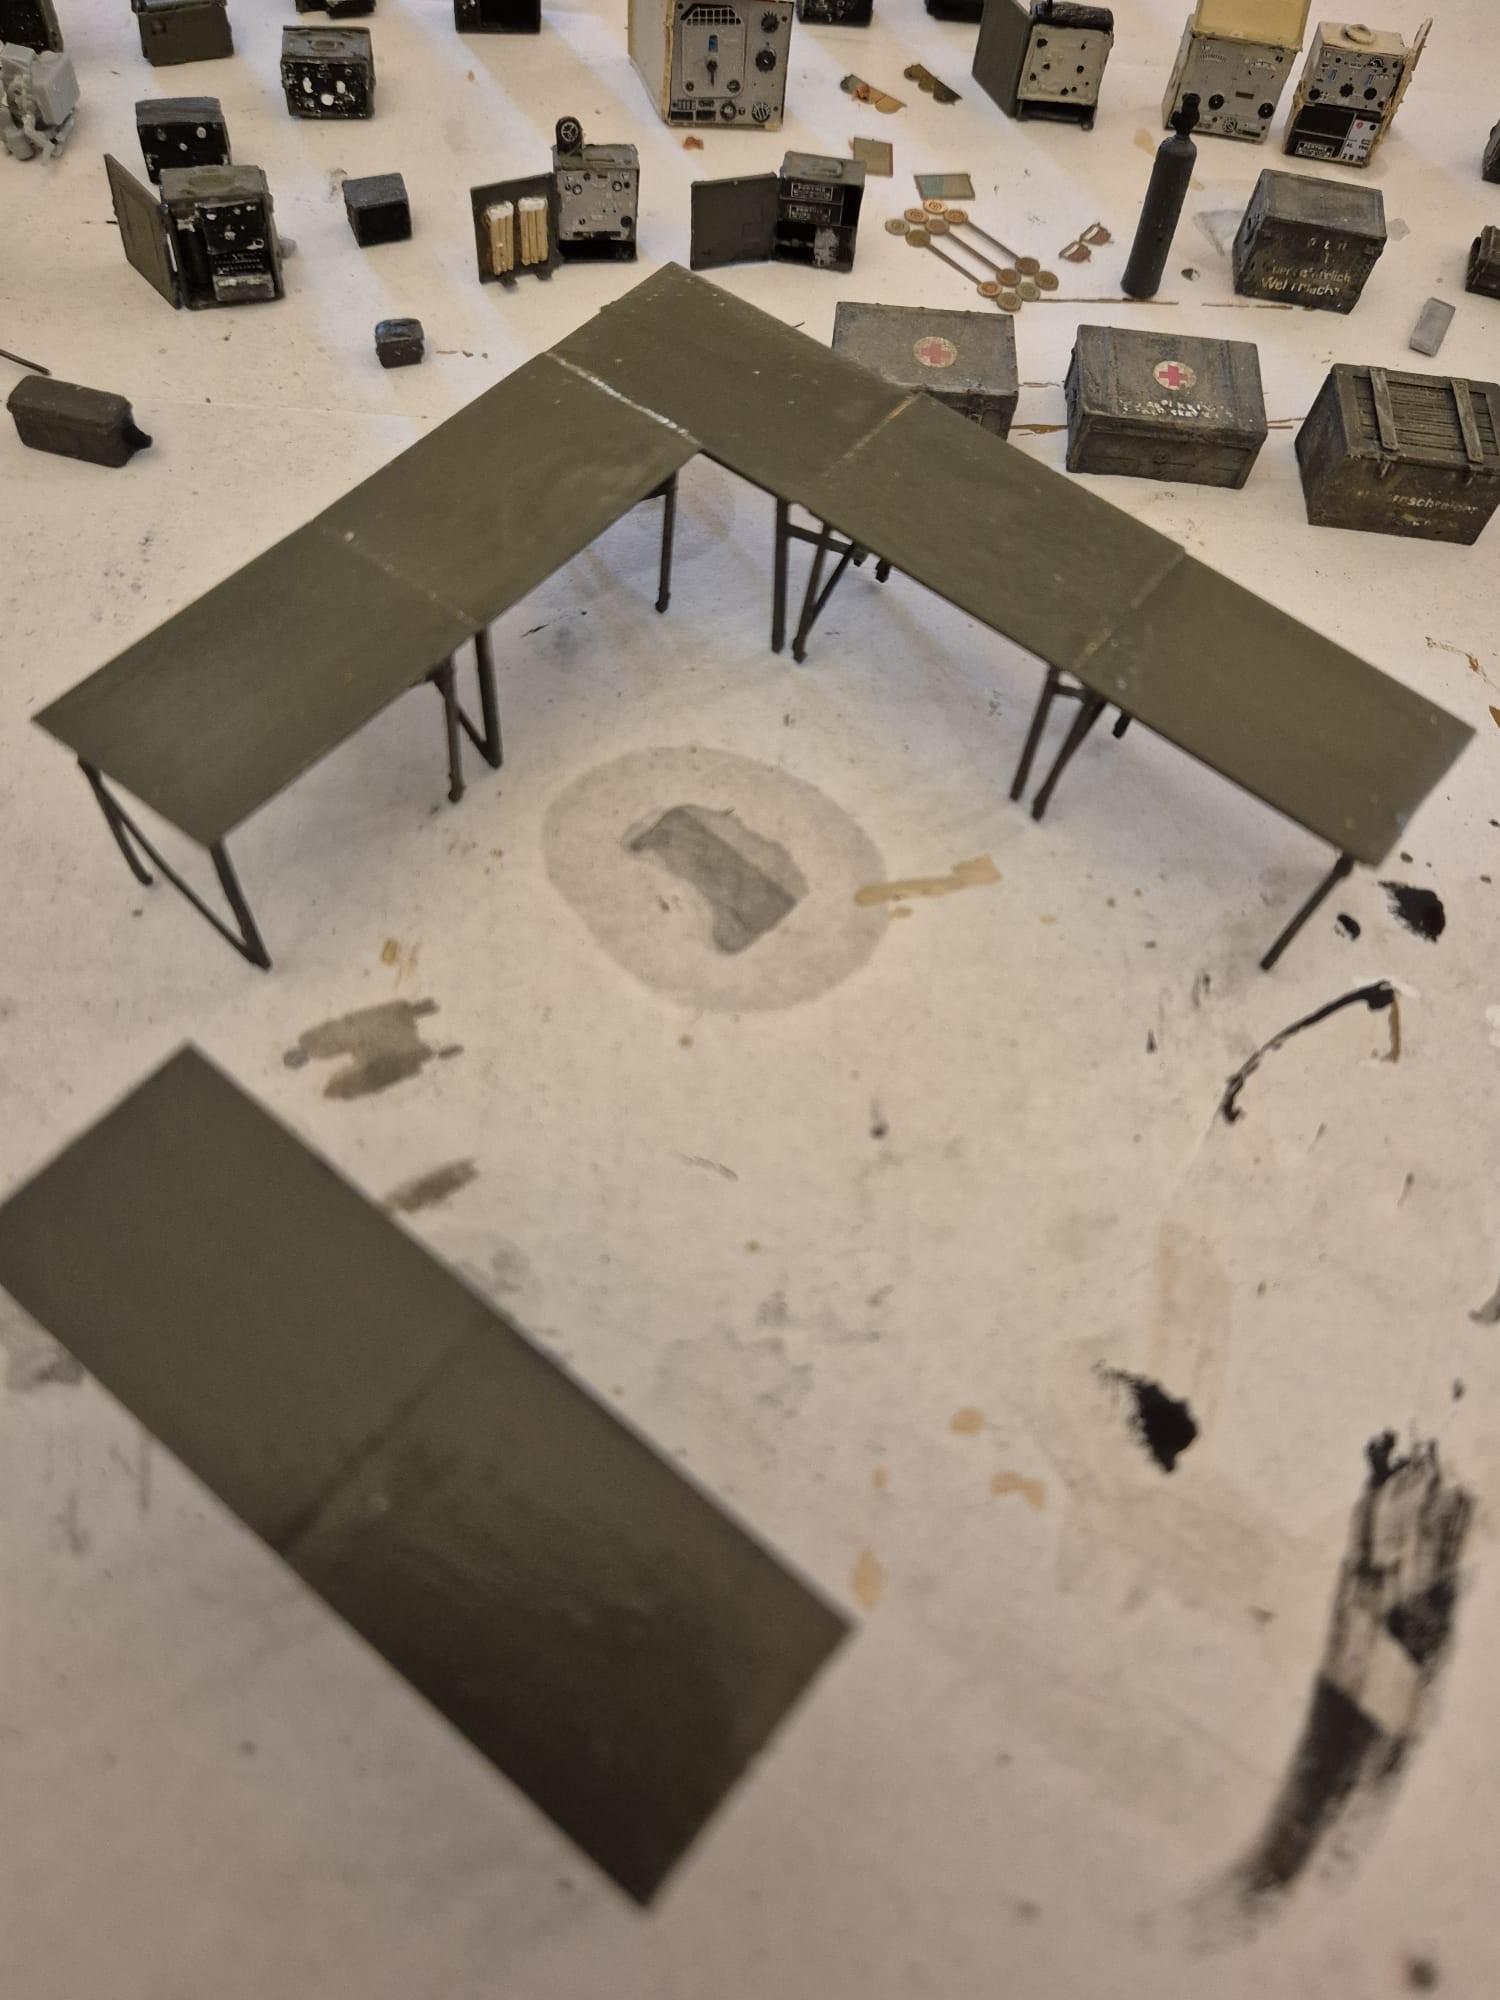
The tables have been all glued together to make it easier to place them into their niches, while the seats or folding chairs remain outside until I have built the communication operators, which I will then glue unto them and insert in front of their respective devices they operate.

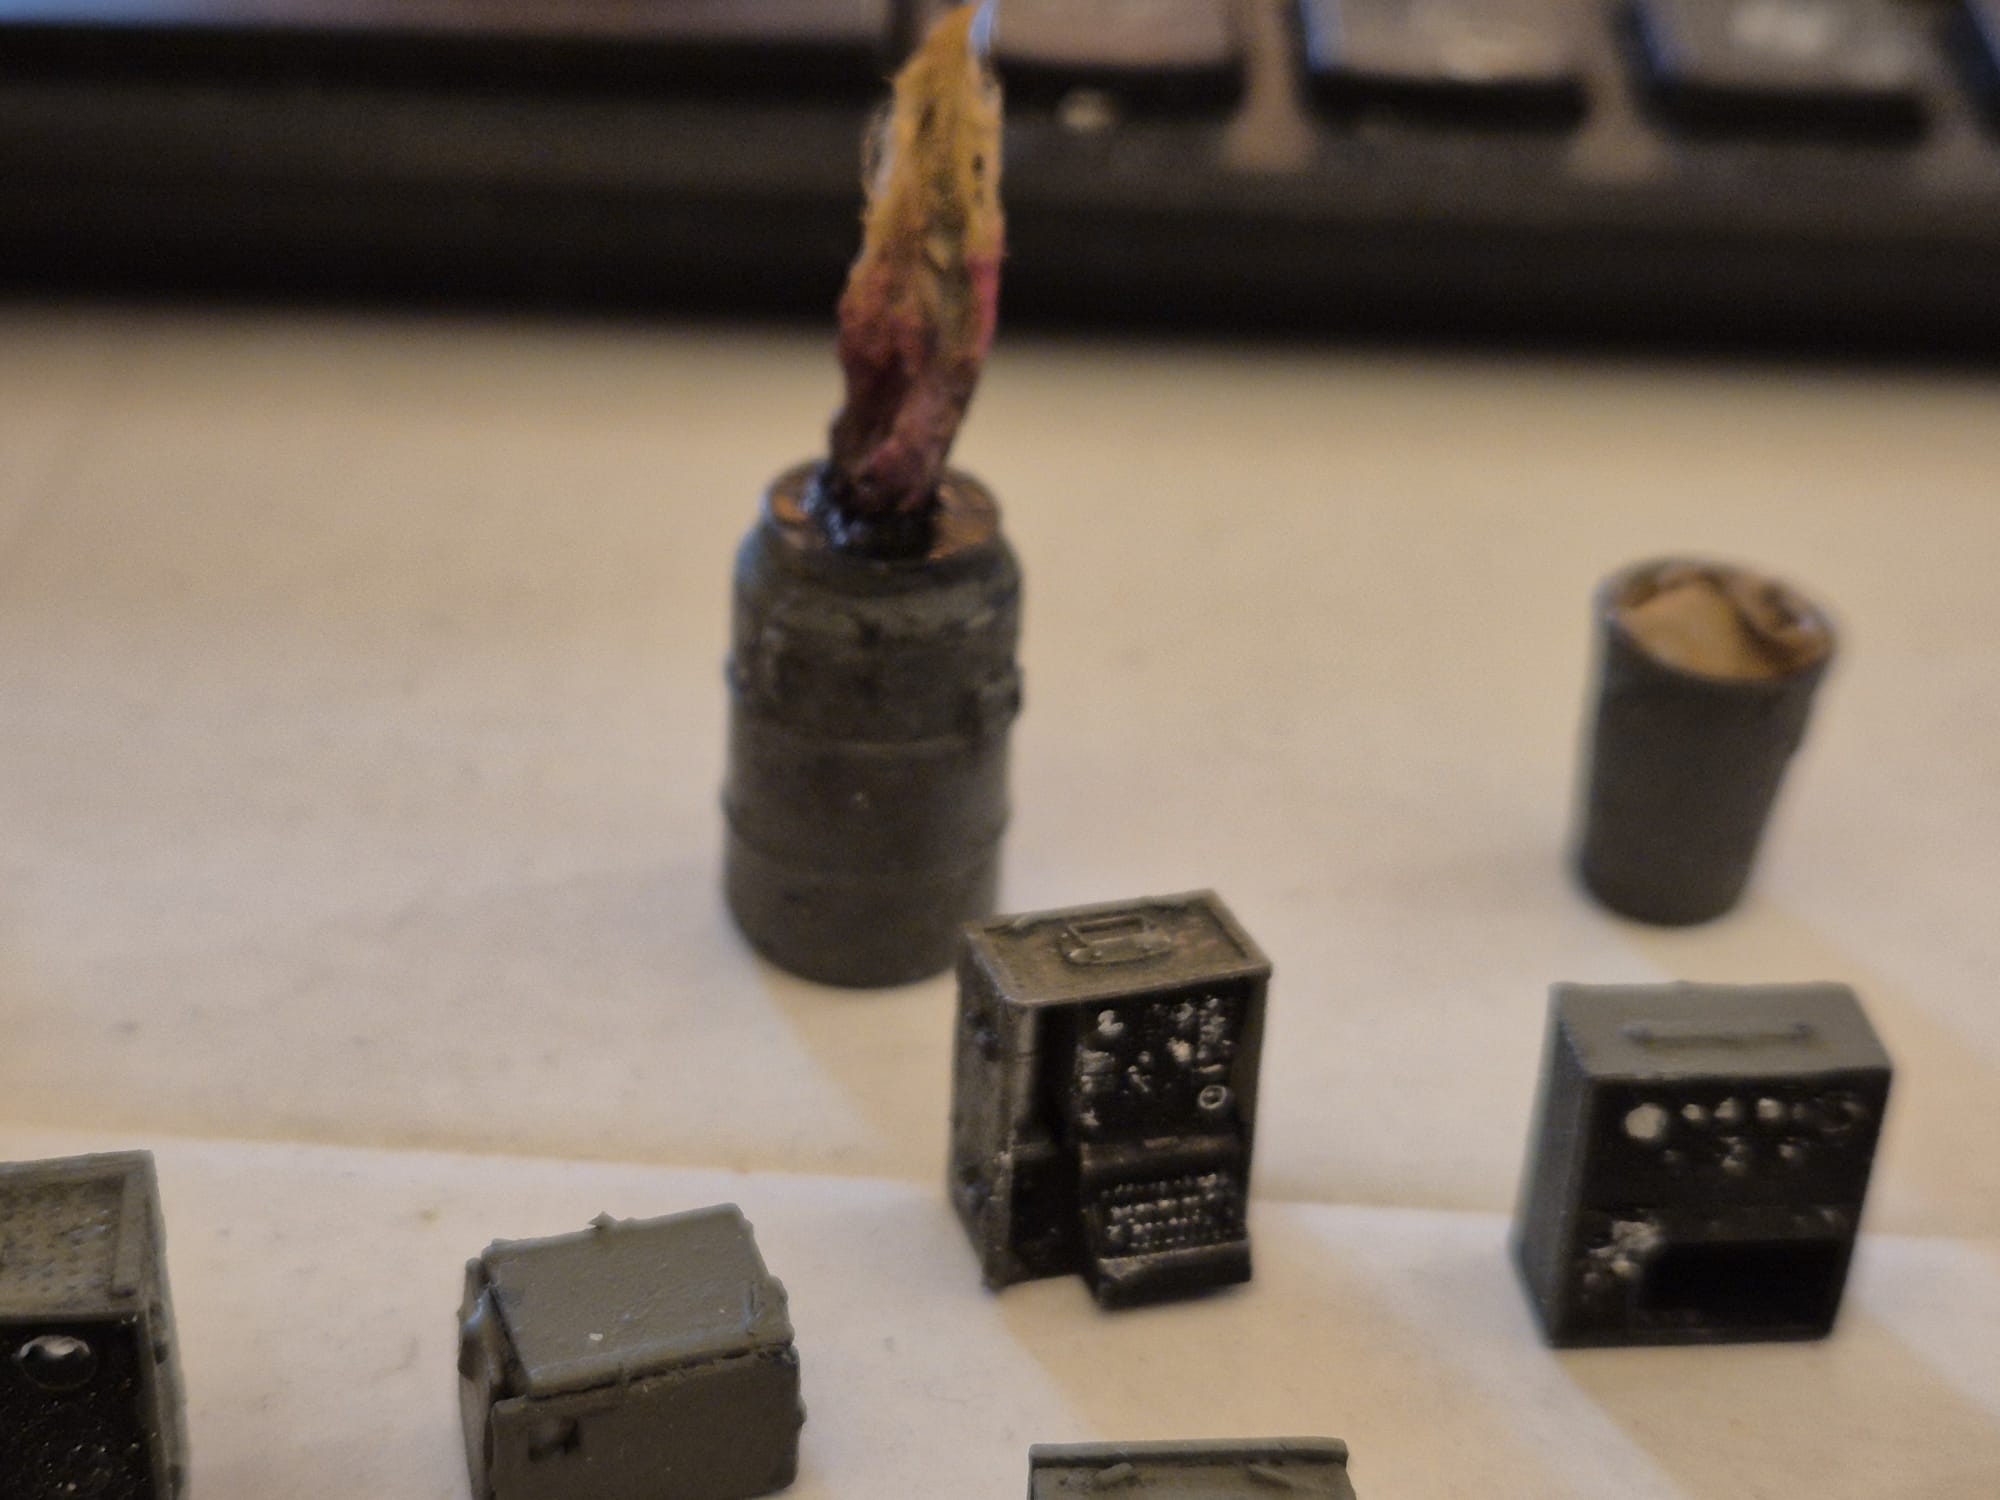
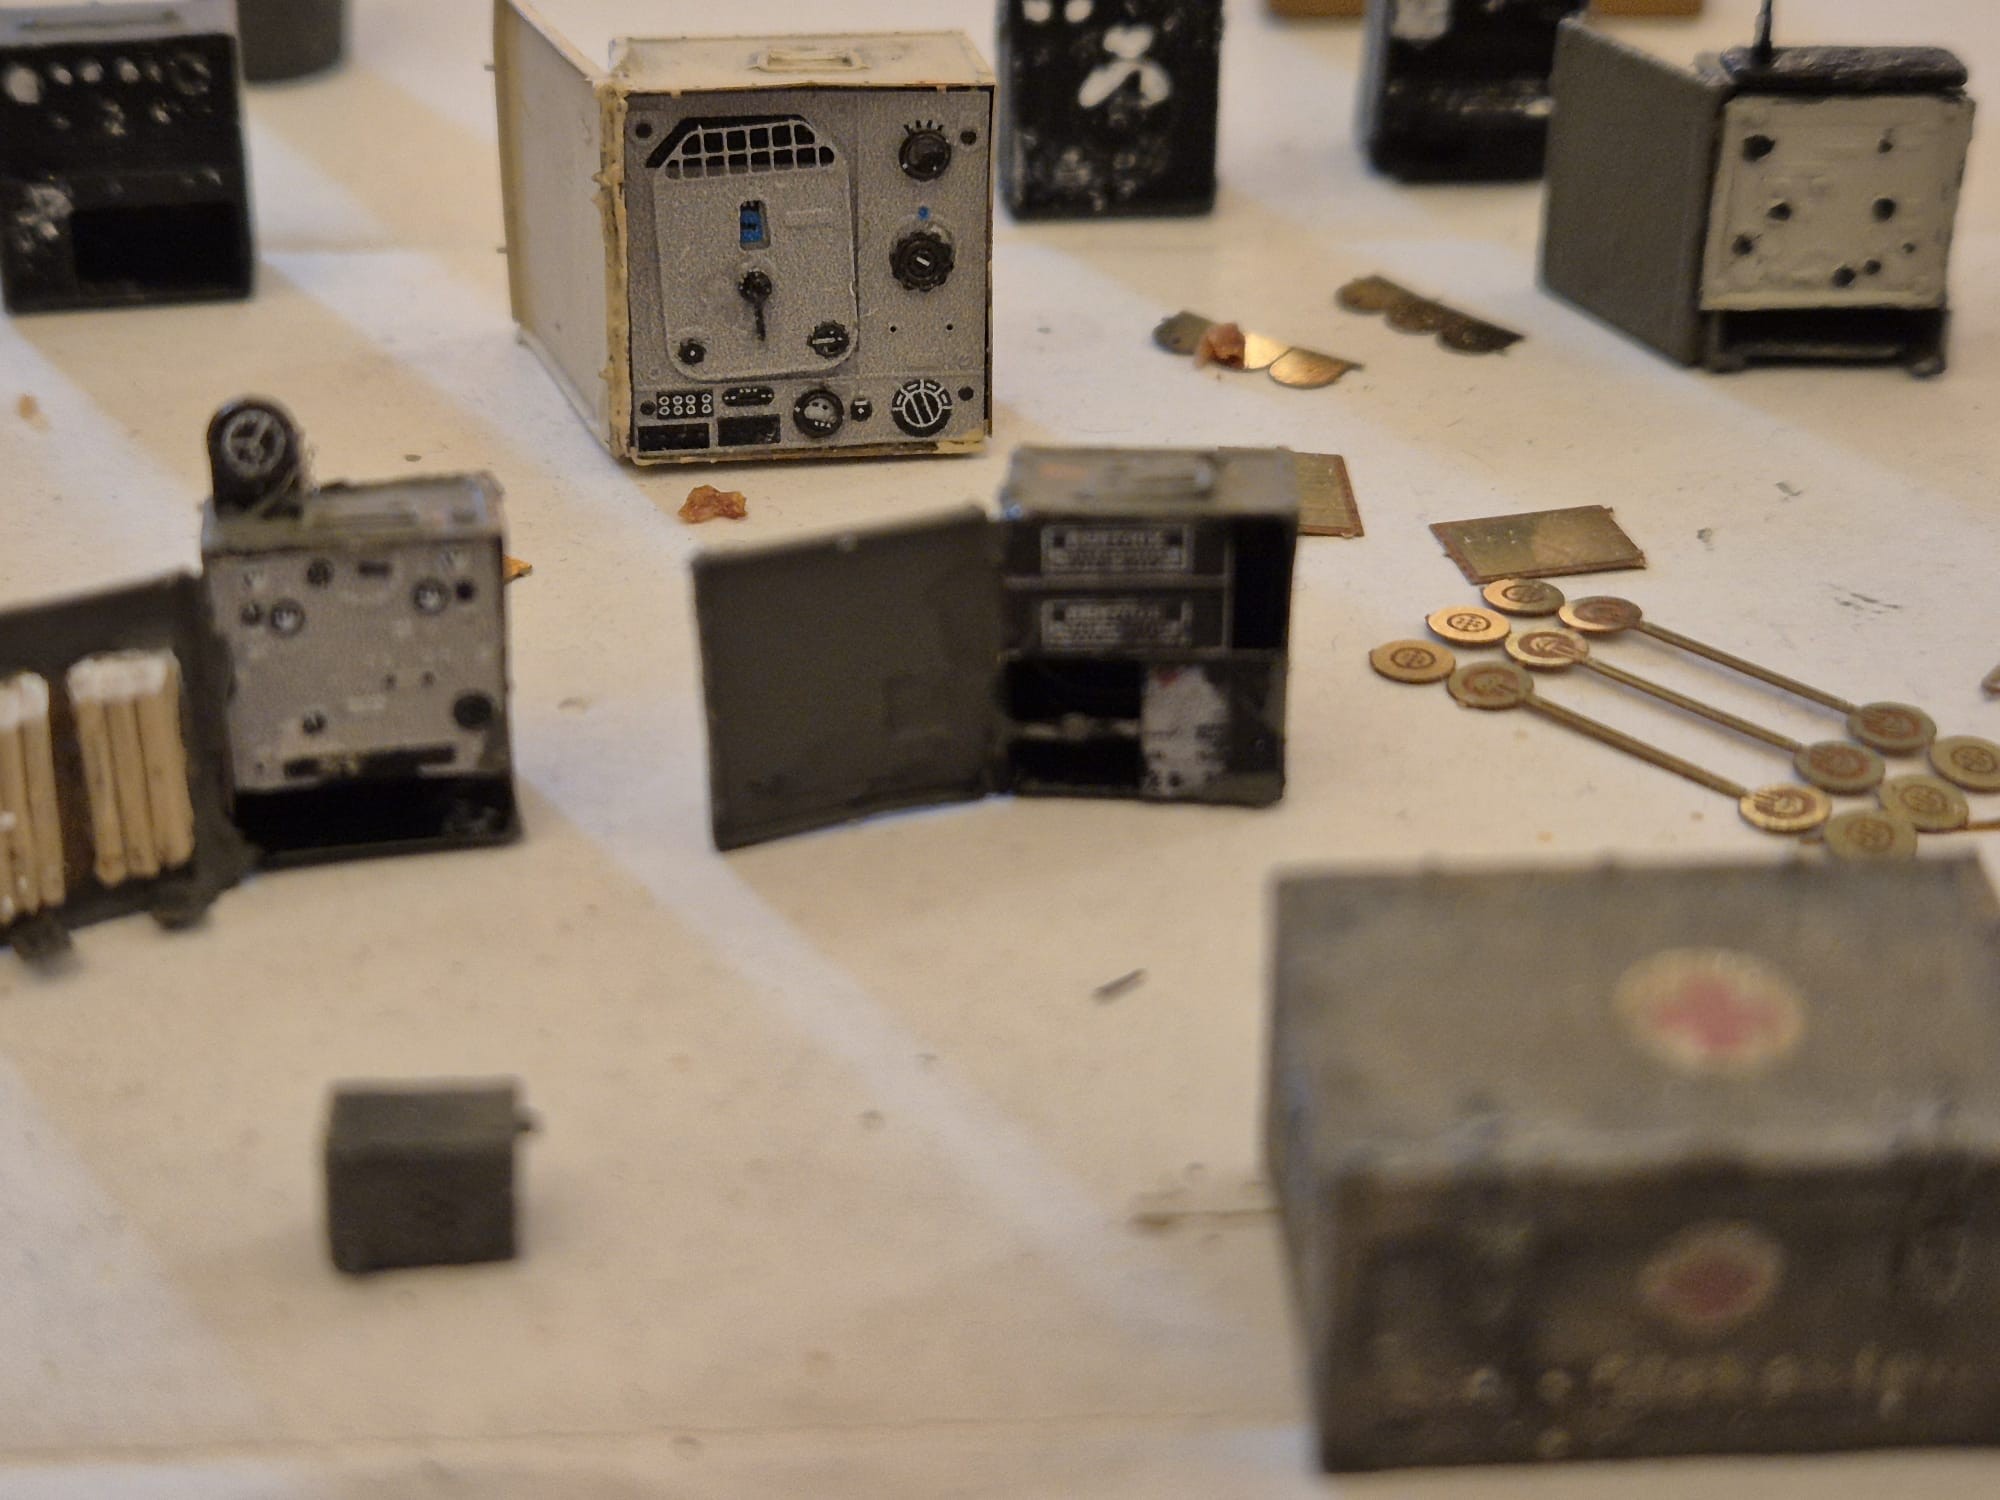
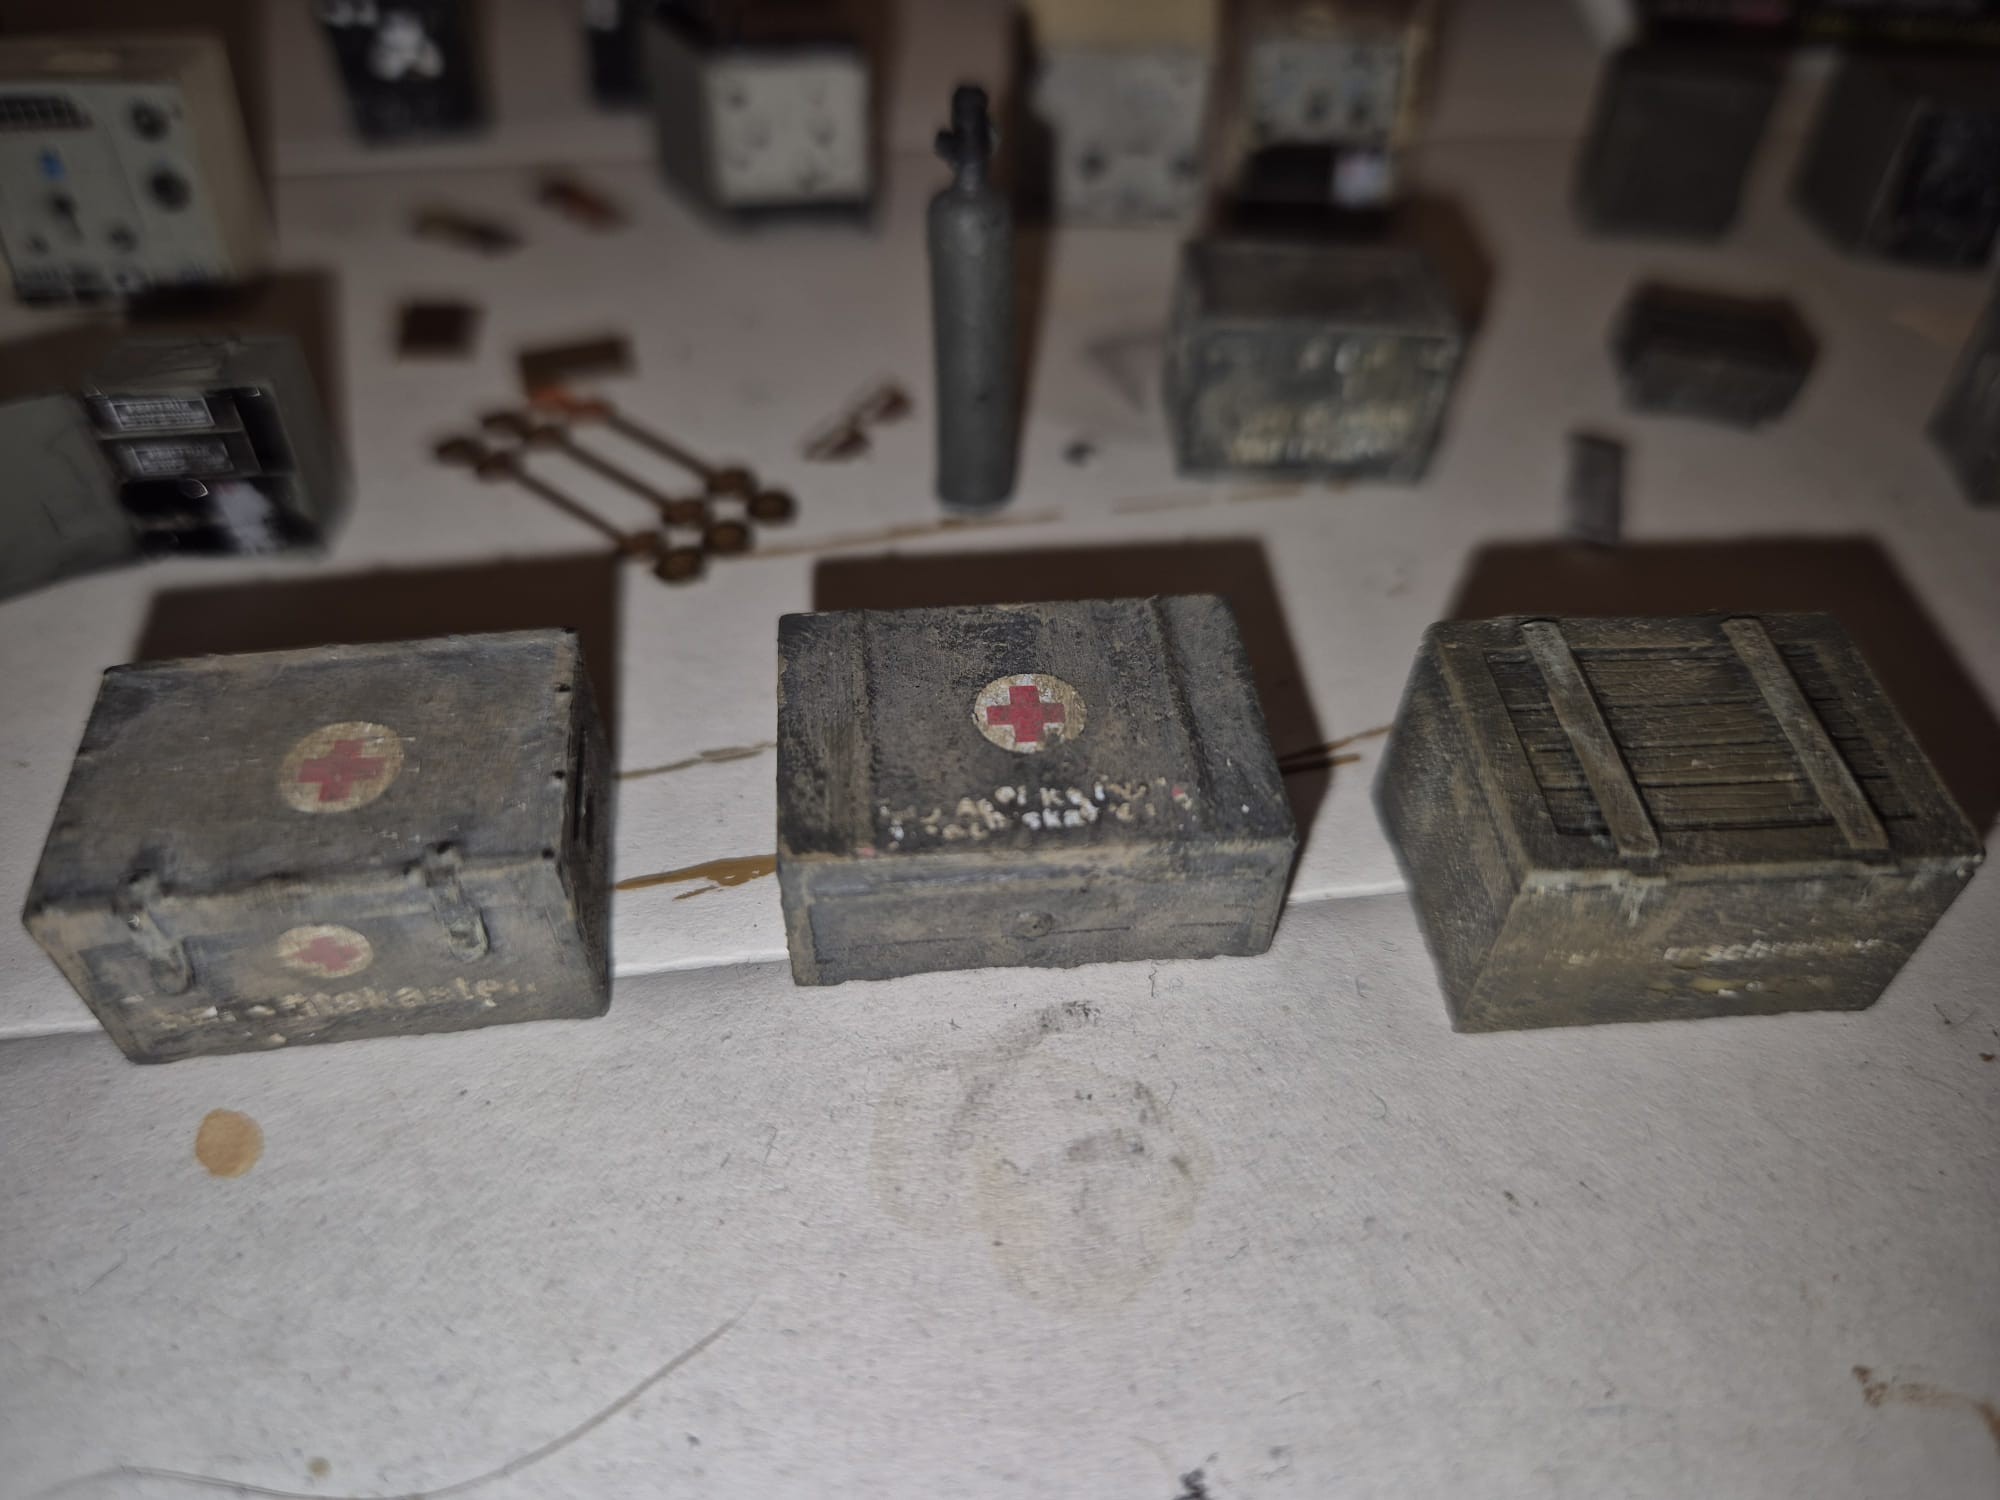
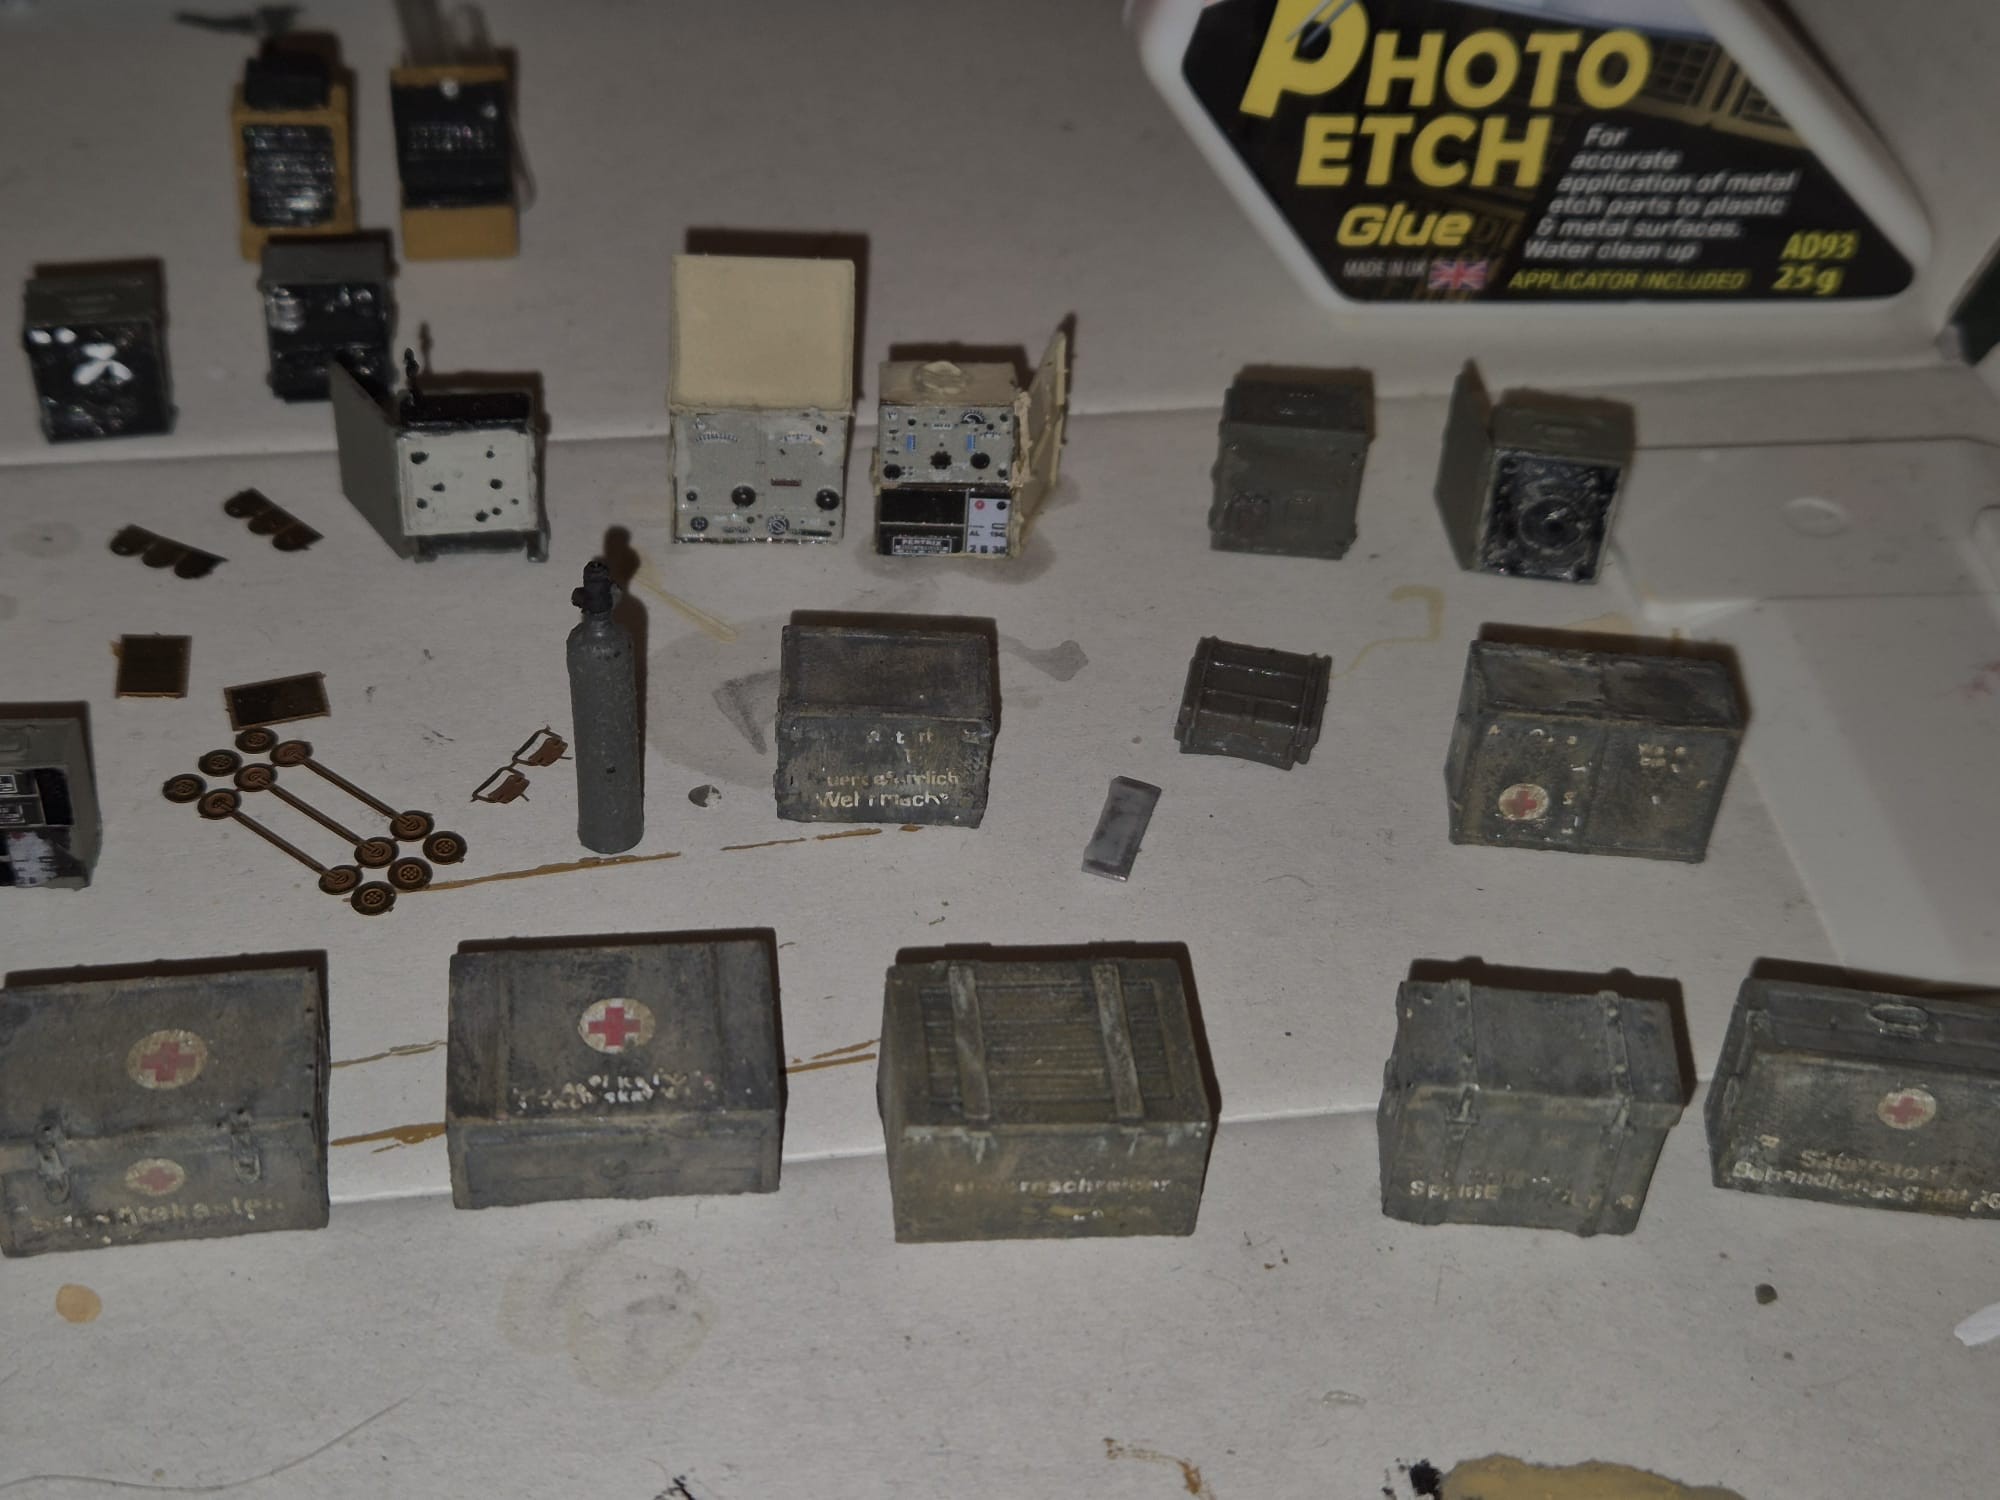
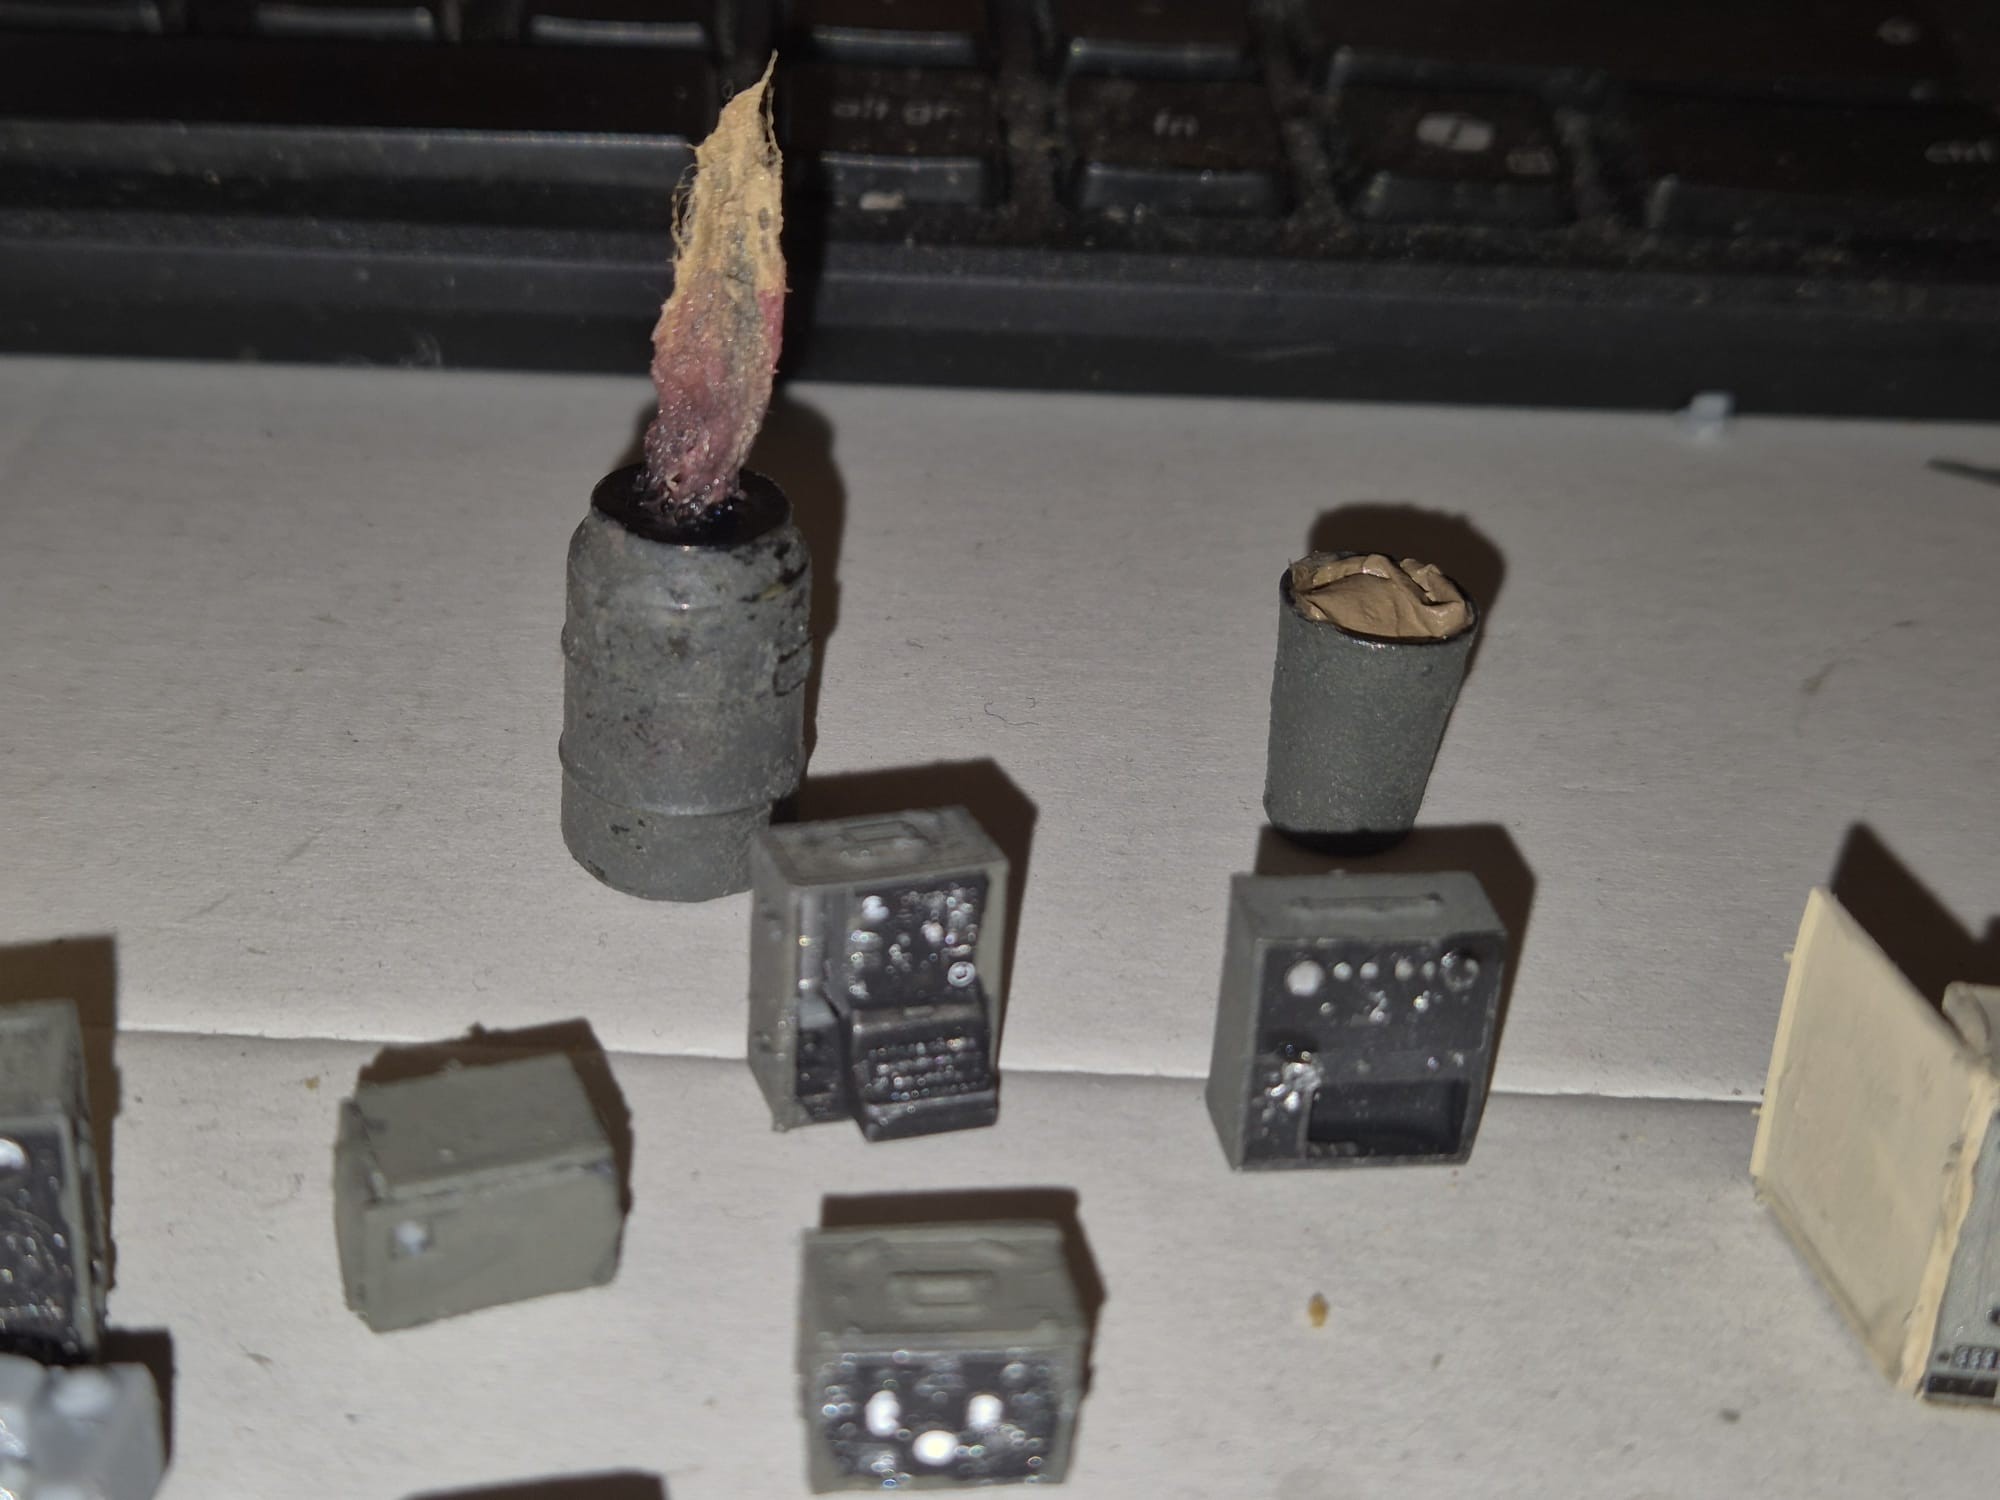
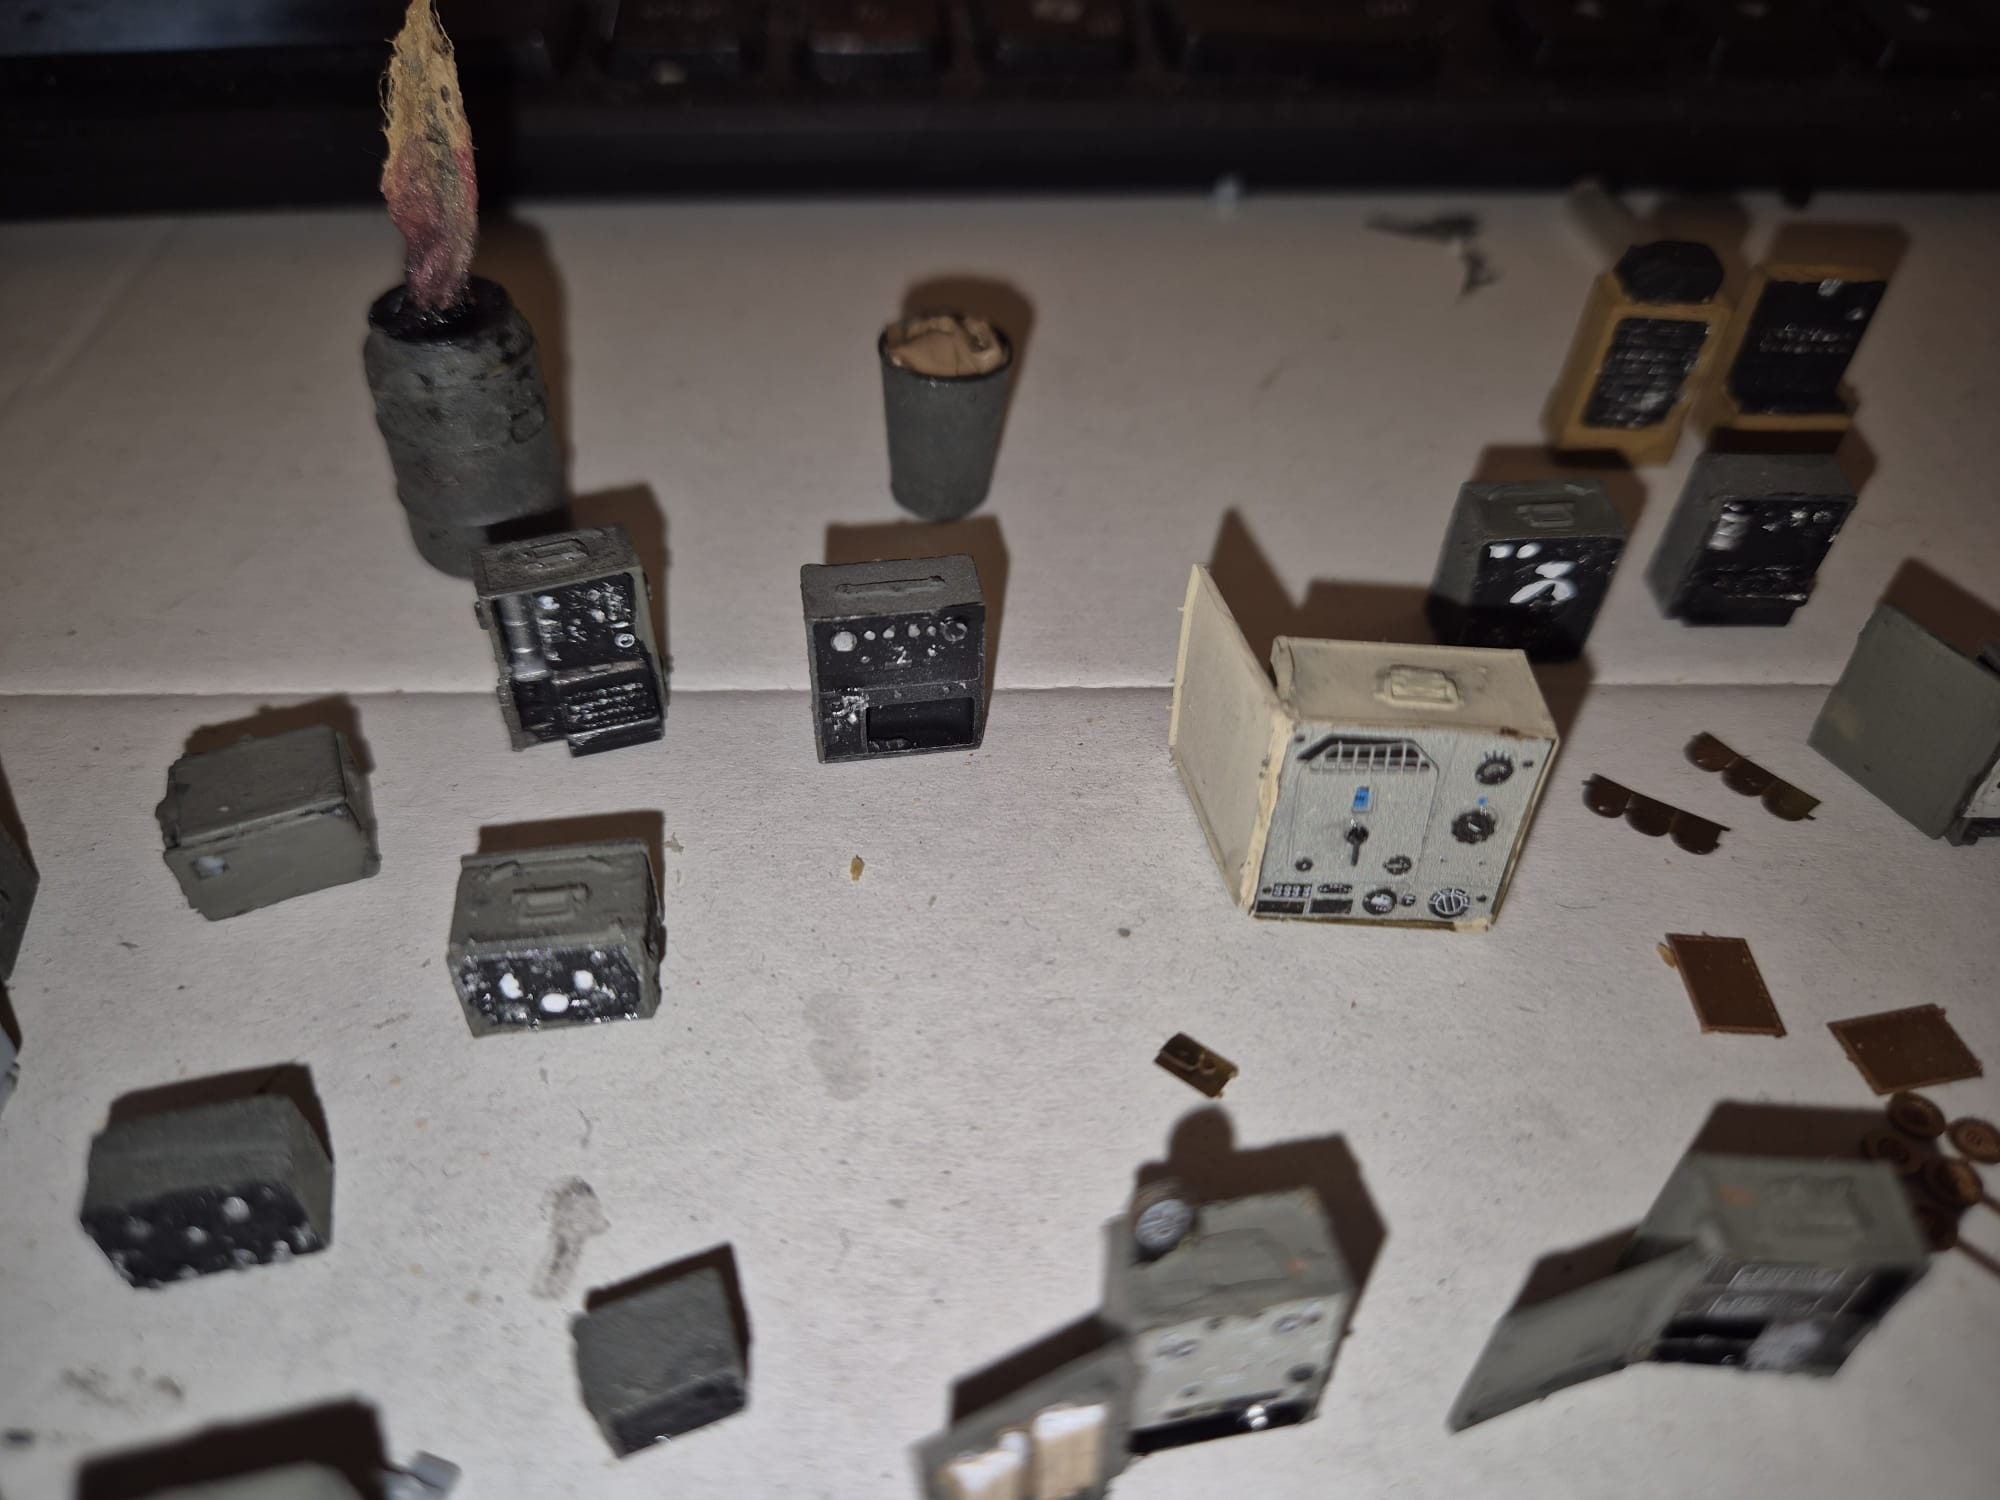
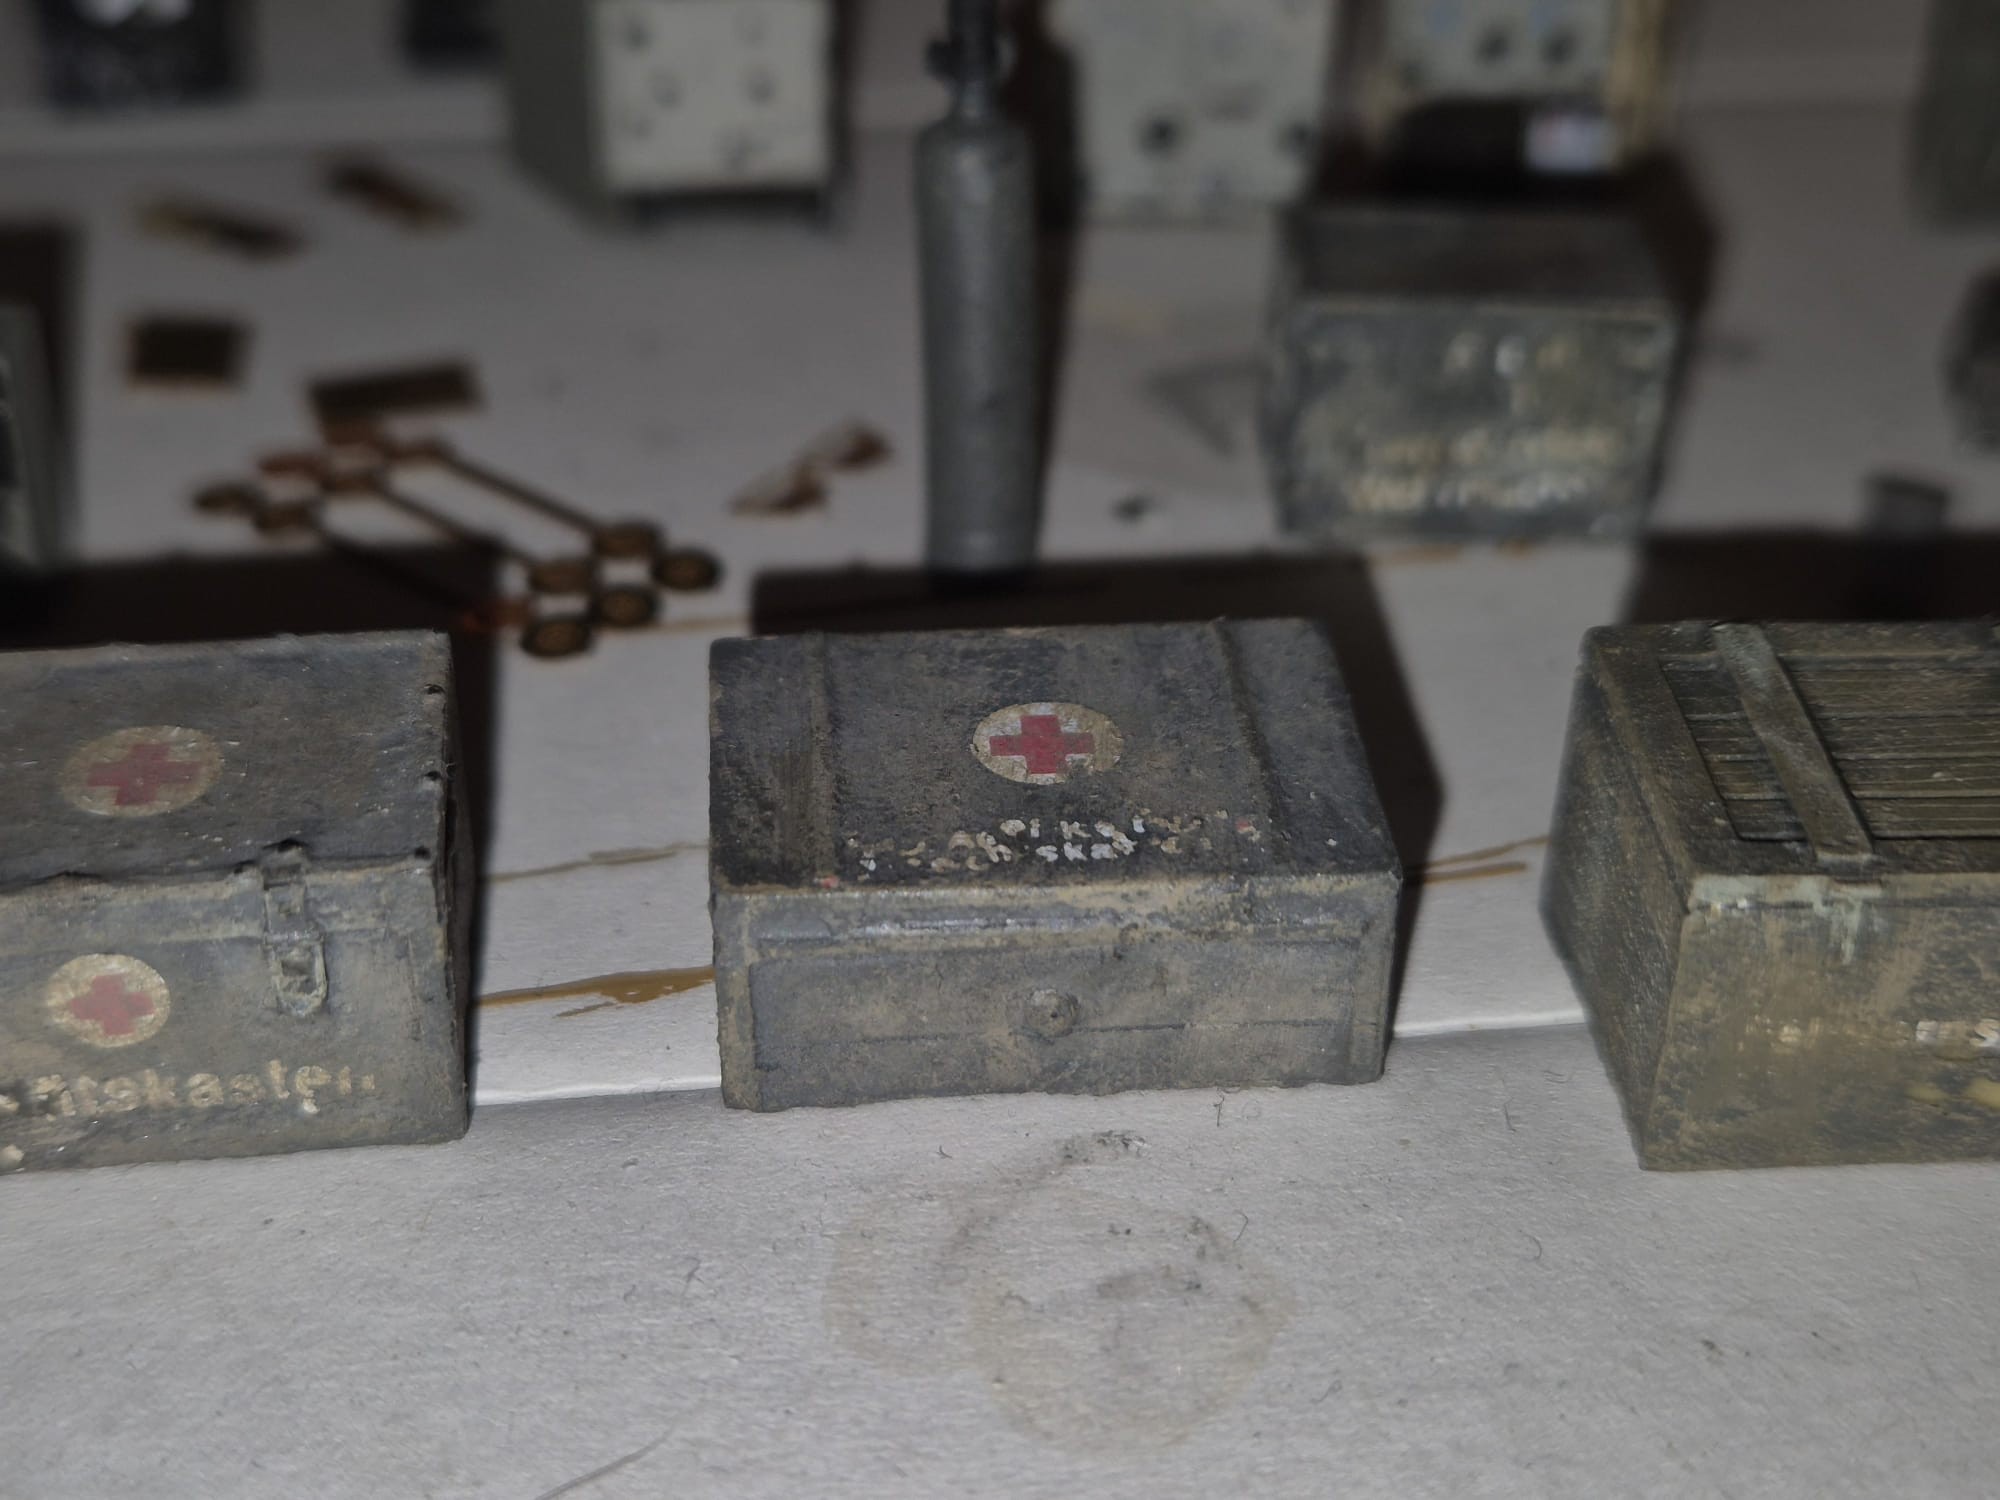
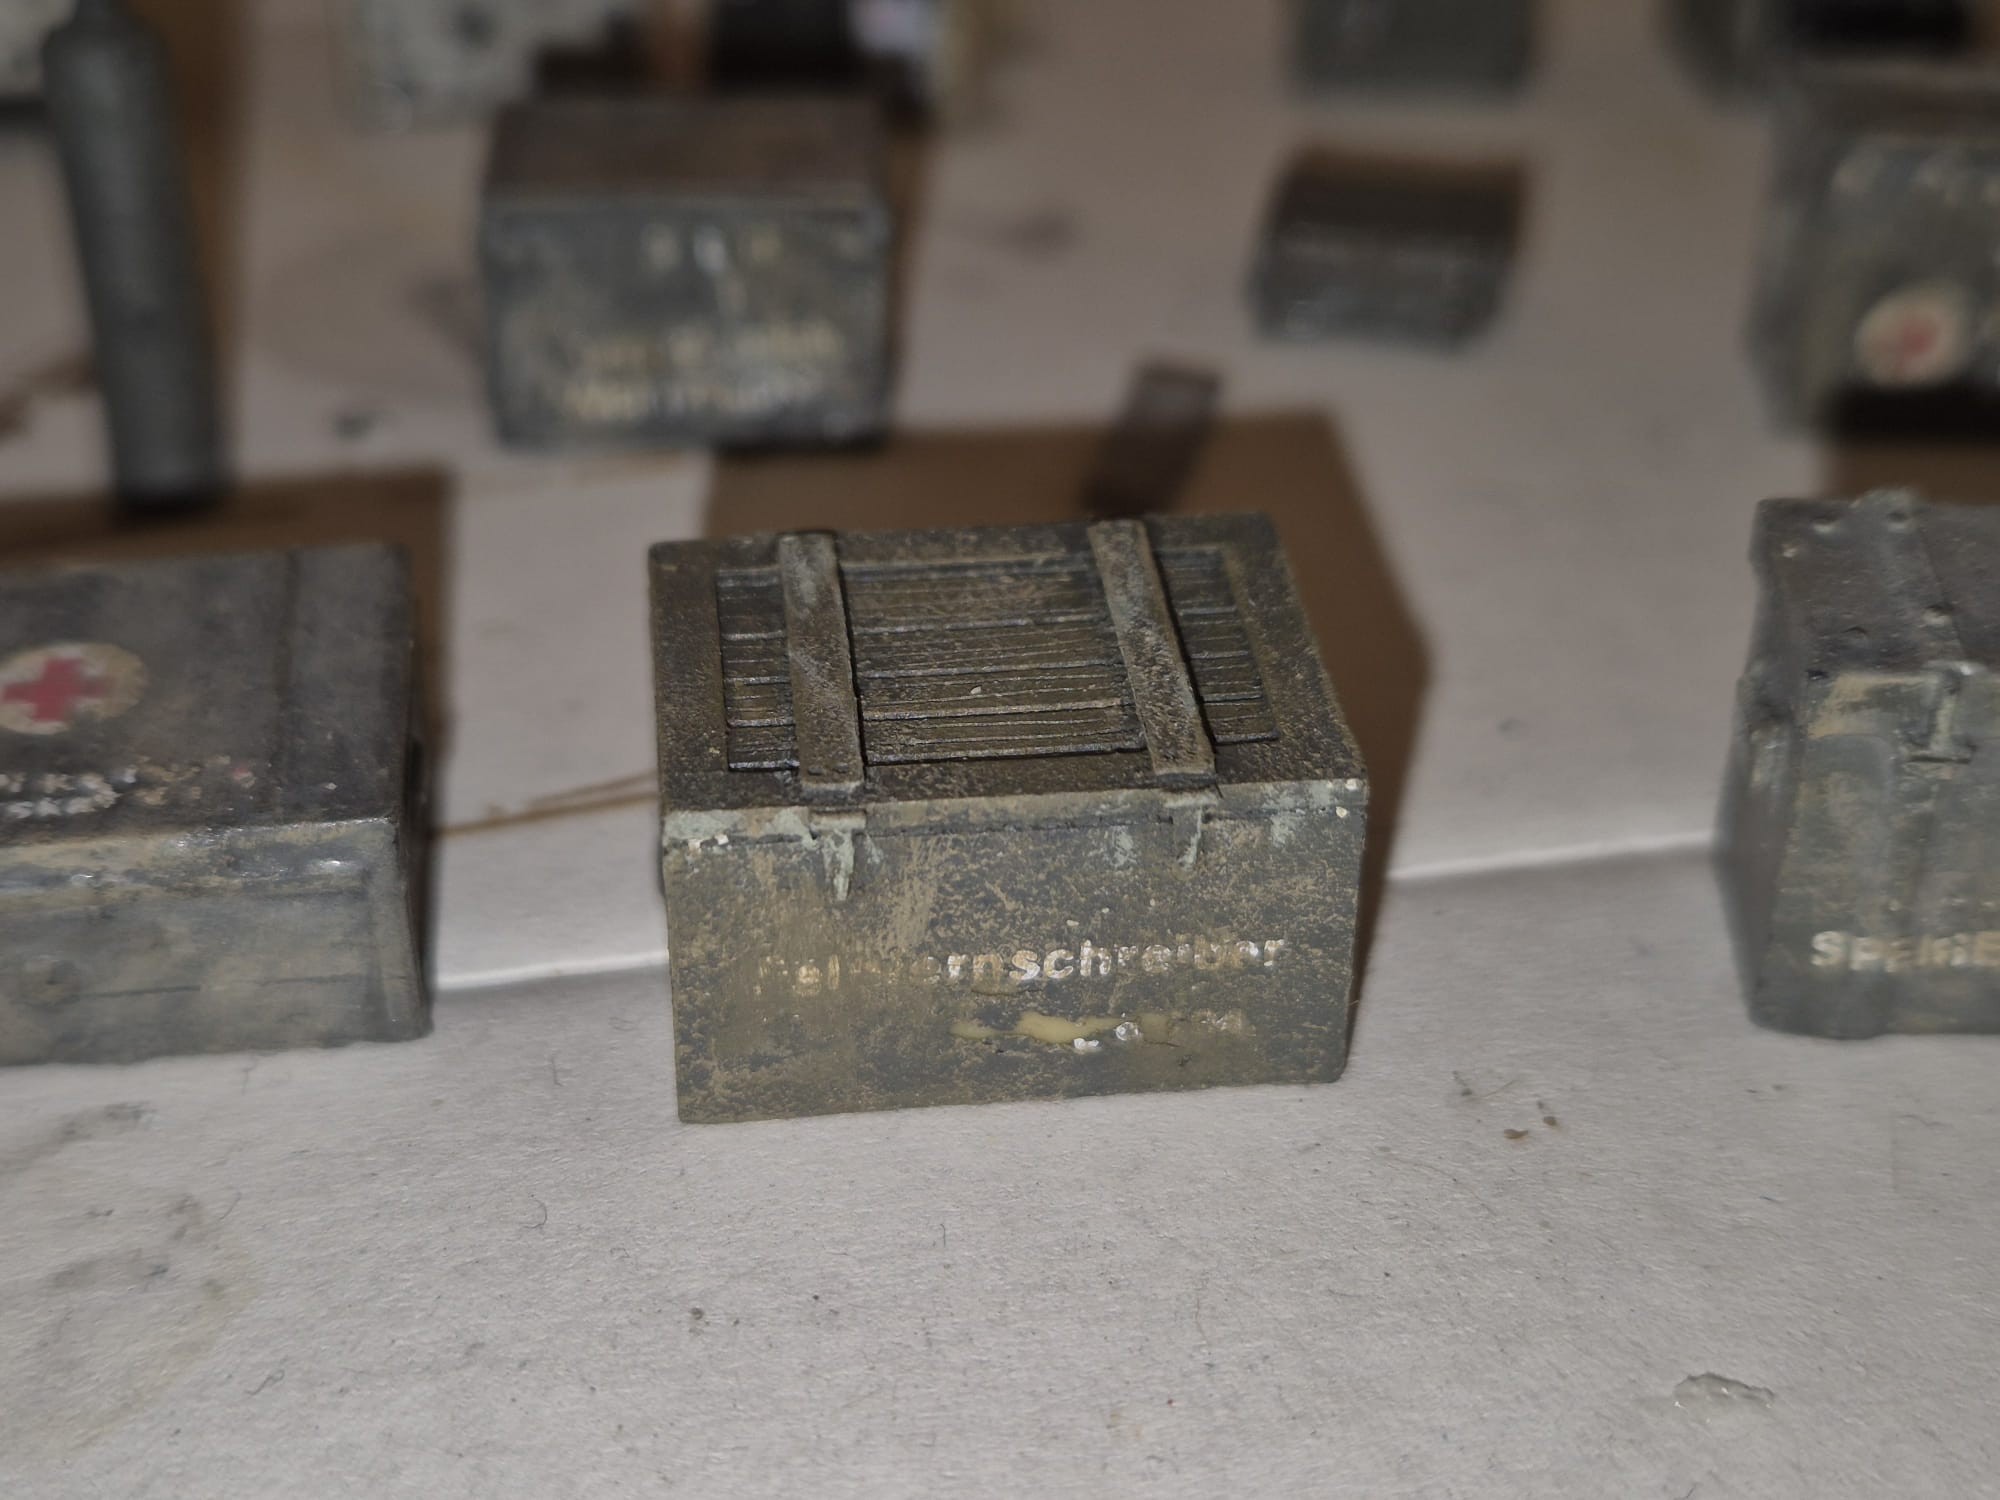
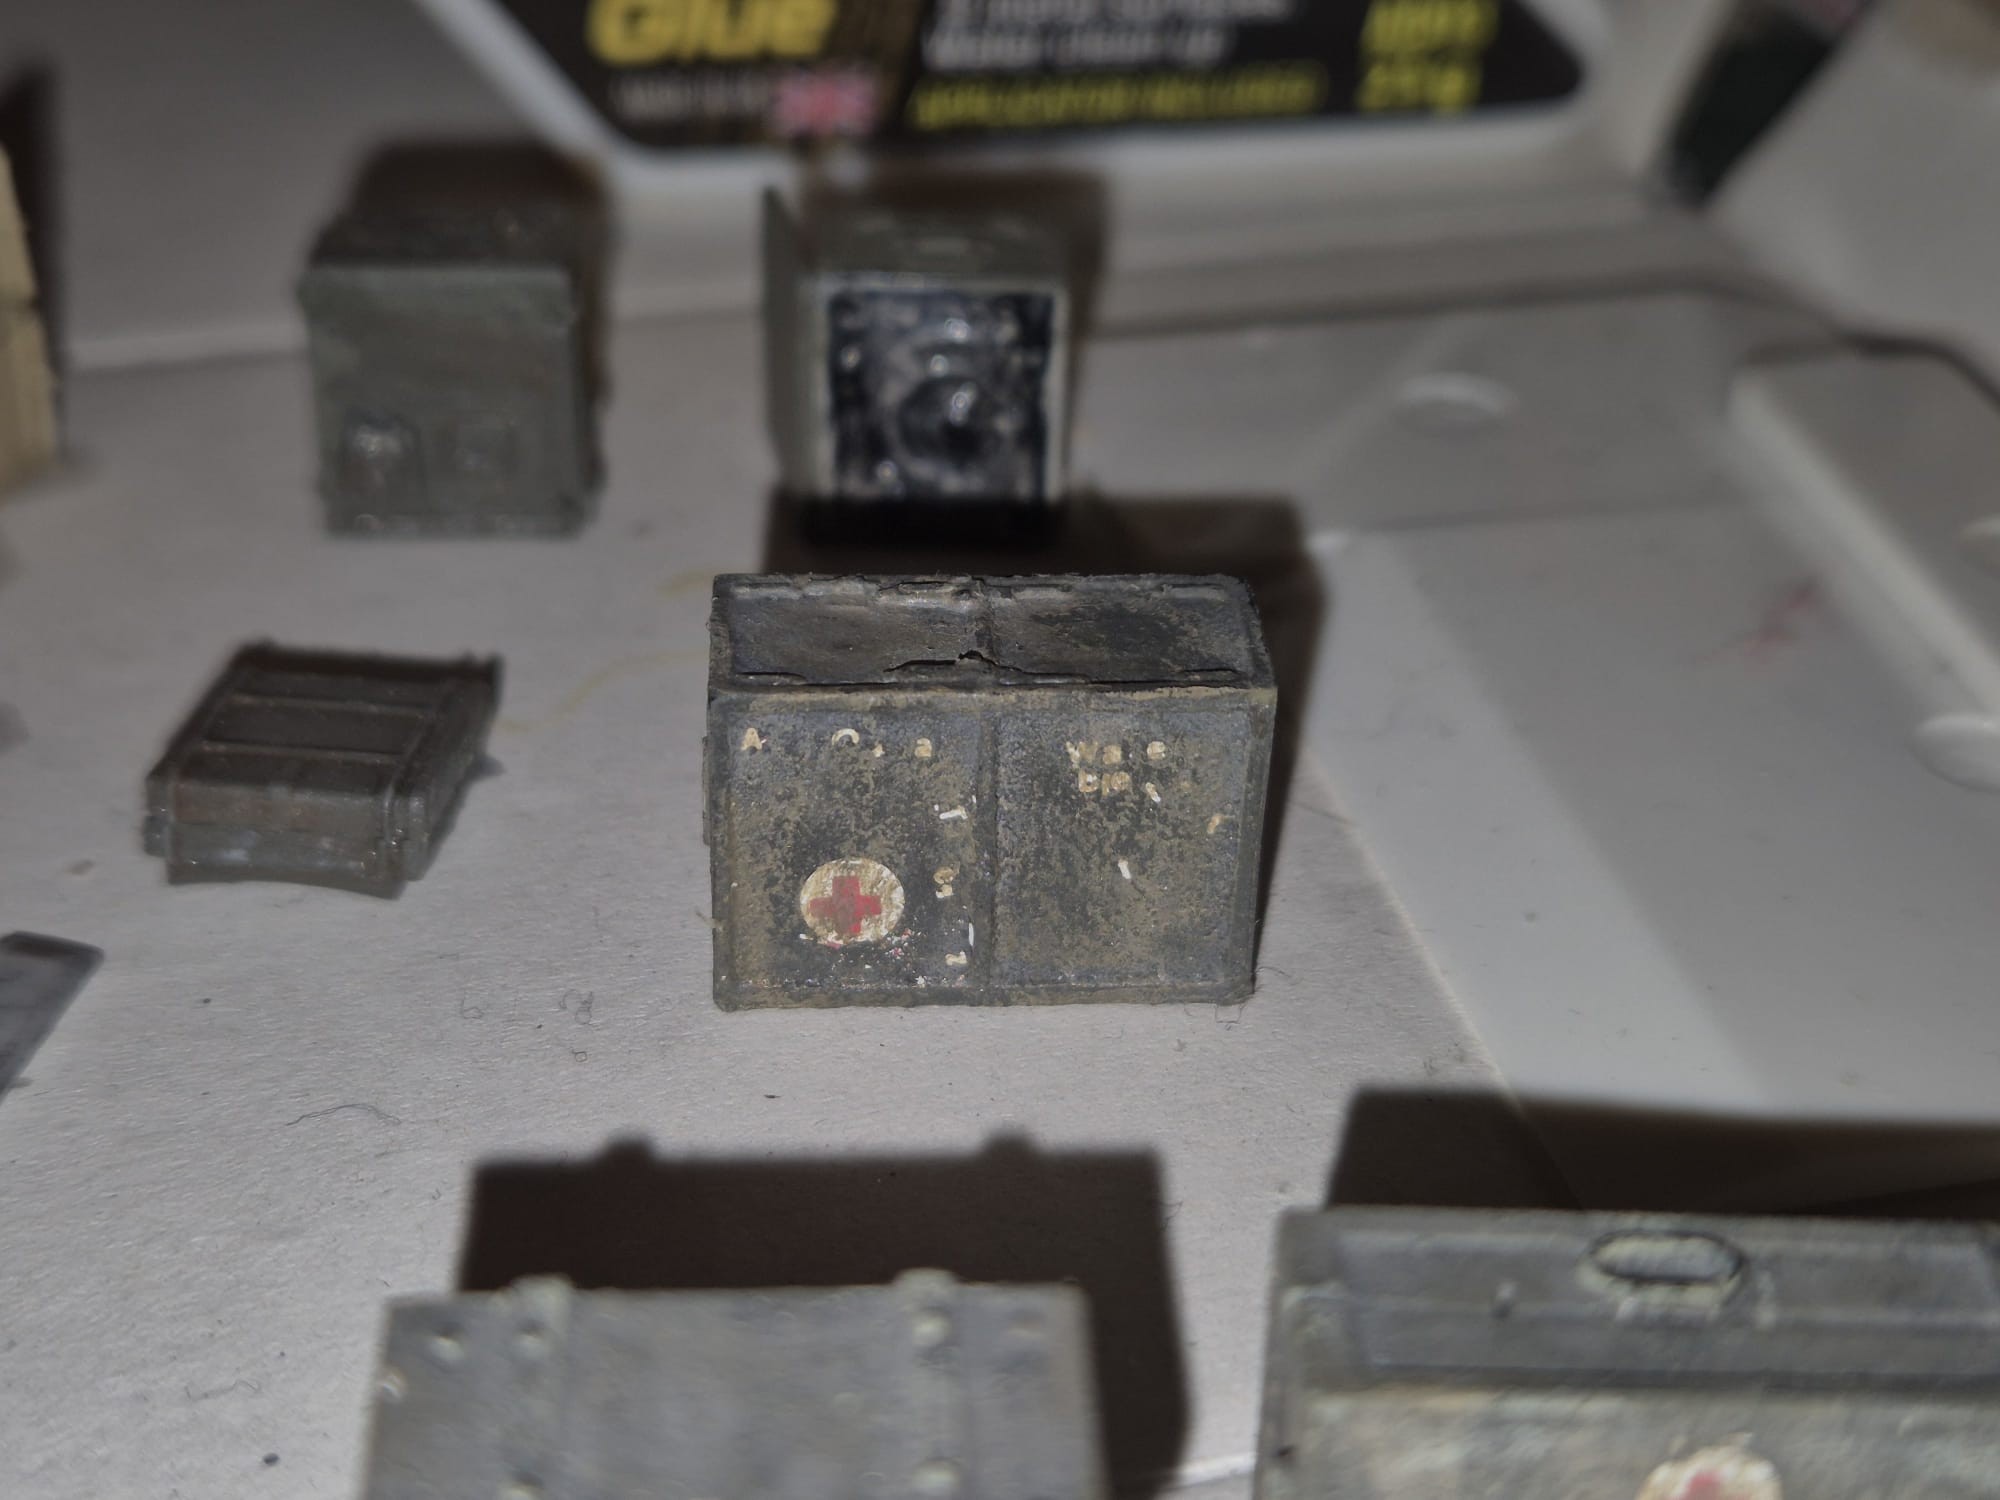
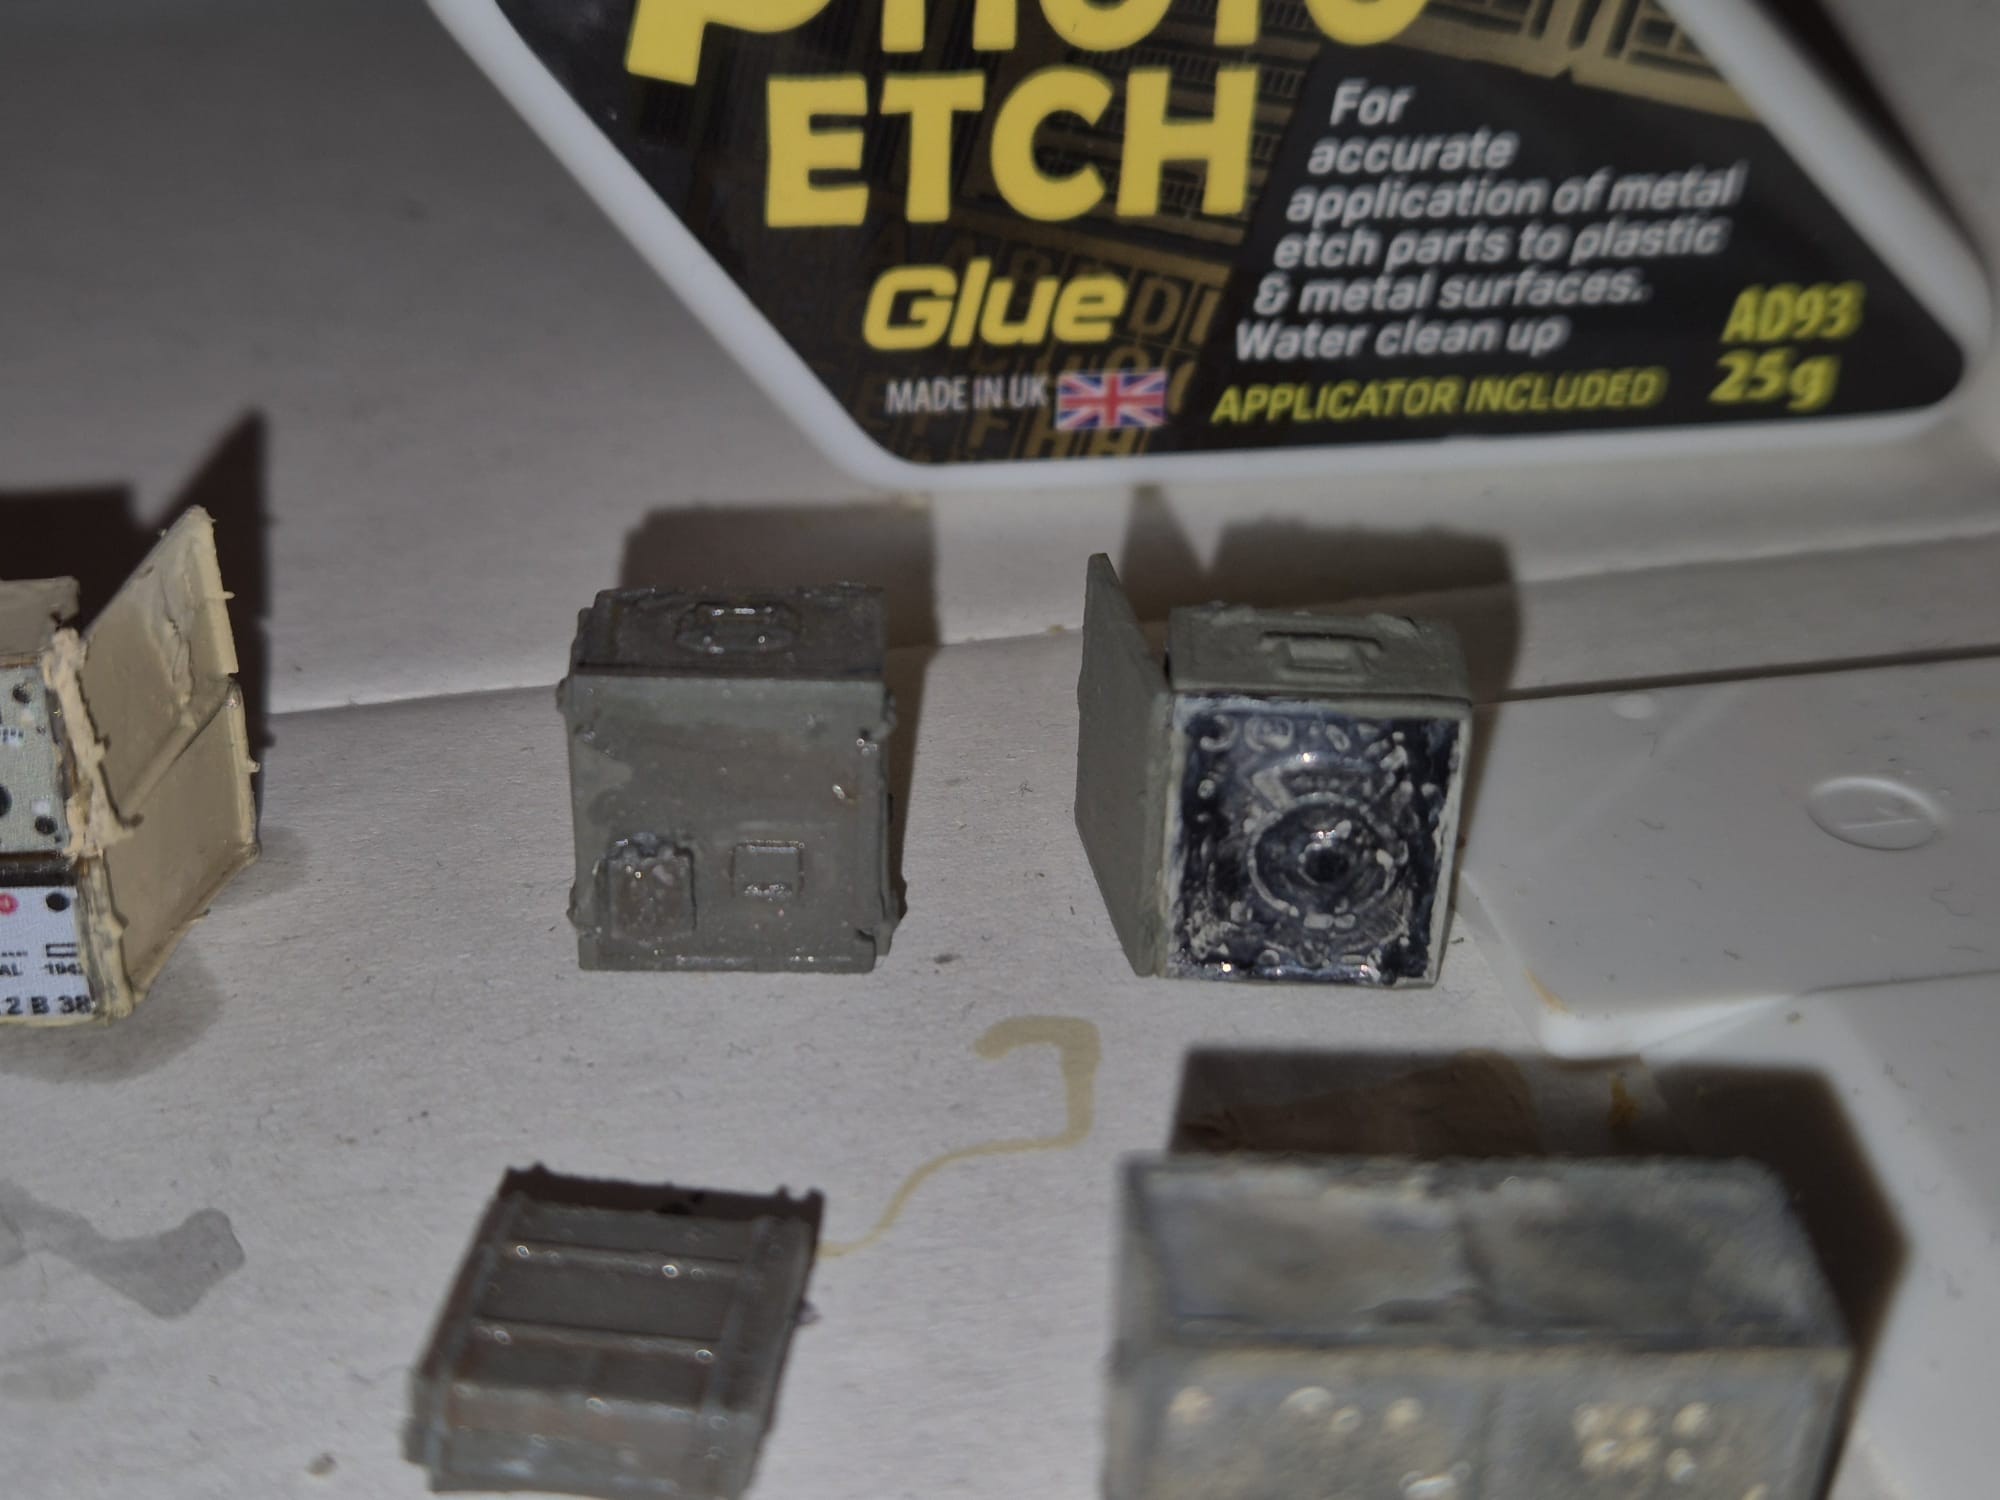
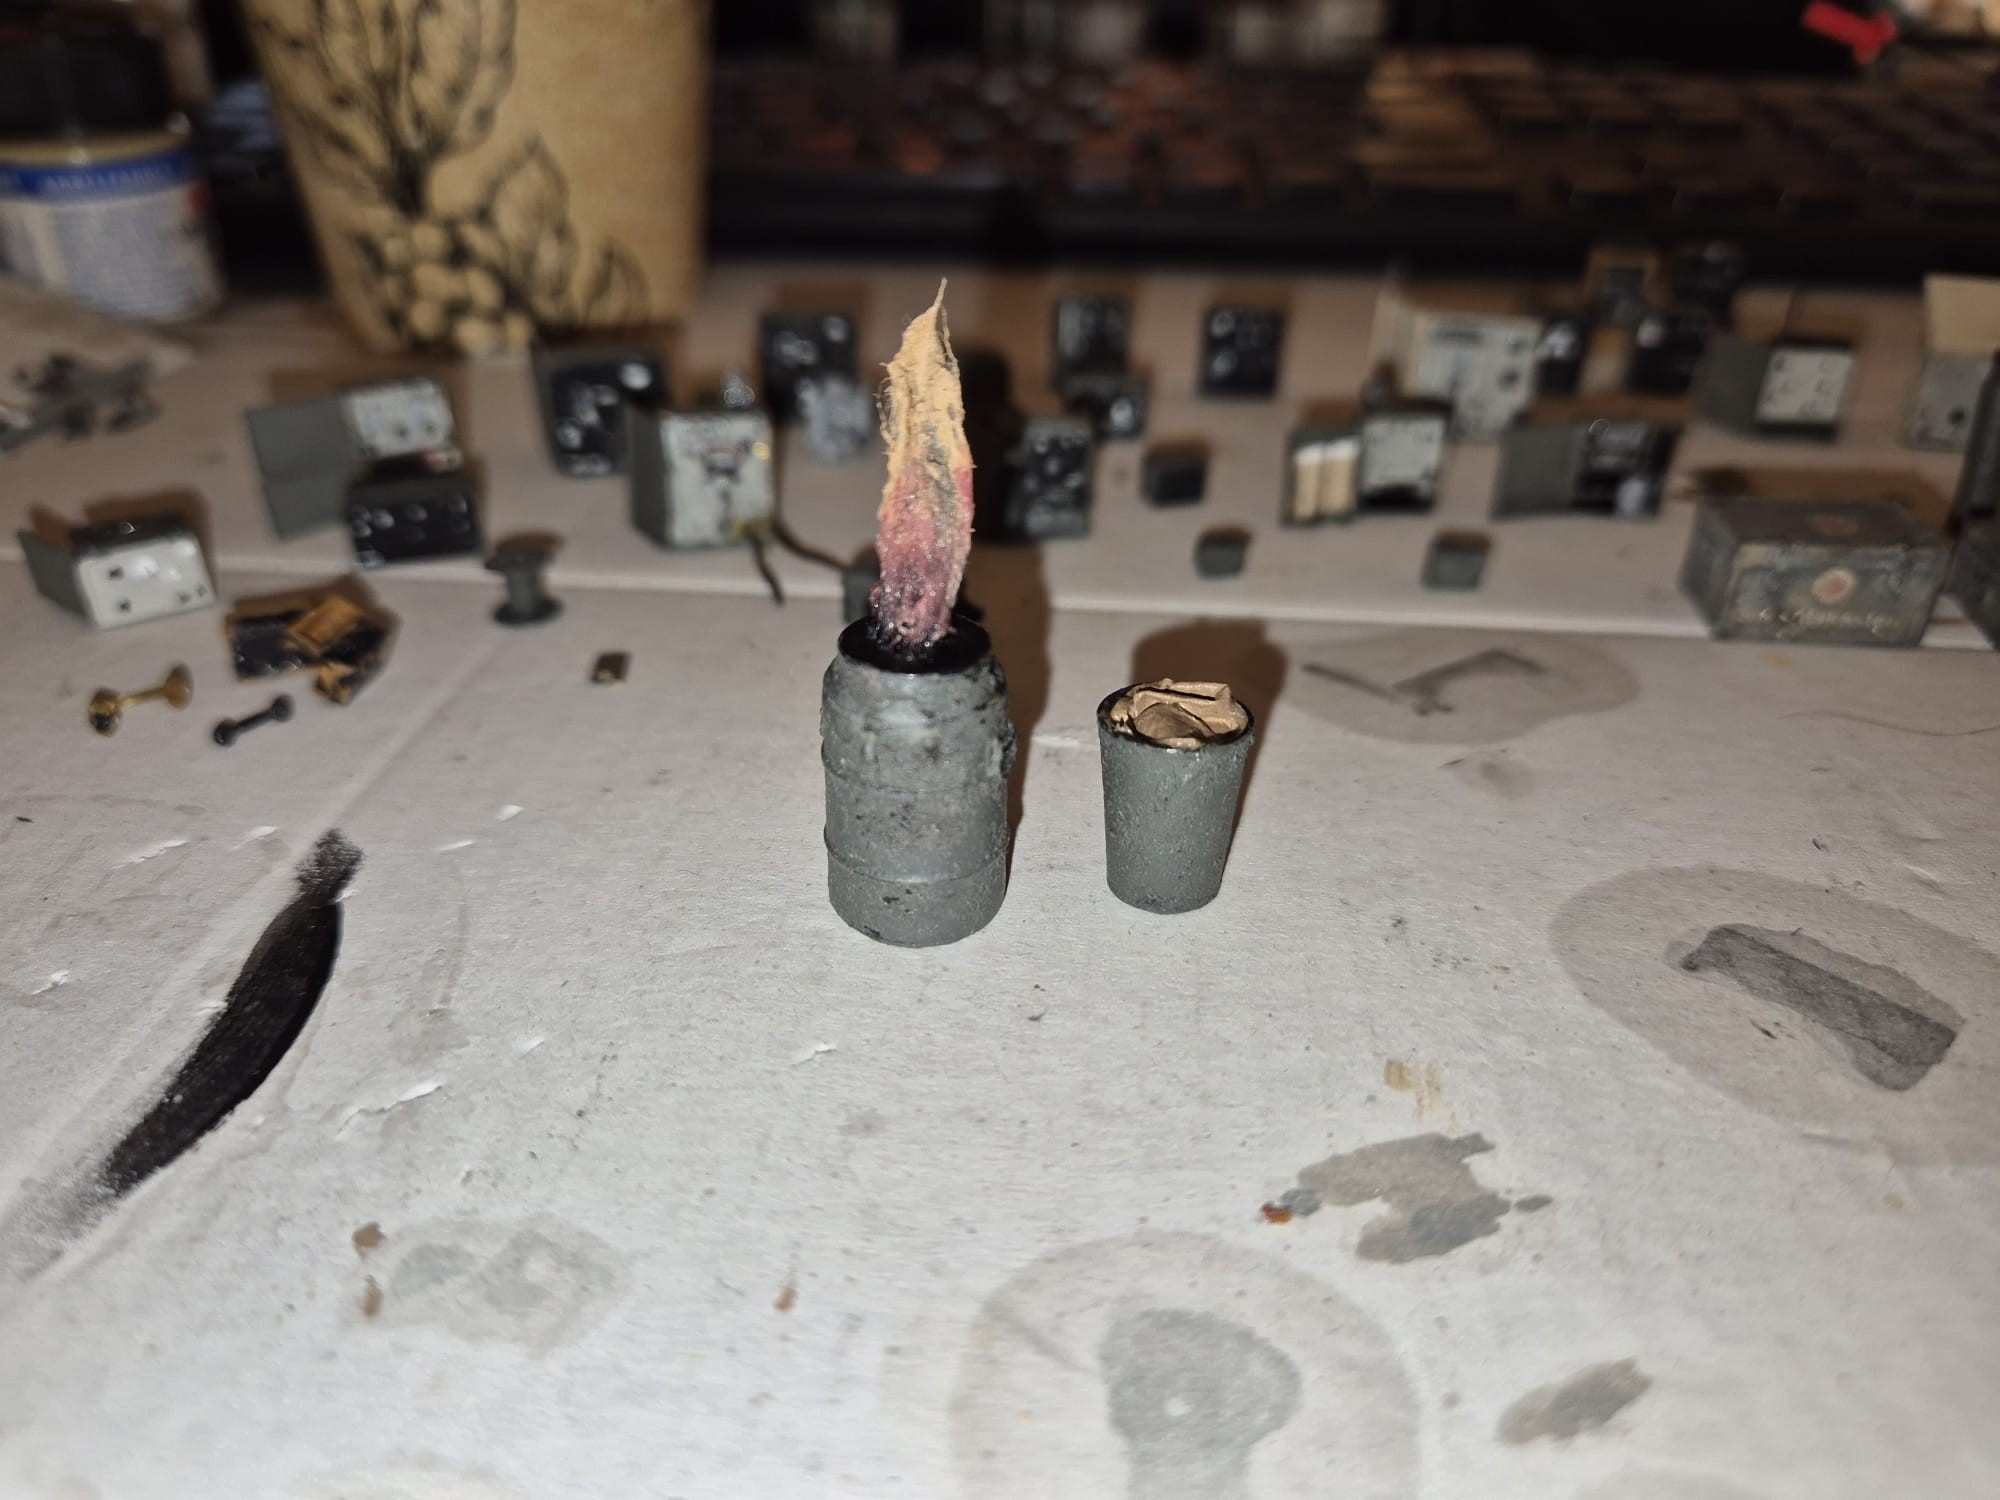
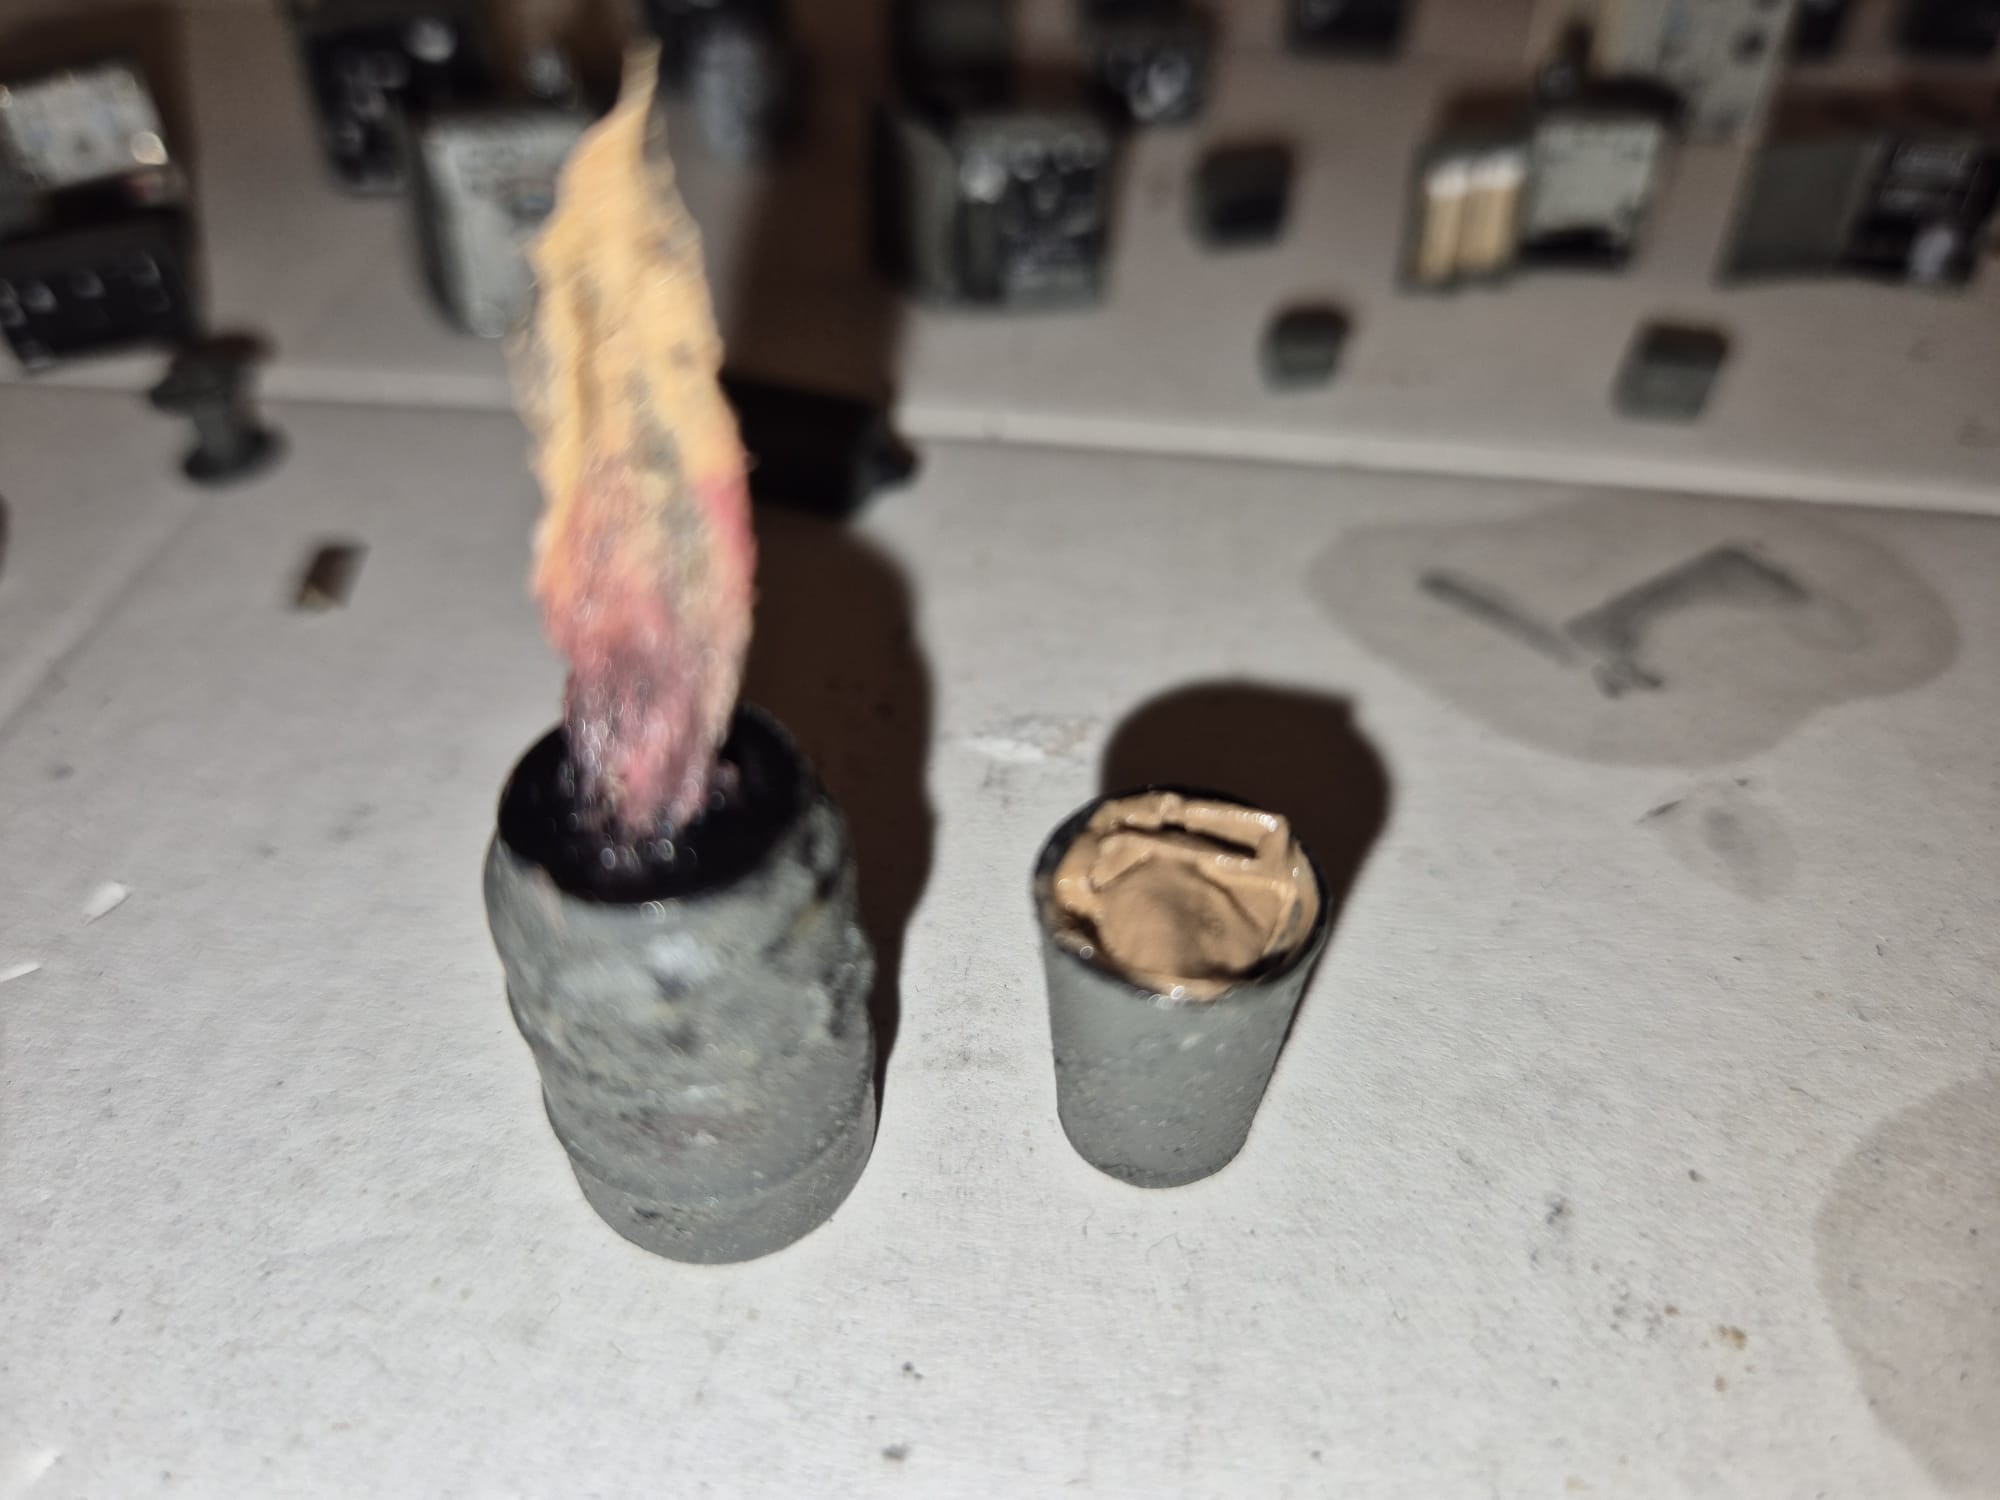
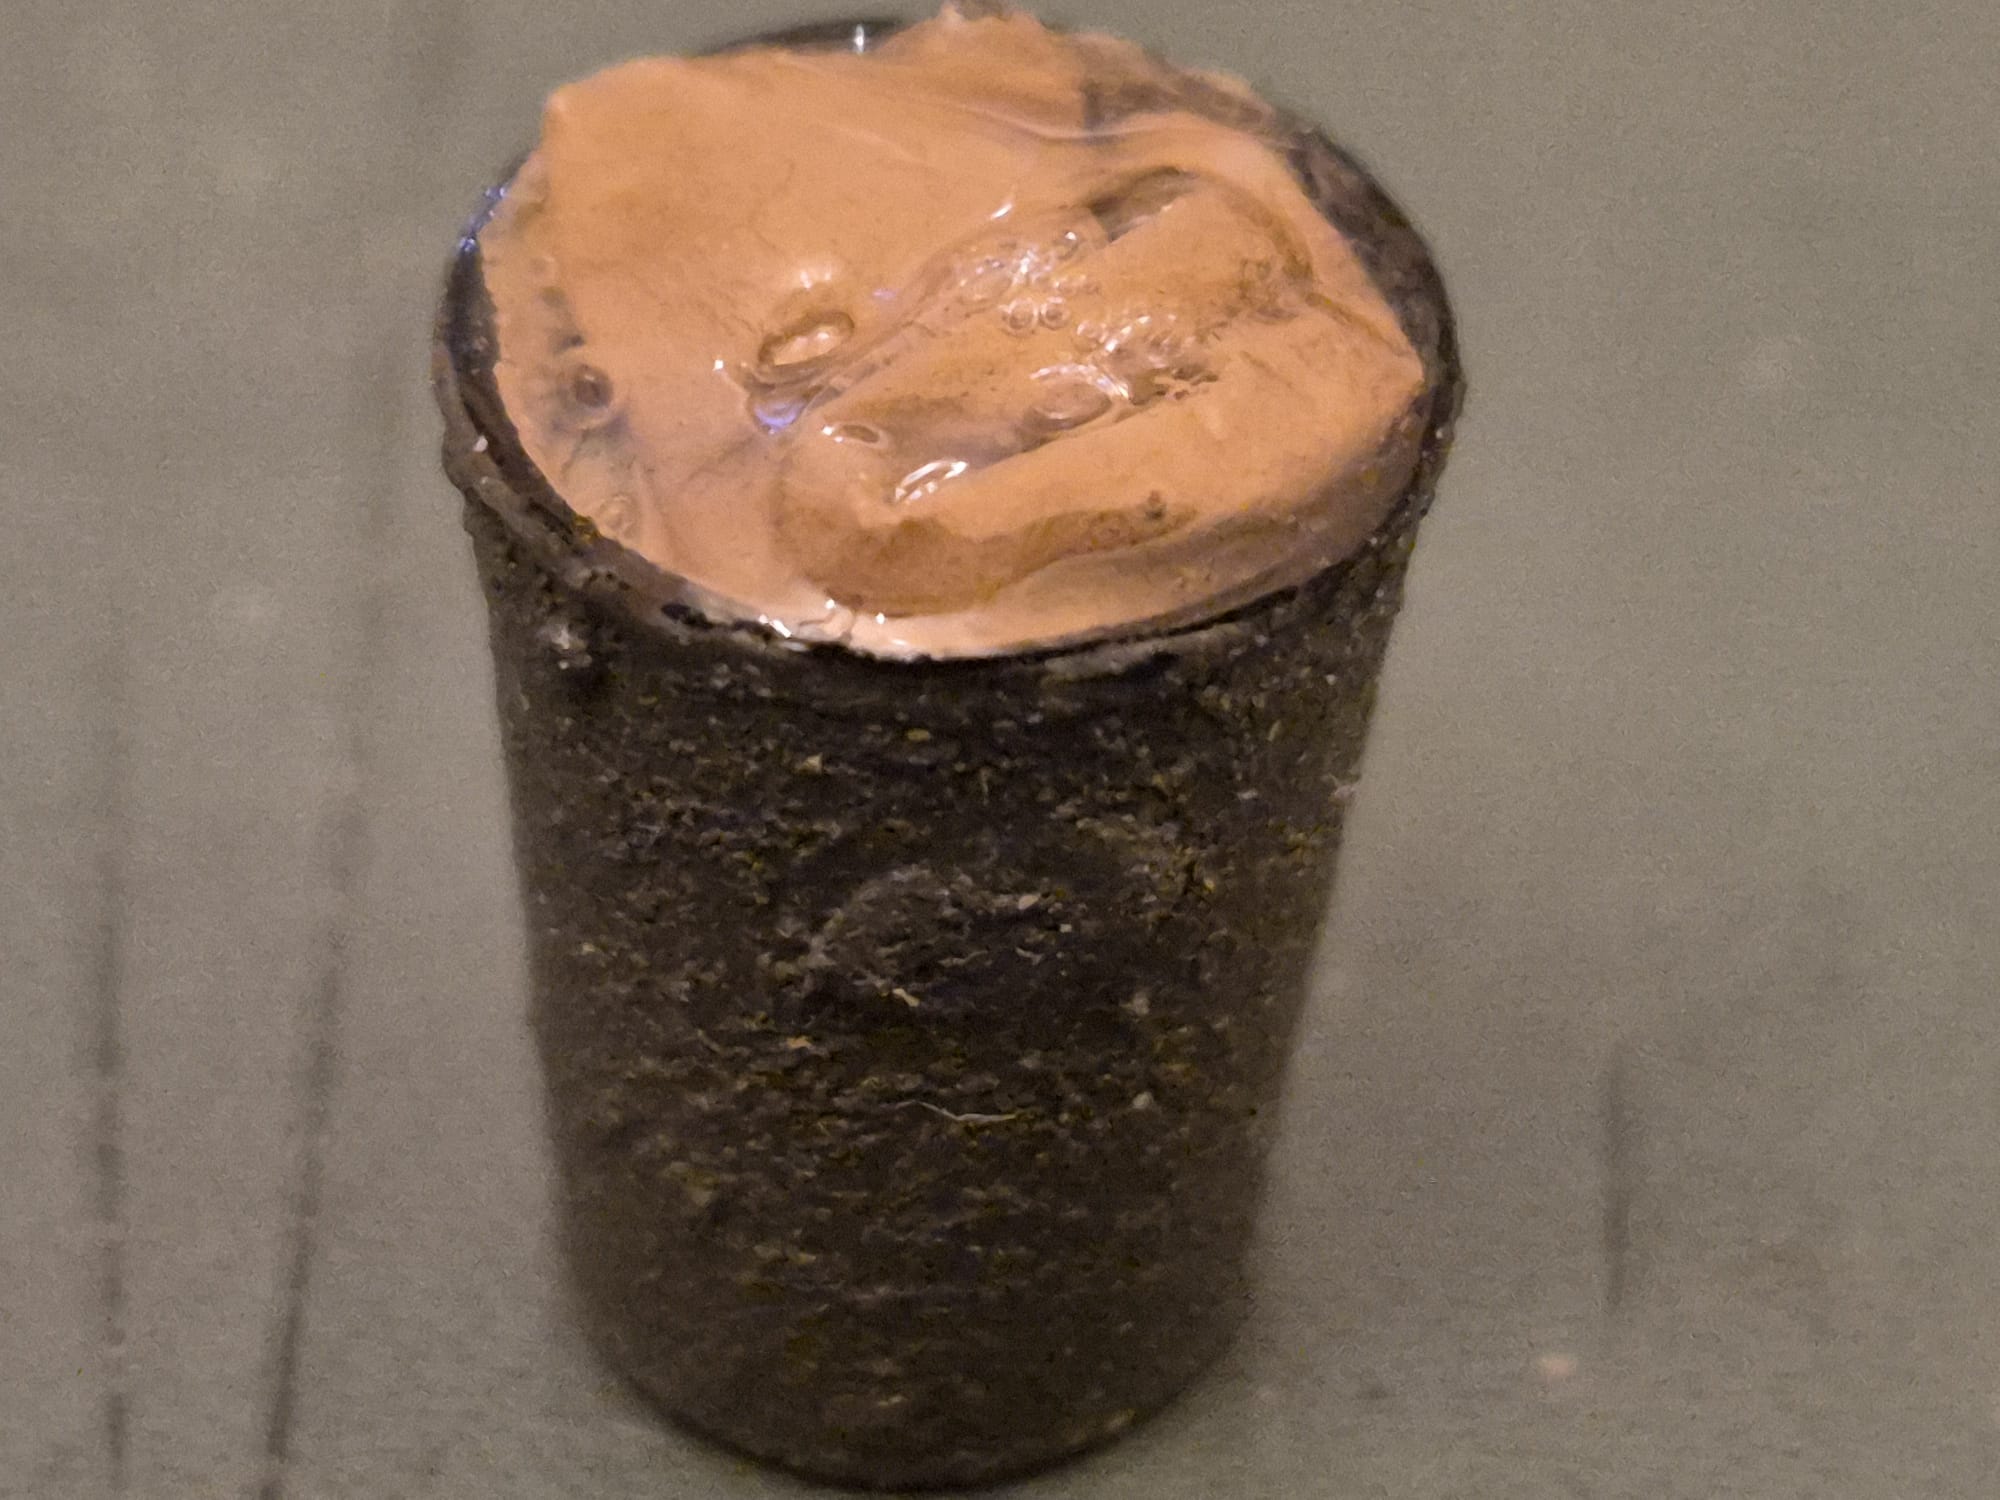
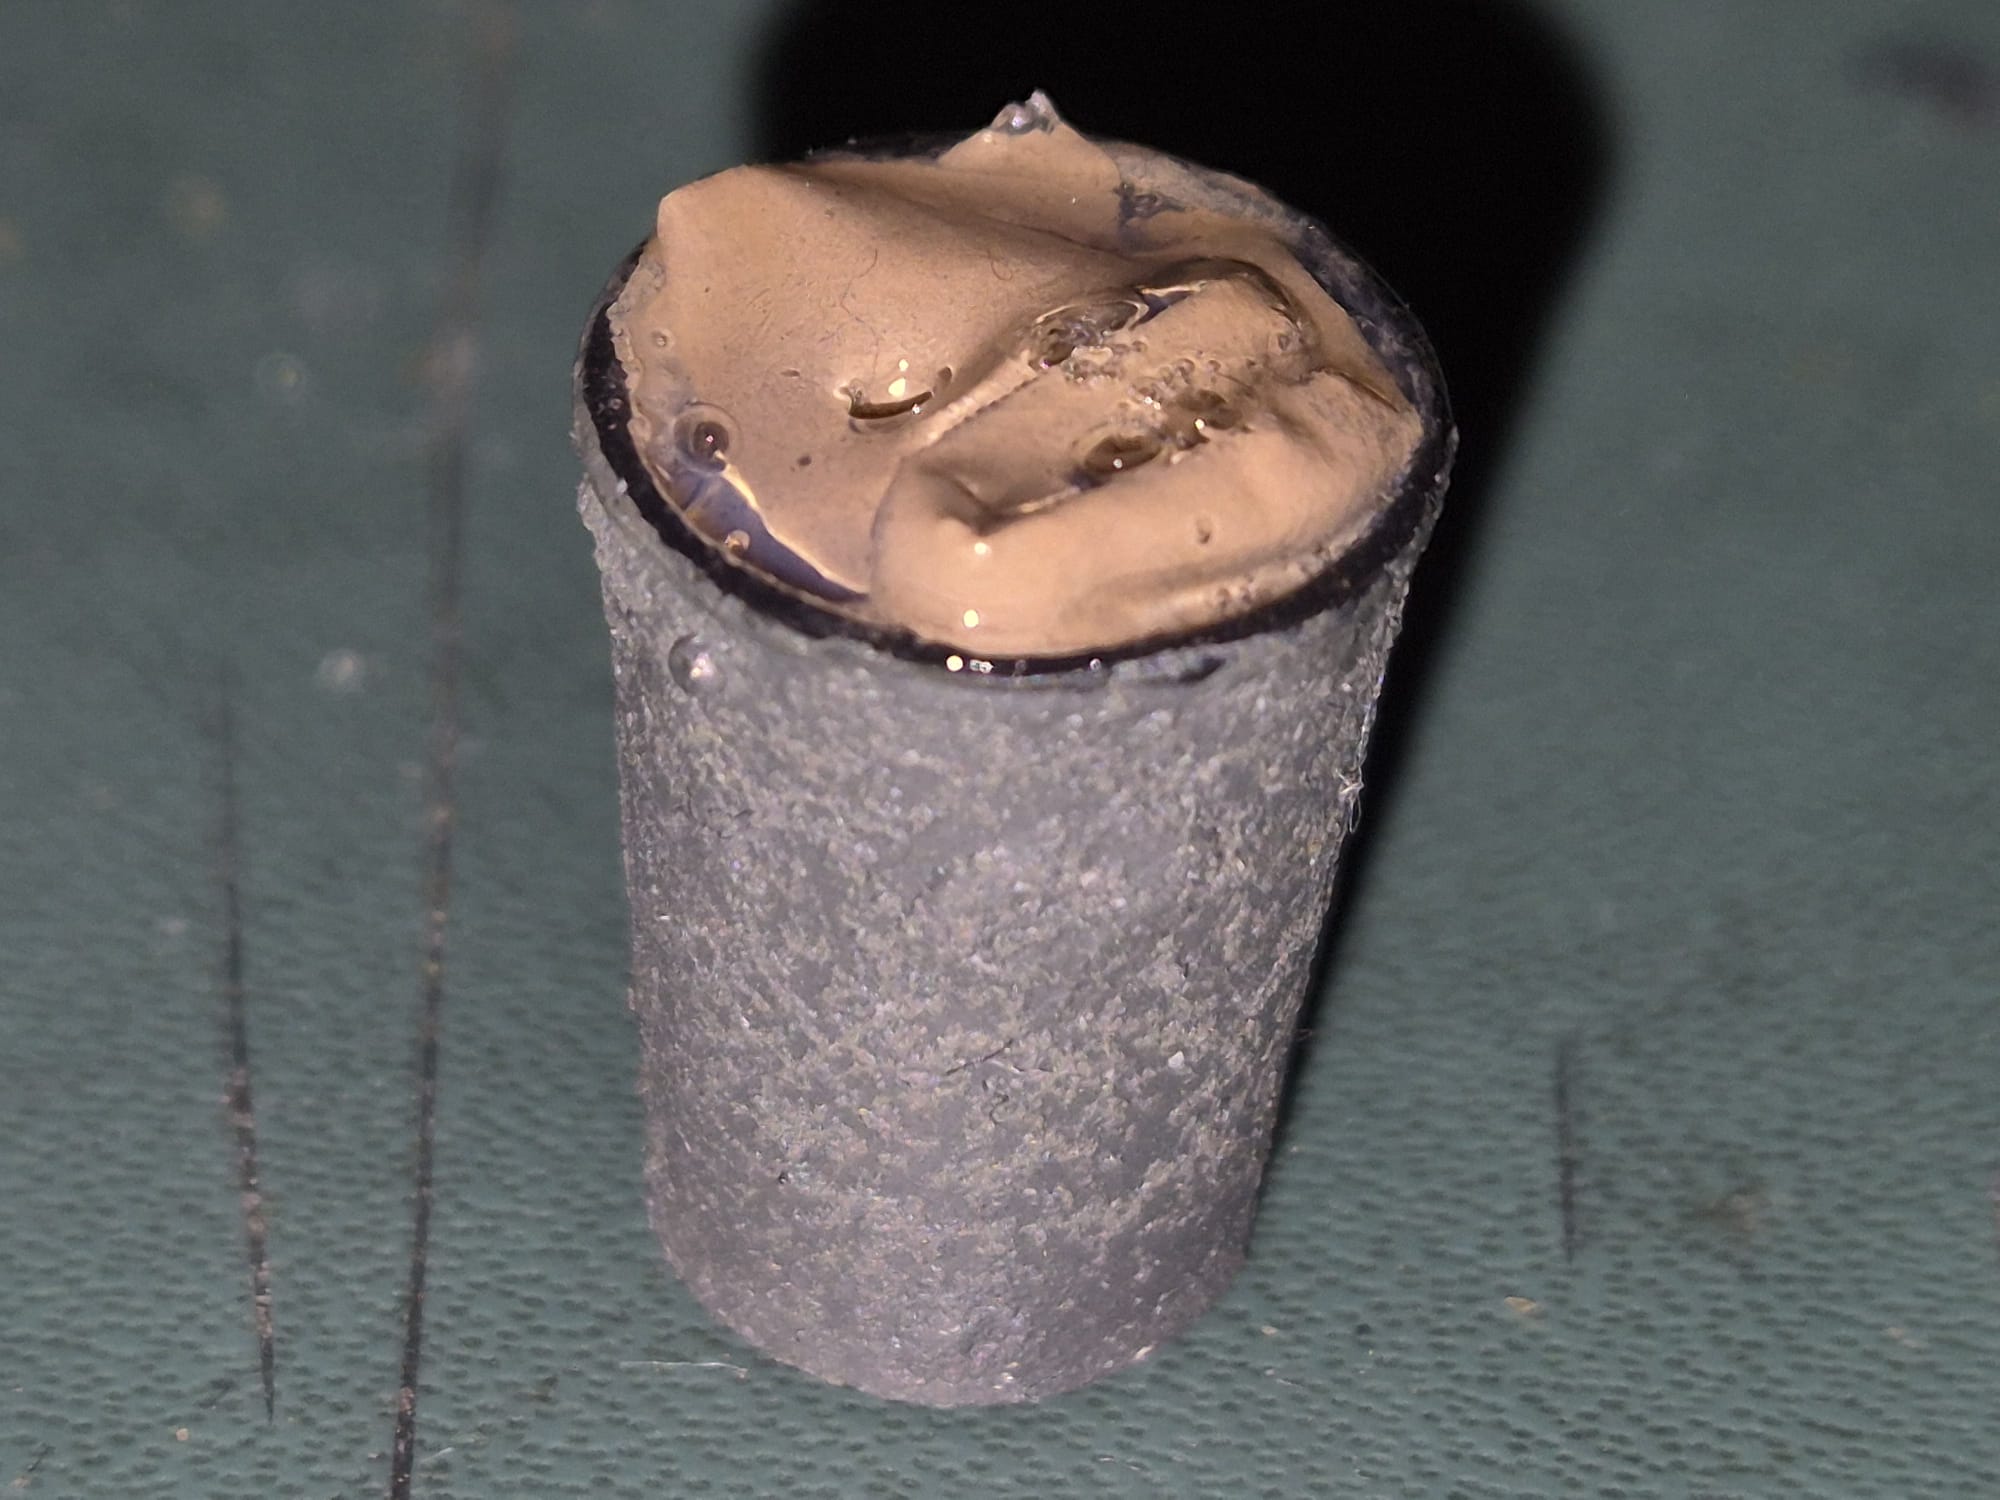
I took two sets of pictures. One under natural light and the other with a flash in order to show them all more clearly. The last few pictures are of a medical trash bin in which bandages are thrown after use and the other a field incinerator for potentially infectious or dangerous materials and chemicals.
I tried my best to reproduce a streaming flame on top.

OK. Here are the pictures under normal light:


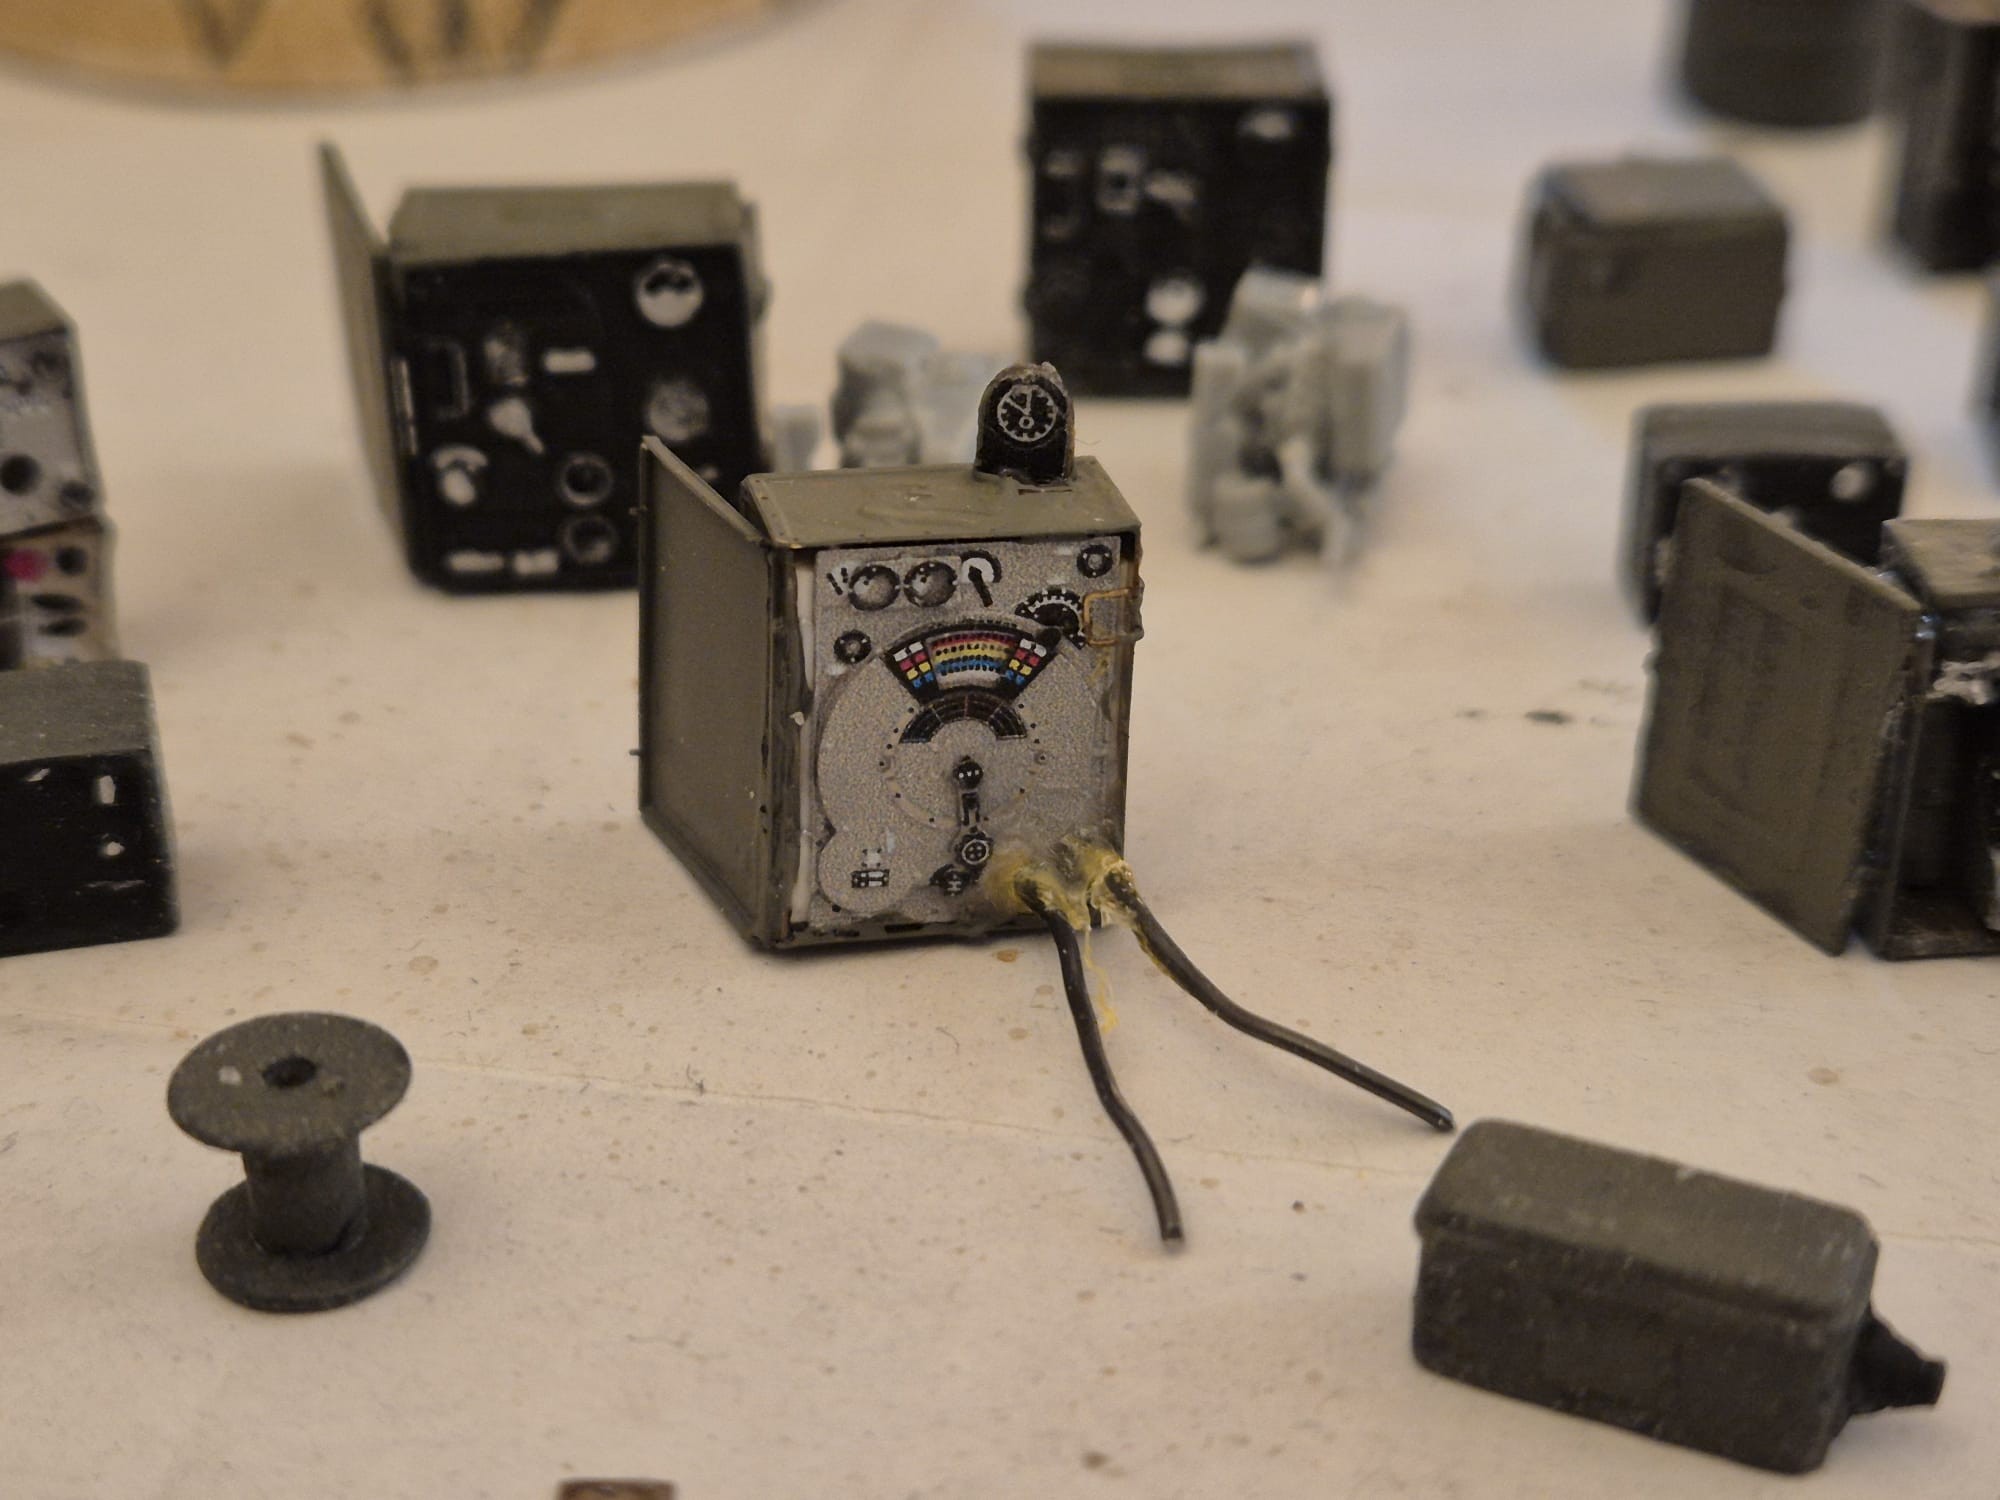
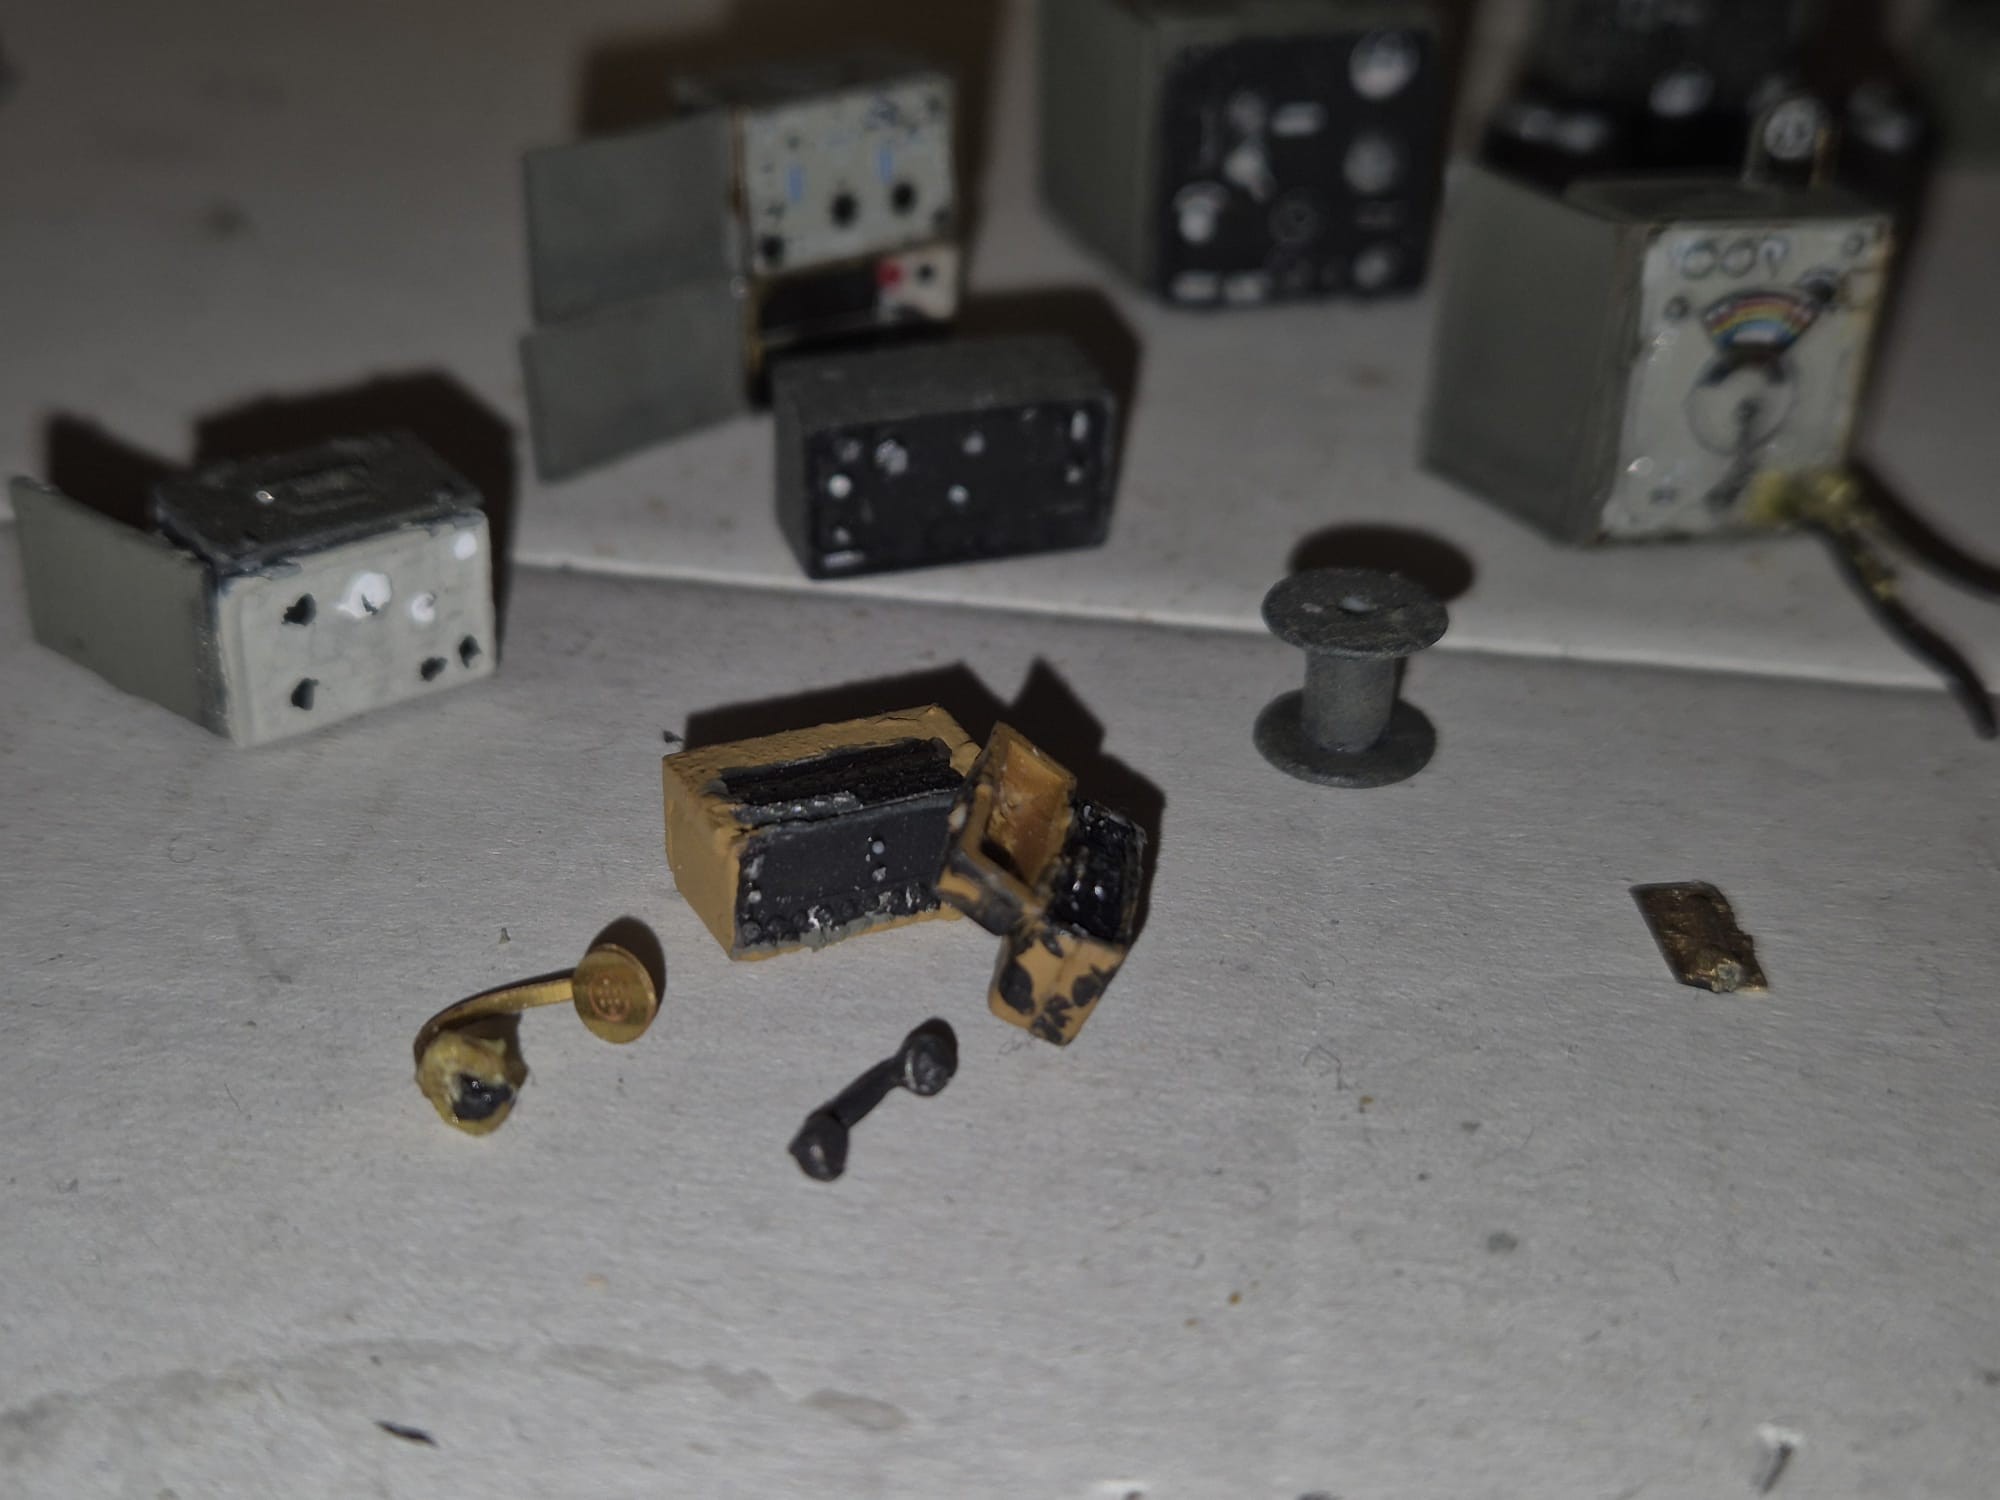
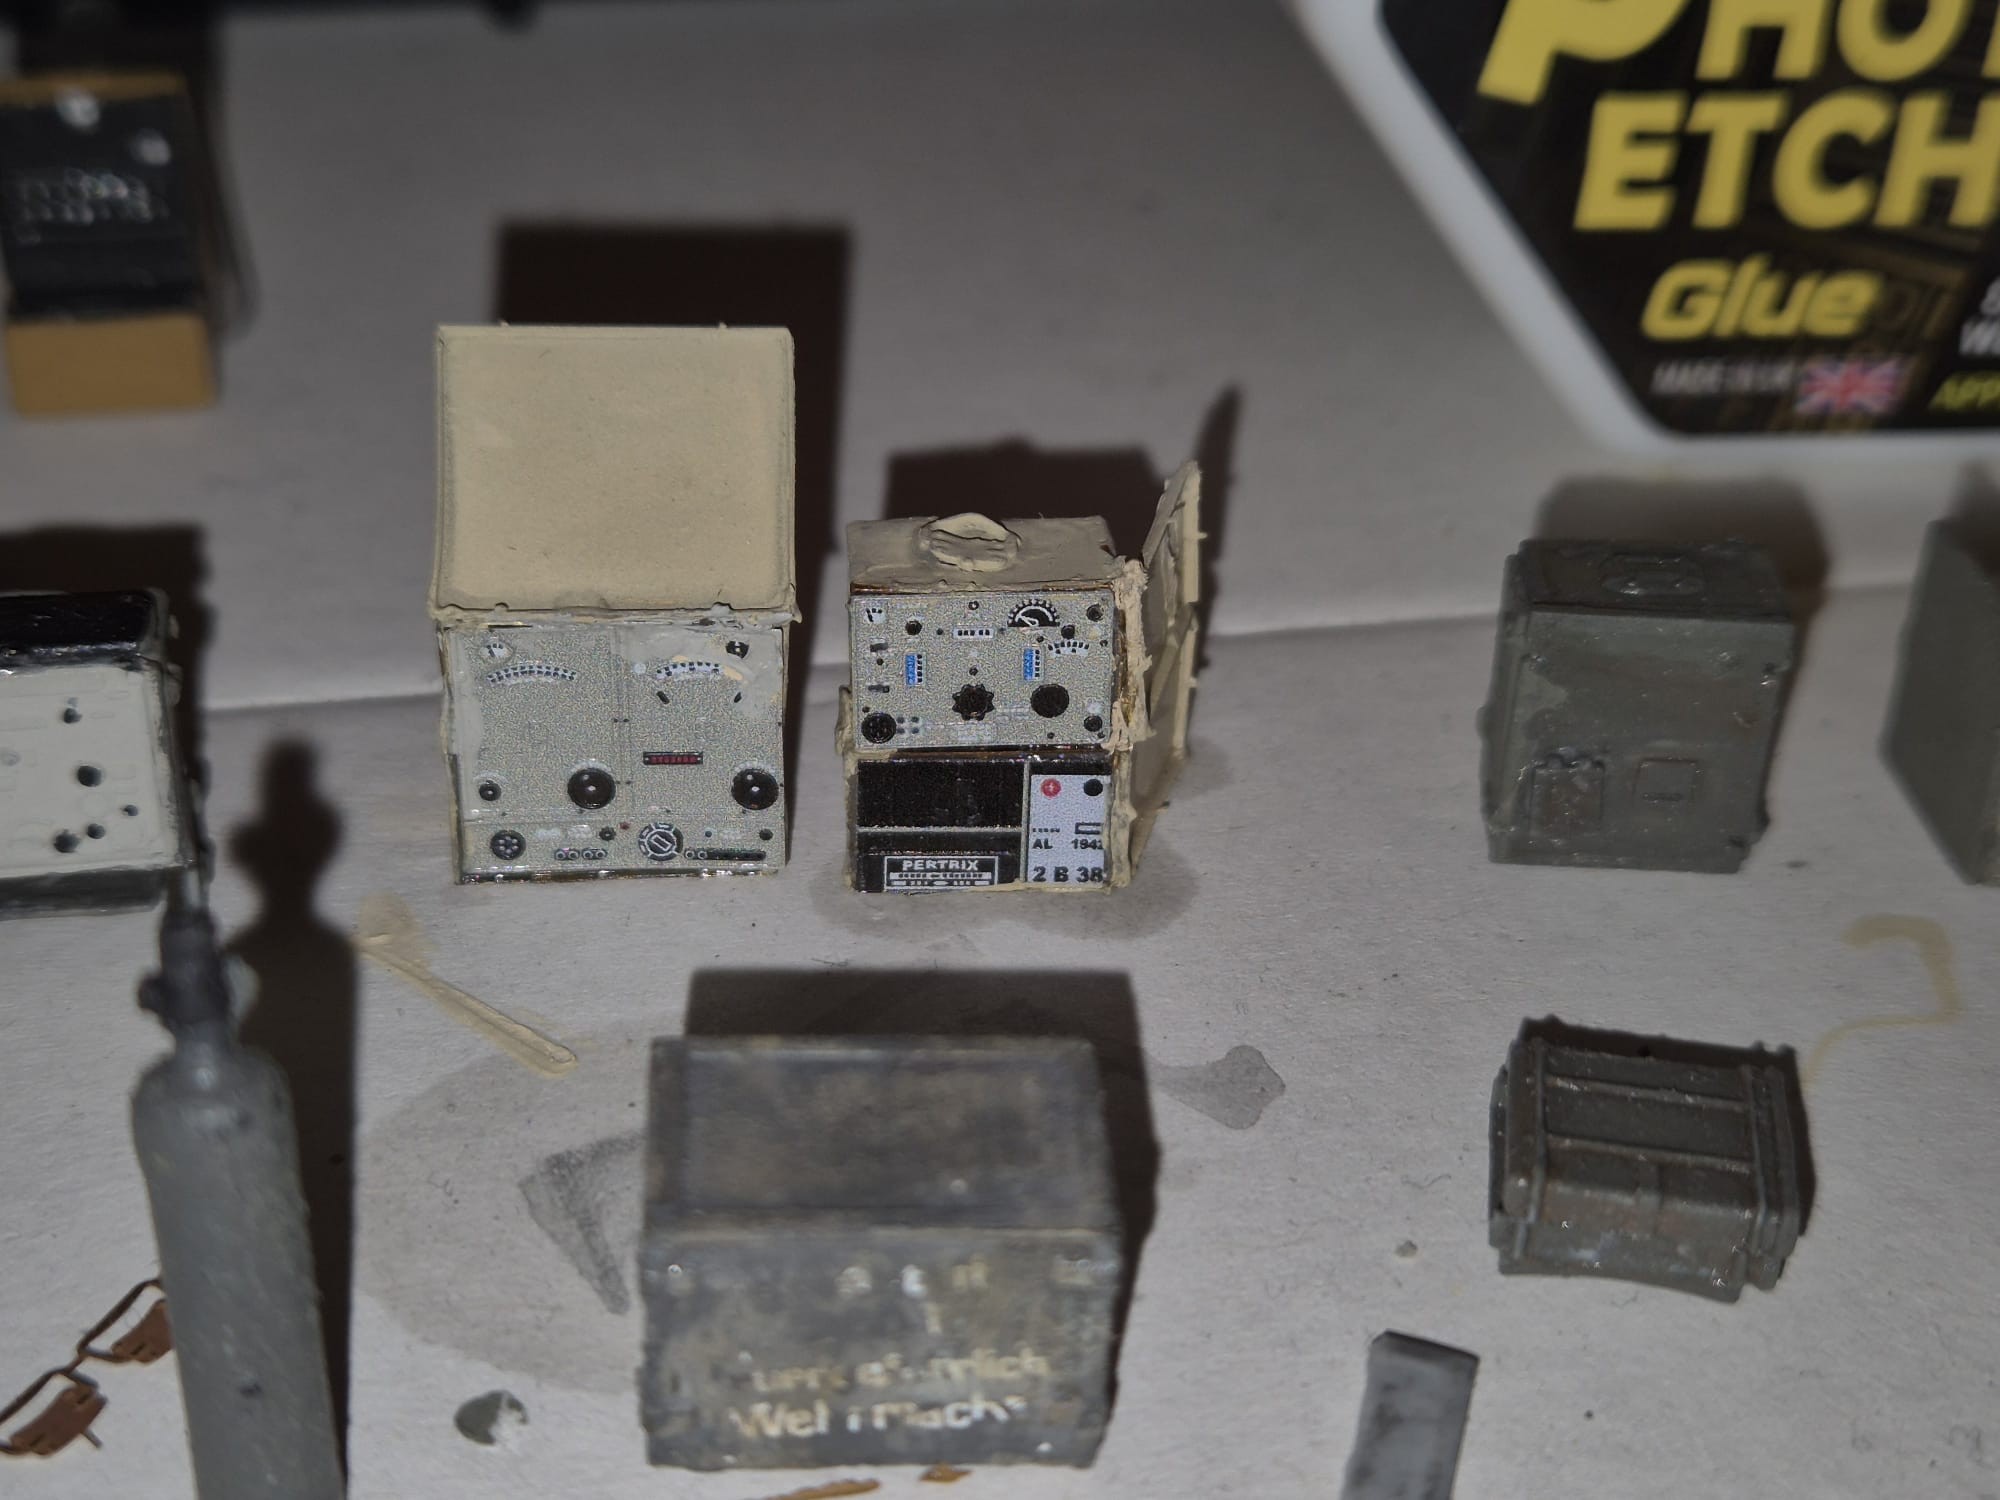
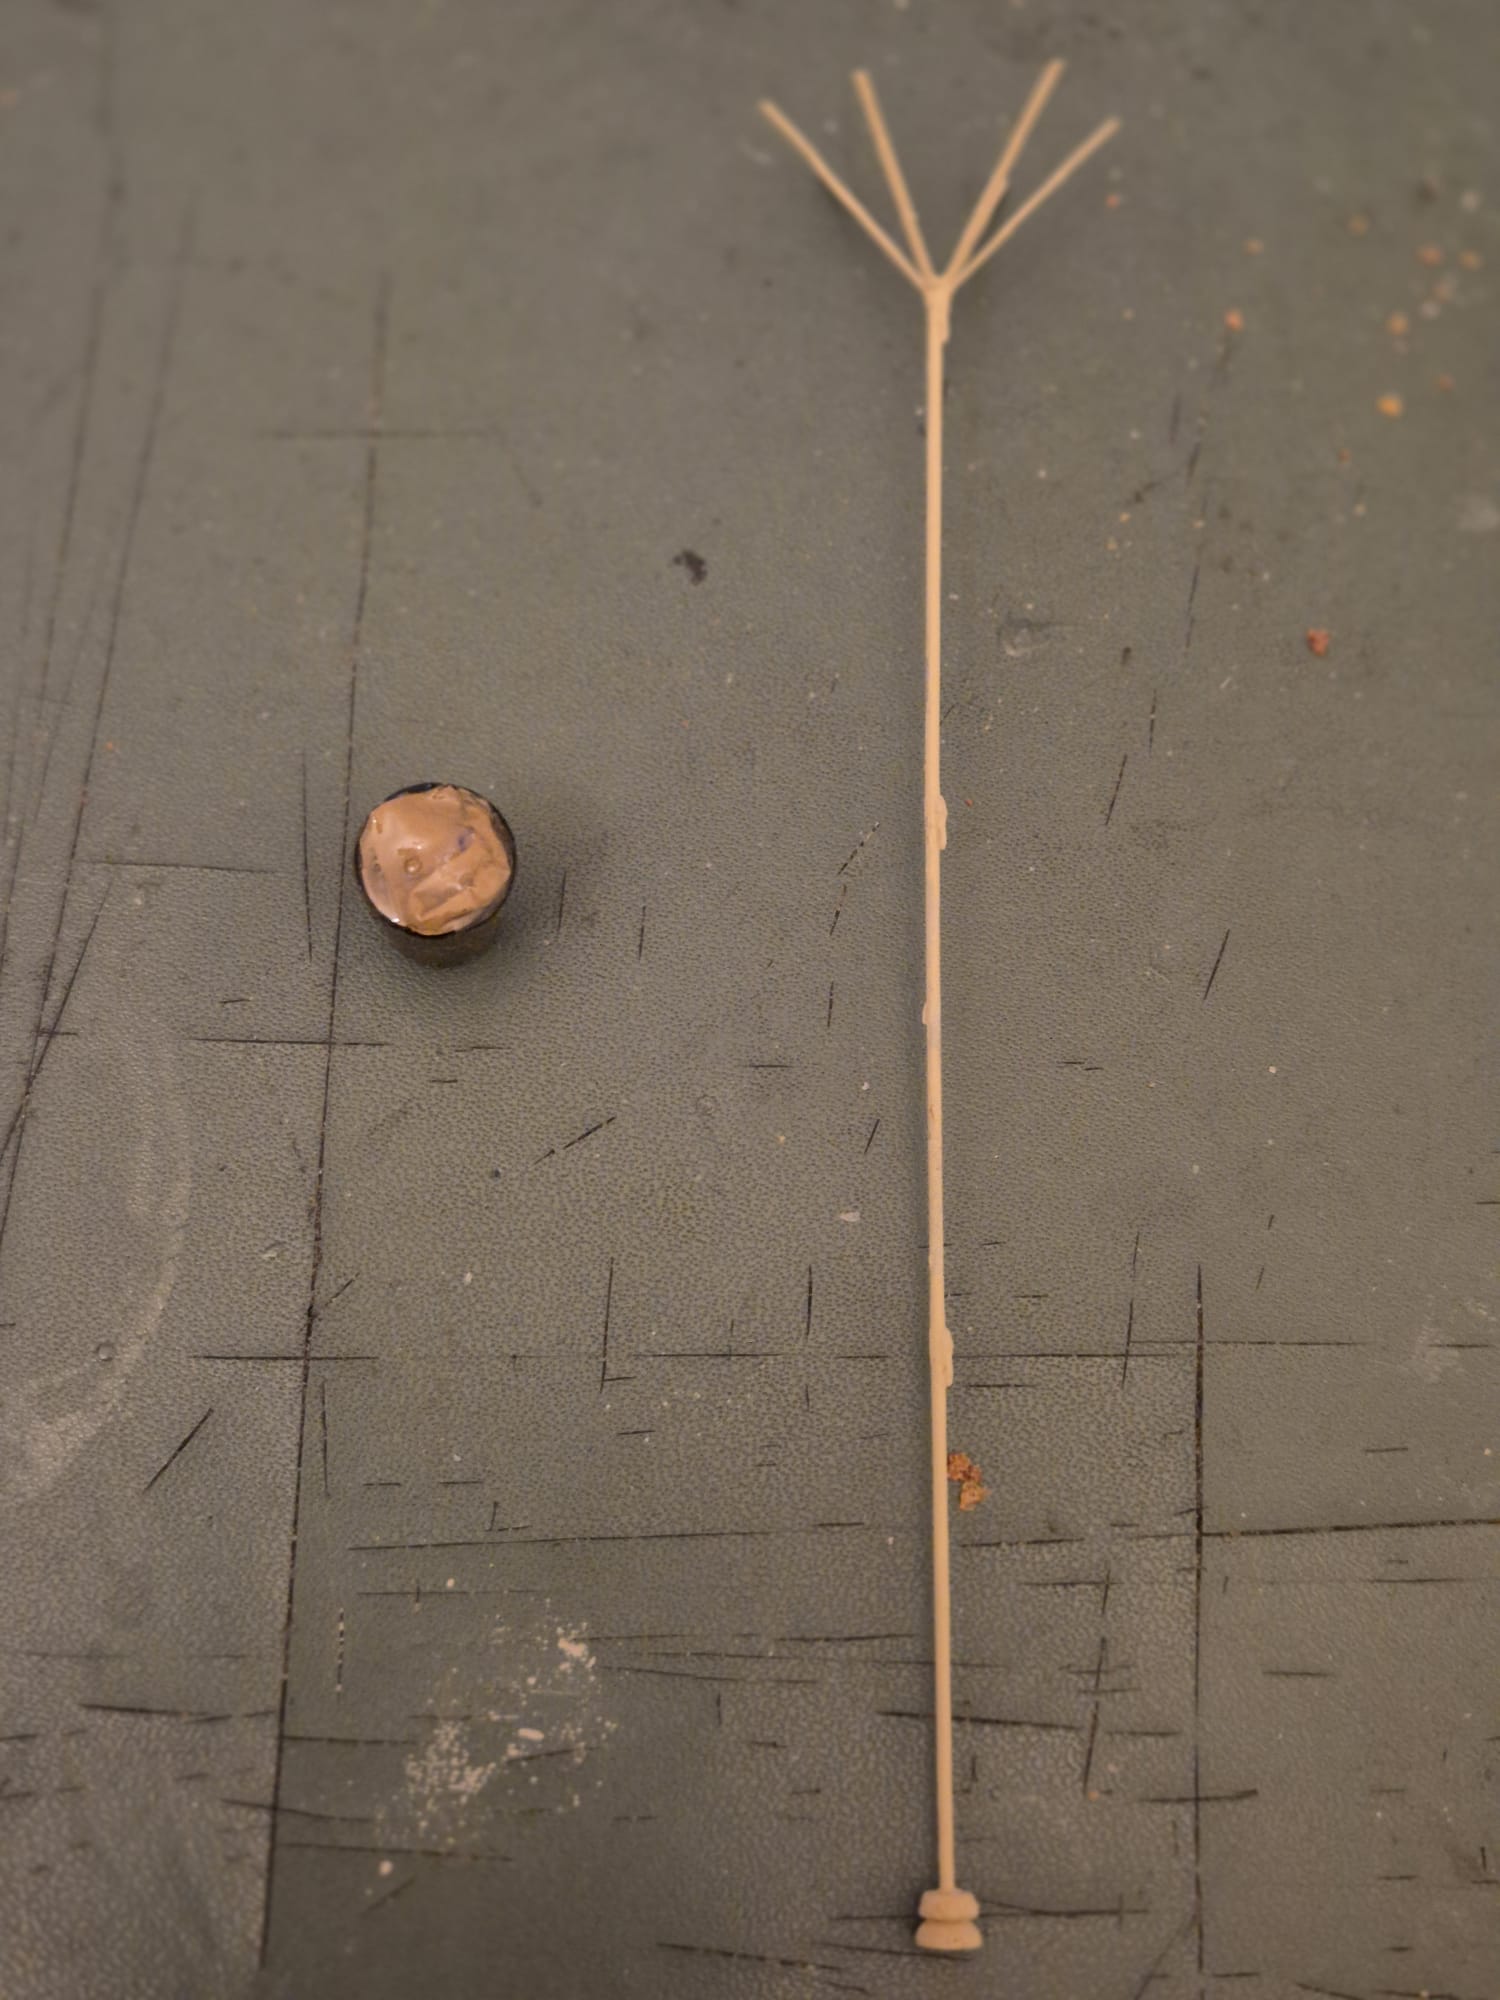
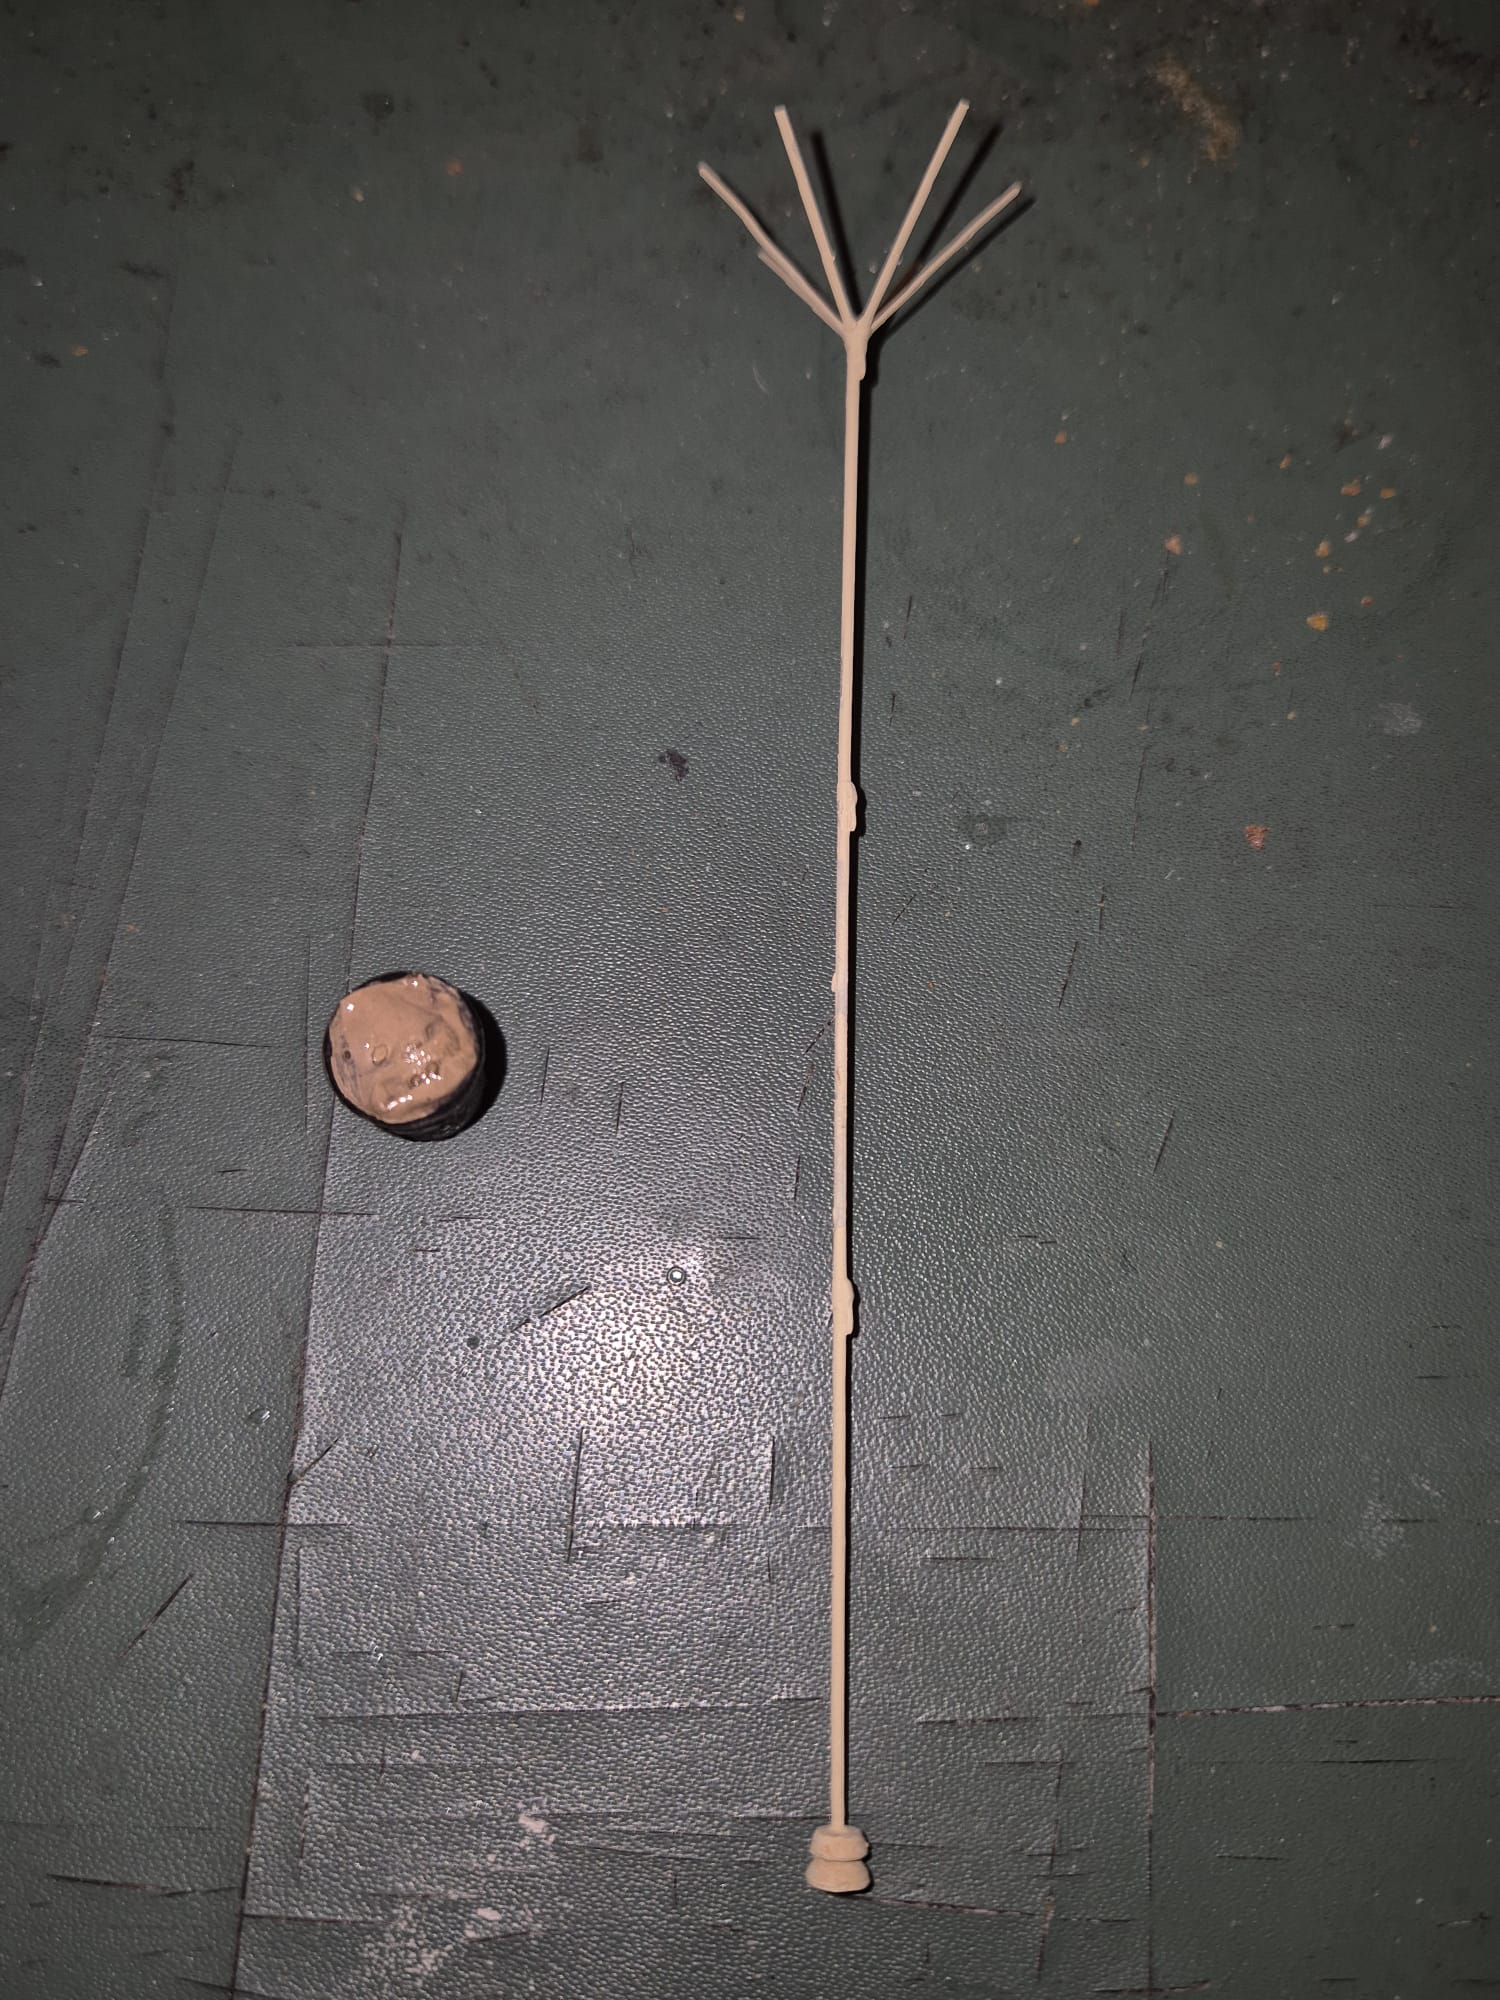
In the next picture you may see the antenna poles that were missing in one of the Eduard models contained in the device’s door (refer to my previous post about the original ones). They were made with stretched sprue, cut into the correct size, glued together in groups of three, painted in German Gray Yellow and the tips in Flat White, then attached with CA glue.


Some more pictures, but this time taken with a flash:


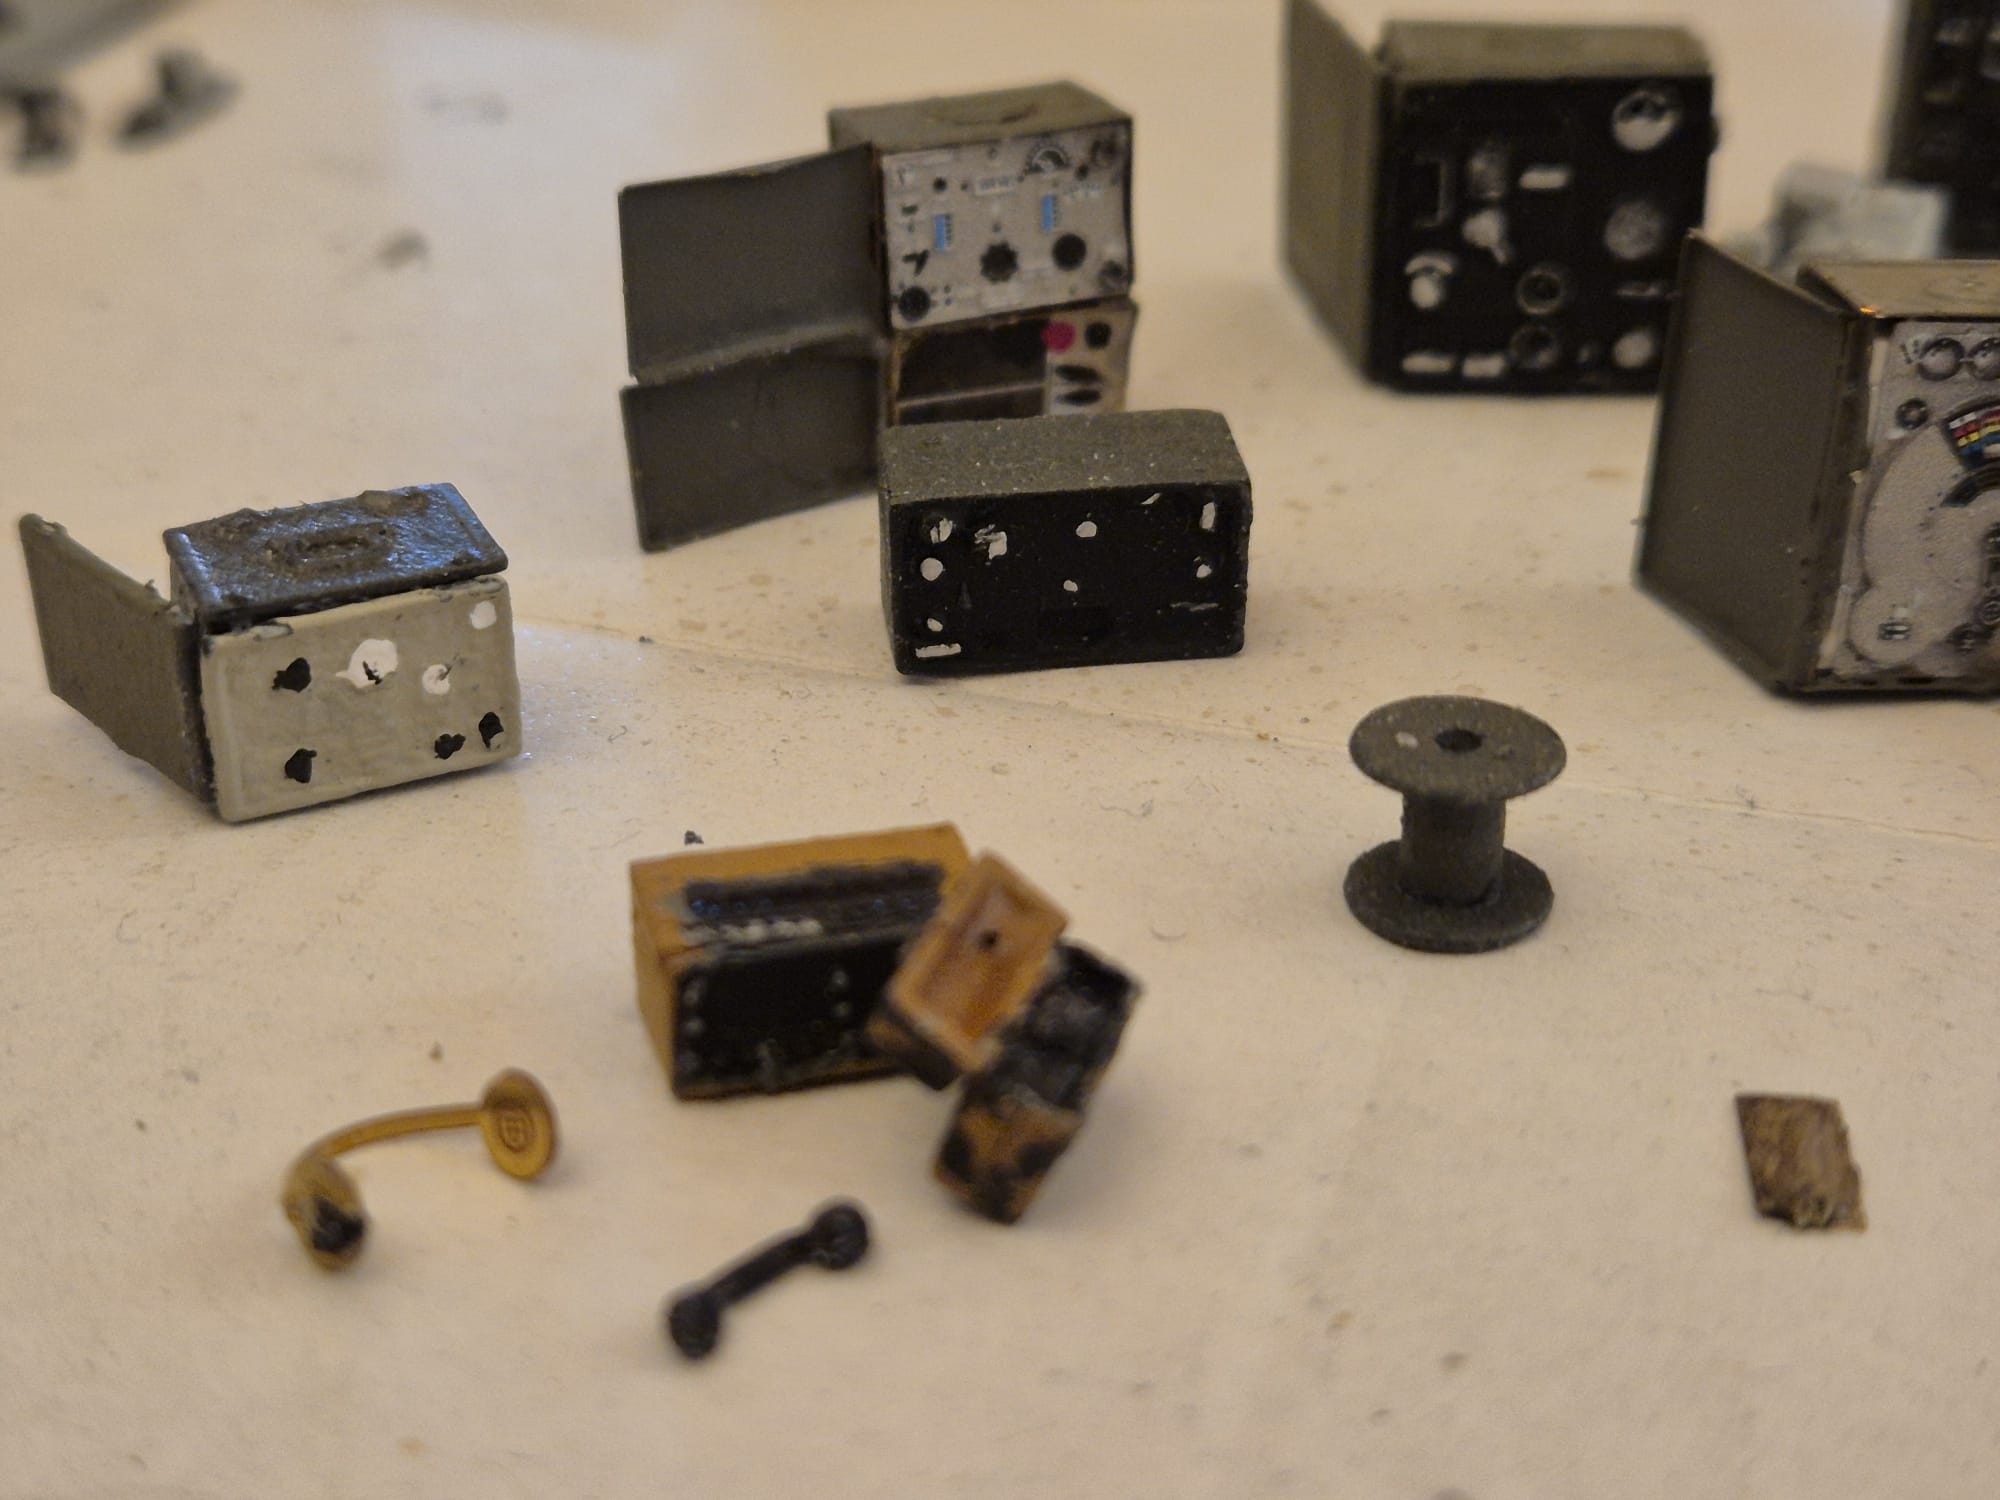
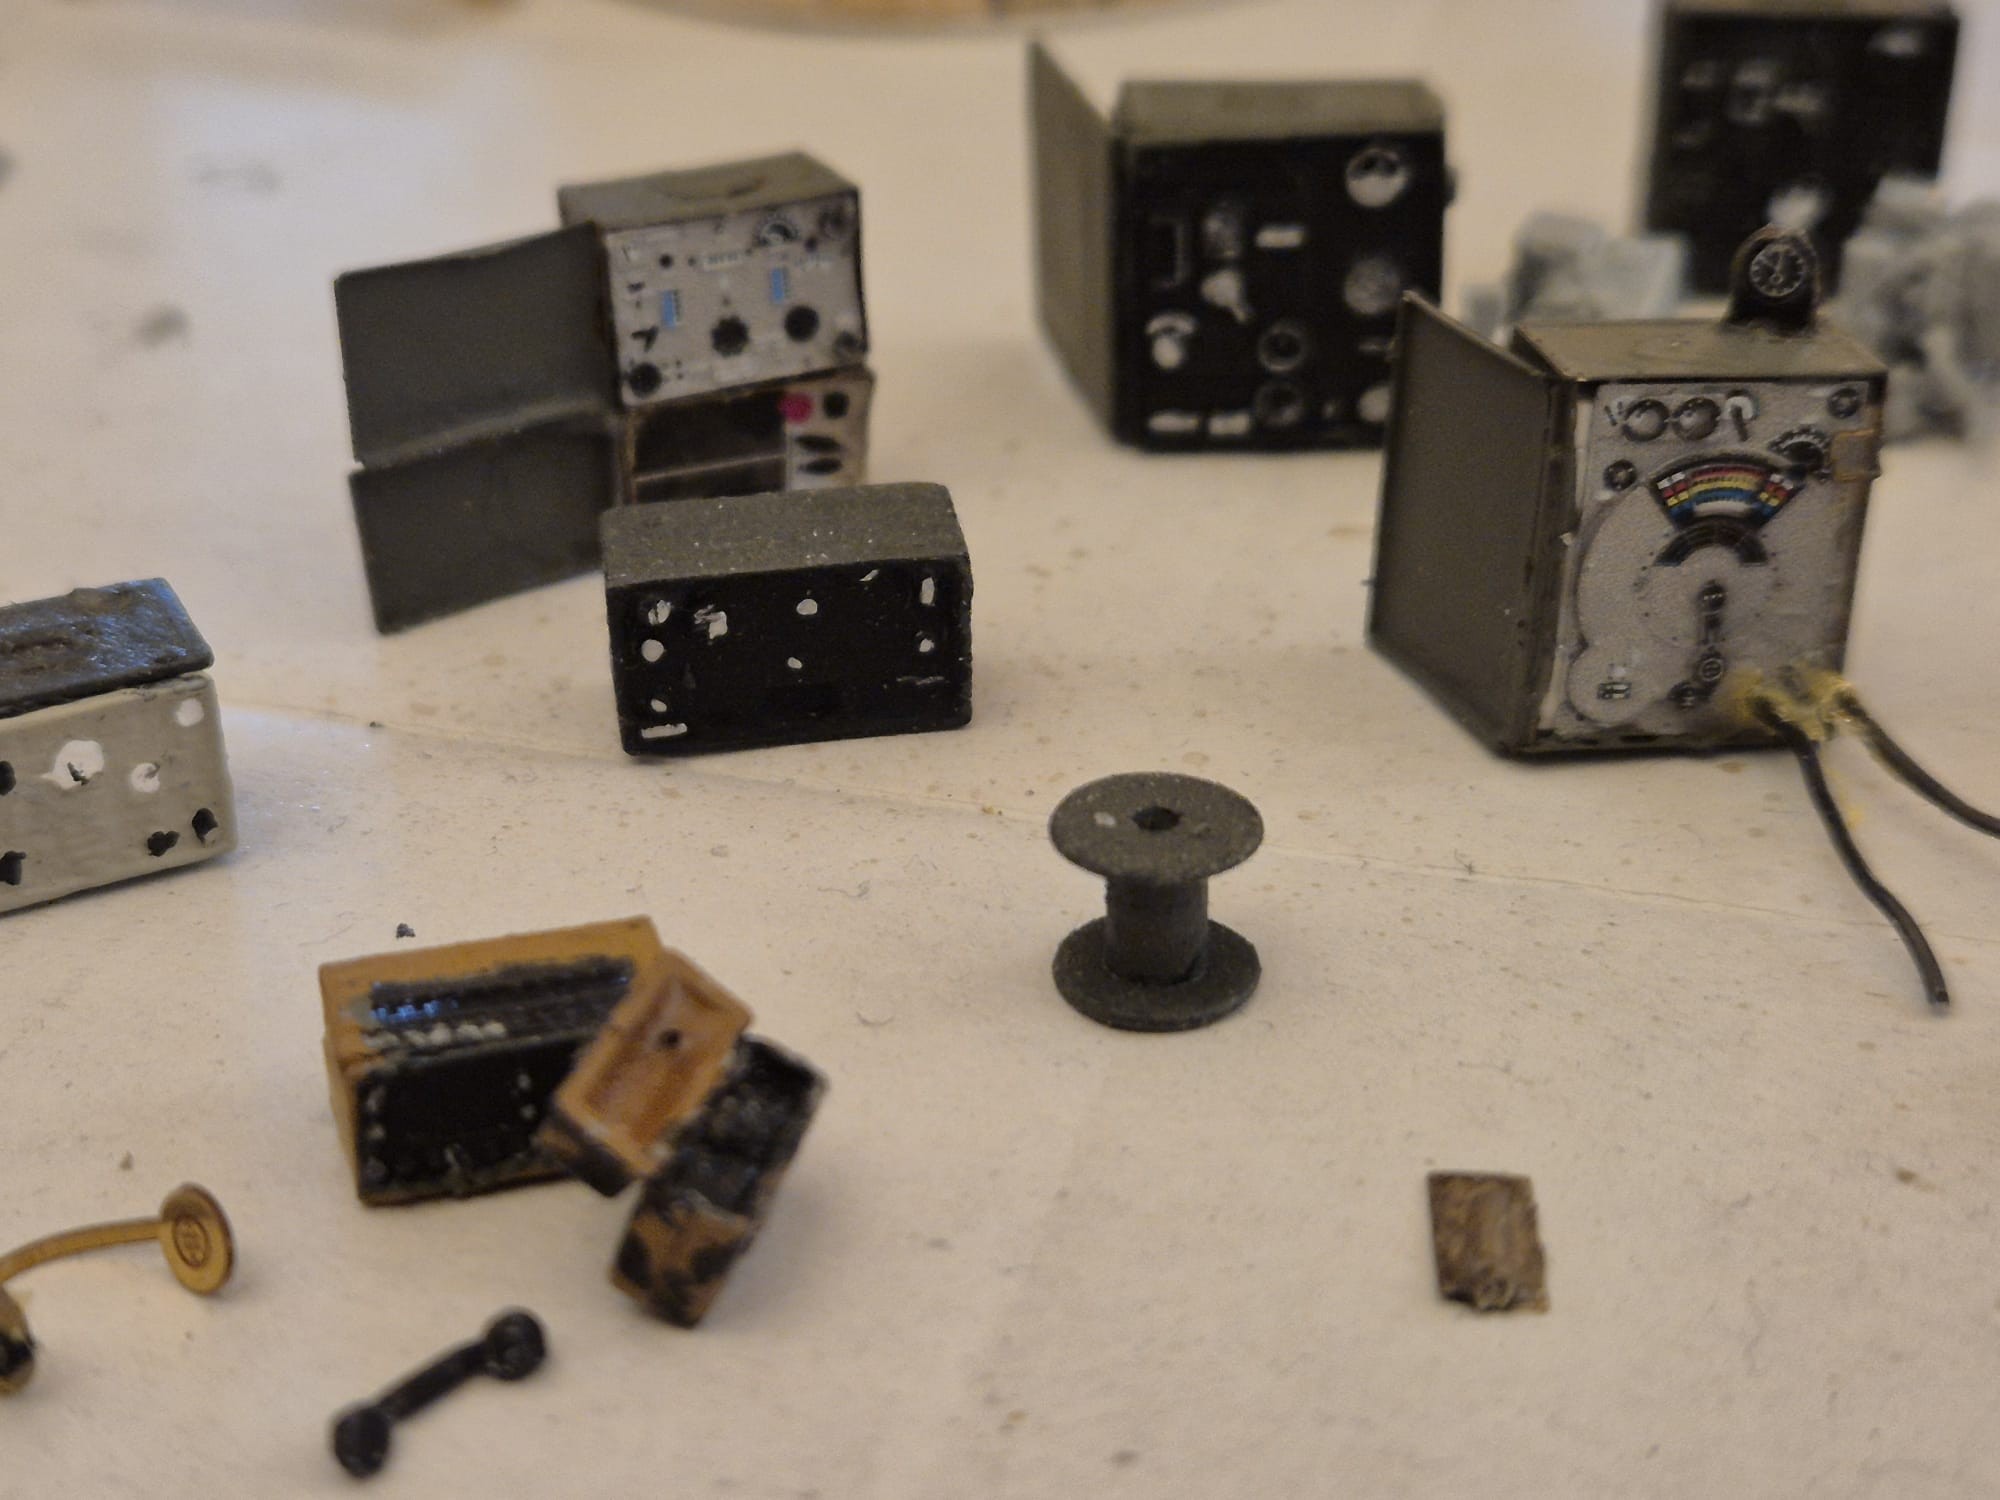
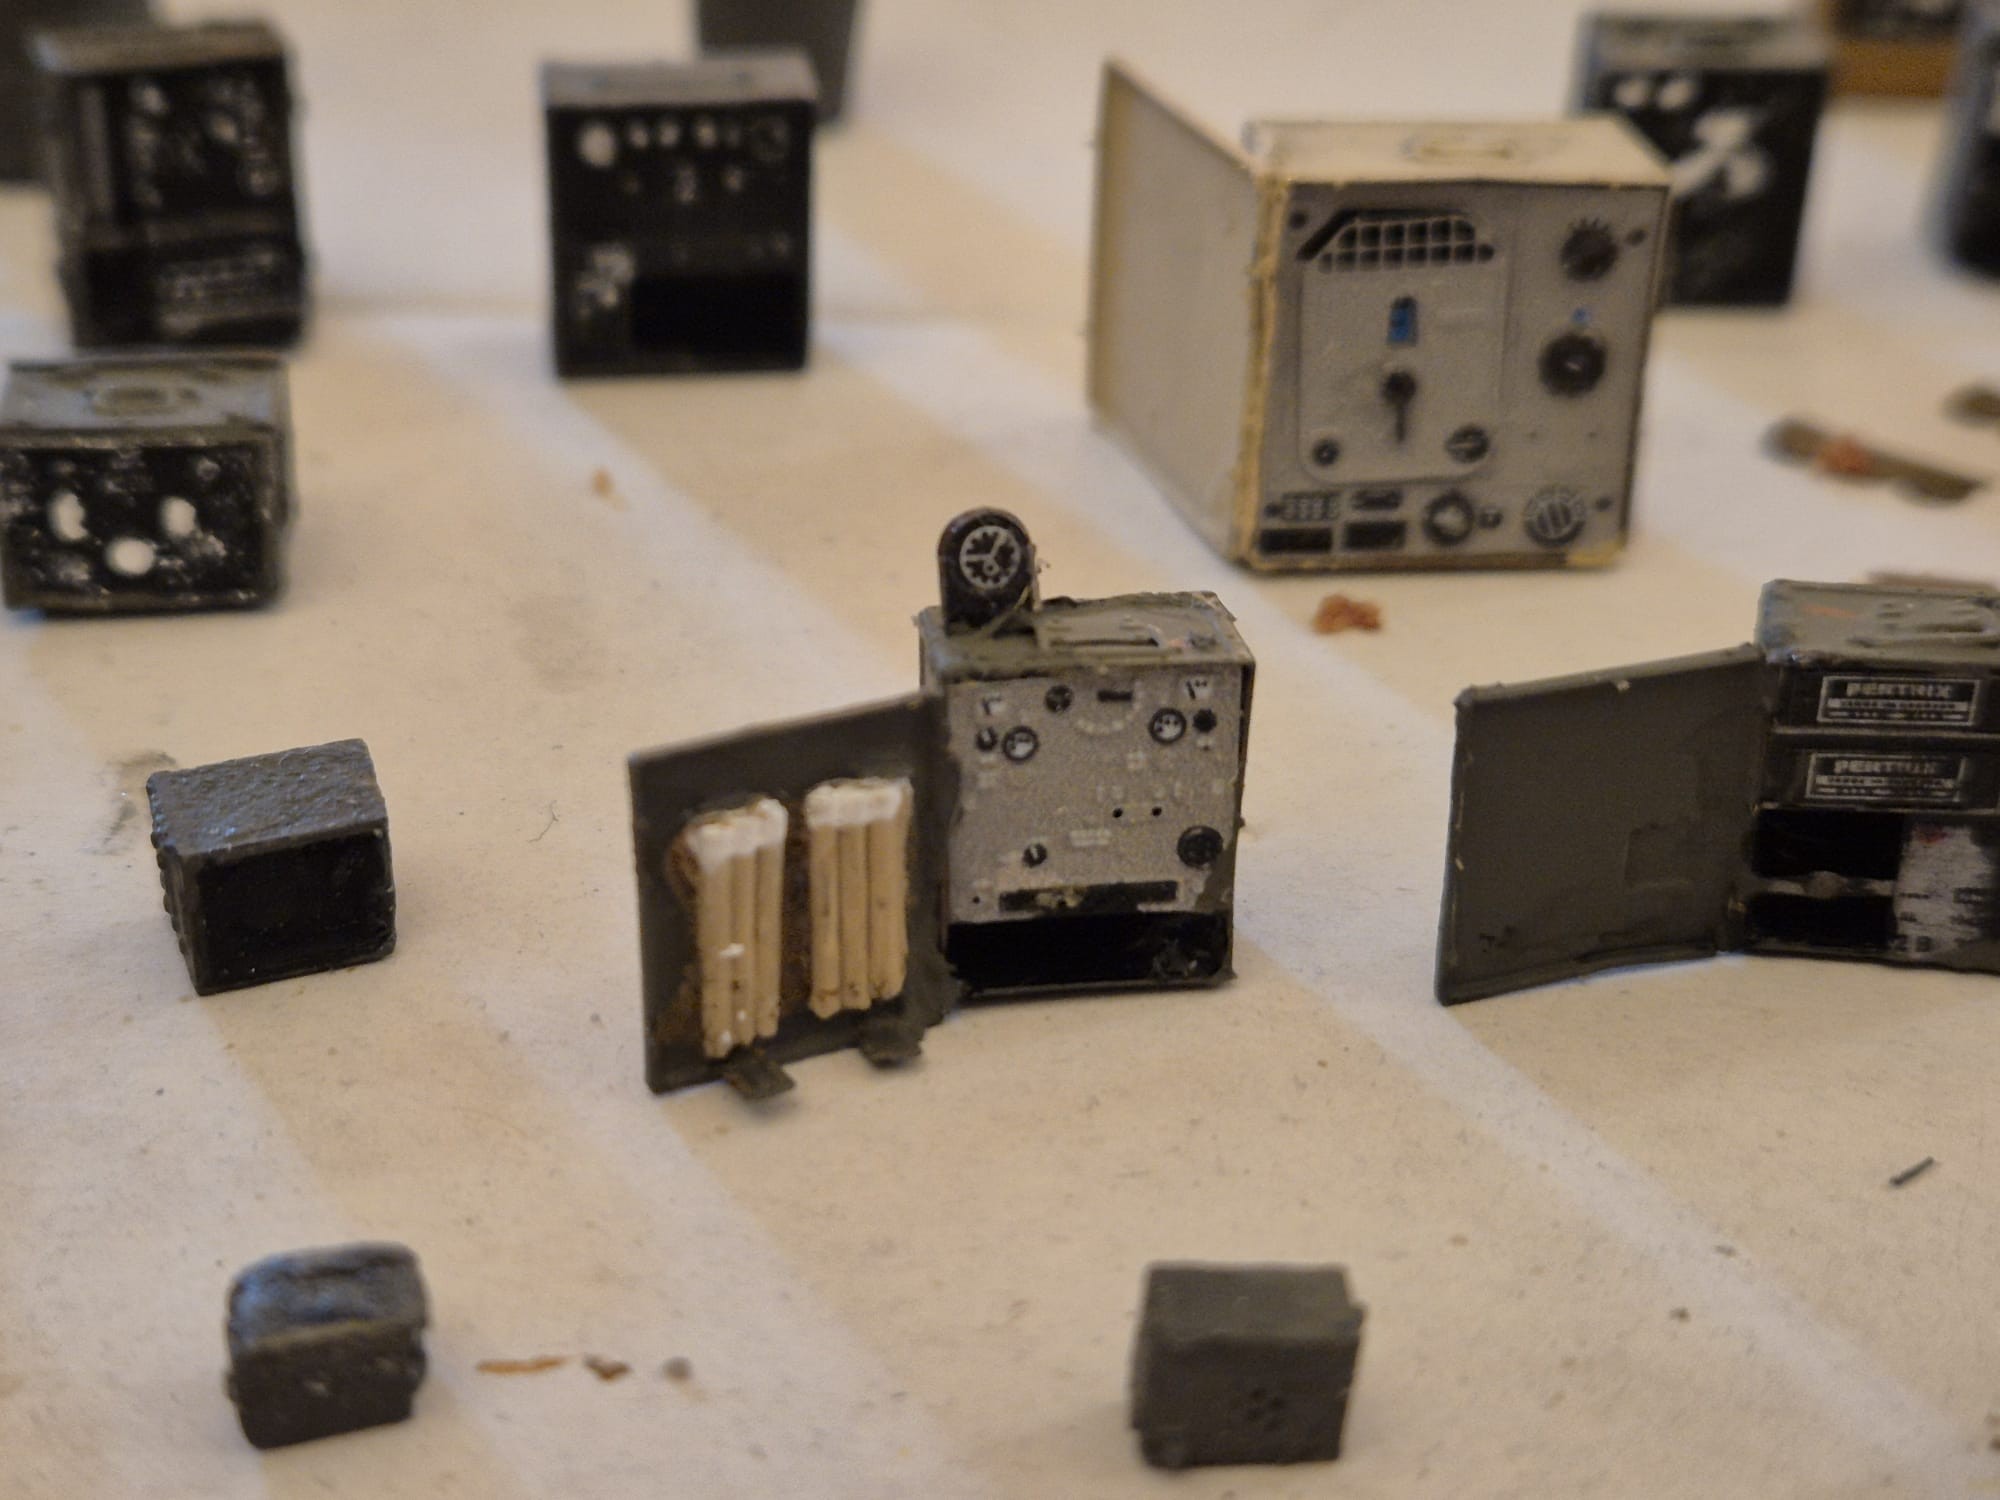
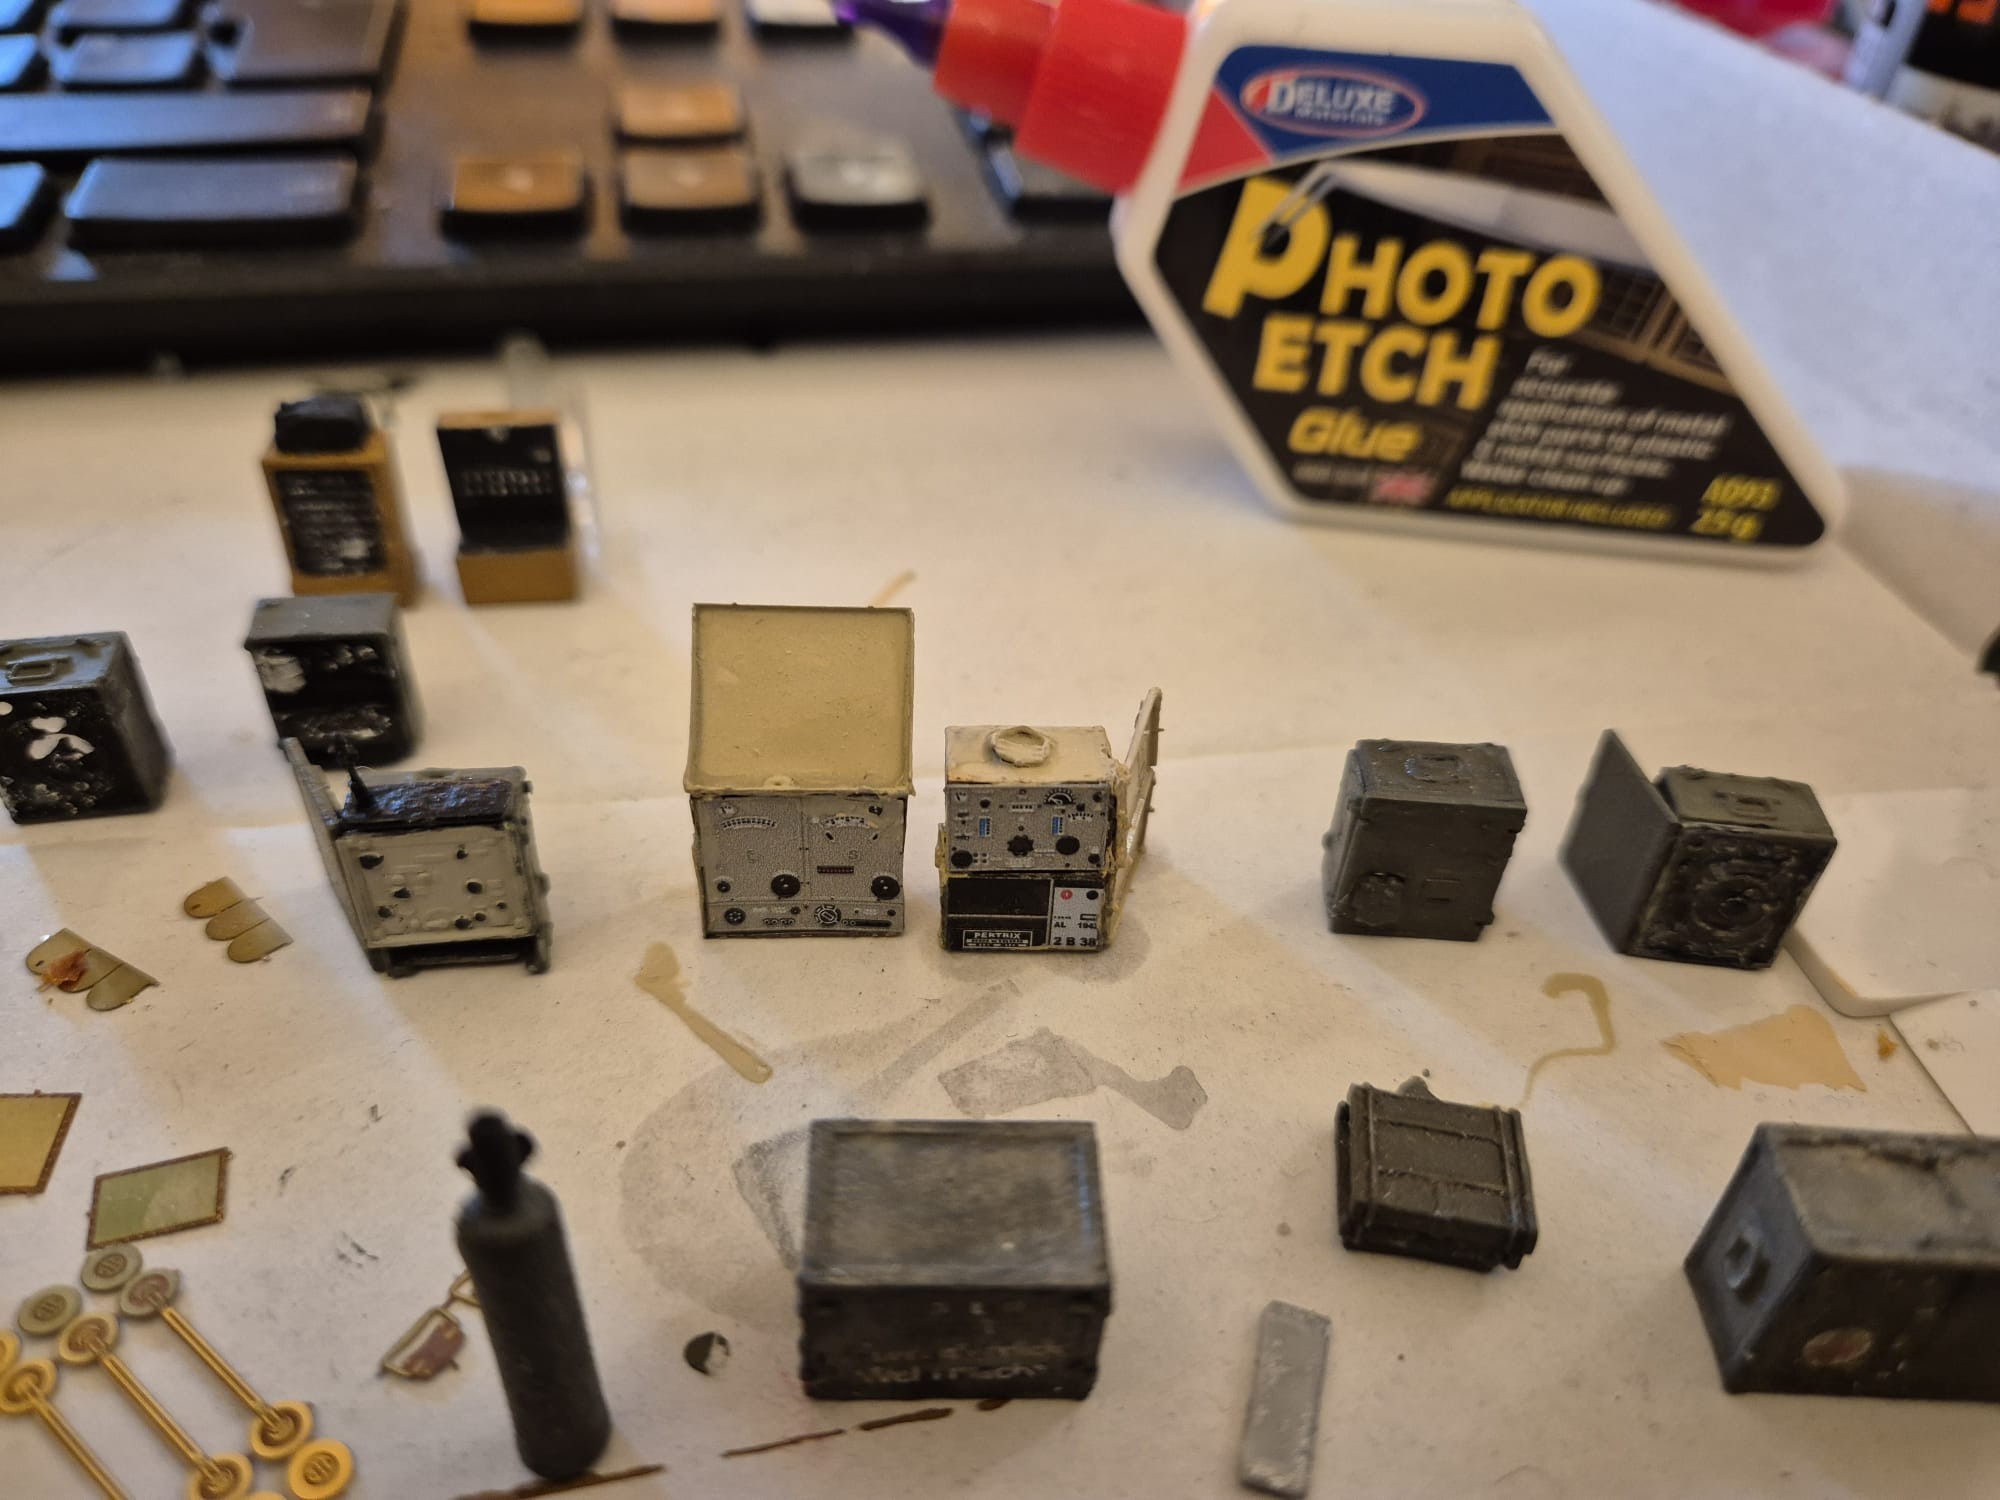
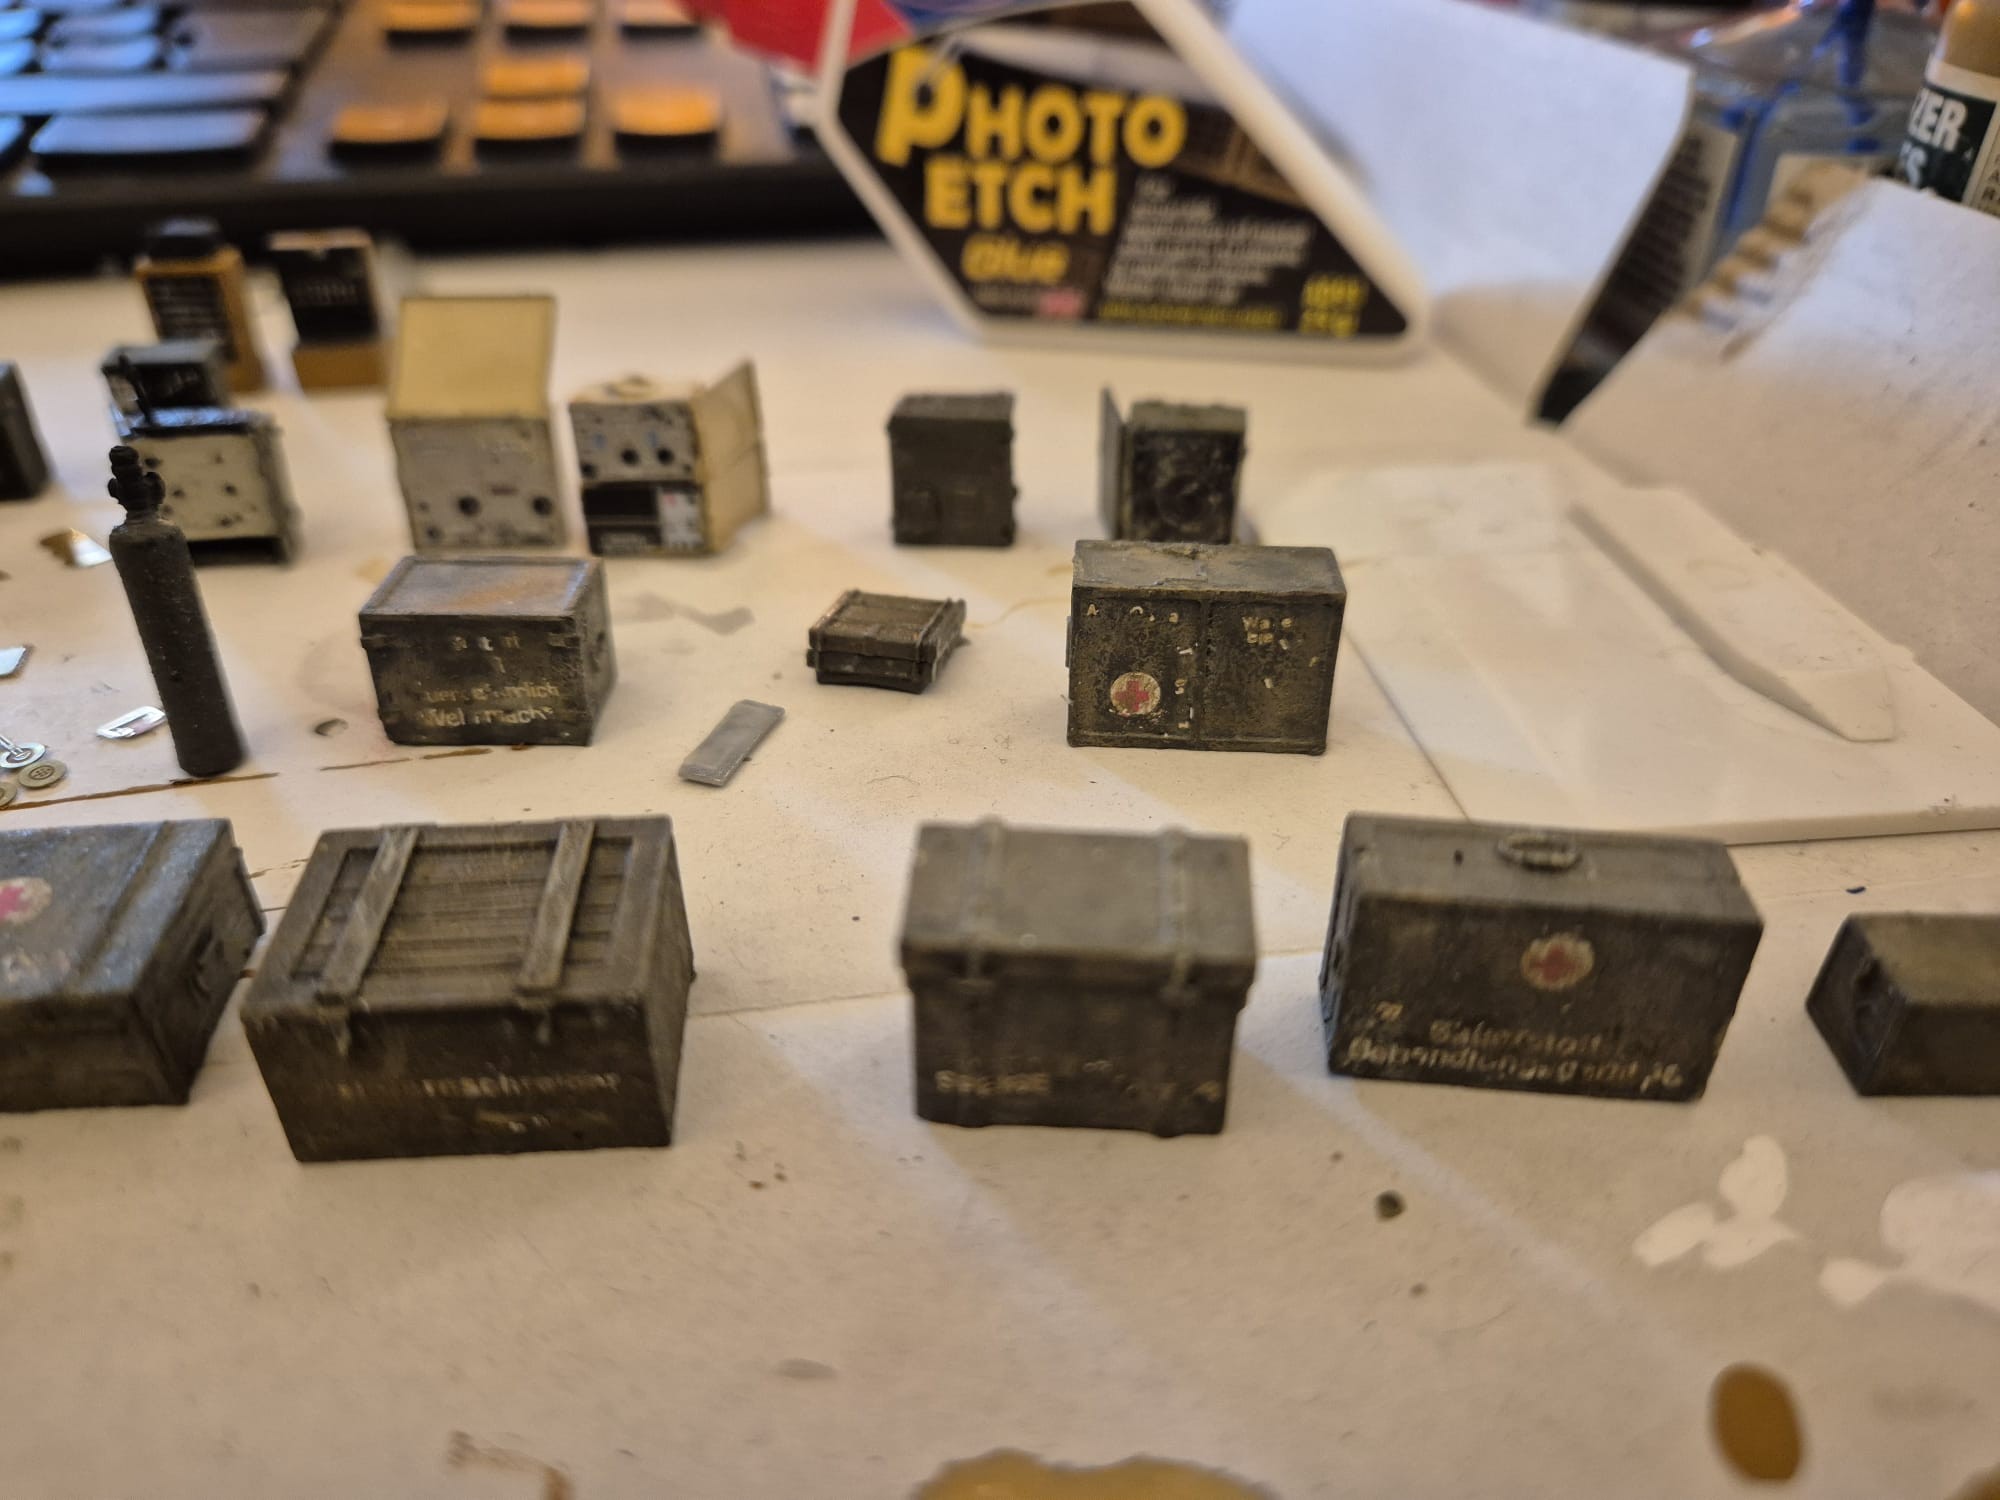
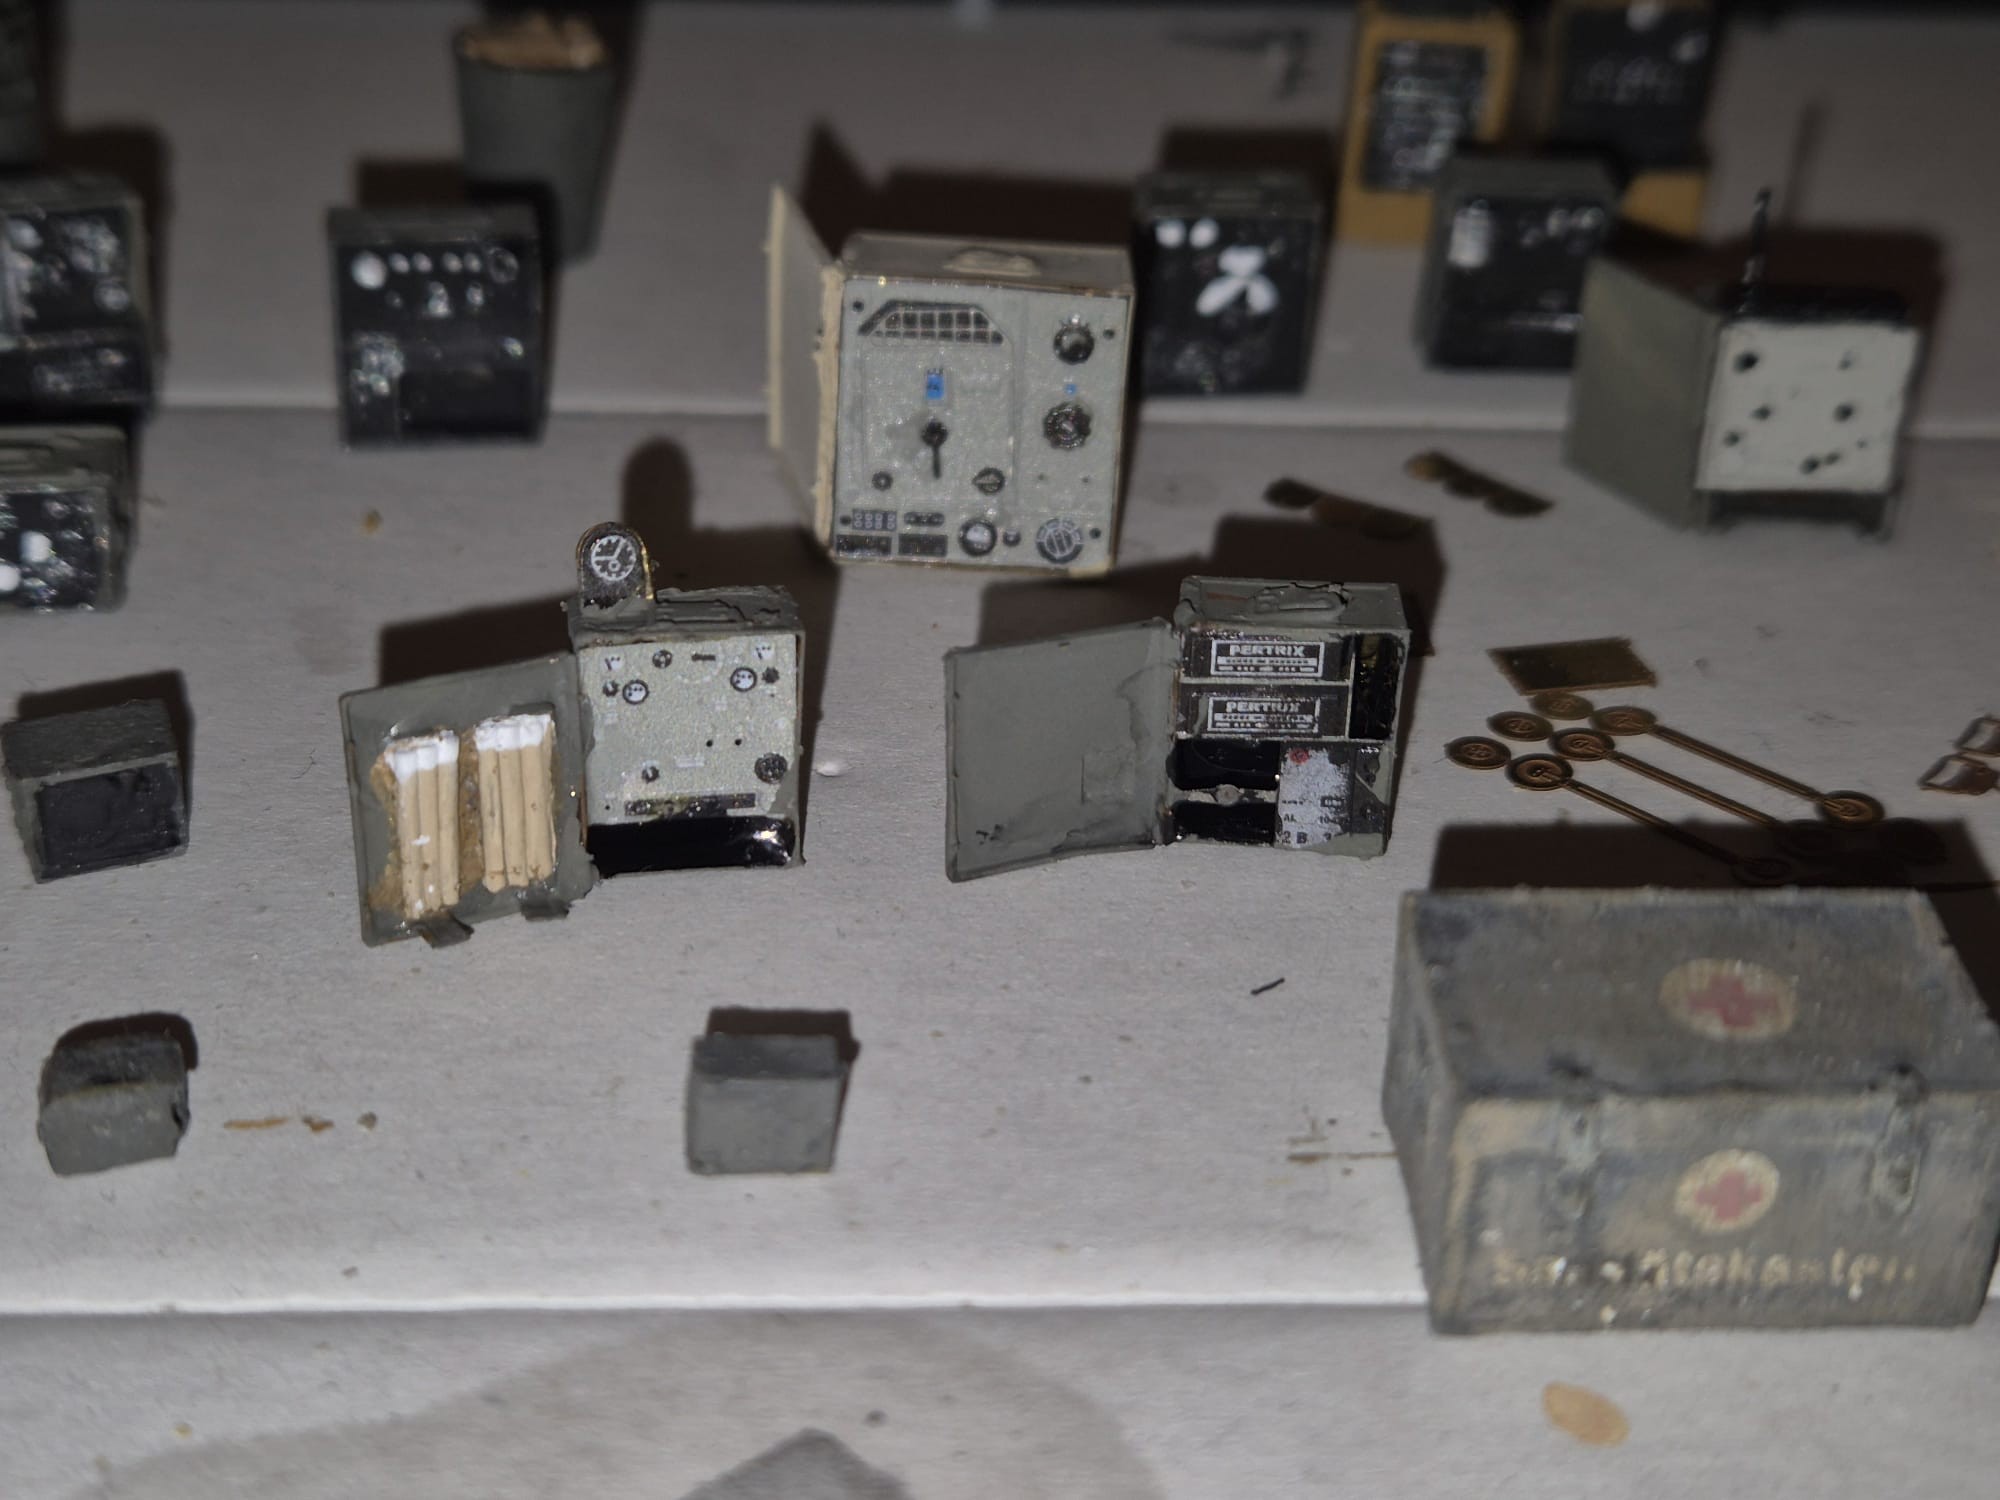
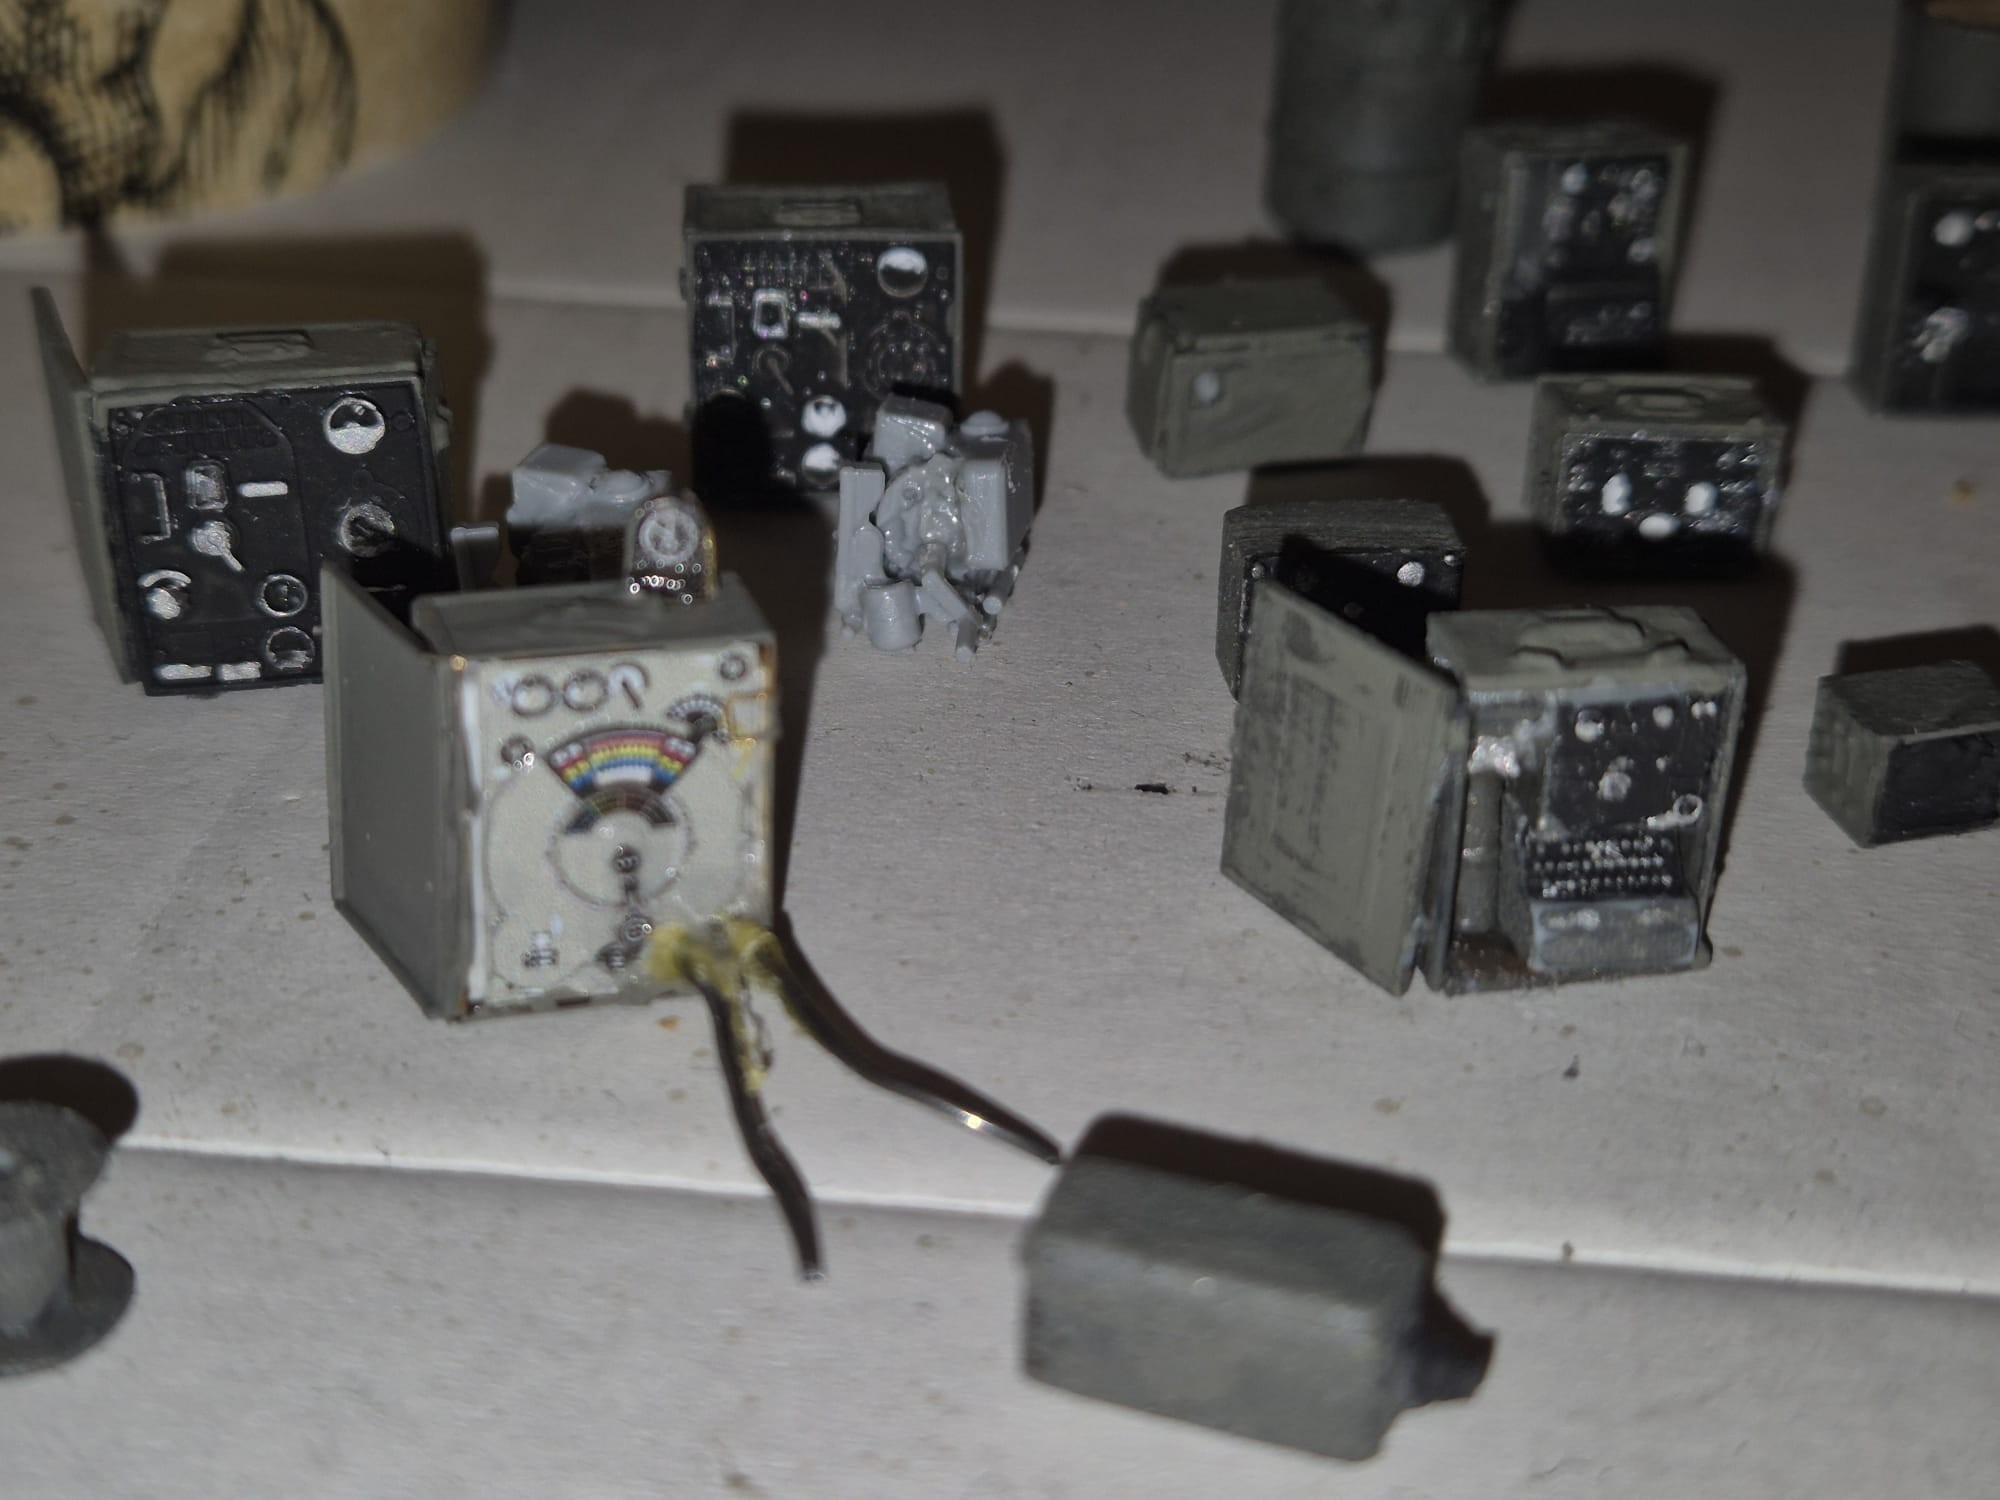
Notice how worn the cases now look. They were dry brushed with Natural Earth, Olive Green and Pale Green then washed over with Neutral Gray and Black washes and subsequently dried with paper towels.


Just finished:
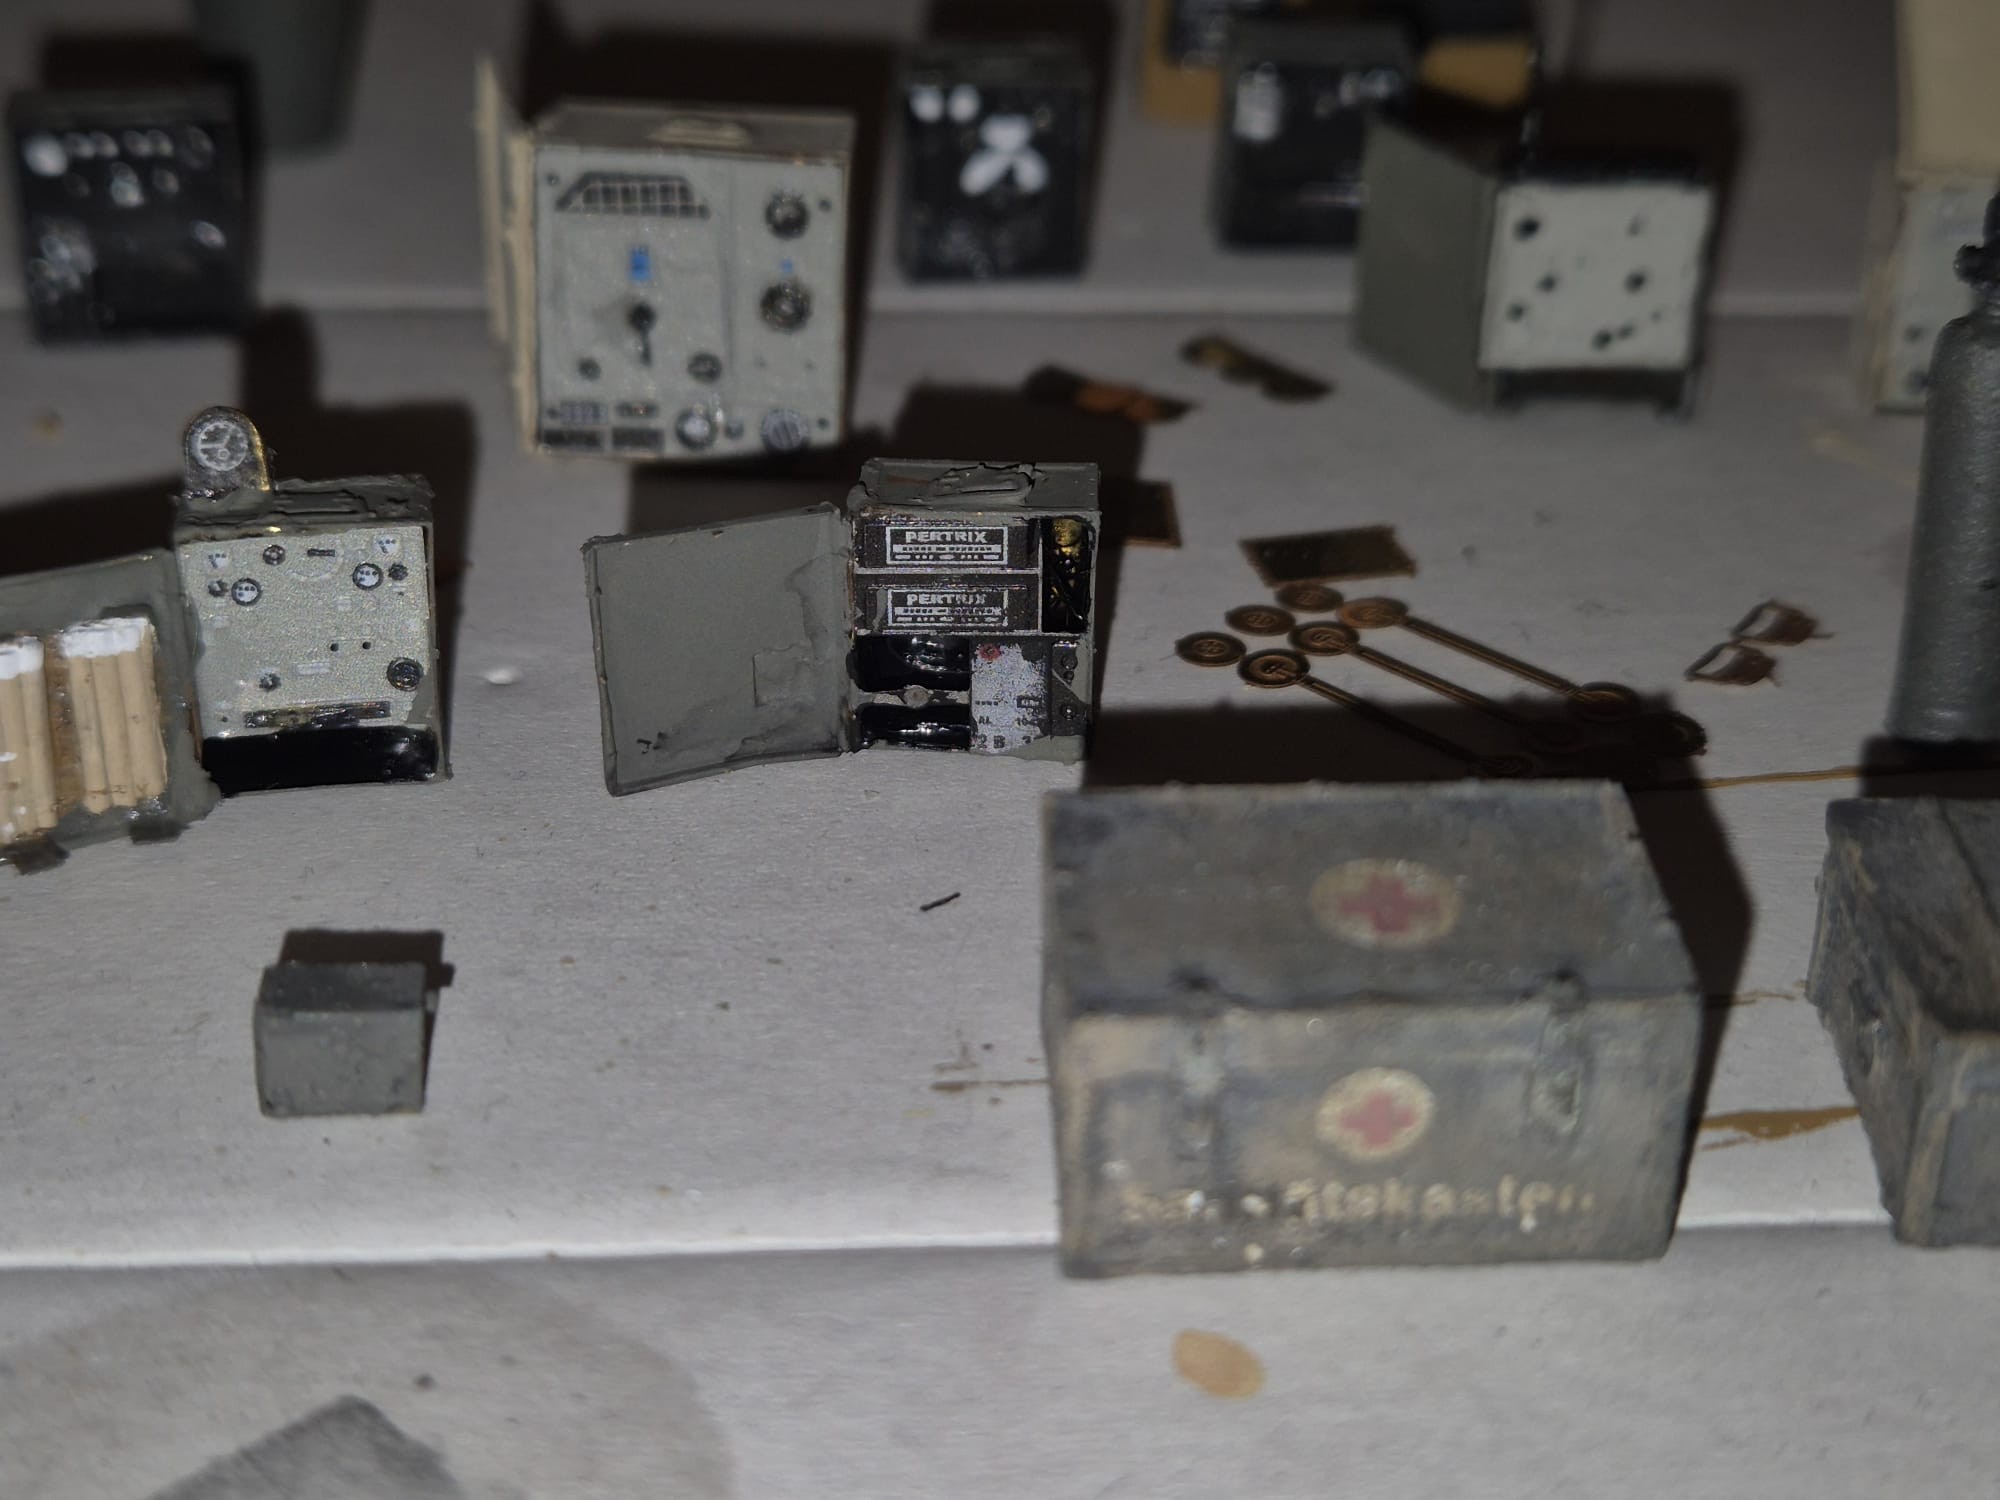
A star antenna on an extension pole which will be fixed on one of the Bunker’s corner surfaces and the Medical Bin now shown with added “Realistic Water” by Woodland Scenics.


What will follow from now on is fixing all that stuff unto the various tables with CA glue then fabricating the various cables connecting these devices to each other with thin soldering flux while arranging all the thin telephone/telegraph cables on the front by wiring them to the devices with thick cotton thread (the planned nylon fibers do not bend as wished and are unpaintable) which will be coiled up and fixed with some CA glue.
Once everything is firmly fixed to the tables I will fix the entire complex under the Bunker niches. The larger devices which do not fit into the niches will be glued unto the previously built wooden table and cabled the same way. The remaining devices will be used elsewhere in other scenarios.

The medical crates and boxes will all be placed unto the Krupp Protze vehicle, while the medical disposing bin and the incinerator will be located by the trench entrance supervised by an officer.

I will be back with more once the entire complex is finally mounted and I will commence building some of the vehicles.

I hope you will continue following my progress because there is still a lot of building, painting and decaling to do.

Until then, enjoy your hobby as I do.

4 Likes

I have to say that all of those pieces of equipment and wooden foot lockers look absolutely real.

4 Likes

Thank you Aggieman (Steven M.). I put a lot of effort into them and despite their very small size I tried to make them as natural as possible and some indeed look good, others instead not so much, but were treated as best as I could with the tools I currently have.
I wished there were a plating machine for such tiny devices in which one could reproduce those tiny faces of those devices by just using an image and transmitting it to the machine from a PC.
But then all the fun would be diminished and it would be an artificial mean of doing things, of which I am indeed against. I prefer doing them with my own hands and eyes and accept imperfection as being the limit a common man can reproduce.
This said though being these so tiny, no one can actually see all the minute details in them, except maybe, by comparing them with the real thing.
But in a way I tried to make them real for my tiny operators who will fill the scene in a very near future. They deserve as much attention as those who actually worked those devices.
Reality is a tricky thing. After all, all I am doing is framing just one moment in time as if it were a picture taken, but in 3D and in color, instead of being flat and in Black & White, and what’s more, it can be seen from different angles enhancing the viewer’s experience and perhaps also adding that kind of detail that so very often is gone missing in a simple photograph, not fully explaining what and who was doing something at that time.
In a strange way, it is also like a static time machine that allows you to better understand what people went through in those fateful days, and this not just through the eyes of officers, but also the common man, or better, the common soldier.
This is why I try to be so picky on my subjects, since I try to honor the memory of those who lost their lives to see us enjoying freedom and perhaps remind some others what would be the risk of loosing it should we once again blindly believe the lies of demagogues.
But enough about that.
Just know that I am very grateful for your kind comment and look forward to keep your interest in my projects running.
I, in return, will do the same with any subject in which I can say something useful and admire the vastity of creative thinking around here.
Be well and remember that only the sky is the limit! The rest is up to us.

1 Like

I’m loving seeing this project come together! Each post brings new details brought to a stunning but gritty realism, like a low-resolution image getting the Blade Runner (1982) “Zoom - Enhance - Zoom - Enhance” treatment

Are you considering collating the posts somewhere? I feel like an aspiring dioramist could really benefit from that.

3 Likes

Thank you pr154, I used to post a lot on Facebook until one day I was totally blocked by their algorithm because I “dared” post some reproduction camouflage uniforms of the WSS German forces trying to explain my technique in painting them in 1/35 scale.
Despite my clear disclaimer that my site was apolitical and not involved in any kind of propaganda Facebook decided to block me for good and not even my explanations to them served any real purpose. I actually never received an answer or an explanation for it.
To add damage was the fact that I also was an administrator for many other pages and sites there and all that disappeared completely and all my material in all of them vanished completely, including some upscaled videos of Babylon 5 episodes on the “Babylon 5: The 3rd Age” site I did post there for those who couldn’t watch them anywhere else.
I was blocked for over a year and only with a ruse could I finally reenter, but ever since then I haven’t posted or created any more sites of any kind. I just managed to rekindle my contacts with a few people I had befriended there earlier. Ever since then I have become very cautious of what I post or discuss on such sites.
Alas, we are living in a paranoid world, more and more restrictive of free speech or even just artistic expression, which was my sole interest in life.
And so, to answer your simple question, yes I have thought about it but I am still living in the fear that someday someone may once again erase everything I have posted, for any capricious reason whatsoever and therefore I have been restraining myself from doing so.
Should I be made aware of a secure place where one’s creations and ideas are fully respected and understood as being just an artistic expression and not either politically or religiously biased, then I would consider it indeed. But as I can see, even the most liberal ones get slowly swallowed into the den of iniquity that the Internet has become these days.
This is why I have tried to trust Finescale Modeler, since I used to collect many of their magazines in time always finding some useful suggestion or trick of the trade to enhance my own modeling experience and why I finally decided to join the active conversation among peers.
My only hope is that this space will always remain as it is and not gobbled up like many others and remain embroiled in stupid political or religious intrigues, which to me are just a complete waste of my creative time.
Should you be able to point me to such a site as I described, then I would welcome your suggestion and try once again to set up my own modeler’s site there.
I thank you for your kind suggestion and will try to post more pictures of my progress in a near future.
Be well and have fun with our common hobby, which for me is slowly becoming my real work of passion.

2 Likes

Ah yes, I too have fallen foul of the Facebook banhammer when I was creating gaming content. The work product was still there, but my page was effectively isolated from public view. Unfortunately there are very limited avenues which are available to a small creator to understand what exactly they did wrong, much less to appeal such a decision.

Without seeking to hijack your thread or tell you how to “suck eggs”, I’ve been managing my own project postings under a “Build Log” style. The individual post/update method you’ve been doing to date is also perfectly fine for sharing your exploits, but it’s harder for an aspiring dioramist to follow your method step-by-step. Opinions on whether the individual update or the build log is the superior method vary in this forum, hence my endeavours to treat the topic with caution and utmost respect for ones own personal preferences :sweat_smile:

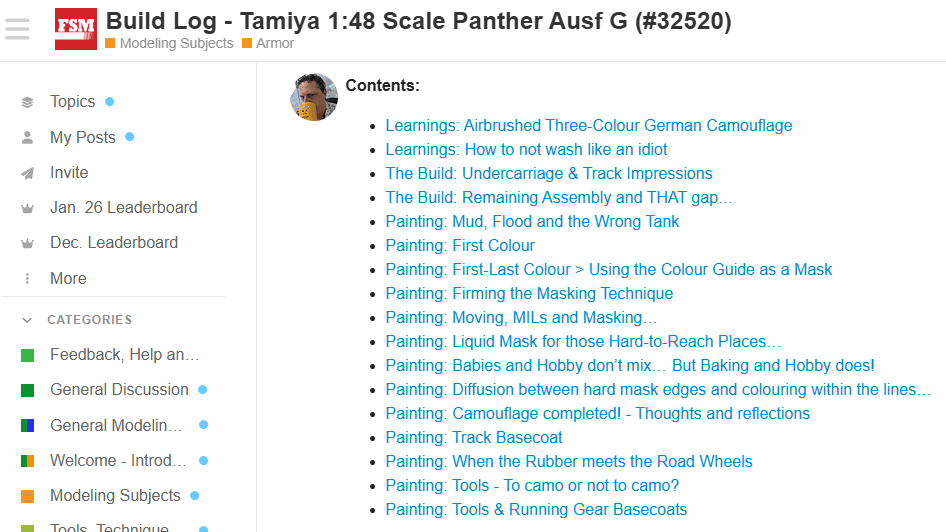
A happy medium might be to include a contents page, which could link to the preceding posts in order. This is something I’ve been doing even within a topic, so that an interested party might be able to find the step that interests them:

Without wishing to make assumptions of your techno-skills, I would be more than happy to generate a copy-pastable slab of text and links that would allow you to replicate a similar sort of contents page. This could allow you to continue to post individual updates within FSM Forums as you’ve been doing so dilligently, while providing access to the foundational content that preceded it. There’s otherwise no need to change what you’re doing or migrate to another platform

2 Likes

Well, first of all thank you for having shed some light to an alternative and very reasonable way to do it and indeed, every bit of help counts, especially if someone would like to follow my progress in a linear way. I used to be a web designer in my time (late 1980s early 1990s) and I already knew what streaming was even before some people here in Switzerland, who only did ten years later, after my return from New York to take care of my aging mother, but in time I lost track of it all and so my techno-skills, as you call them, are just relatively low right now.
I would really welcome and be grateful for your help if you could do this for me. The rest of course will be up to me, but I can still copy/paste stuff, so that much has followed me in my retirement.
And yes, it is comforting to know that I don’t have to be a nomad any longer to display my work somewhere and FSM seems to be the most appropriate venue for what I have to show and to offer. But mind you, I too am still learning how to do things but I like to learn while doing, in other words, hands on and every day that goes by I learn new techniques, new materials which I can use, new little tricks and shortcuts to take and above all, how to work in series as not to waste time and every day is a discovery day for me.
I sometimes feel like an Indiana Jones looking for a long lost treasure that I might eventually find, without allowing a René Belloq to steal it from me, but rather share it with those deserving ones among us.
It is an amazing journey I have reimbarked in after so much time having left it hanging in limbo due to my professional duties, but now I am fully prepared to tackle any hurdle with the conviction that none will stop me from achieving my desired results.
They might not be perfect, but perfection is simply not of this world. One can at least try to produce good work, but it will never be too perfect. Those who believe that do not understand what real perfection is all about and so I simply let it be.
I am simply content that someone might recognize at least my effort to reach a certain result, in which case I am gratified with the fact that I must have done something right, nothing more and nothing less. This for me is already an achievement, and as long as some recognition comes my way I am one happy man.
I sincerely thank you for taking the time to help me and will try it your way, which as I said before, seems a logical and well organized solution to help others follow my work.
I don’t know if I will ever be able to repay your kindness, but should I be able to do so, just ask and you shall have it.

1 Like

Cheers Patrick! The ability to pick your brain on occasion would be more than thanks enough :wink: I’ll have a go at pulling things together tonight and see what you think out of that…

1 Like

Take your time, no hurry. Anything you can do is welcome here. Be well and have a great day in the meantime.

1 Like

Try this my friend :grin: Let me know if you feel any more apt descriptions are required…

Construction: Introduction & Bunker Initial Shape
Construction: Test-Fitting Bunker Furnishing
Construction: Fitting Bunker to Baseboard
Construction: Bunker & Cliff Texturing
Construction: Expanding the Scene
Painting: Bunker Details
Construction: Bunker Backfill & Terrain Profile
Construction: Overall Terrain Profile
Painting: Bunker Painting & Weathering
Painting: General Terrain Weathering
Painting: Parking Lot Weathering & Bunker Furnishing
Decals: German Crates & Radios (PE & Kit Details)
Painting: Tools, Trenches & Rallying Troops
Construction: Test-Fitting Bunker Furnishing & Radios
Painting: Weathering Crates & Radio Equipment

1 Like

Wow! You’ve really done your homework with my posts, although the last two should be reverted and should rather be “Painting: Weathering Crates & Radio Equipment” followed by “Construction: Installing Bunker Furnishings & Radios”. Either than that you did a wonderful job by cataloguing my progress so far. I tested them all and I could really follow my own work with ease. You are a wise man and I thank you for your effort. From now on I will add more chapters to this list and should I start another future project I will make certain it will be done the same way. You have outdone yourself and I am very grateful for that. :+1: :ok_hand: :grinning_face:

I just posted a copy of the building log you sent me with the modifications I suggested in “Modeling Subjects - Dioramas”. Could you please check it and see if it works? Thank you again for the good and wise advice. :grinning_face: :+1: :ok_hand:

1 Like

My absolute pleasure! Your copy-pastery and modifications into the other topic works just fine, so I’d say you’ve got this all under contol! :blush: I’ve actually taken great pleasure in reviewing your work more closely - Until tonight, I hadn’t realised the true scale and enormity of the scene!

1 Like

:sweat_smile: Indeed it is enormous, and to say that I just wanted to start with a small ledge on which the meeting with Field Marshal Rommel took place. But as things went along I was beaten by the bug, and having already built the communication bunker and having read about it in a German military report of that specific April 14th inspection (unfortunately not completed with actual pictures, only descriptions of the site) I decided to go all the way.
Never in my farthest dreams would I have dreamed to do something like this in a first time project, but then I said to myself “why not dare it?” and the rest is history.
Besides, my long time dream to actually also build a full recreation of the second landing on Fox Green and Easy Red (for the Germans called WN61) also nagged at me for a long time, including the correct placing of landing crafts either having already landed or incoming in a full resin depiction of the wild incoming current on the shores at Omaha Beach kept on pushing me further.
But at that time I chose this one which seemed rather easier than the 1/35 scale landing. Little did I know what would be born from this.
And yet I already know how large the landing will be and that will indeed be a long lasting project, probably taking at least one year to complete if not more. It will be 1 and a half meter long (59") by 87cm (approx. 34.25") wide and it will include four landing crafts (1 LCM-3, 2 LCVPs and one British LCA with U.S. crew and soldiers - mostly Rangers - on board).
The entire beach stretch will have all the correct obstacles that the Germans did place into it.
A small promontory prior to the actual bluff heights (where the U.S. Military Cemetery now lies) will contain the huge 88mm PAK43/41 in a well hidden and massive casemate.
To the rear of it, a small Renault Tank Turret fixed on a interred Tobruk will be seen protecting the actual monster.
Then you will have the actual bluffs filled with vegetation, which on top will have an open, but well hidden, machine gun emplacement and left and right two interred Tobruks. One armed with yet another heavy machine gun and another one with a field mortar inside.
The Beach itself will be partially be sandy, and toward the promontory be riddled with stones and pebbles which eventually also offered some shelter for the landed soldiers who managed to reach them. It also functioned as first aid station for many wounded soldiers.
It will indeed be the most complicated diorama I will ever build in my life, but I want it to be a real masterpiece when finished and so I will take my time with it once started, making sure that I will have all the accurate materials, armament and soldiers at hand. All the fortifications are already built, just as I did with the communication bunker, but are not scratch built as I did with that one.
The only one that needed a much necessary modification was the R677 88mm Bunker which had a too short protection wall which I attempted to rebuild as accurately as possible although in the end it will be partially hidden under a lot of earth and vegetation offering even more protection for the Bunker itself against the Allied naval shelling of it.

But back to my present construction. It came out divided into four or five major segments as you could well see by examining it more closely.
All this came slowly to light while I was building the terrain and became much clearer to me once it was fully recreated.
As I said, after having completed the construction of all the vehicles and soldiers what will remain to be done is just to add the much needed generous vegetation that actually grew or still partially grows in that area.
It will naturally be a somewhat savage vegetation, hence not really cared for by human hand and its reproduction will have to also respect this aspect of the build. More easily said than done.

To confirm what I have described for my next project, since I use Brave as my browser, I will follow up to my present message with the description given to me by its AI which probably will also more specifically describe the area.

Today I won’t continue building since I do not feel too well (probably a bit of exhaustion due to the straining of my eyes and too much thinking on how to arrange all those devices on the tables and how to finally fix them in place.

I wish you well as usual and hope to see some of your work as well.

1 Like

And here, as promised, the description of that sector of Omaha Beach as given by the Brave AI.

" WN61 at Omaha Beach, located in the Fox Green sector near Colleville-sur-Mer, was a key German strongpoint (Widerstandsnest) designed to defend the eastern end of the beach. It featured a large R677-type casemate housing an 88mm Pak 43 antitank gun , one of only two such weapons on Omaha Beach, capable of devastating Allied landing craft and tanks. The site also included three Tobruks (reinforced concrete dugouts), one equipped with a captured Renault R35 tank turret , and positions for machine guns, flame throwers, and a 50mm antitank gun.

The fortification was positioned on a knoll just 40 yards from the high water mark , giving it a commanding view of the beach and enabling accurate, lethal fire. Despite being heavily damaged during D-Day, the site remains largely intact, though much of it is now hidden by modern developments. The main casemate is currently used as a private holiday retreat , with modern windows and shutters replacing original wartime features. The surrounding area includes remnants of trenches, minefields, barbed wire, and scattered metal debris from the war.

Today, visitors can view the site from the beach, with the H-667-type casemate visible near the shingle bank. While the structure is not open to the public, its location is marked and accessible via a path from the American Cemetery. The site is a powerful reminder of the intense fighting that occurred during the D-Day landings.

Detailed Configuration of WN61 at Omaha Beach

WN61, located in the Fox Green sector near Colleville-sur-Mer, was one of the most formidable German strongpoints on Omaha Beach. Positioned just 40 yards from the high water mark , it dominated the eastern end of the landing zone with overlapping fields of fire across the beach and draws.

Primary Armament and Fortifications

The centerpiece of WN61 was a massive R677-type casemate , housing a powerful 88mm Pak 43/41 antitank gun —one of only two such weapons deployed on Omaha Beach. This gun could destroy Allied tanks and landing craft with ease and had a direct line of sight along much of the beach. The casemate was heavily reinforced to withstand naval bombardment and tank fire, with only a small embrasure exposing the gun barrel.

Adjacent to the casemate were several Tobruks (reinforced concrete defensive pits):

  • One mounted a captured French Renault R35 tank turret , providing flanking fire.
  • Another housed a 5cm Gr.W 201f mortar .
  • Additional Tobruks were equipped with machine guns and flamethrowers for close defense.

A 1694-type Ringstand was also present, designed for a 5cm KwK gun , enhancing the site’s anti-infantry and anti-vehicle capabilities.

Defensive Layout and Tactical Position

WN61 was part of a network of three strongpoints (WN60, WN61, WN62) guarding the Colleville-sur-Mer area. Its proximity to the shore made it a prime target, but also allowed for devastatingly accurate fire. The position included:

  • Trenches linking weapon emplacements.
  • Ammunition niches and personnel shelters .
  • Barbed wire and minefields covering approaches.
  • A 50mm antitank gun in a dugout, which continued firing after the 88mm was disabled.

D-Day Assault and Capture

On June 6, 1944, the 88mm gun was knocked out within 30 minutes of the landings, likely by a Sherman DD tank from the 741st Tank Battalion or naval gunfire. Despite this, the 50mm gun remained operational and destroyed several Allied tanks.

Staff Sergeant Raymond Strojny of the 1st Infantry Division played a pivotal role in neutralizing the 50mm gun. After multiple failed bazooka attempts and being wounded by backblast, he single-handedly fired six rockets, hitting the gun emplacement and detonating an ammunition cache. This action silenced the position and allowed U.S. forces to advance.

By 9:00 AM , WN61 was fully secured. 31 German soldiers , including 15 wounded, were captured. The garrison had been under the command of Sergeant Major Schnuell .

Current Condition and Accessibility

Today, the R677 casemate still stands but has been converted into a private holiday home , with modern windows and shutters obscuring its wartime appearance. The adjacent Tobruk with the Renault turret base remains visible in the garden. Much of the site is hidden by modern development, but remnants—rubble, metal debris, and trench outlines—are still discernible.

While not officially open to the public, the site can be viewed from the beach, and its location is accessible via paths from the Normandy American Cemetery .

My personal note and addendum:

Actually, what AI forgot to mention was that all this happened after the second landing had been more successful than the first one. The actual first landing that happened between WN60 and WN61 was disastrous and saw practically all of the landing troops either killed or heavily wounded.
Because currents in the Channel were so strong early in the morning many landing crafts all landed in the wrong places and troops were confused giving the German defenders easy targets to aim at, particularly on WN60 where a lone machine gunner mowed down many of those landing troops. His claims to have killed thousands have been reduced since to a few hundreds, but still it was a massacre. He was also called “the butcher of Omaha Beach” because of that.

Nevertheless, the second landing also received a bad welcome by the Germans, but managed to swiftly move to more secure positions and a couple of highly skilled and adventurous men managed to climb the hills on top of R677 by taking a narrow pathway well hidden by thick vegetation and winding itself up to the top and by silently squatting themselves managed to reach the top and taking German positions by surprise, thus opening the first breech in the German defenses.
The men involved in this operation were Captain Joseph Dawson, Lieutenant John Spalding and Sergeant Philip Streczyk.

I plan to include some poetic license in my Normandy landing diorama, since only showing the landing would have been too obvious.
All will be real and well researched but only chronologically compressed into one unique scene.

First of all the dramatic landing, then the taking care of the wounded (which happened a bit later), then the climbing of the bluffs by a group of men and fourth, the capturing and killing on top of the bluffs overlooking the beach.
All four actions obviously not happening at the same time, but I could not envisage a different option when planning for this immense diorama.
Moreover, I need to fill all four sections with dramatic and action packed scenes without having to build more dioramas on the same subject.

Those who know the history of Fox Green and Easy Red, as well as the defeat of WN61 will immediately recognize this point and I don’t think they would mind my rearrangement of facts into one major and important feat by the Allied forces.

Moreover, if one studies that landing more correctly, one might find out that similarly to many other sectors on Omaha Beach, as well as even with the Paratrooper’s landings in Brittany, forces were at times mixed up.
Therefore, besides members of 1st Infantry Division “The Big Red One”, were also some dispersed men of the 29th ID and some Rangers involved in the fray and this is why I will also include these figures among the rest.

Unfortunately war is usually a mess and not as ordered as it may appear at first hand or on paper and this is why it will be by far more interesting to include a component of such confusion in my own landing scene.

Be reassured, the next one will be WN62, but it won’t be as large as WN61 and will only show the lower R669 Bunker of the two on that site (actually an R612, just because I haven’t found an R669 in 1/35 scale, but very similar in shape and embrasure which will be provided with massive protective walls.

That one will only describe the operations happening in and around that Bunker which will be clear enough to form a specific stand alone diorama.

Happy days are here again, don’t you think?