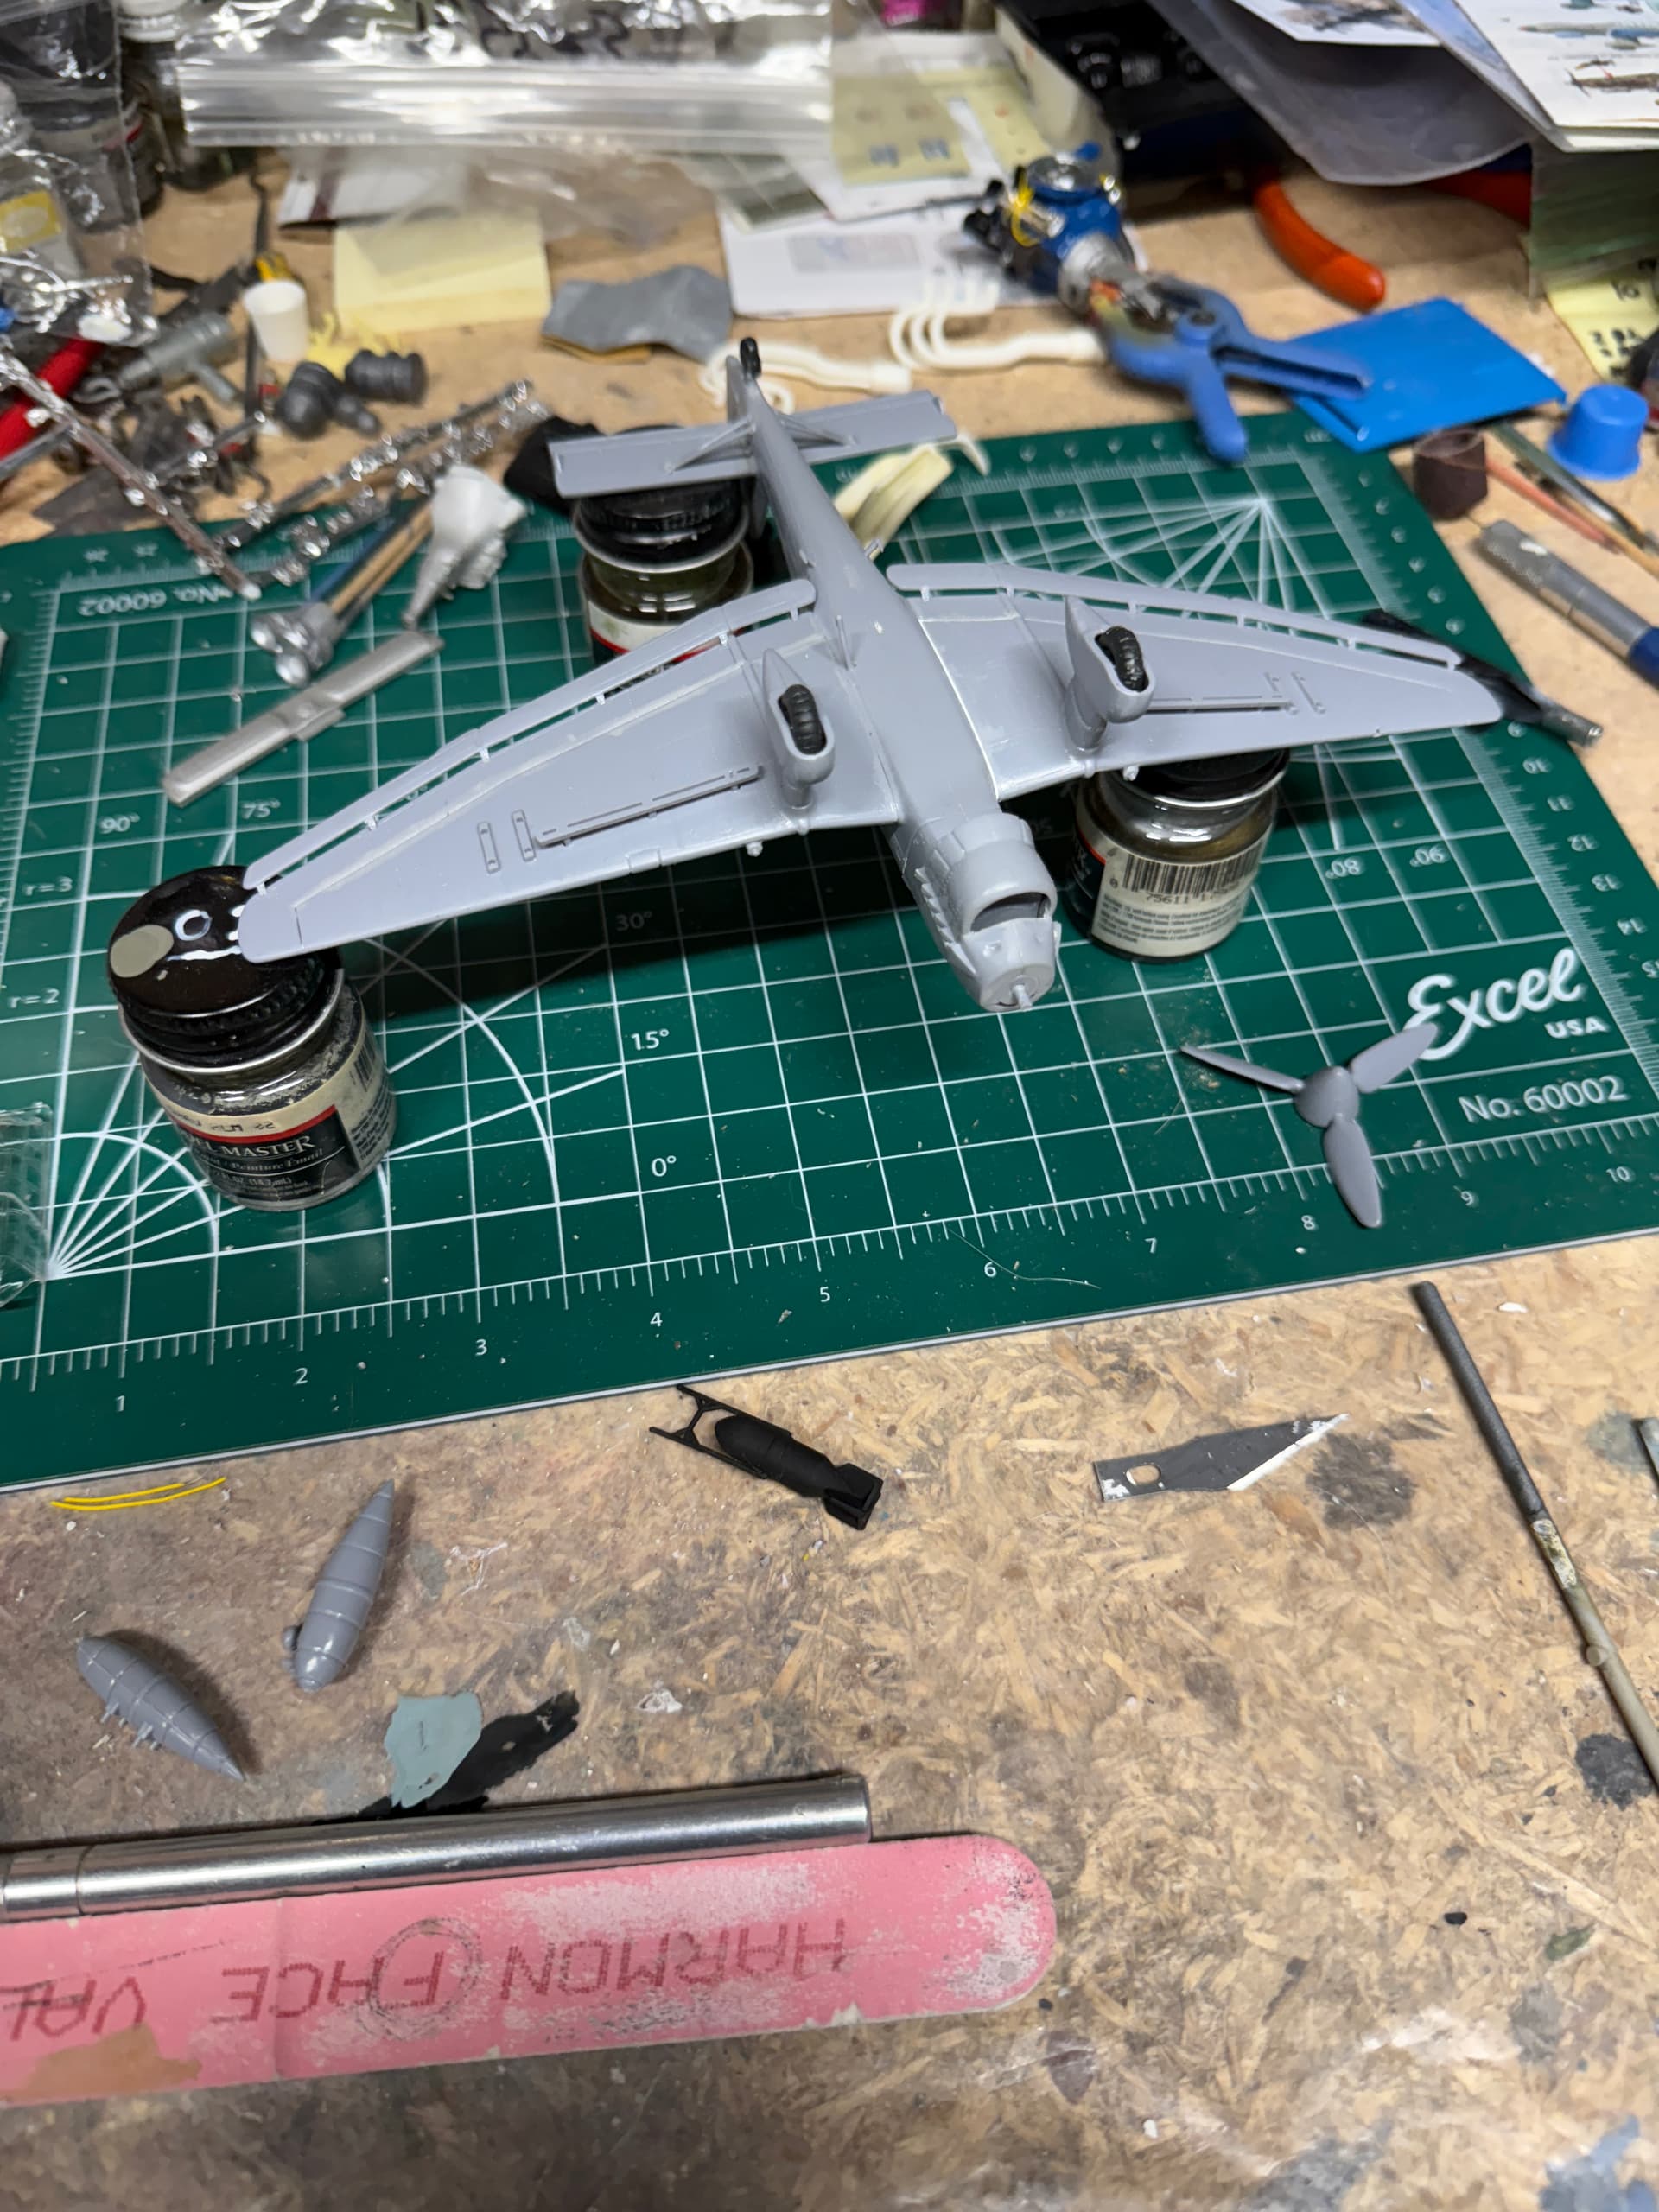
Got a little work done on the Ju87 today withe the Nor’easter blowing through. Not much else for me to do. Might get some 65 on the underside if I stay away from the drink.
2 Likes
Never drink and airbrush. ![]()
Yeah. Paint thinner tastes awful. ![]()
![]()
![]()
@Sturmovik
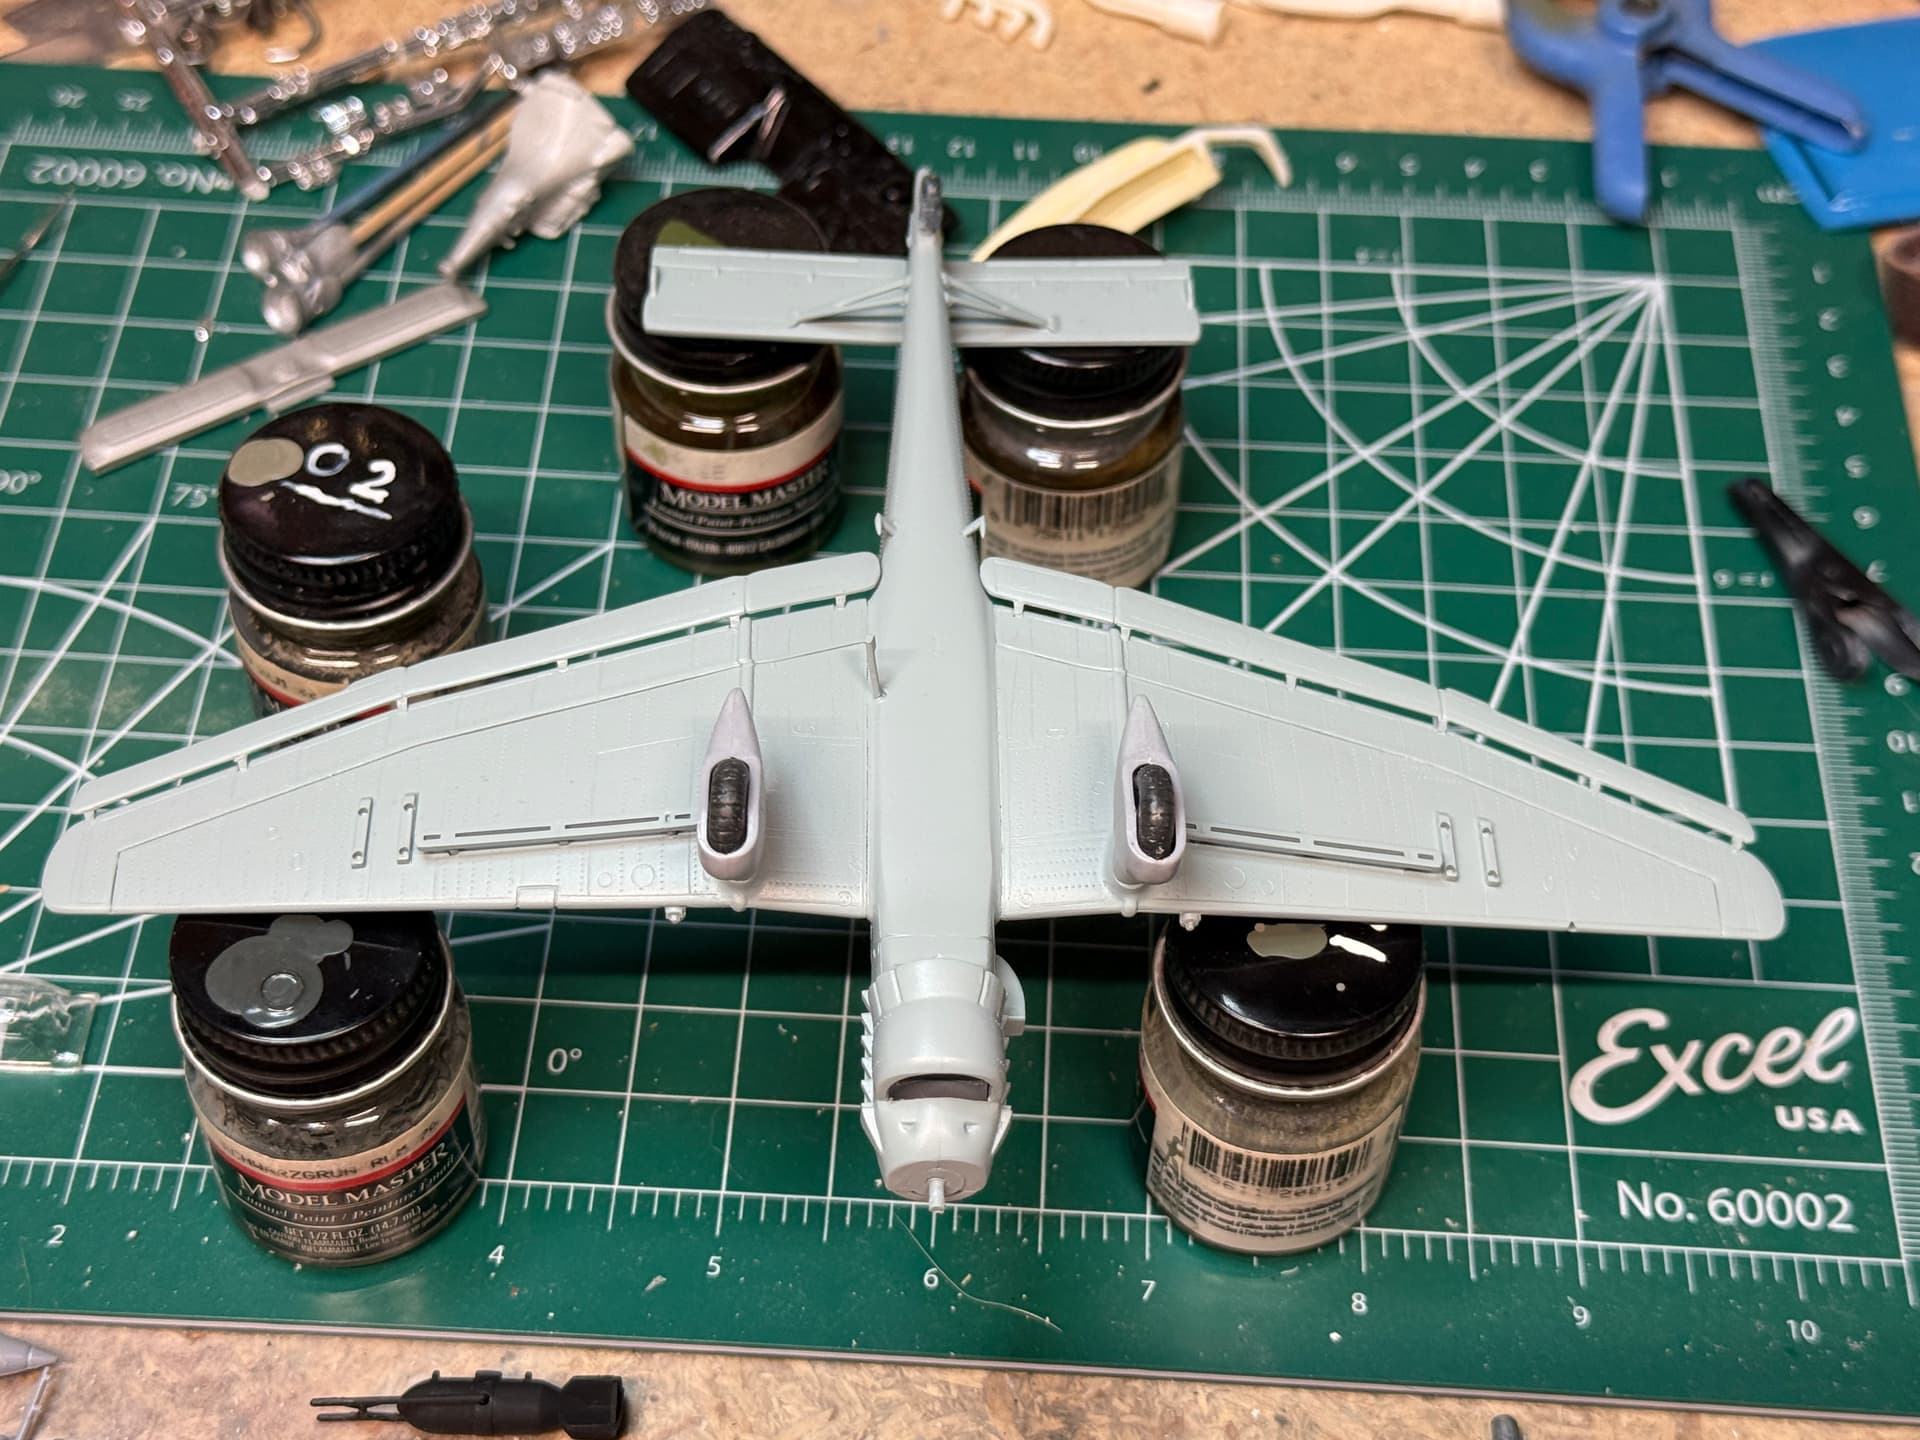
FYSA - the 21sr Century Toys Stuka uses screws to assemble the fuselage. There are caps to cover the screw holes, but they’ll need putty to fill.
1 Like
I did get the 65 on the underside, but still have to resort to jars. I haven’t gotten very far with my jig.
3 Likes
Looks good so far! Guess the jars will have to do until the jig is up. ![]()
Gary
Hi Gents
I’ve decided to enter an Airfix 1/48 Hawker Hurricane I into the Battle of Britain Group Build. I’m pretty well along into the kit, so I thought I’d show you what I’ve got so far.
Airfix has nice boxart. The aircraft shown has just rammed a Hun 109 - and lived to tell the tale.
 01boxart by Eric Bergerud, on Flickr
Naturally I did a cockpit. And, as is usual with yours truly, I was pretty cursory. I don’t build for the camera, and I know that when the kit is finished nobody is going to see inside the canopy. In a way I admire the people that get PE to super detail the cockpit - but I’m not one of them. (Do note that I made some seatbelts out of Tamiya tape.) One thing to note is how Airfix has decided to go about this. You assemble the cockpit pieces and then glue them into a frame.
 02cockpit by Eric Bergerud, on Flickr
And then the frame goes into the wing.
 03cockpitWing by Eric Bergerud, on Flickr
If Airfix made kits as well as Tamiya or Wignut Wings this would work pretty well. But, beware, if you’re off but just a little, it’s going to take some surgery to get the wing into the fuselage. It did go in, and it did take surgery. But after the necessary surgery, some Zap a Gap got rid of seams.
 04fuselageleftrear by Eric Bergerud, on Flickr
 05fuselagetop by Eric Bergerud, on Flickr
As is the case with all of my model aircraft, I use “black basing” on this kit to get the tonal irregularities you would find in any aircraft in service. (You also get it from shadow). I find the technique much superior to pre or post shading. If you’re unfamiliar with black basing, go on YouTube and check Doog’s Models channel - he has an introduction and a whole series on black basing. Simply you prime with the aircraft with black primer. In my case I use an automotive lacquer from Duplicolor (Hot Rod Black) that is both fillable and sandable - with this brew ghost seems go away. You apply it outside with a rattle can. It’s great stuff and highly recommended. And it is certainly black:
 06bbasedright by Eric Bergerud, on Flickr
 07bbasedbottom by Eric Bergerud, on Flickr
We’ll continue with the bottom of the plane to show black basing in action. After priming, you apply the “marble coat.” The bottom of the Hurricane, as was the case for many RAF fighters during the war, was a grey-green color called Sky. (I made a good rendition of it using Golden High Flow acrylics - the best water based acrylic I know of for use in an airbrush. And as Golden makes its paints for the art market, it does very well with a brush. Anyway, the marble coat consists of irregularly applied coats of colors, heavily thinned, that are lighter, darker, or more or less close to sky. Here’s the result - it looks like hell, but it’s supposed to.
 08bottomMarbecoat by Eric Bergerud, on Flickr
You then apply light coats of the base color. Less is more here - if you put on too much you lose the color modulation. I don’t have my photo lights set up, but trust me, the base coat came out pretty well on the bottom.
 09bottombase by Eric Bergerud, on Flickr
The Hurricane had a three color camo scheme. Sky underneath and the fuselage painted - mostly - with a earth color that looks a lot like the Dunkelbelb you see on late war German Panzers. The surface is broken with a medium hue green. The camo is irregular so that means masking. For this work, I like putty. Here’s the idea:
 10topcamomask by Eric Bergerud, on Flickr
Each step of the way I use black basing. So there’s black basing undneath both the earth color and the green. Here’s what it looks like when done. (Again, I don’t have the right lights up, but I’m pretty pleased so far.)
 12topcamo2 by Eric Bergerud, on Flickr
High flow is satin in texture so the decals went on nicely - Airfix supplied good ones.
 11topcamo by Eric Bergerud, on Flickr
There’s still a lot more to do. I will be using oils first to apply filters (I want to darken the earth color), do panel lines and finally to use dot filters to enhance color variance and show fading on the top sides of the wings.
More later.
Eric
2 Likes
Aggie: I’ve got to agree on some of the Revelogram kits. They’re nicely shaped, go together pretty well and look the part.(They didn’t all work - their P-38 just doesn’t make it. Of course until Tamiya took on the subject recently, nobody had.) I’ve got a Monogram 1/48 Me 262. If I get the energy I’ll take up the challenge from Model Meister Paul Budzig (do check his YouTube Channel “Scale Model Workshop” if you want to see a master at work) and sand the surface clean and apply my own panel lines and rivets. It would look really good as Monogram caught the shape of the 262 perfectly. Of course I look at my stash, figure how long I’ll be able to see the knippers and glue (much less the airbrush) and I don’t know that I’ll get everything done. We’ll see.
1 Like
Yeah, I tend to get so fixated on details that no one outside of an IPMS judge with a microscope might notice. Your build looks great to my eye.
1 Like
@Aggieman , Your Ju-88 looks great. If I ever get around to building a multi-engine german a/c , it will definitely have to be an '88.
1 Like
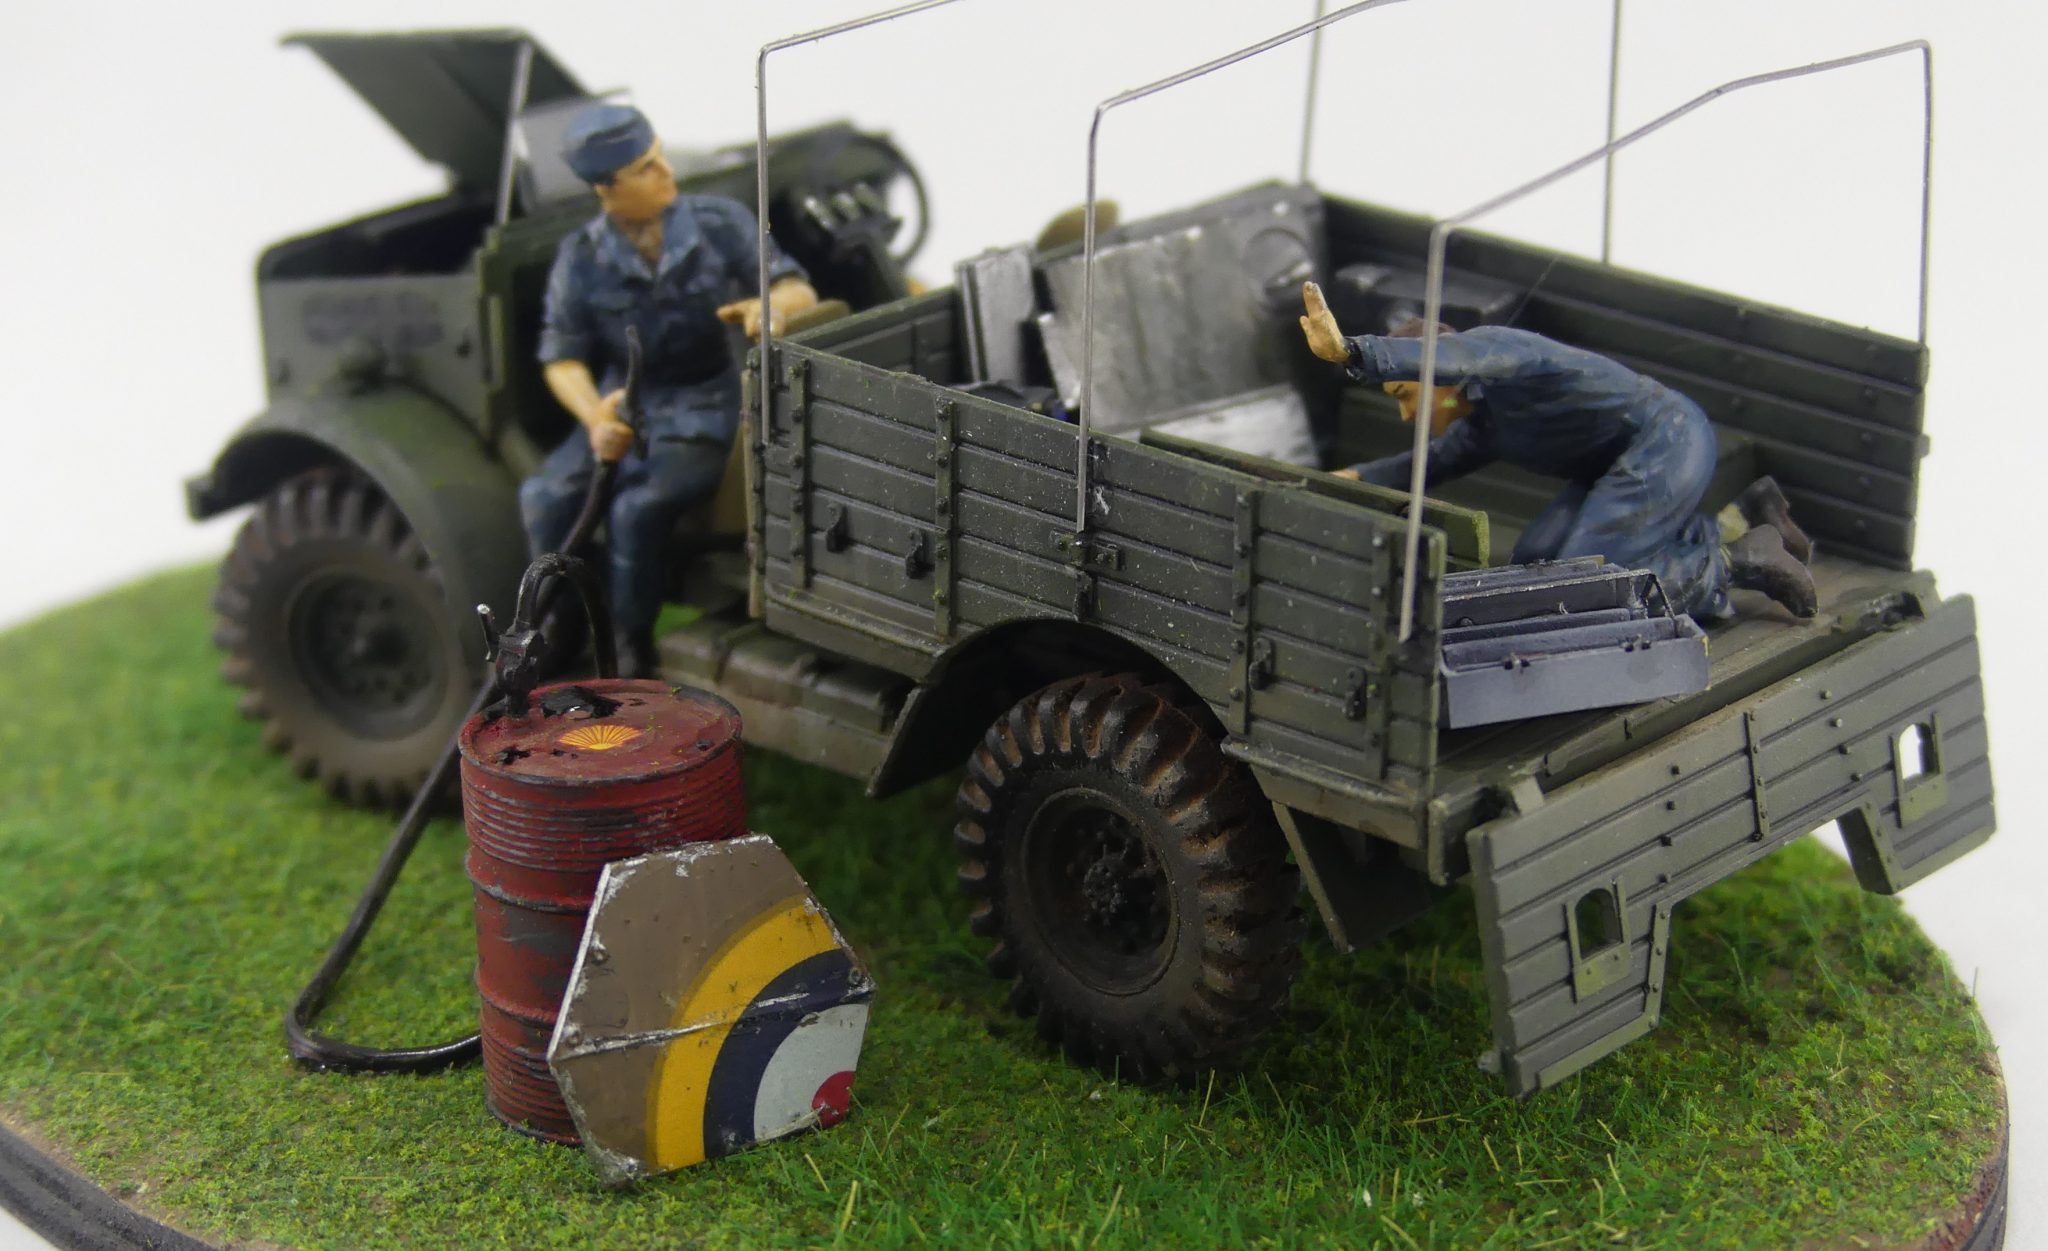
Ok, so my 2nd contribution to this GB. With the same airfix ‘ready for battle’ kit that has the hurricane it also comes with a bedford truck and a refiller. Heres the Bedford with some modified Tamiya and cmk figures. Also detailed the engine a bit, addede the canvas framing, and misc aircraft parts into a maintanence vingette. Figure I throw a non aircraft into this GB. ![]()

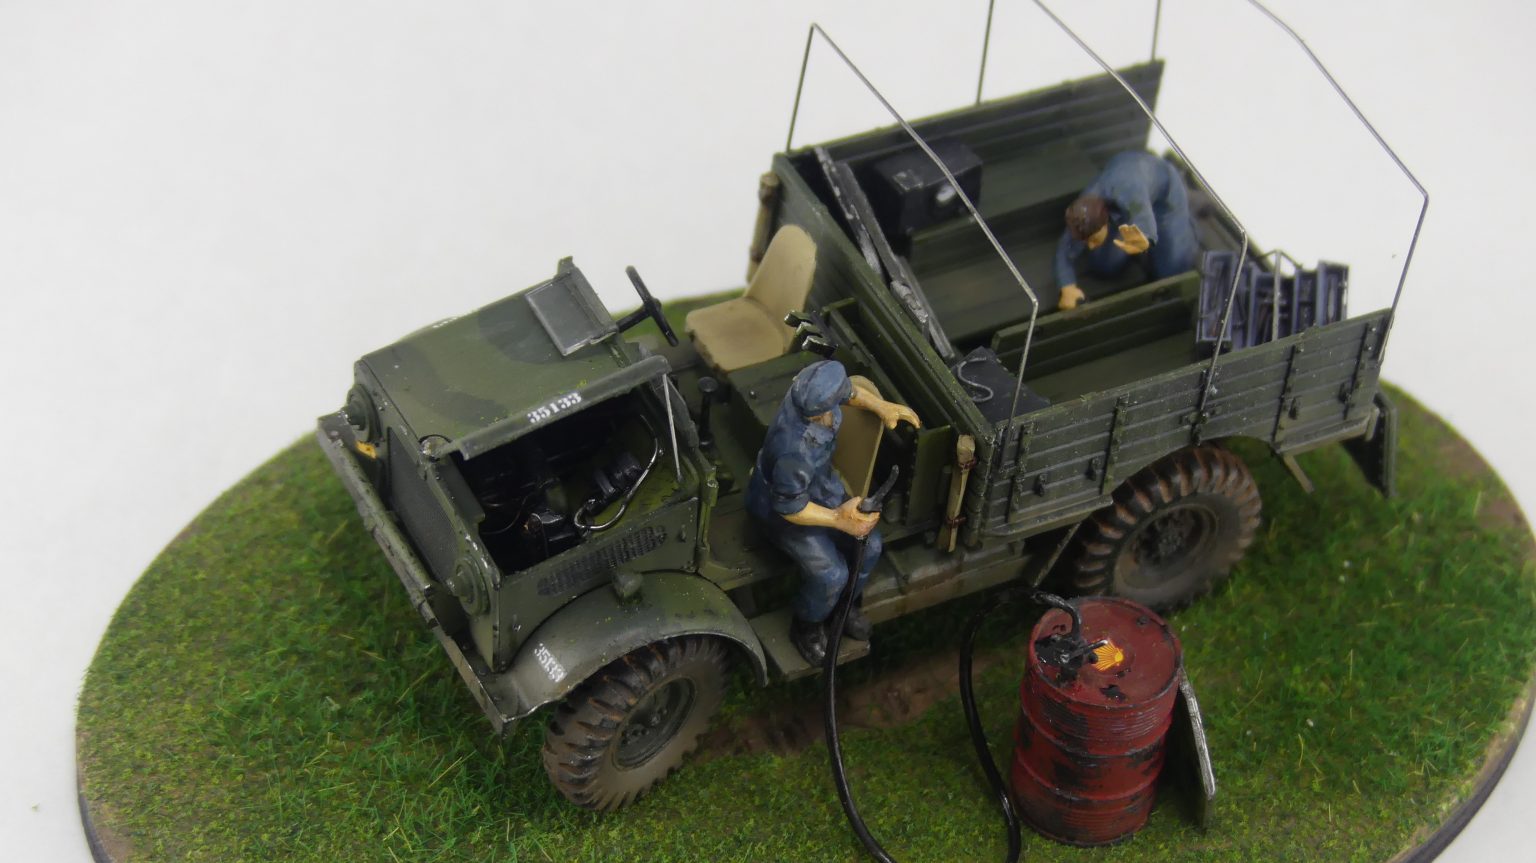
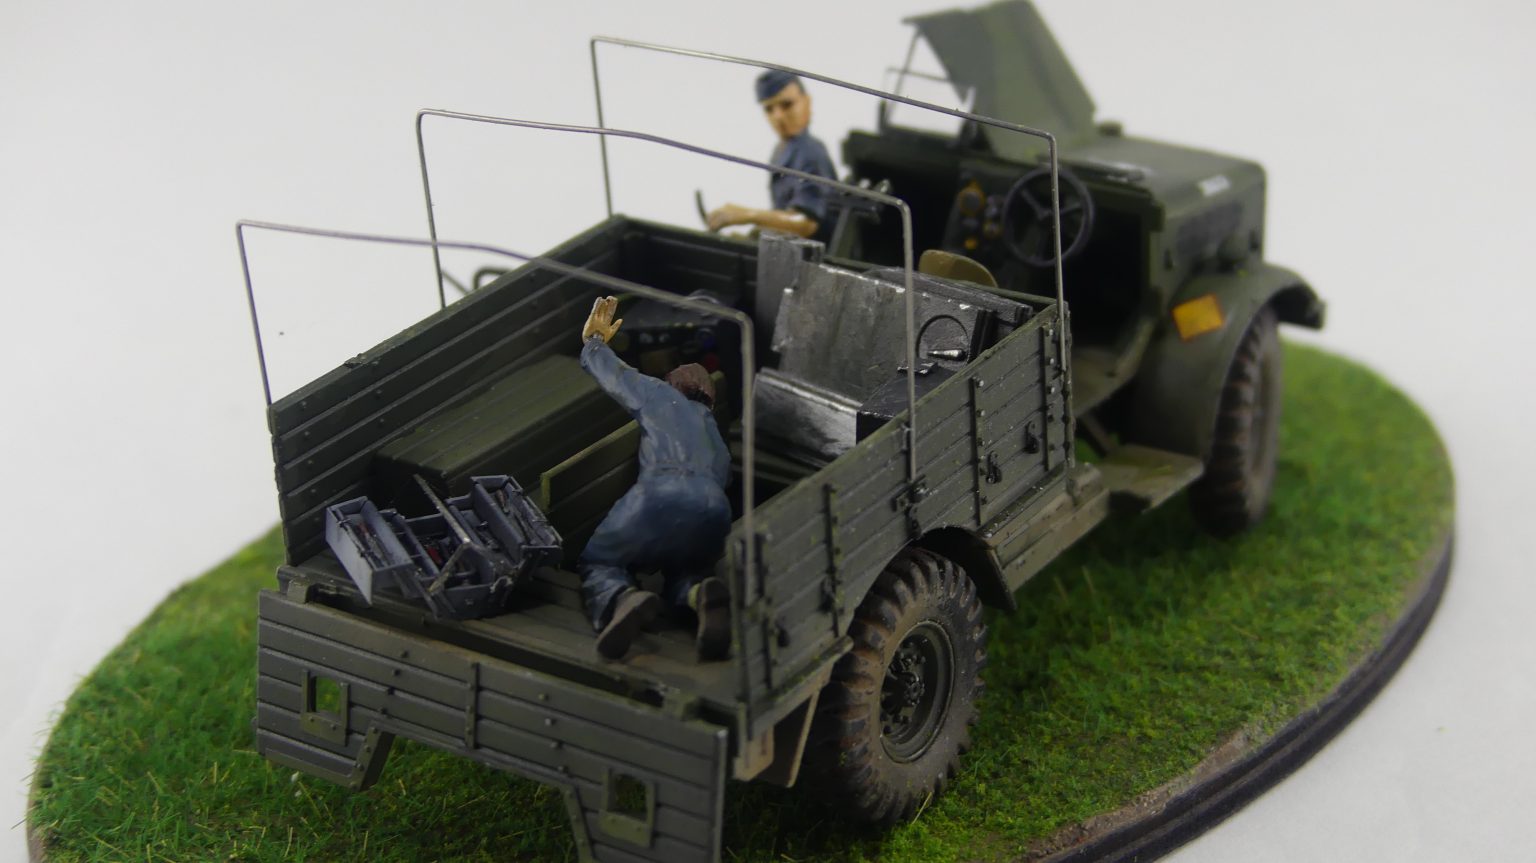
8 Likes
You’ve really brought the truck to life! Great job.
Top work, @waikong! ![]()
NIce work! Give the ground crew some approbation please!
Gary
Thanks for the comments, it was a fun bulid.
Very nice and subtle, realistic weathering. Tells a great story.
Primer coat looks really clean!
Great masking/painting job on that canopy! Looks like it took a bit of work.
Finis:
1/48 Airfix Hawker Hurricane
 hurricane3 by Eric Bergerud, on Flickr
 rightrear2 by Eric Bergerud, on Flickr
The Plane:
The Hawker Hurricane was ordered in 1935 and debuted in squadron service in late 1937. The designer, Sydney Camm, created a kind of hybrid of the old and new. The original design employed a lot of fabric on the rear half of the fuselage - the plane was descended from the Hawker Fury a biplane. By the time the aircraft was chosen for deployment Camm had greatly modernized it. The Hurricane was given retractable landing gear, 8 rifle caliber machine guns and fitted with the Rolls Royce Merlin engine. (So the armament and engine were identical to the Spitfire I.)
The Hurricane’s hour of glory was short but very important. During the Battle of Britain the Hurricane did a fine job shooting down bombers. (The 8 .303 MGs were not ideal for shooting down a multiengine bomber, but 8 guns with a very high rate of fire shredded a bomber’s skin. And if the bomber got home, it often was carrying dead or badly wounded crewmen - not good for Luftwaffe morale.) It was a nimble aircraft and could hold its own against the BF-109 E at low or medium altitude. It was not at home above 20,000 feet or above - even the BF-110 could match its speed. The Spitfire was clearly the better fighter. But the Hurricane had an important advantage - it was easy to produce (using trusted technology) and easy to maintain. So, with its superior, but less numerous Spitfire stablemate the Hurricane was instrumental in defeating the Luftwaffe in the summer of 1940 - no small thing.
But the leadership of the RAF knew well that the Hurricane was obsolescent and it was quickly retired from front line service. The Hurricane II appeared about a year later carrying multiple 20mm canon and served as a ground attack plane and did well in North Africa. When Hawker’s Typhoon and then Tempest appeared in 1943, the Hurricane’s day was over.
The Kit:
It’s not easy to describe Airfix kits. They’re usually pretty good - but note the “pretty good.” Airfix is not Tamiya and in my experience you can expect trouble along the way. In my first post I noted that the way the cockpit was mounted to the wing and the fuselage put on top of it. Fancy engineering and Airfix was not up to the job - I got things together but it required some serious surgery. On the other hand the fuselage went together nicely, as did the landing gear (which can be very troublesome.) The decals were excellent. And if you want to build a 1/48 Hurricane I, Airfix is the only game in town. Hasegawa and Trumpeter both have a Hurricane II, but the Hurricane I played a far greater role in the history of WWII. There was some trouble with the clear parts. I chose to model the plane with its canopy open. Unfortunately, there was no way it was going to fit properly if placed as far to the rear as it should have gone. It’s not a big deal - it looks pretty good a little to far forward. (I might add that I’ve had trouble with Airfix clear parts before. I did a C-47 and the clear part covering the pilot’s seat did not fit well. For this Group Build I did an Airfix Stuka and it’s clear parts were very bad. I did an Airfix P-40 A (Tomahawk in the RAF) and the clear parts were fine - it was the best Airfix kit I’ve built.
The Build:
At the end of the last post I had applied the decals. Consequently I first applied oils for panel lines. I then applied oil “dot filters” to create color modulation on the fuselage. Finally I used some Windsor “transparent white” to fade the surface of the wings. Mind you a BoB Hurricane could easily have been two years old. One thing nice about using oils for panel lines is that when you wipe off the excess you do in the direction that the wind would flow over the wings. This creates a kind of dirty effect that I think very appropriate. Here’s a detail pic:
 Wingdetail by Eric Bergerud, on Flickr
I created a simple base out of plastic with Scenic Express artificial grass attached with Matte Medium. And here is what the plane looks like:
 left by Eric Bergerud, on Flickr
 bottom2 by Eric Bergerud, on Flickr
 RRear by Eric Bergerud, on Flickr
 rightfront by Eric Bergerud, on Flickr
 right by Eric Bergerud, on Flickr
 right rear by Eric Bergerud, on Flickr
right by Eric Bergerud, on Flickr
right rear by Eric Bergerud, on Flickr
 rigfhabove by Eric Bergerud, on Flickr
 rear by Eric Bergerud, on Flickr
 leftrear by Eric Bergerud, on Flickr
 leftfrtont by Eric Bergerud, on Flickr
 leftabove by Eric Bergerud, on Flickr
I’ve enjoyed the BoB Group Build. Happy Holidays all.
Eric
8 Likes
Very nice done, weathering is just right!