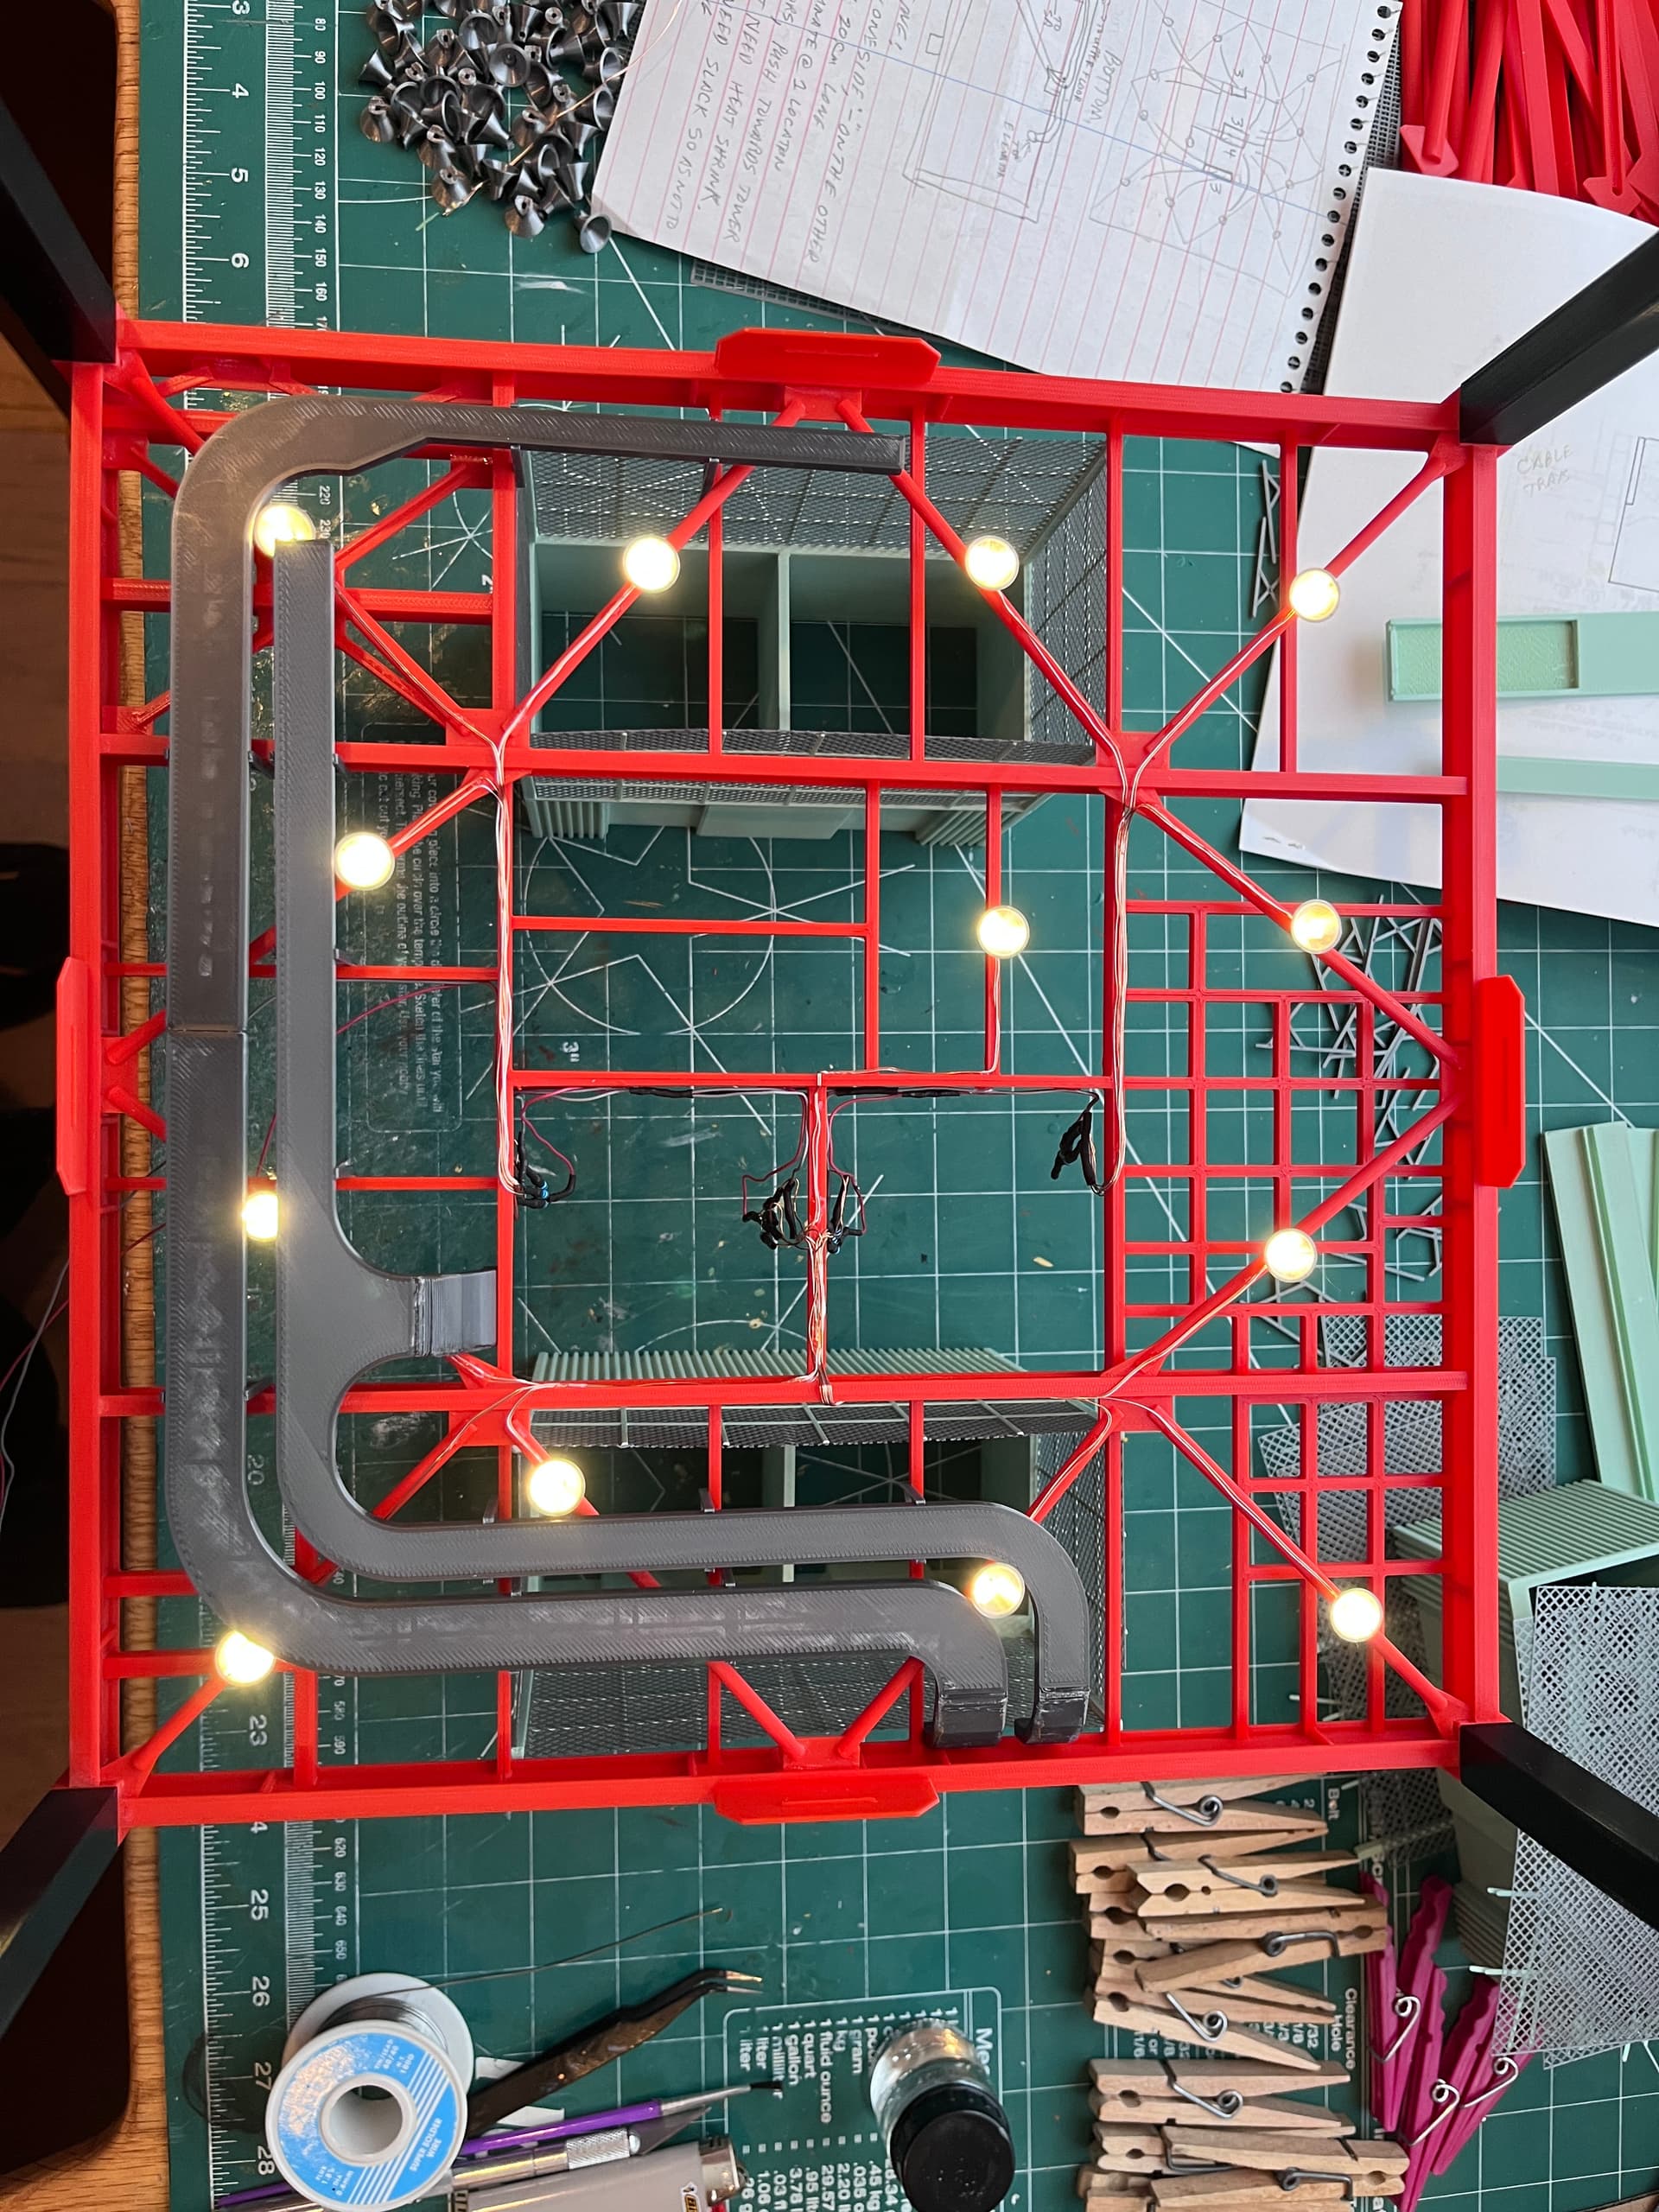
And here are the lights and wires glued into place. Some are offset a bit. This is a whole lot cleaner than the previous model. So far so good.
2 Likes
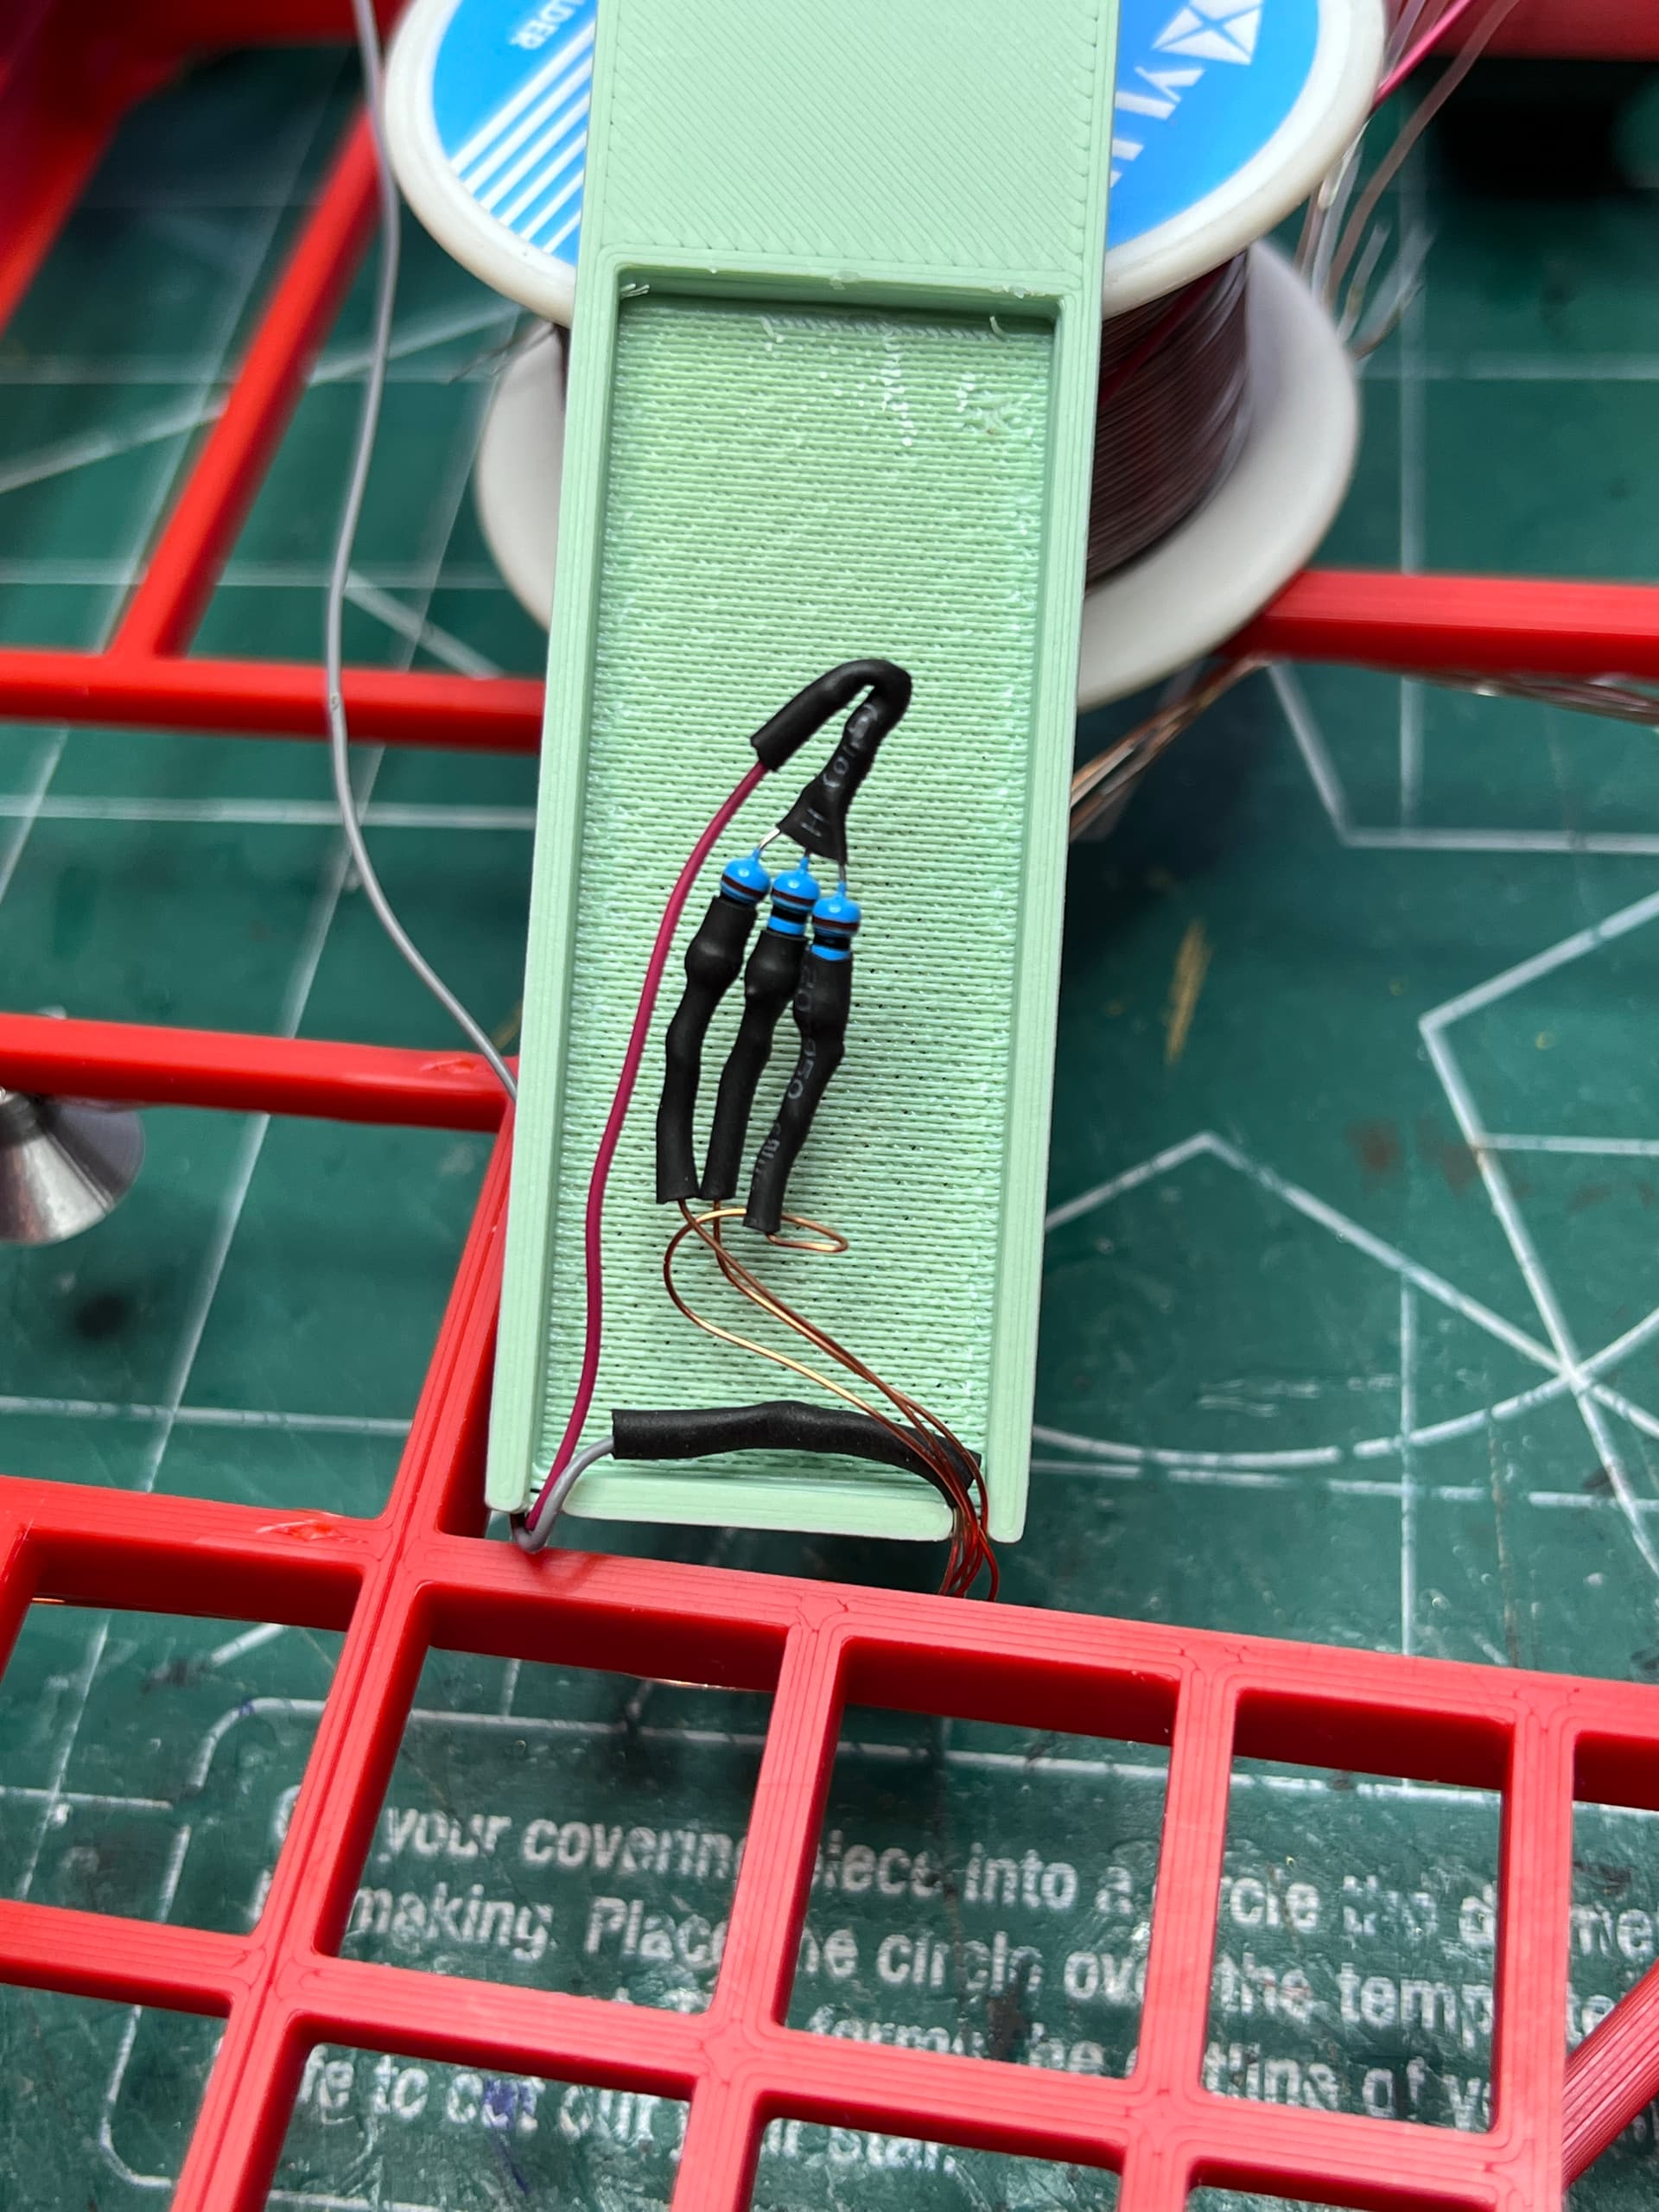
The first floor of lights have been soldered up. Here is a picture of the resistors. There will be four of these per level.
And here is the completed level from the underside with the lights lit up. This is a much better solution than what I did on my first model.
3 Likes
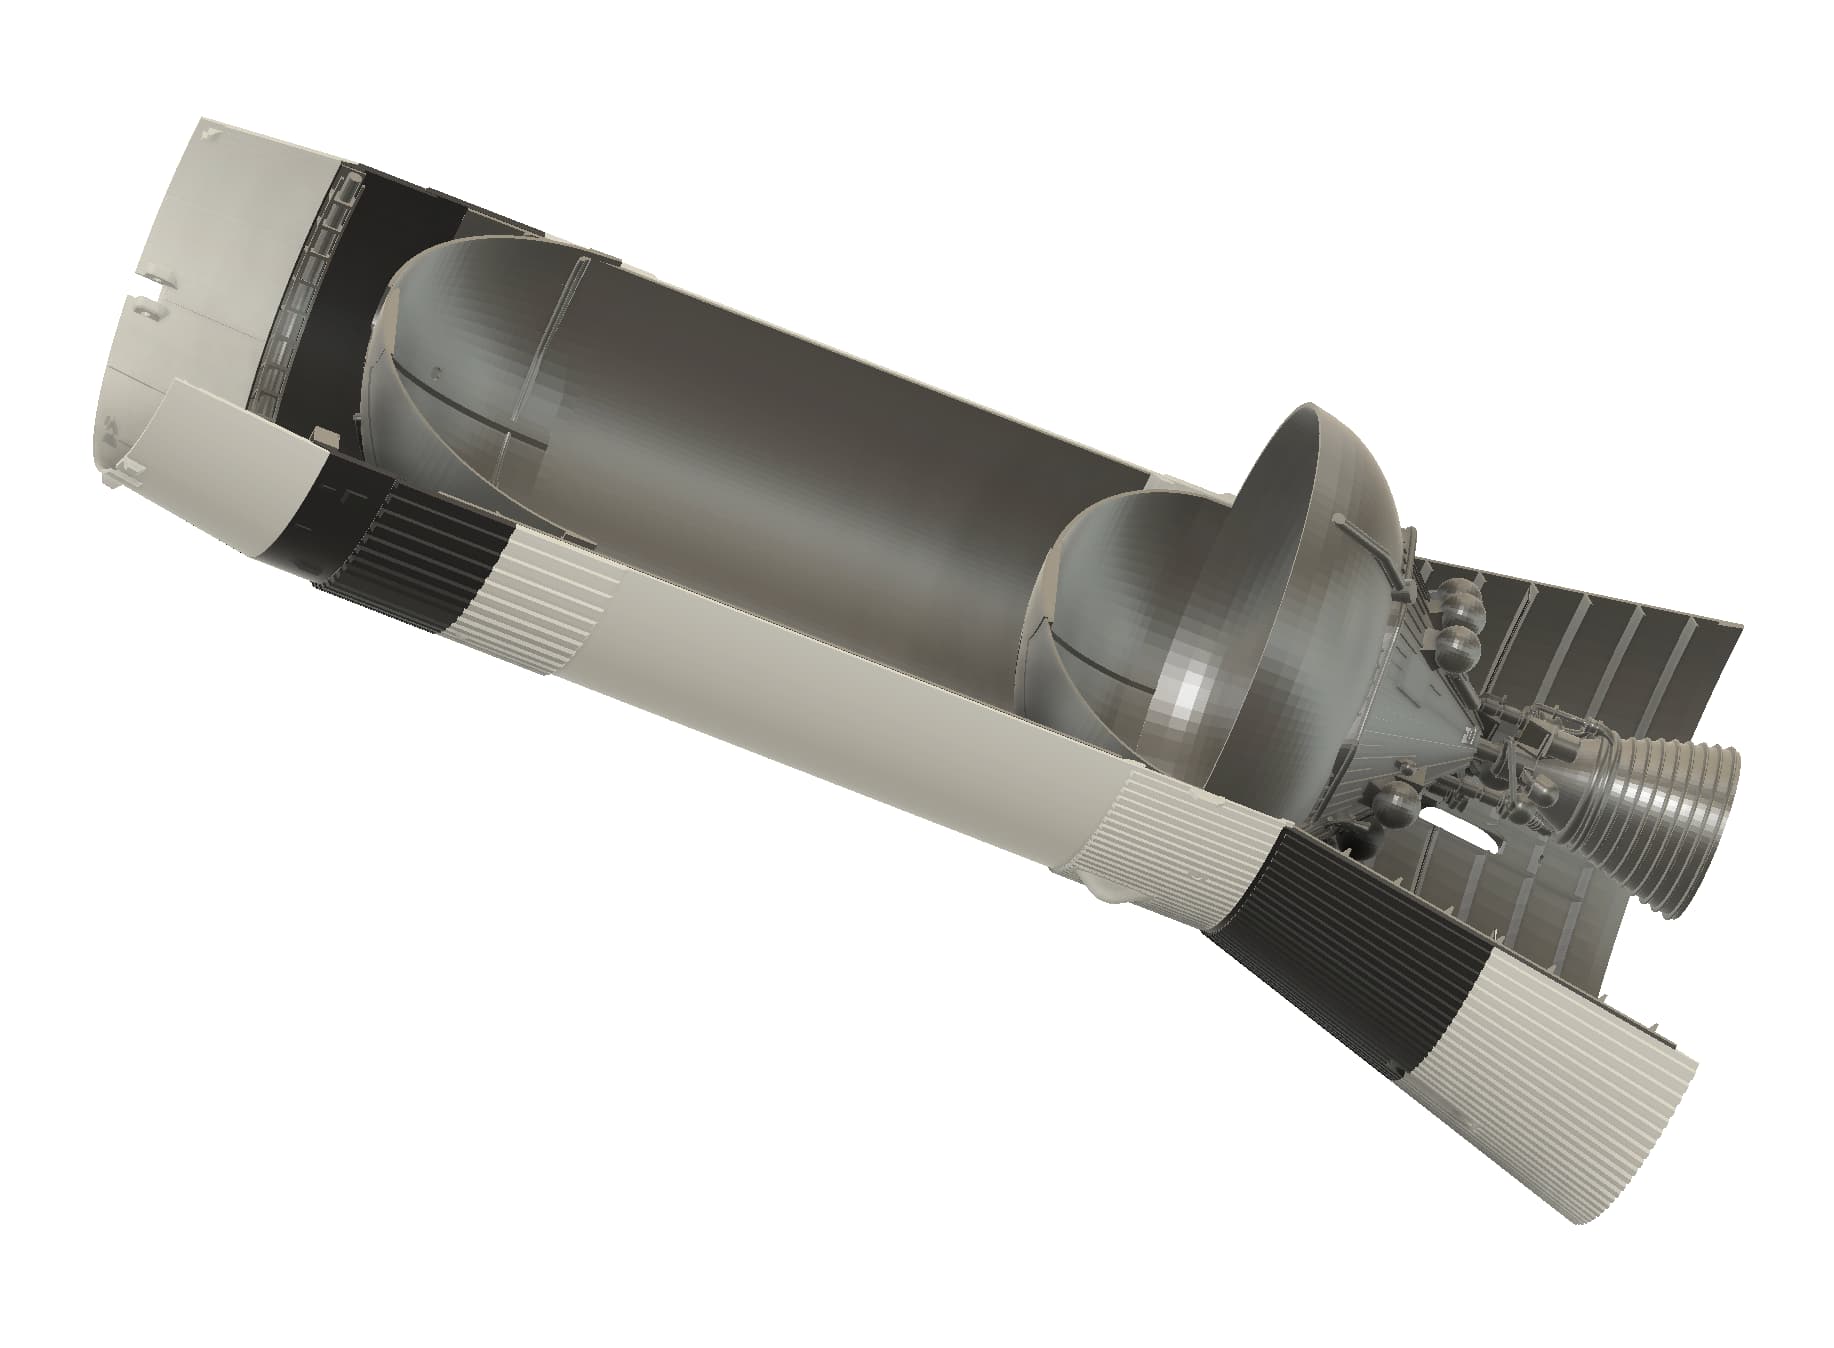
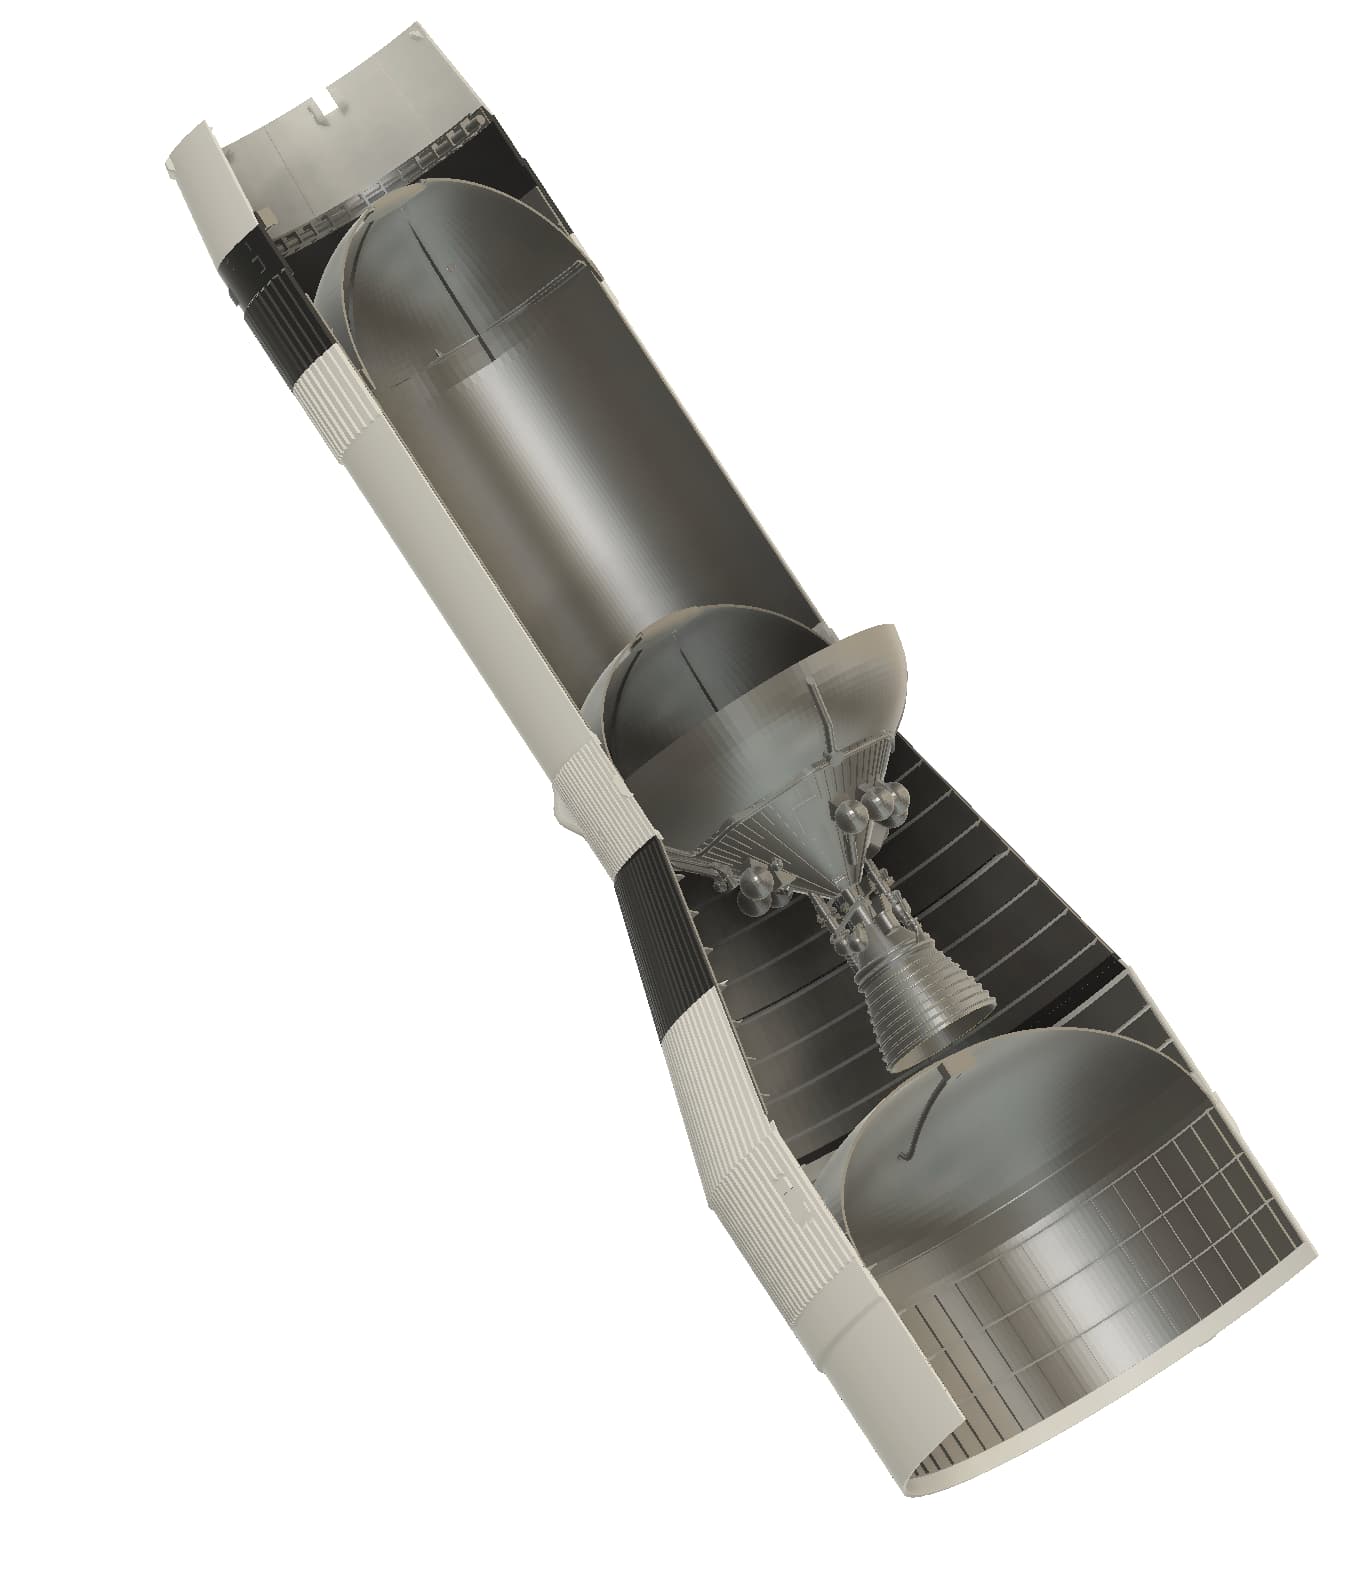
With the lights figured out I have started slicing some of the Saturn V parts in half. Here is the stage 2 tank part sliced to size. It just fits on the printer. This is what drove the scale to a max size.

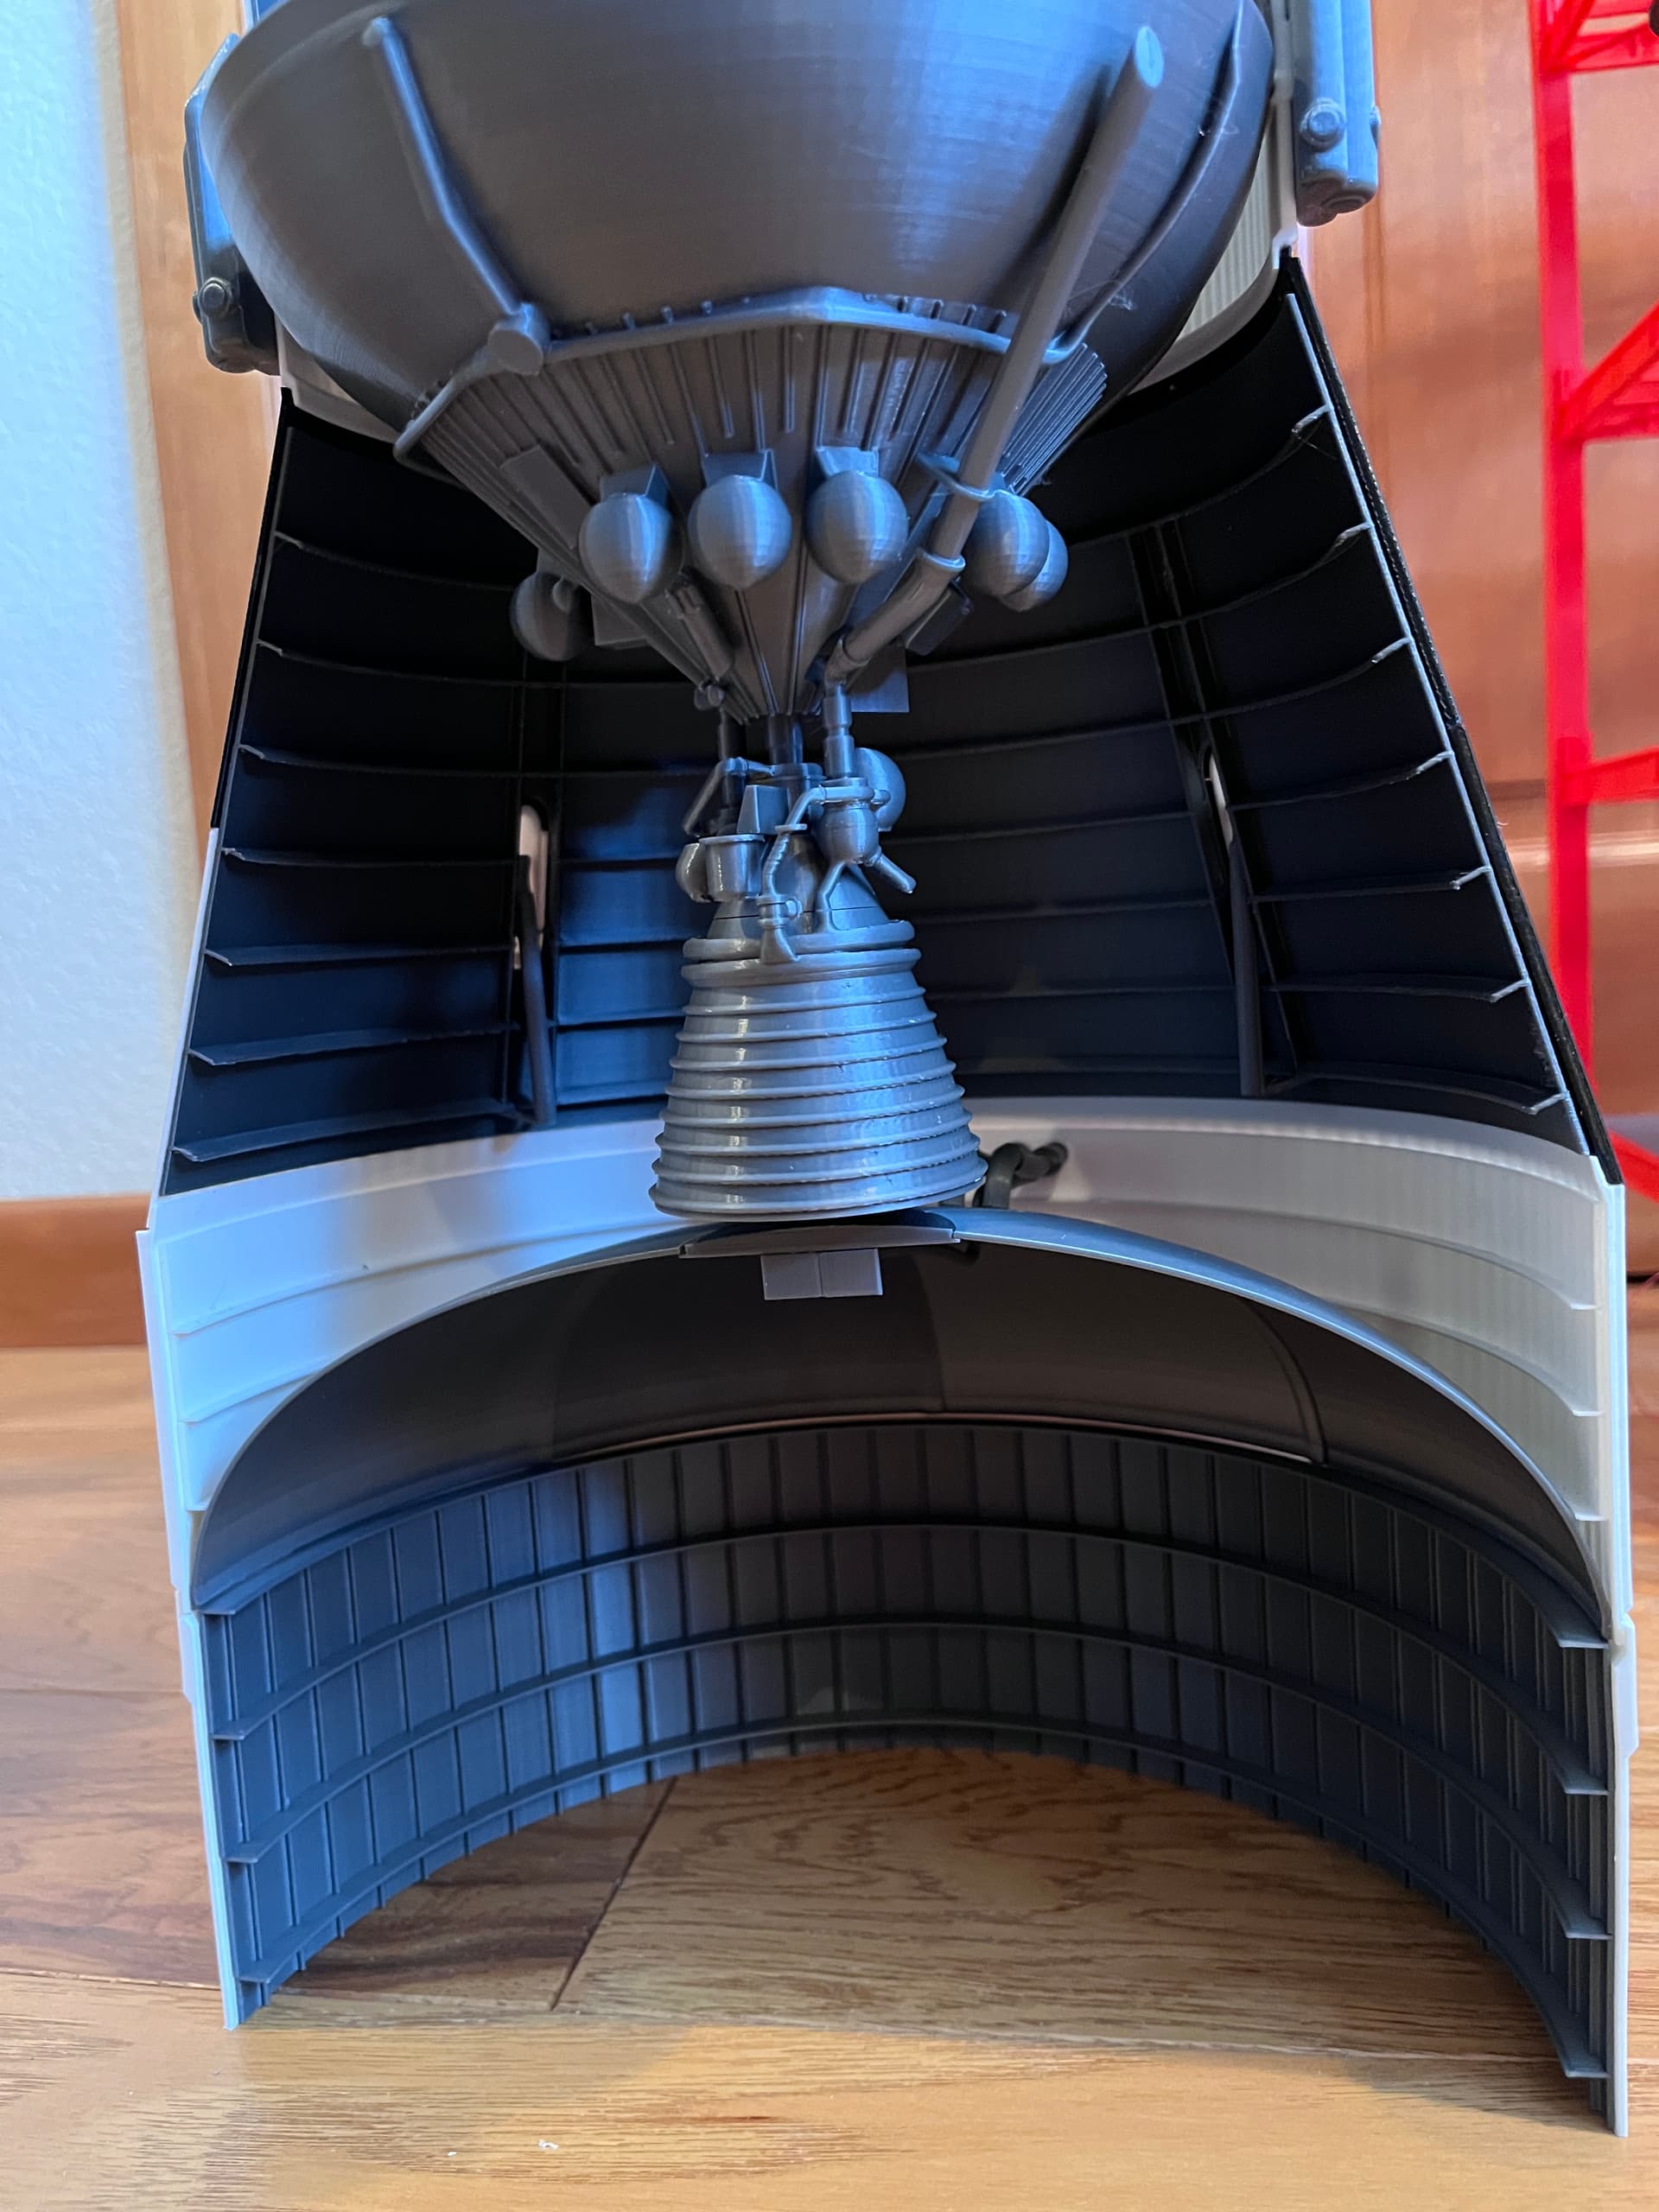
Here are the scaled, sliced and assembled S-IV stage. Instead of slicing the engine I decided to keep the engine and lower part of the LOX tank. These are the main parts and not all the finer detail parts.

1 Like
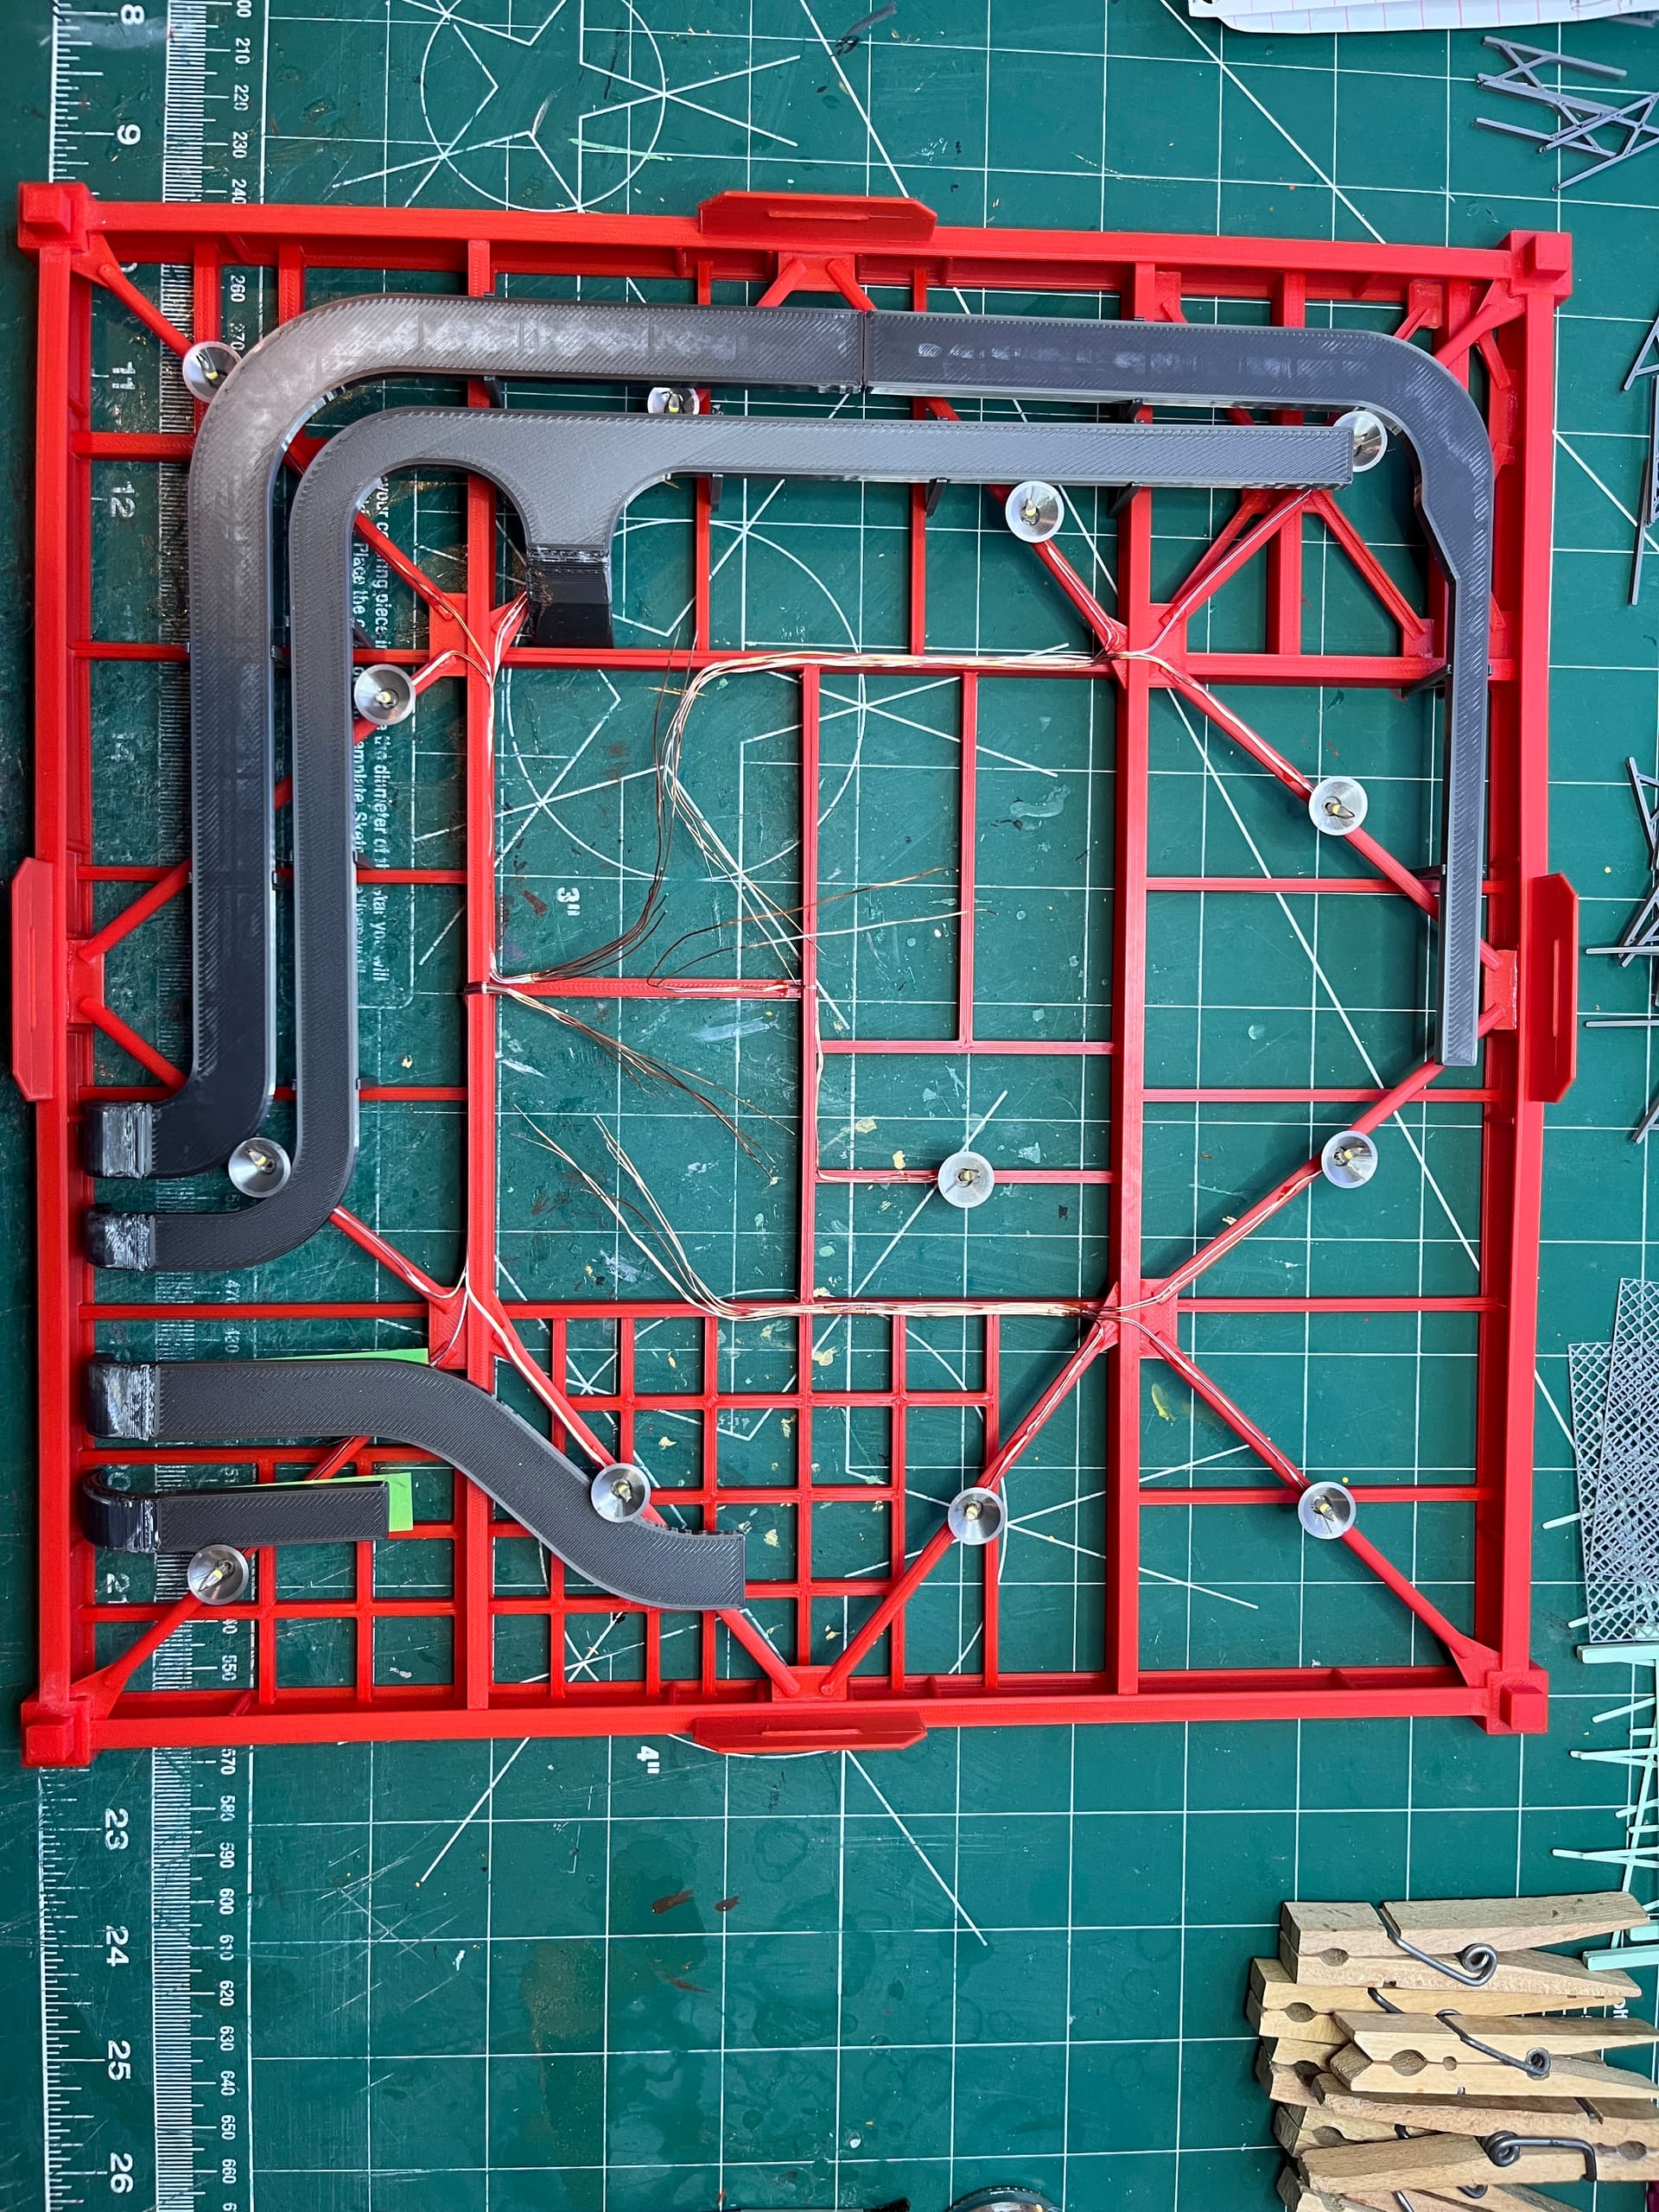
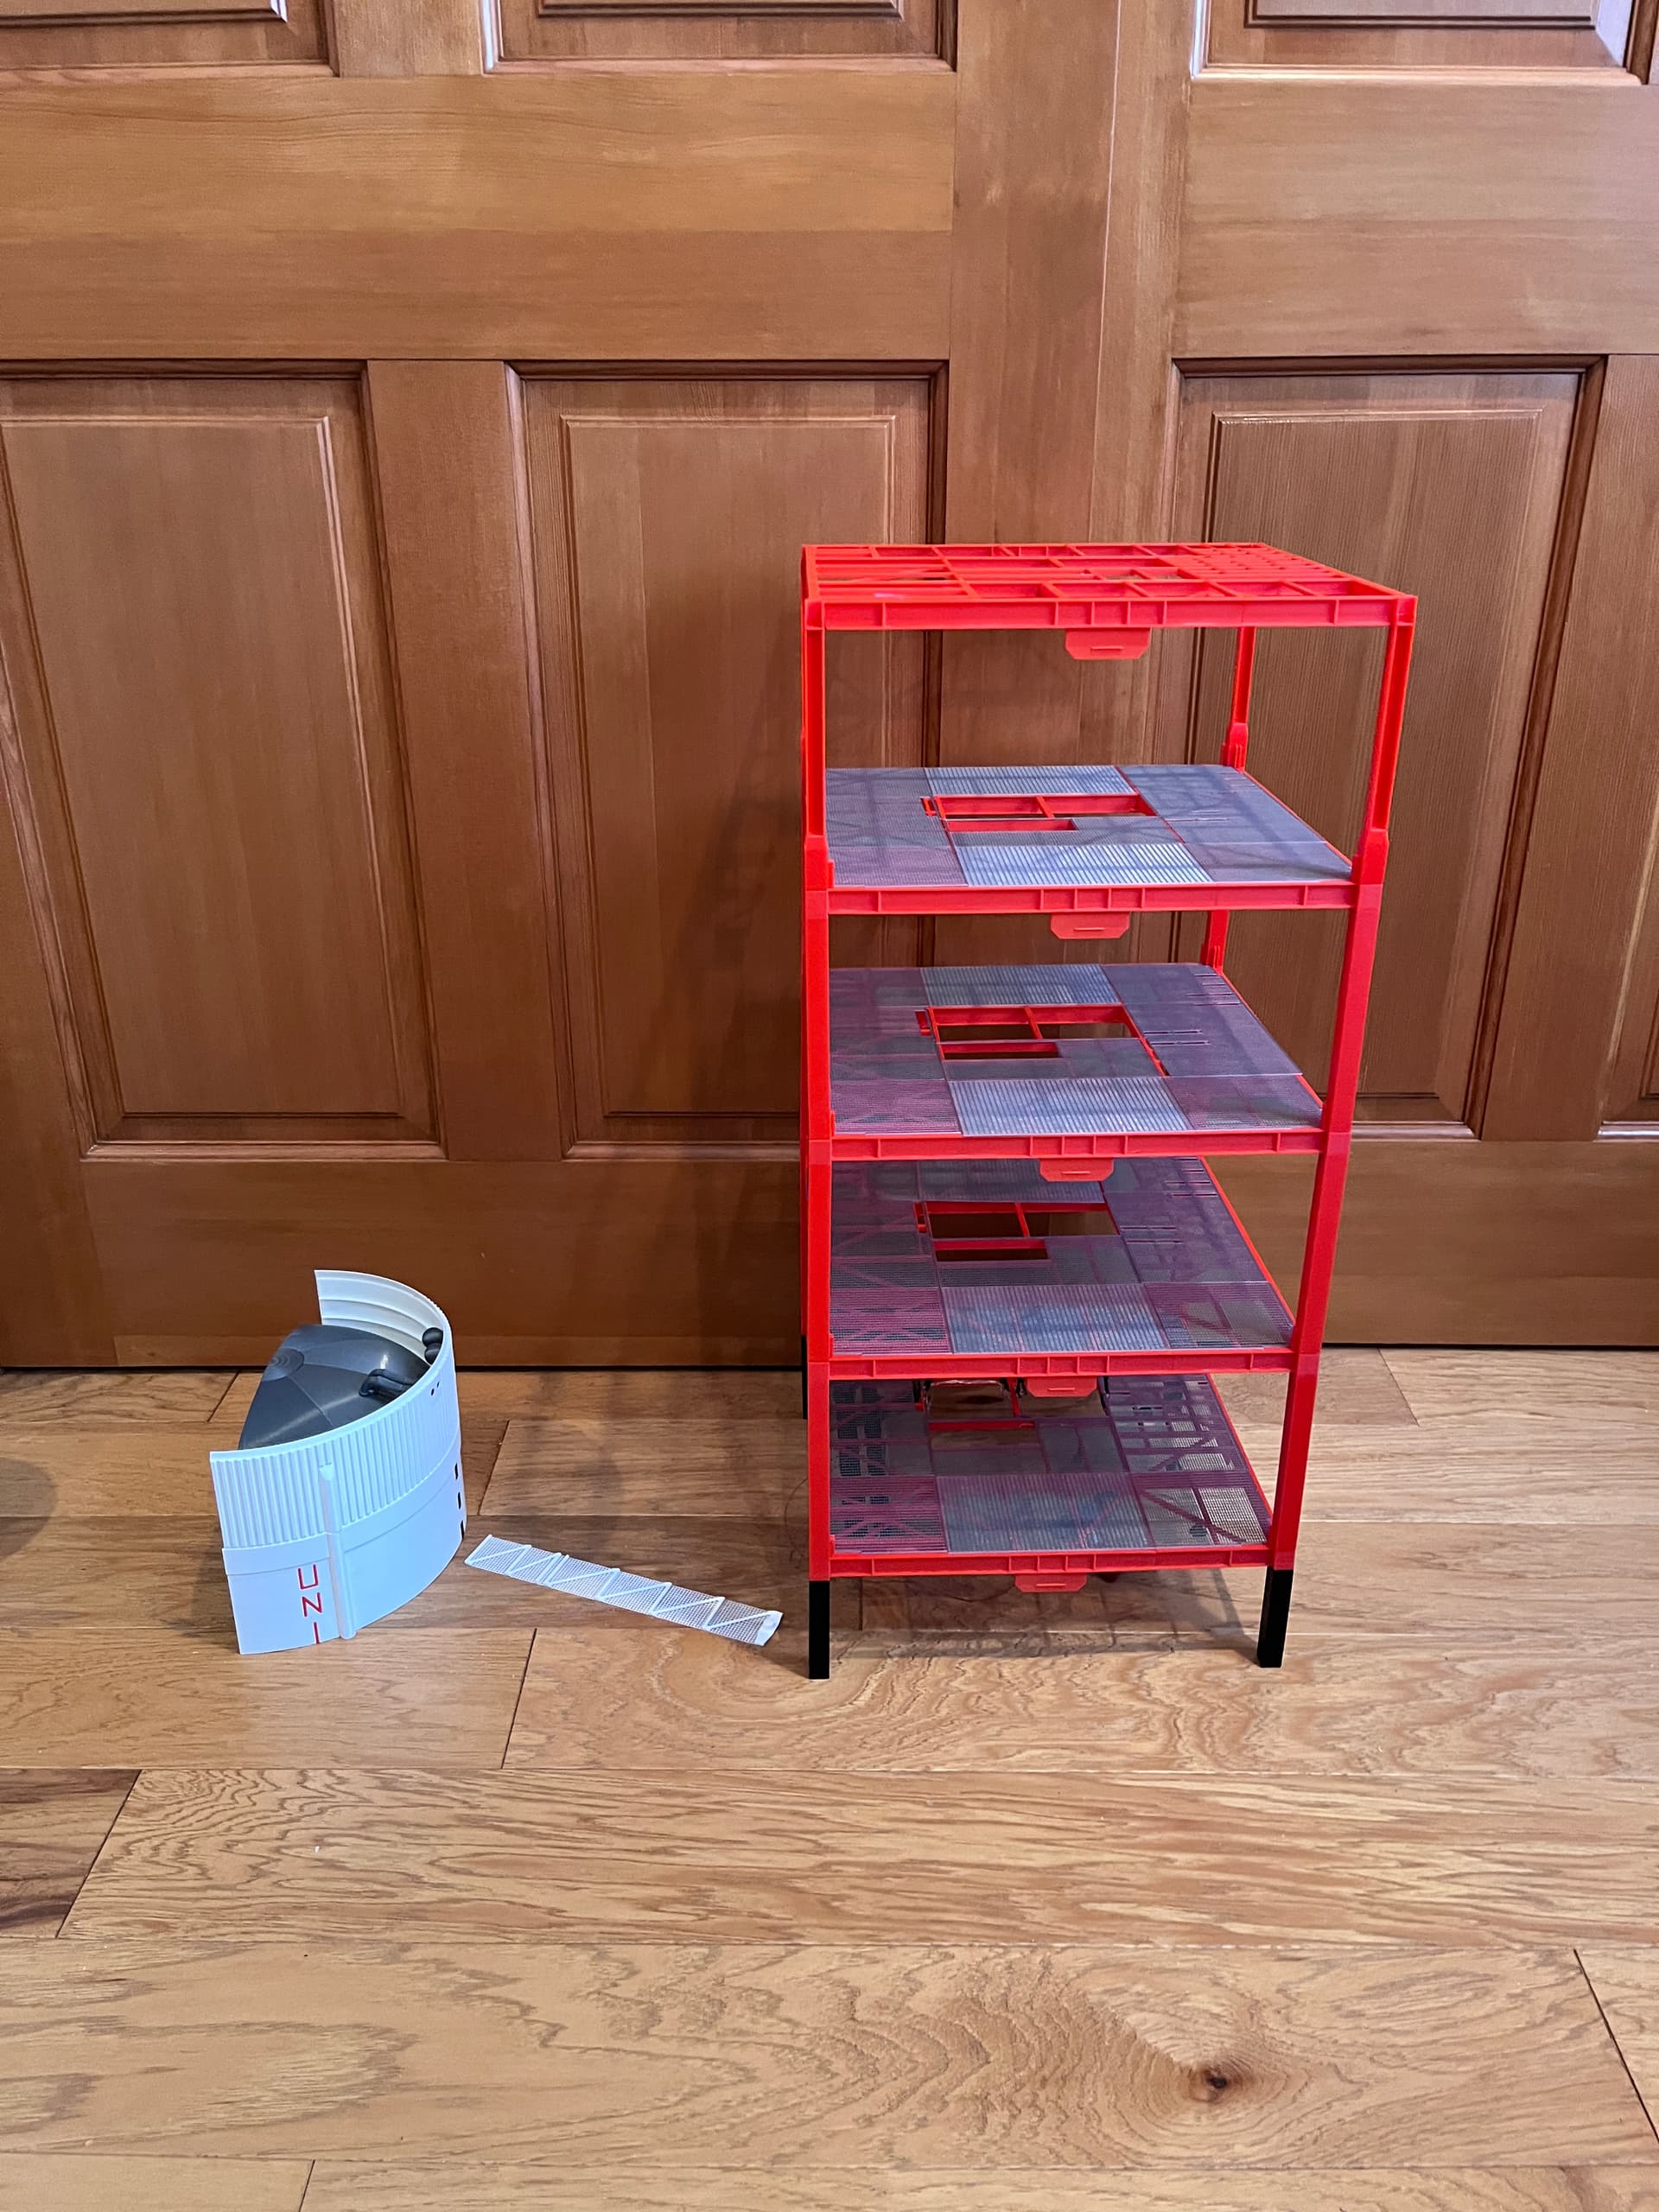
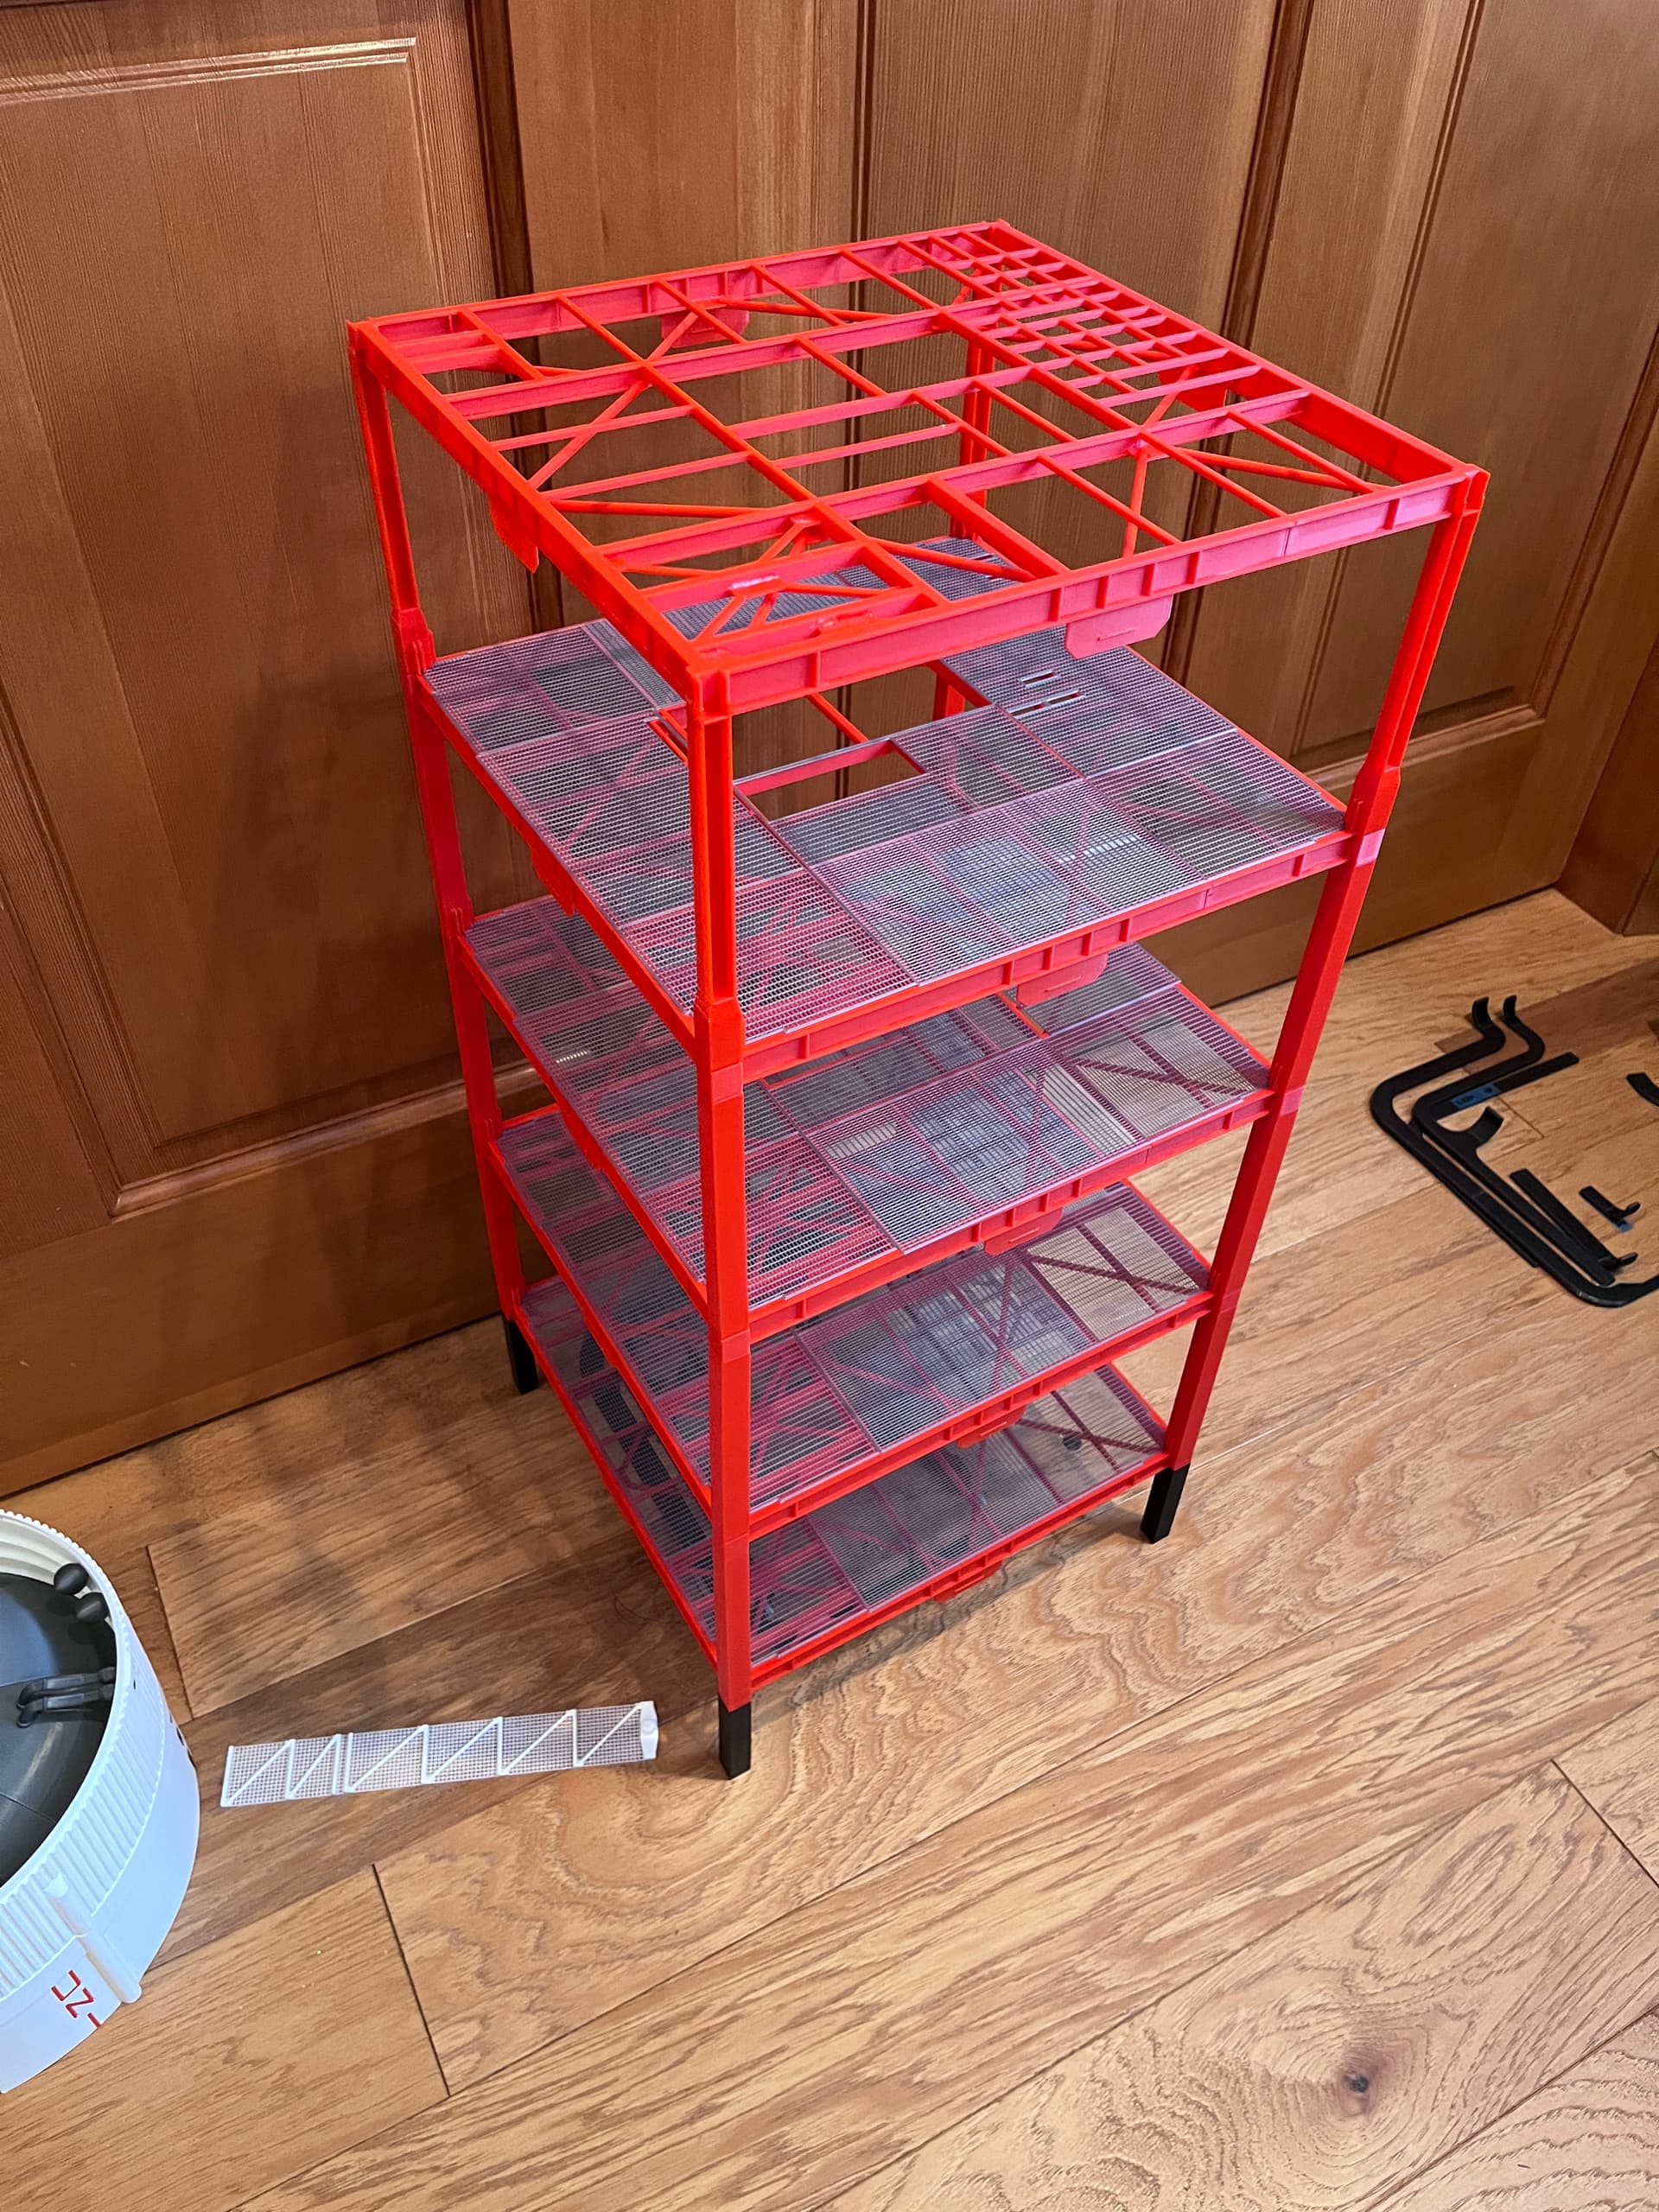
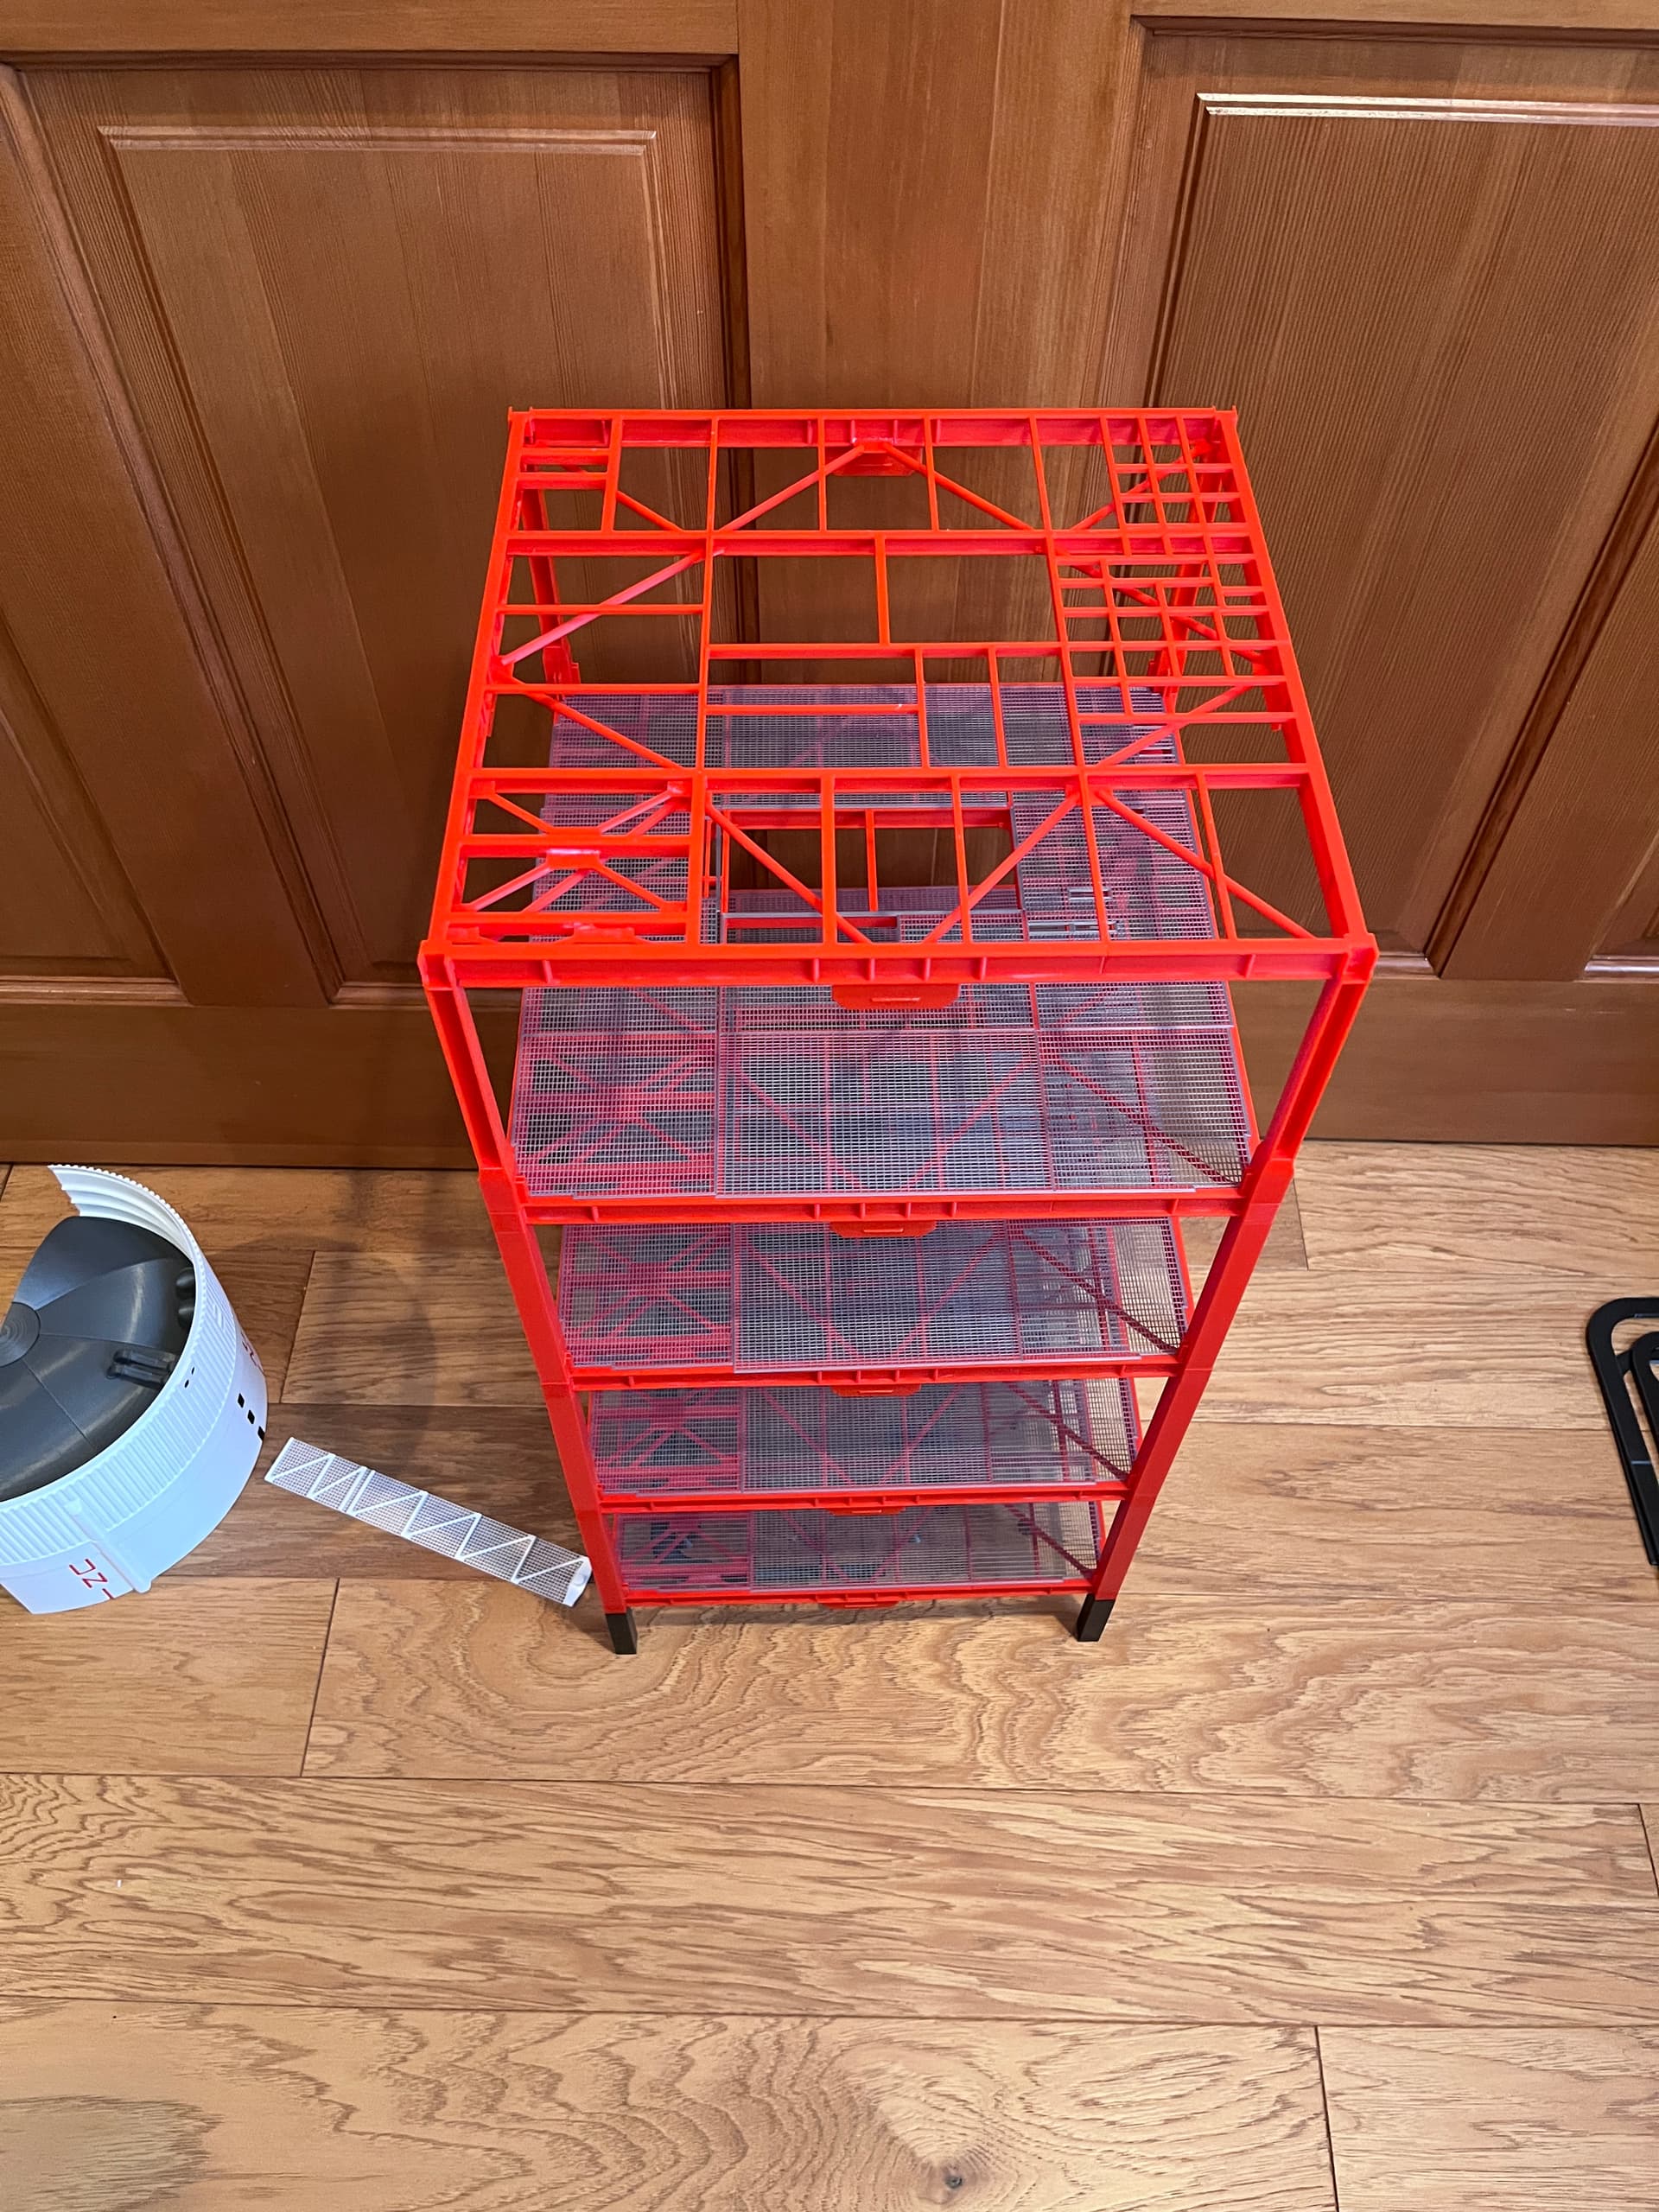
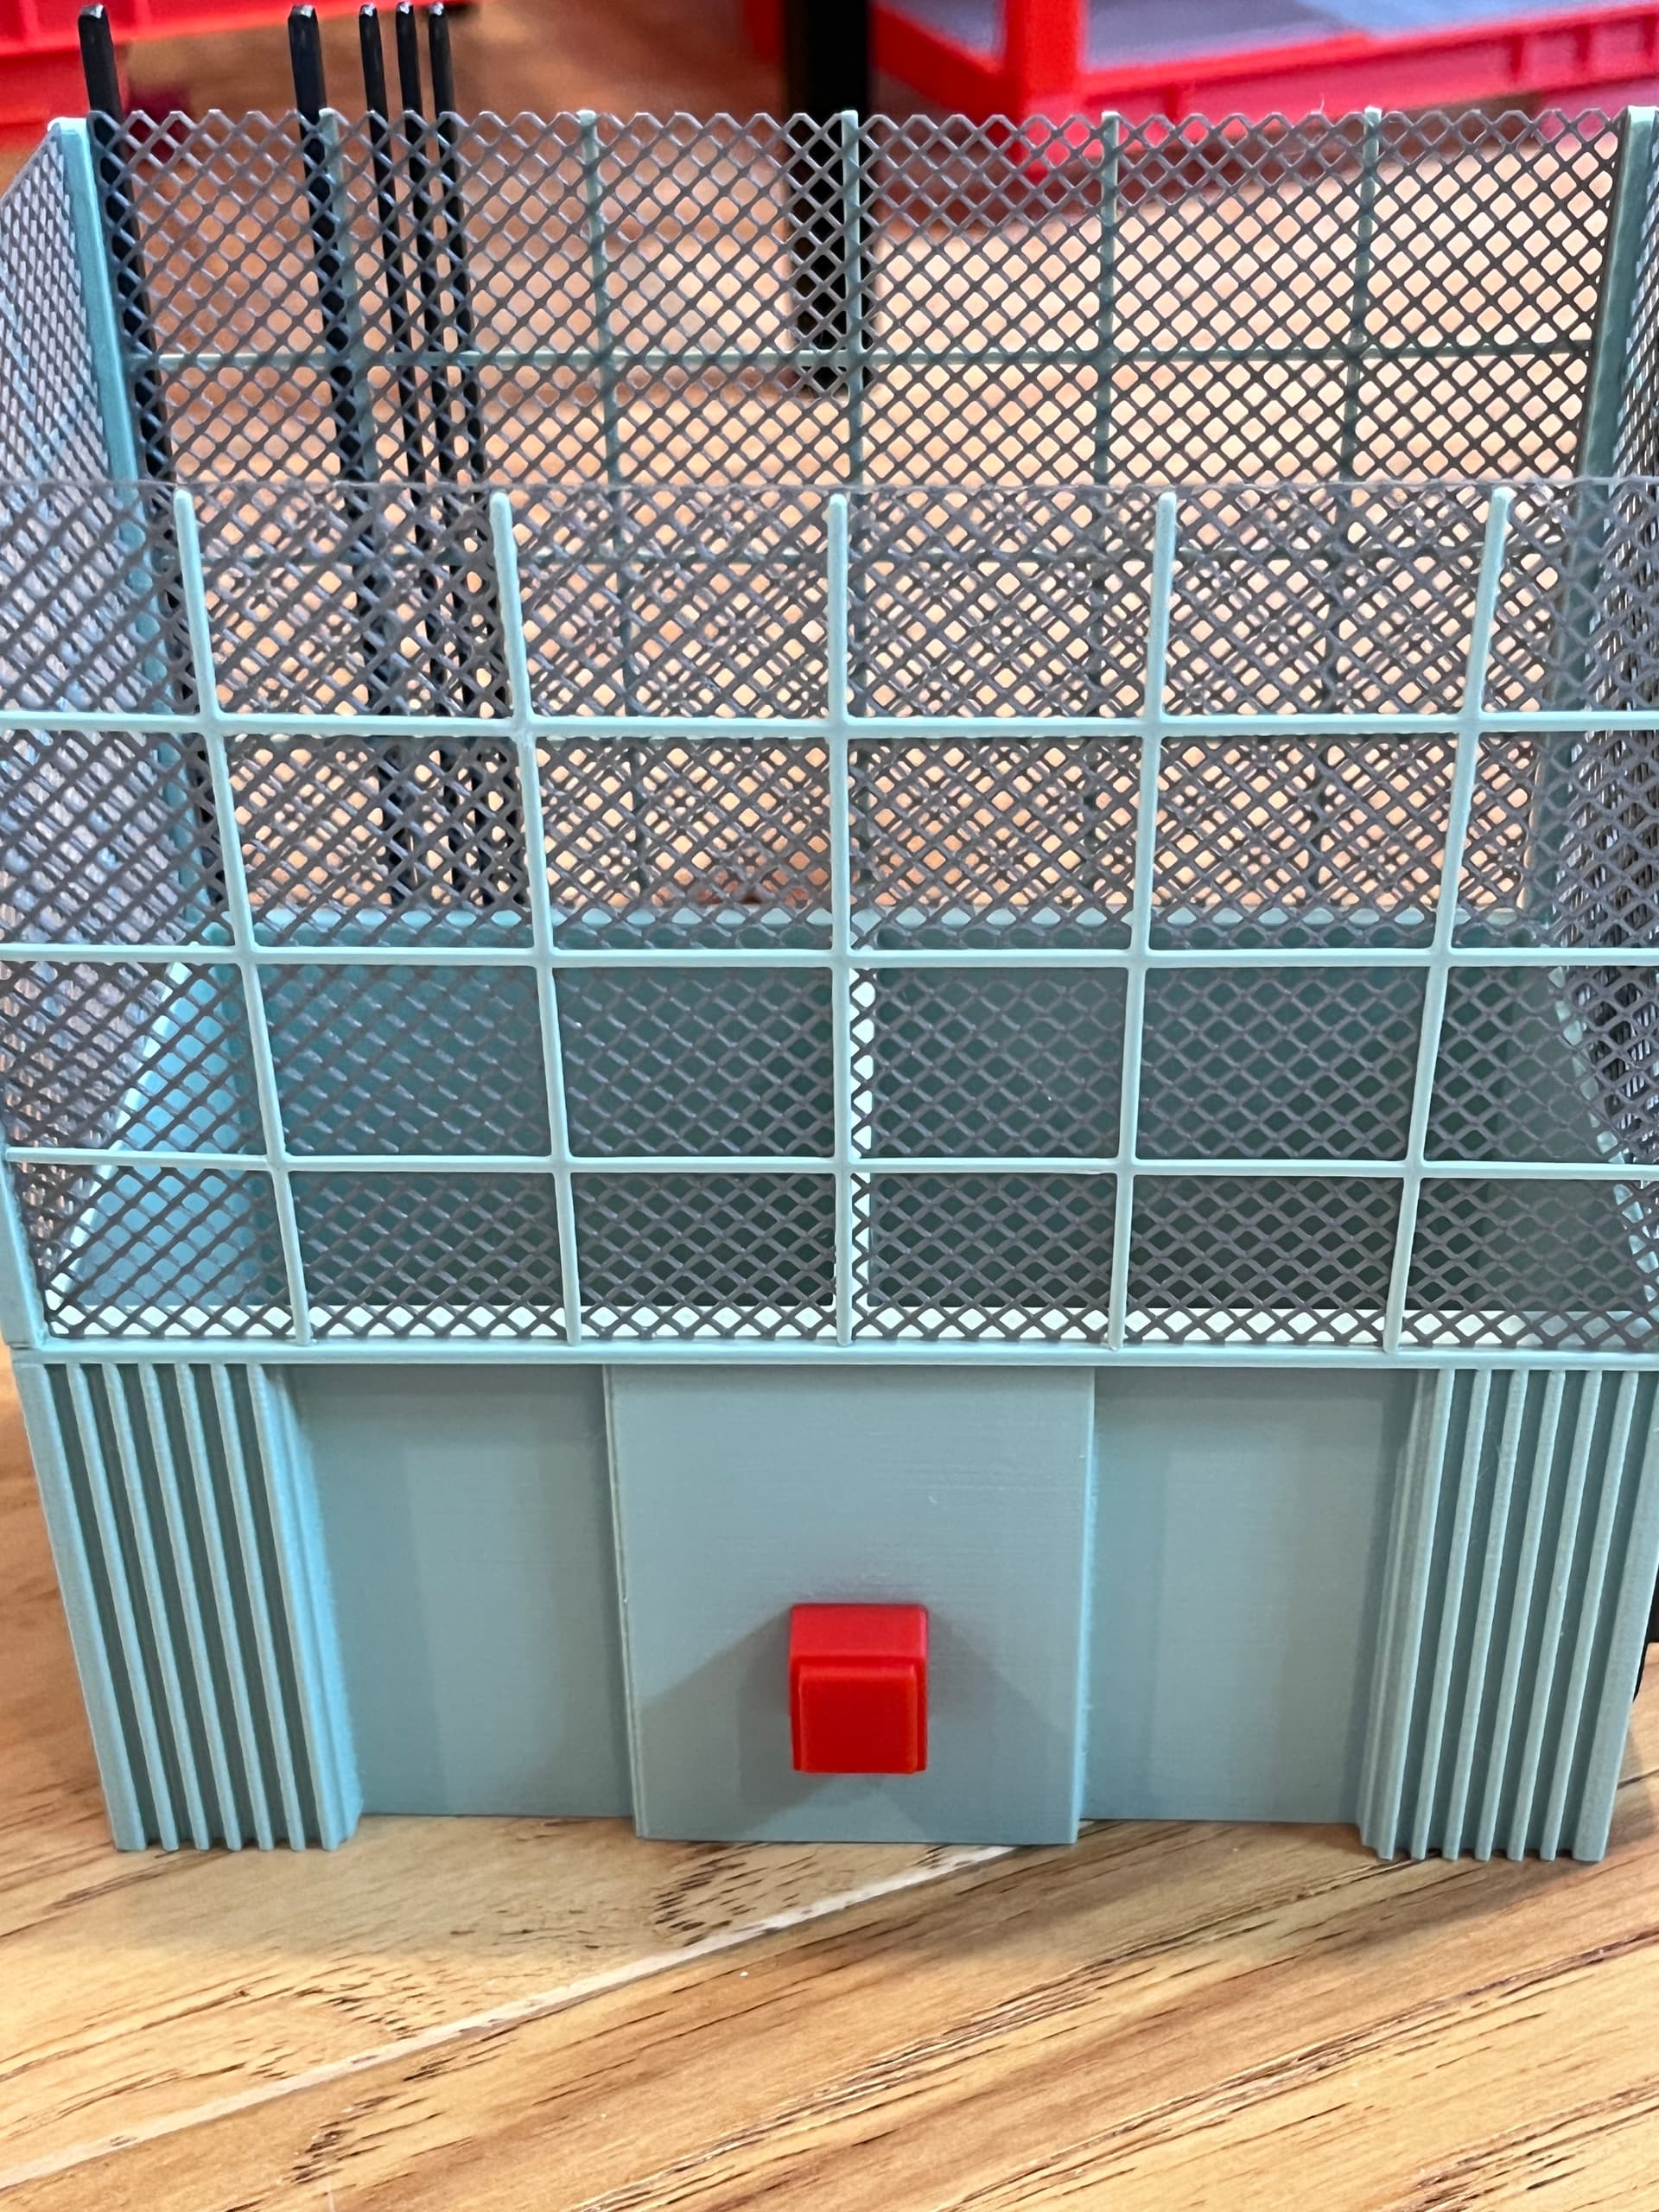
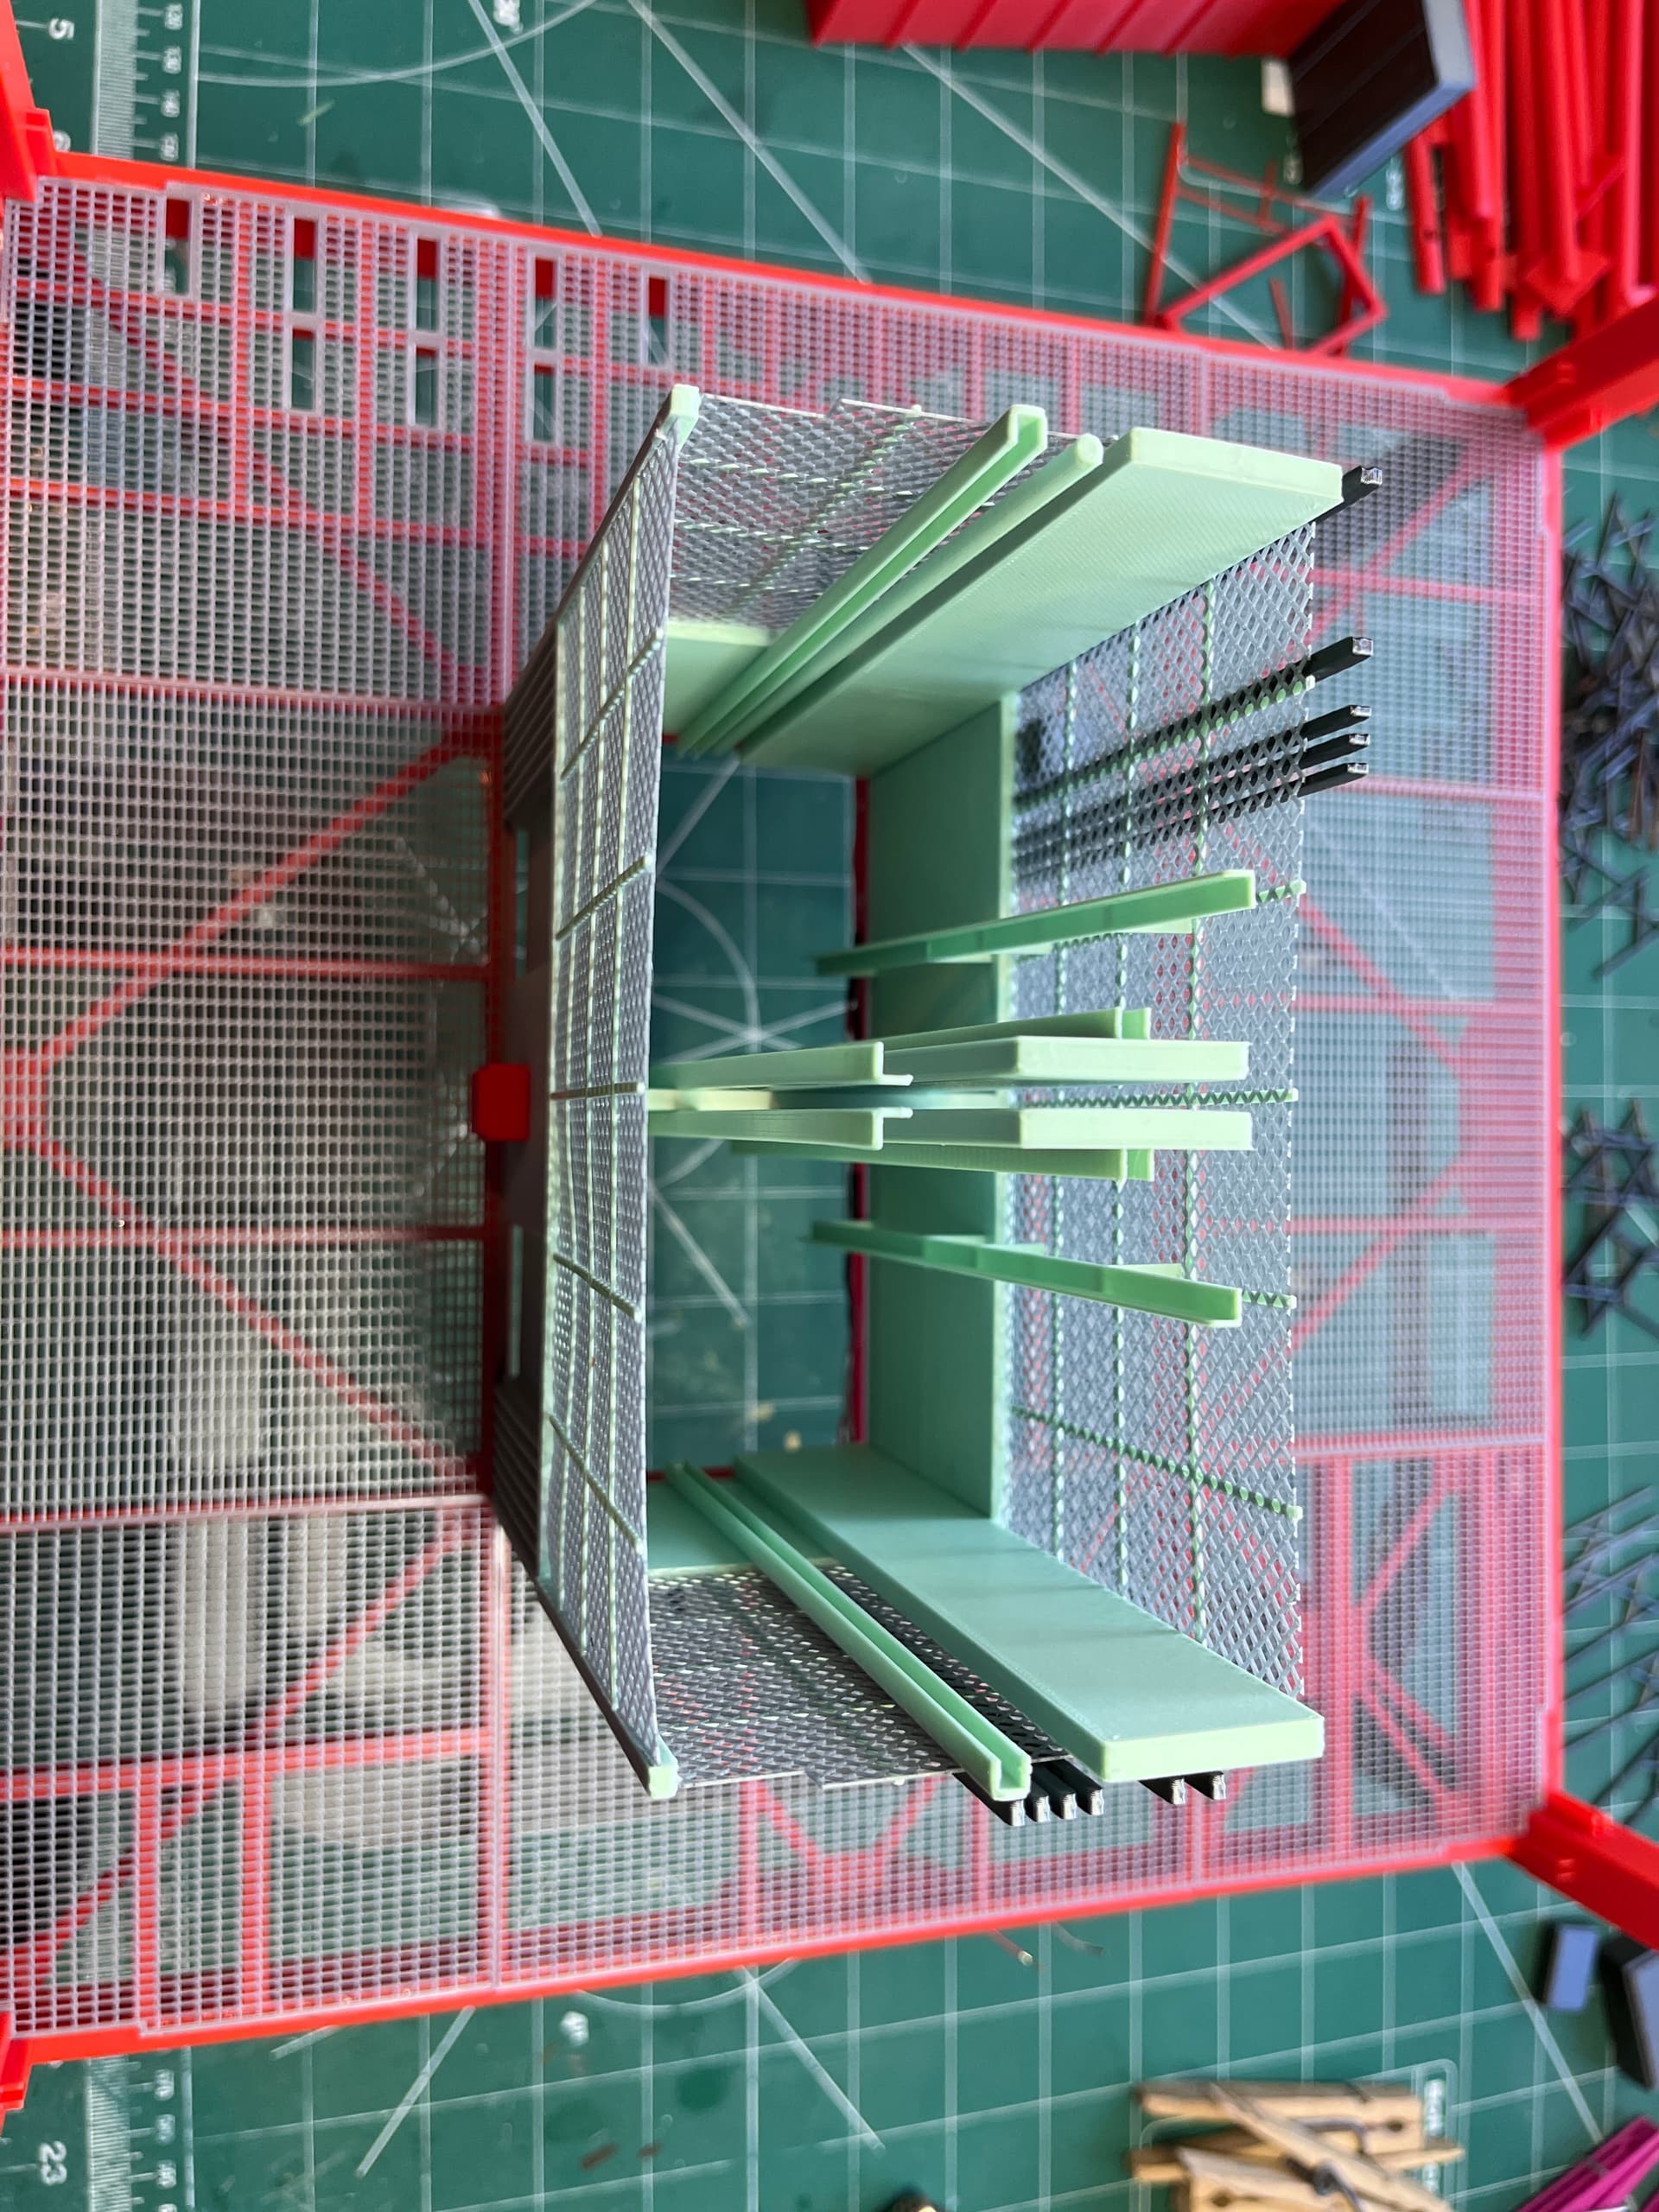
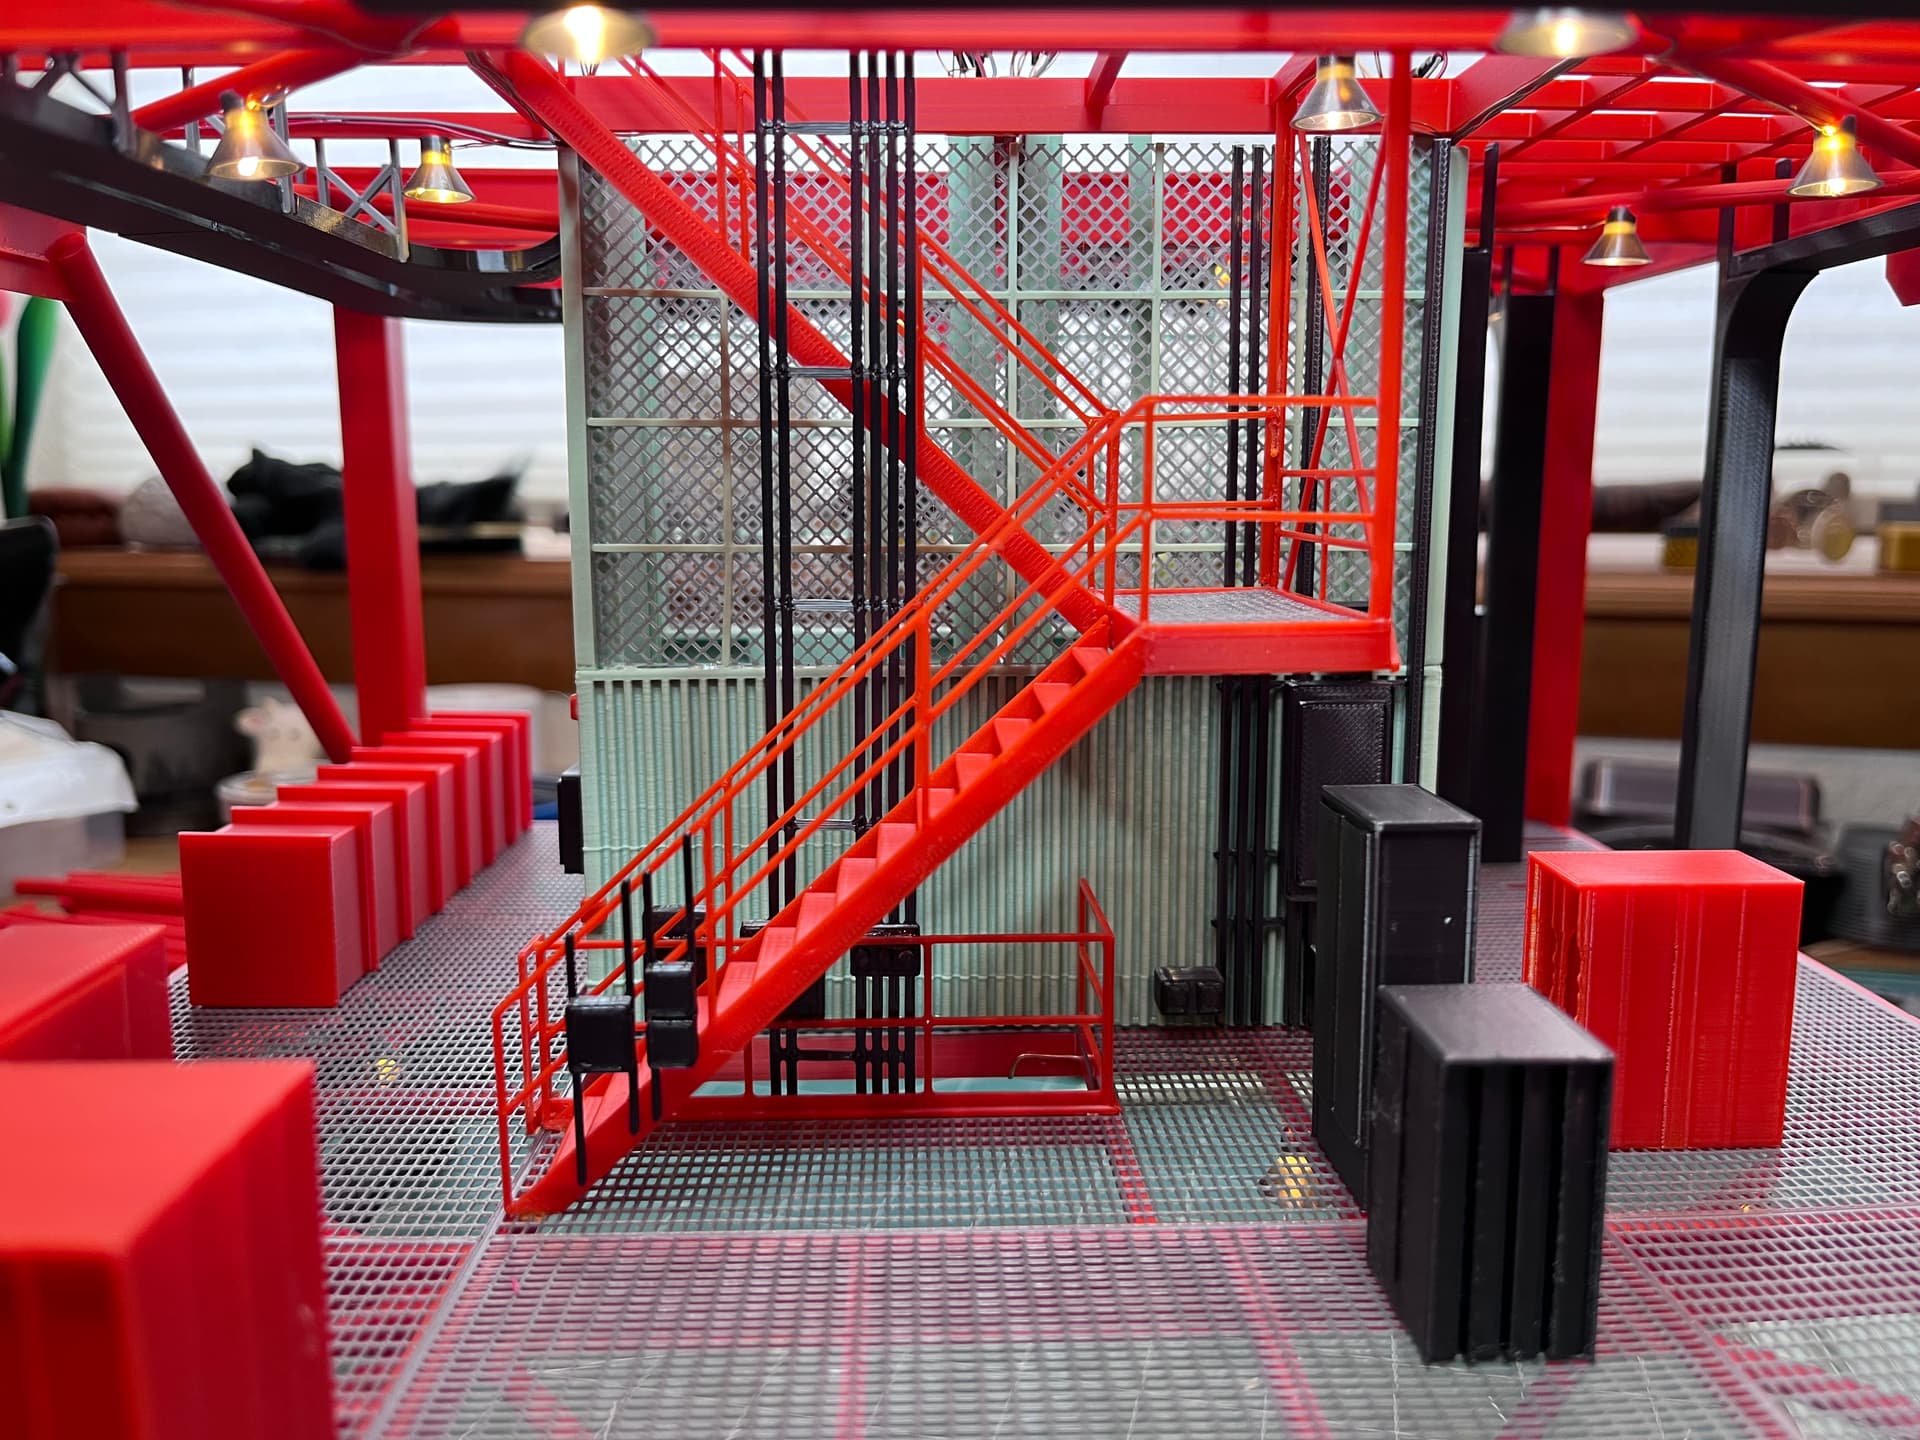
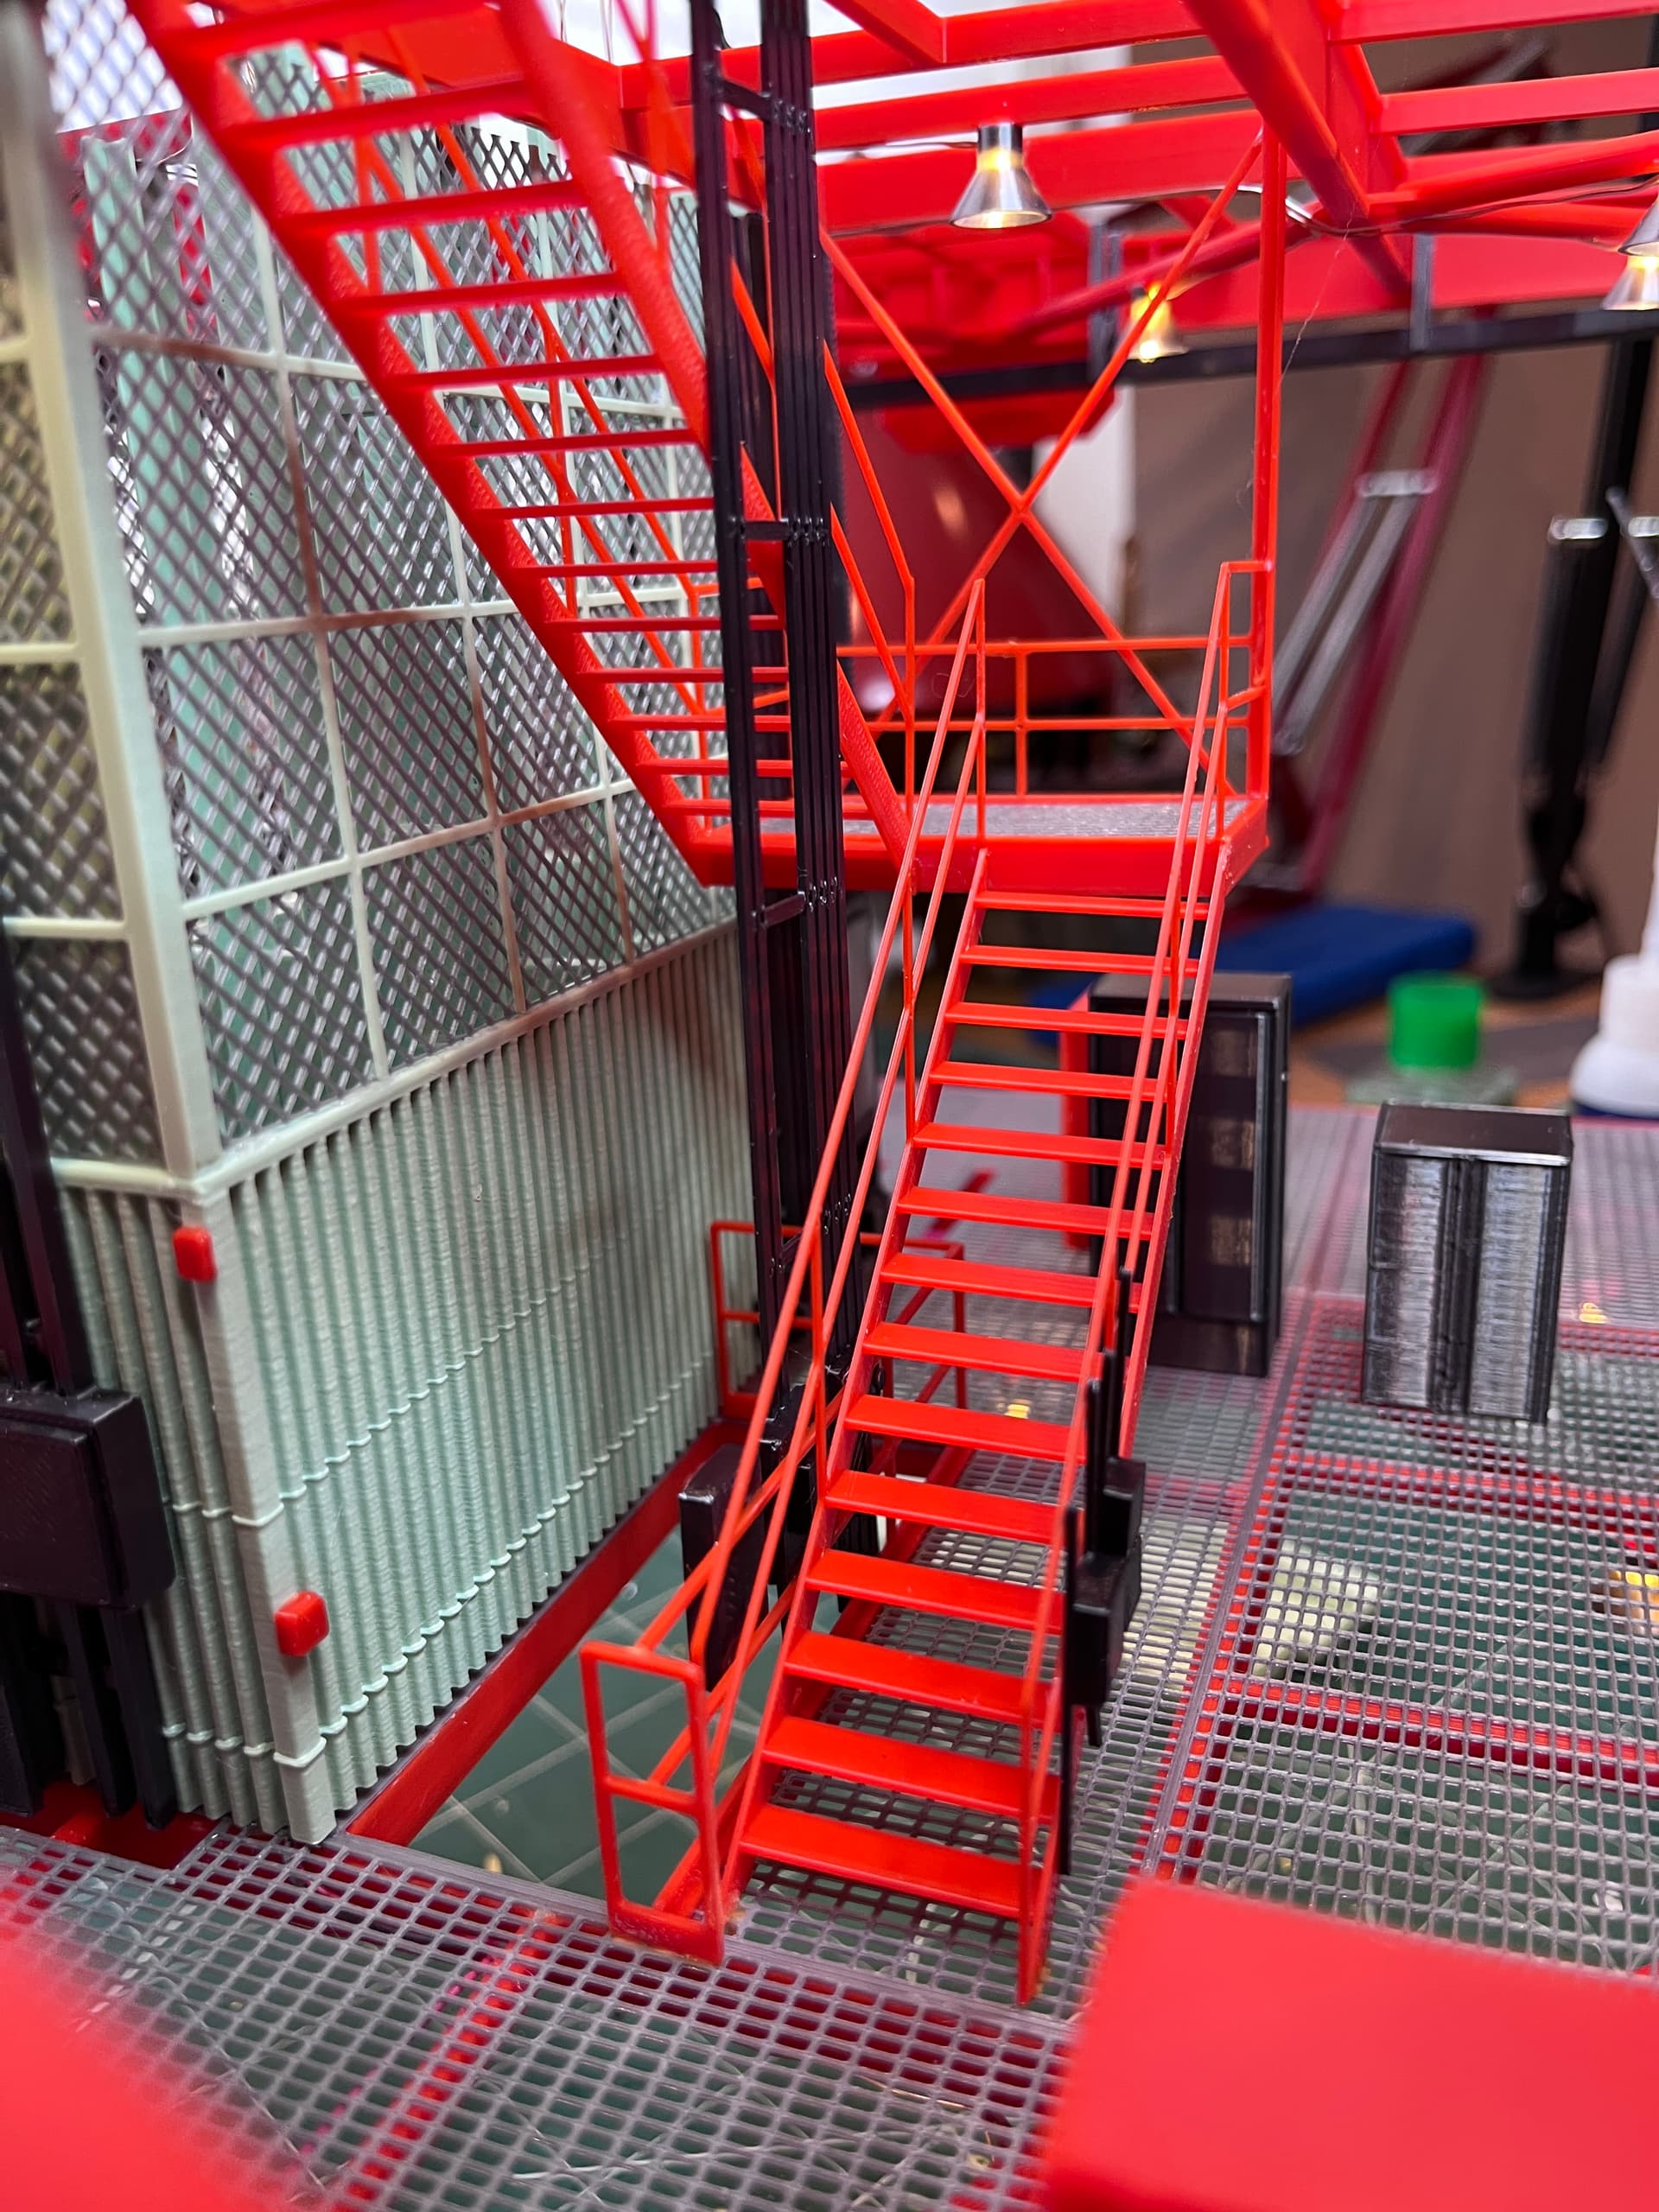
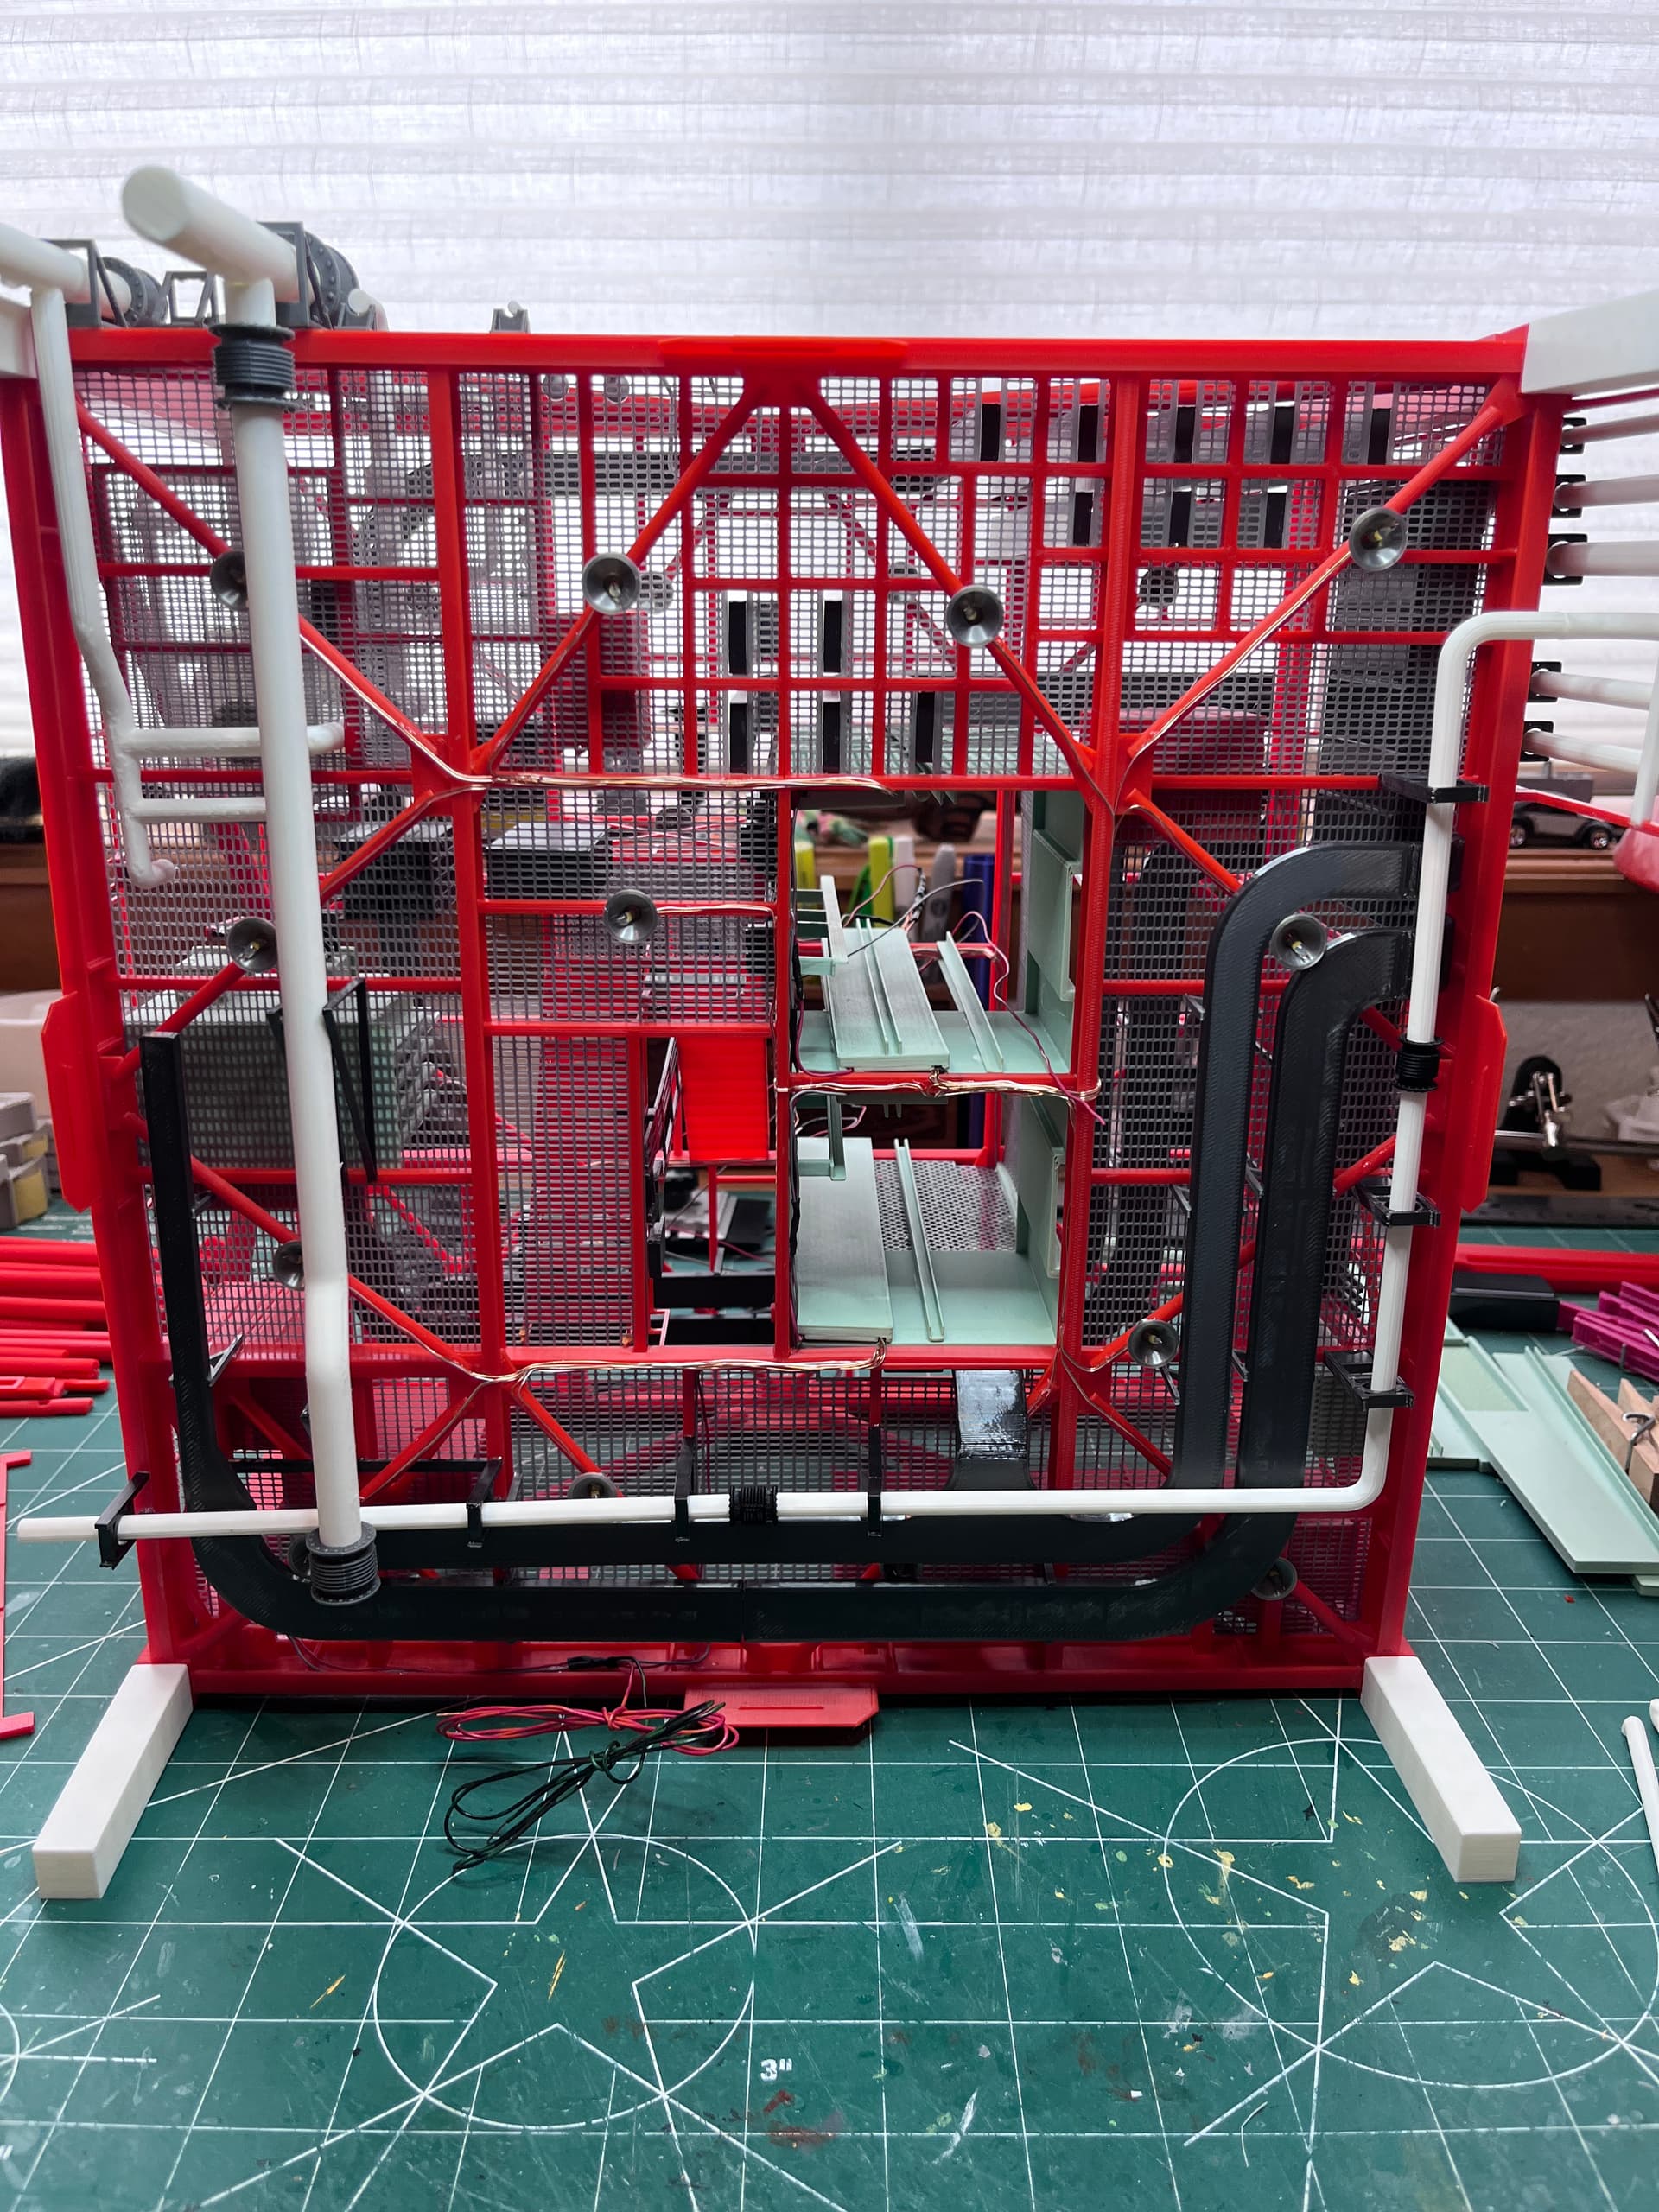
The complete structure is printed. The structure is set in place (not glued) minus the 12" diagonal cross braces. The floor grating is also set in place. I have chosen not to add floor grating to the top level so the floor beam structure is exposed. Also getting a start on the Saturn V cross section.
2 Likes
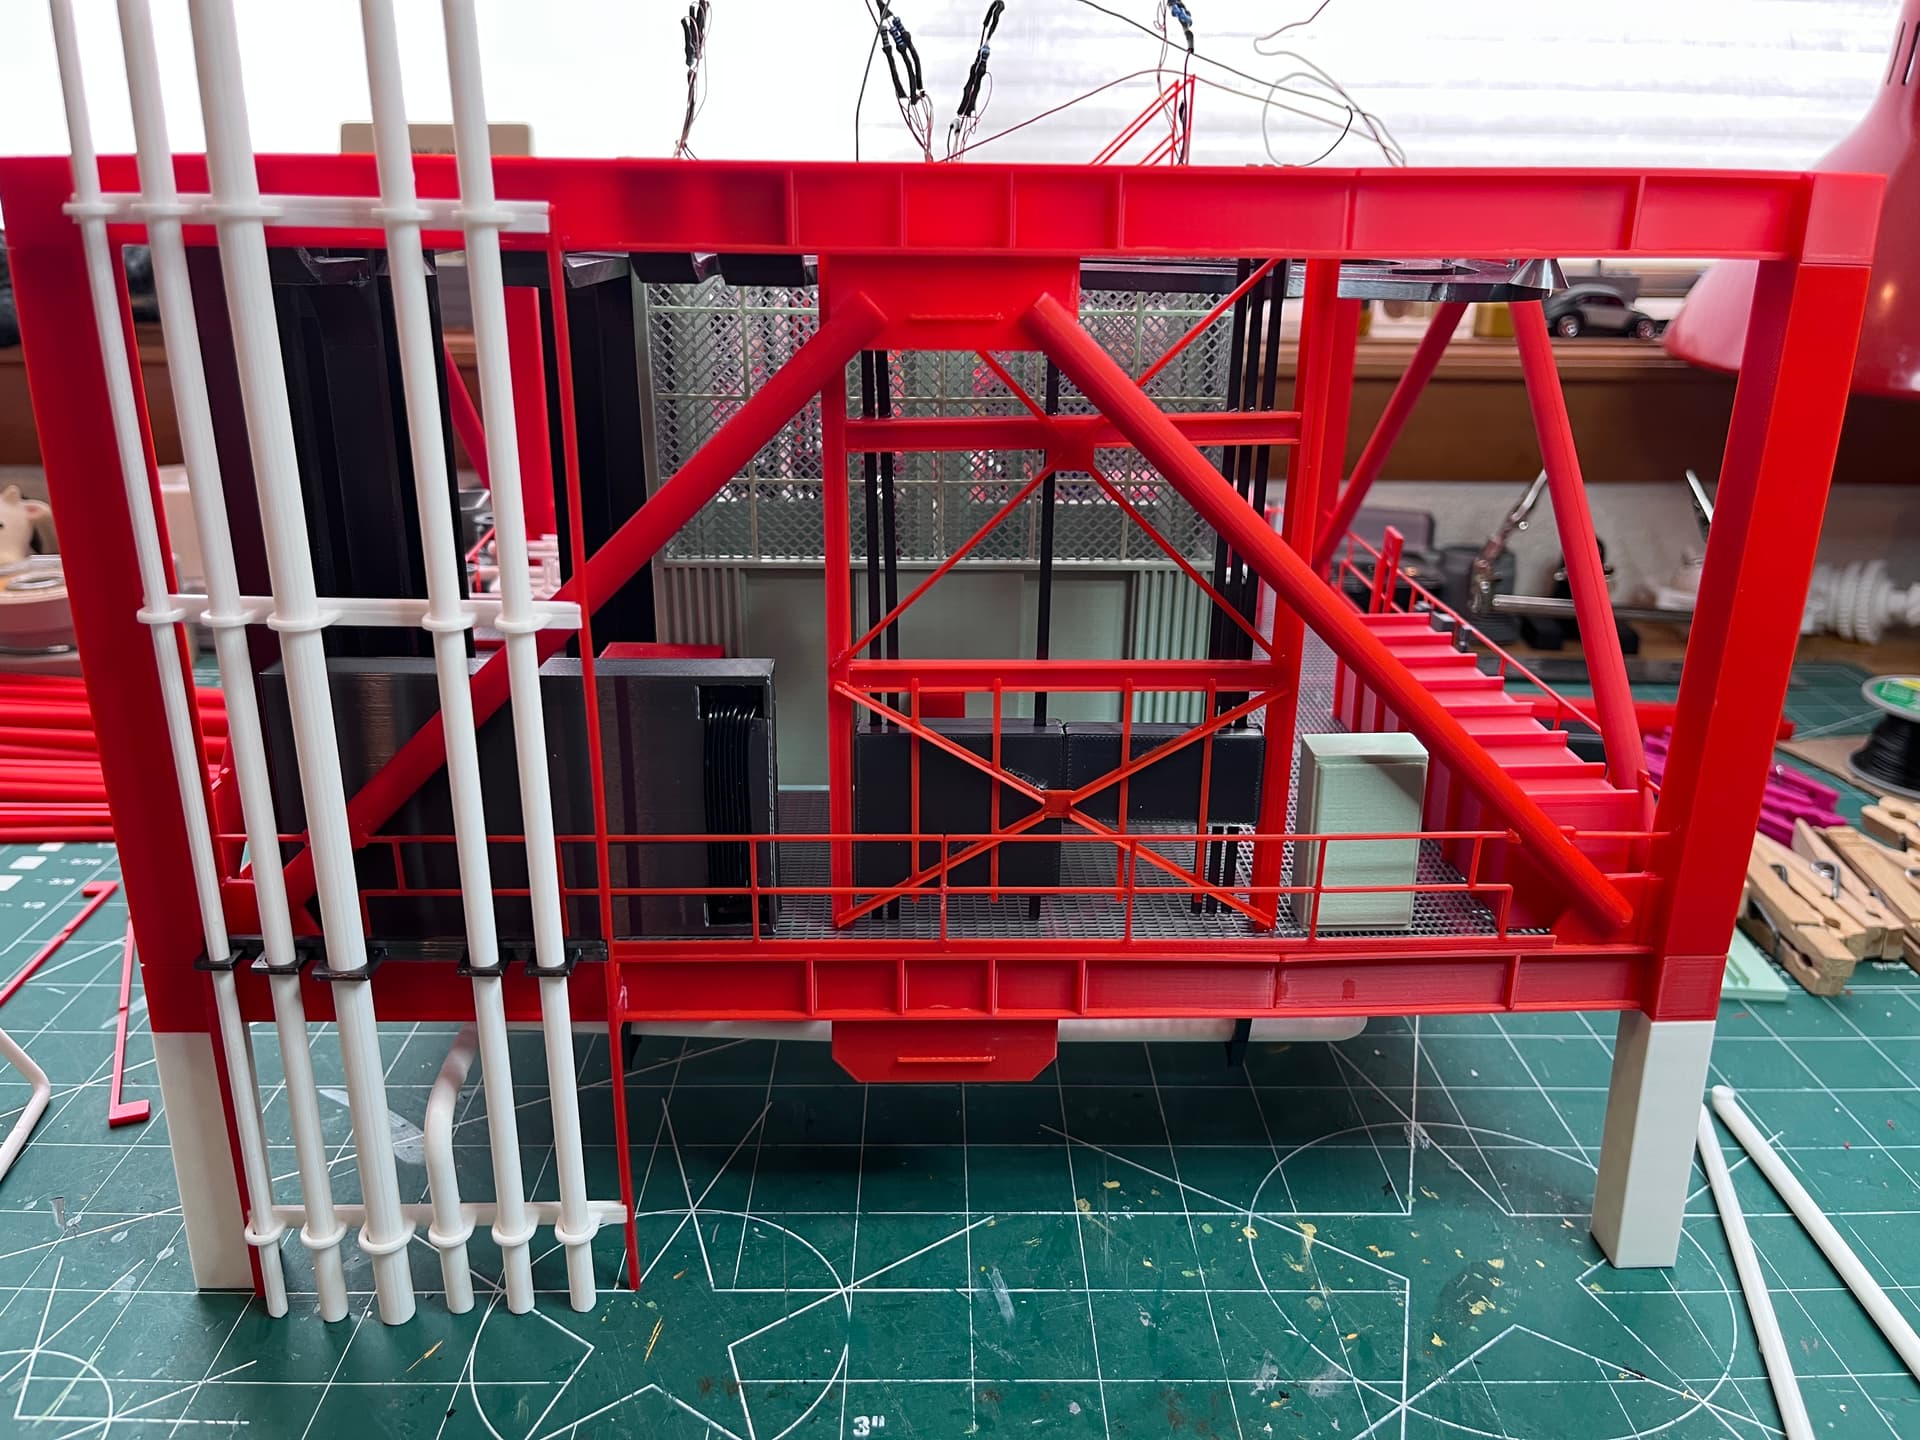
The elevator sub-assemblies are complete. The J-boxes on side 1 and 4 are installed along with various red fire boxes. Side 1 is on 75M-05121-146 and side 4 is on 75M-05121-147.
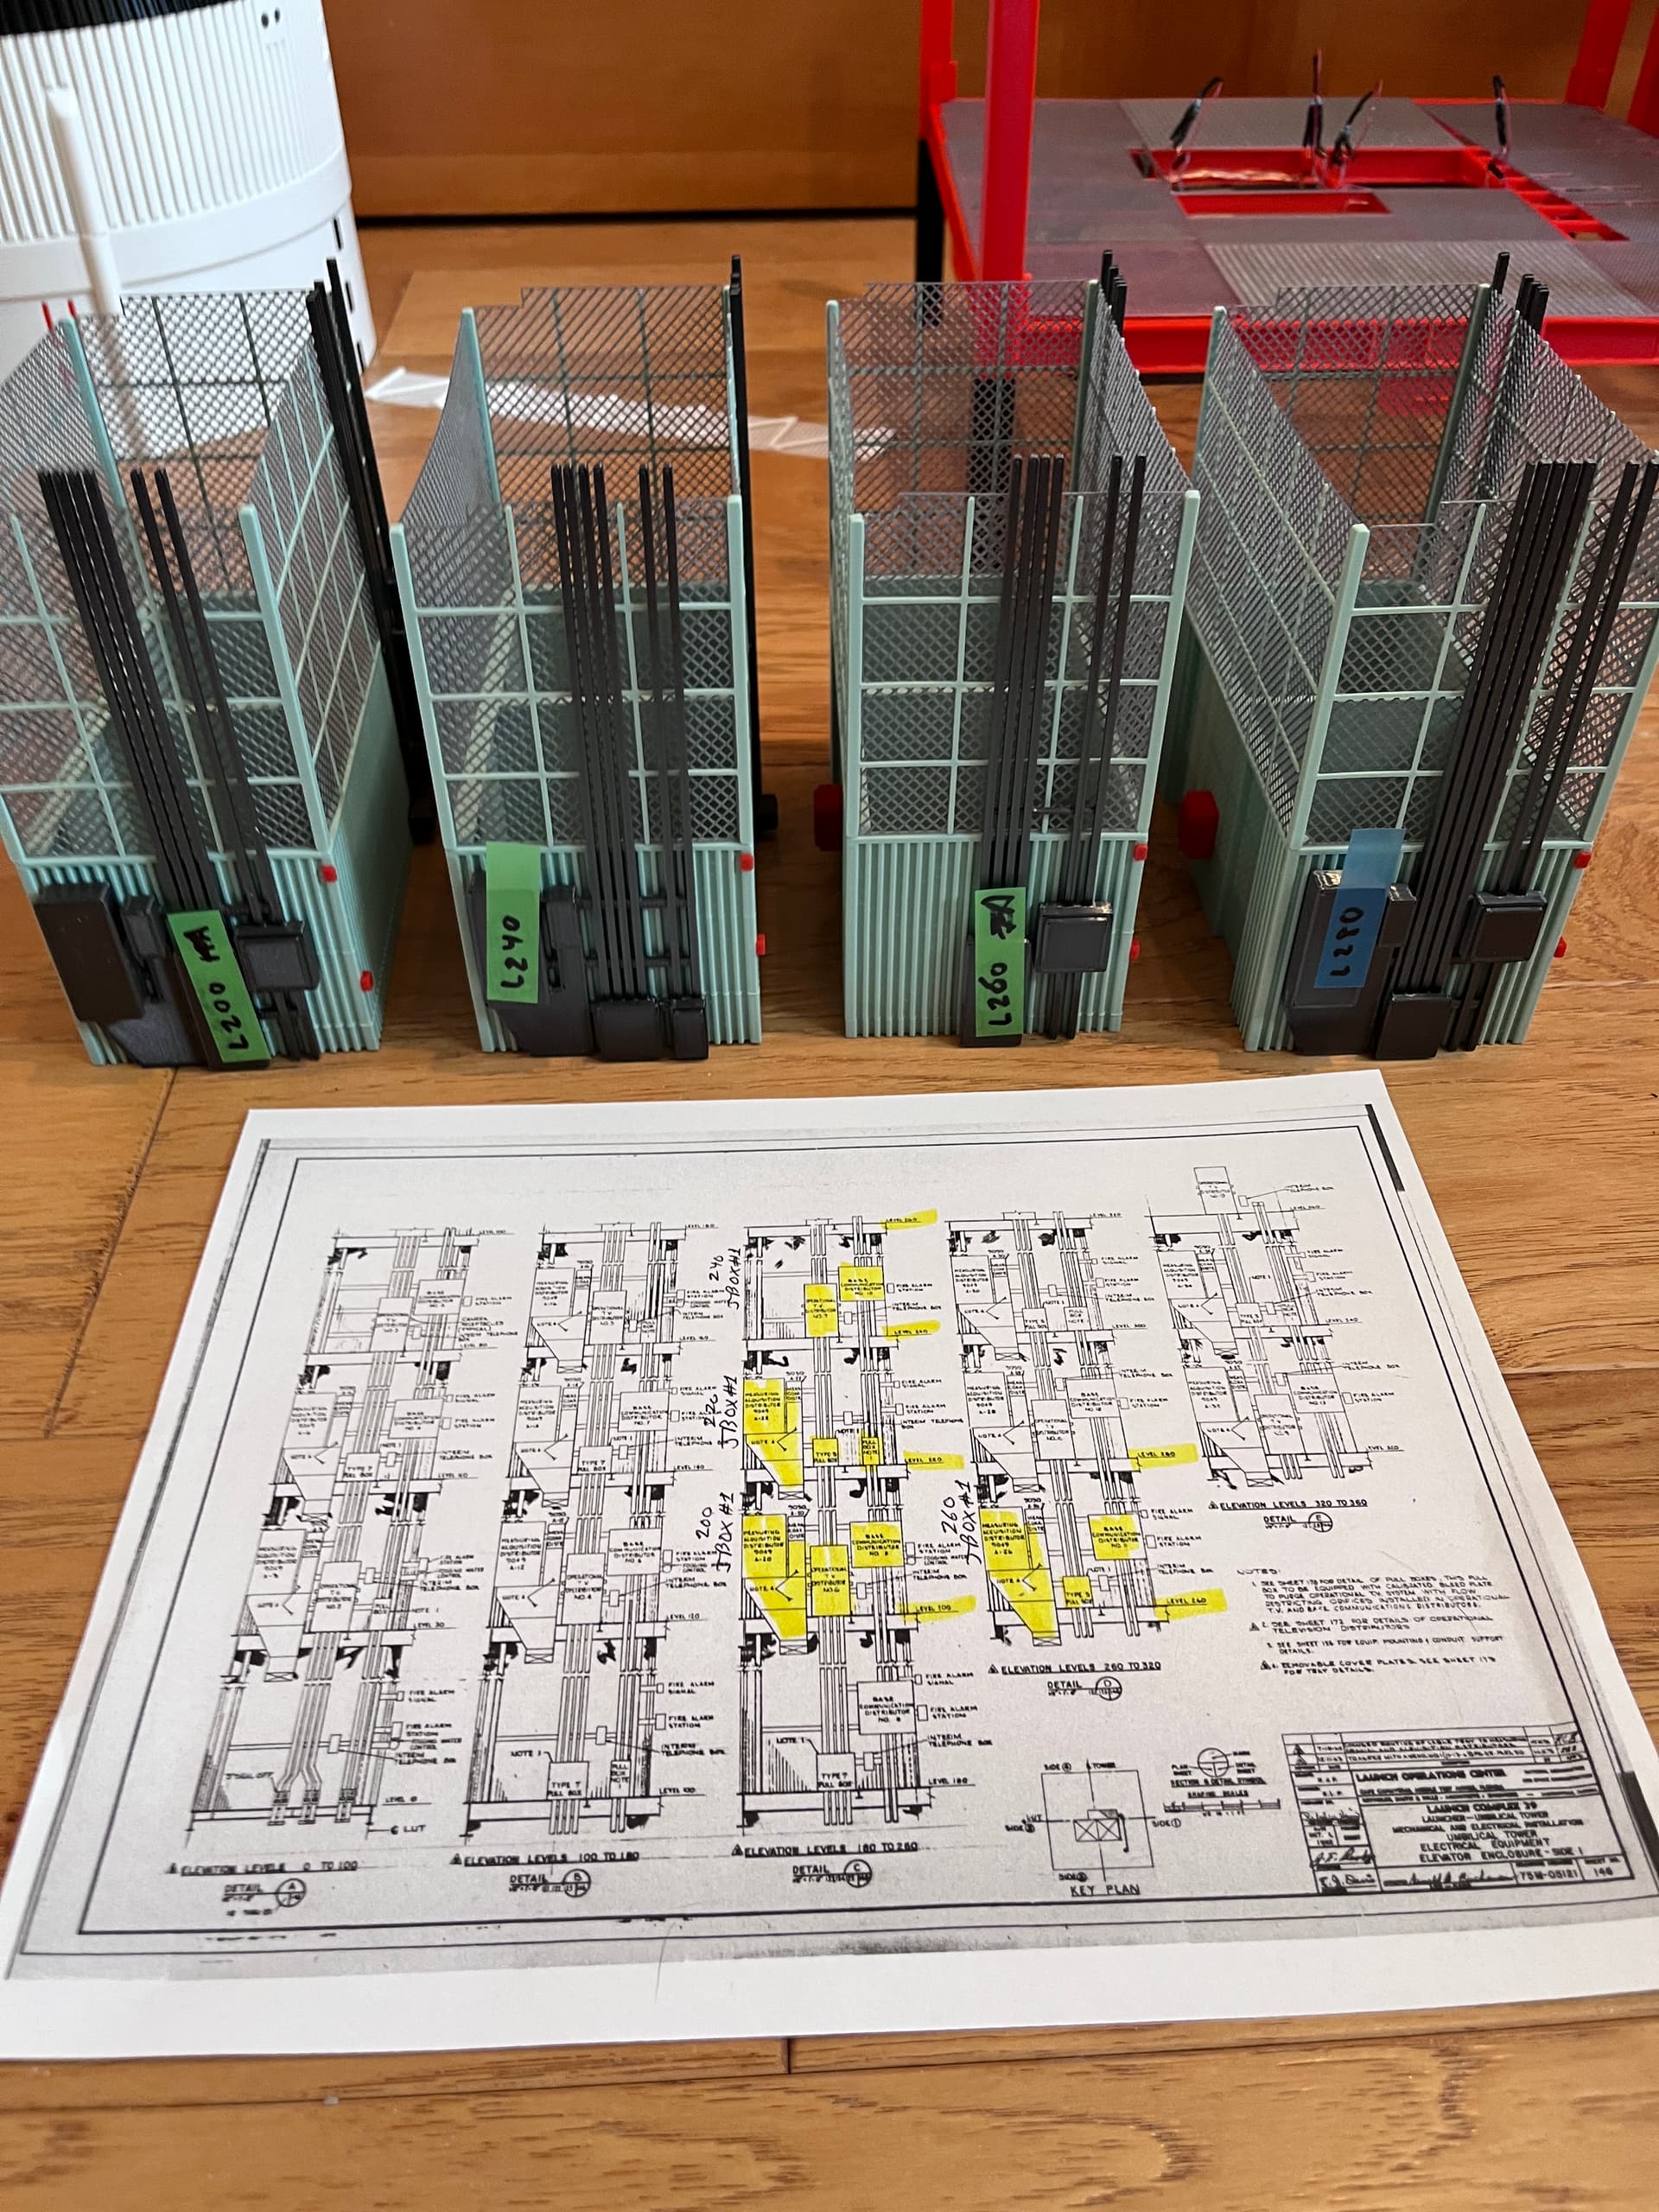
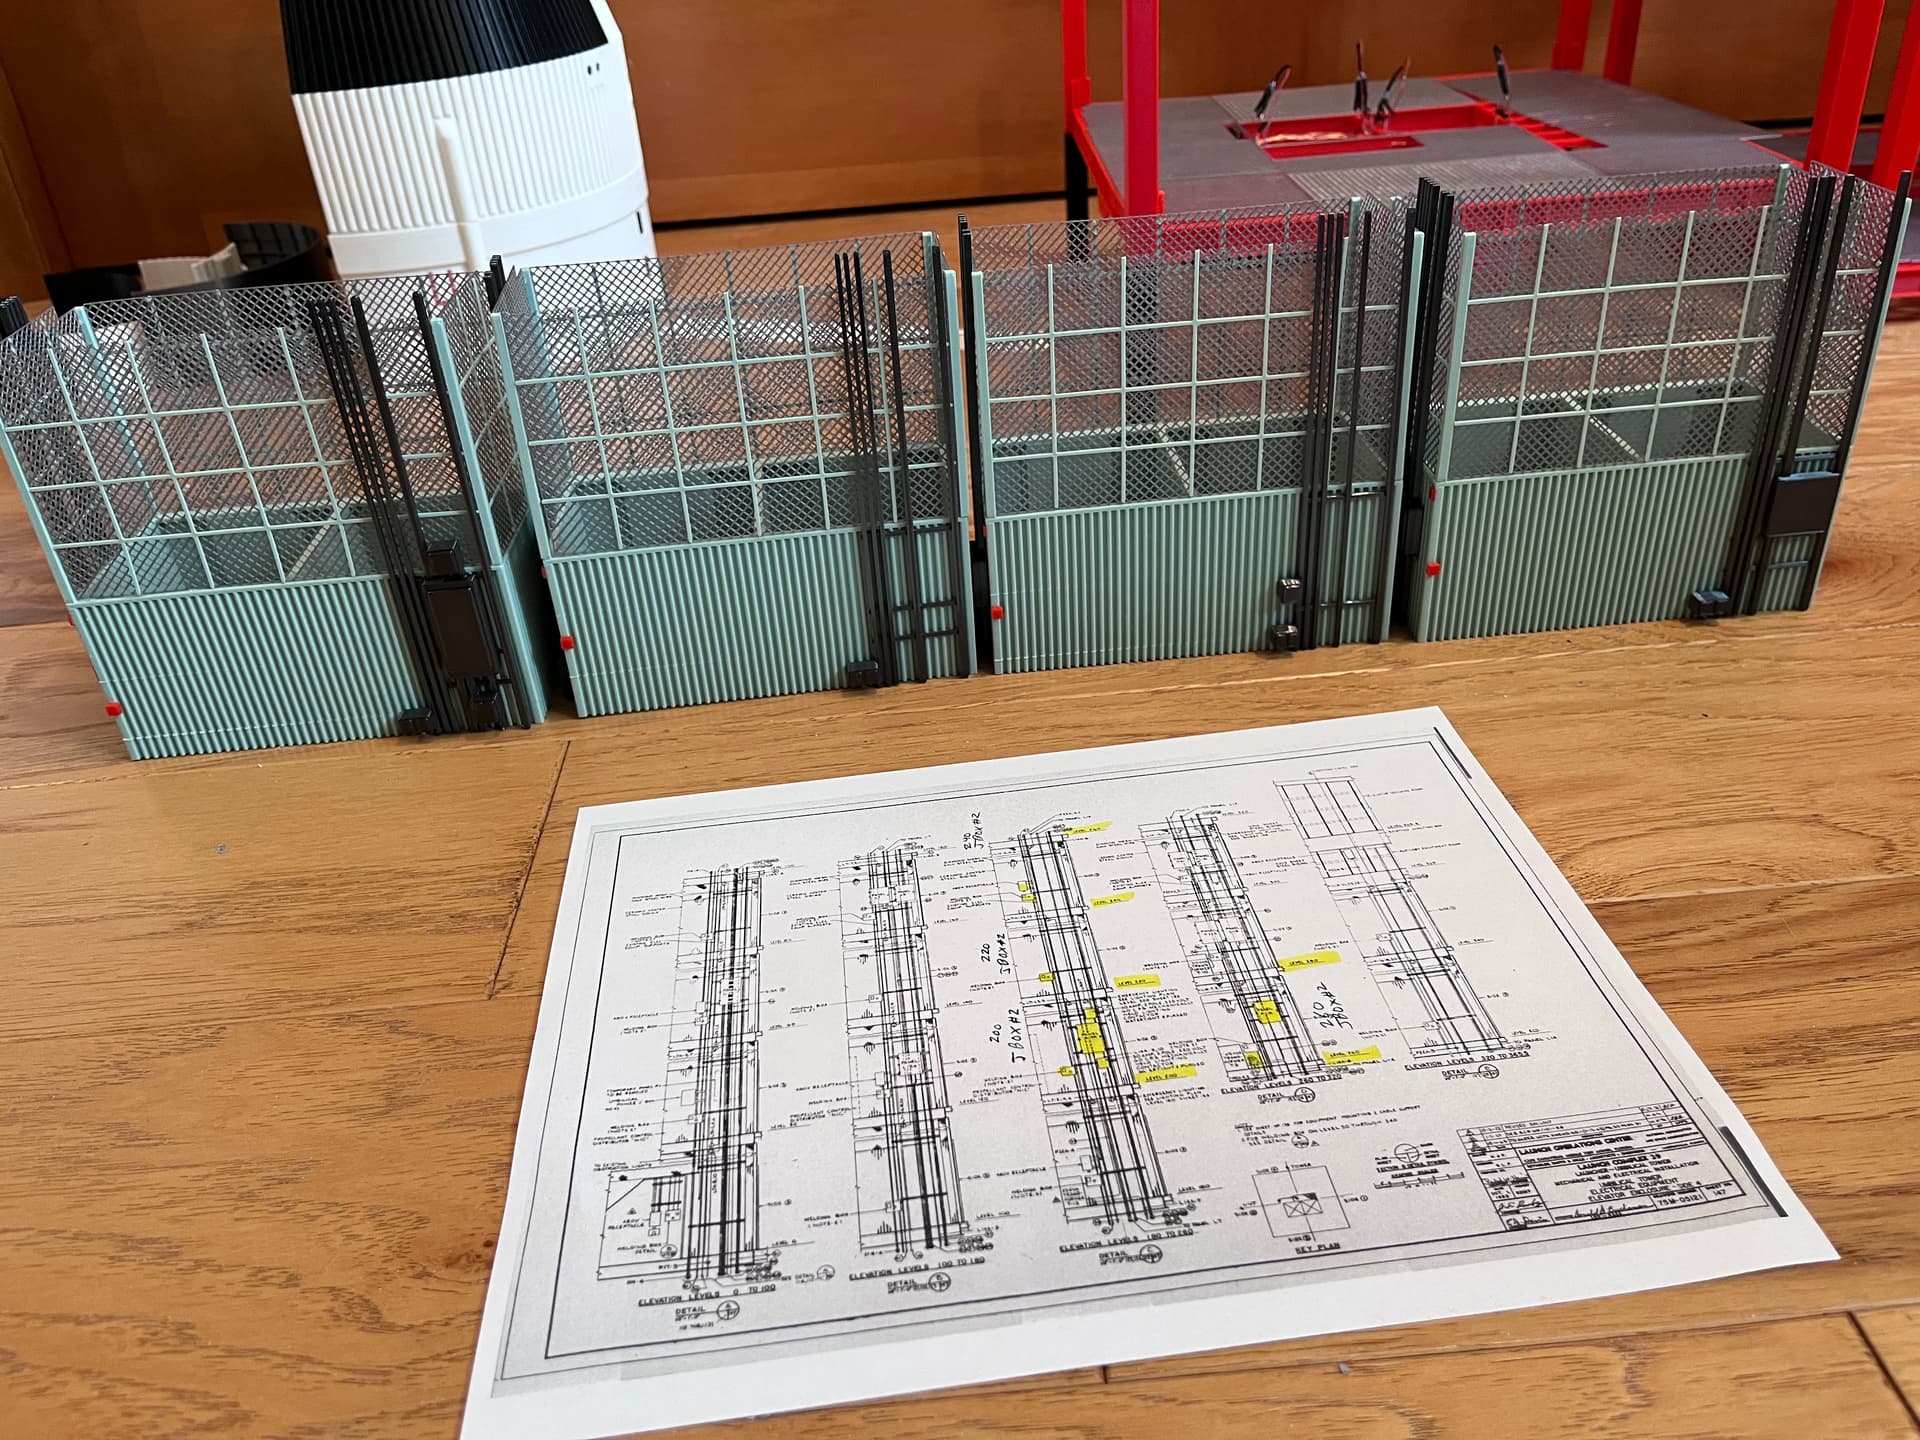
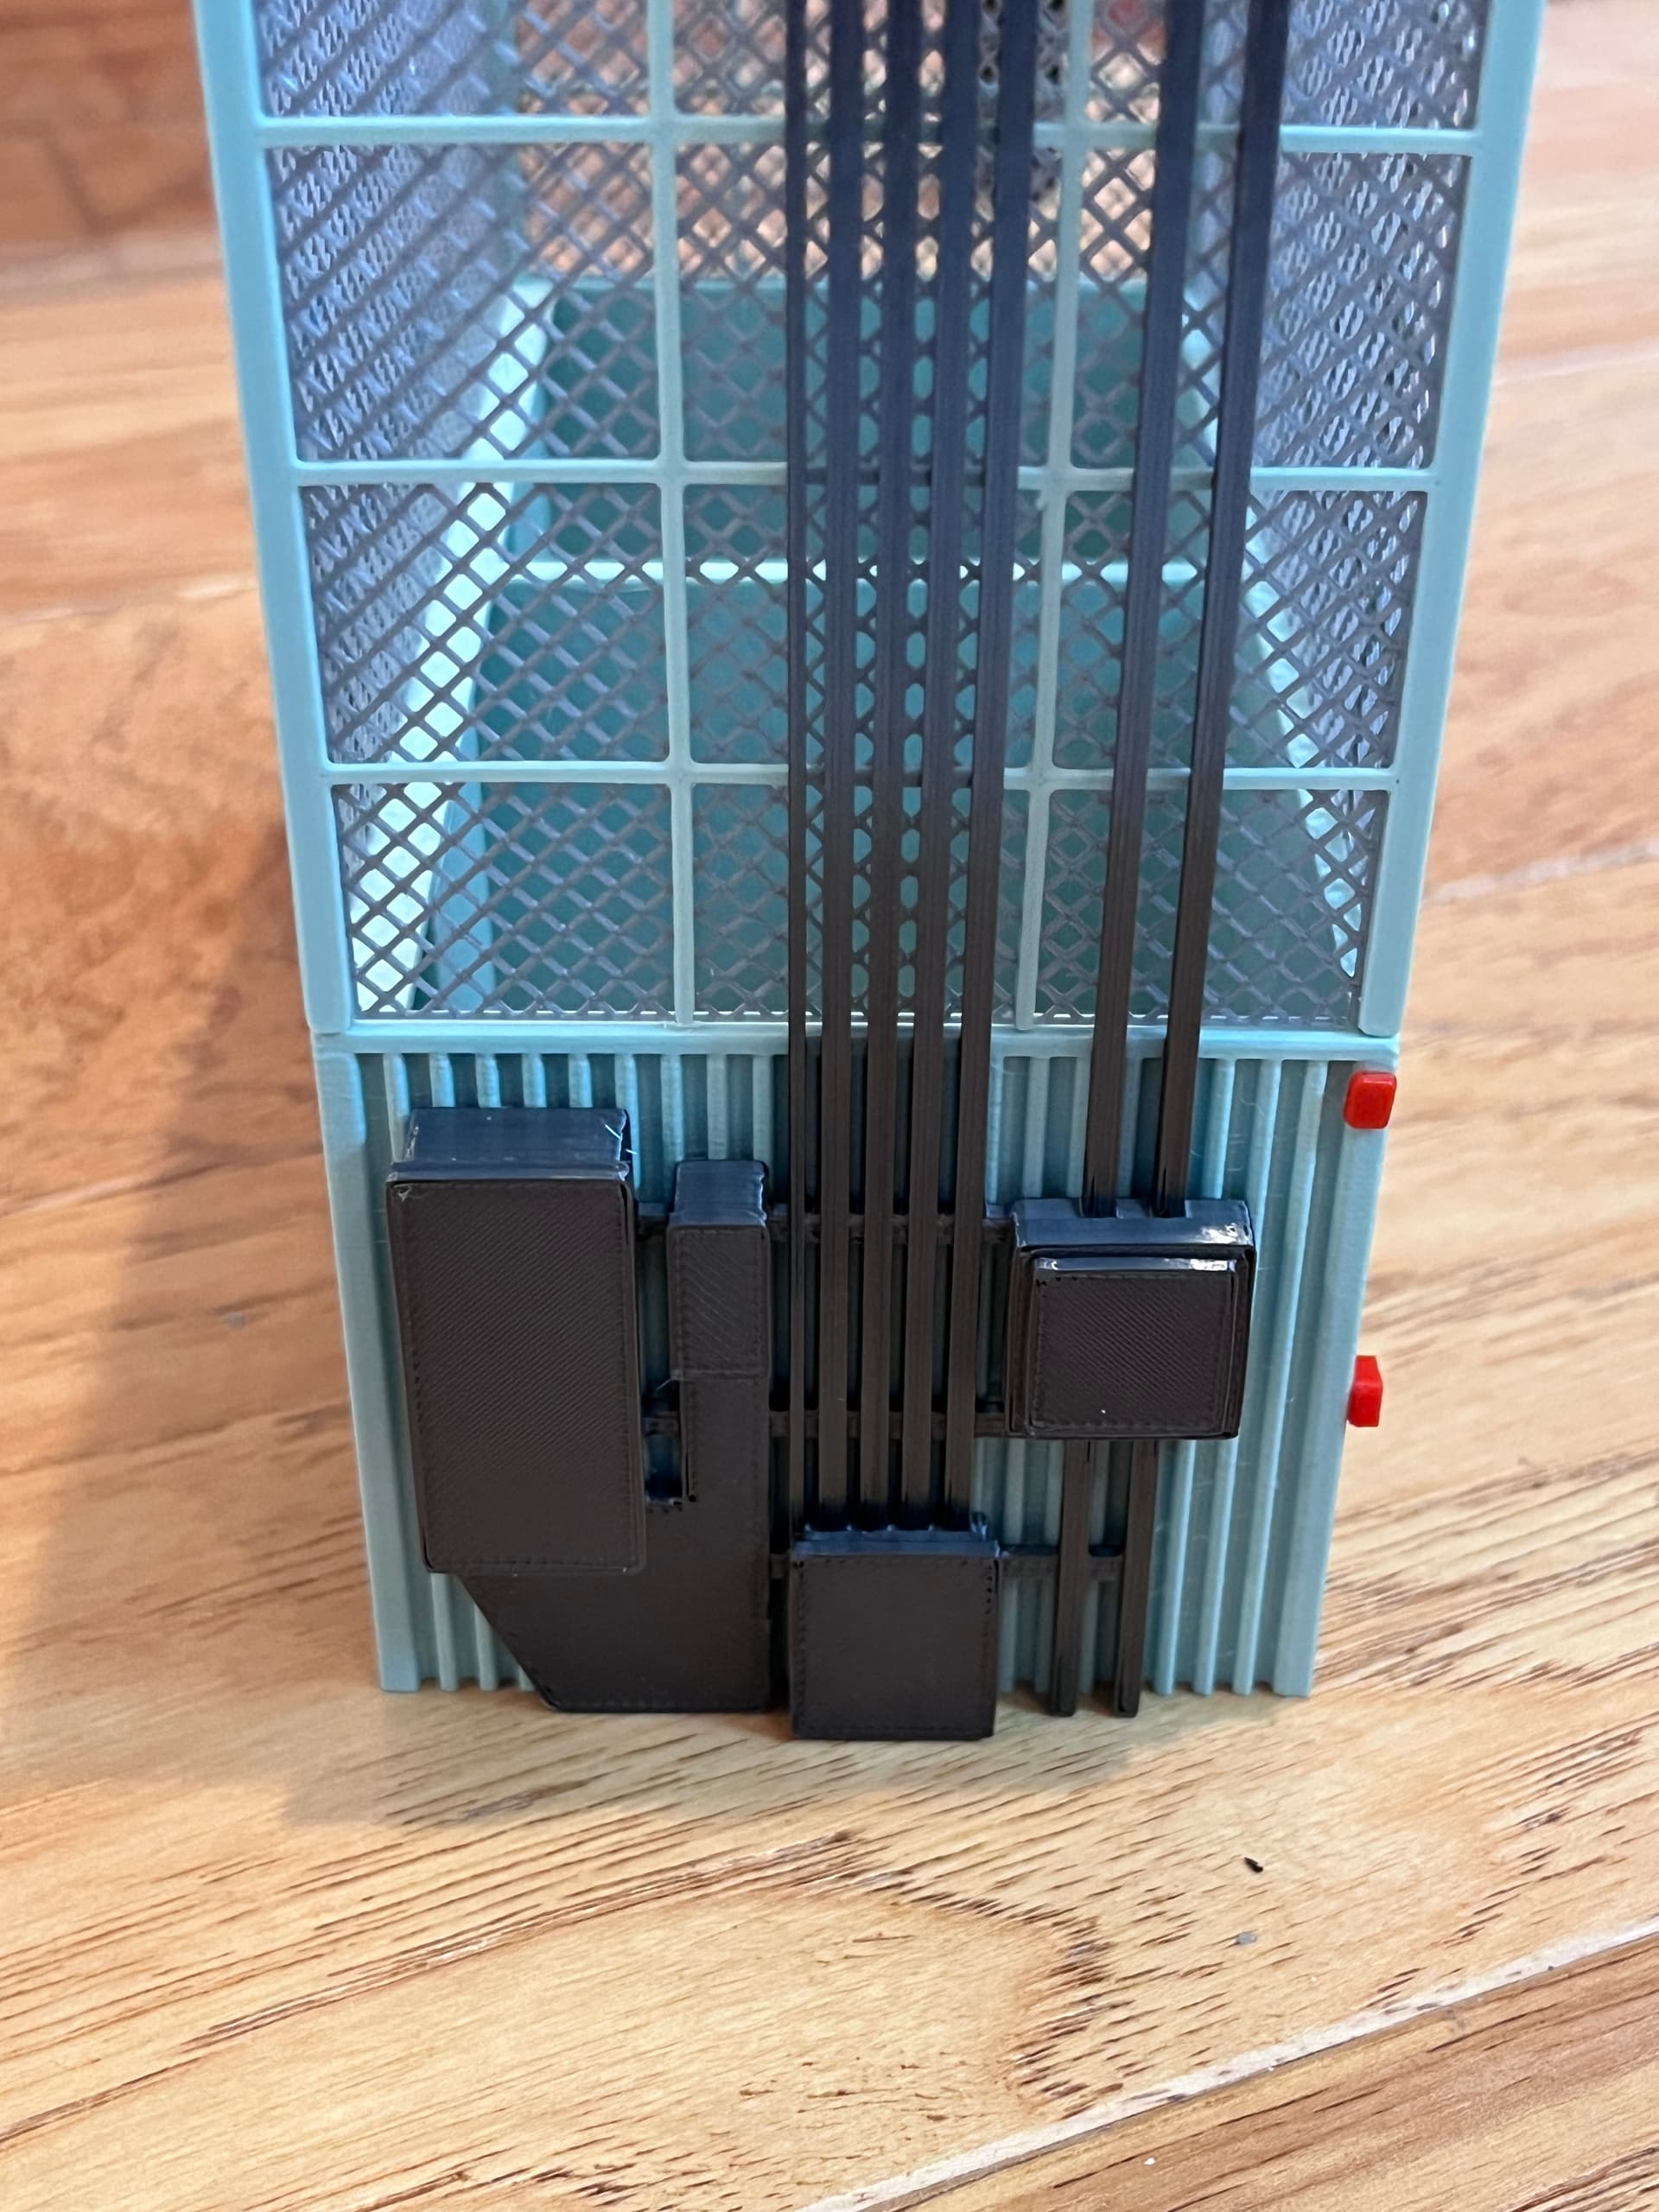
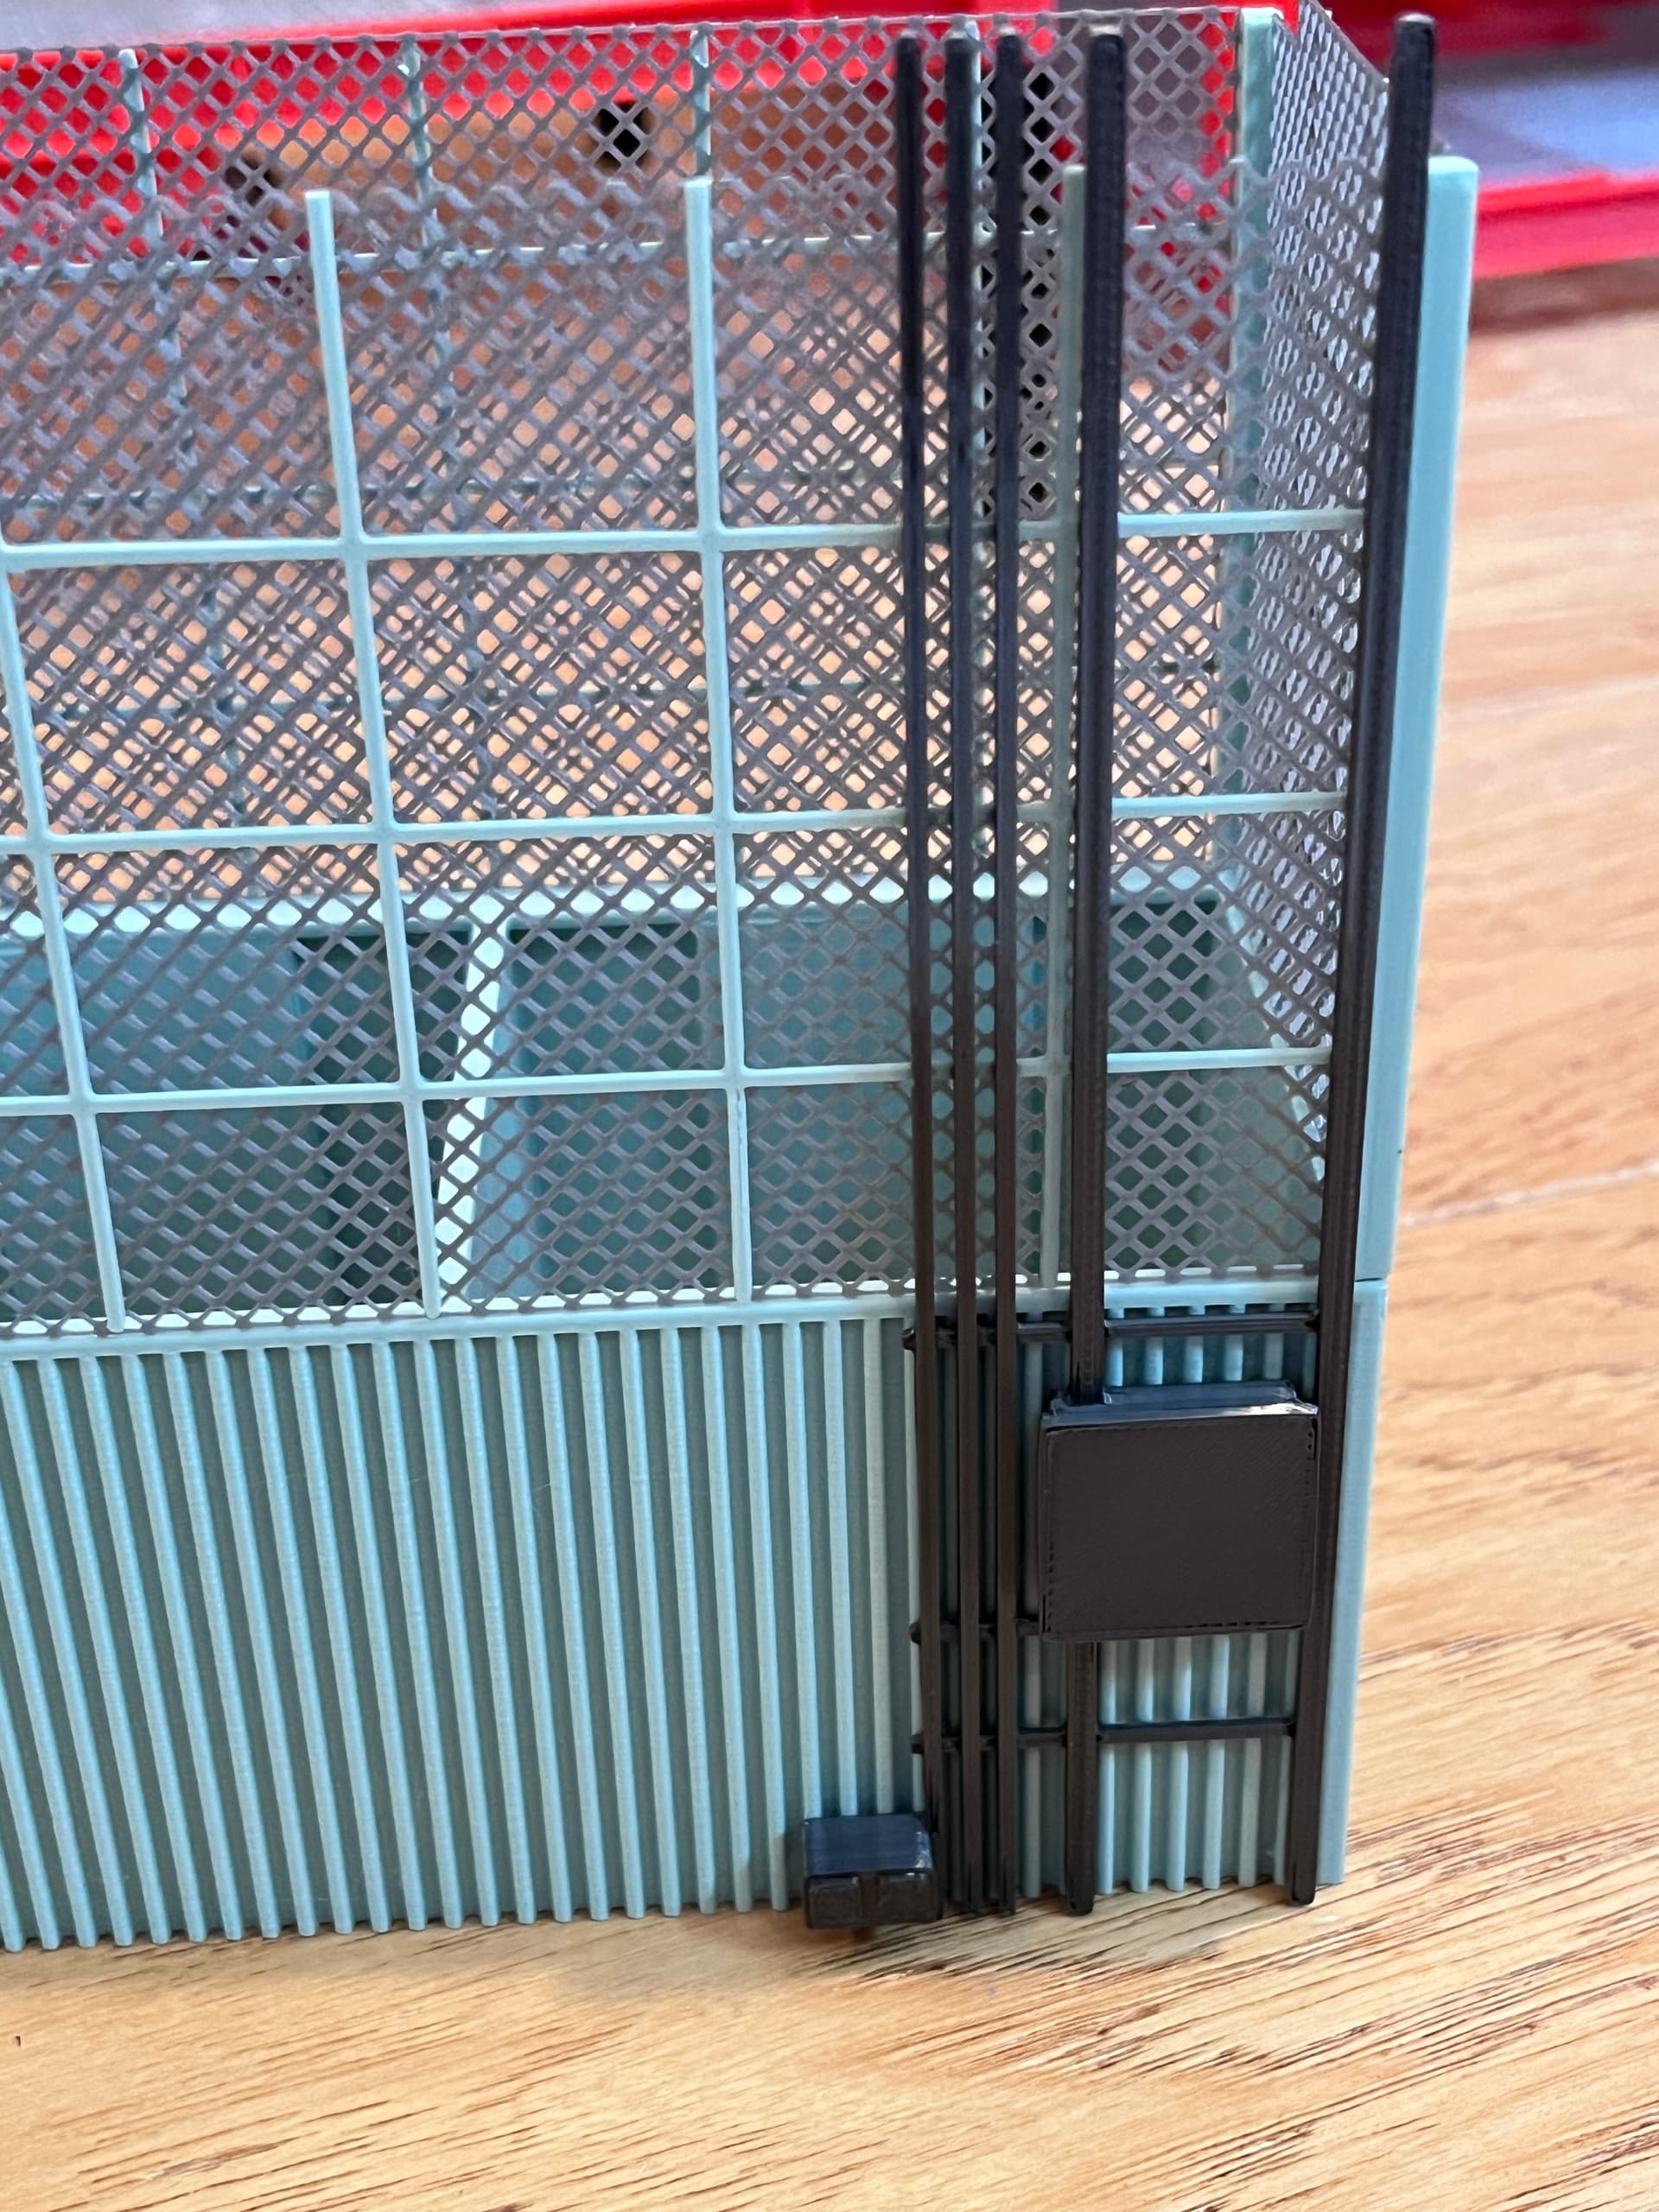
2 Likes
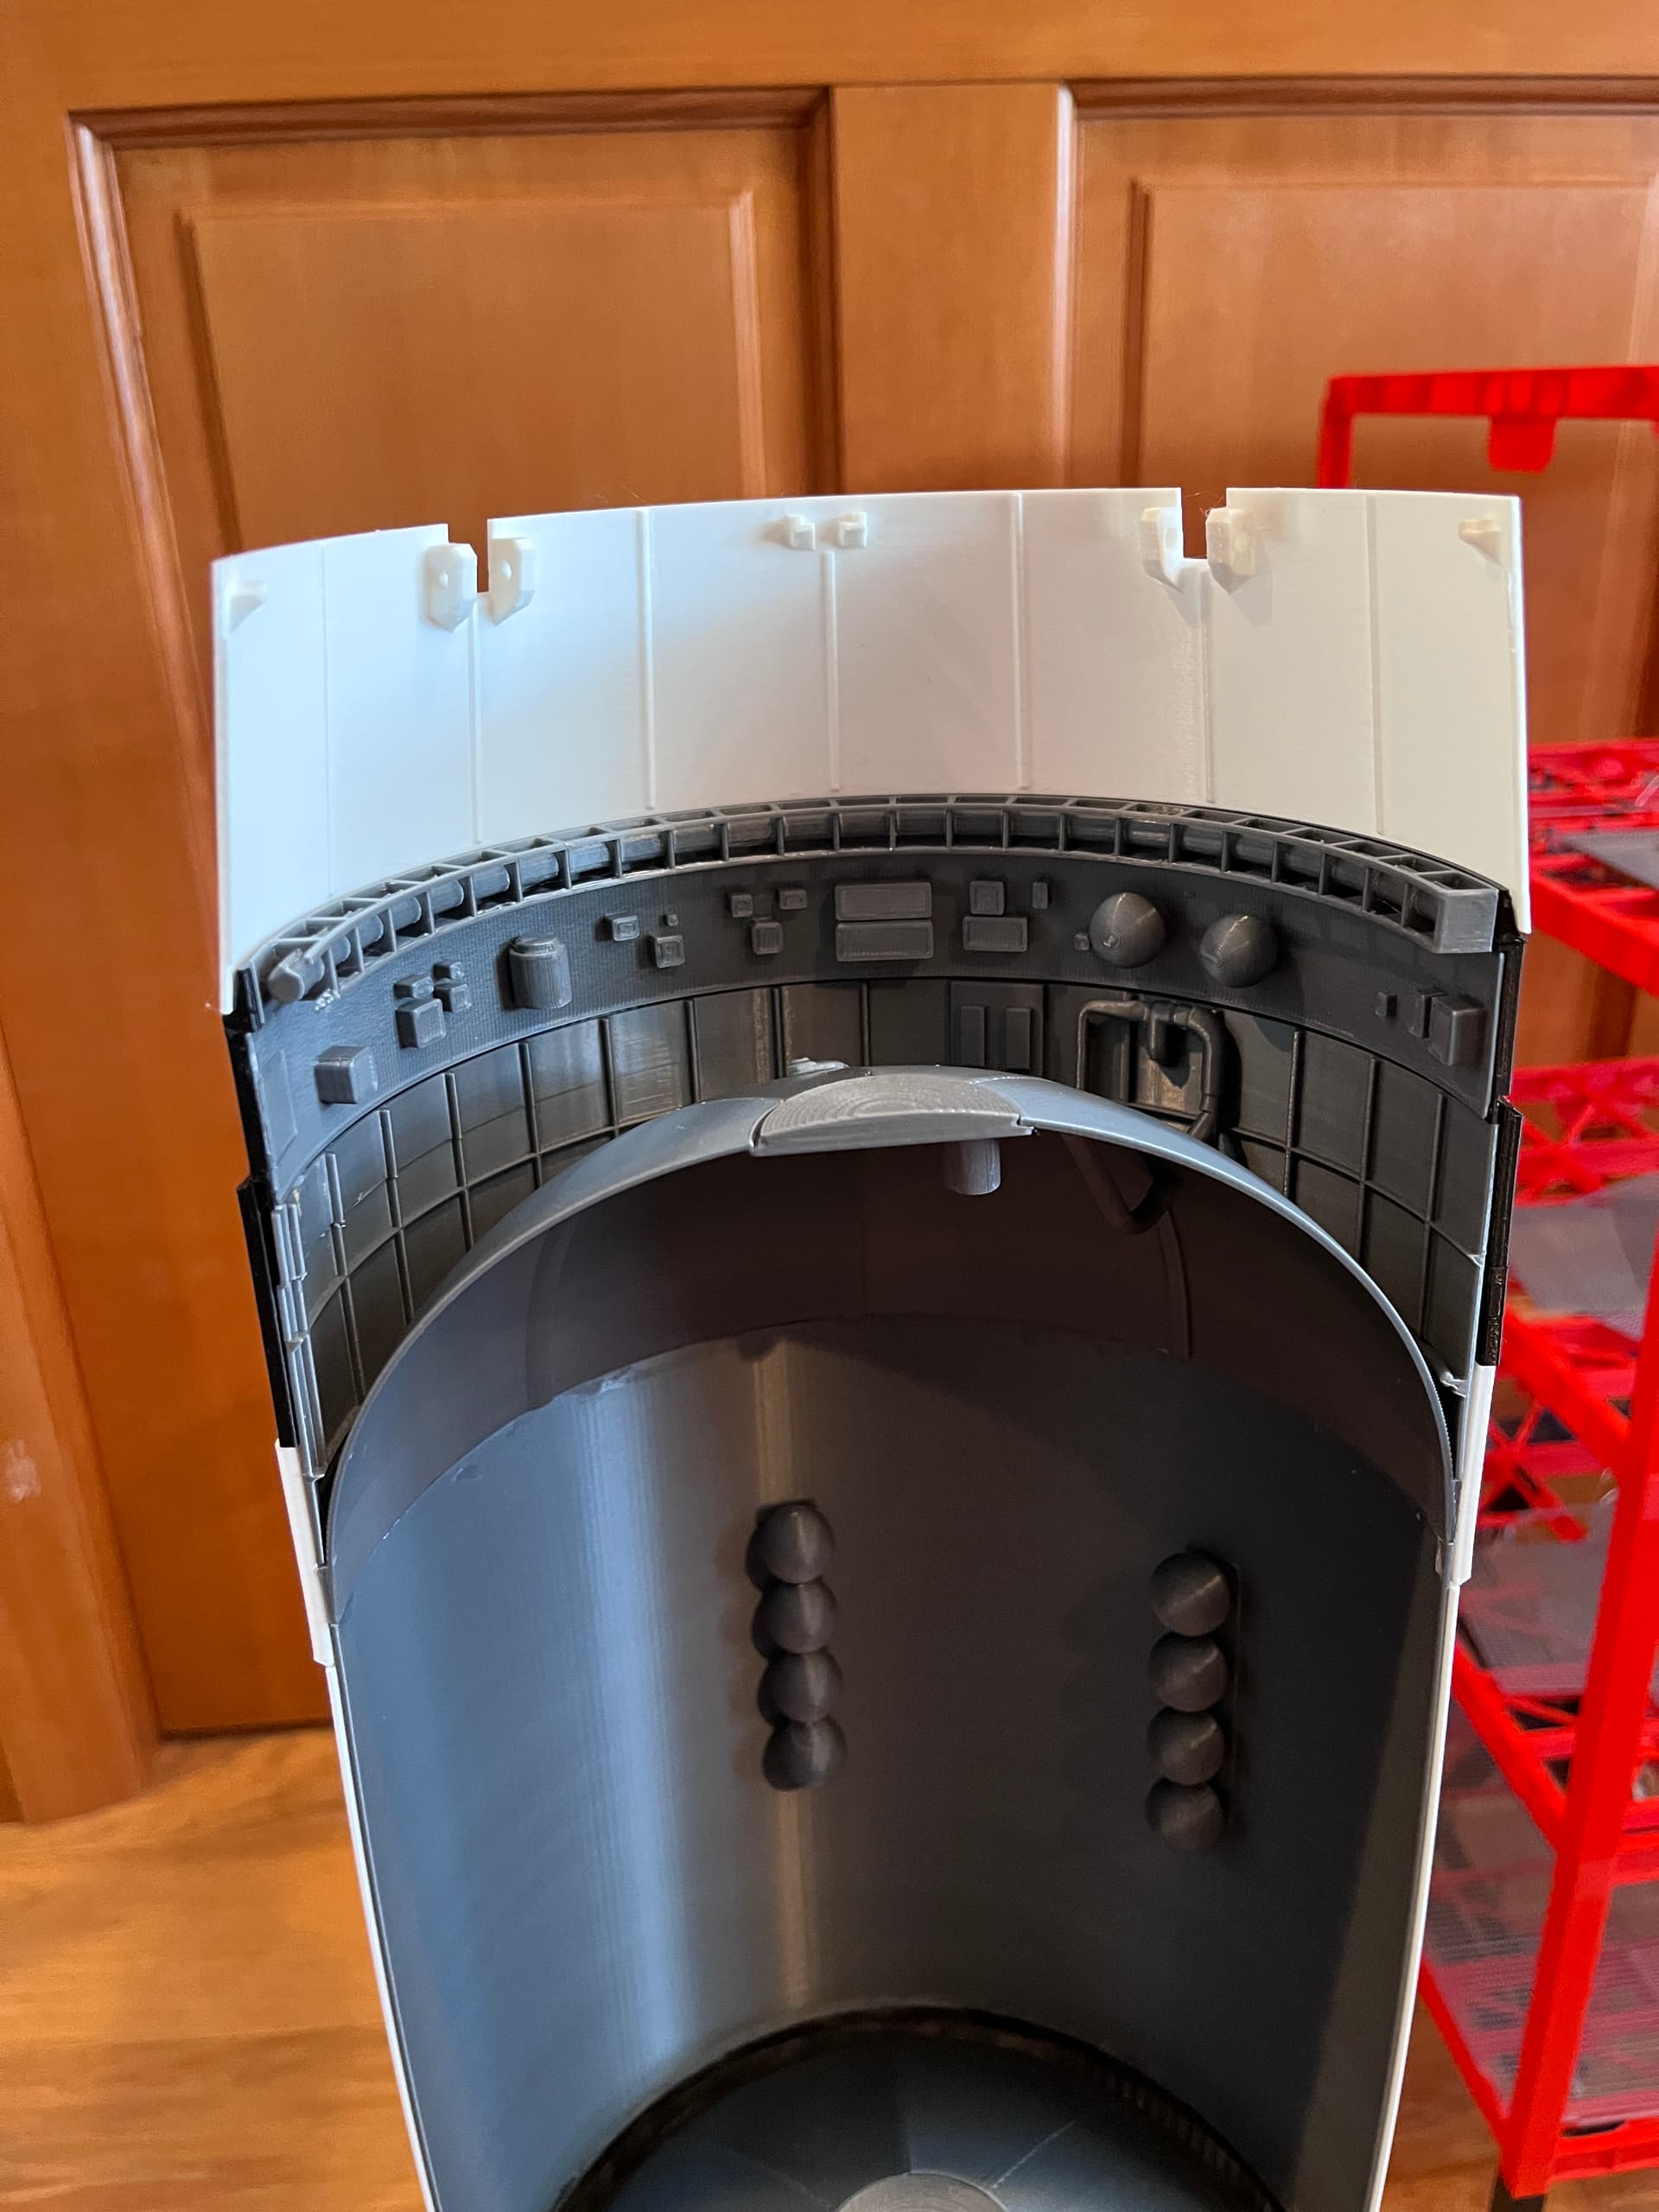
The Saturn V portion of the model is complete. Here are pictures of the inside and outside. I like being able to show all the inner details of the original model. Again, this is not my model, it is made from parts that I can’t publish, but you can certainly purchase them for a small fee from the Amphioxus on Cults 3D. The prices has now gone up to $9.47 for each of the four sections. There may be other models out there as well. This one is a very good quality model. You can see that I simply sliced the parts in half except for the third stage engine. The lowest part, the upper tank of the second stage, was also chopped off at the bottom of the letter “I”.


3 Likes
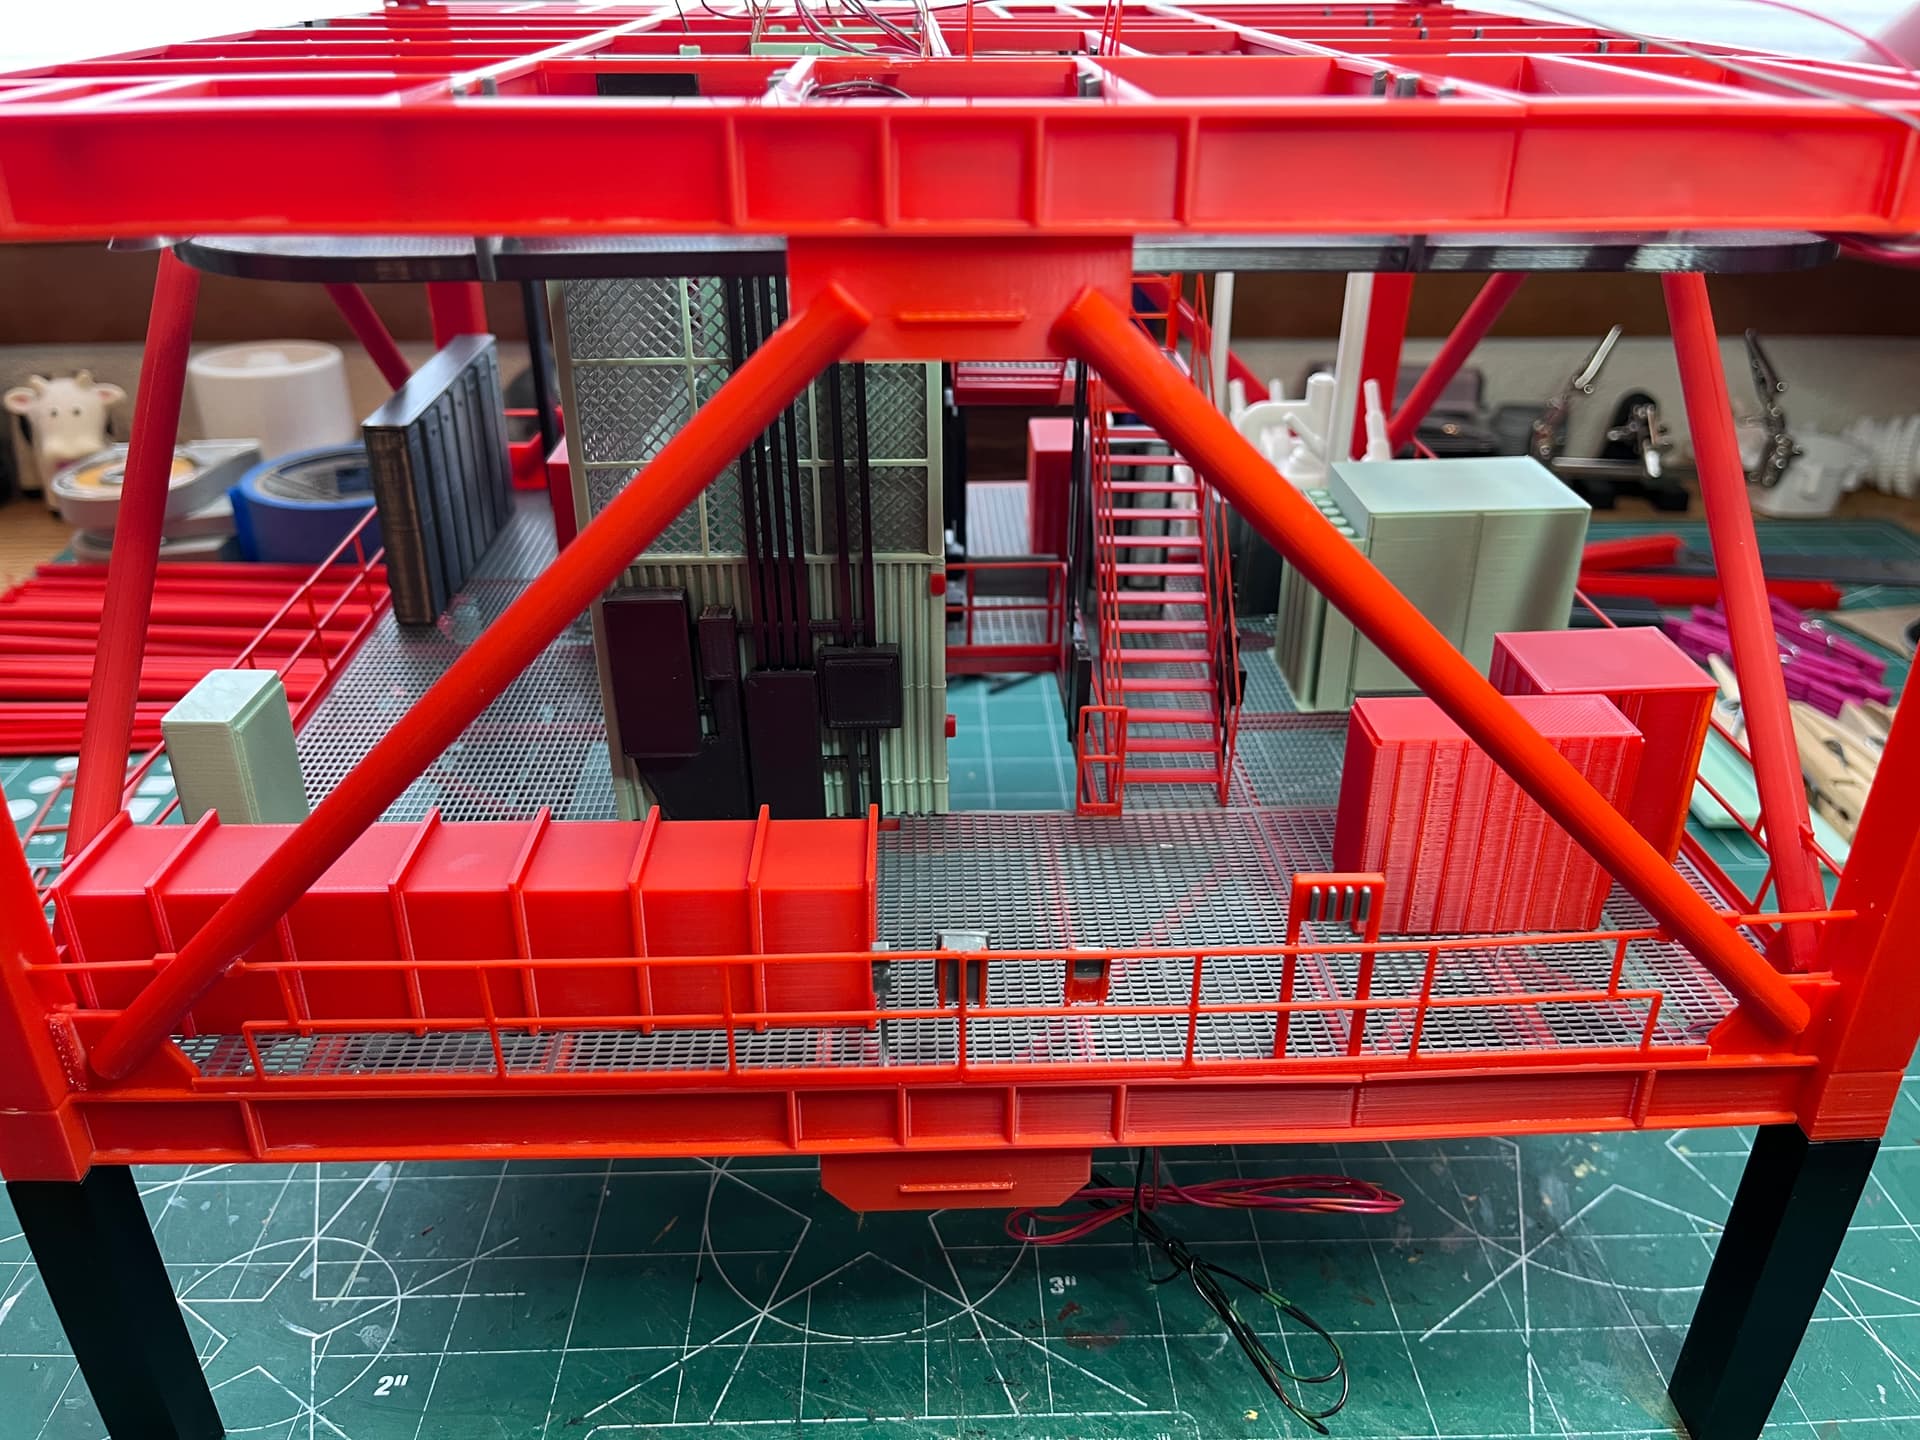
Level 200 is starting to take shape. The floor grating and elevator are glued in place along with some of the large equipment.
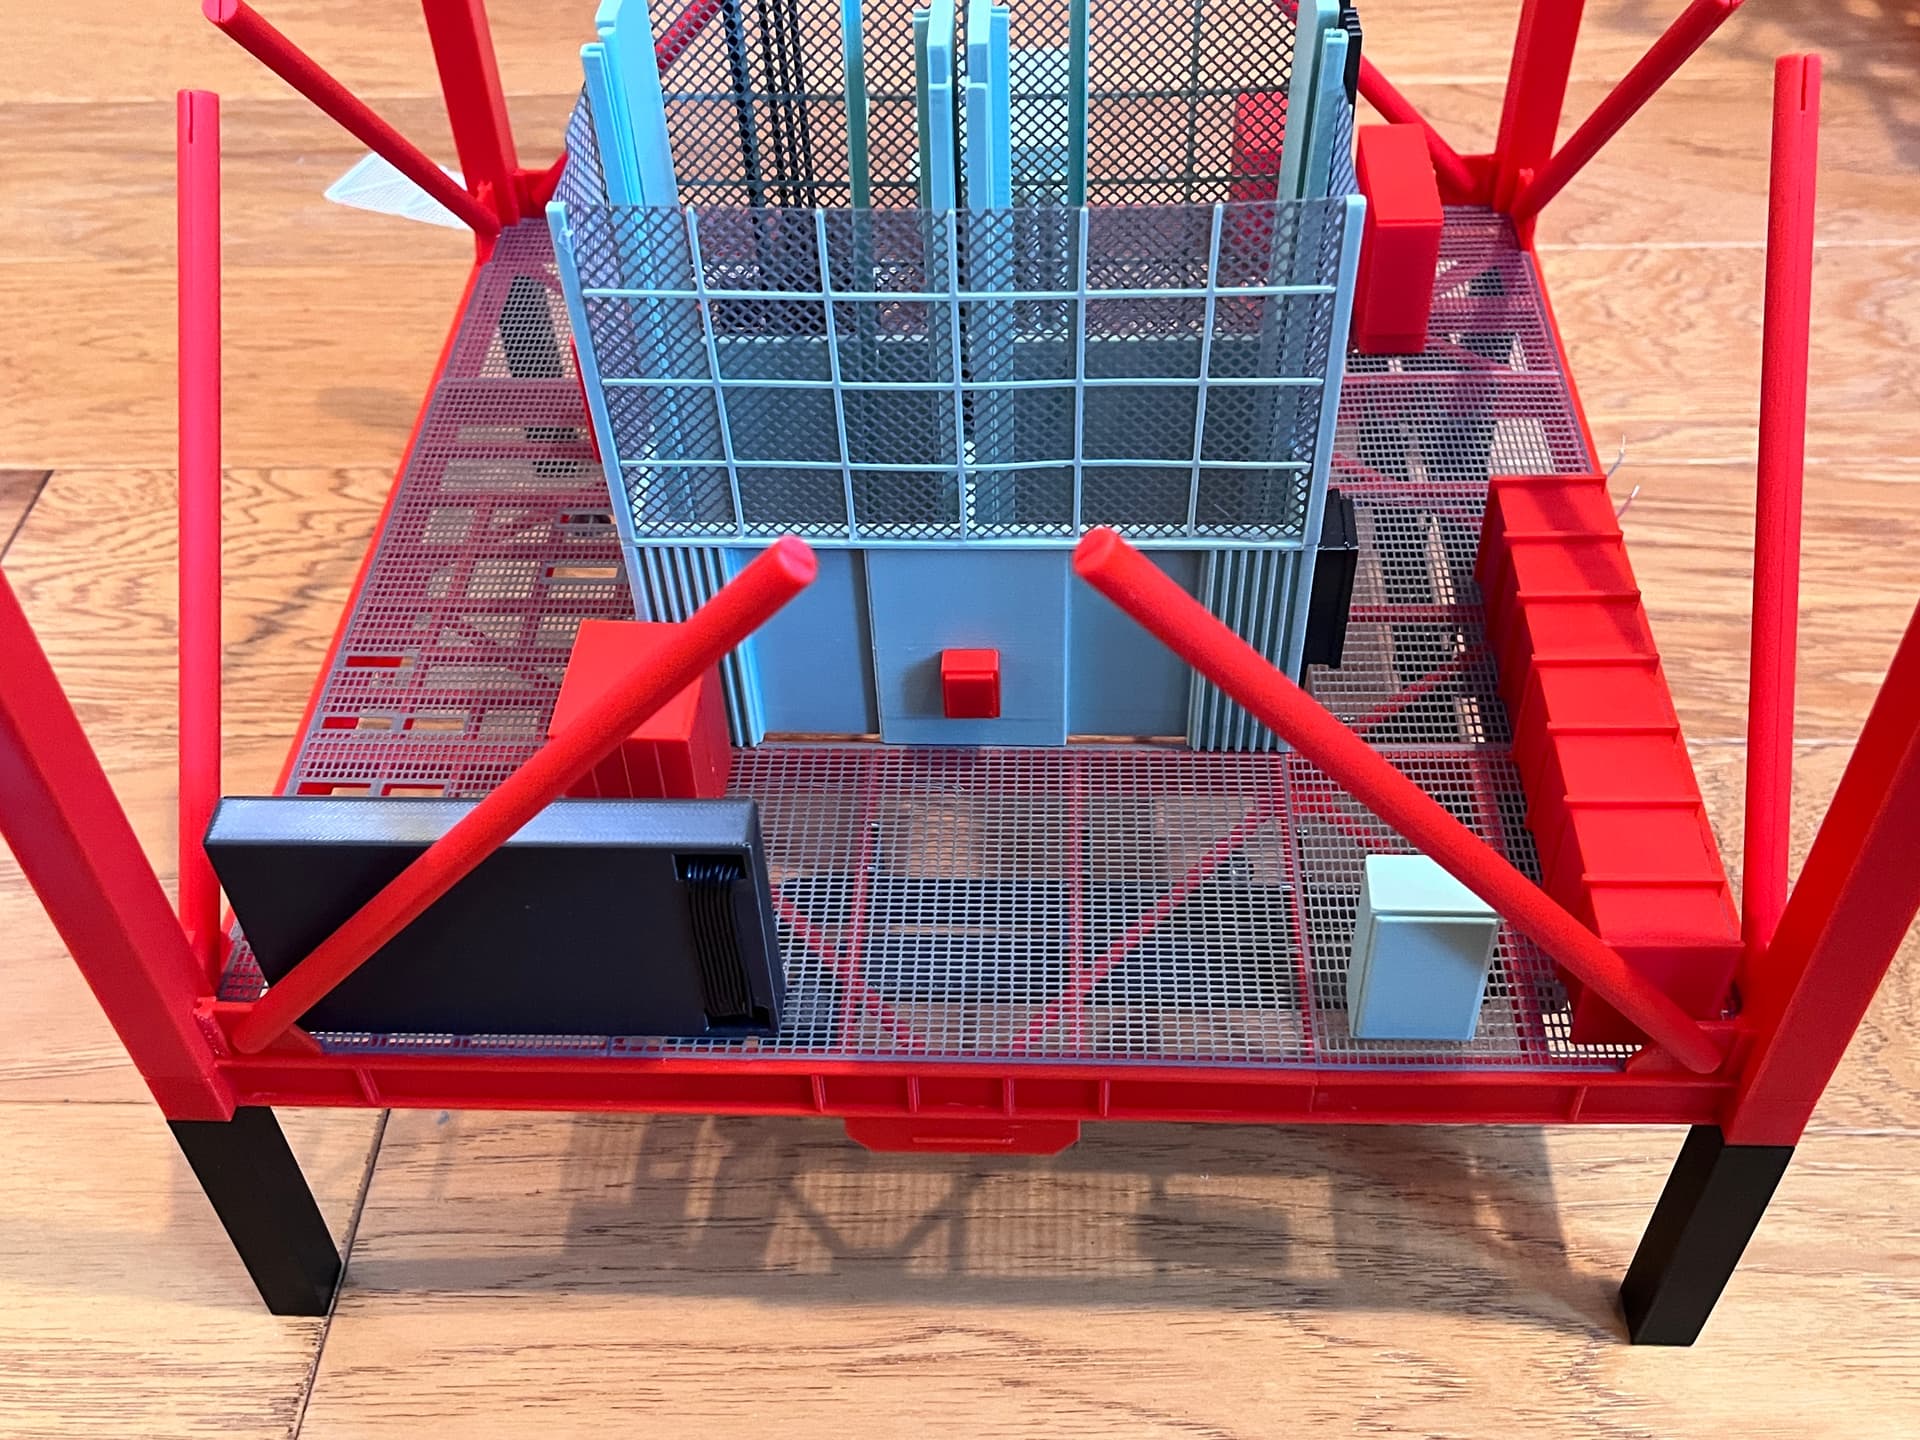
1 Like
Absolutely Phenomenal Work!!!
Thanks. Trying to make it as accurate as possible.
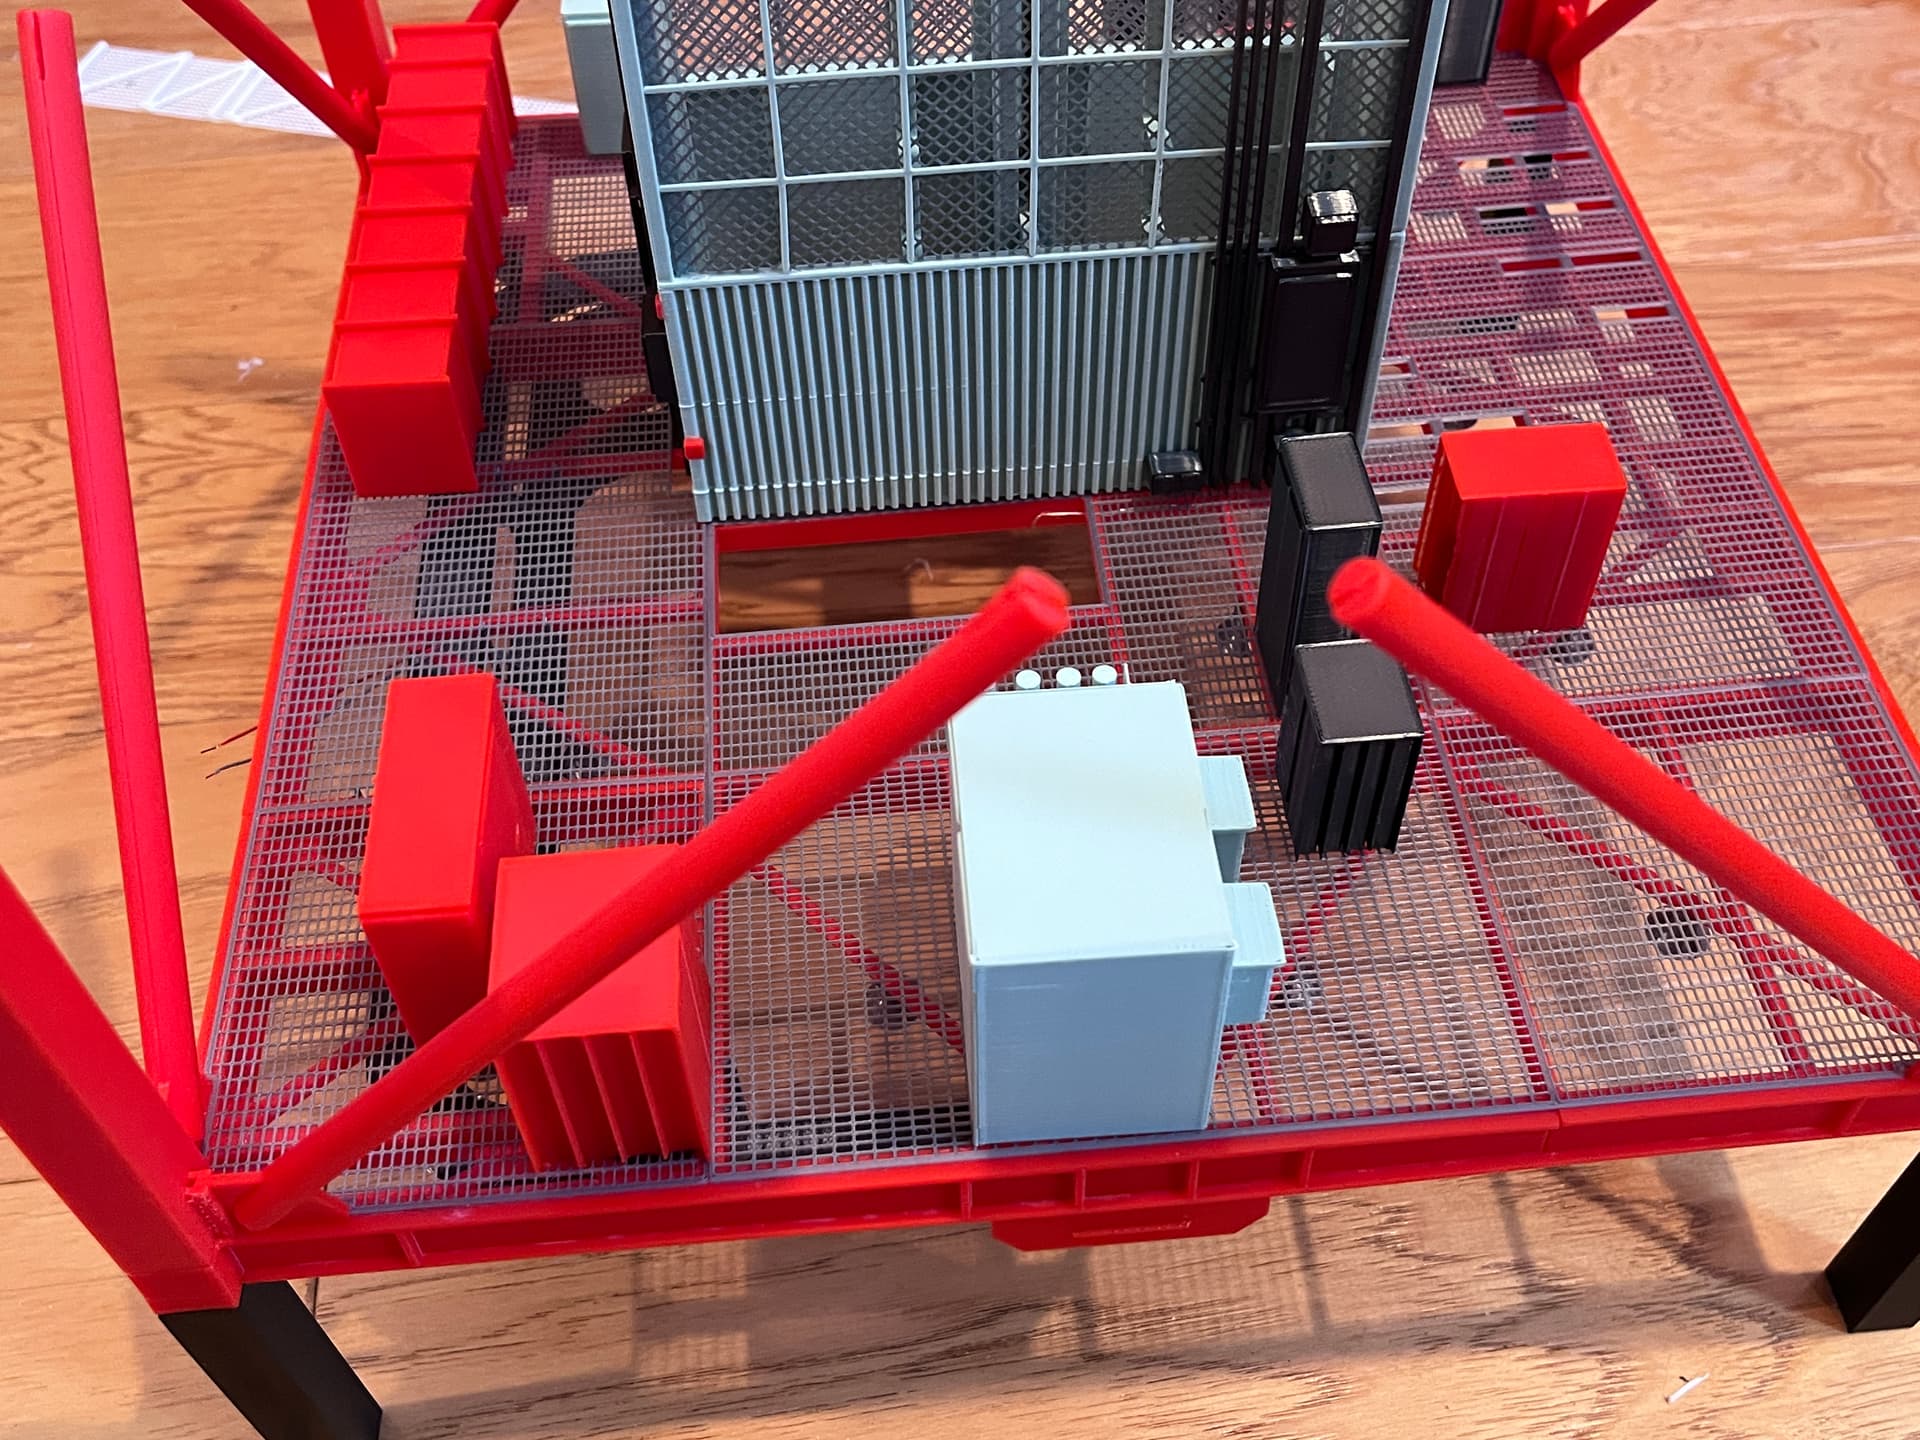
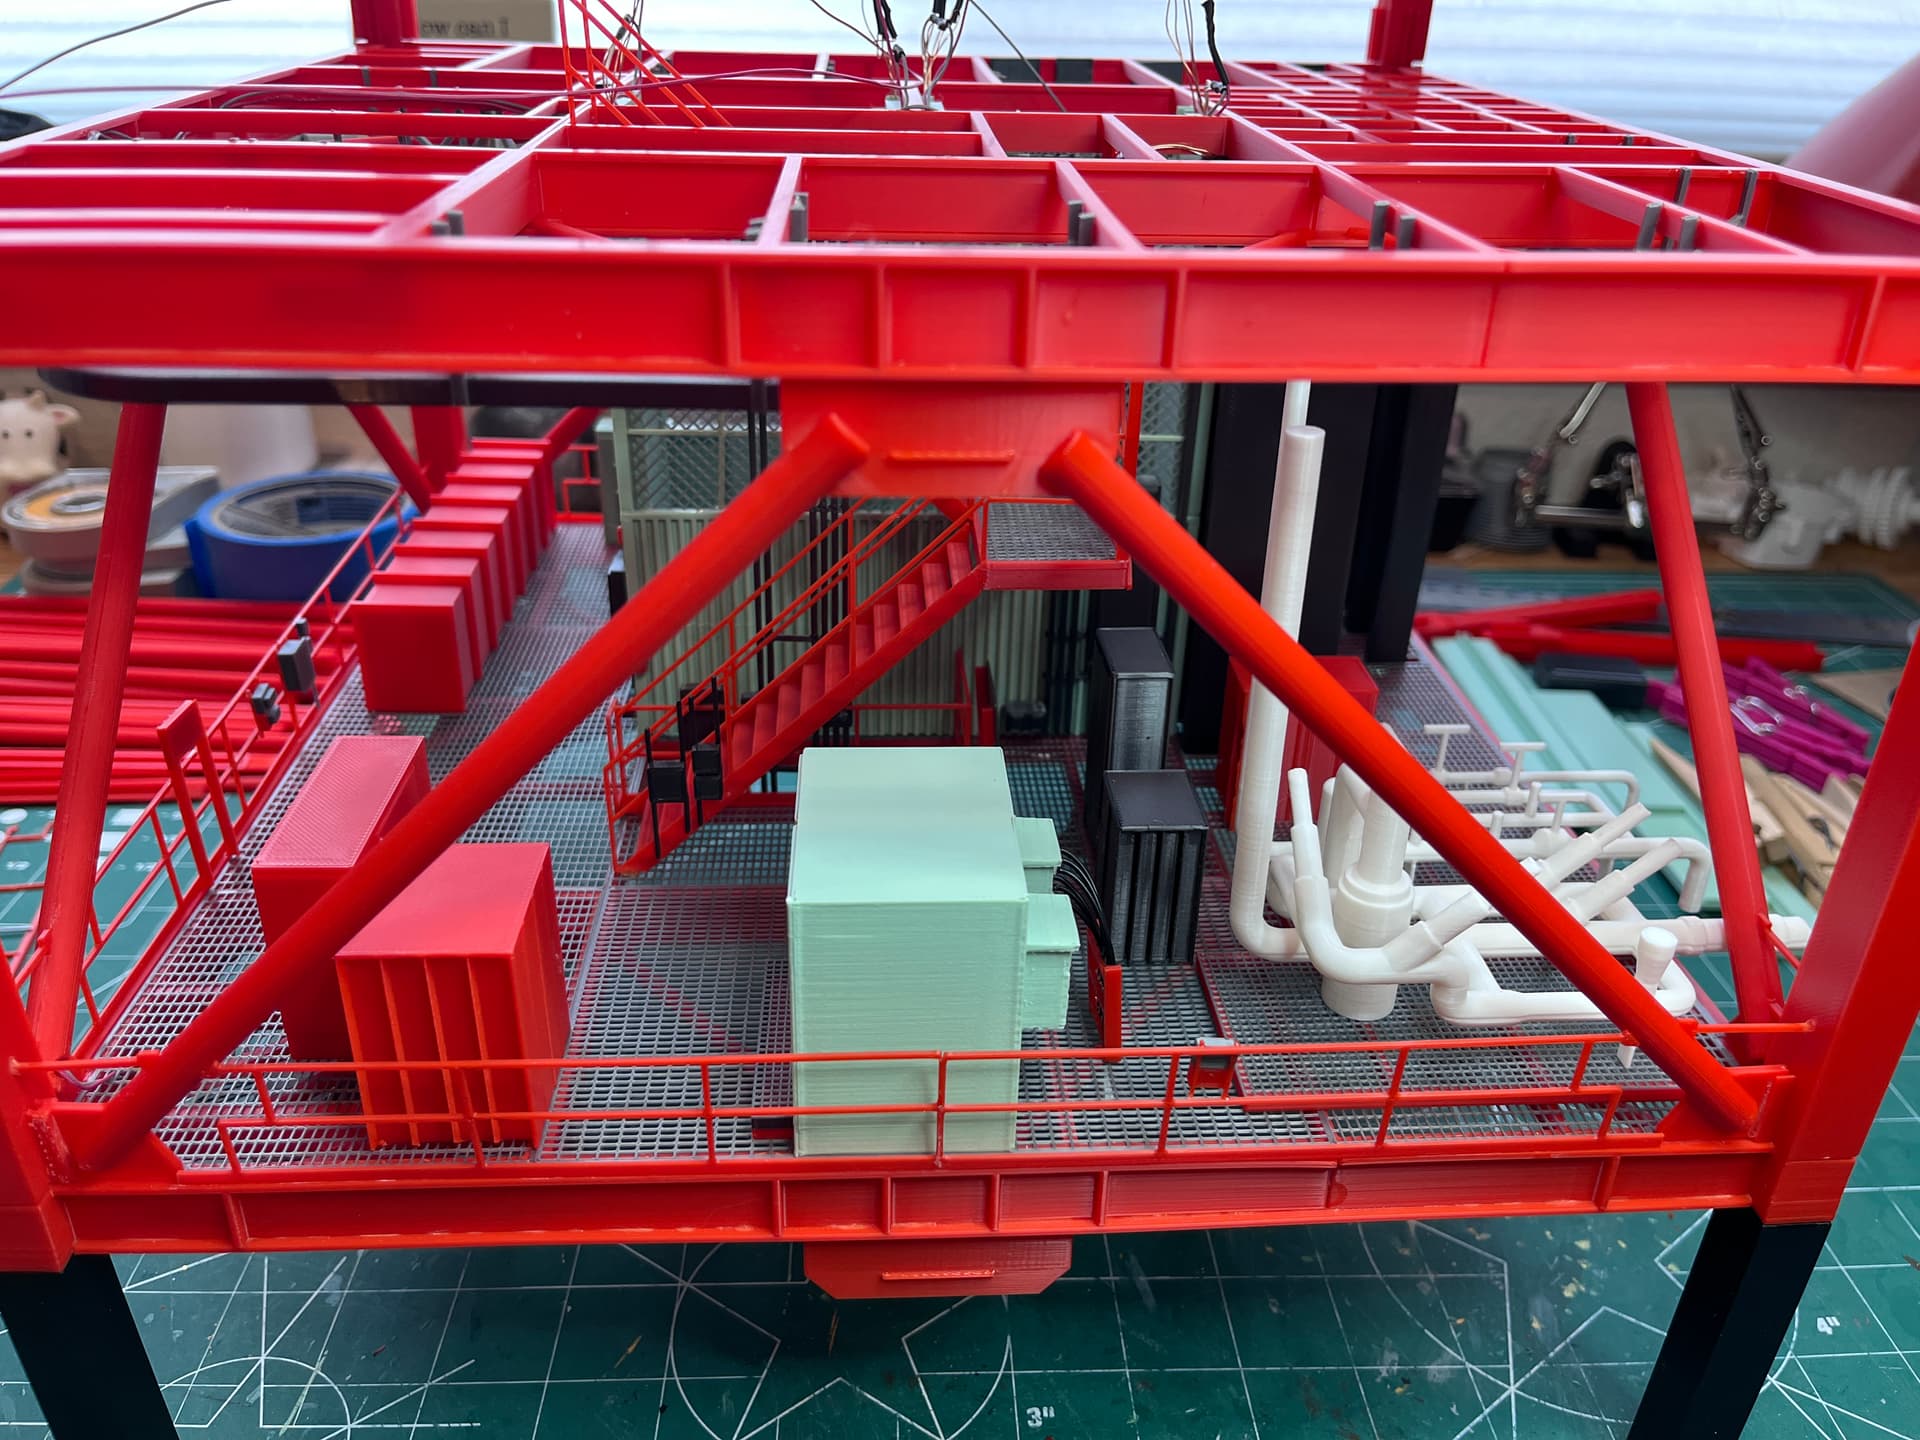
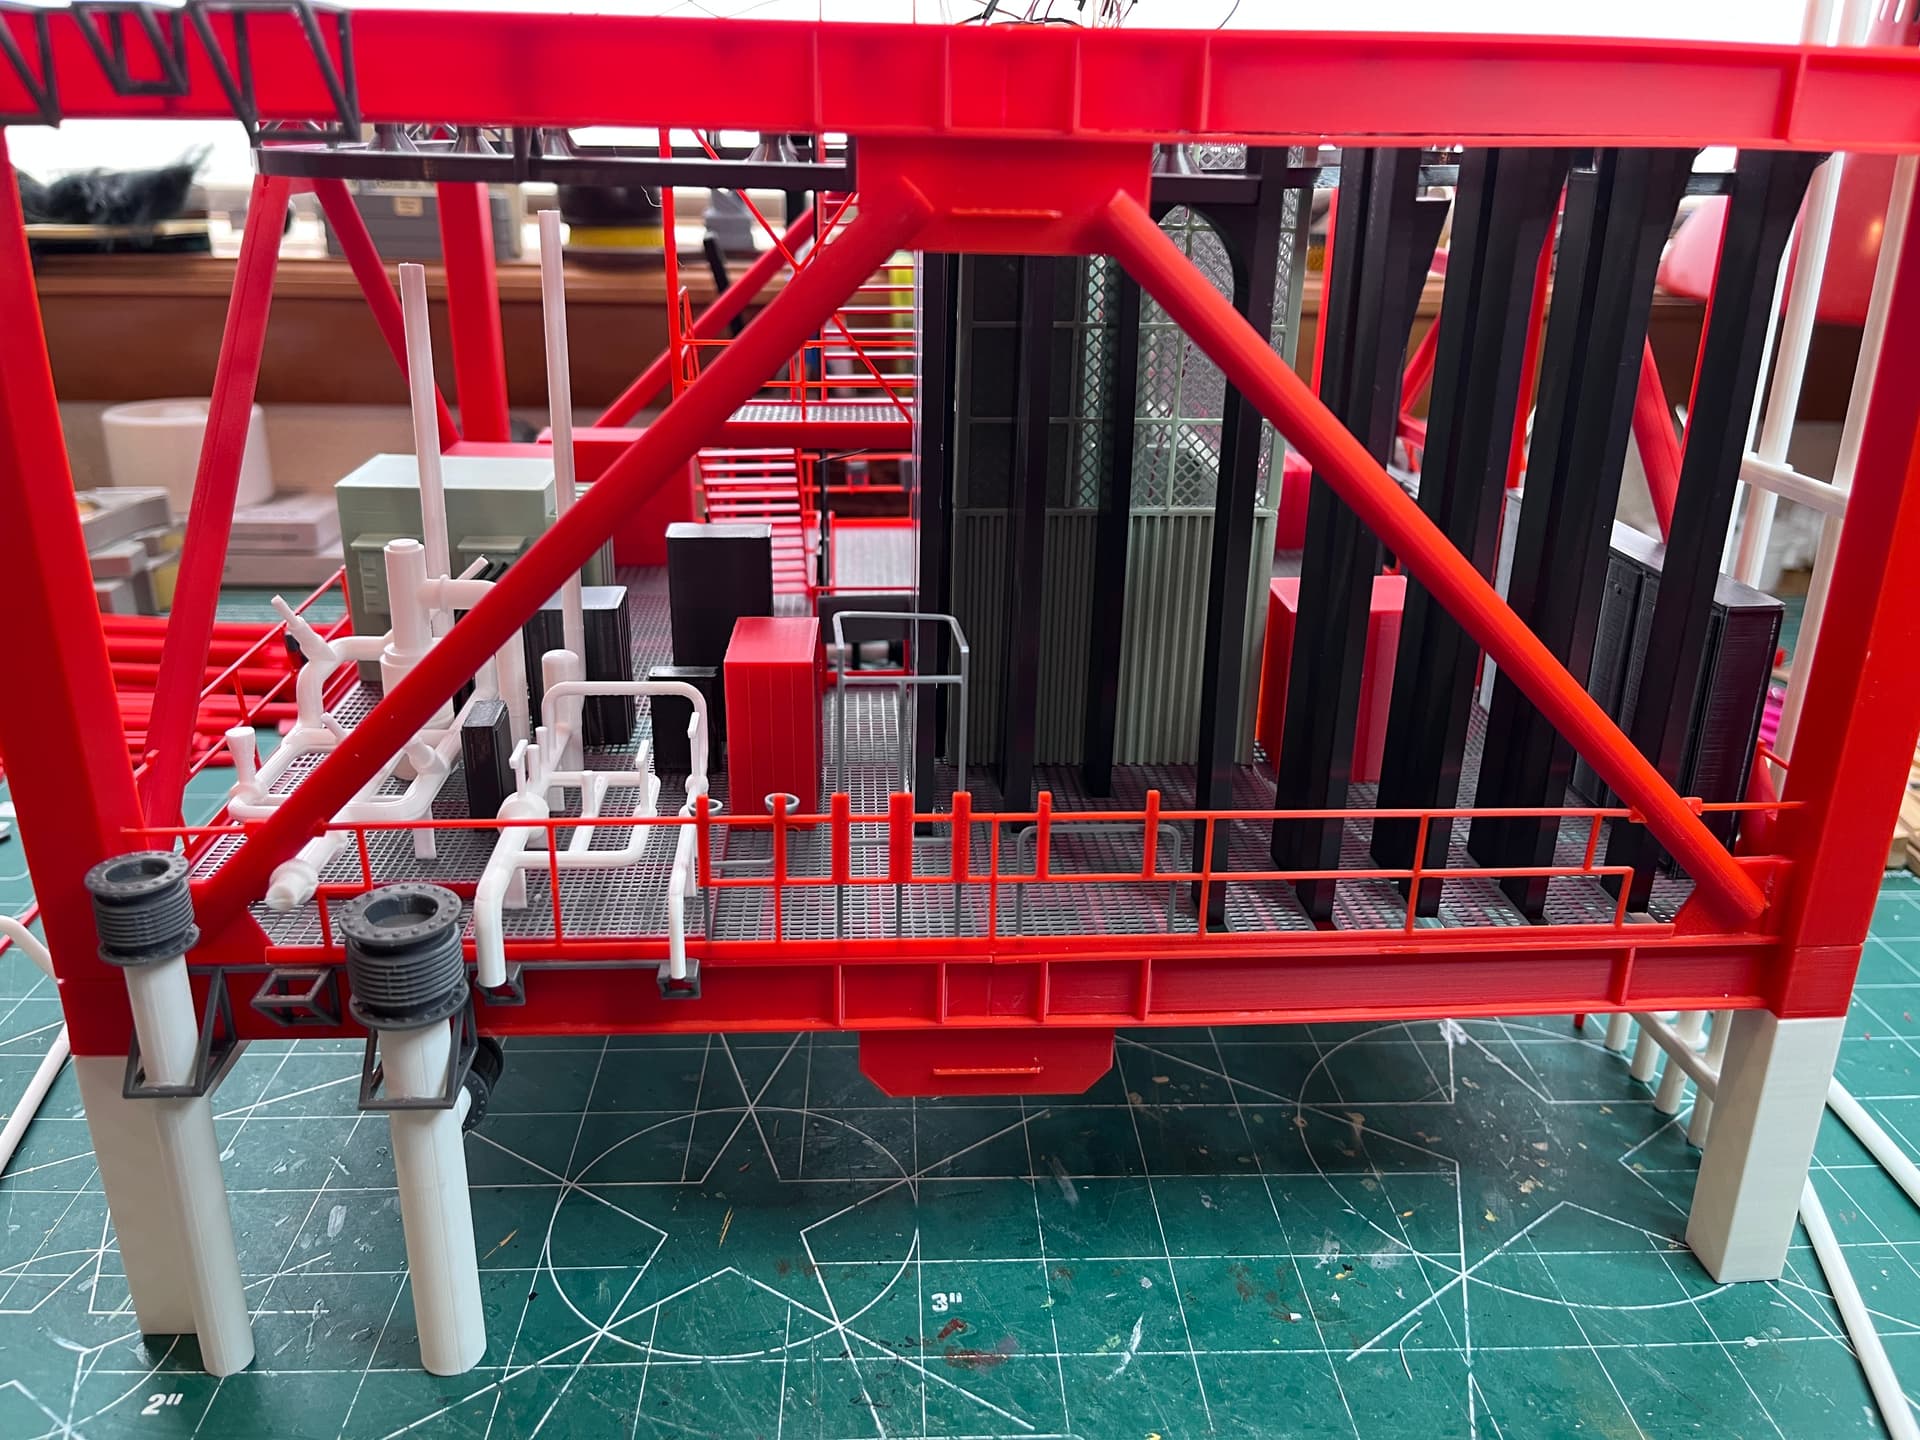
All of the interior equipment is on except for the piping which I am working on. There are a lot of exterior pipes which I will hold off on until all the interiors are complete. Working from the inside out. The side 3 railing is not on yet to allow access to the LH2 and LOX valving, but the railing has the emergency shower, eyewash station and drinking fountain. Side 1 has many small control boxes attached to the railing.
2 Likes
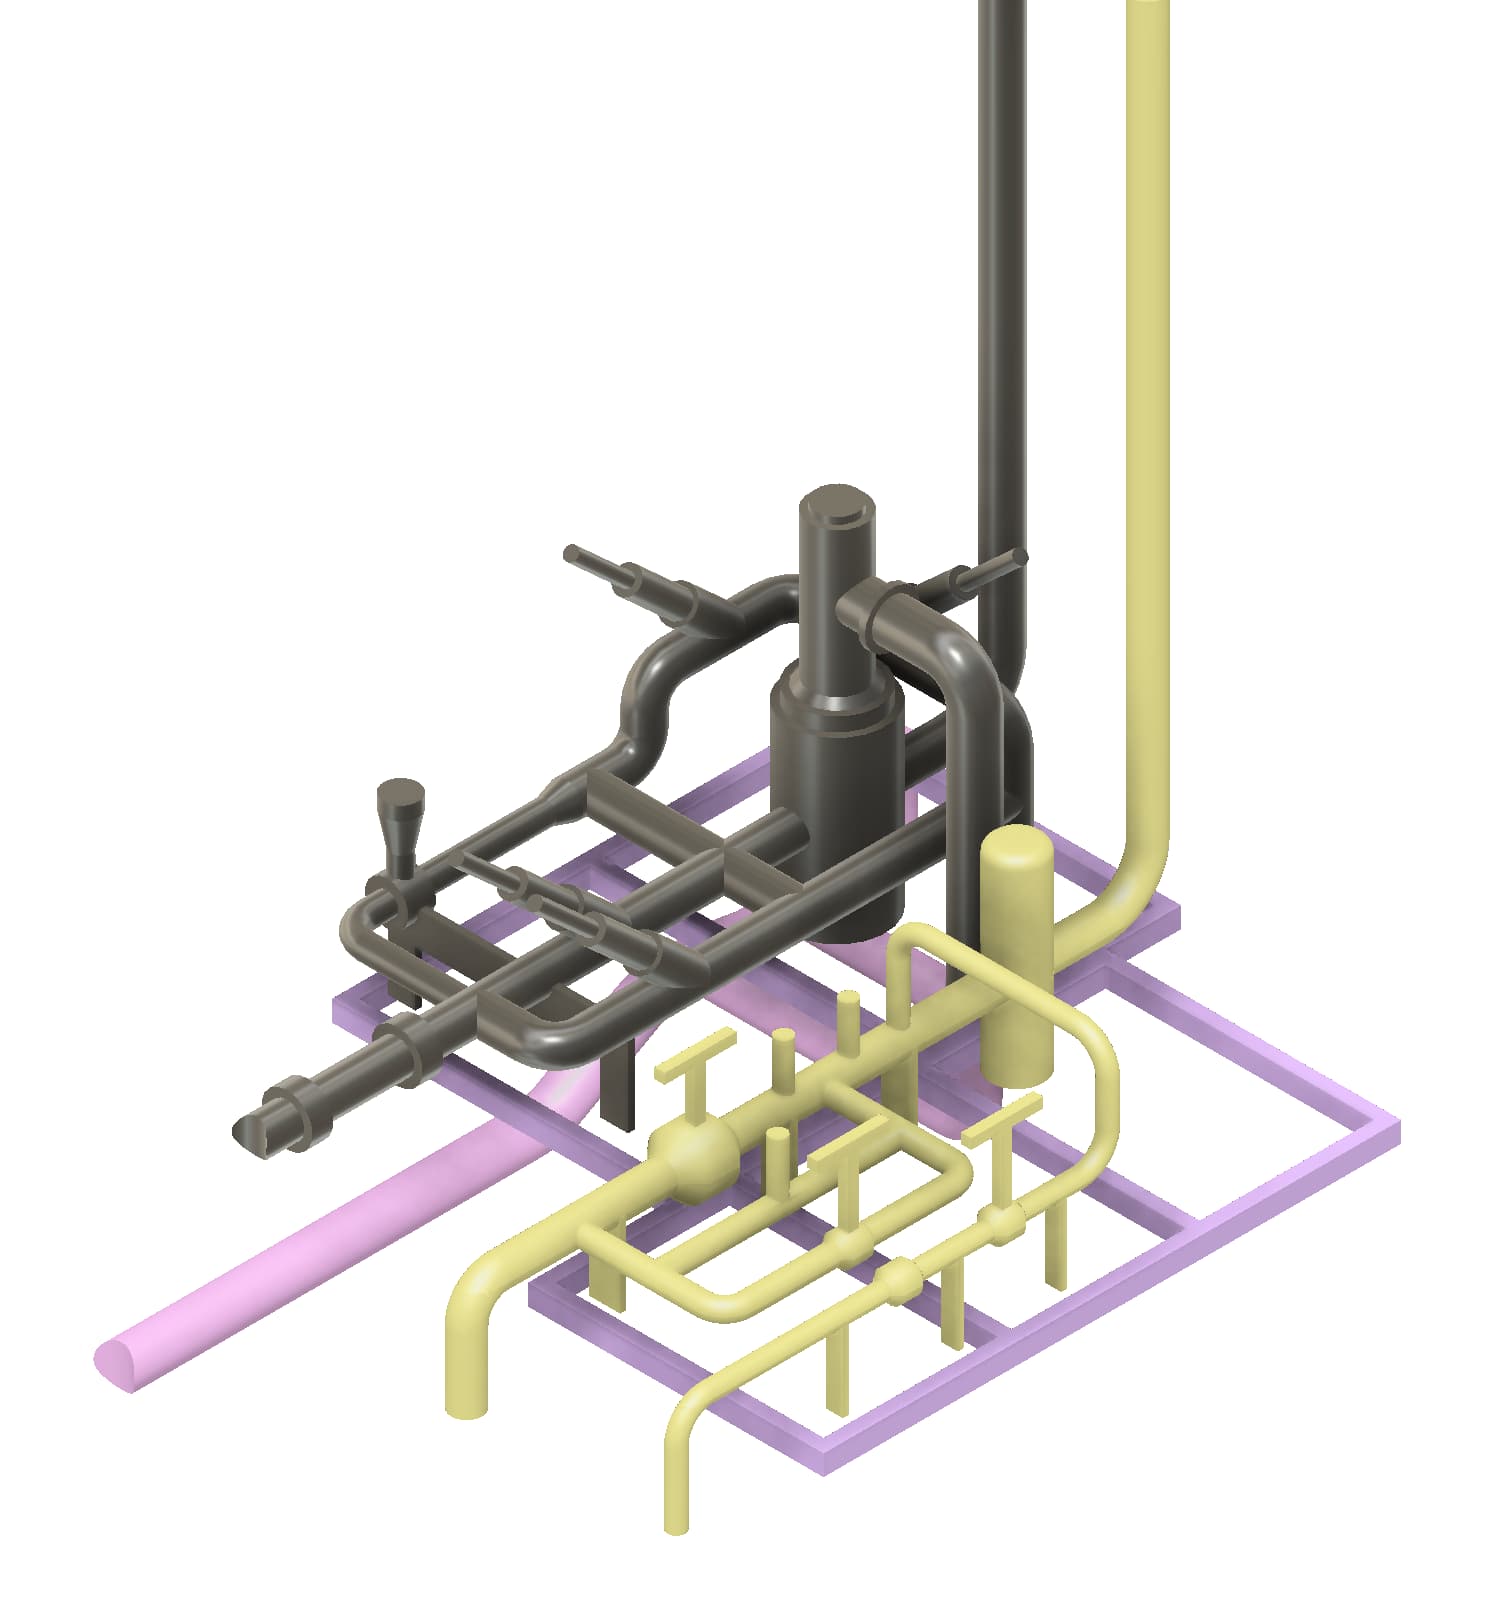
Looking at the LH2 valving and the pipes seem too large. After dusting off some brain cells I realized the drawings are in the Cato Library under LUT drawings. There are pages from the 75M-05753 document. Here is one of the pages. This is exactly the details I need to redraw the LH2 valve assembly, accurate down to the inch.
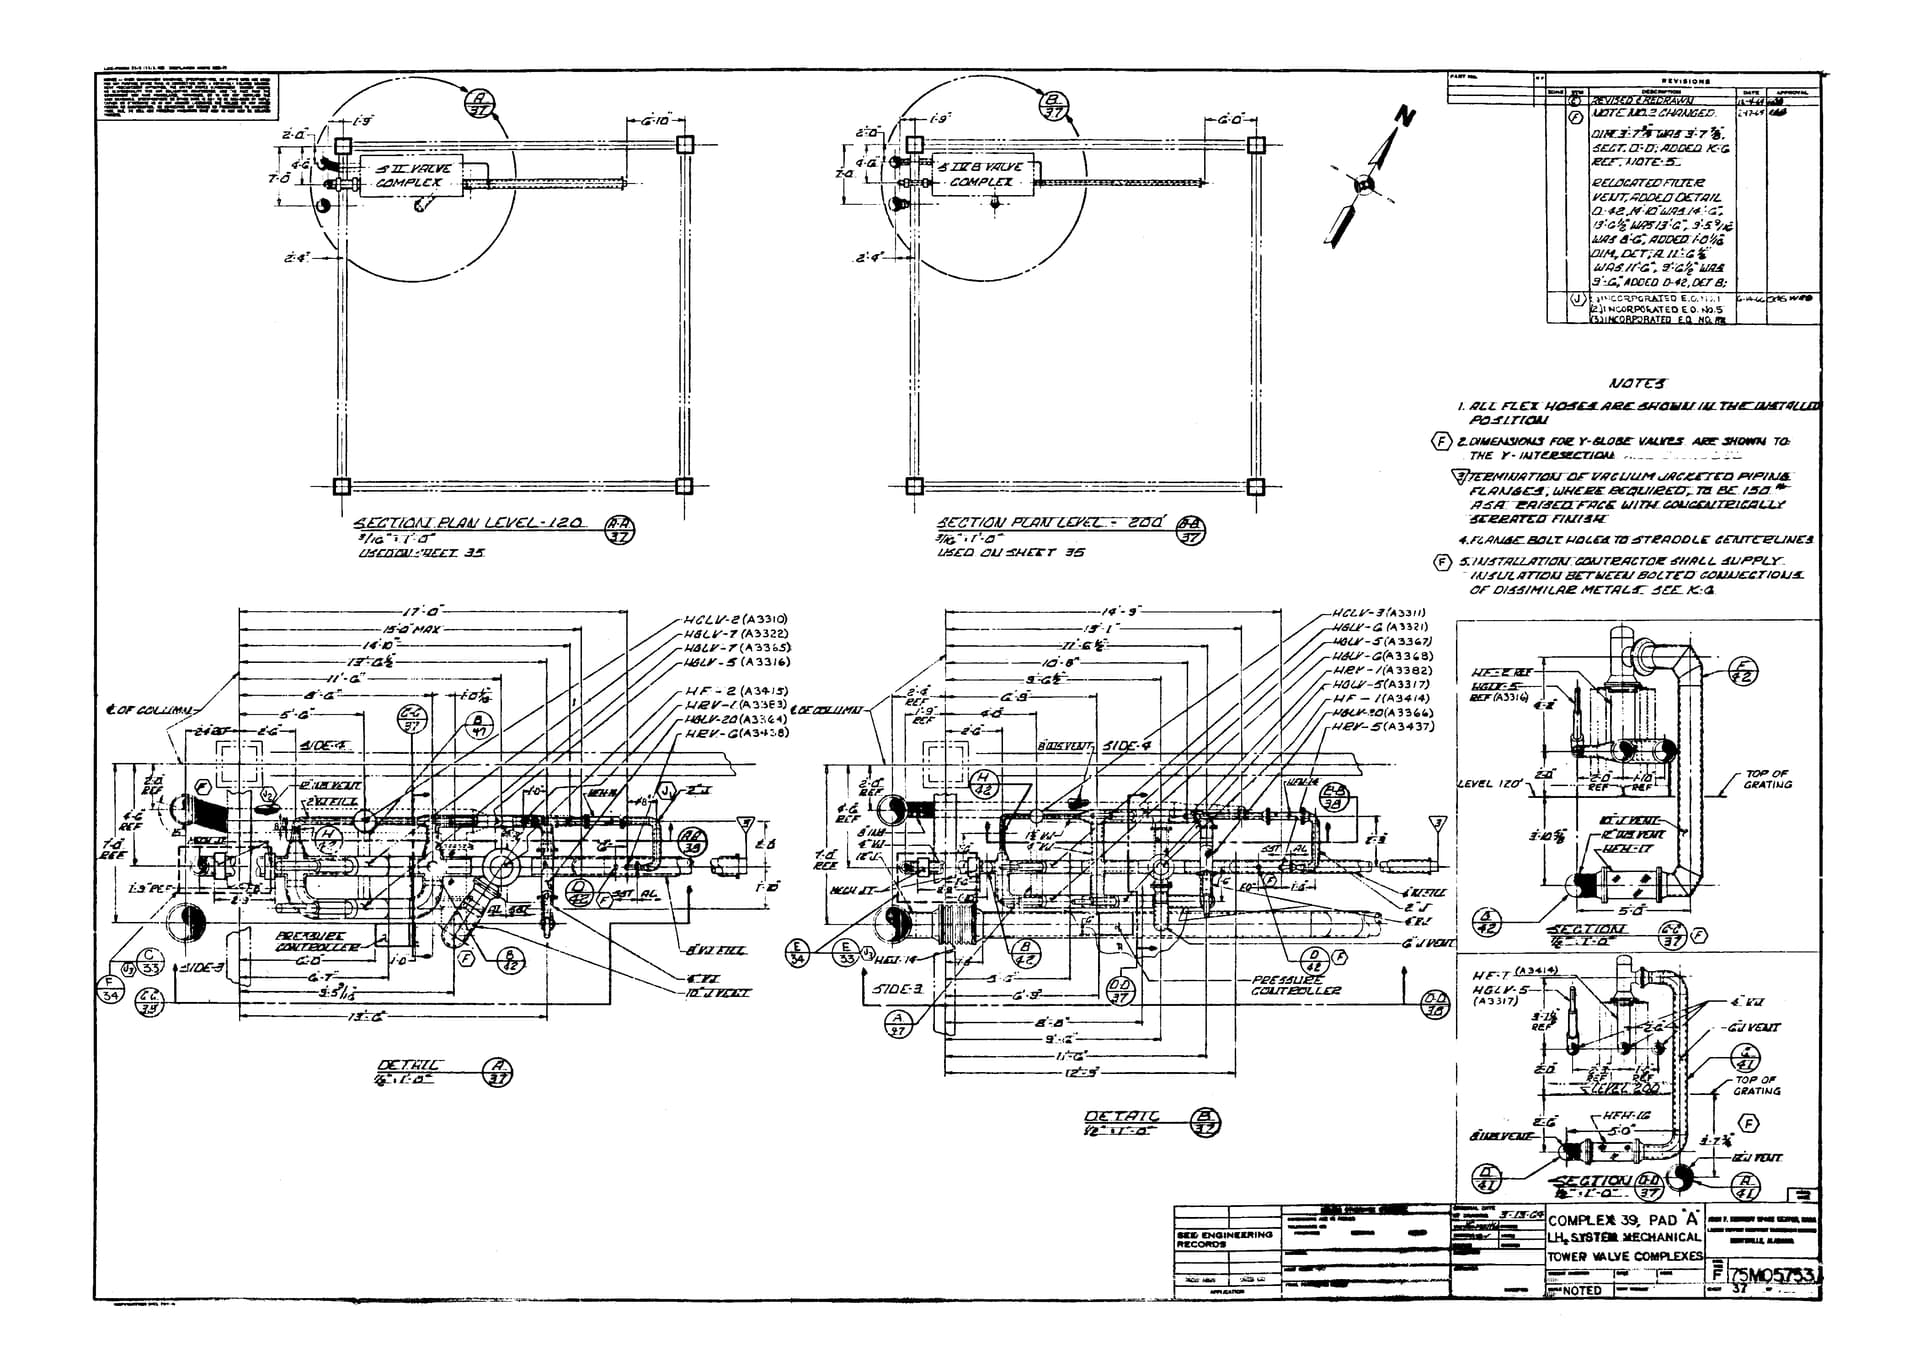
Here is the LH2 part next to the older LOX part including the raised platform and the vent line connections under the floor.
1 Like
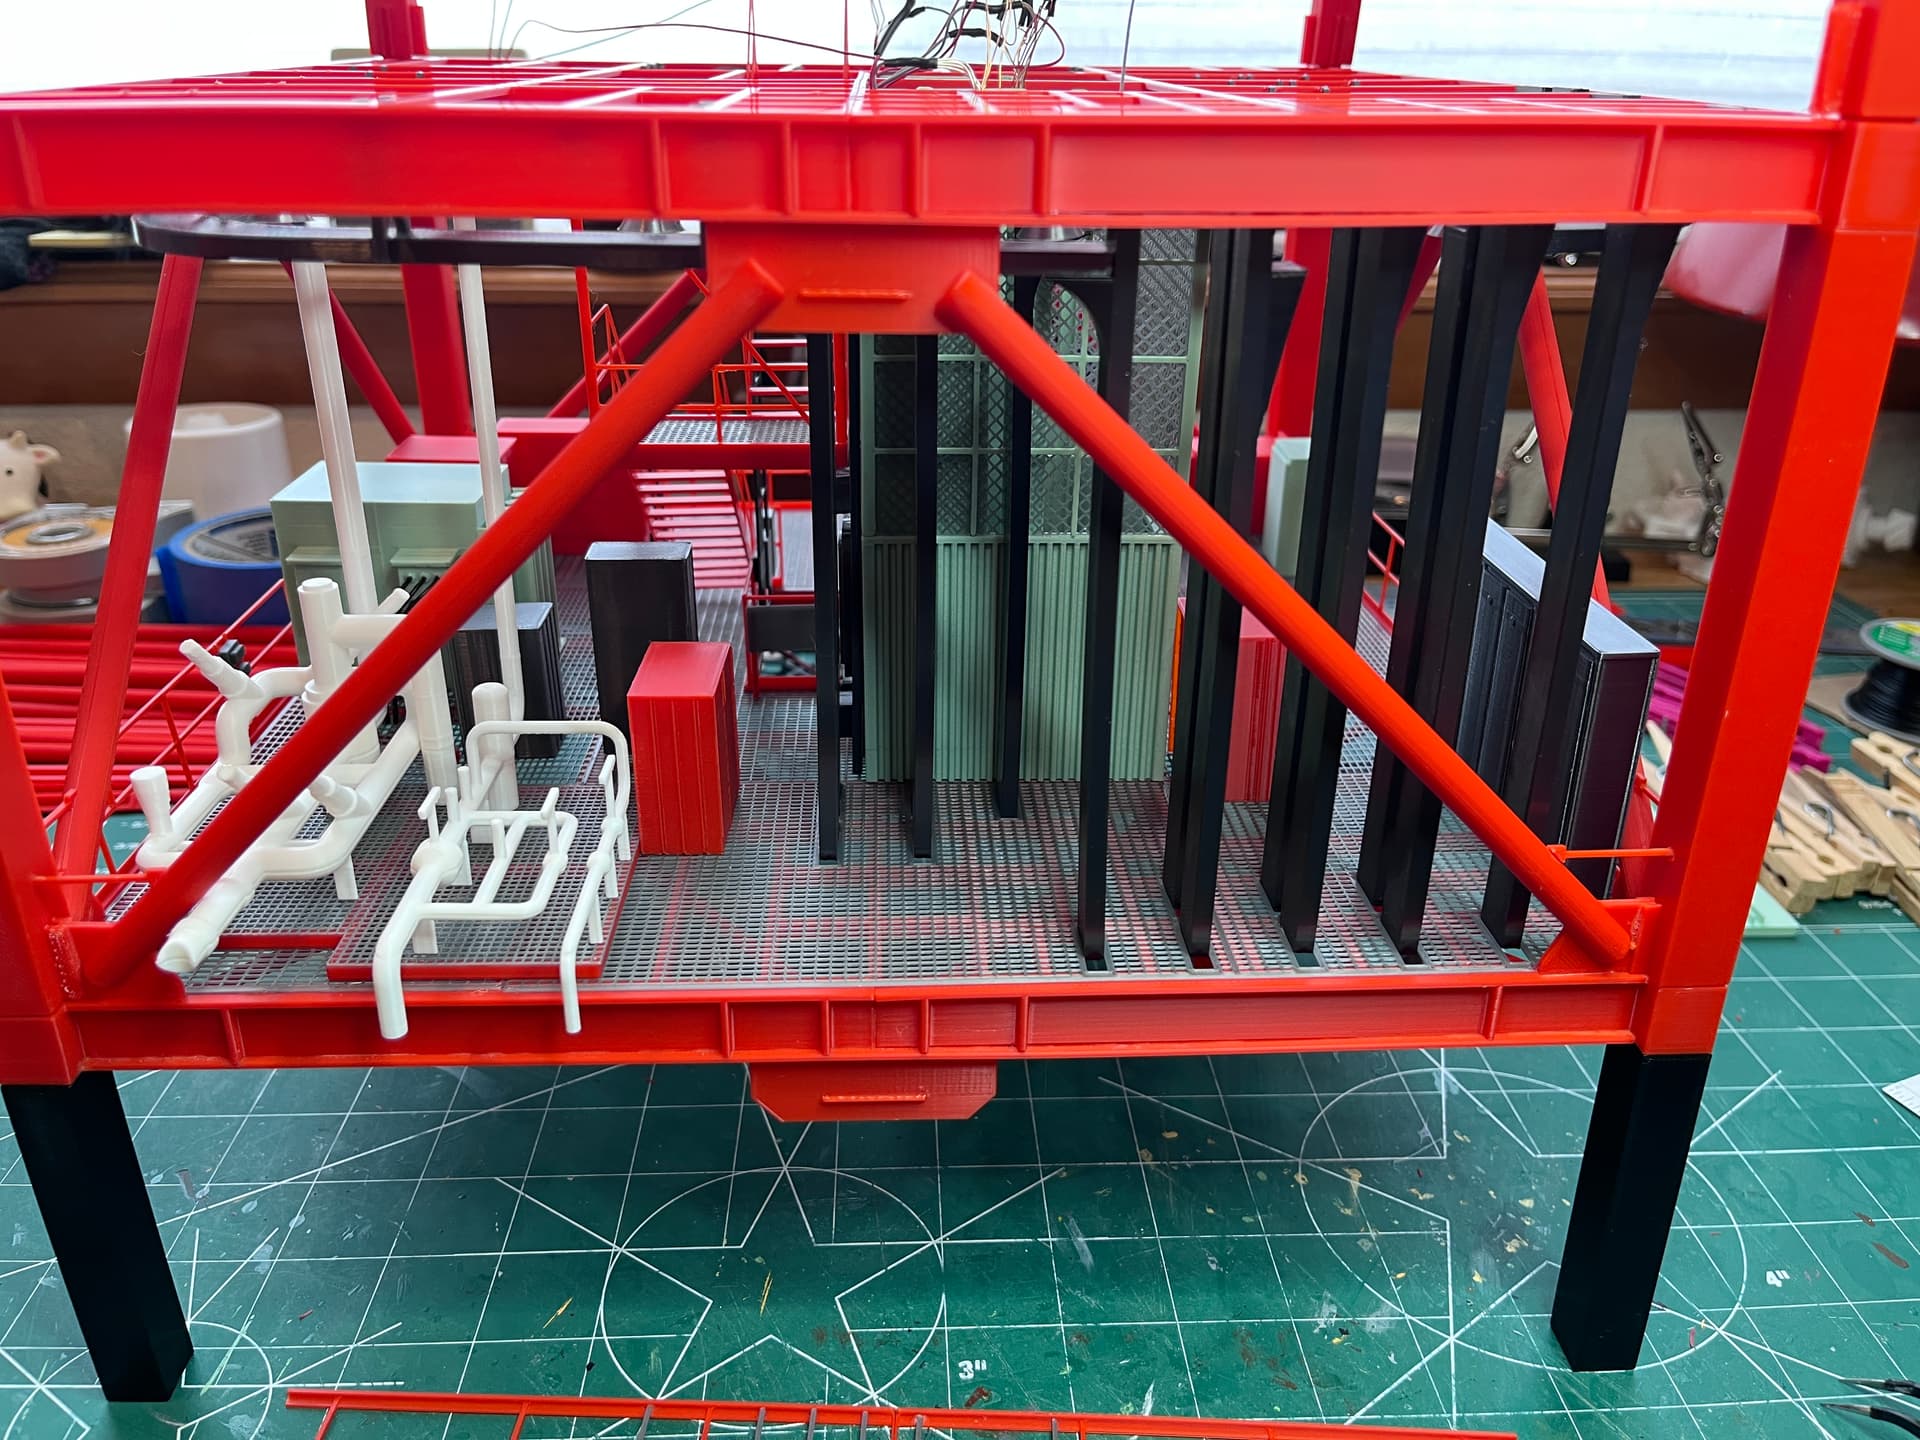
The underside pipes for Level 200 are complete. To complete the placement of the LOX/LH2 valves I had to complete the design of the side and underfloor pipes and then complete the design of the ECS pipes on side 2 since they cross. These are the pipes that go under the floors to the far corner and eventually out the swing arms.
Here are the side 2 pipes. At this level half the pipes have already terminated.
And here is side 3.
3 Likes
Man, You really know your subject to the square inch indeed. I don’t dare count the pieces this model may require and what additional materials are needed to add reality in scale, but this seems quite a museum duplicate of the real thing.
I also don’t even want to guess how many hours this thing has taken you to assemble, but everything seems to fit perfectly and absolutely very clean.
Your attention to detail is that of a true engineer and perhaps also of an architect. Don’t tell me… were you always engaged in such professions?
To me at least, it really seems so.
I envy your complete dedication and your exquisite skills in building this masterpiece.
But tell me one thing. Once it’s finished, will it represent your own private jewel at home, or are you planning to display in an aerospace museum?
It would certainly be a more than welcome item for any museum of this kind and who knows how much your compensation for it would then be.
I will continue to follow your progress and I wonder how the entire complex will then look like, but I must assume to be one of the best depictions ever in any scale ever attempted. Already now, were I a modelist judge I would assign the first price to your work right now.
It is simply too beautiful to pass it by and at least in me, who lived throughout the entire Mercury, Gemini and Apollo program progress a real and impressive gift, since it brings back so many happy memories of those days to me. It was a glorious time of hope for many people.
I wished we would still have some of them these days.
In any case, thank you for sharing these splendid pictures here. They are as worthy as the actual model in itself.
My very best wishes to you.
Thanks for the praise. As you have already guessed, I am retired so I have lots of time on my hands. That means I was influenced by the space programs at an early age, glued to the TV watching launches and people first walking on the moon. It is exciting that we are finally going back to the moon. I have on my to-do list a model of the Gateway.
Actually I spent my carrier working as a software engineer. I do still write software for fun but always looking for new skills. My first big project, and first 3D model, was to re-create the Apollo Guidance Computer using TTL chips. I had to learn these chips and KiCAD because that’s what all the cool kids are using. The hardware design is complete, still working on wiring chips together. The completion of that project may still be years off.
Yes, I do try to create museum quality models. Might as well get things as exact as possible. Although I am standing on the shoulders of others such as the LUT Group who have created an impressive collection of original NASA documents and people who have created 3D visual CAD work such as MicroArtwork by Mischa Klement and others that publish to Turbo Squid. I could not have even attempted such a model without these people and their hard work.
Finally, I never attempt to collect money for my work. Everything I do is freely published for others to enjoy. I see 3D printing as revolutionizing the model making hobby and I encourage other people to find enjoyment in making 3D models. I also encourage others to build on my work, there is always room for improvement.
BTW, the part count for this model is over 1,400 so far…
1 Like
And so i was right after all. ![]() You are an engineer. I envy your skills because I, on the other hand have been cut off from anything mathematical from early on. My grades were simply a disaster.
You are an engineer. I envy your skills because I, on the other hand have been cut off from anything mathematical from early on. My grades were simply a disaster.
My skills are in literature, history and languages and attempting to build historic replicas as best as I can and as I actually am able to understand.
All based on instinct.
But having been also an actor and a stage director I did manage to display my creative mind and develop it to an all encompassing one. I also have a very keen visual memory and can memorize images from photos, films and documentaries and call them back as if I had them stored in an archive.
I also have the natural gift to be able to differentiate various specific colors and shades and then mix them together to reproduce them accurately.
Right now I would wish to have your very same skills because I am so clumsily embarking into recreating a World War II German Bunker called the Regelbau 677 (or Regulation construction 677) which harbored an 88mm anti-tank gun on Omaha Beach and had to design the basic structure by hand drawing it taking an actual model of the gun and shaping it around it. I believe to have finally found the correct shapes and measurements.
I will then cut foam board with a heat cutter. First time I use this kind of tool because I never created a scratch built building from the ground up.
I wished I had your skills in CAD scripting, but I simply do not understand it. All I was good at when living and working in New York was to become a Web Designer, again and artistic side of me to create pleasant and elegant visual environments on a website.
But alas I do not have the means to buy a 3D printer and wouldn’t even know where to start with it, since as said, I am technologically impaired and so I have to resort to sculpt things by hand.
I have a whole stash of future models of the space race as they called it in the 1960s as well as a 1/72 scale Space Shuttle model by Revell and always by Revell the uneven International Space Station in 1/144 scale. Together with them I also have the launch pad of the Space Shuttle in the same scale.
The Apollo Capsule with Real Space modifications for the later version as well as the Gemini capsule in 1/24 scale with the same accurizing details by Real Space to build the Gemini IX and so on and so forth. Still all in their boxes waiting for me to distance myself from 1944.
My goodness, 1,400 parts would kill me and as you said, only so far, so who knows how many more will come next. You must have a real gift of patience to do all this.
I too must have since thus far, I still have dozens of tanks and vehicles from WWII to build and set in many various dioramas from D-Day to Operation Market Garden and from the Battle for the West Wall and the Battle of Hurtgen Forest to the Battle of the Bulge on to the finding of the Ludendorff Bridge at Remagen.
And let’s not even count all the figures I will have to assemple and paint. According to my last count I have over 1,200 German Soldiers in all, and about 1,050 Allied ones, between U.S., British and Canadian troops. And all in very different uniforms, either regular or camoulfaged.
Man, what I was thinking when I started it all…
So, in a way, we both have loads to do but there is one major advantage in all this: it keeps our minds busy doing things of value, even if just in scale.
BTW, I too try to create museum quality pieces extracted by either documents, period photographs or simply WWII documentaries.
And while I am at it, I have the full Mercury, Gemini and Apollo missions on various DVDs produced in cooperation with NASA by Spacecraft Films and 20th Century-Fox and whenever my nostalgia resurges I place one disc in my player and i am back in those glorious bygone days.
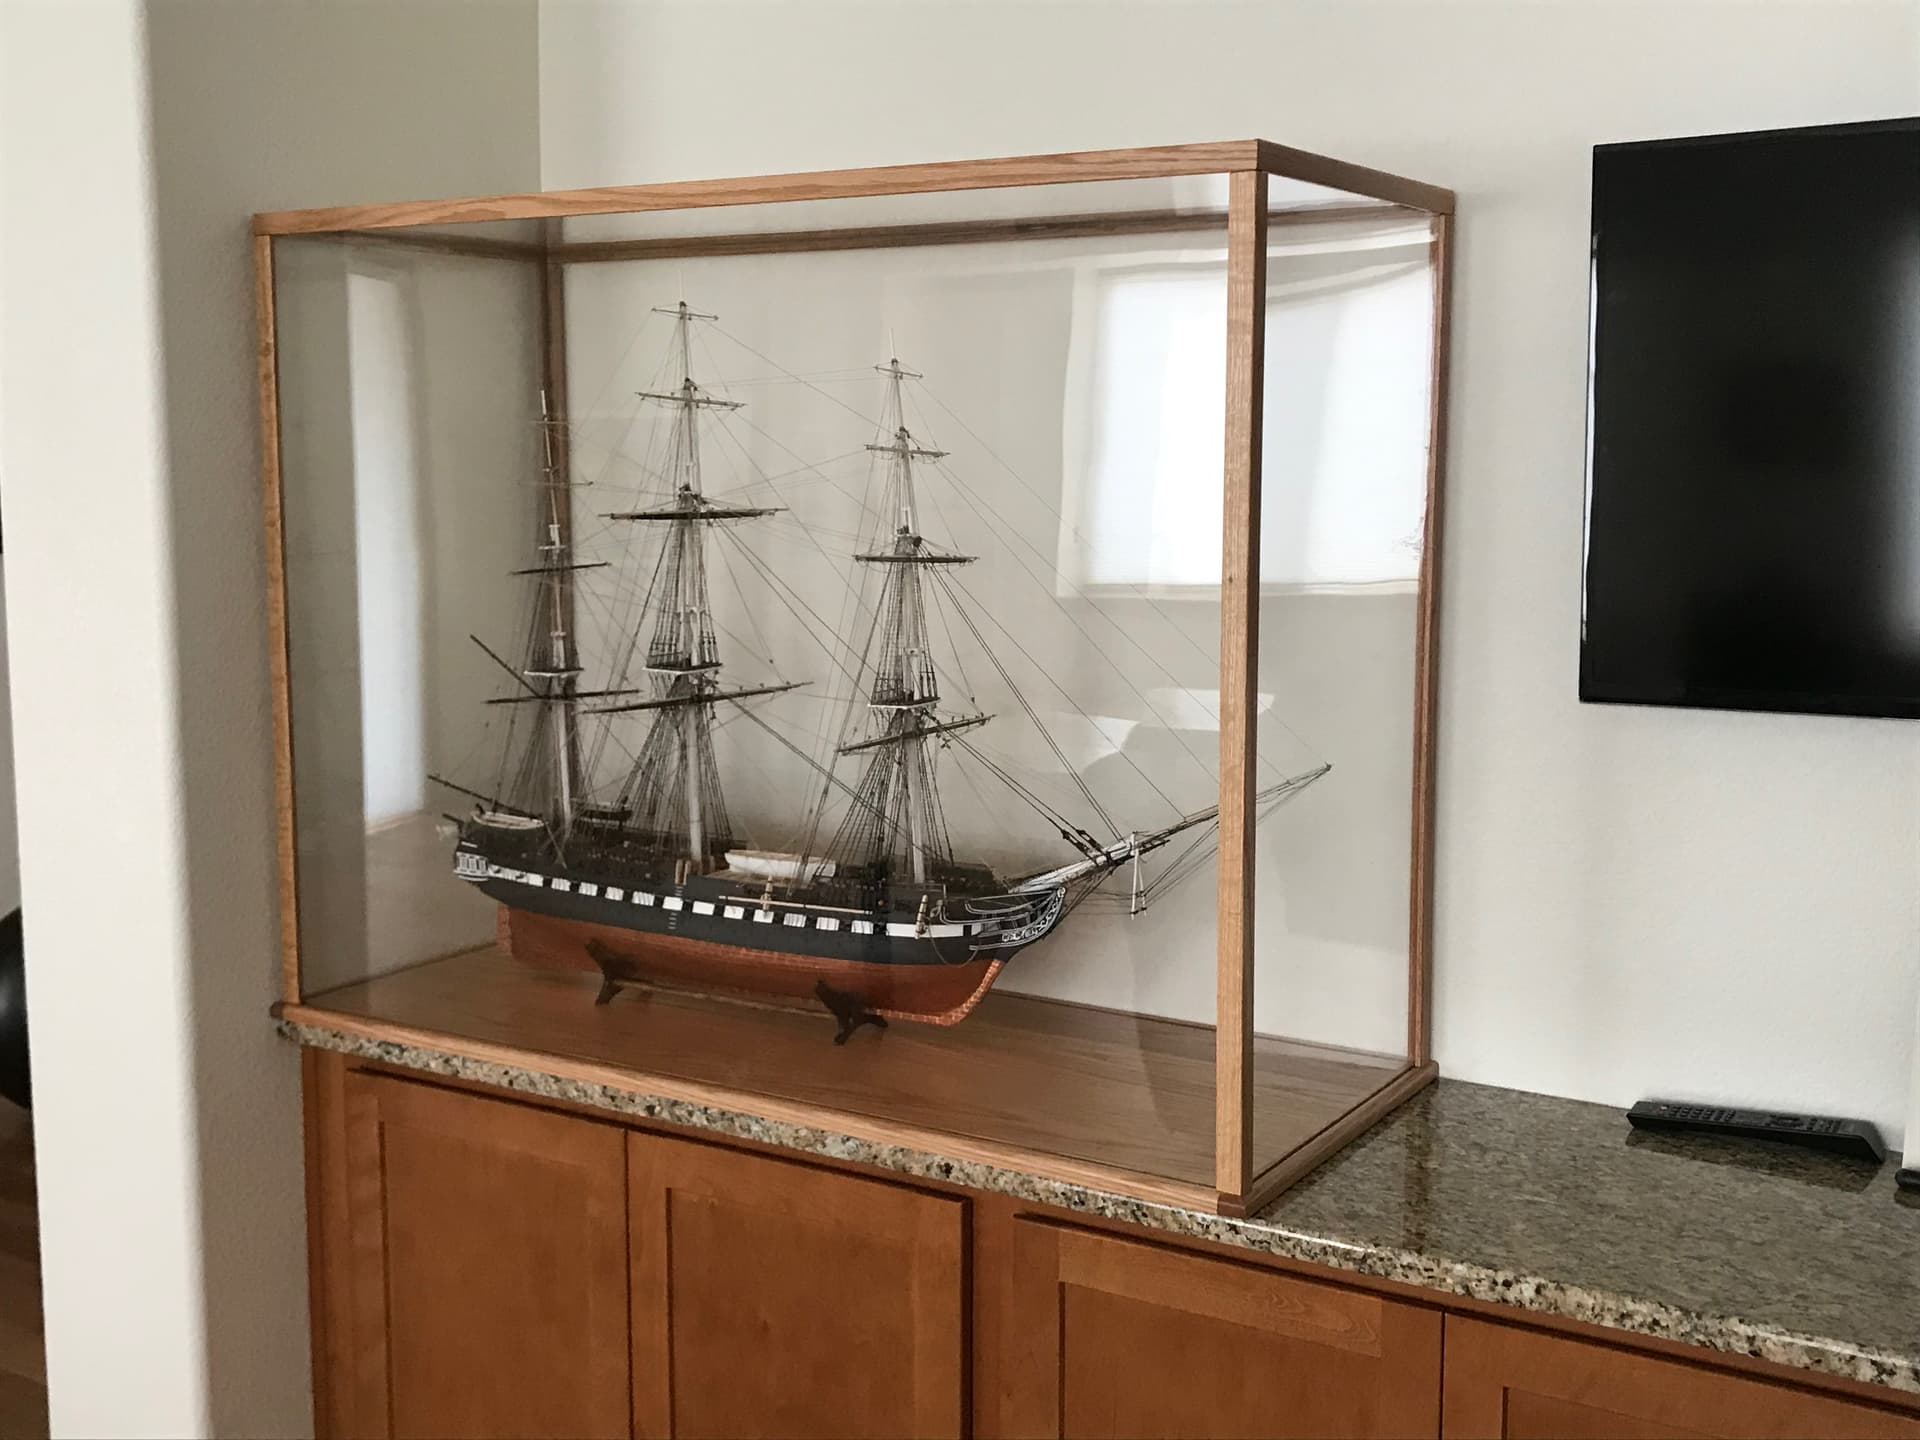
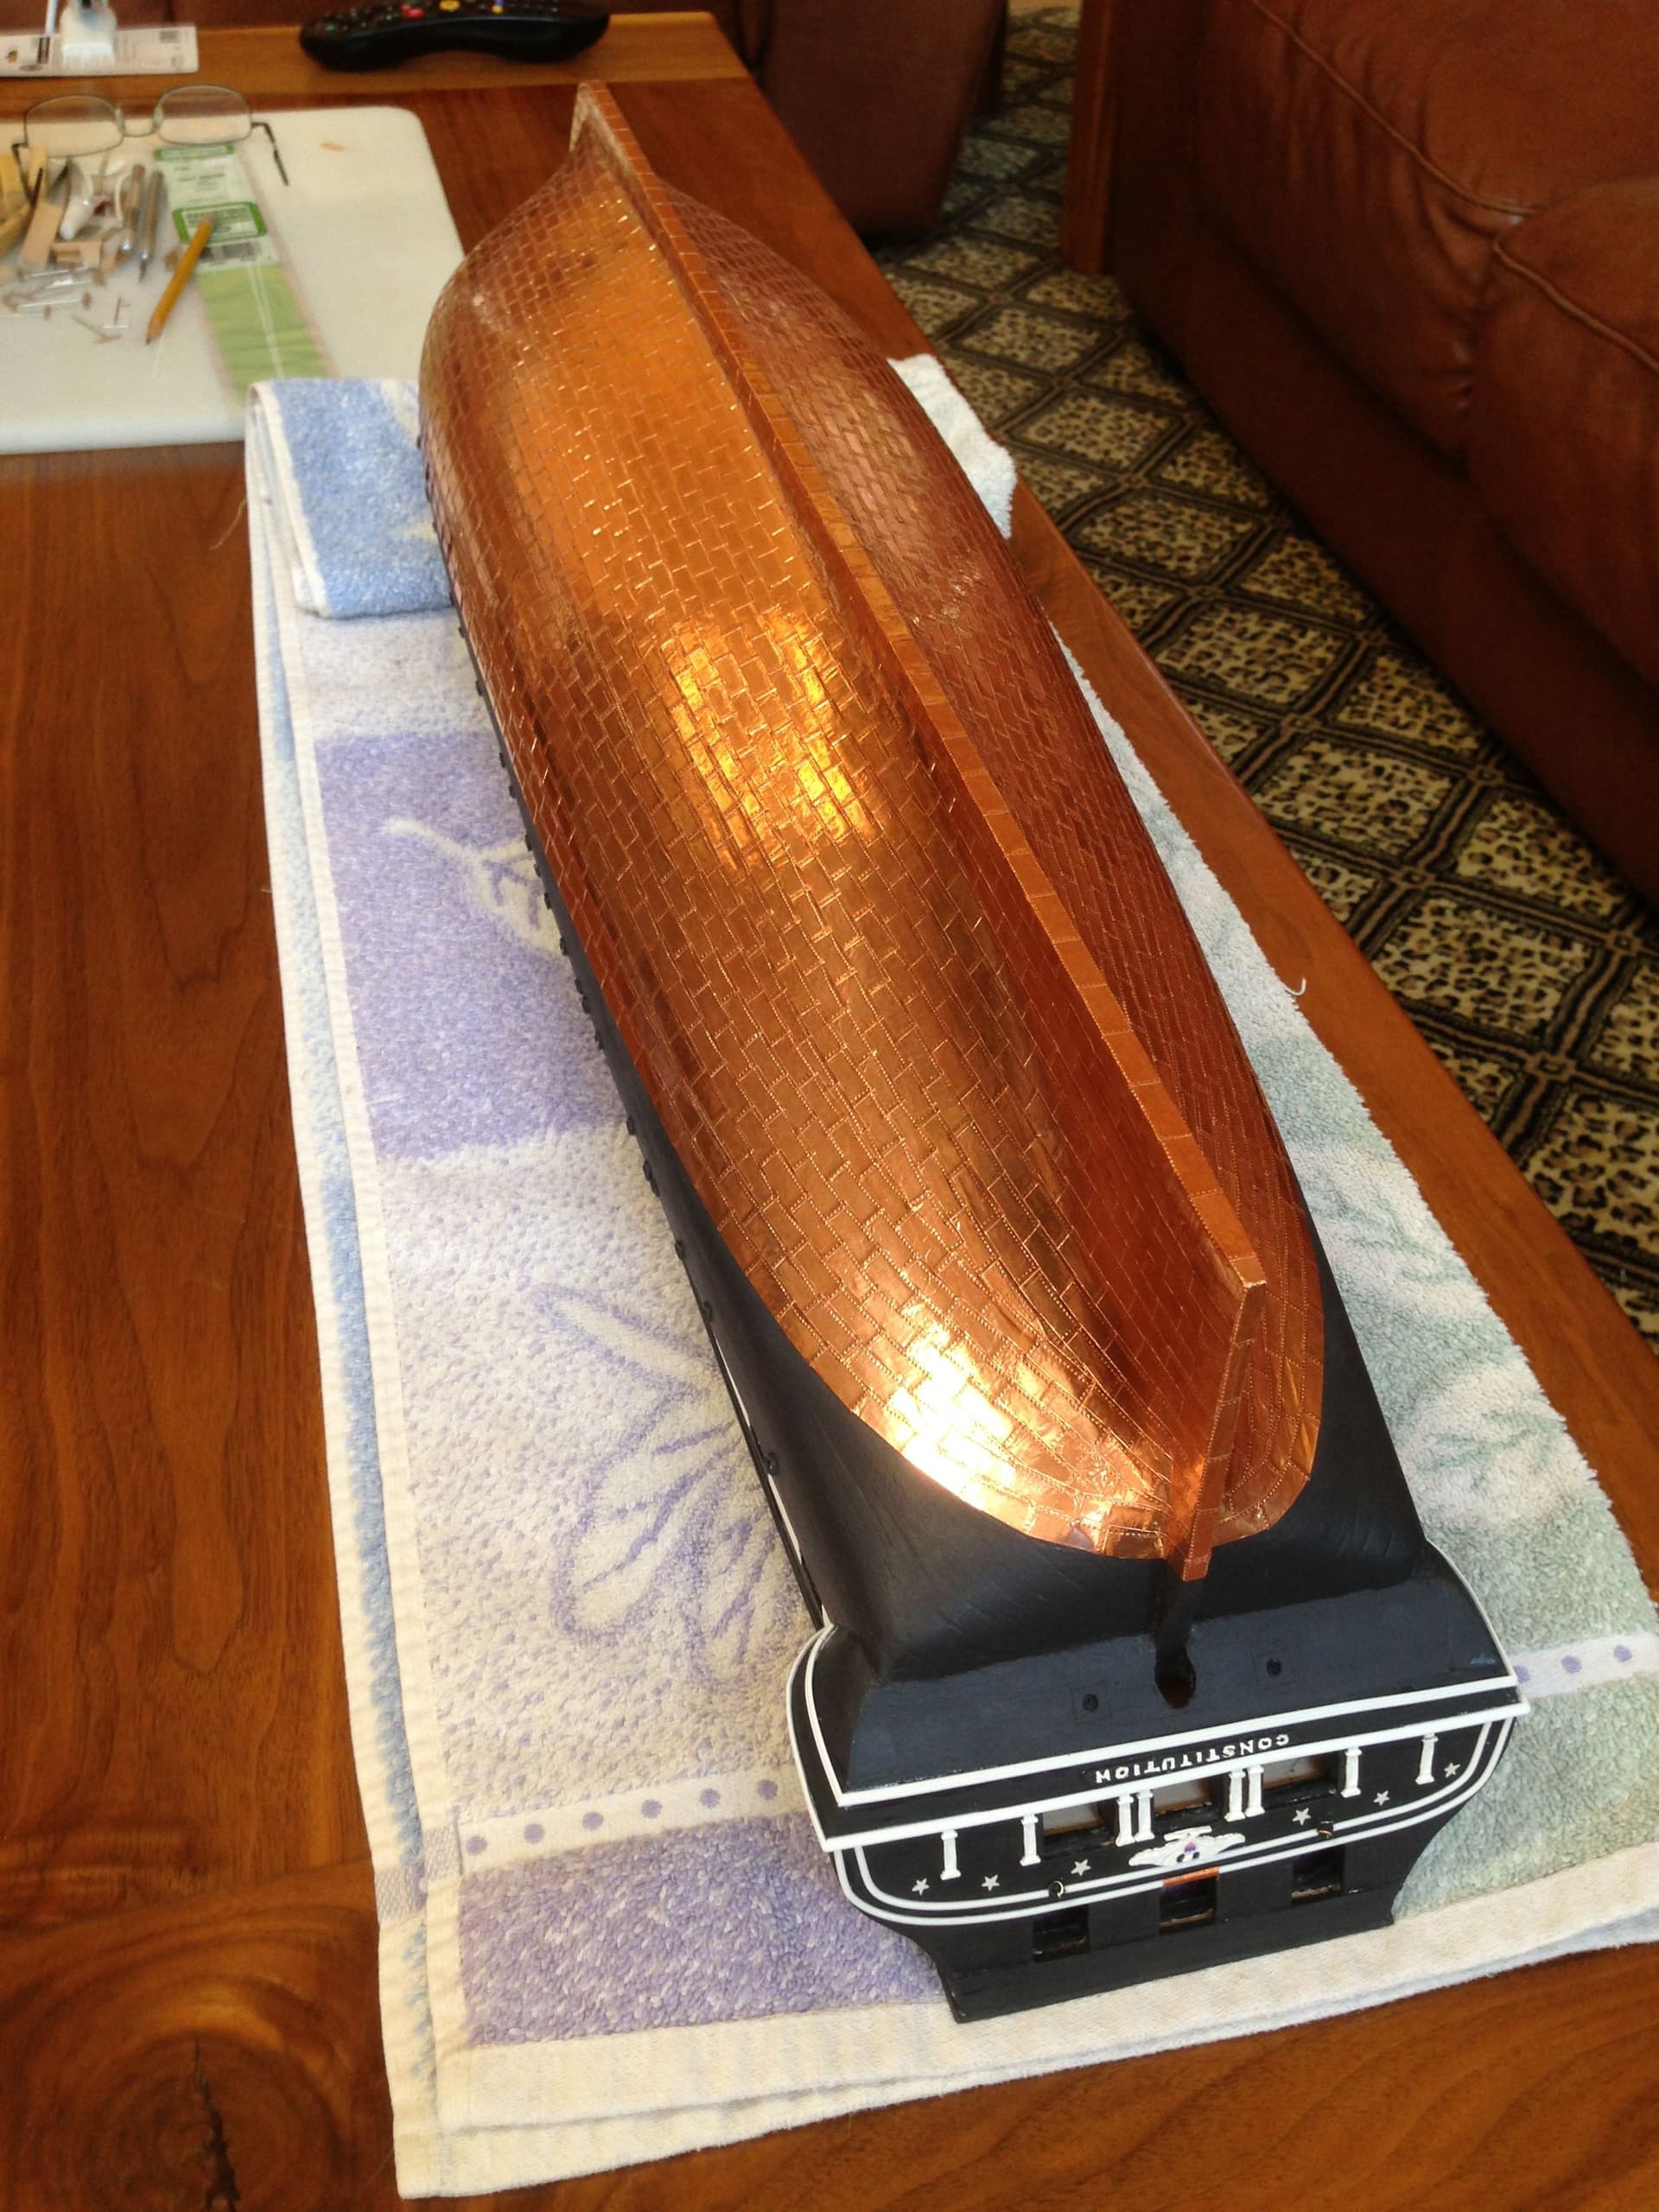
I believe everyone has a creative spark and everyone is different. There is no right or wrong way or material. Use what you feel comfortable with and be creative. My go to material before 3D printing was wood, mostly wooden ships and balsa airplanes, mostly scratch built. The last wooden ship I built took 4 years of spare time, my best model so far. Not for the feint of heart. The rigging is ridiculously complicated. You have to “learn the ropes”. The hull is clad using copper tape used for making stained glass. The netting around the perimeter was sourced from a flower shop. It helps when the you can visit the ship in Boston harbor.


6 Likes
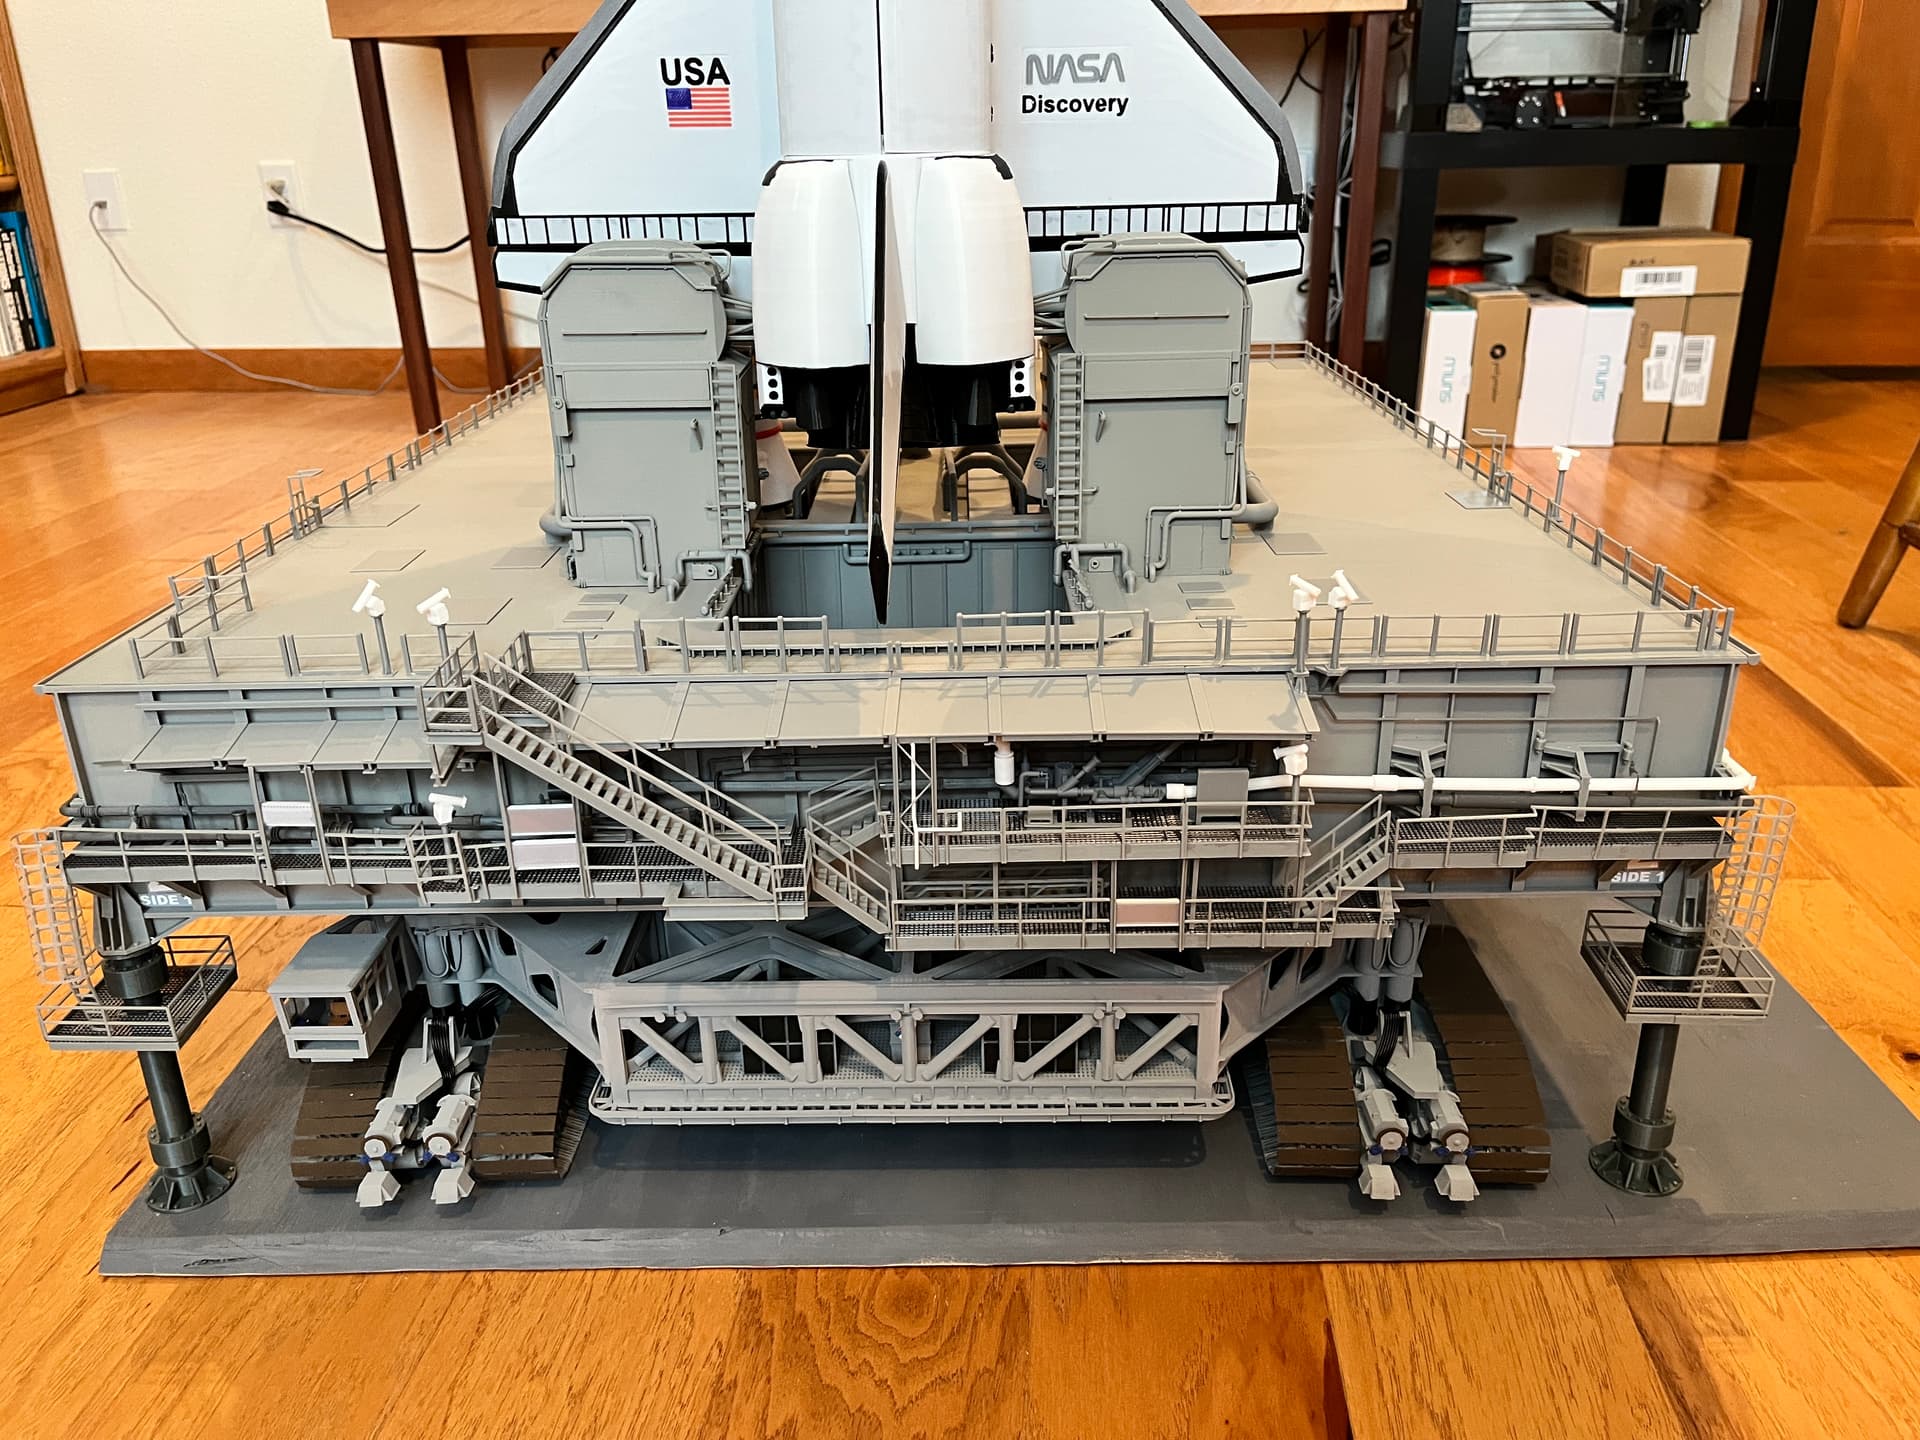
I could never figure out how to scratch build space models before 3D printing. Now I have the tool and medium I have been looking for the last 50 years. I found someone else’s shuttle model, 1/60 scale so I printed that. But the shuttle really needs the MLP and if you do the MLP why not go ahead and model the crawler to put underneath. I have not yet committed to building the FSS and RSS. The FSS would be somewhat easy since they reused floors 120-380 of the old LUTs which I have already built. Still working to collect data on that model.

3 Likes