Hello! Ain’t that a fiddly detail! Great work on this project and keep up this excellent work! Have a nice day
Paweł
Hello! Ain’t that a fiddly detail! Great work on this project and keep up this excellent work! Have a nice day
Paweł
Thanks, Pawel! [:D]
Russ
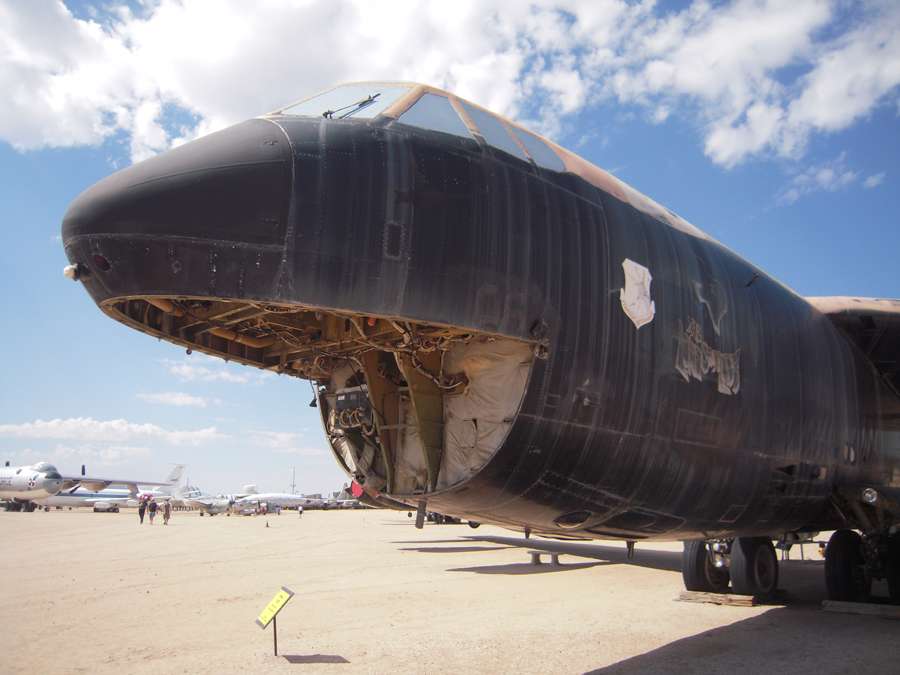
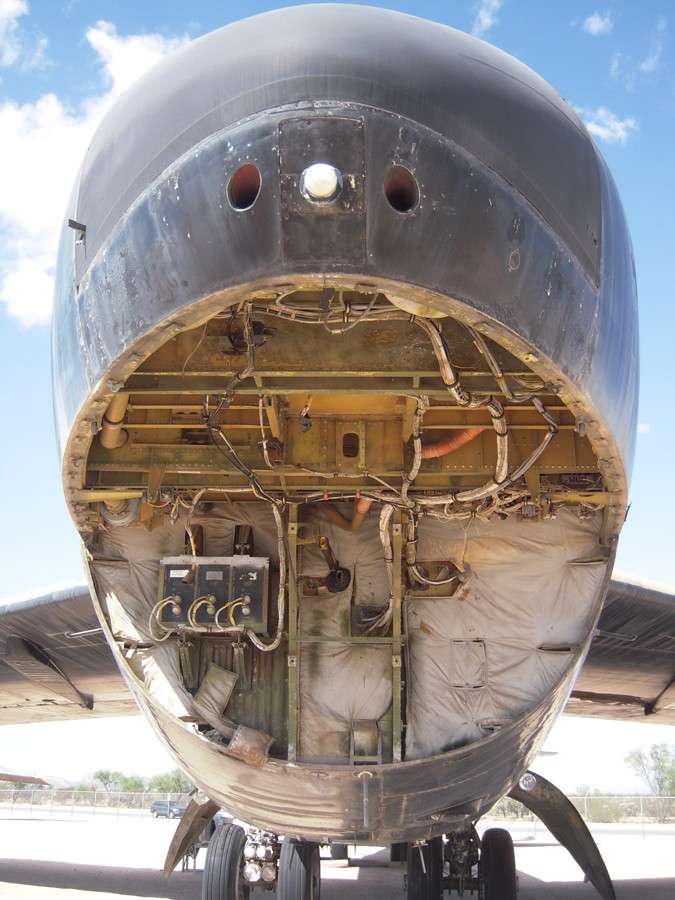
Wynder (Beau) was kind enough to send me some shots of the nav radar antenna compartment on a B-52D at the Pima Air and Space Museum in Tucson, AZ (Thanks, Beau!). Two of these are shown below. There are three units shown in the upper left corner of the compartment that I need to add. These could be power supplies or possibly radar transmitters.The bulkhead insulation is another challenge but I don’t know yet if I want to tackle that.
I’ve also added the one photo I found that shows the nav radar antenna installed.
Cheers,
Russ


Wow russ:
You never fail to amaze!!!
fab maintenance cribs, i love the flooring!!!
Paint is going on very nicely!
is that guy with his hands up you???..lol
Really fantastic work, Russ!!!
Dom
Wow Russ, incredible detail! Great scratch building! [Y] [Y]
Ken
Thanks for the good words, Guys! It came out better than I thought it would [:D].
Russ
Wow! I’d love to know how you made that maintenance stand! I’d love to have several of those myself!
Way to go guy!
Thanks, Duke! The hardest part was getting useful measurements for each part but it would take too much space here to describe how I did it. I will try to put together some instructions with measurements that I can email to you later on, after I’ve finished the other two stands. This first one was a prototype - the last two should be a lot easier to document. BTW, they look fairly big in the photos but they are actually very small and delicate when you’re handling them. Be sure you have a good pair of glasses! [:D]
Russ
Once again, amazing work. I was wondering if you would share the type of paint you are using for the fuselage and the method for applying. I find myself checking in every few days just to see what is new. Thanks so much.
Hello, Pampa, and thanks for the good words! [:D]
I’m really embarassed to tell you about the paint - it’s from a spray can available at most hardware stores [:$]. It’s Krylon Fusion gloss black and it’s designed to bond to plastic. Actually, it covers really well and provides a hard finish once it’s dried thoroughly. It costs about $6 for a 12oz can and there is a pretty good range of colors available.
Cheers,
Russ
Hi, All,
Quick update - I finished the second B-4 stand with the platform raised about 3 feet. I decided to open the gunner’s access hatch so this stand will go under it.
BTW, the handrails on these stands were designed to fit into sockets on the platform and could be removed to position the stand closer to the aircraft. I modeled this particular stand as an older version; later versions had 3-4" plates welded between the rail sockets. This helped prevent a technician accidentally knocking a part or tool, or even a whole toolbox, off the stand and possibly onto someone’s head.
Inserted 7/21/19.
If you would like to build one of these B-4 stands, I have written a manual on how to do it. Please send me a Personal Message (PM) by clicking on my avatar and then clicking on the “Personal Message” button. I’ll send you the manual in pdf format. NOTE: Any email addresses in the manual are no longer valid so please PM me for any inquiries.
Cheers,
Russ


Hi Russ,
Nice work once again. Those stands look so realistic!
Btw, I just watched a re-run of “Mail Call” that highlighted the B-52. They had some really great shots of the BUFF.
Ken
Thanks for the good words, Ken! [:D]. I used to watch Mail Call but I don’t see it much any more.
Cheers,
Russ
Hey Russ:
“and possibly onto someone’s head.”
I’ve had more jobs than I can count. I was working on a store interior re-model,
and I was working with a Croat guy named ‘********’ whom had a lot of lost his fingers in the
'*******" war. He was replacing a 6 foot flourescent light system and dropped a 5 pound light ballast over my head, voluntarily, and then said to me “you have to watch out on a job site.” It’s Okay, this happens all the time"“”"
Against my adrenalin impulse to tip over his 12 foot ladder, I coolly decided to let him live, and immediately told my “boss” to take that ballast and store it safely in a warm, dark, moist, orifice…lol…
i will never forget when that ballast whizzed past my eyes and smashed into the floor…[:@]
…errraaarAAARRFF!!![8o|][8o|][8o|][6]
We needed cash so bad I just moved on…[A]
There’s nothing like knowing the guy(s) you are working with ha(ve)s your back…[Y]
Dom
Yikes! Not good! I guess that proves the old saying - “Beware fingerless Croats!” lol! On the other hand, I can see how not having fingers could lead to that kind of accident. The least he could have said was “Sorry!”
Russ
Hi, All,
I just finished my ECM antenna farm (see below). I wasn’t able to find any closeup photos of the antennas on an operational aircraft, which is not surprising since the systems were classified and photography would not be allowed - the length and shape of an antenna would give a clue to the frequencies and purposes of the system.
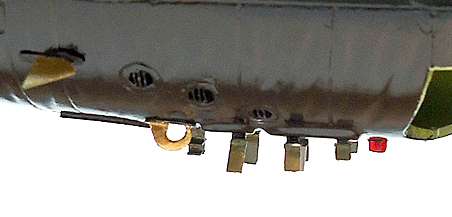
It’s been many years and my memory is not the best, but I don’t ever remember replacing an antenna that was painted black (that doesn’t mean there weren’t any - I just dont remember seeing one). They were always an olive drab color or gray. Except for the scimitar antennas - we started getting some that were not painted but rather had an anodized coating that prevented corosion. These were a bronze or almost copper color (as depicted on the model). SEA aircraft had priority, and if an antenna was needed desperately, they would often be cannibalized from other aircraft, so it wasn’t unusual to see antennas that were different colors or shades, or even white.
Some pictures of museum aircraft show the antennas painted the same as the aircraft, but this is purely for show, and for convenience. The actual antennas had a special paint that was designed not to interfere with radio signals (no lead or other metals), so antennas would never be painted to match the aircraft unless it was done by the manufacturer. The different colored “panels” on some antennas were made of a honeycomb material similiar to fiberglass and were designed to protect the actual antenna elements. They were transparent to radio waves, much like glass is transparent to light waves. They were softer than the metal so they wore more easily, like the paint that was scoured off the aircraft wings and engine intakes. They became a lighter, almost honey color or gray compared to the metal on the antenna.
Cheers,
Russ


Hi Russ,
Thank you for the detailed information about the ECM antennas! Very informative! I am filing this away for future reference. I appreciate the time you took to explain it in such detail.
And once again the detail you have added to your B-52 is just incredible. I hope you are keeping a list of all the modifications you are making to this kit. If you decide to take it to a contest, it would be handy.
Great job!
Ken
Hi, Ken, and thanks for the good words! You are most welcome for the information - I figure I better put it down somewhere before I forget it entirely [:D]. As a matter of fact, I have a notebook I started for this plane and I do have a partial list of changes and additions I’ve made. Thanks for reminding me - I need to update it.
Cheers,
Russ
Russ: Nice work there on the antenna farm and that wrinkled skin looks better everytime I see it.
Dom: Gee whiz, I thought I’d worked with some clowns…
Thanks, Cliff [:D].