1/72 B-52D with Big Belly Mod, Operation Arc Light

Hello, All,

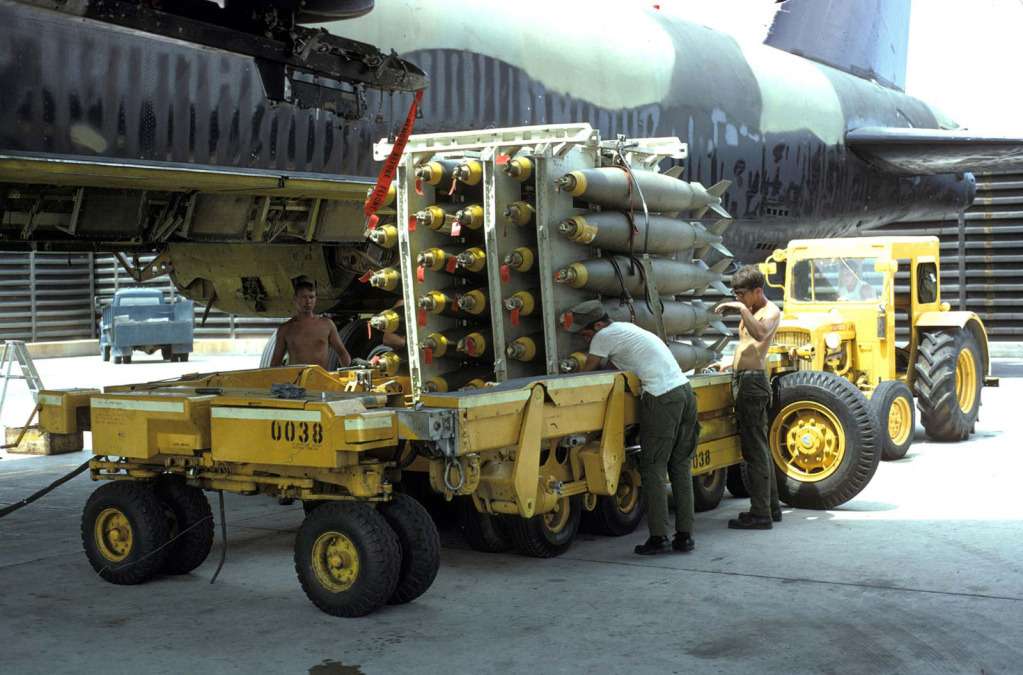
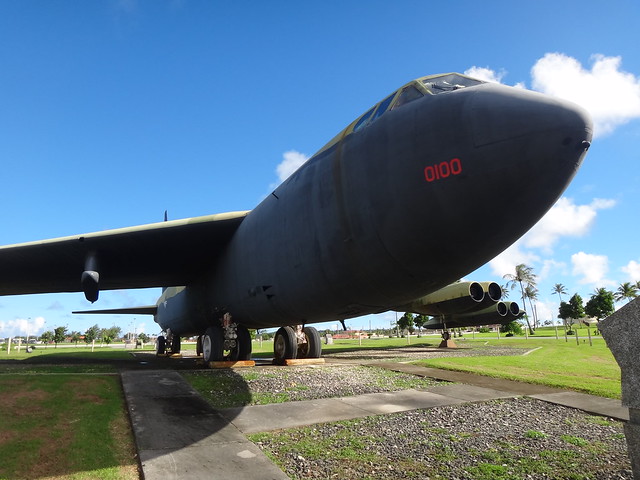
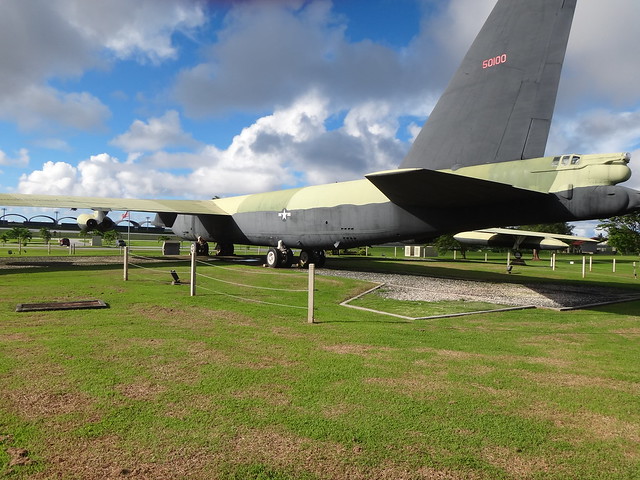
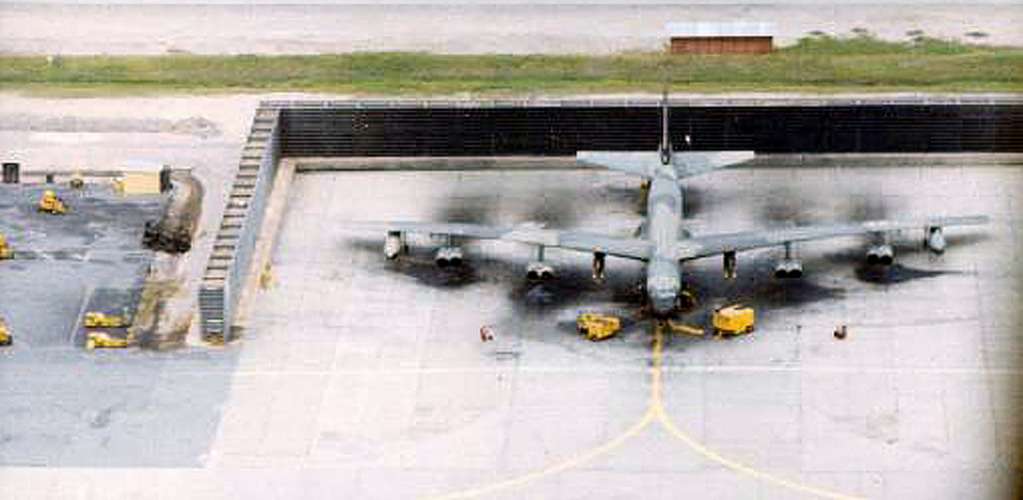
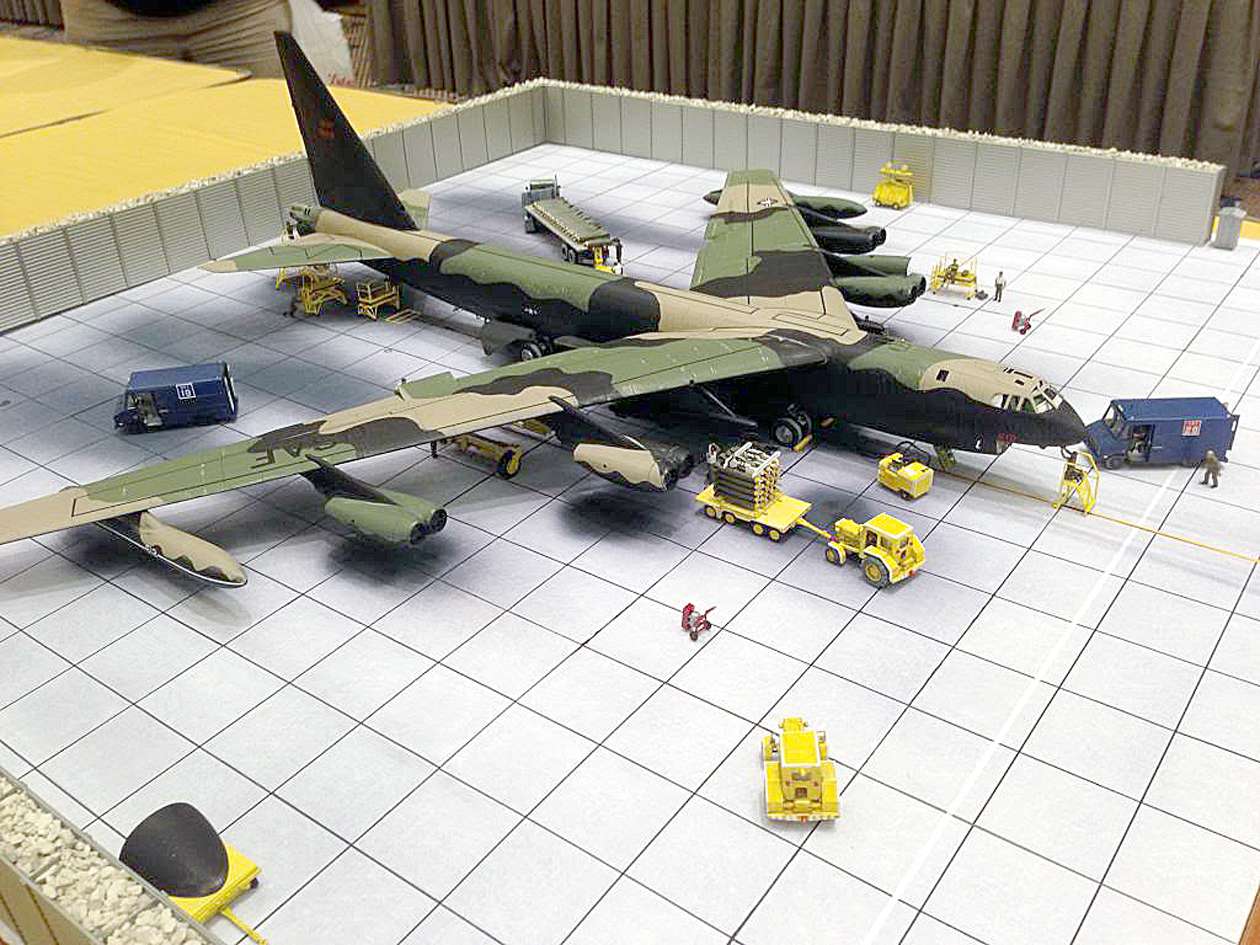
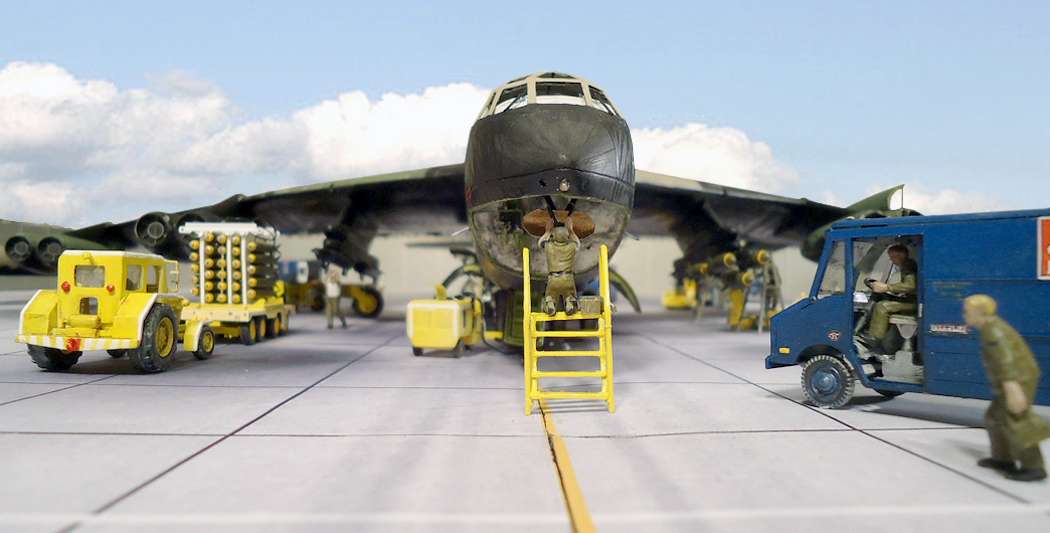
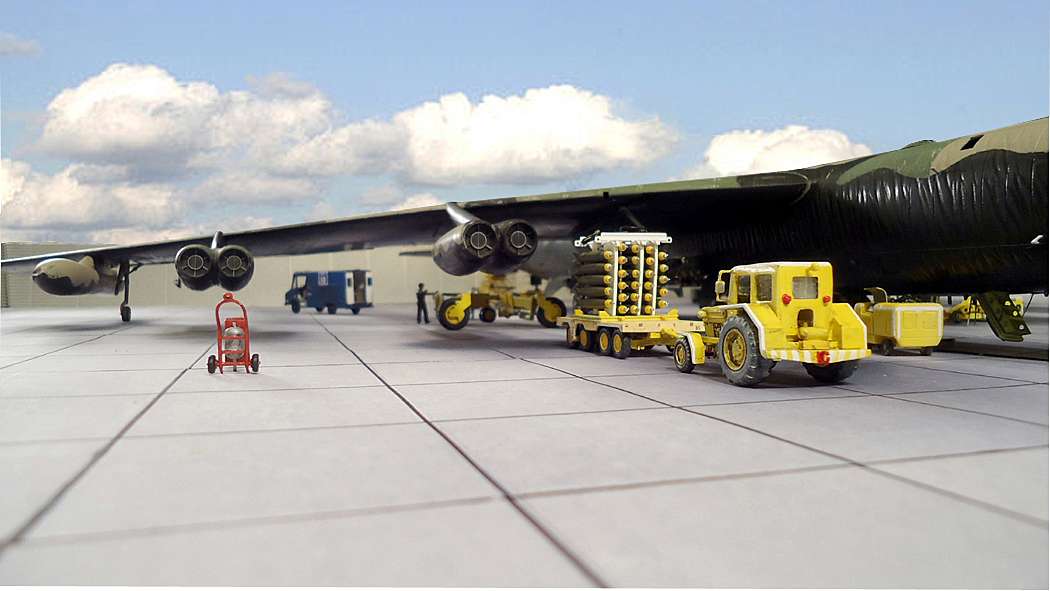
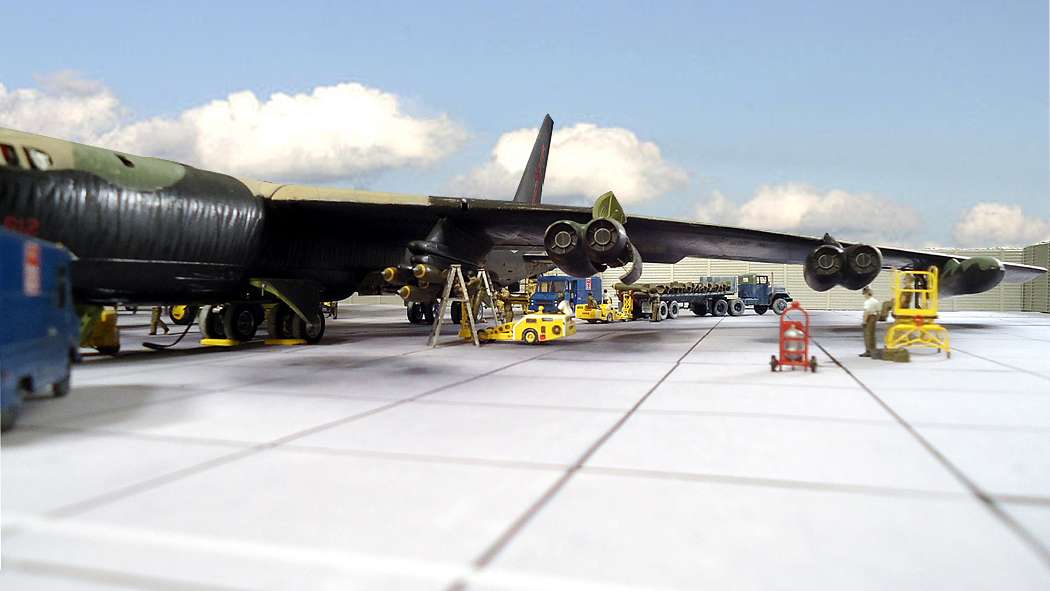
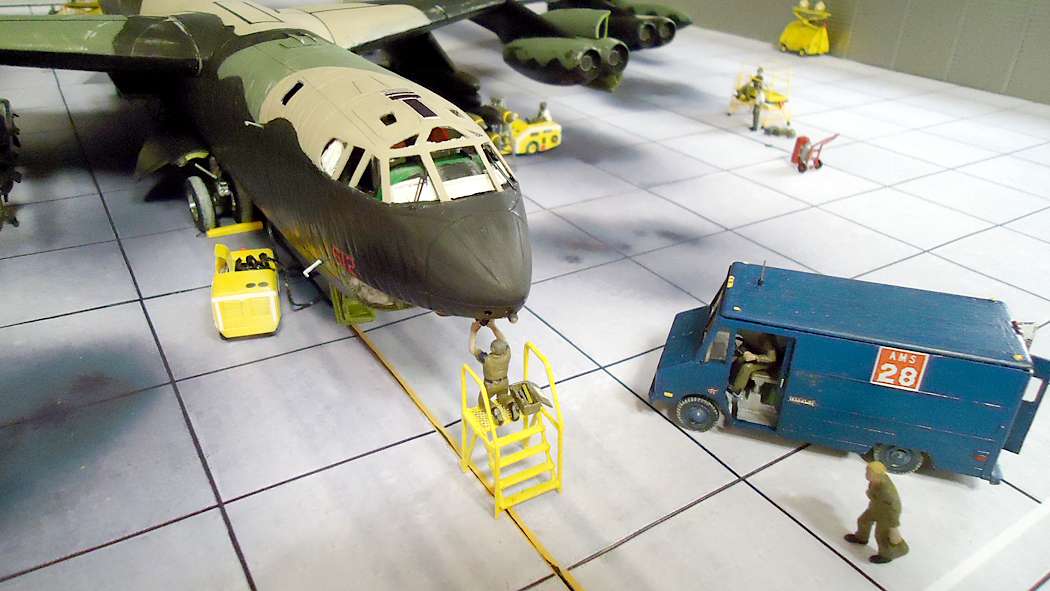
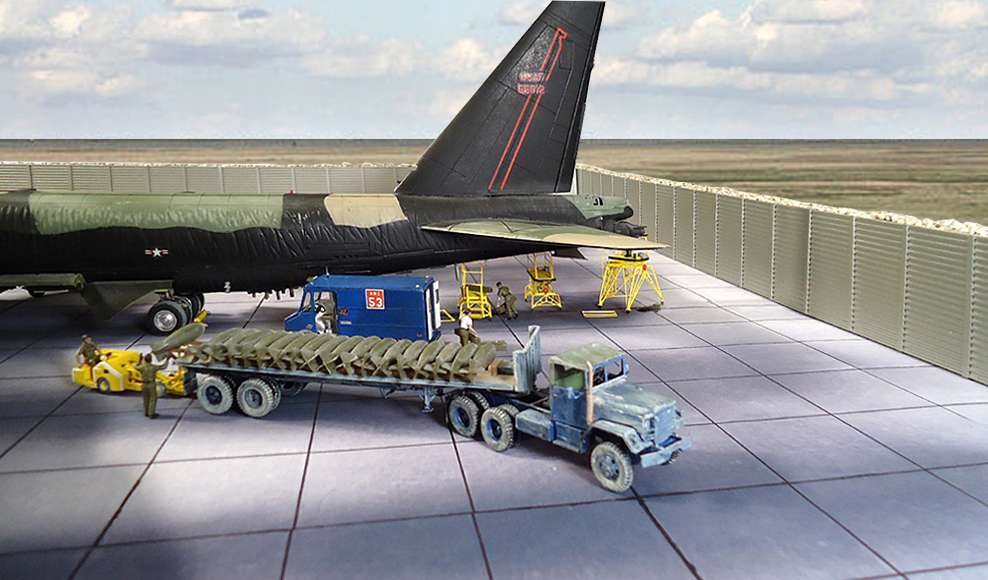
This project is a 1/72 scale diorama of a B52D bomber being armed and readied for an Arc Light mission over Vietnam. The model I’m building is Monogram’s 1/72 B-52D, kit #5709.

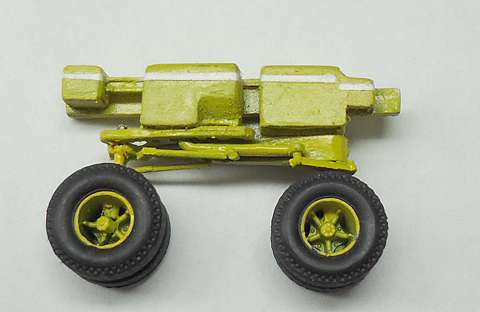
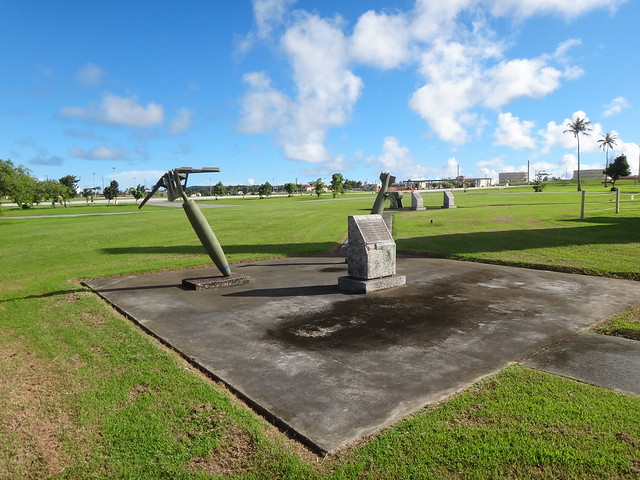
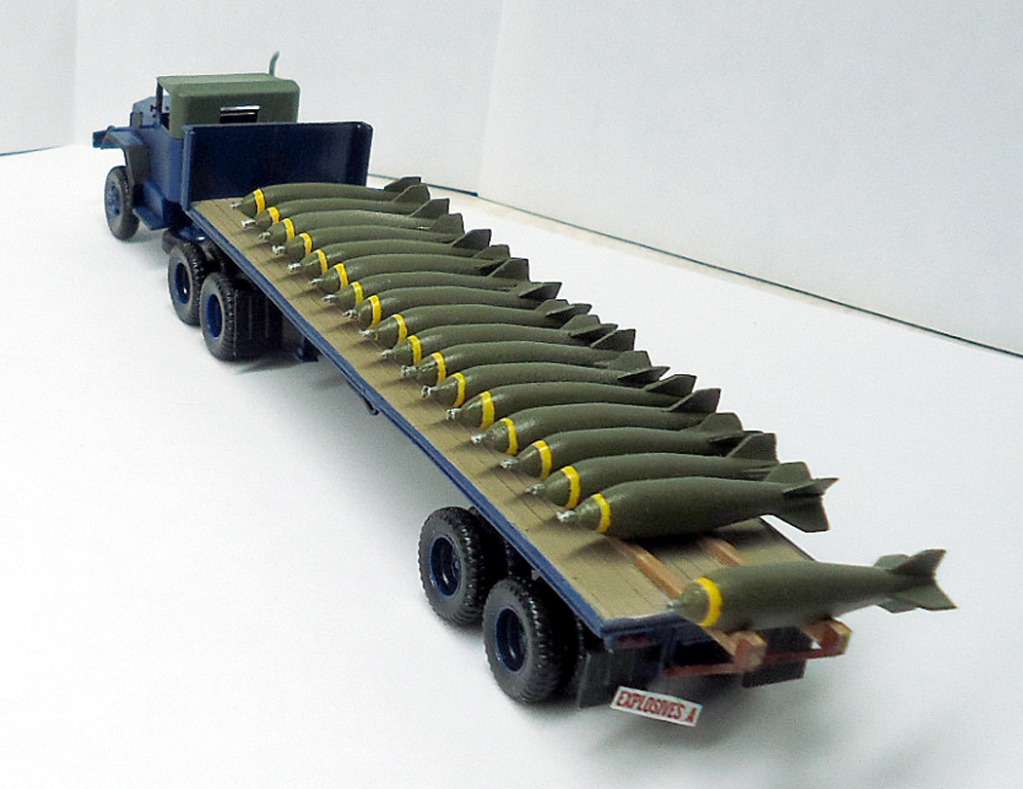
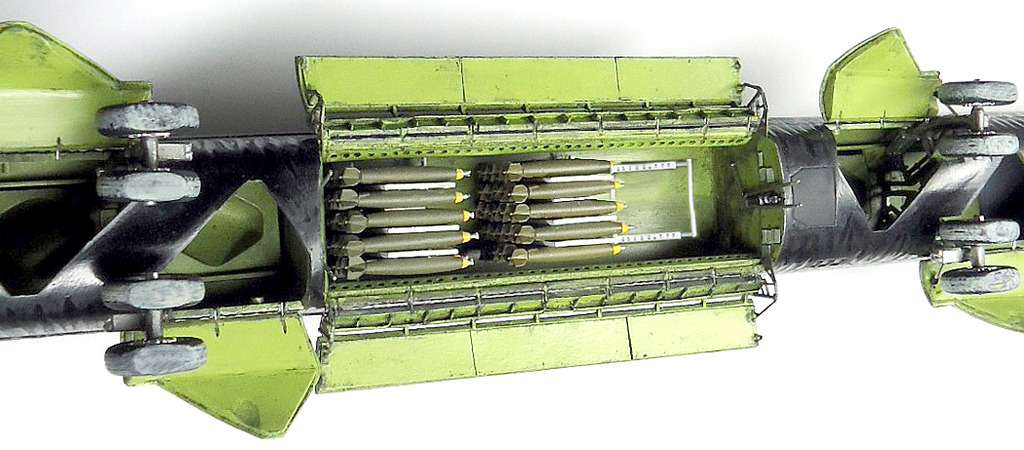
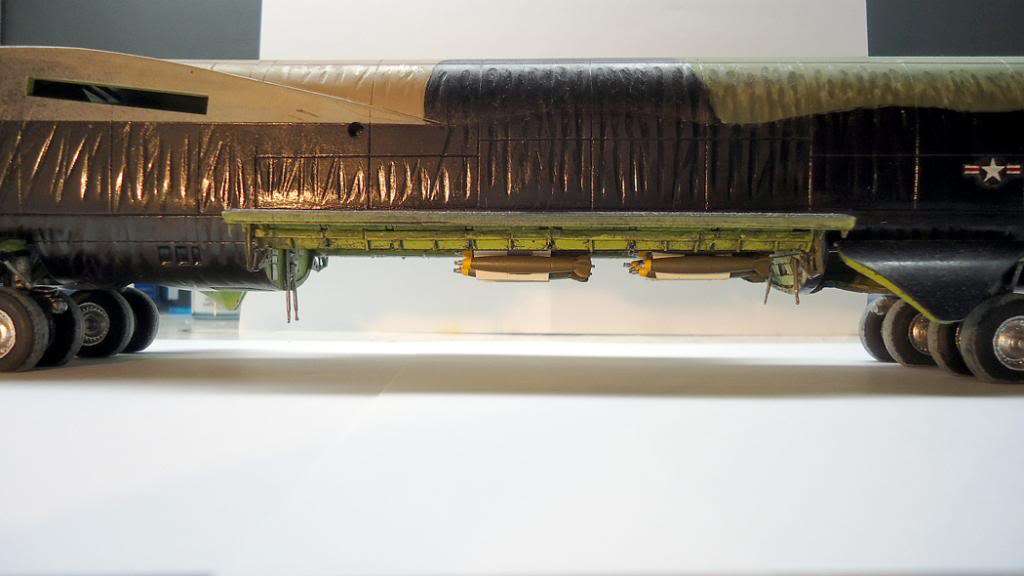
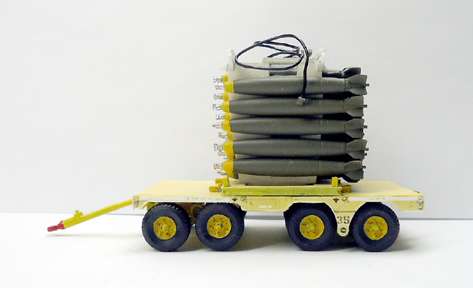
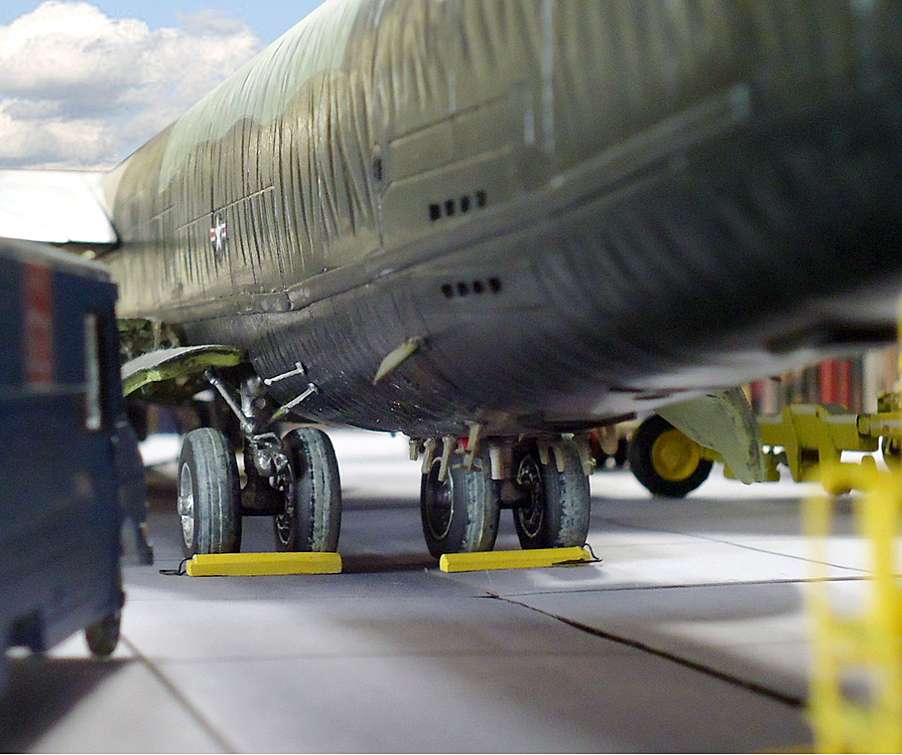
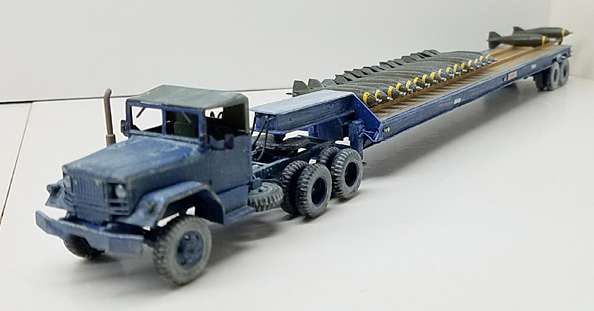
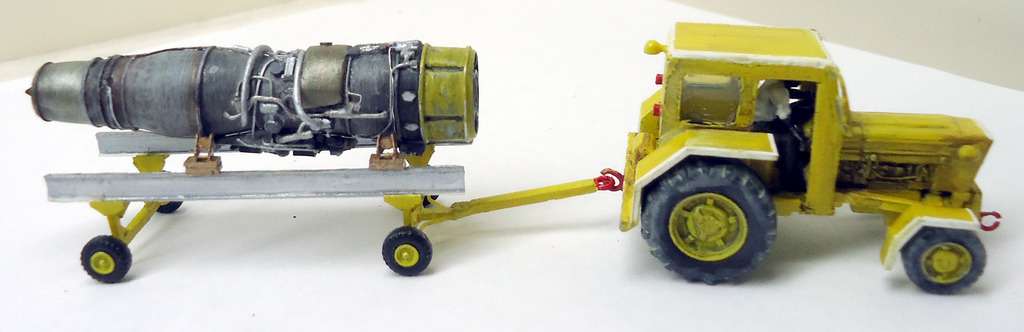
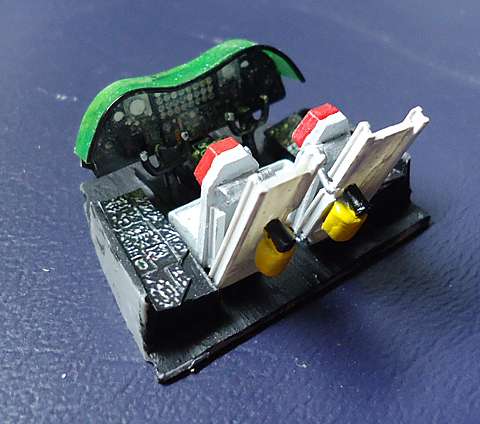
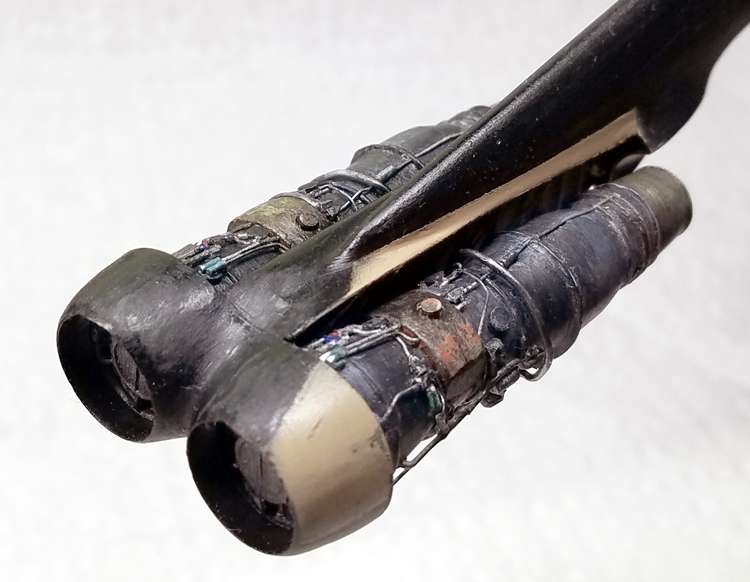
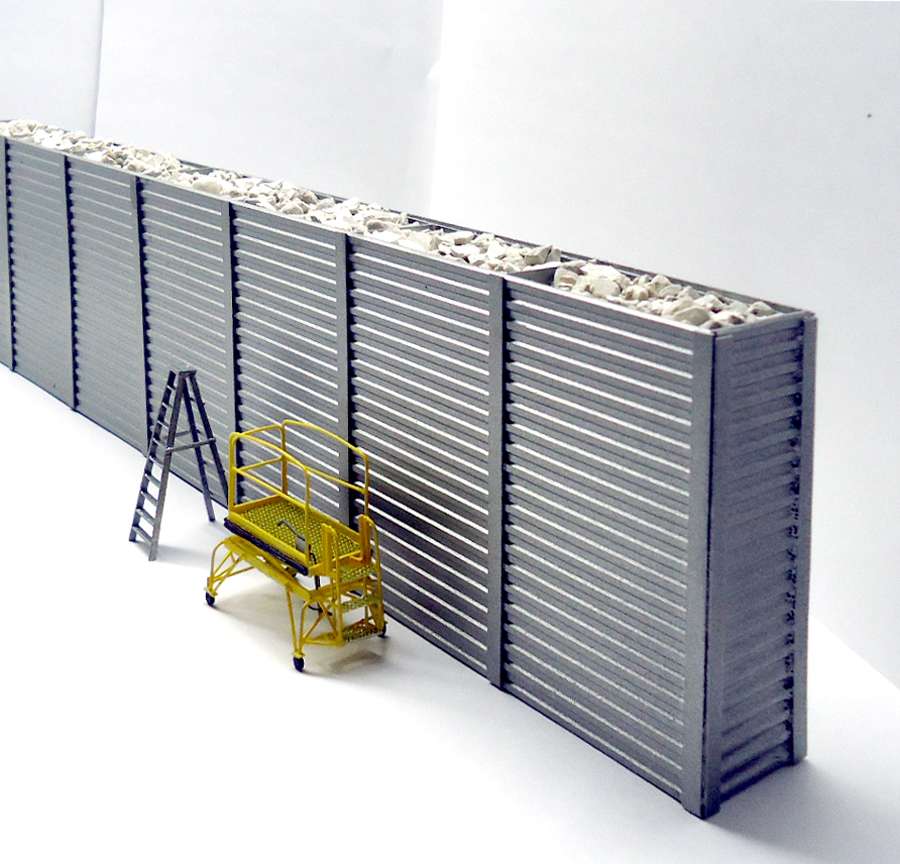
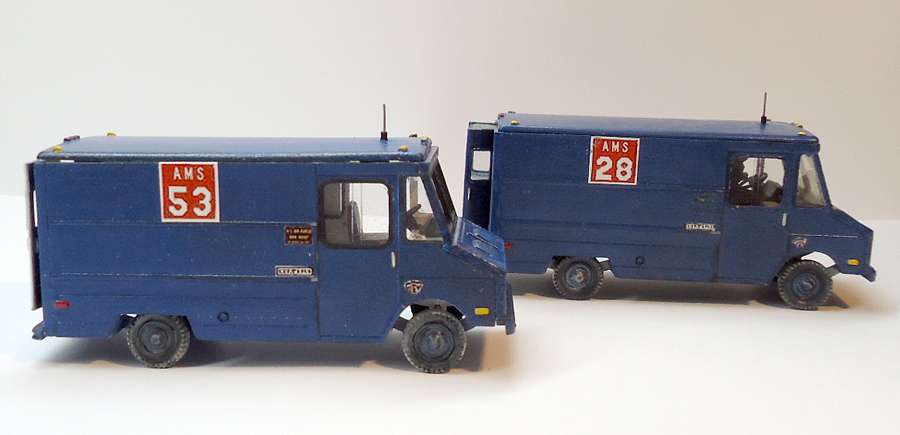
I included a full revetment, ground service equipment, three scratch-built “Big Belly” bomb clips loaded with 500 lb bombs, a scratch built bomb lift trailer and a scratch built flat-bed semitrailer (bomb truck) with 750 lb bombs for the pylons. In addition to the bomb loading activity, I also added maintenance scenes for the nav antenna, left outboard engine, ECM chaff loading and tail gun turret maintenance.

Below is the setup I wanted to capture:

And below is the finished diorama, along with some pictures of the build:

Note: This project actually came together because of three other FSM builds:

Andy (Mr. Magoo) Mitich’s 1/72 B-52D “Big Belly” Racks - 1/72 B-52D "Big Belly" Racks - FineScale Modeler - Essential magazine for scale model builders, model kit reviews, how-to scale modeling, and scale modeling products Thanks, Andy!

My Superdetailing the 1/72 B-52D Cockpit - Superdetailing the 1/72 B-52D Cockpit - FineScale Modeler - Essential magazine for scale model builders, model kit reviews, how-to scale modeling, and scale modeling products This was my first solo build here.

Ken (Son of Medicine Man) First Annual Berny Memorial Group Build - First Annual Berny Memorial Group Build - FineScale Modeler - Essential magazine for scale model builders, model kit reviews, how-to scale modeling, and scale modeling products Thanks Ken and all the other guys in the build!

If you would like to visit these builds, just highlight the entire link starting with http://… copy it and paste it into the address window above, then hit Enter.

Cheers, and thanks for looking!

Russ

3 Likes

Great work so far Russ. The first photo is exactly the image i have had in my head for years of how i wanted my B-52 dio. The flatbed and the revetment are two things i wasn’t sure how i would reproduce. I may have to steel a few more of your ideas from this.

No problem, Bish. You’re welcome to anything you can use [:)]

Russ

I’ve been reviewing my pictures of bomb loading and I’ve decided my diorama isn’t going to look complete without a bomb lift trailer, so I’m taking a stab at building one. Below is what the bomb lift trailer looked like and my version of the control end. I figured I’d tackle the easy part first. The wheels are from that HO scale semitrailer that I used for the bomb truck. They’re a bit too large but they’re the only ones I could find in this format that are close to actual size.

Russ

Russ:

VERY COOL!!!

Dom

Thanks, Dom [:)]

Inserted 6/29/19 from First Annual Berny Memorial Group Build, page 35:

The right side ram air intake was missing on my model so I added it. The ram air intakes are located forward of the front main landing gear on both sides of the fuselage. Here’s how to do it:

1.) Take a piece of paper and press it against the two inlets on the left side fuselage half. Rub them with your finger to make impressions of both inlets.

2.) Cut out the impression of the lower inlet.

3.) Flip the paper over and line up the top impression with the right side top inlet. Then use the cut out of the lower inlet to draw an outline on the fuselage.

4.) Use a sharp #11 Xacto blade to carve out the inlet. Go slowly to avoid cutting too deep.

The added right inlet is shown below.

Awesome project! Here on Guam at the AFB there is a B-52 on display as an Arc Light memorial. Can’t wait to see yours finished!

Hello, Sub, and thanks! You in the military there? I was TDY on Okinawa but flew in and out of Guam several times. I’ve seen pictures of the memorial there.

Thanks for stopping by!

Russ

Yup. I’m navy, on the submarine tender out here.

Cool! [:D]. I was Air Force, 20 years. What’s life like on a sub tender? Do you stay out for long periods?

Normally no, but we were just stateside for several months in the shipyard. What did you do?

I was an Electronic Countermeasures (ECM) technician.

Not to steal your thread, but today we were up near the AFB so I stopped in to grab some photos for you.

DSC01871

DSC01875

DSC01876

DSC01877

DSC01881

DSC01883

DSC01889

Now thats a memorial.

No problem, Sub. Great pictures! Thanks!

Russ

Here’s my finished bomb truck loaded with 750lb bombs - I plan to do the weathering later. The bomb on the end will be shown about to be lifted by a jammer. The “Explosives A” sign is held on with a single strand of my lovely wife’s hair [:D].

Inserted 6/30/19 from my notes.

The following shows basically how I built the bomb truck tractor (the trailer was the best I could come up with at the time, but was far too short and the wrong type flatbed. Long after I finished the diorama, I built a proper long-bed trailer which is shown on or about Page 35 of this thread).

Since there were no 1/72 civilian tractors available, I decided to model an Army tractor which was also used by the Air Force. I bought the Academy M35 2.5 ton cargo truck kit and modified it. I shortened the chassis and made my own fifth wheel.

Make the following modification:

1.) Cut off the back 8mm of the chassis frame (B24) just at the angle braces, as shown in the Academy assembly instructions below.

2.) Cut off the upper support plates from the side frames (B1, B2) as shown.

4.) Glue the side frames (B1, B2) to the chassis frame (B24) as shown in the instructions.

5.) Fabricate a rear plate 4mm x 14mm plate from 0.5mm styrene and glue it across the cut between the side frames (B1, B2). Ensure the top of the plate is level with the top of the side frames as shown in the second photo below. I didn’t add any details to this plate like tail lights or license plate but you can do that if you want.

5.) Proceed with the Academy assembly instructions to finish the truck.

NOTE: You can add the front winch per the instructions or leave it off and mount the front bumper directly to the chassis (as I did later on). Both configurations appear to have been used by the Air Force.

Below is a diagram of the fifth wheel I made, with my dimensions.

The photo below shows the finished tractor before weathering. The mud guards are from the Academy kit and are attached with strips of styrene.

Cheers and thanks for looking!

This build just gets better. Sweet.

Thanks, Bish [:D]

I agree with Bish. Sweet.

'Never seen so many crater-eggs on the back of a flat bed like that![Y]

Man, I can hear 'em hatching now!

Lol, thanks Dom [:D]