It is coming out great Mike. Good job as usual.
William - Sorry to be formal!! Thanks for stopping by and for the comments. This is an anal hobby and we do like our details. The real PITA is making the tiny tape fit right [:S]
Bill - Thanks…just like the posts, I try to keep the build slow and steady [whstl]
Gino - Always a pleasure to have you drop by my position. Thanks for the comments. I count on you to pick up my displacement [;)]
Thanks guys
Rounds Complete!!
Really looking great Mike!
John - Thanks for stopping by and for the comments.
Rounds Complete!!
With this week’s time at in the studio, I applied a mix of pigments, MIG Industrial Dirt and Desert Storm Sand to the wheel wells and suspension area. While this was drying I applied a wash on the tires using MIG Brown for Desert Yellow. After everything dried, it was time to mount the tires. Care needs to be taken to make sure the correct tires for each side. After the rear tires were mounted the sway bars were installed and a coat of MIG Brown for Desert Yellow applied to the bars
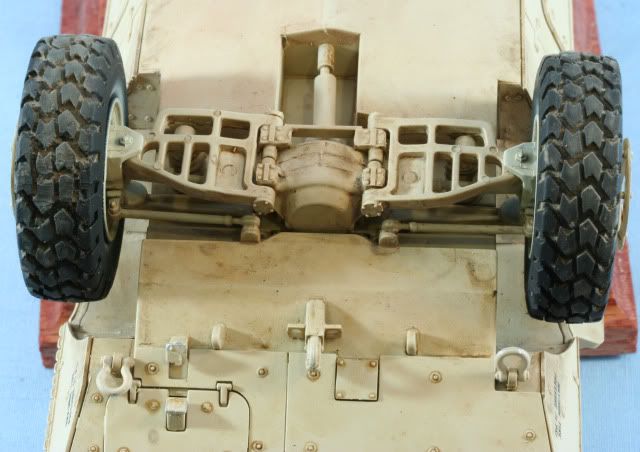
The front tires were mounted and the steering linkages assembled. These are partially covered by the protective front plate which I installed after the linkages. All were also given a coat of MIG Brown for Desert Yellow.
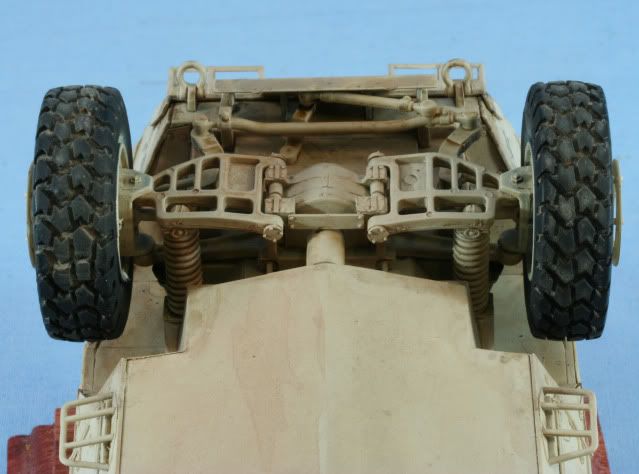
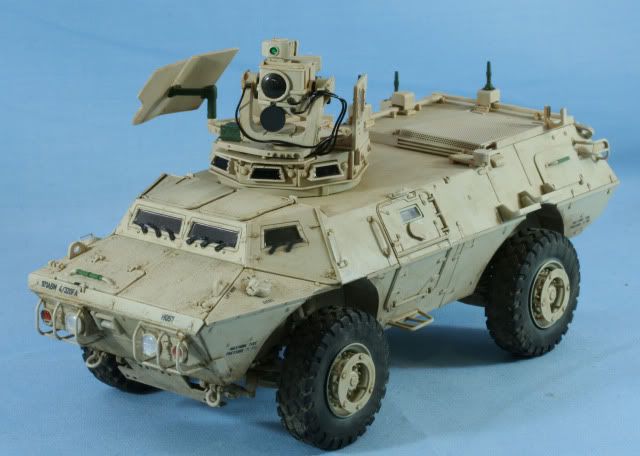
With the tires mounted things are beginning to come together. I gave the turret assembly a coat of MIG Brown for Desert Yellow and pin-washed the highlights with MIG Dark Wash. The tires were weathered with the mix of MIG Industrial Dirt and Desert Storm Sand pigments.
While waiting for things to dry, I drilled .070 pilot holes in the antenna mounts and mounted 3 Lion Roar modern antenna bases.
I am getting close at this point; I need to finish the M2 and a few other details. Also need to get the base ready.
As always thanks for stopping by. Your comments good or bad are always appreciated.
Rounds Complete!!
Its coming together great!! I can’t remember, did you use the kit tires? They look really nice. Great job so far, as usual.
Mike this build looks so great! a feather in your cap to be sure! … HeavyArty is right, the tires look exceptionally exceptional… (don’t quote me on that, it is very bad grammatically )… nice going man
bill : )
Gino - Thanks for spotting for me…good catch on the tires. I forgot to mention…they are from Chris Mrosko at New World Minatures. They are a bit pricy but very nice…Chris talked me into a set at AMPS this year.
The kit tires do not look bad but the resin tires are excellent. The NWM tires have a very small pour block. I also used the dremel to restore the tread where the pour block was, as some of the area does show once the tires are installed.
Again thanks for the adjustment…hopefully the answer is on the mark!
Rounds Complete!!
Bill - Thanks for the peek. The tires are nice. Their size makes them a prominent portion of this “armored car”. As for the bad grammer…I’m originally from Brooklyn, therefore -
Fourgeetaboutit !!
Rounds Complete!!
Coming along nicely Mike, looking forward to seeing it on the base in the near future. [B]
!http://th38.photobucket.com/albums/e105/CommentCrazyGirl/Smileys%20Emotions/Argue%20Tease/th_aprilfo.gifI knew the tires would make it FIZZ!
Maybe a bit of light dry brushin’ with some buff on the contact
surfaces ?
Awesome job Mike! [:D[
I’ve got the 1117 on my To-Do list as well. I might have to invest in that M1200 conversion kit.
Nice work on the tires Mike! It sure is shaping up nicely.
Bill - Thanks, yep its time to head to the wood work shop and a nice piece of Oak!
Thanks
Steve - Thanks and yes I agree…the tires need a bit more “dust” and contrast
Richard - It is a nice build, you will enjoy it. Thanks for the peek.
John - Thanks, always a pleasure to have you drop by.
Rounds Complete!!
Really nice build Redleg! I oogled that conversion at Rob’s booth in Atlanta back in Feb!!
Totally missed this one too. Just got done going through the last six pages. As always amazing work. Inspires me on my humble modeling atempts. looking forward to seeing this completed and to cooler weather.
From the heat of Texas
Stephen[cwby]
Kdawg - The shame is Rob has closed shop just shortly after putting this conversion out. Hopefully either
Chris M picks up the masters and puts them out under his New World Minatures or someone else but hopefully it does not go away with Formations.
Thanks for stopping in and for the comments
Stephen - Thanks…I am humbled and thank you for the very kind words. As for cooler weather…it has been hot everywhere…I know you guys are really dry…I am looking forward to snow [:O]
Thanks again guys
Rounds Complete!!
Neat looking little buggy there, Mike!
I think you could have gotten away with a little more chipping and scratches under the axles there, but that’s a minor point, as you wouldn’t see it anyway unless you picked the model up, and since it’s going to be on a base…
Cool beans though so far…
Yeah, It is sad… His products are awesome!
Karl - Thanks for the peek and always appreciate your comments. Once the model is set on the base, unless someone is using a dentist mirror to look at the under details…it will not be viewable…soooo I try to invest time in the more visable areas.
But…I do agree if the underside was more viewable. I still have a few more scraches in areas tha do show.
Thanks again for you thoughts…it is always great to hear from the king of finish!
Rounds Complete!!