Well I must say I am glad someone is giving a nice detailed build of this. Cause I am working on this model as well. I am at the placing of the armor on the body. I bought the Rhino for the front. I was wondering on how I was going to deal with all the windows on the turret. Any suggestions? I am still looking for a air brush set up. Its going to cost about 300.00 for everything. But winter is coming and I need new treads for the truck. Love the Wisconsin Winters here.
Keep it going. Looking forward to seeing this one.
Kevin - Thanks for stopping in and for posting the pic.
Yes, this is a modification of the M1117 which was designed as an “armored car” for MP and security units. The main difference between the two is the turret and electronics. The M1117 has a gun turret basically.
The M1200 was designed to give artillery forward observers in light units better protection than a HMMWV and make use of an existing body frame. It has a different turret designed for target identification, though it does have a M2 for protection. It is loaded with electronics and radio equipment. That is the essence of the Formations conversion kit. The turret and all the additional radio antennas and the duke antenna.
Hope that helps the clarification and why the artillery guy is building this vehicle!!
Autovomatic88 - Thanks for stopping by.
Be careful with the rhino setup. I have not seen any pics of an M1200 with a rhino. It does have a duke antenna so they may not be using the rhino. Also I am sure these are deployed with other vehicles for protection…they may have a rhino
As to the glass on the turret, I am working on the turret now. My next update (hopefully this weekend) will go into how I am doing that in more detail.
Steve - Thanks for taking the time to comment. After your last build I am sure you are [|-)] I totally understand.
Thanks again guys
Rounds Complete!!
Just a quick update for this week.
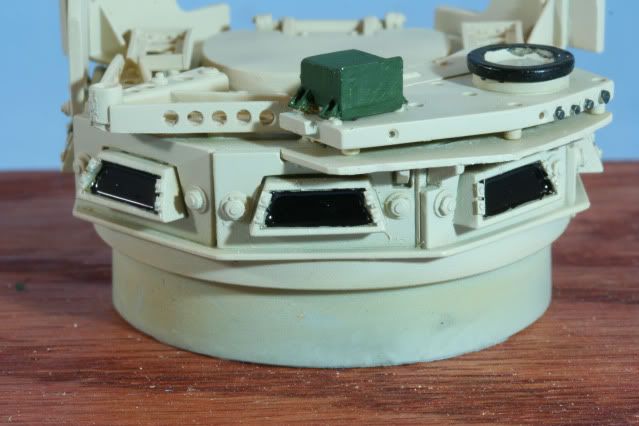
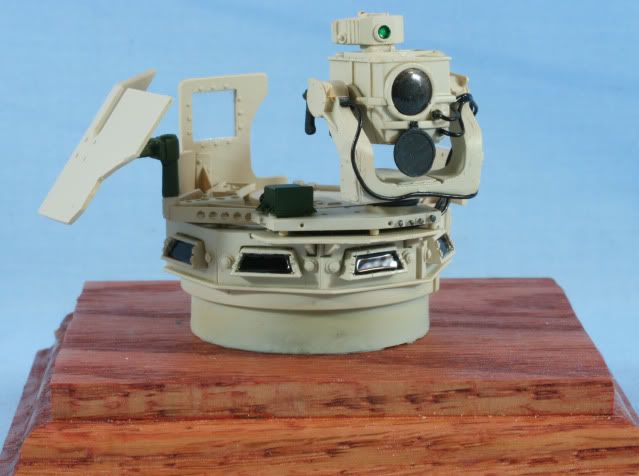
First, I gave the turret a coat of Model Master Acryl 4720 Sand. The power supply box is painted NATO Green and the race ring for the electronics package mounting is painted with Alclad Jet Exhaust. The connector ends for wiring are painted with my Parkerized mix.
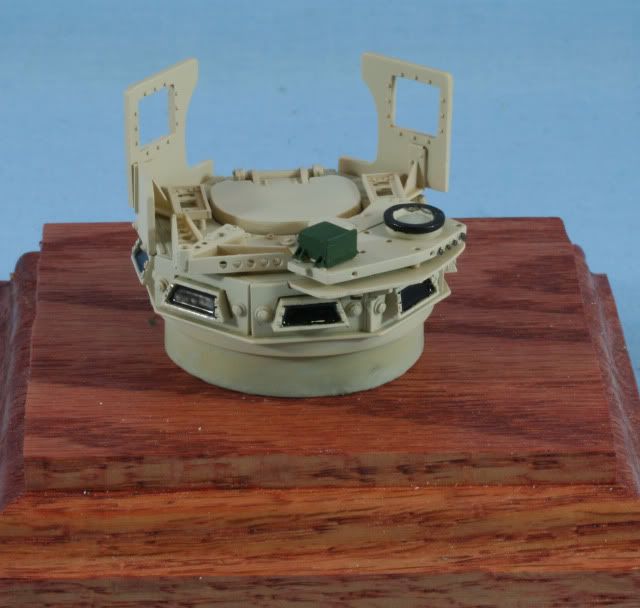
The turret glass was done by first painting the inside of the blocks with NATO Black, then using drops of Future to create a clear casting. It took two coats of the casting Future to create the final effect. When the drops are placed, you have to work any air bubbles out before it begins to set up.
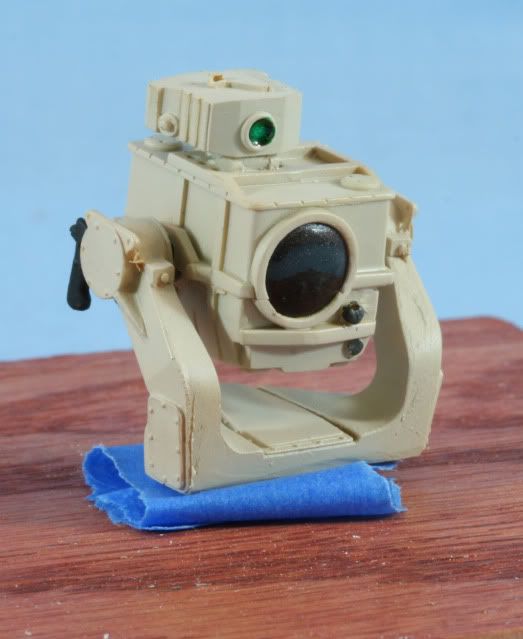
Next was the electronics package. In order to get the rounded effect on the large lens I used a kit unused part. Part A54 is a round rear view mirror which is optional. I removed the mounting from the back and with a bit of sanding it fits perfect in the space on the Formations kit. The “lens” is painted Alclad Jet Exhaust and then was mounted. Once mounted, it was given two heavy coats of Future for the glass effect. I will use the other mirror to create the lens cap which is hinged and hangs down below the lens.
Here is a look without the lens cap
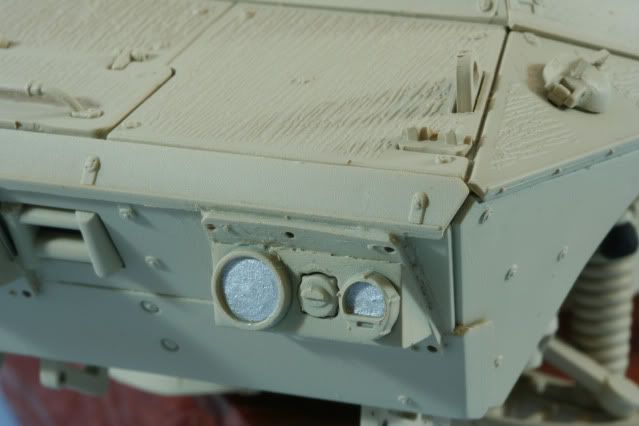
Also the body was treated to a coat of Model Master Acryl 4720 Sand. Here is the body and the suspension painted and the suspension mounted.
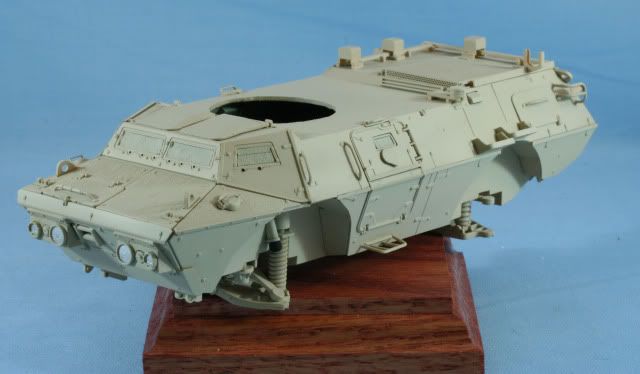
Here is the front lights painted internals first with Black and then with Alclad Chrome. The clear headlight lens will be inserted along with the turn signal lens which has been painted on the backside with Clear Orange.
That’s it for now. More details to come.
As always thanks for stopping by. Your comments good or bad are always appreciated.
Rounds Complete!!
Its coming along great Mike. The turret looks awesome.
Looking great! Tell you the truth this is going to be another great lesson for me because I know nothing about this vehicle. [:D] Remember I am into WWII stuff… but I enjoy anything in 1:35 scale!
Gino - Thanks for stopping by and for the comments.
Andy - That is one of the major purposes of this forum…teach. Glad you stopped in and hope you enjoy the ride!! Always a pleasure to have you stop in.
Rounds Complete!!
Nice work on the various optics components Mike, starting to take shape and come to life! [Y]
Bill - Thanks for stopping by an the optical observation [proplr]
Rounds Complete!!
hey Mike : )
Just a quick note, I think what you did with the extra piece and using it for the optics came out really well…It’s gonna be a stand out job !
Rounds complete ! er oops thats your line… I gotta get a byline…
yer pal,
bill
Bill - Thanks for stopping by. It is always good to make use of spare parts…if you don’t eventually use them, they are not spare, they are junk.[;)]
This part fit just right and gives the optics the proper look.
Over and out…no thats not it
Nothing Follows…now thats boring
Rounds Complete!! … [;)]
Nice work so far. The optics look just right.
Jet - Thanks for stopping in and taking the time to comment.
Rounds Complete!!
Great job so far Mike, love the conversion. I’ve been working on the same kit but with a straight OOB build. Excellent kit! I’ll be watching your build with interest.[:D]
Nate
Ah yes… the application of paint. One of the biggie milestones when all the little bits start to pull together. And pulling together very nicely in deed in this case.
Nate - Thanks for stopping by and I will be looking forward to seeing your M1117 in September. Enjoy
Marc - Thanks…ahhhh paint…it is soooo hot and sticky it is slowing things down. Even with AC it is brutal.
Rounds Complete!!
Mike that is certainly one cool subject, looks almost menacing/evil. I must ask is the targeting thingy the same that is on some strykers, 1130 or 1311. Just wondering. Goodluck with the rest of your build and I’m sure you will produce another cracker.
Terry.
Terry - Thanks for stopping by.
The M1131 Fire Support Vehicle and the M1200 are very similar. They are both for the use of the fire support team or forward observers. They are using similar electronics and equipment.
There employment is based on the type of unit…the M1131 is employed with Stryker brigades while the M1200 is employed with light units like the 101, 82 and 10th Mountian.
I like the M1200 and M1117 as it is the armoured car revisited and has its roots in the M8 and M20 cars of WWII and V100/150 was also related
Thanks again for taking a peek
Rounds Complete!!
Well, with all the heat this week, it is truly summer!! I am trying to keep this build moving down the road.
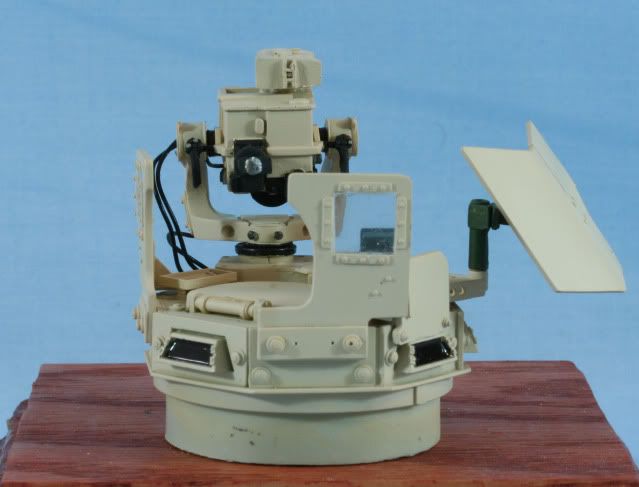
First, I finished up the turret. I added the wiring using thin solder painted Black and the jack ends painted Steel. The M2 50 cal shield and mount was added. Then I cut the plexi-glass windows for the rear shields using .010 clear styrene and mounting with Gator Glue. I used the other rounds mirror to create the lens cap and a small section of PE for the lens cap hinge.
The only thing missing is the M2, but here is the turret.
On the rear view you can see the punched circle silver decal for the viewport in the sight
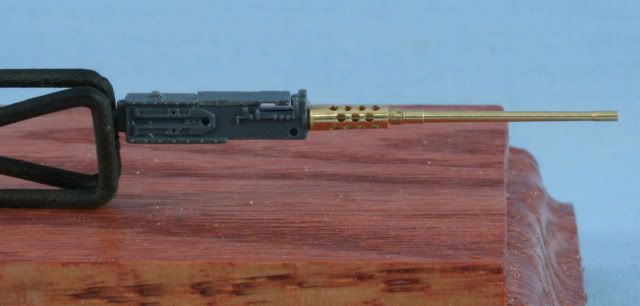
Began work on the M2. I replace the Formations M2 with an Academy M2 from their machine gun set. I drilled the M2 front to accept the Lion-Marc metal barrel set. Here is the assembled M2 ready for the paint shop
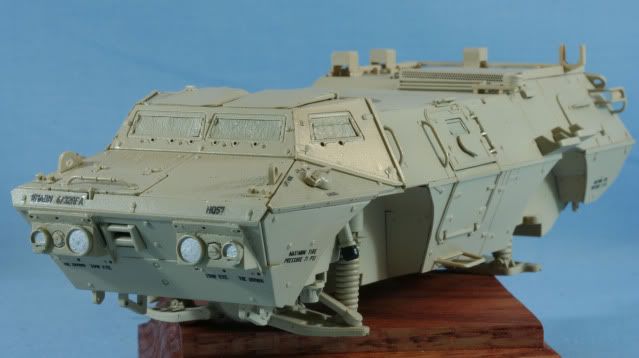
On the main body, after a coat of Future, I applied the decals. I was making my own bumper decals for the 4/320FA from 4 brigade, 101 airborne. While I was into making decals, I had to replace some of the kit decals like “TOW EYE” which the kit decals were spelled wrong, “TOK EYE” and my favorite, ”TIE DOWN” which was spelled “TIE DOKN”. Here is after all the decals are applied.
Once the decals set for a day, I will apply another coat of Future to seal them in and then begin weathering.
As always thanks for stopping by. Your comments good or bad are always appreciated.
Rounds Complete!!
Nice work on the added wiring details and other bits Mike. I hear you about the heat, thankfully I am able to paint indoors and not have to slave away in the garage like I used to! The decal misprint put a smile on my face, glad to hear you were able to get those fixed. [B]