Most of the adjustment was indeed in highlights and shadow, followed by a tweak in brightness and contrast and a slight bump in hue and saturation. Normally, the D90 produces beautiful pictures with almost spot-on color reproduction. But that night, something seems to have gone wonky and I couldn’t get a decent picture. I may have forgotten to reset something after my last outing, so I’ll have to walk through the menu tree to see if I disabled anything.
Once I get decent pictures going, I’ll submit them to the magazine and see what they say.
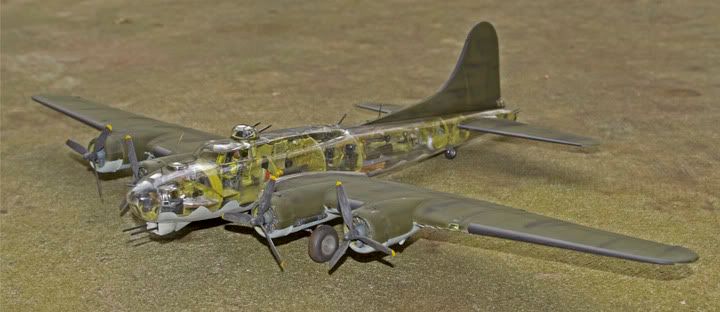
Well, I decided to submit a picture to FSM, so we’ll see what happens.
Here’s a small version of the one I sent.
Though, when I submitted it, I didn’t remember to put the kit info in the box where I told them about the technical specs of the picture. Hopefully, if they contact me, I can give them the build info, then.
Fred I am happy to see you submitted a picture to FSM your model does truly belong in the readers gallery. It is a very impressive build, wish you all kinds of luck.
Thanks, Randy [:D]. Normally, the recognition from you guys is more than I need and certainly more than I deserve.
But, after 10 months of hump busting, I figured this bird needed a little extra appreciation. And hopefully, it’ll encourage more people to try methods they wouldn’t have before.
Fred you deserve every bit of recognition on this build, you truly out did yourself on this one. I do admit I took some tricks from your build and put them to use. I look forward to seeing more of your builds, maybe one day I will reach your skill level.
I wanted to give them the kit info, so I resubmitted the pic, but included a few more, just to give them choices. I haven’t heard anything back, yet, but I don’t know if that’s necessarily bad news.
Fred, give them some time. FSM is really slow in regards to giving you an answer for stuff like this. I had an article that was accepted - but took 3 months for the reply. That was 16 months ago and it’s going to be published in another 2 issue - so you need real patience.
Looks great! I got a visible as well, but I’m going to wait on it as I want to work on other B-17 variants after I finish my early G. Next in the pipeline is a B-17D I got half assembled from e-bay a couple years ago. After that I want to get a YB-40 going. Doing these variants is nice as it is something different than the normal G or F, yet it is still a B-17!
Thanks for the info, waikong. Still haven’t heard back, but now I won’t be as concerned [:)]
B17, Hope you’ve got an airfield to display those birds. Mine’s sitting on top of my display cabinets (two ikea deltofs, pushed together). Otherwise, I’d never have built it.
Thanks, Borg. Even after working on it for 10 months, I still like to peek into it and see all the nifty details - half of which I scratchbuilt. You’d think I’d know this bird inside and out [(-D]
Hey Dog, this is a commercially available kit from Revell. Goes for about $25, give or take. I have considered making a vac table to make my own kits. I just don’t know about getting clear material (acrylic/styrene/lexan) to make my own.
Great job on this! I am planning on doing one with the visible side and I was also thinking of painting past the seams, after seeing years, that confirms it for me as it looks so much better that way.
Thanks, slingshot. Just be weary around the front end, from the top turret, forward. There’s not a lot of room to get sanding sticks in there and there’s a lot of detail that is easily obliterated.
I ended up not sanding the front seam after I almost erased one of the top observation windows. Maybe with better planning and better tools, it would be possible, but not with what I had on hand.