Uh-1y venom marine assault helicopter box opening

The title has to be 15 characters. Nailed it.

I finally had a chance to open my (see title). Once I finally managed to figure out Academy’s system, I took a look at ever sprue.

The sprue’s are alphabetized, not numbered. A through G. D and F are times two. In engilsh, Sprue D and Sprue F are double sprues with the same parts verbatum across the sprue.

Each sprue starts at 1 and works its way to last. One sprue had 43 parts on it. One had 31. One had just the clear parts. No letter designation, just a separate sprue with windows and other clear parts. The double sprues had a ton of parts on them. One had 64. Times 2 that means you have 128 parts to deal with.

Even at 1/35 scale there are parts that I still have no idea how I am going to find the manual dexterity to lift them, much less glue them and set them. Let’s just say that if I use tweezers, and it snaps loose, it’s gone. The fuselage doesn’t even come close to being as large as the Huey I just finished.

The cargo doors have an outer and inner part. They have a handle. Two fifty cals, possibly a mini gun. Rockets. Folding rotor blades. Not much on the color scheme. Light Gray, Darker Gray, your imagination unless you wish to follow the instructions to the letter.

Two books of instructions. Enough decals to confuse the enigma machine.

My most challenging part of all this. I know nothing about this bird. Some of the parts stood out because it is a UH-1 something. It’s a Huey that got a major facelift. More rotor blades on the main and tail, all kinds of avionics, and my guess is the cockpit and cabin are borderline 1st class accommodations. Probably not. But having to leave the parts attached to the sprue until I have to use it, whatever it is, means no prior removal, bagging up all the fuselage parts, transmission parts, main rotor parts, armor, and cleaning them together. I could do that on the UH-1D because I knew what every part was, and where it went ahead of time. I didn’t need the instructions to tell me what part went where.

Right off, I like how the parts are barely attached to the sprue, Much easier to cut off, much less damage from the shock of the cut to repair. The molding looks good. I don’t like that a modern model like this didn’t put in a parts list with the name of the part and what area of the bird it related. Sprue G, Part 1 Sync Elevator tail section. Sprue F Part 34 Mini Gun Barrel Armament. If I knew what it was and why it went where it goes, I could let the instructions show me the part and not have to be handcuffed to the sprues
1 Like

I have the 1/48 kitty hawk version of that beautiful bird. Looking forward to getting inspired by your build.

I’m going to cheat a bit on this 1Y. For every part of manufacturing this model Academy got right, they missed the mark, at least in my arena, on a couple of things. First and foremost, a parts list with nomenclature. Not every model builder willing to build this model is a seasoned veteran of the hobby. Again, I can’t stress this enough, I’m 61 and a greenhorn. Last model I built before building the two Huey’s I’ve strapped together with plywood and spent fence posts, was in 1984. 61 means one thing, I’ve lived 61 years. I’m not 61 years wise. In the model building world I’m 17 again and new to the craft. I need to know what I am holding when I look at the instructions and they tell me with a picture only, that goes here. Blindly having to follow page after page of pictures with dashed lines showing you where to put that part is not my idea of customer service. Printing out a 14 page fold out book in two parts with 98% of the written word in Korean, of which only 3% maybe tells you something you need to know in order to build this model, is not customer service. Thanks to this instruction book I now know how to spell CAUTION in Korean. Anxious to find out in my remaining years where that will come in handy.

14 street signs that are, thank goodness, written in english, Korean underneath, but no explanation as to what those street signs mean. Cement with a slash through it, I got you, “no cement”. And by the way I am smart enough to know that cement means glue. They appear to want you to know that if you plan to decal certain parts of this model, you will need to do that NOW. Trying this after you have put the cabin section inside fuselage will be…impossible.

FILL? With what? Water? Then there are the over kill of OPTIONS, forks in the road to the hell I will have navigate throughout building the model. CUT? Who wrote this manual, Tonto. BALLAST!!! I have to level this thing to make it sit flat on a table? And then we come to VER. 1. Which version am I building? Could have led with that.

I did at least manage to figure out with the instructions help, what the little numbers in the yield signs mean. Color. Have no idea what the small case letters a-e in circles mean. Failed to mention those. It’s this attitude that “everyone knows that”, that frustrates me. What gets my wrench in a knot even more is when I ask, “what is this?” and someone replies, “everyone knows that.”

At least I don’t get that on this site. So if anyone reading this plea for help has any idea what the road signs (big circle, wide dash line in the middle, helpful word written in the dash) mean, I’d be very thankful if you could lend me some knowledge. Otherwise, I’m gonna do what the YouTube builder does.

1 Like

It seems to me that you are worrying about the hobby way too much. It is supposed to be fun and relaxing. Lighten up. You may also be starting on kits that are a little more advanced than you are ready for. Maybe start with something easier like Tamiya kits that usually fall into place. The Academy UH-1Y is definitely a harder kit to start with early on. You may need a few kits under your belt first. Maybe focus on basic modeling skills for a while; like removing seams, sanding pieces flush and square for good fit, building and painting sub-assemblies, filling and sanding gaps, etc., etc., etc… Once you get these down, start on the harder kits.

Overall, the Academy instructions are pretty good if you ask me. I have seen much worse. Study them before building and you should have minimal issues. To me at least, the “road signs” are pretty easy to understand. Cement - use model glue of some sort. Do No Cement - no glue, press fit. X2 - do it twice (or how many times the number is) for multiple parts. Decal - add decals. Ballast - add ballast. PE - the part is photo etched. Fill - fill with your choice of filler putty to close up a gap that isn’t on the actual helo. Cut - cut something out. Option - it is an optional part or done for one of the options for versions, i.e. guns or seats. Opposite - do the same for the opposite side. Hole - drill a hole. Caution - be careful with this step. Instant Cement - use super glue here, usually with PE. Ver. 1 - parts or instructions for the first version, in this case, it is used for decal/markings as there are different versions in the kit.

If you look through the instructions, you will see it comes with the options to build it with either crew seats or door guns in back. It also comes with the option of either open or folded rotors with securing bars for them. There are also 5 different decal/markings options.

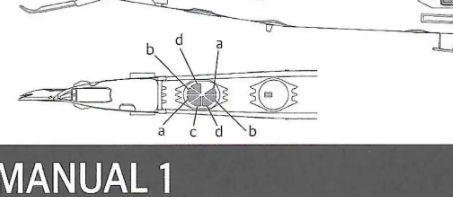
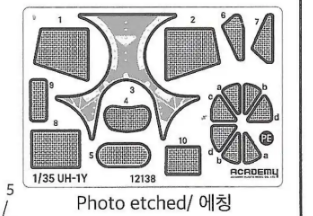
“Have no idea what the small case letters a-e in circles mean.” If you mean below, those are the parts on the PE sheet, to the right. Attach them as shown in a circle using the same lettered PE parts.


Also, on most models, it is easier to mostly build it then paint, as opposed to painting everything first in pieces. It also makes gluing it together easier since you don’t have to scrape paint to get the glue to work. On aircraft and helos (APCs as well, if they have an interior), you usually have to build and paint the interior first, then close up the fuselage and build the exterior. Once built and all gaps have been puttied, filled and sanded, tape off the windows and openings and paint the exterior as one piece. This technique is much easier and results in a much better looking model in the long run.

“…if you plan to decal certain parts of this model, you will need to do that NOW. Trying this after you have put the cabin section inside fuselage will be…impossible.” This is very true. Some decals have to be added to the cabin interior or engine area, etc. before closing it up. This goes to my above statements about helos and aircraft being built in stages. They are really two models that get almost completely built in sequence; interior then the exterior.

Lastly, most, if not all instructions do not list what the parts are. Most builders don’t care what the individual part really represent, just that they look good once assembled. You will not usually find a parts list of actual part names.

2 Likes

Man am I glad I asked that question. Since posting my last desperate plea, I have watched 3 videos on how to build this model. First one was no voice, just modeler working (hand model reference), a cat did show up once, but he did what you said. Built, painted. He used an air brush. He did mention some scratch work on the intakes as they didn’t quite go together like he wanted. Another one had a british gentleman going over the sprues. I learned, from him, not the model company, that sprue B is for an AH-1. I also learned that sprue D has two sprues one for the UH and the other for the AH. Might have been a nice idea for Academy to write that down someplace in the instruction book instead of making me watch videos to find out. I fully agree with you that this is a more advanced model for my “greenhorn” status. But, even so, companies could at the least, try to be more helpful with information such as this, instead of making us figure it out.

1 Like

Yes, sprue B is from their AH-1Z kit, but some of its parts are used on the Y as well. In real life, the two aircraft have 85% parts compatability. It really doesn’t matter that the sprue comes from another kit, which is common for model companies to use the same sprues instead of recreating new ones for a few parts. The parts are still B parts and get used as if the sprue is only in this kit. The 2X D sprues (both are used in this kit and it is not one for an AH and one for the UH) also come from the AH-1Z kit, but also have some parts used on the Y’s, esp. if you build the blades fully opened. Again, it doesn’t matter what other kit also uses them as they are used here as well and there is no need for Academy to tell you this as it is not an issue. Again, I think you are reading way too much into what the companies should or shouldn’t tell you. The kit comes with all the parts needed to build it. Who cares what other kits it shares parts with? I would also recommend not wasting too much time watching YouTube videos as most of the guys there have no idea what they are talking about, the supposed (but nonexistant) sprue issue is a good example.

2 Likes

@HeavyArty, thank you for taking the time to write such a thorough reply.

I actually started thinking about how I might answer some of those questions myself, and then I read your post and realized you’d already covered it far better and more completely than I could have. :joy:

That’s excellent advice, and I’m sure it will be very helpful.

And I think it really reinforces something Chopper Chief said in his post about being able to ask questions here without getting the “everyone knows that” response.

That’s what these forums are all about, after all — sharing what we know and helping each other along.