The Official F-4 Phantom II Group Build 2010

OK gang, I took advantage of a few free evenings I’ve had this past week and got some modeling done. Not much, but some.

Since all three cockpits are pretty much done, I started to glue fuse halves together. I began with the -111 jet. It was the one that was missing the cockpit structure. It was an easy fix once I decided that I wanted to use one single piece, versus two halves like the original molding. (Thanks for all the suggestions!) First I glued a small piece of 90-degree styrene to each fuse half. This gave me little shelves to rest my replacement “part” on. Then I cut two scrap rectangles matching the kit’s parts profile and glued ‘em together, then onto the shelves. The mounting hole for the canopy’s actuator was added too. Even though I’m building this jet with the covers closed, I’m still gonna add the actuators for visual purposes.

Before:

After:

It was mentioned to me that I should paint the pilots “bare hands” because pilots never flew without gloves. (Thanks for the info Berny!) I gave it some thought but decided not to because I liked how the bare hands broke up the monochromatic (green) look of the pilot’s uniform. Who besides the hardest of the hard-cores is going to know anyway? Maybe he took ‘em off because his hands got sweaty…

The Sundowner jet is the only one of the three that won’t have the intakes capped off with FOD covers, so since I couldn’t use the resin intakes that were supplied with the kit and my budget doesn’t allow me to buy replacements, I decided to fudge it. No IPMS judge is ever gonna peer down the intakes with a pen-light, so I didn’t bother with replicating the trunking.

Instead, I thought I’d try a little forced-perspective modeling (Thanks Janne!). I painted a black spot on the back wall of the intake area then feathered it outward until it faded into the surrounding white. Hacking up a donated fan face (Thanks Ken!), I glued it over the spot.

I haven’t glued the intake sides onto the -111 jet yet, because I wanted to try something a little different. The intakes are glued onto my -84 jet, but since the -111 intakes won’t have covers, I needed to mask for paint first. I figured it’d be easier if I did that before gluing the intakes to the fuse. I dry-fitted the assembly to the fuse to make sure I could do it and still get away with minor/no seams. It looked good, so I proceeded. I did some minor assembly of the intake interior and exterior, and finally laid some tape. Now that the intakes are taped, all I gotta do is glue them on, plug the intakes with some foam or tissue, then spray some paint.

Then I turned my attention to the Revellogram –J. The pit was installed and the fuse halves joined. One thing I noticed was an ugly gap at the back of the cockpit area. It seems that Revellogram intended the rear deck of the cockpit assembly to fill this void, leaving two small gaps at the edges for the tabs on the canopy to fit in to. Well, it didn’t work that way for me. No matter how hard I tried, I couldn’t get my parts to line up the way they were supposed to.

I knew leaving that huge hole was going to be a little obvious, so I came up with an idea on how to fill it.

First, I took a little Milliput and pushed it into the void. While it was still really soft, I took my canopy and pressed its tabs into the putty.

I removed the canopy to allow the Milliput to dry, but once it did, I reinstalled the canopy to begin shaping.

Using a bit of tape to hold the canopy in place and protect it, I began to sand the Milliput to match the contour of the spine and canopy.

After a couple of minutes of careful sanding…SUCCESS!

Now all I gotta do is replace all the raised detail I lost during the process. Luckily, that won’t be as difficult as it sounds.

I have another free night to model tonight. Hopefully I’ll have another update soon.

Thanks for looking and please feel free to comment!

Cheers,

-O

O – great save on those details! Especially the canopy area on the old Monogram. Under the paint you’d never guess it was there. You’re cranking these birds out! I only got a start on a teensy OOB cockpit last night.

Cheers, Mike/TB379

O,

After looking at all of the shots of the -111 birds cockpit, can you tell me what type of paints you are using? I see what I think looks like dry-brushing and washes, but I was hoping you could go into a bit more detail about what you have done?

Thanks,

Jar

Hey Jar,

I’d be happy to tell you what I’ve done & used. As far as the painting goes, I only use MM enamels. I’ve tried acrylics but I just don’t like 'em. Can’t get 'em to work as well as enamels. I’m sure they work fine and it’s all user error, but I’ll stick with my enamels. But I digress…

For the base gray in the 'pit, I used Dark Gull Gray (36231). The black is Aircraft Interior Black (37031). I like Interior Black better than plain flat black because it looks more like a very dark gray. It isn’t as stark as black. The tub & fuse sidewalls are airbrushed gray, and the panels are airbrushed black. The instruments, and everything else in the 'pits, are brush painted. For the dry brushing on the instruments, I used Camouflage Gray (36622). It’s still light enough to give good contrast, but it’s not as bright as white. For highlighting the structure & the seat frames, I used old school Testors silver in the little square bottle. I use that pretty sparingly because I can get parts a bit too bright if too much is used.

On the pilots, I used Gunship Gray (36118) for the mask & hose. The visor & helmet are painted with plain ol’ square bottle flat white & flat black. The gloss comes from some brushed-on Future. Their seat cushions and flight gear are painted various shades of green, including MM Faded Olive Drab, Olive Drab (34087), Medium Green (34102), & Dark Green (34079), with Dark Tan (30219) for the seat belts.

As far as detailing goes, besides the dry brushing on the instruments and structure, I don’t do a whole lot more. There are no washes on my 'pits. My builds are always (so far) buttoned up, so little is seen through the canopy anyway. In my opinion, washes add great depth & detail to builds, but I think too much gets lost in the cockpit…unless you’re posing your canopies open. I’d rather concentrate on the exterior detailing (i.e. paint, decals, weathering; etc).

Hopefully I answered your questions. If there’s something specific you’re curious about, just ask, I’d be happy to answer.

Thanks for looking, and I hope you’re enjoying my build(s)!

Cheers,

-O

Hello everyone!!! I just want to put a post in to keep track of this build and to say that there is some very very nice work going on!!! I have two 1/72 kits of the Phantom, an old Monogram 1/72 C model, and an ESCI RF. I have other more pressing projects but hope to join in. I build slow but deliberate so if I see I can I will commit. Will be watching![t$t]

Hi Simpilot! Hope you make it aboard, the squadron can always use more pilots!

I’ve done a little on my Fujimi -J. Here are some of the research sources I’ll be using and the decal sheet I’m leaning toward using:

!(http://i301.photobucket.com/albums/nn48/MikeTheModeller/Fujimi F-4J/DSCF4747a.jpg)

And here’s a first look at parts, the fairly basic cockpit going together and the wings and droptanks assembled and their joints doctored.

!(http://i301.photobucket.com/albums/nn48/MikeTheModeller/Fujimi F-4J/DSCF4763a.jpg)

Technical question for those in the know, prompted by the excellent discussion of cockpit painting above…

I used the Gunze paint reference in the kit instructions and backtracked it by comparison charts to Humbrol 147, which equates to FS 36495. It sure looks like the cockpit grey I see in photos but it’s a very different number to any I’ve encountered before. Does anyone have any thoughts on the correct interior colour for a -J in the Vietnam period?

Cheers, Mike/TB379

Phantom over Vietnam!!! lol I have that book at mum and dads!!! Good Read!!! Thanks for the welcome and hope I can see fit too contribute a build!!! Color wise? I would go with the lighter shade for the office and maybe use the darker shade, if not too drastically contrasting, as a wash maybe?[2cnts] HTH!

Hi Richie! Yep, it’s a heck of a read, almost half the book devoted to describing a single operational sortie blow by blow – breathtaking!

I think I’ll go with the paler shade, it’ll provide a good contrast on the instruments. I’m going to use Supercsale decals throughout, I have the sheets for stencil data, national insignia and walkways, and it’s time to put them into action! The instrument panels on the stencil sheet sure didn’t fit Hasegawa’s old-tool F-4E, and they’ll be only a slightly better fit here, but with the canopy closed no one should be the wiser. I would do a wash, but there is no raised detail whatever, nothing to highlight, just bare boards.

I’m more interested in the exterior finish right now. I’ll get fancy with interiors later, in larger scales!

Oh, BTW, I’m looking at VMFA-232, in late Vietnam markings, red tail with the devil logo on the tail as opposed to on the fuselage, as they wore in '73 and later. As a Marine Phantom I’m thinking about an appropriate underwing load, possibly TERs on the inner stations lugging Mk. 82s, with tanks on the outer stations for either a long range strike or an opportunistic support mission with plenty of loiter.

Cheers, Mike/TB379

The correct cockpit colors for all F-4 Phantoms is FS-36231.

oortiz10 - Great progress pics. Your Phantom is coming along GREAT!!!

Also, thaks for sharing your technique on filling the gap behind the canopy. I have a Eurofighter sitting on my bench due to a huge gap behind the canpopy due to a faulty mold pour. Now I think your idea will help finish her up. Thanks again.

Thunderbolt - you’re killing me man! I have soooo many Phantoms in the stash it’s not even funny…I want to see if I can find a way to get one into the build order. Would hate to miss out on this GB, especially with me not being able to work Achtraden into the mix (seriously bummed).

Let me see what I can do! Unfortunately for me, the ones that would most likely work with my plan are big - either the Tamiya 1/32 D (with lots of AM) or the Revell 1/32 E (with lots of AM). I think I’m going to need to quit my job…[^o)]

Lookin good everyone. I haven’t been able to do much to mine this week, as I am at the point now where I need to start priming and painting, and guess where my paint room is…

That’s right, the good 'ol outdoors, where it has snowed and wind blowed all week with a high of 4 degF today and a wind chill of -15 below. got the few joints all puttied up.

Yeah, oortiz10, and all building the Monogram/Revell birds, the cockpit tub’s rear deck does fill that void. A careful hot water bath and selective re-shaping the cockpit tub will bring this and the back seat up into proper position. If you don’t, the back seat sits a little too low as well. All I have to do is finish filling the small gap and -walla… or viola, or vwaalaa or however you spellit[:(DD]

Here’s a tip for everyone not past this stage yet, and I learned this only by building no less than a dozen or more of these over the years- after repeated test fitting and tweaking the shape of the cockpit tub, go ahead and detail the cockpit sides and assemble the fuselage without the cockpit in it. Do not attach the wing assembly at this time though. After the cement has dried, assemble and detail the cockpit, and you can now slip it in from the rear through the opening where the engine exhaust nozzles will be. slide it forward and up into position from underneath where the front landing gear bay will be.

While holding it in proper position, you can use CA, or 5 min epoxy to tack the cockpit into place, as there is room for you finger to hold the rear of the tub in proper position long enough for it to stay while the CA or epoxy sets up. now that it holds itself, you can cement it in permanently. The front of the tub kinda just falls right into place if you have your finger in the right spot while holding it.

I wish I would have thought, and took pictures of this step wile I did it. It works really well. Hope this helps.[bgr]

well here is my rendition of the revell cockpit, i dare say its far from perfect but its the first time i’ve tried things like dry bruhing so im fairly happy with it.

First time dry-brushing??!! Well don’t worry you nailed it the first time![Y]

Great tip about the R/M Phantoms! If you get around to doing number 12 or 13 sometime (impressive, to say the least) I’d love to see the in-progress pit insertion pics. [Y][Y]

ortiz: i hope you dont mind me asking but how are you planning on replacing the raised detail you lost? im building the RoG phantom and i can forsee loosing some raised detail.

cheers, chris

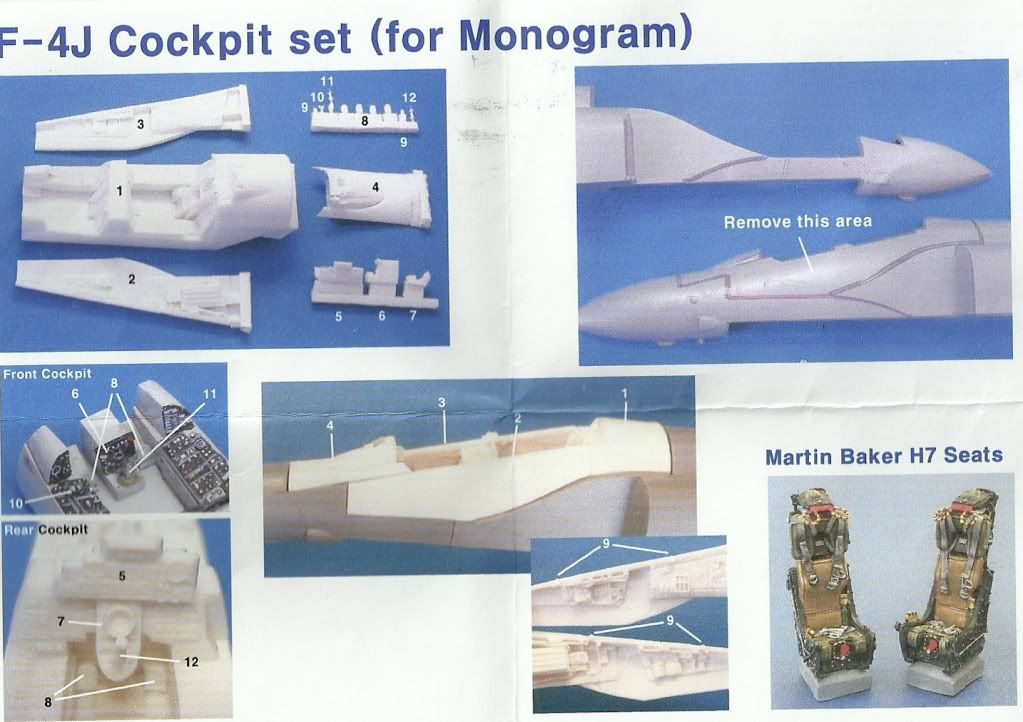
I see that everyone is talking about the cockpit installation on here so looks like progress is going well for most. What I would like to ask is, has anyone worked with the 1/48 Legends F4J cockpit on the Revell/Monogram kits? It says I have to cut (yes I said cut) the upper half of the fuselage area where the stock cockpit would sit off. To say the least I’m a little nervous about performing this kind of surgery on my bird. Any suggestions on how to not screw this up? The image below is the guide that came with the AM cockpit.

[View:/themes/fsm/utility/Legend 1/48:550:0]

Benny: Did Navy/Marine F4’s have rudder pedals in the rear seats? I know the throttles and control stick were removed. Thanks.

No the F-4J did not have rudder pedals. You are correct that the throttle and control stick was removed. The antenna hand control was relocated from the right console to a pedestal between the RIO’s knees. That pedestal is visible in the RCP shot.

Chris,

I picked up some raised details from Archer Transfers. I bought some of their resin panel lines and rivets. I’ve never used 'em before, so I’m gonna give 'em a try. I’ll post some pix and let you know what I think.

Cheers!

-O

I would like to submit a Revell F4D kit of the Phantom I crew chiefed on in 1980-81 at Kunsan AB ROK. Low visability markings and Maverick weapons systems were the order of the day. 35TH TFS PACAF, the Wolf Pack. This jet was very dependable and survived the change-over to F-16’s in 1981. Probably still flying somewhere.