The Official F-4 Phantom II Group Build 2010

The Official Phantom II Group Build 2010

It’s start date!

Recapping the particulars:

Start: January 1st 2010, end June 30th 2010, with overrun if needed.

All variants, all users, all markings, all services. All kits, all scales, OOB and AM equally welcome. Started kits – 10% done or so is fine. Crossovers with other builds also fine.

As I said a fortnight ago: “I’ll be launching the proper thread on the GB forum at New Year, ready for a January 1st launch, so we can have our kits, tools, supplies and markings on the catapults and ready to go as the holiday season winds down toward the resumption of business, then a long supersonic cruise to midyear.”

It’s January 1st, so gentlemen start your turbines! You’re clear to break shrinkwrap and cut sprue! Let’s buuld some planes to be proud of!

Cheers, Mike/TB379

Update – as of Feb. 26th on this side of the dateline, we have 33 participants. No builds completed yet but some getting closer – badges are in the works so they’ll be ready when the first planes are rolled out to the squadron line.

Order of Battle

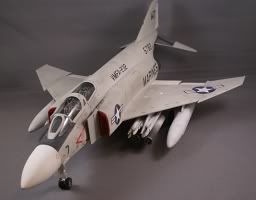
  • Thunderbolt379 (Host): F-4J (Fujimi, 1:72, with AM decals); possible F-4E 5000th Phantom.
  • TempestJohnny: F-4G (Fujimi, 1:72, probably OOB)
  • Wirraway: RF-4C (Revell, 1:32)
  • 44Mac: F-4C/D (Revell, 1:48)
  • Aagranata: F-4G, (Hasegawa, 1:48, with Leading Edge decals – 190th FS Idaho ANG)
  • Snoopy: (not decided yet)
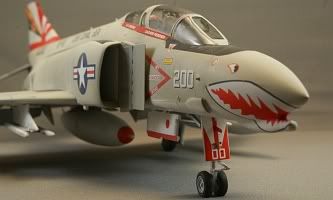
  • Bomber Boy: F-4E Thunderbirds (Revell, 1:72, classic four-plane formation)
  • Mongo580: RF-4C (Hasegawa, 1:72, “Carolina Kangaroo”)
  • Bushi: F-4C/D conv. to -B standard (Accurate Minitures, 1/72 )
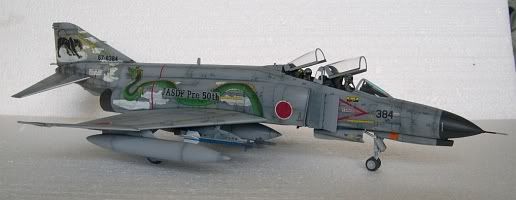
  • Gamera: F-4EK Kai Super Phantom (Hasegawa, 1:48)
  • Helo 53: FR-4E Israeli (Hasegawa, 1:72)
  • Skipper 74134: RF-4B (Hasegawa, 1:48)
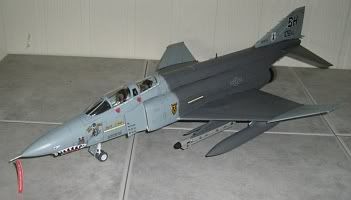
  • Army: F-4G (Hasegawa, 1:48, with loads of AMs)
  • Kustommodeler1: F-4C/D (Revell, 1:48) ; F-4E (Academy, 1:144)
  • Stikpusher: RF-4C (Testor, 1:48)
  • Morefirejules08: F-4C/D (Revell-Germany, 1/48, OOB)
  • Jarhead 50 5.0: F-4J (Monogram, 1:48, with poss. AM cockpit)
  • Constructor: F4-C/D (Revell, 1:48 with AMs)
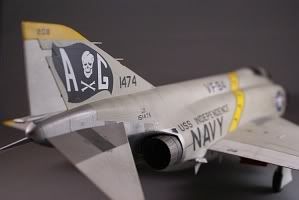
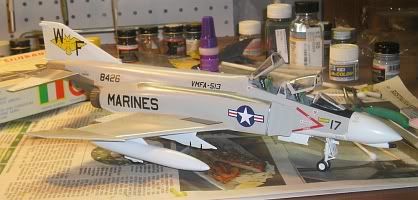
  • Oortiz10: QF-4N (Hasegawa, 1:48, x 2); F-4J (Monogram, 1;48, VMF-333)
  • BONE Fanatic: F-4J (Tamaya, 1/32, Fighting Shamrocks w/ Big Ed and True Details AMs)
  • Kg4kpg: F-4G (Testor, 1:48)
  • Dirkpitt289: F-4(?) (Hasagawa, 1:72, Bicentennial scheme, Robin Olds’ plane)
  • Xradio81: F-4D (Revell, 1:48, 35TH TFS, PACAF, Wolf Pack, Kunsan AB, ROK)
  • Buffrin: F-4C/D (AMT, 1/48th, OOB, poss. AM decals)
  • Bob357: F-4E (Tamiya, 1:32)
  • Caribwill: RF-4B (Hasegawa, 1:72, OOB)
  • Gkicsak: RF-4B/N (Hasegawa, 1:48, OOB)
  • Jmart: RF-4E (Hasegawa, 1:72 ‘IDF’, OOB)
  • Darson: F-4G (Hasegawa, 1:48, loads of AM)
  • Gregbbear: TBA
  • 68GT: F-4G (Testors, 1:72)
  • Cml: F-4G (Tamiya, ex-Italeri, 1:72, OOB); F-4E (Fujimi, 1:72, Aussie decals)
  • FastasEF: RF-4C (Revell, 1:32, OOB)

Badges

Completed

25th Apr. 2010 Caribwill

25th May 2010 Oortiz10

21st June 2010 Gamera

25th June 2010 Oortiz

25th June 2010 Oortiz

24th Aug. 2010 Wirraway

2nd Nov. 2010 gregbbear

28th Nov. 2010 Xradio81

so who does the group build art that appears at the bottom of posts? (hope that made sense as i dont know what its called!!)

it’s Jan. 1 we are wearing sunglasses, there’s styrene and paint, we got a build, HIT IT!!!

James

HAPPY NEW YEAR!!!

All right, I opened the bags to my Revell Germany F4C/D 1:48 and here’s what I find… The classic Monogram mold in it’s original form, amazingly crisp and clean for it’s age.

The exterior detail is finely raised panel lines and rivets.

For those who strictly like recessed panel lines, I would like to take a second to note that raised detail is not always a bad thing Just take a look at the fuselage detail on the model and this pic of the real thing, and we can see some details are indeed raised:

The underwing detail with the landing gear wells is fairly well represented and will be fun to detail.

The interior detail is fair as well, I could go with some AM stuff, but I’ll stick with OOB for sentimental reasons to honor the Monogram name

Wheels are nice. It comes with 2 figures, the pilot standing and the WSO seated.

And again, the decal sheet is one stage I can’t wait to get to.

Sorry for the long post, just excited to begin that’s all!! YEEE-HAAAAA!!

Darrin,

that’s a great post of the start of your bird for the build. (hey that kinda rhymes) As you said that kit has some teriffic details. The cockpit tub looks identical to my kit which is an old monogram from 1983. I’m very exited to be part of the group and loko forward to hearing/seeing everyones progress!

Respectfully, Erik.

MFJ – I’ll be organising the badges (yep, a selection) from this end, my sister did a superb job on the badges for Achtraden, so she’s got the commission for these too. Expect them to be forthcoming!

KM1 – nice big first post, this is gonna be a colourful GB with lots of Rhino action!

Men, today’s sortie will be a basic reconaissance. The squadron will assemble at the maintnenance sheds for inspection of basic materials, then proceed to detailed examination of projections for conditions ahead. This will involve structural analysis and consideration of aesthetic presentation. You’ll be double-checking available toolkits, supplies and special supplementary packages for the augmentation of your aircraft. All right, men, let’s get to it!

Cheers, Mike/TB379

Bone Fanatic- welcome to the build!

Kustommodeler- looks like she’s going to be a fine build. I’m really impressed with the detail on the standing pilot.

I’m not cool enough to get invited to New Year’s parties so I worked on the pilot and the weapon system officer (not sure of the exact term) today:

I’ll try to get them installed in their office by the end of the weekend.

I’d like to join please. Only Phantom I have left is a Testors 1/48 F-4G so that will be the one for me.

Chris

Hi Chris, welcome to the squadron, I’ll update the Order of Battle with your details.

Gamera, those Tamiya pilots look superb!

Cheers, Mike/TB379

OK gang,

I’ve never mashed plastic in a FSM GB. Is this where we post our build threads?

Just asking to make sure I’m planting stuff where it should be.

Cheers!

-O

Mike,

I’d love to jump in but one of my resolutions was not to oversubscribe to group builds this year. However, if time permits I’d be in with either a 1/72 Revell Germany RF-4E in Tiger Meet markings or the Italeri RF-4C.

OK got the basics of the cockpit done, just gotta add the wear and tear, but only a little…

Oortiz – yep, post your build log, installment by installment, right here, complete with pics – quality of shots doesn’t have to be great, it’s the build that counts!

Lewbud – terrific, if you can squeeze out a Phantom by midyear you’re more than welcome!

KM1 – you’re chewing into that build already, great work!

Cheers, Mike/TB379

Alright, since I got sucked into this Phantom GB…and it’s after the first…lets build!

I bought Hasegawa’s QF-4N second-hand from a seller on another board.

I’ve never built a Hase kit (gasp!) or a Phantom (gag!), so I figured I’d try my hand at this one since I got it for a steal. The seller included some resin bits and a couple of other nice extras. (Thanks Dan!) Don’t know if I’ll use 'em though, but they’re nice to have. We’ll see. He did tell me when I bought it that he had sanded down the cockpit sidewall detail because he planned on using an AM cockpit set. Well he never got around to it and sold it to me, sans the cockpit set.

I figured it was no biggie since I build my kits with closed canopies. My thought was that no one woulda seen the sidewall anyway, so it really wouldn’t be missed.

So I went to my LHS after work yesterday to pick up a few odd-n-ends for the build, when lo and behold, what do I see? The same kit sitting on the counter! There’s a Post-It note stuck to it saying it was for sale. I asked the clerk about it, and apparently a private seller was looking to get rid of it. It was being offered well below retail, so I snatched it up. Now I have two Phantoms to build! (What am I getting myself in to…?)

When I get home I crack open the second kit and…TADA! There’s a surprise in there for me! A copy of the old Microscale sheet, 48-73, with two Navy and one USAF jets on the sheet.

It’s a no-brainer! One of my Phantoms is gonna be a VF-111 Sundowner. No, has to be! I just hope the decals hold together. Who knows how old these things are? I don’t, but I’m guessing they’re pretty old. The price sticker on the decal sleeve says $2.25! Uh…before you ask though, I have no idea what markings I’m gonna dress the second jet in…so don’t ask. [:P]

The Spring semester doesn’t start until Jan 25, so I gotta get as much done on these builds as I can before then. Time will be thin once school starts. With that in mind, I start building…

I learned that the USN/USMC didn’t have flight controls in the back seat of their Phantoms, so out came the Dremel and away went the control stick mount. Then I scabbed over the area with a small square of styrene.

I know wunna yous is gonna ask, “Why’d you bother with the control stick if you didn’t bother with the side panels or the Navy vs USAF cockpit?” Answer is, because a hole in the floor is more obvious (to me at least, and that’s all that matters) than the slight difference in/lack of instrumentation.

I spent the first day of 2010 working on the cockpits. I got one done but ran into a problem when I went to dry fit it in place.

First, the finished cockpit:

It’s mostly OOB, except for the lead foil seatbelts. I know the belt pattern isn’t accurate, but I was going for “representation,” not “duplication.” Besides, since my cockpits are always closed, they’re simply an effort to “busy up” the office.

Now, the first problem of the new year…

As I handled the assorted parts from both kits, I noticed a slight difference in the fuse halves. I couldn’t quite put my finger on it until I really looked closely.

The fuse halves from the first second-hand kit I bought, was not only missing the sidewall detail (which I expected), but also part of the cockpit structure.

Cue Homer:

You can see the fuse half missing the structure taped to a fuse half that has the structure. (Apparently, you can also see how dirty my camera body is. YIKES!) Oh well, building has stalled at this point until I can figure out how to engineer a replacement part. Not a big deal, it’s just that I didn’t expect that. Hmm…

Anyway, that’s my first installment. I don’t have to be back at work until Tues, so I hope to get more done and posted soon.

Thanks for looking! Don’t forget to drop your two cents in the bucket on the way out.

Cheers!

-O

You can’t build a Navy/Marine F-4B/N using the F-4C/D model. The F-4B/N had the thin wing and small main wheels and tires. The rear cockpit did not have side consoles. The rear instrument panel was completly different. The IFR probe was located on the right side by the rear cockpit. On AF jets it had the IFR receptacle is on the back bone just aft of the rear canopy. There were many more diferences but not as visible as I just mentioned.

Oortiz – berny13 is right in that there were multiple minor changes between the Navy/Marines and USAF series Phantoms. (I’ll have to check my refs, I was under the impression the thicker wing was on the -B model to accommodate beefy landing gear for carrier ops, and this was deleted to save weight and frontal area on the USAF model…) But if I’m reading your message correctly, you’re not intending to cross-build – the kit depicts a Navy-series airframe with all the bits and pieces that go with it, so the Sundowners decals would be appropriate, there would be perhaps only a few minor points to attend to to backdate an -N airframe to its -B predecessor.

Now, as far the easiest fix for that missing element of the cockpit structure – my first impression is this: CA a scrap of stripstock under the existing part on the left fuselage half, to extend across the gap close to the right wall when they’re joined. Assemble the fuselage, then you’ll have a precise area measurement available. Cut and file some pieces of strip stock to match the dimensions of the inter-cockpit bridge on the left and glue them down onto the first piece of stock, so you build up the straight, stepped appearance on the right. Fill, sand, paint, and under the intercockpit canopy section nobody should be able to see anything amiss. How does that sound?

Cheers, Mike/TB379

Just the opposite. The USAF specified anti lock brakes and larger brakes for short runway landing so MDD gave the USAF Phantoms larger gear. It also had the bulge on top of the wing and gear doors. The Monogram kit is really a F-4C with the larger gear and wing bulge. The cockpit is for the F-4C and has the side consoles which no Navy jet had. The F-4N was rebuilt F-4B’s with slotted stabs, ECM up grade and still had the thin wheels of the F-4B. The Monogram kit can not be used to build the F-4B/N aircraft. It can be used as a starting point for the F-4J which had the thick wing.

Oortiz, that F-4N is one of the cool choices in the USN,151000 combines the VF-111 markings that we all enjoy,with an N conversion that didn’t get the DECM cable conduits on the intake sides,VF-51 had aircraft during the same time period (1975) in that same configuration,it also had the early type nose IR sensor, with the late type tail tip, and slotted stabs,pretty interesting aircraft to a Phantom fan

enjoy your build

Rex

Hey everyone thought I would post this, a pic of a F-4B. As soon as the temp goes up some this week I will go out to the airport and take a few up close and some cockpit shots.

Bushi

A quick question for those of you who know the history of the Phantom: according to my research the lack of an internal cannon was finally resolved with the F-4E model production. Why does my F-4J not have one then? It should be mounted centerline under the nose, right?