It looks like I need only paint the bottom hatch white. The ‘Blucher’ (if you can read it) has the whole hatch painted and my version has the bottom half painted. Nice link - thanks Darson [Y]
I should try some of these rub-down decals soon.
The suggestions for stowage were merely to cover the spots left by the things I’d ‘misplaced’ but now I have re-ordered that sprue stowage isn’t a big problem now but I’ll pop a couple of things on there, even if only Jerry cans or tarps.
I’m off to work in a minute and will be working from home tomorrow and Sunday but that means that the rest of the weekends this month are ALL MINE! HA HA HAAAA!
At present my model is decaled and painted in full - it also has a very glossy finish which I put on for the decals and to seal everything.
I want to add filters but I’m sure that the AK filters like a nice matt surface and pin washes want a glossy surface? Any ideas on the best way to go about adding filters and washes now?
I’m thinking filter and pin wash now on the gloss surface. Then matt coat, then add washes and pigments and chipping/heavier weathering/streaking?
What do you experts think re the gloss and matt surfaces and which way round to apply filters and washes?
I’d appreciate any advice - I’m not applying heavy damage, just weathering effects and a few light chips maybe.
I’ll be finishing the Friuls this weekend and doing whatever else I can - it depends on how busy I am. I want to have this build finished by the end of September so I can start my Dragon Tiger I Ausf E with Zim for Tigermans ‘Steel Cats’ GB at the beginning of October.
I am not sure which procedure works best. I sprayed flat clear on first before I applied AK filters on. The of course I sprayed flat clear again at the end to protect all of jobs.
You will start your Tiger at end of September?!?!?! It means I will start my build before you do if I can finish my Pz III. LOL
Nothing really show yesterday. The paint had all set well and the decals were sitting PERFECTLY after a couple of treatments of Micro-Sol.
Basically I was wondering about best procedures. The tank was glossy all over because I want to get some good capillary action for when I do my pin washes. Usually I’ll just do the decal areas before and after decal application.
Last time I put down AK filters over a glossy surface there were lots of ‘bits’ left sitting on the surface - AK recommend that their filters be applied to a Matt surface to capture these ‘bits’. Today I tried Blue for Panzer Grey Filter and a Brown for Dark Yellow Filter and they were fine. This obviously should have been done prior to varnishing but basically, in my haste to make some progress, I forgot! D’oh! [:$]
I’ve got one more light layer of Blue for Panzer Grey Filter to do and we are done with the Filters. Pin washes and washes next then the heavier stuff.
I’ve got rusty mate, I need to speed up! It’s easy to forget you best methods that work for you after 3 months!
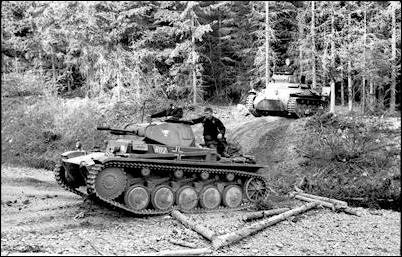
Today I wanted to put a white aerial marking on the engine hatch that most of the 1940’s Panzer’s going into France would have had. I masked off a nice square using low tack/no residue Scotch Tape and air brushed Tamiya Flat White onto the spare rectangle. After 5 minutes I removed the masking and the ENTIRE square of white paint lifted clean off. It didn’t take to the glossy surface!
I had to rough the deck up a bit and ended up painting a square with a brush and Vallejo Model Colour ‘Stencil’ white. It looks good.
I’m working this weekend but it’s very quiet today so now the white marking is on I’m assembling more Friuls.
First off please read last post if you haven’t already then this one!
Update - with photos:
Paint is on, white aerial marking is on the engine hatch and the antennae is dry fitted. Light filters have been applied and before I start on heavier weathering and apply a matt coat (LIGHT chipping and streaking etc) I’ll be using the very glossy surface to assist with pin washes.
I’m working this weekend so now I’m up-to-date I’ll be completing the Friuls tomorrow. I bought about 6 0.5mm dia 12" lengths of Brass Rod to use for the links as the Friul wire is so thin they can be pulled apart!
I’ll be finishing the Friuls tomorrow and hopefully I’ll have time to blacken them too with the AK Blue Burnishing Fluid. I’ve pre-drilled all links so it’s just a matter of inserting the Brass rods now. Then it’s FUN TIME! I’m not going to use the PE clamps but will instead use the Tamiya tools and I’ll add a thin piece of flat hammered metal wire (5 amp fuse) to fix on to look like clamp releases. I’m keeping my PE clamps.
I’ve looked at wbill’s Pz II chassis Wespe blog on his site - I have to get one! GREAT WORK BILL!
Note: RB Brass Antennae in place and Friuls slowly taking shape! Also note the handpainted aerial recognition marking:
I hope you like her so far - remember she is FAR from complete which is why she is glossy! FEEDBACK NEEDED!
This 312 decal at turret rear really gave me some hassles but after plenty of Micro-Sol she was fine!
Note: RB Brass Antennae in place and Friuls slowly taking shape!
Friuls, 0.5mm dia Brass Rod for links, AK Blue for Panzer Grey Filter and ‘Stencil’ paint used for the Aerial Marking - also some of the bits of stowage I’m using:
I hope you like her chaps. I’d love to hear any suggestion for weathering/chipping (basically how much)?
Tomorrow I’ll get the Friuls finished and Burnished too IF I have time.
Then next week I’ll be on the finishing run and starting the weathering and adding stowage!
Looks Great I just started this kit about two weeks ago and was trying find out about that two tone camo i thought that most panzer IIs had that going into Poland but never found a solid case till now great build and can’t wait to see what you do on that Wespe when you get it
Nice work on the aerial marking Ben! Other details are looking sharp and the tracks will be a plus as well. Just be sure that you position the antenna in the fully upright position when the time comes…it was raised/lowerd via a locking handle on the inside of the hull and basically only had 2 positions…up or down. [;)]
Because I was working from home this afternoon/evening I couldn’t commit to anything serious incase I got caught up on a 30 minute phone call. Luckily it was pretty quiet and due to the fact that I worked yesterday (from home aswell) too, the remaining weekends this month are all mine - sweet. That should allow me to get this Pz II totally finished and I’ll be ready to begin my Tiger I Ausf E build for Tigerman’s ‘Steel Cat’s’ GB!
Anyway - today got one complete run of Friuls finished and made a start on the other half run of Friuls.
Also, I raided a huge fret of Dragon tool clamps and pinched the clasp release handles and fixed them to the kit tools - they look sooo much better as do the Friuls:
still looking great i’m keeping a eye on this one its been really helpful as i build mine… i’ve never used them tracks before i mostly have just stuck with either AFV or dragon MT how hard are they to assemble?
Rambo - Friuls are brilliant [Y] Being made from Lead they have a scale weight so natural sag easily occurs and it does look VERY natural too! I’ll use AK’s Blemishing Fluid to complete the tracks - I soak the Friuls in the AK liquid for ten(?) minutes and they take on an aged, blackened/rusty appearance but they can be primed and painted as normal too. The high points on the tracks can be rubbed down with a file to expose bare metal to show track wear from running on concrete road surfaces.
Imo the kick ass - much better than Modelkasten tracks as they can take all the pulling around they need. Theya re affordable as long as you aren’t knocking out one build per week! Here in the UK they cost £20-£25. Modelkasten plastic workables cost about £15-£20.
The extra weight given to the model really helps too.
Tigerman - I wish you could have too bud! She’s going to be good! I’ll be building my Tiger I Ausf E for your GB straight after this build! Probably at the start of October?
Hiya Ben, for the weathering I would go for a dusty with the areas where the crew clamber over kept mostly clean
While I’m not a massive chipping fan if you are going to do it I would keep it light given the speed of the campaign, the fairly new condition of the vehicles and theamount of time in service.
I’m not sure why I asked that question re the chipping? I think I must have been half asleep when I wrote that last night and intended on enquiring about something else?
As you say, some very light chipping yes but mainly light dust. This isn’t going to be a mud covered, beaten to bits hunk of junk!
Glad you like the clamp handles - God them clamps are a nightmare. It didn’t take me long to decide to just stick the handles on! LOL!
I will use the proper full PE clamps for my GB Tiger I build though.