Mg- That light treatment is slick, dude. It looks like natural shadowing in there.[Y]
Ditto on the light, very nice effect/result. [Y]
Ok, I am totally stealing that trick for my next spotlight! Very nice work on this kit!
Chris
Oh, those Tamiya string cables? Super easy fix to them- if you have extra-thin CA around, that is.
Grab one in a clothes pin or similar clamp, hold it vertically and let the extra-thin CA run down the string length. Any drippage can be wicked off with a paper towel. Let dry thoroughly and you have a relatively stiff yet workable cable ready to paint.
scratchmod- Glad you like the build and the light technique.[;)]
Dre- Guess the extra time spent on the light is paying off. Thanks for the tip about the crazy glue and string…definitely will try that out.[Y]
wbill76- Thanks again, just wait to you see the IR serchlight I don’t think it will dissapoint.
Killjoy- Looks like this light technique was a success…now I just have to sell the tip to FSM.
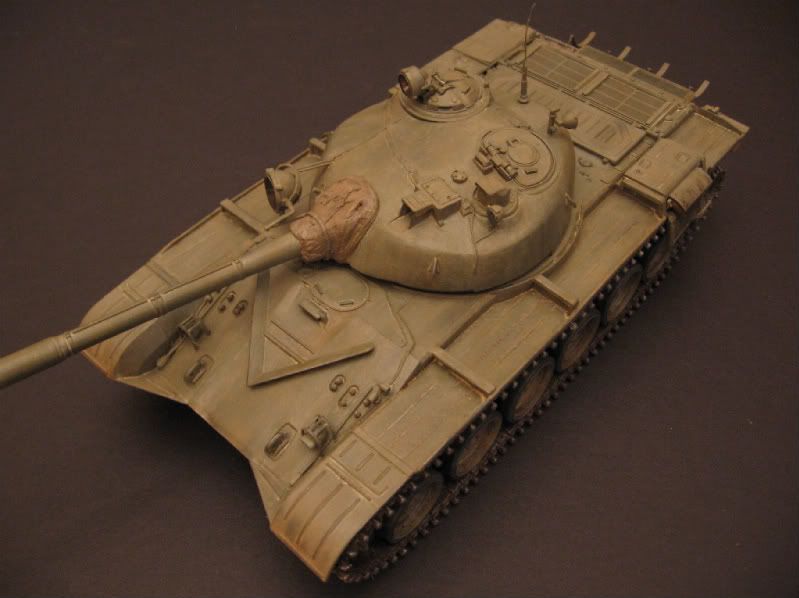
Got some more work done that really pushes this build torwards completion. The mantlet has been fixed up, barrel attatched, and the rear hull(un-ditching log and all) have been finished up.
As for the rear hull portion, the fuel tanks are finally in place. The unditching log has been glued to it’s proper supports and then to make it seem like it’s tied down, I took the kit-supplied string(the one with the loose-ends) made two tie-downs for the log and now it’s actually realistic versus a log that would make you wonder how it’s just sitting there. As for the the string, I first painted it with a mix of Testor’s wood and Winsor & Newton yellow ochre. Then gave it a wash of burnt umber to bring out the detail.
The tow cable has also been finished up, painted with a mix of Testor’s steel and black, then washed with black. Signal lights were touched with a sharpie and then given a clear coat. Simple but effective.
!(http://i267.photobucket.com/albums/ii291/mgmikael/T-72 Afghanistan/DSCN0952.jpg)
!(http://i267.photobucket.com/albums/ii291/mgmikael/T-72 Afghanistan/DSCN0956.jpg)
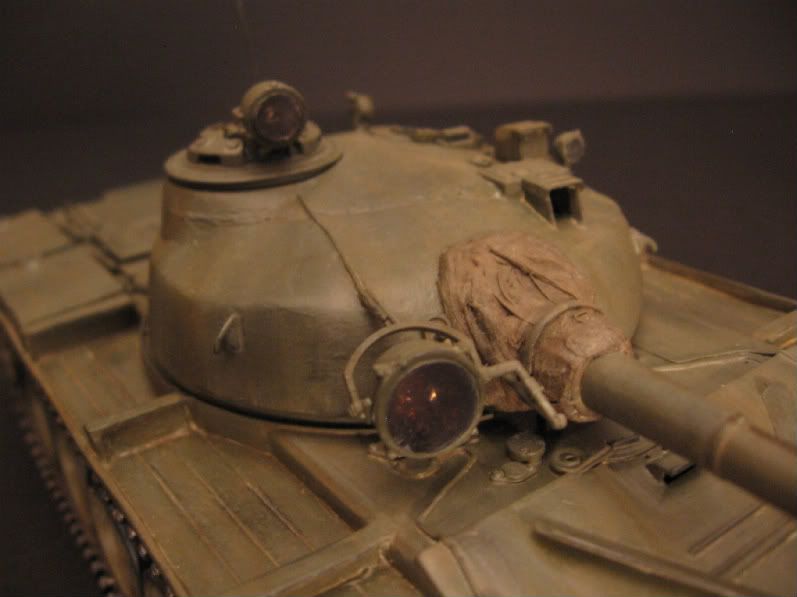
Now we come to the turret and barrel. After alot, and I mean alot of sanding the barrel is pretty much ready to go. The mantlet cover was another story…as you can see in the first image below, the fit was non-existent.[:O] That wasn’t due to Tamiya but me, since I added the turret bulge. That meant the mantlet no longer sat flush with the turret itself. So after cleaning up the mantlet detail, I glued it in position(polyurethane glue), but as is obvious their was a huge gap left over.
!(http://i267.photobucket.com/albums/ii291/mgmikael/T-72 Afghanistan/DSCN0936.jpg)
After letting the barrel set in place, I went to work. Putting the entire gap and at the same time molding the putty into fabric folds like on the kit piece. Essentially creating a mantlet out of a glob, yes sanding was necessary.[;)] After puttying I started the tissue treatment(tissue pulled apart into one ply and soaked in a mix of water and glue), it helps add more detail, not to mention hide some of the imperfection of the putty work. Long live the mighty tissue.[:D]
!(http://i267.photobucket.com/albums/ii291/mgmikael/T-72 Afghanistan/DSCN0951.jpg)
Finally the finished mantlet, all ready for painting.[:)] After cutting off the excess tissue and adding more folds to the mantlet, I called it quits. The mantlet cover itself was done, last but not least I then added a small rubberband(cut to fit, so in other words it’s no longer a working rubberband) to the area where in the orginal piece a slight wraparound brace was for the cover.
!(http://i267.photobucket.com/albums/ii291/mgmikael/T-72 Afghanistan/DSCN0957.jpg)
Thanks for looking, all comments, questions, and suggestions welcome!
Awesome work so far on this–a great looking build going on. Like everyone, I say that that light thing is brilliant!
Nice detailing, Mikael!
Nice fix on the mantlet cover Michael, keeps getting better and better! [Y]
doog- Thanks for stoppin’ by, and thank you for the comments. Glad that light technique payed off.[;)]
wbill76- Thanks, now it’s onto getting the vision blocks scratched and finishing up all the little headlights & searchlights. Then it’s the final stretch.
yep, im really liking this one mg.
Thanks for the comments, camo junkie![:)]
The infra-red light is in place and so is all the vision blocks. So now I can safely say all construction is 100% completed. Woo Hoo![H]
Vision blocks have been finished, drilling out would be a ridiculous waste of time considering how small they are. So I simply took a fine-point sharpie and used that for coloring in the vision block areas, then I took some clear plastic and simply cut to size and glued(using a clear parts cement) the pieces over the ‘sharpied’ areas. Done and done…simple yet adds some extra detail.
!(http://i267.photobucket.com/albums/ii291/mgmikael/T-72 Afghanistan/DSCN0958.jpg)
Infra-red light is also in place, used the same process as I did with the search light on the turret. (process was discussed in an earlier post…so if you want some info on it go back to the older posts.[;)]) I also finished all the headlights and mini-searchlights using the ‘wrapping paper’ process but for all those I didn’t drill them out, considering they were way too small. Also light wiring has been added too.
!(http://i267.photobucket.com/albums/ii291/mgmikael/T-72 Afghanistan/DSCN0959.jpg)
Oh, and finally the mantlet has been painted in a burlap color made from mixing Testor’s wood, olive green, and black. Once the paint dryed I started adding some pin wahses to the mantlet, like black burnt umber here and there in the fabric folds. Now with construction all finished up, it’s onto weathering the beast. Lower hull and suspenion areas were weathered before tracks were installed so now it’s onto the upper hull. Hope to get the first wash on later today…yes, one more update before the final pics!
!(http://i267.photobucket.com/albums/ii291/mgmikael/T-72 Afghanistan/DSCN0960.jpg)
Thanks for looking![:)]
Alrighty then, I said I’d get those finished pics up and here they are. Weathering consisted of an overall grime wash(to get that dry arid feel), then a light dirt color made from burnt umber and Floquil aged concrete. With those two washes done, I then did some pinwashes here and there with burnt umber for a little dark splotching, and aged concrete for some very light areas of weathering. Once letting that dry, I took a graphite pencil to areas on the hull, fenders, and turret and really rubbed it in. Creating the appearance of areas where the paint rubbed off showing the metal.
Sealed that in with Krylon, finished up with pastels, and an iron powder wash to the exhaust. Hopefully it created a realistic appearance to what a T-72 in testing may look like in a non-combat postion during the Soviet-Afghan War. The parts I scratched include…yeah right, like I’m gonna list everything. If you wish to know what I scratched, modified, and removed then your simply gonna have to read the entire WIP.[:P]
!(http://i267.photobucket.com/albums/ii291/mgmikael/T-72 Afghanistan/IMG_1643-1.jpg)
!(http://i267.photobucket.com/albums/ii291/mgmikael/T-72 Afghanistan/IMG_1672.jpg)
!(http://i267.photobucket.com/albums/ii291/mgmikael/T-72 Afghanistan/IMG_1612.jpg)
!(http://i267.photobucket.com/albums/ii291/mgmikael/T-72 Afghanistan/IMG_1633.jpg)
!(http://i267.photobucket.com/albums/ii291/mgmikael/T-72 Afghanistan/IMG_1635.jpg)
!(http://i267.photobucket.com/albums/ii291/mgmikael/T-72 Afghanistan/IMG_1656.jpg)
!(http://i267.photobucket.com/albums/ii291/mgmikael/T-72 Afghanistan/IMG_1683.jpg)
Thanks to all those who followed this WIP and for checkin’ out this build! All comments and questions welcome!!
I like it a lot!
I personally think T72s look like hot rods with the skirts off, as well.
[Y]
Yup, me too. I like it.
Put me in the ‘I like it’ crowd too!! Well done! [Y][B]
RBaer, wing_nut, and bbrowniii - Glad you guy’s all like it, thanks for the comments! Hmmm…now where are the people that love it.[;)]
Very nice work Michael, definitely one to be proud of to have on your shelf! [B]
Excellent build! You really did yourself proud with this one!
Chris
I think that you knocked this one outta the park- the lights and gun shroud are enough to be proud of, but all of the extra work that you’ve done is really sweet.