About 5 years ago, I purchased Trumpeter’s 1/350 BB-35 USS Texas and Bronco’s 1/350 LCS 3 USS Fort Worth. After examining the Kits, I realized I was in over my head. So later I bought the Revell Arizona to cut my teeth on a serious Battleship build. Life got in the way and they all sat in a closet.
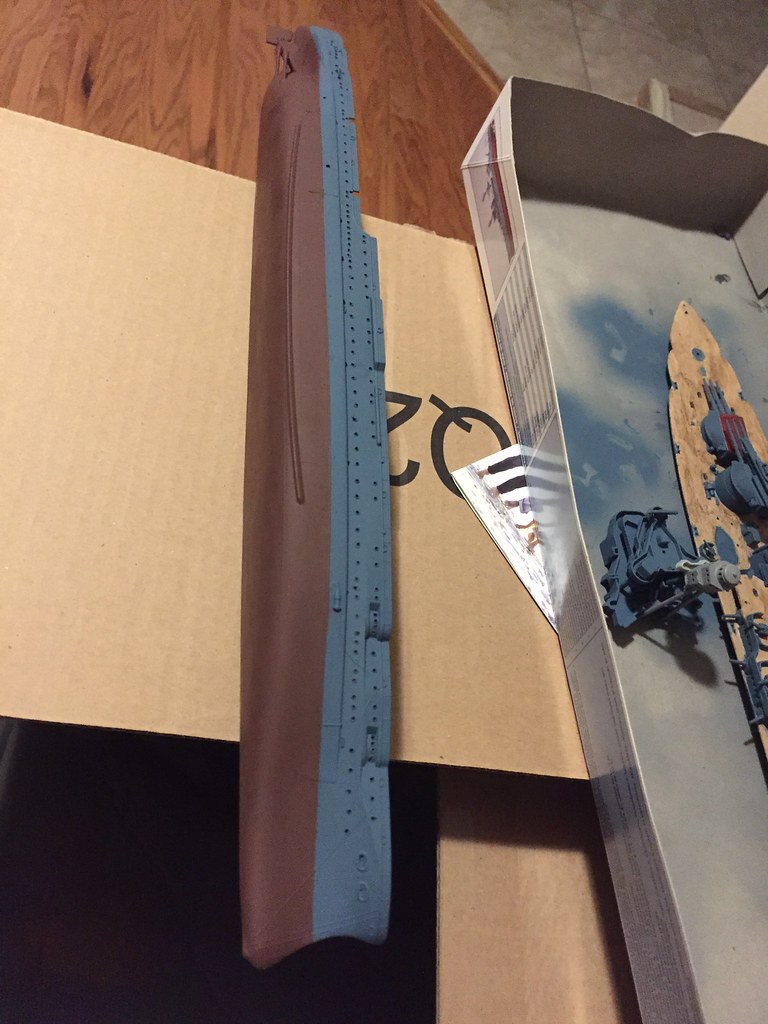
So now I’ve been working on the Arizona. I want to make her close to the new model they put at her memorial. I drilled all the hull portholes. I had thought I managed to build and sand the hull without needing filler. Priming told me otherwise. So I corrected that And re-primed. I airbrushed the bottom with Tamiya acrylic hull red. So far so good. For the blue parts, I had read a post here the said Sea blue Was the color. So Ibought Tamiya Sea Blue. Having watched all Frankie Day’s 1:200 Arizona build on YouTube, I thought Seablue was correct. Well after airbrushing it, I realized that was too dark. Almost black. So more research said Tamiya medium blue was a match for late 1941 5-S A and B. This appears to be correct, cause it is much closer to the memorial’s model. So 2 coats of that. Tonight I masked the hull to airbrush the black stripe. I’m Using the blue painters tape that worked for the hull red and medium blue with minimal seepage. Big mistake. It seeped bad. Should have used a black sharpie. So could use some advice On that.
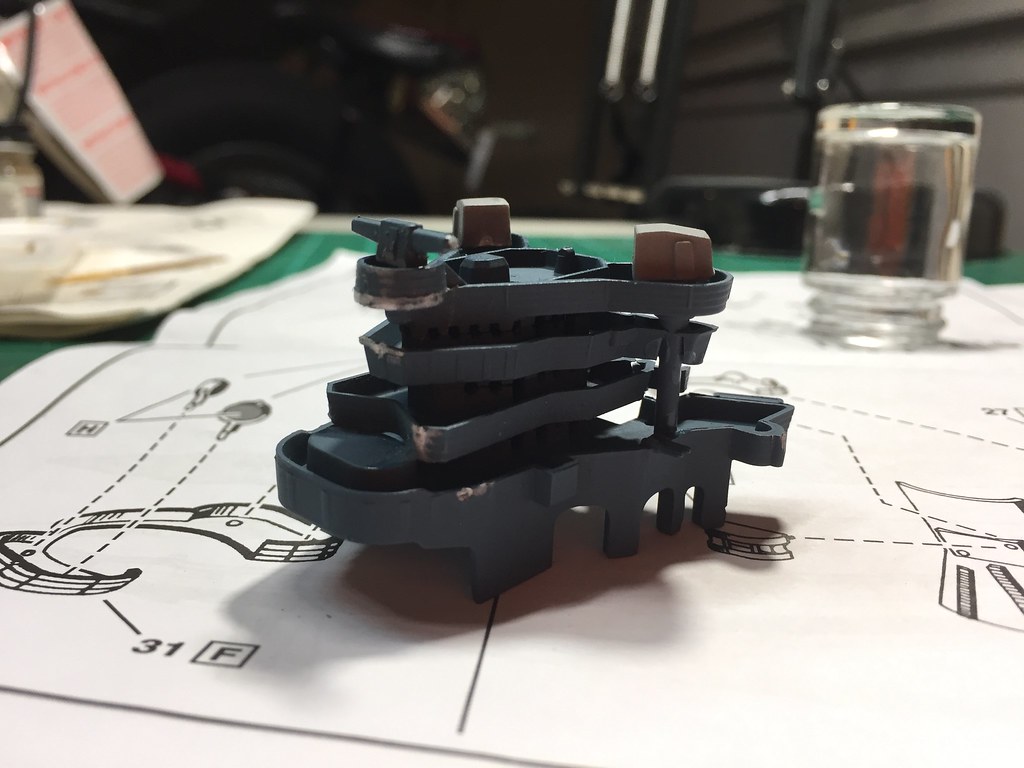
Last night I spent a long time masking the turrets, bits and anchor chain sections Of the fore deck. Thinking there had to be a better way, I tried hand painting the aft deck. Another big mistake. Straight Tamiya didnt brush well. Thinned 2:1 was too watery. And after all these years, my hands are still not that steady for fine brushing. What should I do here?
I plan on trying to mod her Gulls to look close to Kingfishers.
3 parts paint to one part (X-20A) thinner is the sweet spot for brushing Tamiya acrylic. You will probably need to recoat, but don’t be tempted to try recoating without letting it cure at least overnight.
I don’t suggest the Sharpie. Its more a purple than black, and any clear coat, in particular acrylic, will make it run like Bolt.
If masking isn’t working for you, try a paint pen. The pen line is pretty thin though. The actual boot stripe was about 6 feet high so, at your scale thats about 3/16".
I left the railings. Except for drilling the port holes, don’t plant on any extra mods for this kit. Some claim it is more accurate than the newer kits.
I second Phil. Are you using Tamiya’s acrylic thinner? If not, I recommend it. I also brush Tamiya acrylics by hand, and I had problems with them, till I read that they are formulated for airbrushing and are meant to be thinned. Then it took me a while to experiment with water and with isopropyl, till I tried Tamiya’s proprietary thinner. All problems were resolved. No clumping, no lifting coats off with a second coat. I can put down a layer of color as thin and as even as if I had airbrushed it.
My ratio is probably not as precise, probably closer to two-to-one, thinner to paint, than three-to-one. I use an eye dropper to measure the thinner out, on a ceramic palette.
I built Revell’s scaled-down version of this kit, in 1/720, and never built the original, large-scale kit. How are all of the horizontal seams between the superstructure parts?
Glenn, the shape of the Revell Arizona hull in the stern is wrong as it is concave not convex & the torpedo bulges are missing tho outlined causing the model to be narrower then it should be. look at the Arizona i’m working on in the above link i had posted before to see the difference between the worked on & non worked on models of that ship.
I see what you mean. But I think I’m going to complete the kit as is for the most part. It’s been a long time since I’ve completed any models. And when I was younger, I would just get frustrated and give up when things didn’t go as planned.
Thanks everyone for the tips. I’m trying to take these misteps in stride so as to not get frustrated and quit. One of the reasons for this kit is to learn. And with 40% off coupon at Hobby Lobby, they’re affordable to scrap. Better to scrap this and start over than scrap my 1/350 BB-35.
I am thinning with the Tamiya acrylic airbrush thinner. And I do use eye droppers to measure. I mix them in a pallet tray. Tried 3:1 to night. I used a finer tip brush and painted the decks. It went well. Will have to touch up some blue spots when done. But at 3:1, it’s still thin. So it will take multiple coats to get adequate coverage. Then comes the dark brown wash. followed by cleaning up the blue spots. Should I spray a clear coat between any of these steps?
In addition, I masked the lower hull and airbrushed the top again with The Tamiya medium blue. I plan to do the lower hull tomorrow night. Should I spray a clear coat before trying the stripe again? I plan on masking again. I may get some Tamiya tape. Then use a black paint pen this time for the stripe.
Here are some photos of my build so far. Plus what I’m going for. Other than color and the planes, I don’t plan on investing alot into making this kit super accurate.
You are doing everything right. It’s a heritage model and has so many basic problems that I personally think it’s better to put it together nicely as is, paint it the way you want, and save the PE etc. for the larger model.
It can be fun to spruce up these old Revell kits. I’ve done it for the T2, the seaplane tender and the C-3. But they have no better options really.
I think the fore and aft deck need only one more. The upper deck needs two. Then the dark brown wash. Followed by cleaning up the blue.
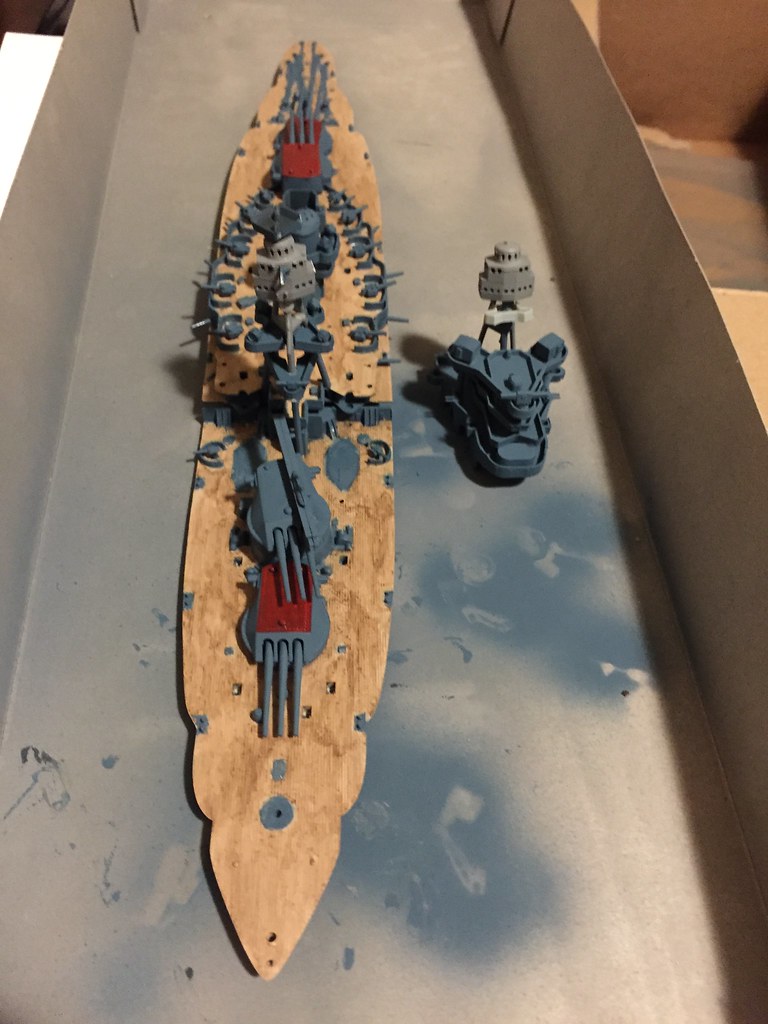
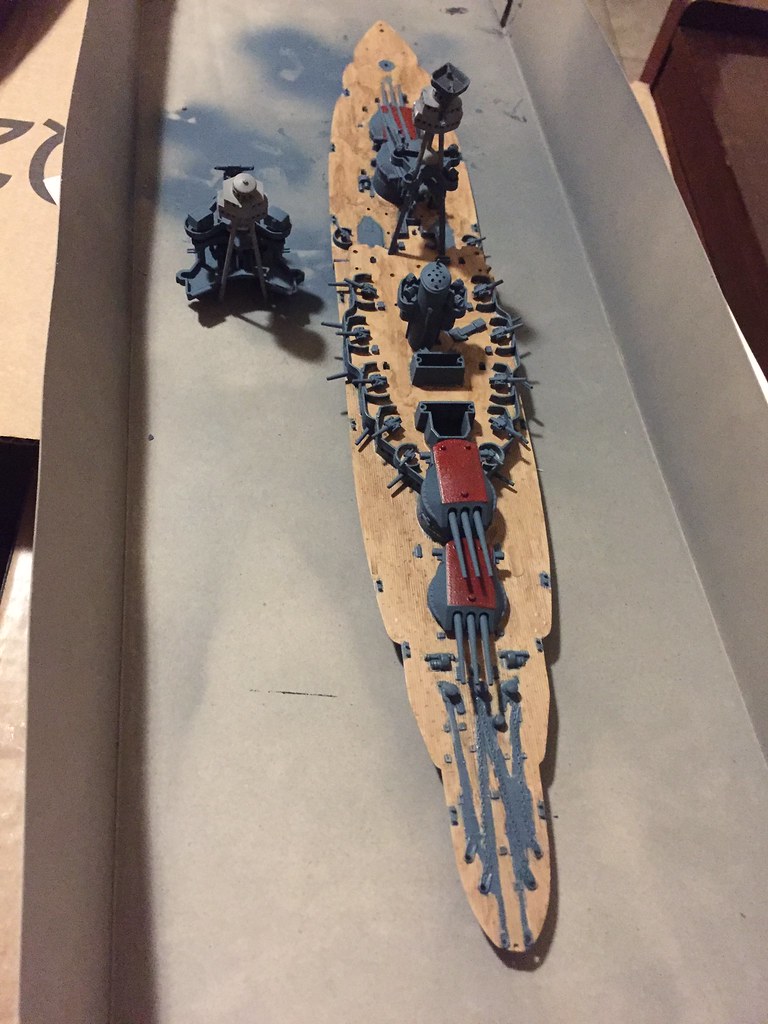
I plan to continue the deck tomorrow. As well as fix the paint job on the lower hull. And paint airbrush the top of turrets 1,2 and 4 Tamiya red. That is if it is warm enough.
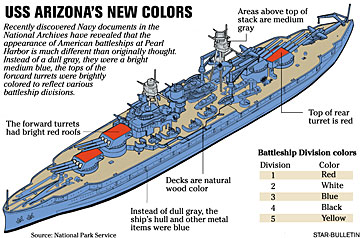
those 2 8 sided plates between the 2 empty gun tubs on the lower deck are wood covered so will be same color as the rest of the deck. the Arizona was not sea blue on the hull as she was in the process of being repainted before the attack & she was in measure 1 colors.
Cool and rainy day. So I didn’t airbrush the hull. Maybe tomorrow. Should hit 77F.
continued painting the decks. I think they’re done. Just need the brown wash. Then clean up the blue sections. Painted the top edges of the boats and cross members tan.
I like her… one thing you can do on paint bleed through is to apply a clear coat after masking and before your color. The clear will seal the edge. Or shoot a light coat of the color you are masking over, will do the same thing…ie., if doing the boot now after the other two colors then the clear, or clear/hull color if doing the hull red as in the last pic.
Last night I masked off the hull to paint the waterline with a black paint pen. Should have put another coat within 3 hours but didn’t. So that will wait till tomorrow night.
Tonight, I continued construction. Inserted the decks into the hull. Added the boats, cranes, catipult, stack and bridge.
Thanks GM. She’s getting close. Just need to paint the masts, anchors and screws. Hopefully tomorrow will be warm enough to airbrush the masts. They’re so small, it won’t take much.