Revell 1/32 Hawker Sea Hurricane Mk IA "HurriCat"

Finally making progress on this bird… The Sea Hurricane Mk IA starts life as the Revell 1/32 Hurrican Mk IIC, but gets “regunned” to eight .303s and I have to add catapault spools… A little background on this rather “unusual” Hurricane variant.

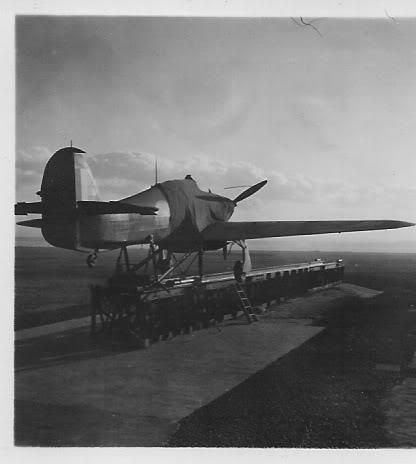
The Royal Navy, having lost the fleet carriers HMS Courageous and HMS Glorious, came up with a “Churchillian” solution to stopping the German FW-200 Condor and He 11H bombers from hitting the North Atlantic convoys as they approached the mainland via the Western Approaches to home ports… They modified some ex-RAF Fighter Comand Hurricane Mk Is (Actual “Battle of Britain” veterans with really high-time in the logbook and on the airframe) to the Mk IA model Sea Hurricane, or “Hurricat”. Flying boats took care of the submarine threat, but the bombers were another story. As the the first step, the Fleet Air Arm called for and received volunteers to fly Fulmars from specially built fighter catapault ships, HMS Pegasus, Maplin, Ariguani, Patia, and Springbank. The Fulmar-equipped CAM-ships met with no successes, since the Fulmars were too slow to catch the German bombers… Enter the Sea Hurricane.

The “Hurricat” was launched, via catapault and 3-inch rocket-assist, from the bow of a CAM (Catapault Aircraft Merchantmen)-ship. Each CAM-ship had one Hurricane with two pilots assigned, so that four-hour “Cockpit Readiness” watches could be maintained once the convoys came within range of the German-held coast of France. (They didn’t operate at night however, since any parachuting/ditching pilot would very likely be lost in the darkness…) The idea was that once the enemy formation was located, the Sea Hurricanes would launch, engage the bombers, then either fly to a land-base that was within range of the plane’s remaining fuel, or ditch/bail out in front of the convoy (had to be in front, as the ships would NOT stop to pick anyone up) and be recovered. This was the case more often than not, since the pilots had a tendency to want to get back to their ship rather than be stuck ashore for some reason… (I don’t understand that, but then I never was Navy guy… )

The first successful action of a cat-launched Sea Hurricane intercept was done by a 40 year-old (Take THAT kiddies) Austrailian, LT Commander R.W.H. Everett from the CAM-ship HMS Maplin on 2 August, 1941. Launched to shoot down a Focke-Wulf 200 “Snooper”, Everett engaged and destroyed it but was unable to bail out, due to a snagged 'chute/seat harness, and he instead ditched, promptly disappearing under the waves…

Fighting his way out of the cockpit after having cut through his 'chute and seat harness, he managed to get to the surface and was promptly picked up, little worse for the wear, although he became violently ill for a bit after “gulping down several gallons of seawater”, he said…

As the first pilot to have shot down an enemy aircraft with the Hurricat, he was awarded the DSO.

As more modern fighters entered the fray, they were gradually removed from service, although some Mk iCs continued to work the Gibraltar route until mid-1942.

The cockpit of the kit is rather nice, typical of the big Revell kits of the 60s and 70s. It’s moldng is two-dimensional though, so some attention has to be placed in this area… The A-frames on either side of the seat pan need to be perpendicular to the cockpit sidewalls, not paralell to them, as you see here:

!(http://img.photobucket.com/albums/v233/HansvonHammer/Screenshots/Models/Hurricane Mk IIc/HurricanePit2-1.jpg?t=1295814295)

!(http://img.photobucket.com/albums/v233/HansvonHammer/Screenshots/Models/Hurricane Mk IIc/HurricanePit1.jpg?t=1295814322)

After adding masking tape seat harness-straps through a slot drilled in the deat back, I went to work on it. I didn’t try to copy the origianl cockpit, just wanted to make it look a bit more 3D and a bit “busier”…

!(http://img.photobucket.com/albums/v233/HansvonHammer/Screenshots/Models/Hurricane Mk IIc/HurricanePit3.jpg?t=1295814683)

!(http://img.photobucket.com/albums/v233/HansvonHammer/Screenshots/Models/Hurricane Mk IIc/Hurricanepit4.jpg?t=1295815201)

!(http://img.photobucket.com/albums/v233/HansvonHammer/Screenshots/Models/Hurricane Mk IIc/HurricanePit5-1.jpg?t=1295814934)

I added some sheet and strip styrene here & there for the oxygen gauges and regulator, breaker panel, added flattened solder hardware to the harness straps, and a Sculpy Clay seat cuchion and headrest. The headrest was unique to the Hurricat, due to the 4-G take-off in 70 feet… I made some stretched-sprue tubing for the oxygen supply lines, added “garage-sale sign” sheet-styrene O2 regulator, lamp rheostat with a “salami-sliced” piece of sprue for the knob, the cockpit lamp, etc, on the port side, and an epoxy putty map case, some switch panels, and a GNDN (Goes Nowhere, Does Nothing) wiring harness on the starboard side, as well as other fiddly-bits, just to busy things up a bit more. Since the photos were taken, I’ve also added a hand-hold forward of the throttle quadrant (to keep the pilot from inadvertantly pulling the throttle back on launch), which was re-done as well to a little higher degree of detail than the kit’s. …

After looking at the above photo, I stripped and repainted the seat pan… (I had stupidly applied Tamiya paint with a brush, and we know what THAT does, lol)

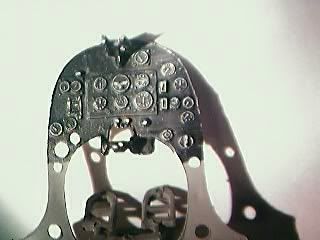
I test-fit the cockpit to make sure that I didn’t have sprue sticking into the joints to cause a fit-problem later, and I also finished up the instrument panel. I usually do these big Revell fighter-panels another way, painting them white first, then coloriing them with a black Sharpie. After the ink dries, I remove the ink on the raised detail and reveal the white by using an alcohol-dampened (not wet) paintbrush, but this kit’s panel had a decal, so I opted to use it instead. I just “Sharpied” the panel black, then applied the decal with some vinegar (my prefered decal setting-solution) to snuggle it down, and then shot some Dullcoat over it to seal it in place. The Sharpie leaves a gloss finish, so no clear gloss-coat was needed for decaling the panel.

I also discovered that when the fuselage halves are mated, most of the work disappears, lol… So I’m glad I didn’t go hog-wild on scratch-building the office a bit better…

!(http://img.photobucket.com/albums/v233/HansvonHammer/Screenshots/Models/Hurricane Mk IIc/HurricanePit7.jpg?t=1295817263)

Now to finish the detail painting on the A-frames, scratch-build a better gunsight, and then onto the engine…

Nice work Hans. Keep us posted.

Regards, Rick

Thanks… And I will… If anyone has any comments of critiques, feel free to sound off…

Double post -edited…

I was aware of the Hurricat program but not familar with the details. Thanks for that info. I will be keeping an eye on this one Hans. I have a Mk I of this kit in the stash and will see what you do to dress this one up. Is the IP a kit decal?

Yeah, IP is a decal, Stik… I was gonna do it my normal way of white, then Sharpie, then alcohol-dampened Q-tip, but after I test-fit the panel, I saw that not much would show, since the relief isn’t exactly the “crispiest” I’ve seen on the Revell big birds and the effect is too subtle on the finished Hurricane panel (unlike my Spitfire Mk II panel here)

With the decal, the gauges are more easily seen, even if they are a bit clunkier…

I found this short clip while net-searching for some more Hurricat refs…

http://www.youtube.com/watch?v=EREXTfiROHw

Goor thing I did too, or I’d have missed the rockets…

Been kickin’ it on the Hurricat all night, got this far…

!(http://img.photobucket.com/albums/v233/HansvonHammer/Screenshots/Models/Hurricane Mk IIc/HurricatRadFront0001.jpg?t=1296729707)

I cut out the molded-in screen, and added a piece of fine brass mesh for the radiator grille with another piece of that stuff for the rear. Added a slice of brass tubing into the face of it for the oil cooler intake. Actually be recessed instead of protruding, but I don’t have a decent punch & die set anymore to cut a clean hole in screening ( but I like it anyway)… Also a piece of brass rod for the brace was added, then painted in aluminum. As you can see, there was some shifting of the oil-cooler intake and glue residue left behind, but you can’t see the “plugged” holes in the mesh in normal light.

!(http://img.photobucket.com/albums/v233/HansvonHammer/Screenshots/Models/Hurricane Mk IIc/HurricatGunMuzzles.jpg?t=1296729707)

I cut the 20mm cannons off the wings, plugged the holes with sprue, the drilled out the new holes for the .303 guns. Using an X-Acto knife, I didn’t have much in the way of precision drilling, so as you can see, I got one a little big and had to insert a stretched Q-Tip handle to make the opening a bit smaller. A little putty to blend it, and close up those gaps, a few swipes with some sandpaper, and it’s fine now…

!(http://img.photobucket.com/albums/v233/HansvonHammer/Screenshots/Models/Hurricane Mk IIc/HurricatLExhaustStack.jpg?t=1296729707)

I sanded the exhaust stacks, which had some flash and pretty big parting lines, then drilled out the ends with a steel-cutter bit in the Dremel. The important part wasn’t depth, it was keep the openings in the center, which was no easy task, as you can see…

!(http://img.photobucket.com/albums/v233/HansvonHammer/Screenshots/Models/Hurricane Mk IIc/HurricatPitLside.jpg?t=1296729707)

!(http://img.photobucket.com/albums/v233/HansvonHammer/Screenshots/Models/Hurricane Mk IIc/HurricatPanel003.jpg?t=1296729707)

!(http://img.photobucket.com/albums/v233/HansvonHammer/Screenshots/Models/Hurricane Mk IIc/HurricatPitRside.jpg?t=1296729707)

Finished up the cockpit, after adding the O2 hose made from a wire wrapped around a drill bit, then bent into shape and installed. I painted it Testor’s rubber, drybrushed with Testor’s dark tan, and I drybrushed the greeblies on the A-frames on each side of the cockpit, as well as giving the other greeblies around the area a wash of dark something or orther (the goop in the bottom of the thinner jar).

The document bag is made of epoxy and painted with Testor’s MM Leather, given a dark wash, and then drybrushed with dark tan.

I need to start planning the catapult… If I did my math right, it’s going to be a bit over 2 feet long, but that seems short to me… The actual cat is 70 feet in length…

Looking good so far![Y] Glad I wasn’t one of their pilots, hoping the convoy would pick you up.[:|]

Someday I am going to make one of these, but as part of a model ship, in 1/700, so the whole thing is going to be just a tad more manageable size-wise. Yours is going to be one heck of a display when done.

WOW !!! [t$t][:D[[snWow][snYea]

Initially, I planned on making part of the CAM-ship’s bow to mount the cat on, but then after thinking about it for a while, I realized that it would simply be a cropped-off ship in the diorama and look exactly like that, which would appear rather ridiculous… It’s ok in photos to have objects get cropped, but on dioramas, cropping ships, aircraft, and the like, well… It looks silly… So, after some searching on the web, I ran across some photos of the cat mounted on a concrete slab on a hillside, when they were testing the concept… Think I’m going that route, rather than building a 1/32 scale mechant ship bow…

Lookin’g good Hammer, and I’m with you on the “how to mount it” dilemma, the concrete slab looks like a good option. Maybe a couple of aircrew or “a suit” with clipboards looking at the setup would finish it off.

Ohh, I like the idea of a couple clipboard-wielding “Boffins”… And a test-pilot in the “Pre-War” white flightsuit…

Looks good Hans. I really like the added detail in the cockpit and to the radiator. Sounds like a great plan on the diorama.

Thanks for the Kudos, men… Means a lot…

I just can’t shake that CAM-ship base outta my head though…

What if the base were “CAM-ship”-shaped? I forget the artist’s term for doing that thing… You know, a black “silhouette-type” base? I could just jig-saw one outta wood, route the edges, shoot it black… Maybe a blue trim to suggest the “water”…

Or am I over-thinking it and should just stick with the shore-launched test flight?

After all, these aircraft generally were a one-shot deal once they went to sea ( a few made it to shore bases, but most didn’t)…

Hans, can’t fault the use of a silhouette base to put the plane in context. Good luck on the project.

Pat.

Thanx, Scoot… I reckon I’ll do a quick build of the silhouette after I get the cat built, and see what it looks like anyway… Won’t take but an hour or so to make, and I’ll find a use for it even if I decide to stick with the “Hilltop” idea…

I shot the camo on today, fixin’ on decaling right now… 100% Rattle-can camo too…

Pics after I get’er decaled…

Well, she’s painted and decaled, and the shading has commenced… I started with the guns and exhausts, then moved onto the panels and rivets, using powdered artist’s charcoal for all…

!(http://img.photobucket.com/albums/v233/HansvonHammer/Screenshots/Models/Hurricane Mk IIc/hurricane008.jpg?t=1297311496)

!(http://img.photobucket.com/albums/v233/HansvonHammer/Screenshots/Models/Hurricane Mk IIc/hurricane007.jpg?t=1297311496)

The guns were decaled over with some strips cut from Monogram’s TBD fuselgae band.

!(http://img.photobucket.com/albums/v233/HansvonHammer/Screenshots/Models/Hurricane Mk IIc/hurricane005.jpg?t=1297311496)

I’ve only completed about a third of the shading, so now it’s back to it…

[Y] I like it.