Not too far into it but having a ball. Lots of parts and “the build” was always one of my favorite phases. When does the deck get glued on? When all the bits that get glued from the under side are done?
1st armor modeling injury as well. While putting the track together on a piece of over turned tape, I pushed down to connect 2 links and the guide… thing… (Little help on that one) went up under the finger nail about an 1/8 inch or so. Dried blood makes a neat weathering agent. Heavily weathered tank can make you a bit woozy I would think.
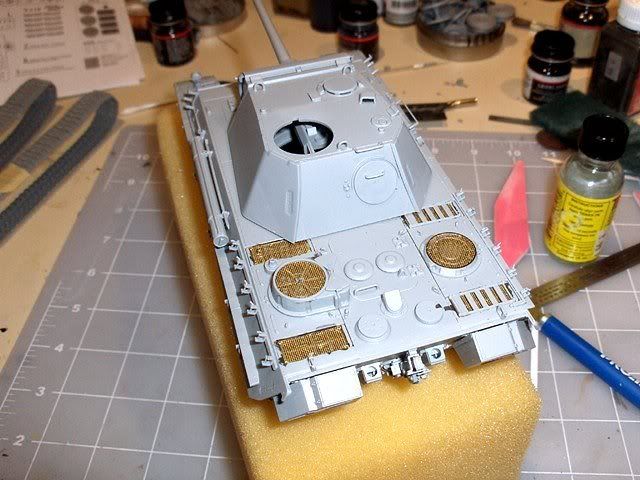
Off to a solid start. Looks like you already conquered the tracks. Like Steve, I’m befuddled by those who can paint them assembled. Sure easier to have them assembled, but painting them…well I’ve seen it done.
The avatar won’t be perm very long. You’ll need a new treadhead one, because you won’t be going back to the light-side. LOL
sweet looking work so far Marc, Love the Avatar. Im no expert by a long chalk but i would have assembled and painted the wheels and tracks after id painted the rest. Thats just me though. There are some premium builders over in this forum that assemble all 1st then paint. I just prefer my way cos it seems easier. I like easy.
Thanks for the encouragement. The tracks and wheels have been taken off since I snapped this pic. It is beyond me as well how they could be painted on the tank. I used doog’s method… I think it was doog’s, gotta find that tutorial again… of assembling them on the tape painting with the glue and letting then sit. My problem was something came up and I had top leave waaaaaay too long. They were stiff but they moved enough. The wheels were held on the axles with fun-tac. Not quite sure how to get all that back on after painting[%-)].
Its generally just the front lengths of track that you have to be a little cautious of, as the track sags behind the drive sprocket making the tracks difficult to remove once dry. When ive done glued links in the past i try to assemble the tracks in 2 or 3 pieces. One piece would be a long ‘C’ shape around the rear idler to about half way along the length. The second piece would go up to the front drive sprocket to about 12 oclock. And the last piece would come from the 12 oclock position to the large 1st piece around the rear idler.
An easy, yet expensive option is the likes of MK, fruils or even Drogon smart tracks.
Look forward to seeing your finished work though Marc. If your painting is anything like your plane stuff, it should be worth the wait.
That’s some nice progress. Looks like you got the tracks down. But one thing puzzles me. How could that thing reach take off speed on those treads alone? Ow wait… Nevermind.
That’s why the green capped tamiya glue works well. It gives you ~20 minute window, and only ~5 seconds to stop flowing, so you can set the track soon after wetting and not worrying about sticking the wheels and track together.
I do the final connections on the bottom. Whatever the number the kit called for, I usually give a few more and leave a little slack at one end of the tape. Then drop the extra links till it’s 1 more than a tight fit. You want it a little lose because repairing broken track after weathering is a pain. Push that extra link up around the idle wheel before turning thing over to let it sag.
I am starting to see the light at the end of the tunnel. Granted, the light is dim and it is still a long walk 'til I am standing in full sun… but I’m getting there. I donnu if I will have to remove the “Temporary” from my avatar but I already planning my next armor project[:D]
I have just 2 words so far… but DAY UM there are a lot of parts on this thing.