I think at the time of the queen’s visit in 1976 there was still an understanding that the guns had been purchased from England. In fact, I think it was commander Tyrone Martin who did the more thorough research to uncover the sources of the guns after he retired from serving as Constitution’s CO - and he was the one who toured the queen around the ship during her visit and probably told her they were British guns!
Charles!
Thanks for the nice note - it is great to see the kids enjoying ANY museum!
Evan
Time for some attention on the guns…
Quick review - We know that Constitution carried thirty 24 pdrs on the gun deck during the Guerriere battle and through the entire War of 1812. These versions were 9’6" long and cast in 1808 by the Cecil Ironworks in Maryland. The original 24 pdrs on Constitution were about 8 feet long and were replaced with this newer set after complaints by one of her commanders that the shorter versions lacked range and accuracy and tended to fill the deck with smoke because the muzzles didn’t extend very far beyond the gun ports. Interestingly, there are three known examples of the original “1794 pattern” shorter versions still extant. Two in Savannah, Georgia and one in Georgetown, SC:


These two are numbered 83 and 81 and researchers believe they are part of the original batch of 90 that were delivered to the navy for use in the new frigates. It may be that these were used to bombard Tripoli in Preble’s day.
They measure 105 inches in length and are marked as weighing 46-0-0 hundred weight - about 5040 lbs. The Eagle emblem is very cool…
http://markerhunter.wordpress.com/2010/03/06/early-american-navy-24-pdr-guns/
Here is the one in Joseph Rainey Park, Georgetown SC:


http://www.waymarking.com/waymarks/WM11TY_24_Pound_Naval_Gun_Georgetown_SC
This one matches the other two in Savannah, but does not appear to be part of the original batch and may never have been on one of the big frigates. It was uncovered in a river mudbank in 1991 and restored. Most likely, these all were fitted on some of the horrid Jefferson gun boats and eventually ended up in these local harbors.
Yet another thing to appreciate about the 1/96 kit is the fact that it includes a complete gun deck with individual guns. Many more expensive wooden kits (at larger scale) don’t even do that… They use dummy barrels and only expose the area under the waist.
I have dabbled a bit with modifying the kit provided carriages to include more representative detail… The trucks are too small (and poorly molded) and of course none of the hardware is in place. I added the curvature under the carriage, scribed a line to represent the two pieces of the carriage sides,removed some of the material in the back under the quoin to give it a more “dimension”, and added the brass pin and various eyelets, bolts, and rings for the breeching. I also added new axles and wheels:
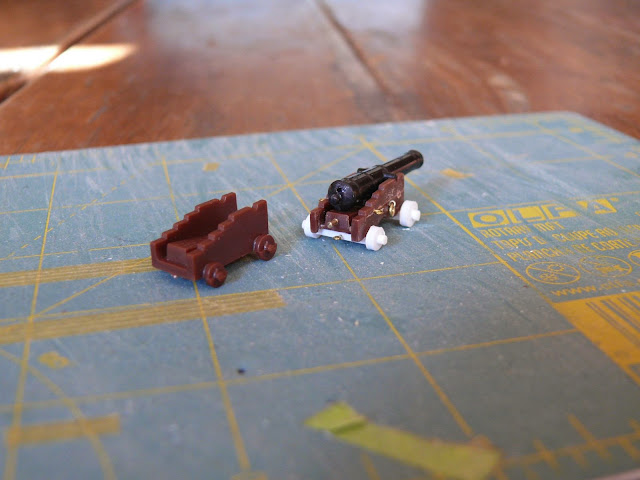

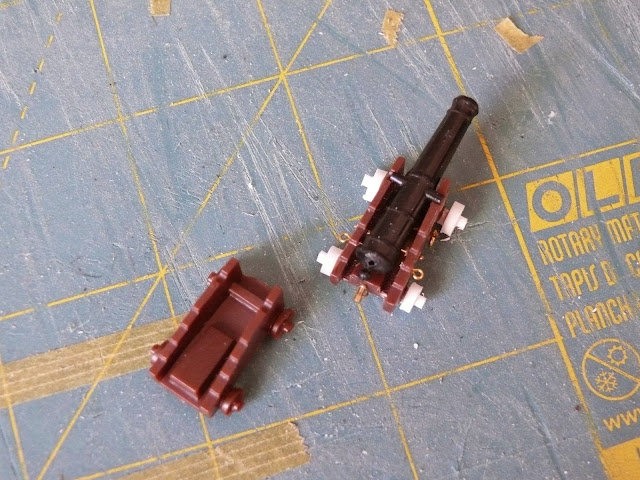
This is my first pass and I may need to make further refinements before settling on the final version. I will probably only “trick out” 10 or 12 of these and do some simpler modifications for the rest that won’t be seen once the spar deck is in place.
I hope to post more progress soon.
Thanks for your continued interest!
Evan
In my foolish and over-zealous youth, I used a saw to cut the sides away from the base of the carriages, since they match the taper of the guns.
This turned into an on-going , ever-escalating quantum of joy with little to recommend it (especially not without recourse to language inappropriate here.
See, once you taper the carriage, you then need to use a round needle file to realign the trunnion notches… Then, to need to trim the trunnions. You also wind up scratching out the axles trees, and the iron bar that holds the base for the qiun. To then have to fuss with correct sixed trucks. Then, to debate the capsquares for th trunnions. Only to take a micrometer to the gun barrels and have yet more tweaking ahead (oval cross sections, muttermitter mooglyoogly).
To then face needing to repeat the process not quire three dozen more times.
Ah, just so, these are the passions we apply.
Evan–
Looks to me like you’re choosing a wise path here, and CapnMac’s comments buttress that point!
Charles
Thanks Charles!
Capn Mac - I hear ya…
Let’s discuss the gun barrels…
We know that the 1807 pattern 24 pdrs on Constitution measured 9’ 6" and the OOB versions match nicely:

The kit provided barrels are perfectly fine, but they lack a certain menace… They seem a bit thin to me. With that in mind, I had included some of the white metal versions in one of my Bluejacket orders for comparison:
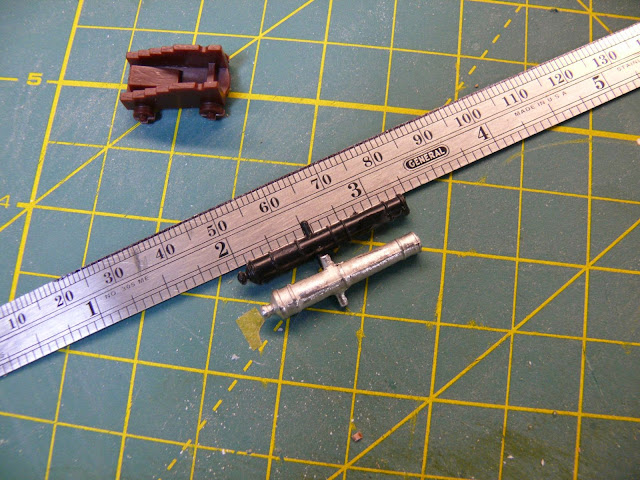
These are a nicer fit, I think… They have more of the requisite girth I’m looking for and they general show similar proportions to the 1794 pattern preserved in South Carolina:
But where have I seen a barrel like that before…? Aha - the Heller Victory:

The Heller kit includes a bunch of these barrels to represent both the 32 pdr and the 24 pdrs on the lower decks. I have two Heller Victory kits, so it’d be no big deal to repurpose a set for my Connie build. Heck, I could utilize the Connie 24 pdrs on the Victory down the line…
Now notice how the trunnions are represented on the Heller versions… They sit off center down lower. We see this in the 1794 pattern barrel as well. This positioning allowed for better depression angle when sitting in the gun carriage, but was inherently weaker than center cast trunnions. The 1807 pattern 24 pdrs apparently utilized the trunnions on the centerline.
Here is how the barrels would need to sit if the barrel is mounted properly:

This looks fine, but the upward angle is a little awkward sticking out of the gun port. Mounting the same barrel upside down gives a better angle out of the gun port and sits down nicely in the carriage:

But the gnawing fact remains that it is upside down. The solution is to remove the molded trunnions and add the properly centered trunnions:

Much better. Looks like I have more holes to drill… Be back in a week or so!
Thx
Evan
For cap squares, I had a sample piece of 16mil copper flashing that had been lurking on my desk for forever. Found a steel rod 1mil larger than the trunion diameter, and clamped that to a scrap bit of rock maple. Rummaged through the stray bits box and found a ball cutter just about 2mil bigger than the steel rod. Put the cutter in the Dremel in the router jig, and ploughed a nice straight round-bottomed dado in a bit of oak scrap.
Set the copper over the steel rod, set the oak scrap over that, and took that out to the big shop vise in the garage and gave it a smoosh.
Scribed a cut line parallel to the hump in the copper, then though about what I wanted to next. Turned out I had a scrap of sheet goods about the same thickness as the scribed length of the capsquare. Bent the copper down at the scribe, and this fit over the sheet stock. Found a scrap (HEECPOB) dowel, and slipper that under the hump. Which was then put in the vise to hold it all together.
So, the sheet stock is running left to right, with the hump up. Used the oak scrap as a thickness gauge, and took a razor saw (several, before I was through) and made parallel cuts the width of the cap squares. A careful pass with a utility knife pareted them off the copper.
Wound up making about seven dozen to have a complete set. They responded well to BlackenIt, which saved some trouble.
But, was a great deal of work for something nearly invisible.
But, for all the time (and razor saw blades) spent at the task, I was not out in gars or cavorting with wimmins of questionable virtue–so that was a plus. Of sorts.
I know that this scratchbuilding effort would be a grave injustice, but has anyone ever considered building the Constitution when she was used as a receiving barracks? There are some pictures of her in that configuration taken in 1903-07. Maybe I’ll give it a go with a smaller-scale (and less expensive!) kit.
SgtSki…
I have seen a model of her “barracks” version in the Constitution museum. It looked to be a modification of the BlueJacket kit…
Evan
Sorry folks for the very long gap between updates… Had to call a timeout for the holidays and some business travel.
I’ve been fiddling with guns a bit in the background, but I also managed to lay down some black on the hull. I had several flavors of Vallejo Black in my collection: Grimy Black (too greenish), Engine Black (too much sheen), and regular “Black”. I went with the latter - it lays down very flat and has a nice neutral tone.
Still much to tune up and I have kept some of the masking in place until I paint the red linings of the spar deck ports, but here are some quick views:


The final appearance of the yellow stripe took some thought and compromise… The Corne paintings show the stripe in line with the edges of the gun ports and finishing with a scalloped end after the most forward gun port:
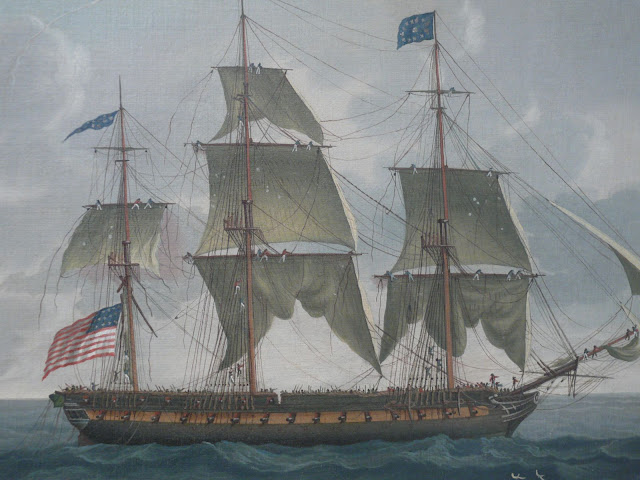
This is the path to choose if you’re paying strict adherence to the Corne paintings. I have to admit, however, that I do like the wider stripe shown in the Thomas Birch painting of the Guerriere fight:
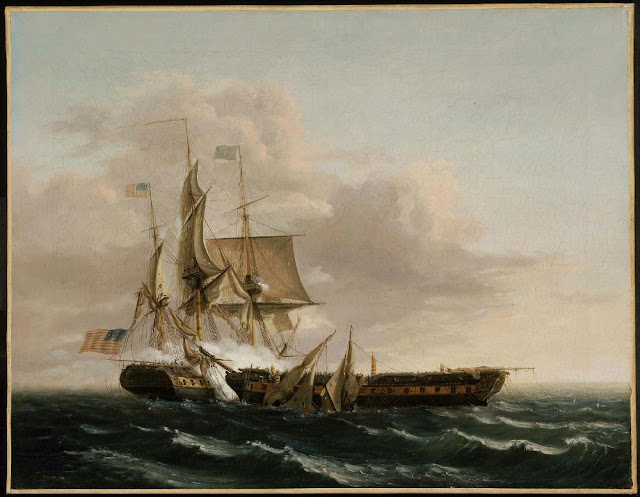
This gives the ship a more robust look and sets off the gun ports nicely. I do think, however, that it would be too big a leap from the Corne paintings. The 1803 painting done by Corne for Commodore Preble provides a very nice compromise:
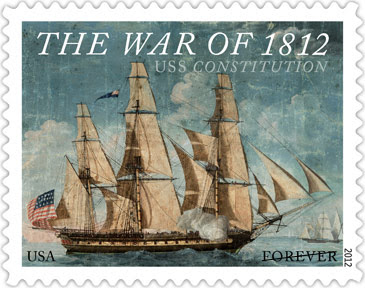
This shows the stripe in line with the upper edge of the gun ports and extending just a bit below the bottom edge. This version also includes the scalloped front end. (of course, this has led some people to think that Corne copied this older version when making the 1812 series for Isaac Hull… I don’t think so. Too many other differences and it seems likely that Corne had access to the ship during her late 1812 refit to make newer sketches and notes). Exercising a bit more artistic license, I’ve elected to use this for my model.
Here is how I approached the scalloped front of the stripe:
I rummaged around in my collection of spare washers and found one small enough for the purpose. After laying down two strips of Tamiya tape, I traced the outline of the washer with a hobby knife. I then transferred the tape to the model and masked off the rest of the stripe before laying down the black paint.

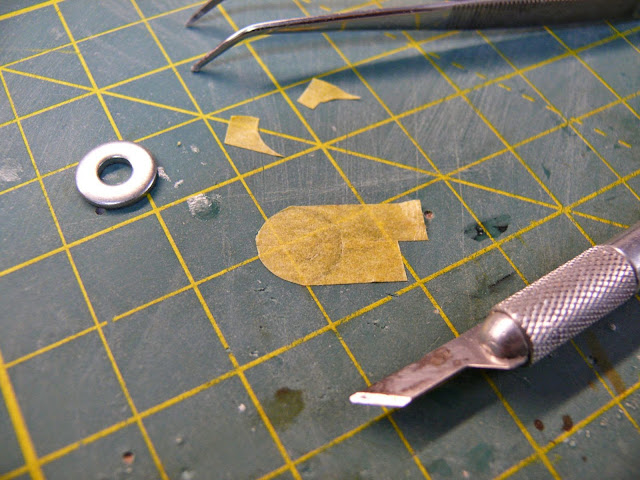
Thanks again to everyone who follows along (and shows great patience between my updates!)
Evan
Even,
Beautiful work as usual. She is really coming together nicely.
Steve
Evan–
This is just lovely. The attention you’re paying to the paint selection resonates with me powerfully–I’ve been frozen with indecision for over two months now trying to nail down the right yellow for my dear Surprise.
And I have to say I love the scalloped edge to the gun port stripe. It just looks right to me.
Finally, I googled and found some pics of the Constitution as a barracks. Oh my God . . . some things can’t be unseen.
Cheers!
Charles
I have been closely watching this thread and taking copious notes on many of your techniques. I just recently acquired my Connie, and have started plotting my build. I want to take this opportunity to thank you, Evan, and all the rest of the “regulars” on this thread. Your knowledge of shipbuilding, history, and love of this hobby is very inspirational. Moreover, you are very inclusive and approachable with model builders of all skill levels. I am patiently waiting for the next update. Again, many thanks for all you have done in making this an amazing thread!
Evan,
I haven’t posted in awhile, and it goes without saying that I am thoroughly enjoying your outstanding job. I particularly love the coppering and the excellent attention to detail that you are showing us. I do, however, have one question. Why did you use a bright yellow for the gun port bands instead of a yellow ochre? The Corne paintings seem to show yellow ochre for the color.
Please understand that my question in no way implies criticism, just curiosity.
Thanks!
Bill
Weathering should turn it into a more brownish shade of yellow, but I’m interested too…
I just picked up an interesting variant of a pre-coppered USS Constitution . . . the version with the cloth sails and wood base. The hull coppering is also pre-weathered instead of the bright version of the 1960’s. Has anyone else seen one of these?
Bill
Ahoy Gosselin!
Your note is very generous and much appreciated. I do hope that others enjoy reading along with my perspective as I figure out how I want to approach the many conundrums related to building the Revell kit to align with some sort of historical foundation. I really have come to the table with limited skills and have attempted to share my attempts to get better along the way… Interestingly, this is my TEST project for improving my skills for eventually completing the Heller Victory model in my stash. And that is where my “yellow” stripe intersects…
Bill/rdiaz -
I have the idea that both the Victory AND the Constitution will eventually be displayed side by side. I’m not too keen on the idea that both ships would have the exact same color scheme. With that in mind, I’ve set aside the more traditional yellow ochre for the Victory and I’ve tried to go with something slightly different for the Connie - while still trying to stay true to the spirit of the Corne paintings. To that end, I’ve skewed the Connie color towards the brighter version of the Connie yellow stripe seen in the Corne paintings held in the Naval Academy collection:

I’ve also sought inspiration from some of the outstanding models of Phillip Reed in the American Ship Model Gallery:
http://www.shipmodel.com/models/diana-hms-waterline-exm-


His model of HMS Diana is too stunning to fully comprehend, but his brighter yellow stripe inspired me to try something similar.
I have toned mine down with an additional layer of Sienna wash since I posted the earlier pictures and it does seem to bring the overall effect closer to the Naval Academy version of the Corne painting.
I hope to get farther along this weekend and can hopefully post another update soon.
Thanks again for the continued interest!
Evan
Bill, I think the kit you encountered is the “Museum Classics” version, from the late seventies. The parts of the model itself were unmodified, except for the hull halves. On their insides they had sockets for holding a couple of nuts, which held the bolts for the “brass-plated” plastic pedestals. The sails were, as I remember, sprayed with some sort of flocking that made them kind of fuzzy. (Where Revell got the notion that real sails are fuzzy I can’t imagine.) And it came with a wood baseboard - if I remember right, some kind of cheap Asian hardwood - though I might be wrong about that.
Revell did the same thing with its 1/96 Cutty Sark.
Dr. Graham’s history of Revell says the two kits were in the Revell catalog from 1978 through 1980. (He says the bases were Philippine mahogany, and the flags were made of cloth. I’d forgotten about that.) During that period Revell was (like every other American plastic kit manufacturer) having serious financial problems. These kits apparently represented one more effort to squeeze more profits out of old molds.
That model of the Diana… holy Jesus. Just look at that water… you’re right, it’s just too stunning.
John,
That is precisely the kit. As you can imagine, the sails and the baseboard are junk. The interesting feature of this version of the kit is the pre-painted weathered coppering of the hull. Otherwise, it is precisely the same kit.
I have never seen the Museum Classics version of the Cutty Sark, but Revell released the same with the so-called United States.
Bill