Thanks Carl,
Glad to have you on as a fan. Maybe this will show up at a contest some day and you’ll get to see it there.

Thanks Carl,
Glad to have you on as a fan. Maybe this will show up at a contest some day and you’ll get to see it there.

Thank you Mr Treadwell,
Coming from such a respected forum prodigy as yourself, I am honored. Your 1/16 projects are spectacular and !http://th88.photobucket.com/albums/k197/RedKnight_04/Smileys/th_hatsoff.gifmy hat’s off to you in return. Glad you noticed the barbed wire. I thought it would be an original touch since I haven’t seen anyone else do it. At this point in the thread I’m surprised that no one else had noticed or mentioned it.
Can’t kill a friend. Your advice on the chain is duly noted and credited. I was going by the following photograph in which the chain looks reasonably larger.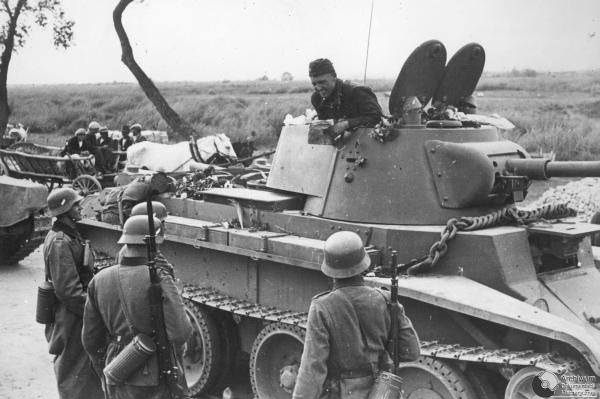
Not to worry, the chain is just laid in place. Here’s a previously taken picture with the 42 lpi chain.
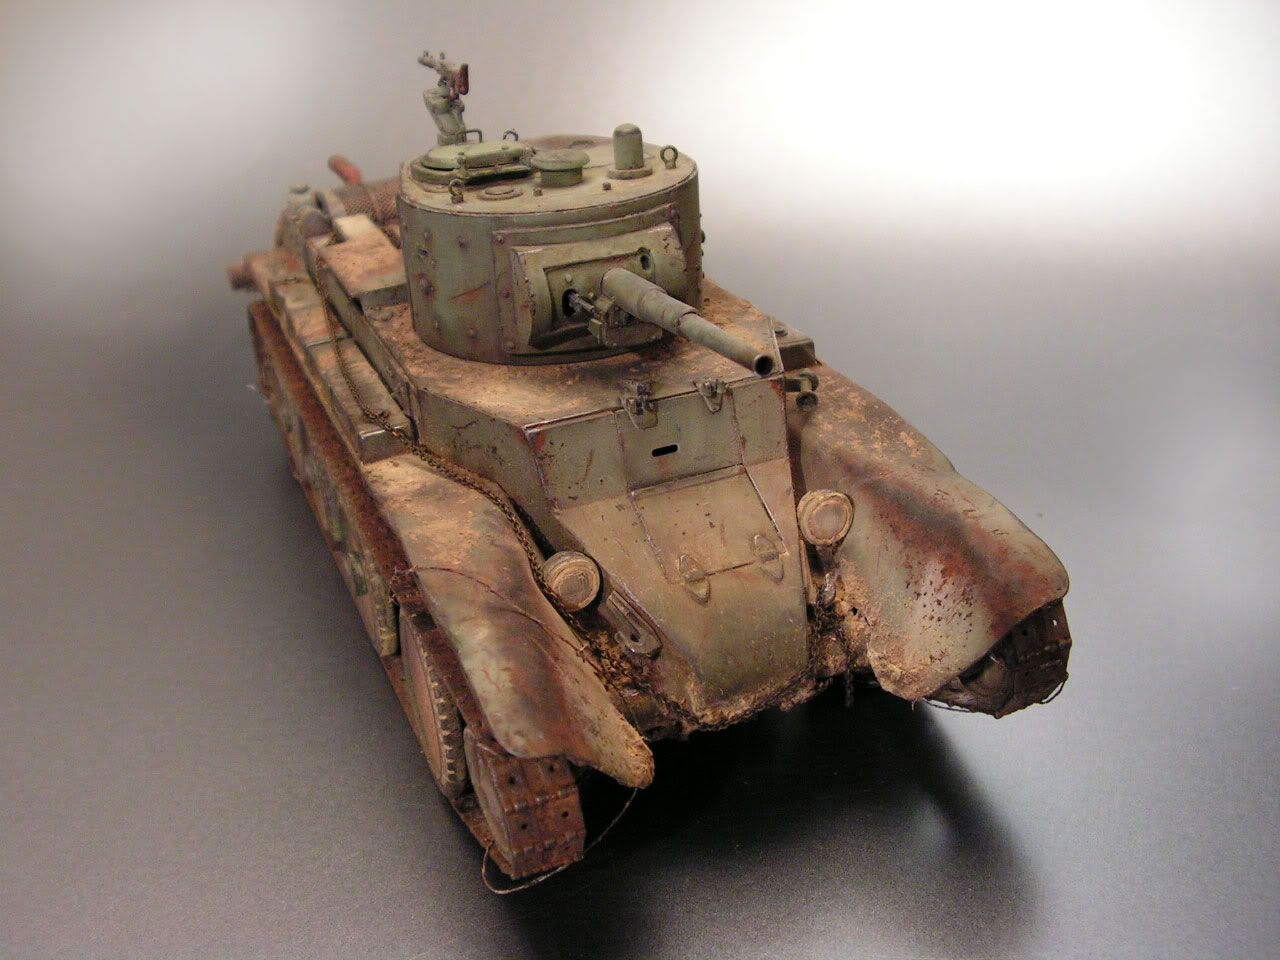
hhmmmmm… whaddaya think? Does it seem just a bit small?
And… a bonus picture of BT hangin’ out on my counter top with his battle hardened friend… he’s just lookin’ around for a Panzer to pick on…or a smiley.
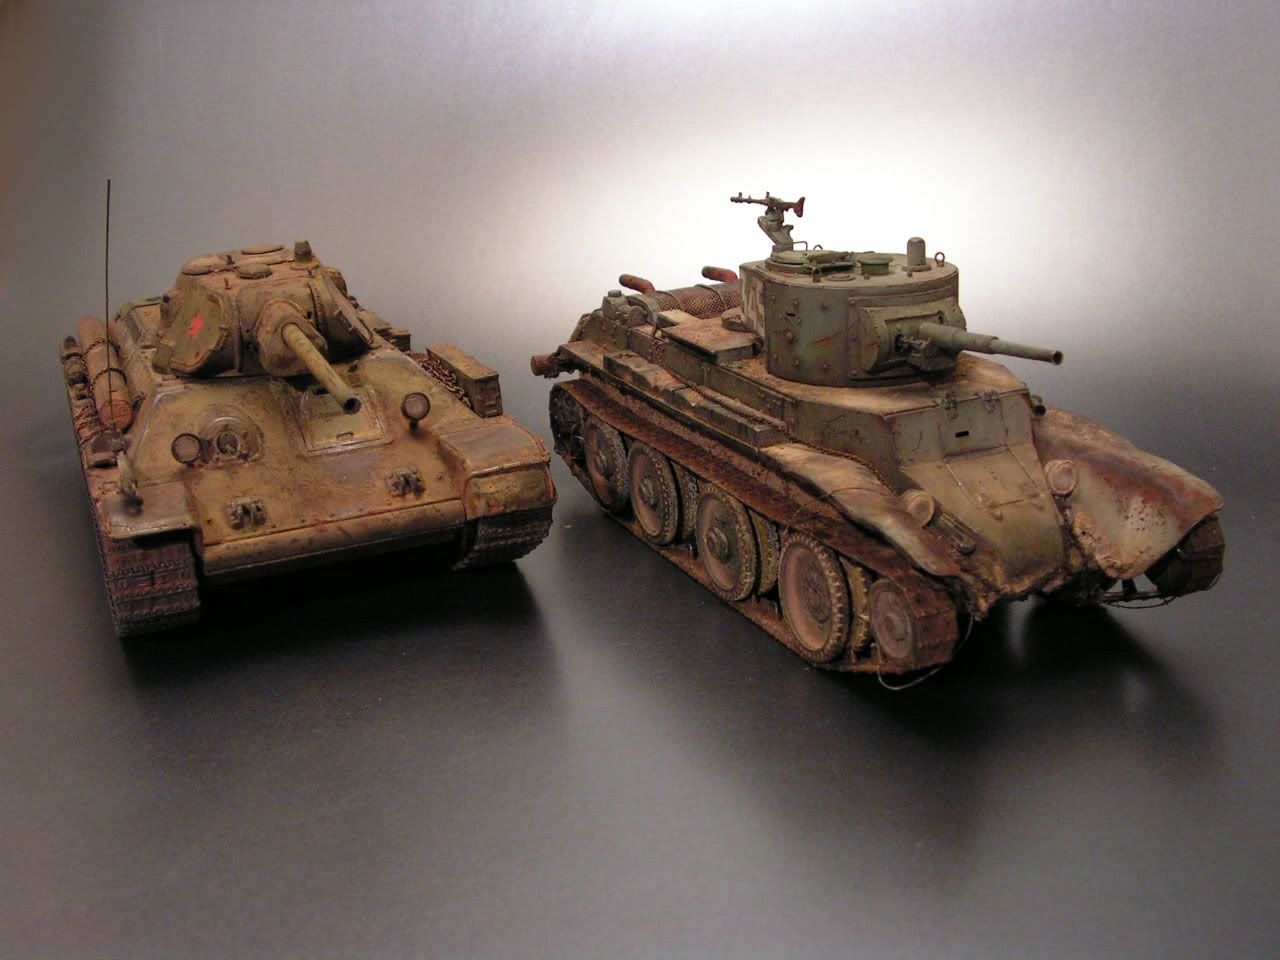
Oh, and I’m looking forward to your Trumpeter 1/16 Tiger II build. Yeah, I know it’s coming…can’t fool me.
(Man… now I’m glad I took typing in high school)
Save
Very cool photo, Steve–I never would have thought that this yank was that big? It’s really deceptive, how large it actually is!
By the way, I did notice the barbed wire–I just was so overawed by the whole tank that it just was included in the 
Hello DMaster 2 the Disaster, thanks for the comparison shot. Always thought that the BT series tanks were much smaller.
OBTW, that’s a fine looking T-34 in your soviet arsenal.
Mobious
heya Steve[:D]
the 42 lpi looks way better to me[:)]-- don’t know what size was on the earlier photos, but to my eye, whether it is correct or not-ESTHETICALLY–the 42 lpi looks perfect- [tup][tup]!!–Don’t Know if you will change it or not --up to you man and I respect your decision-but with that small correction it looks like a 10 to me now!!–Thanks for the new ‘old’ picture-- again–awsome build my friend—tread[8D]-- edit–I am also kind of taken aback by the realative size comparison to your T-34/76-- much bigger than I previously thought it to be!!
 Thanx Max!
 Just stay at it, and you will work out your very own shiny t**d too.
The rust is coming up next…
I really like the realistic weathering on your tank, awesome work!!!
Glad you like it Tigerman.
My next build may take a little while as I have some more urgent “life’s priorities” to attend to. Hope you’ll be puttin’ something up soon.
!http://th28.photobucket.com/albums/c202/Livvy82/Emoticons/th_thanx.gif
Yeah, I definitely remember it very well; looked pretty nice too…except that muzzle brake, he, heh. I believe it was your first tank too, right?
If I can work it out on this end, you should be able to get your stuff to look something like the one I did, if that’s what you really want.
!http://th182.photobucket.com/albums/x147/silence-screams/Smileys/th_thsmiley_signinsertevillaughhere.gifMight be a while though.
Thank’s for the WOW factor JWB.
!http://th169.photobucket.com/albums/u207/mishi49/Smileys/th_thEmoticon-47.gifHey Tigerman,
My next build may take a little while as I have some more urgent “life’s priorities” to attend to. Hope to see you puttin’ something up here soon.
Thank you for checkin’ it out and posting your opinion.
Miene Gott!!!..a Meisterwerk!!! There should be a posting of BT-7/5s. Biffa has done a couple that were very nice…would be wonderful to see them all side by side so to speak. Great work!
!http://th277.photobucket.com/albums/kk62/truckintedybehr/Smileys/th_respect-055.gifAnd a big thanks to you also beav.
The suspension on this kit is tricky, the fact that the instructions are so vague doesn’t help a thing. Be careful as two of the parts making up the front roadwheel arms are depicted backwards and it’s easy to assemble them on the wrong side upside down. Be sure to get the shock absorber/springs whatever in the right position.
You’ll have to glue the front return idlers in the furthermost position possible. Anything less will result in the tracks having gaps around the drive wheel and front return idler. You can’t use the diagram depicting the track positioning. I had to switch the tracks around to get them to work.
I always form my tracks around the roadwheels. On this kit the front roadwheels have to be put on permanently first, (you’ll see what I mean) but of course if you do that it makes it difficult to paint them. Inversely, if you don’t glue them on first, then you have nothing to form the tracks around. Have fun as I can’t give you an accurate blow by blow account as to how I did it. I’m sorry, it’s just something you’ll have to struggle with as I did. I’m sure you’ll figure it out. You already know more about this kit than I did when I started this project.
OK, the rust…
It’s simple really. Use a file or an e-xacto knife to “scritch” up the finish where the rust or wear pattern is going to go before ANY painting; of course this depends on how severe you want the rust or wear to appear. You can also use laquer thinner or liquid cement and a small brush to stipple the surface. These methods give texture for the rust and enhance the appearance.
This is too easy. After the final finish is acheived, a very thinned (aprx 80%) solution of burnt (aprx20%) sienna…spread it out in the pattern you want and let it dry thoroughly, it shouldn’t be thick…lighter than a stain but heavier than a filter. I only use turpenoid. It’ll look like crap, but be patient and let it dry. Next, do the same thing with lamp black in the center of the patches…spread it around in the pattern you want, let it dry. You can blend other rust colors to vary the effect making sure to let each layer dry completely. I’m sure some will think this won’t work because it’s just too simple. Once it’s dullcoted it does just what you have seen. At least for me.
By the way, (not that I have a problem with it) there’s no drybrushing involved in the finishing process on this project or in any of my previous builds; I can only imagine though that drybrushing would probably be a help.
Hope this answers your question beav and furthers you in the adventure.
!http://th206.photobucket.com/albums/bb138/suzyq1067/Smileys%20Hotbar/Everyday/th_fun.gifThank 'ya Jester,
Those kind of sentiments just keep me a rollin’…
WOW WOW WOW
A masterwork!
I am humbled!
Mark
!http://th295.photobucket.com/albums/mm142/sunrise131/smileys/th_smiley-TANKS.gifMarc,
You know… you’ve got your own “WHAM” factor here. For some reason that jack block you did just sticks in my head.
I’m currently working on my next project and trying to get some dialogue together.
!http://th179.photobucket.com/albums/w281/happymidget_2007/smileys/th_happy.gifOKAY!
I can understand that!
!http://th276.photobucket.com/albums/kk13/daniellepcos/Smilies%20and%20Emoticons/th_smilieyourock.gif
Thanks!
Stand back as the thrashin’ will continue …
Thanks Kenneth
I did notice the barbed wire, but alas like others did not mention it. I did save the images on my PC to serve as reference of different finishings, yours is a superb piece of work.
Terry.
АХ! Товарищ
 (AH! comrade)
Always good to hear from a loyal weatherhead. Nah, that’s not styrene… !http://th179.photobucket.com/albums/w281/happymidget_2007/smileys/th_happy.gifit’s just that high quality russian metal.
I DID add extra detail, but none of it is the aftermarket stuff. I most always improvise with bits and pieces of thrift/dollar store tidbits.
WELLLLLLLLL… if I can remember to take pictures as I go, I might be able to get some kind of info up later on concerning my next ongoing build.
Now, what was I doin’…
Thanks greatly smj.
Thanks Bryan…
that means a lot!

