That dirt comes from the dirt supplied with the rustall kit. Use a tiny dental tool with a small flat tip to allocate the dirt where you want it. You can brush off what you don’t like. When you get it just the way you like it, use an eyedropper and place a drop of (I use turpenoid) turpenoid that leaches out and fixes it in place. Now, it won’t blow off when you spray on the sealant coat. You do this towards the end of the build so as not to disturb it. Actually after you seal it in with dullcote, it is quite durable.
All wear work (dents/dings)is done before gluing the parts to the tank. The wear on the fenders is done the same way as with the fuel tanks by using various shaped files and x-acto blades. Pay meticulous attention to impact patterns.
The end result of this build is a combination of many, many techniques.
Now that is one FANTASTIC looking tank. You turned a cheap $5.00 kit into solid gold.[tup] I can’t give you enough compliments on this build disastermaster.[bow][bow][bow]
Seriously, that is one epic build, and I hope my weathering can come out half as well as yours on the SU-76M I’m working on.
I guess the guy who sold you this kit for $5.00 would have sold it to you cheaper if he saw this beat up, rusty tank that has gone from bad to worse! Great work!
…and that adjective is greatly appreciated Eoin. Thank you.
However I can’t help you with one word, so…
As you know, it’s been said that a picture is worth a thousand words or two or three.
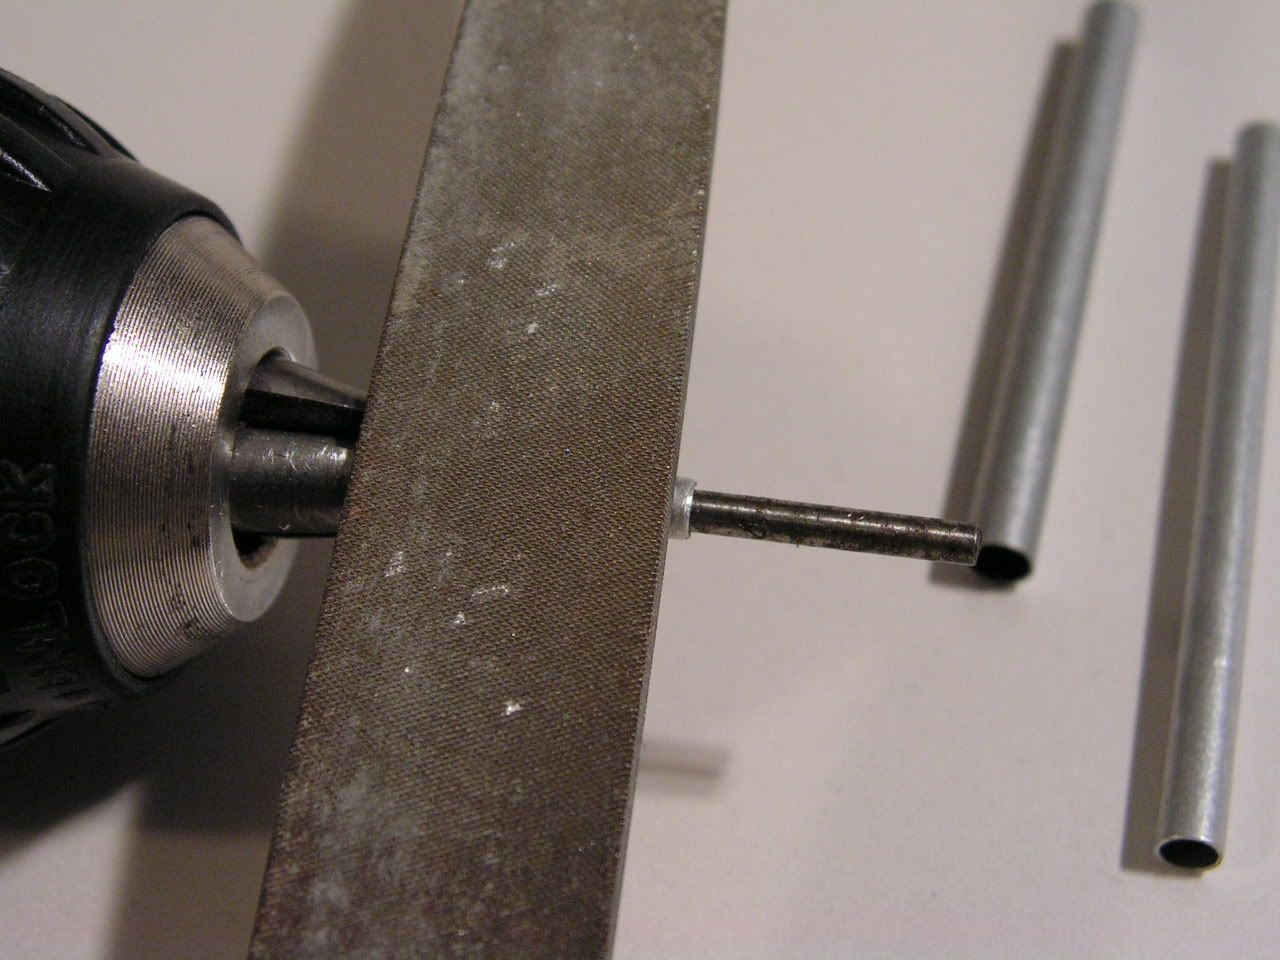
Here’s my poor mans lathe…battery powered at that. A corded drill is too fast. A simple project.
For this mini-project, get some tube aluminum like what you see in those plastic bags of assorted brass & aluminum tubing. Pick three pieces that will telescope together by measuring the kit part.
So, here I am at the kitchen sink… this should take about 30 mins once you get everything together.
For the shorter tubes, pre-cut (if needed) to the general length and put a drill bit that fits accurately (sharp end toward backwards the drill) inside the tube you need to cut off and place it in the drill chuck. You don’t have to tighten this 'till your teeth shatter either. This reinforces the tube from distorting and bending. Get your razor saw (that sucker will slice you) and place against the chuck (it’s hardened steel) in place of the file as shown in the above picture. Crank up the drill, hold the saw carefully and cut it about a 1/16 longer than you need using the jaws of the drill as your saw support. You’ll easily cut through the aluminum but not the hardened drill bit. Next, lay the file against the end of the cut right on the drill bit shaft and file it on down that last 1/16 or so as the drill spins.
For the muzzle, well the pic pretty much says it all. This will give you a uniform lip. All you have to do now is apply more pressure toward the end to get the taper. Stop occasionally and eyeball it to see how you’re going. If the lip looks too thick, just use the file to wear it down a bit. Since it’s telescoping you can adjust the length when you install it. While it’s spinning in that drill, use some scotch brite or fine steel wool to polish/finish it up. I used liquid superglue to assemble the tubing and only had to press it into the mantlet with a tight finish . Make sure to take into account how far this completed unit will fit into the mantlet.
You can use this setup for simple barrels and save some money. Just think of all those Early Sherman and T34 aluminum barrels you can claim as your own.
Well, I hope this is clear. Thanks again!
Gotta go!
I only had about 20 minutes to work on my model yesterday.
Hey DM, That’s the same poorman’s lathe I use to turn 2 piece plastic barrels. Glue the 2 halves together, chuck it up and use sandpaper to smooth out the joint seams, a micro chisel to redefine the muzzle break seam if needed. Works great.
Thank you for such an “over the top appraisal” doog, I’m really flattered.
I’m glad to be able to motivate the guys here to push a little harder to reach their full potential.
A WIP huh. Well, that’s certainly a winning invitation for sure. It’s just a matter of finding the time. I got to work on my model less than 30 minutes yesterday. It already takes me 4-6 months to butt out a new one; documenting and photography might even double it.
So, you guys want to wait 8-10 months for the next one to come out as a wip?
Don’t pop over here often, but I kept seeing this thread in the “most recent post.” Man, am I gad I stopped by! That is absolutely stunning work, it just looks SO real! Seeing stuff like this makes me want to build another tank. I too would love to see your WIP. Again, beautiful ugly work! [^]
This weathering is simply on another level, I’m glad this one didn’t entirely pass me by even if I’m a bit late to the table.
There’s so many different weathering techniques on it that make up the unique finish, and it’s the exact look I try to replicate. All of the small details are just right, from IMO a nearly perfect green shade to the fantastic rust effects.
Then I’m even more grateful for your taking the time to post us your barrel turning skills, definately something I’ll have a go at.
8-10 months for the next one…well we’ll be waiting outside the delivery room then
It’s been staring me in the face and I’ve only just noticed your link (/forums/955605/ShowPost.aspx)…and I’ve run out of superlatives…the scatched varnish on the benches…well, it just doesn’t get any better
Dust, rust? The dirt and dust are the lighter colored earth elements on the horizontal areas and under the sponsons, also on the headlights and on the wheel rims/tires. The rust is on the exhaust pipes, front fenders and the various nicks and scratches. The tracks and chain are a combination of both with metal contact points showing through on the tracks.
Good to hear from you and many tanks for your approval.


 Well, that’s certainly a winning invitation for sure. It’s just a matter of finding the time. I got to work on my model less than 30 minutes yesterday. It already takes me 4-6 months to butt out a new one; documenting and photography might even double it.
 you guys want to wait 8-10 months for the next one to come out as a wip?
 late at night…
 …here I am again, can’t sleep. Woke up at 2 am.
 I guess I got used to looking at it and thought it didn’t measure up. Well, now I’m glad that I did.
