me 262 nose weight

Hey Guys. I’m building a Trumpeter 1/32 scale Me 262 A-1a (kit #02235) and after some preliminary test fits it looks like I’m gonna have to weight the nose so it won’t sit on it’s tail.

Anybody got any tips? Advice? PRIOR EXPERIENCE WITH THIS KIT? Any help I can get would be most appreciated. I’ve weighted quite a few noses in the past so I have a good idea what I’m doing, so I’m looking for specifics, like wether it’s better to weight the nose or the nacelles, and how much specific weight was used in what location. Or at least a good approximation to give me a starting point.

Gary

think of nose wight like a fulcrum (or see-saw). The further away from the pivot point you put your weight, the more effect it has on the other side. The further forward you put your weight, the less force (and weight) you have to use.

This is a problem with lots of tricicle undercart aircraft models.

I have built this one myself. and the best place to put the weight is between the cockpit tub and the front nose gear bay.

Aternativly you could put some small fishing weights either in the gaps where the cartrige case ejection ports are on the underside, either side of the front nose wheel bay. Anywhere front of the main undercart is good, but the more forwards you can get it the better.

I would also reccommend Eduards big ed update set for this kit. It fills in detail nicley and does make this model from an excellent kit into an outstanding one.

Do lots of painting first and dry assemble more than once before applying glue. The more you understand this kit and the way it has been designed the better your build willl be. It does go together very well and the menacing shark like shape of the fuselage never fails to make me shiver just a little bit.

It is possible to display the engines with a little bit of cutting of the engine nacells around the hatches rather than use the clear nacells, with a little more detailing work on both engine and nacelle hatches etc it comes together really really well and with a good late war paint job really stands out in your cabinet.

Just as a thought. The real ME262’s had constant trouble with their engines and had to treat them with gentleness when powering up and in flight. I just wonder if this aircraft had gone through a proper development phase and was introduced earlier it could have proved a real problem to the allies.

I think that some allied test pilots that took this bird up said that if if wasn’t for the engines it was a really top aircraft that handled well.

What are you using for weights? Obviuosly, lead is heavier than steel, and for any given area, lead weights are going to work better than steel will in the same volume.

I haven’t built the Trumpy kit (Revell, yes, trump, no) so I’m sure exactly how much you area you have to work with. On the Revell kit, I had to fill the nose and both nacelles with lead shot (you can still get it at stores that sell ammo reloading supplies). Buying a 25-lb bag of reclaimed bird or buckshot for 80 bucks may seem like a lot, but it’s about a life-time supply and it makes the tree-huggers happy (er)…

I’ve done the 262 but in 1:48. Your nearest tire shop might have the answer. My cousin owns a shop and I just grab a strip whenever I need a few. It wouldn’t hurt to ask to buy a few; who knows if the hand you a few for free [;)]

They look really big in this picture but they aren’t. They use these weights for tire balancing, they are flat and already have adhesive. You can stack a few more if needed or even cut them with a hard knife.

Thanks Snap. Do you remember how much weight it took? I have a decent little scale that weighs in grams and ounces both. I built the Revell kit way back and I seem to recall that called for one ounce but I ended up using a bit more. What about the space at the very front of the nose? It gets sealed anyway, and it should hold a couple of grams. I was thinking maybe there and also fill the front cones in the engines. Another spot that will be hidden anyway. I have the Big Ed set and you’re right, it really adds a lot. How did you do the flap detail when it came to painting? Mask it (gonna be a pain) or paint the flaps & ailerons seprarate? I’d like to have the flaps down but if it’s gonna be too big a hassle I’ll model them up. Bish checked that for me and found photos of both positions on the ground. I do have some liquid mask. Think that might do it? I’ve never used that stuff before.

I plan to paint as much as I can before assembly. At least the entire underside and the lighter of the two top colors. I think I’m gonna do it as Franz Schall’s JG7 bird. Those are the decals that came with the kit, the other markings being for Nowotny (I also have AM Galland decals). So far it’s going together wonderfully with very few fit issues. I plan to display with the engines buttoned up, so I’ll concentrate my detail in the wheel wells and gun platform. Well, the office, too. The BE set really sets you up for detail there. I screwed up the throttles, but other than that it came out pretty nice. Still haven’t done the gunsite. I also plan to seal the radio compartment so I’ll leave all those hidden parts out to save on weight aft of the main gear. I like to display my aircraft about 20 minutes after touchdown upon completion of a mission. I’m thinking about trying to scratchbuild some FOD covers. All the photos I’ve seen show them as red with some kind of pull strap in the center. They look like they’re made of plywood.

I’ve read some about their troubles with engine overheating. Wasn’t that part of the reason they used Doras for airfield cover? Once at altitude and speed it was supposed to be pretty sweet and outclass the field. Kind of like an F-16 up against Luke’s X-Wing. The first time Galland flew it he said it felt like the angels were pushing.

Hans, I’m probably gonna use split shot sinkers (unless I can remember where I put those buckshot pellets). I was thinking five-minute epoxy to hold them, but I’m nervous about distortion. Does that stuff heat up much when it cures? I could also use RTV silicon. What do you think? I can’t remember what I used on the Revell kit. I built that one around '95 so it’s been a minute.

I’ll post a couple photos of this monster in a bit so we can better see what we’re talking about.

I’ve seen those tire weights and they look like they’d work pretty good. I like the small split shot cuz they’ll go into cracks and crevices without much cutting. I’ll take your advice and ask for a couple the next time I’m at the garage.

Gary

Snap you’re talking about the gap between the CP and the 30mms where the fuel tank is supposed to be, right? I was wondering about the small space at the very tip of the nose and between the wheel well and the skin on both sides way at the very front (2nd pic). Wouldn’t I have to use a lot less weight if I put it so far forward than if I put it in the fuel tank spot?

I have not done this particular model of the ME262 so I cannot comment on this kit. That having been said I would suggest that you determine whether or not the landing gear legs will hold the added weight, or consider the metal gear if they are available for this kit. Secondly look into either making a mold of the area where you intend to add the weight and cast the lead to fit the space, or use low temperature melting point lead and form the lead in place. This type of lead may still be available, or not. I’m not sure as
I have not used it for ages. IIR it was expensive. It may not be available because IIR it contained mercury.

The Trumpeter kit comes with metal landing gear. It looks pretty good, too. They needed some clean-up and primer, but I think they’re gonna look great. I’m considering displaying this kit on a mirror so good detailed gear will be important.

Like I said at the beginning of the thread, I’ve weighed down more than a few noses in the past, and I’ve always found it easier to use small round weights with a fairly thick liquid adhesive. Besides, I’m not equipped to cast lead so that makes the choice easier.

Gary

Dunno about 5-minute epoxy, as I’ve never used it… But just about everything else I’ve used in two parts generates heat… The only time I’v ever had heat-issue though is when I set the whole thing on fire (really) using too much catylist in the resin “water”…

I’ve used CA to hold lead though, and it wrks prett good, but it doesn’t handle shock well… I also have used shot that’s been poured into a sandwich bag… The bag keeps the shot in place and conforms to the space inside, and also hold any shot or sinkers in place that may break loose during final… Just put the bag in place, then fill it with the shot… (I read that last in a Reader Tip in FSM, tried it, and it worked well) I skipped the bag part in an F7F Tigercat… One good bump and I had shot rattling all over inside of it… Couldn’t fix it w/o tearing the fuselage apart, so I just lived with it and the noise until I got it pinned down on the diorama…

For the B-25 I just glued up, I added lead sinkers to the space in the bombardier’s crawl-tunnel, between the panel and bulkhead, and under the flight-deck floor in the nosegear well… Gonna need more in the nacelles though… I glued them in place with CA, and then added a big dollop of white glue for extra hold…

Don’t see why silicone wouldn’t work either… It’s just slow-drying… A little time in a warm place will speed that up too…

You plan on mocking-up as much as you can right? I always do, in case I forgot to add something to the tail… I just tape stuff together to get an idea on how much wieght is gonna be needed, then add about 10-15% more. Brass tubes work well for the gear struts to find the “tipping point”… Heck, even sprue will do for that…

The density of some common (high density) metals and alloys are indicated in the table below:

Metal or Alloy Density (kg/m3)
Admiralty Brass 8525
Aluminum bronze (3-10% Al) 7700 - 8700
Antifriction metal 9130 -10600
Beryllium copper 8100 - 8250
Bismuth 9750
Brass - casting 8400 - 8700
Brass - rolled and drawn 8430 - 8730
Brass 60/40 8520
Bronze - lead 7700 - 8700
Bronze - phosphorous 8780 - 8920
Bronze (8-14% Sn) 7400 - 8900
Cadmium 8640
Cast iron 6800 - 7800
Chemical Lead 11340
Chromium 7190
Cobalt 8746
Constantan 8920
Copper 8930
Cupronickel 8940
Delta metal 8600
Electrum 8400 - 8900
Gold 19320
Hatelloy 9245
Inconel 8497
Incoloy 8027
Iron 7850
Lead 11340
Manganese Bronze 8359
Mercury 13593
Molybdenum 10188
Monel 8360 - 8840
Nickel 8800
Nickel silver 8400 - 8900
Nimonic 8100
Palladium 12160
Phosphor bronze 8900
Platinum 21400
Plutonium 19816
Red Brass 8746
Silver 10490
Solder 50/50 Pb Sn 8885
Stainless Steel 7480 - 8000
Steel 7850
Tungsten 19600
Uranium 18900
Wrought Iron 7750
Yellow Brass 8470

  • 1 kg/m³ = 0.0624 lb/ft³ = 0.000036127 lb/in³

Among shown as a metal/alloys should are the SAFE, cheap, high density?

Pretty much all I got from that is that lead is denser than steel, an’ I already knew that… [;)]

I didn’t understand what you asked at the end though… Was it to read something like, “Among which of these shown as a metal alloy are safe, cheap, and high-density?” or something along that line?

Steel is obviously safe, but it’s not as dense as lead. However, lead, in and of itself, is safe too… Just don’t take it internally… So no eating, drinking, or inhaling it while you’re gluing it…

Mercury is denser than lead, but we all know that too, that and it melts at about -38 degrees F… But where lead is toxic, mercury is poisonous… Gold is even denser than mercury, and platinum is denser than gold, but I doubt anyone would want to use 5 or 6 thosand dollars-worth of gold or 15,000 dollars in platinum to weigh-down a Messerschmitt… And if you use plutonium, the DHS and the FBI’s gonna come and see you about your “models”… Unless it’s depleted urainium… I got some of that laying around here somewhere’s… It’s legal to posess, BTW…It just has to be registered and you have to promise not to “abandon” or scrap it without first telling the scrapper that you have DU in the junk you’re selling him…

However, I digress…

Lead is ok to use… Just don’t suck on a piece of it while you’re trying to quit smoking or something…

This was my solution on the same kit.

I think that cost me about 20p.

Saw this idea in a review of a Fisher kit, and just thought D’oh that is so simple.

Karl

This area either side of the nose wheel bay is the ideal spot for the weight.

To get the correct weight you have to dry fit the main parts together, along with the undercart and then add weight equally both sides untill the nosewheel sits properly. Then add a little extra for luck.

I would use the metal undercart stuff for this kit and don’t even think about putting weight in the engines or around the engine nacelles. They are more or less within the same line as the main undercart and won’t do anything about tail sitting.

Hans is right. Lead shot or very small fishing weights are the best for this kind of thing. Putting money as a weight into models is not very good economy ( I’m a Yorkshireman - I know) and leaves you a few vital pennies short of that next model… do you break open the prize winning kit or…

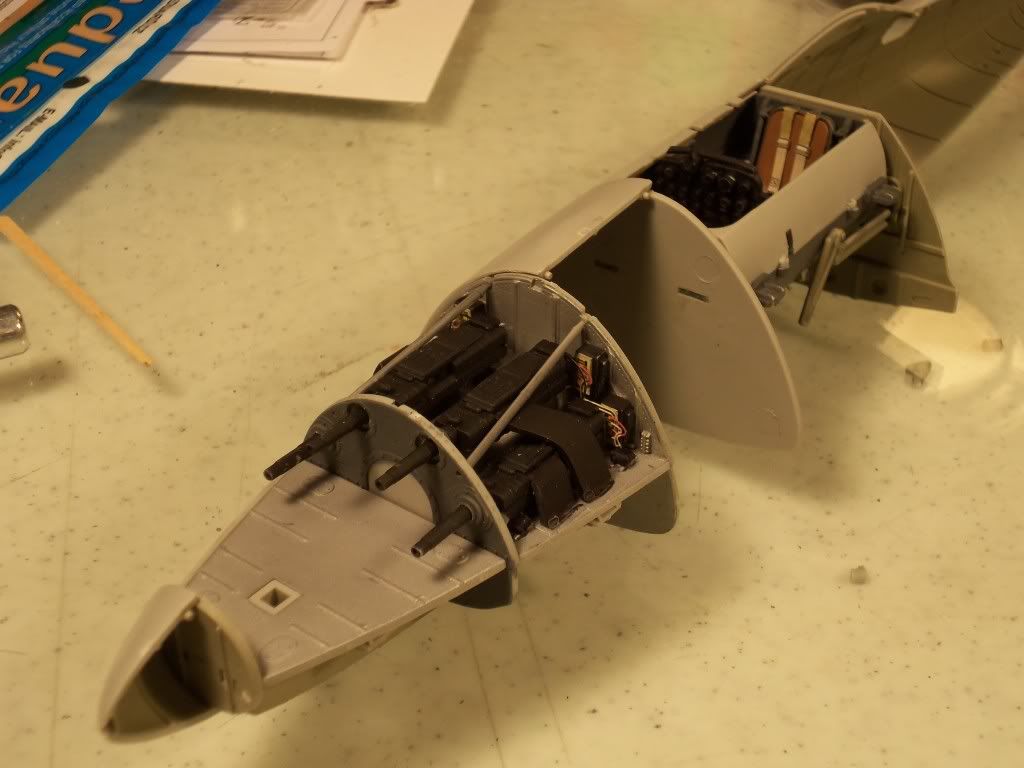
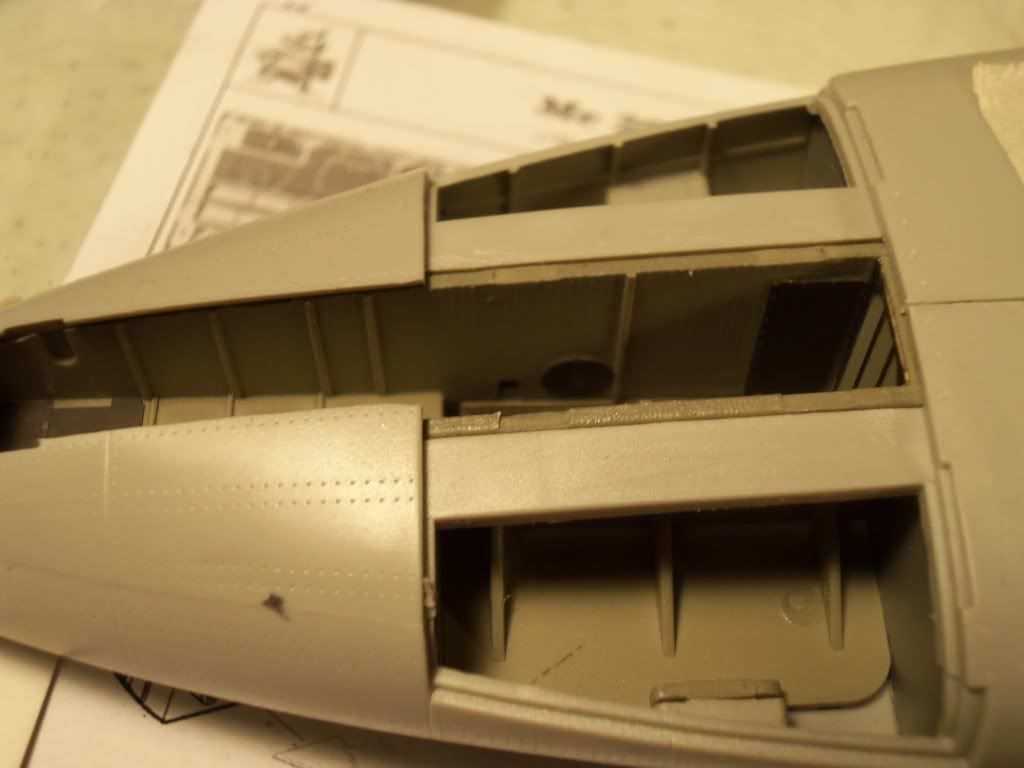
This model needs lots of thinking about when it comes to the painting. It is best to paint lots while on the sprues. This does lead to the downside that you will have to touch up and clean parts once assembled and you may need to do lots of repainting/spraying. This is where the dry fitting comes into it.

OOB with no extras this is a very good kit fit wise and there is lots of detail, with Eduards big ed set and the right colours this turns into a cabinet stopper. You may consider a mirror for it to sit on that will reflect the wheel well detail. Also the RATOGs add that little extra.

Now, the colours. Trumpeter tend not to give the correct colour codes and the colours the Luftwaffe used are always a hot debate.

Having had access to original chips and painting orders I have managed to get 100% matches from the Vallejo MOdel Colour paint range.

For the interior you will need:

Cockpit interior - RLM66 - VMC 70866 or Vallejo Model air 71055 (70866 is 100% match)

Everywhere else inside , wheelwells cockpit tub exterior etc RLM02 - VMC 70866 or model air 71044 (70886 is 100% match)

Exterior Undersurface

Either

RLM76 - VMC 70907 (100% shade match)

Or

RLM99v.1 (yes it does exist) - Not matched as yet, but FS34583 is a 100% match.

RLM99v.2 (yes it does exist) - Not matched as yet, but FS34672 is a 100% match

That should give you a starter.

James

Hey Guys,

Thanks for all the help.

Hans, this is the epoxy I was thinking about. Since it’s Rider’s brand a lot of guys may not be familiar with it but it’s just your basic 5 minute epoxy. The directions don’t raise any concern about excess heat during curing. Remember that 1/24 scale FW 190 I did? When I replaced the kit gun tubes I used copper tubing and fixed them in place with this epoxy. It seemed to work well and didn’t give me any heat problems on the wing surfaces above or below the gun tubes. But, that was a small amount and here I was planning to just lay in the lead and pour some epoxy over it so I’d be using considerably more of it. If anyone thinks heat may be a concern maybe I could just coat the pellets in epoxy and lay them in a little at a time? I would say a half hour should be sufficient in between applications since it’s 5 minute epoxy, right? But it would be better to be confident that heat won’t harm me. I like the bag idea, as long as I can get around the heat thing. Personally I don’t think it will be a problem, but I’d hate to FUBAR the thing.

I will test fit everything a gazillion tmes of course. I use exactly the same method you do, taping things together to see what’s what. I think the actual gear legs will work well for checking. They fit pretty good so as long as I avoid too many in and outs I should be OK. PLus it will be the actual added weight from the metal nose leg. Or, I do have brass tubing as you suggest.

Tom, I’m with Hans. Thank you very much for the help, but what’s your point?

Karl that’s an excellent idea. The only thing that would worry me is Hans’ concern about what happens if it breaks loose later? That’s a pretty big chunk to have rolling around in there.

Snap, I agree about lots of thought before painting. Right now I have it narrowed down to two schemes, Adolph Galland’s JV44 bird, or Rudi Sinner’s JG7 craft. Both are similar so the preliminaries will be the same and I’ll definitely try to paint as much pre-assembly as possible. For things like wings, engines, flaps, etc, I’ll take them off the sprue but pre-paint them as sub assemblies. There will still be lots of touch up but I like that part anyway. Those final finishing touch ups are always fun for me. I’m not sure I’ll use the ratogs. Didn’t those drop off after take off? As I said earlier, I like to model my planes about 20 minutes after touchdown at the end of a mission. The ratogs would be long gone by then, eh? Now Snap, you and I have had the paint conversation before so you know I’m using Model Master enamels, but I do have all the RLM colors. I believe you said your research showed MM paint to be over 90% accurate for match? But I’m using the colors exactly as you called them - RLM66 for the interior, 02 for the wheel wells and other interior spaces, 76 for the underside and I have both the topside colors (I think 81 & 82, but I remember checking and I know I have the correct combo).

Now, Snap and Karl both said they’ve built this kit, so I’d appreciate it if you’d post me a photo of your finished model. I think that would be a big help, so let’s see your stuff, Brothers.

Gary

Just outta curiousity, I went and got some of that stuff a little while ago too, just to test it (My boss is paying for it, Used the company charge account at the hardware store. I’m sure I’ll have a work-related use for it, so no Bad Karma points). It didn’t generate any heat to speak of… I’d do what you suggest about “layering” it… Should be fine…

Excellent, Hans. Thanks for the test. With that bit of info I’ll go ahead and use the epoxy and not worry about it so much. It will still be a bit before I get that far, but I’ll post a pic or two so you guys can see how it worked out. Now where DID I put that buckshot?

Oh yeah, if your boss likes to pay for stuff let’s see if we can come up with a work related use for a Ferrari.

Gary

I’m hopin’ he’ll leave me his Beamer…

He’s 88 years old and I want it… You know… To take care of it and always cherish his memory by keeping it on the road in his honor…

Look at that. Mine’s black, too. [:D[