Yes it is I, the most random on-and off poster. I have decided that being at school should not stop me from building and painting my models!
My first project, will be a M270 that I hope is destined for the desk in the ROTC office. I decided last semester that a well built model is needed there, since the cadre’s children? have all submitted their own offerings (and unfortunately they are all broken and weird looking). As a grateful cadet who receives lots of help and paperwork from the office staff, I decided that I too, should submit a model. However mine will be securly attached to a base, which will be velcroed down to the desk top so that others will not inadvertantly knock it off.
I was at first thinking about doing some real armor, but then I decided that I should model something from the Field Artillery, which is closer to my desired branch choice ADA.
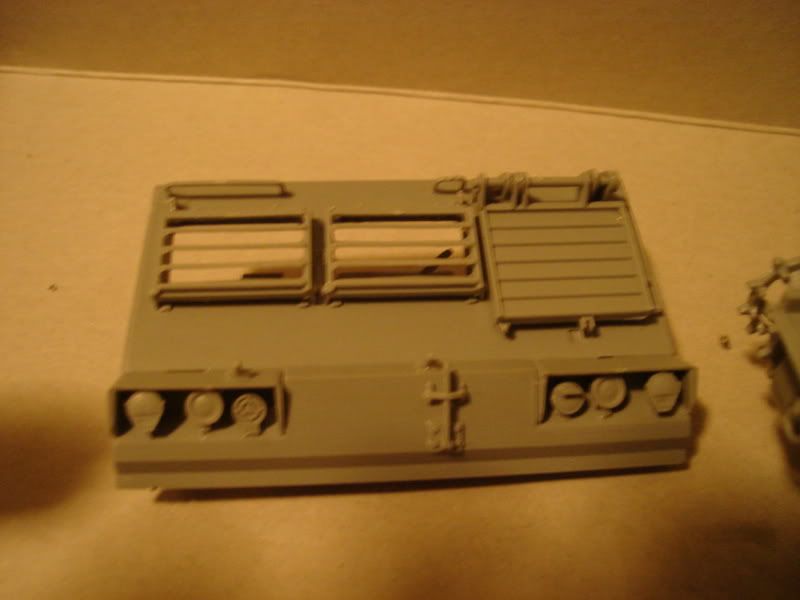
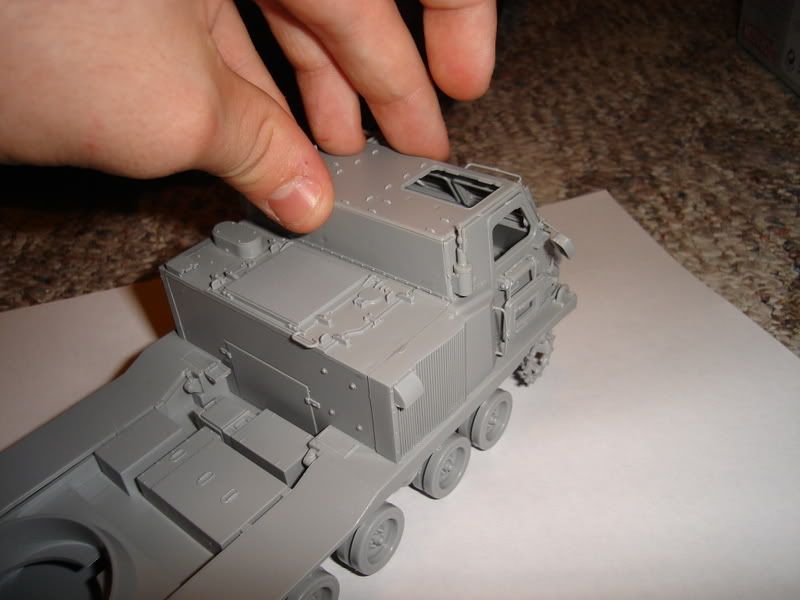
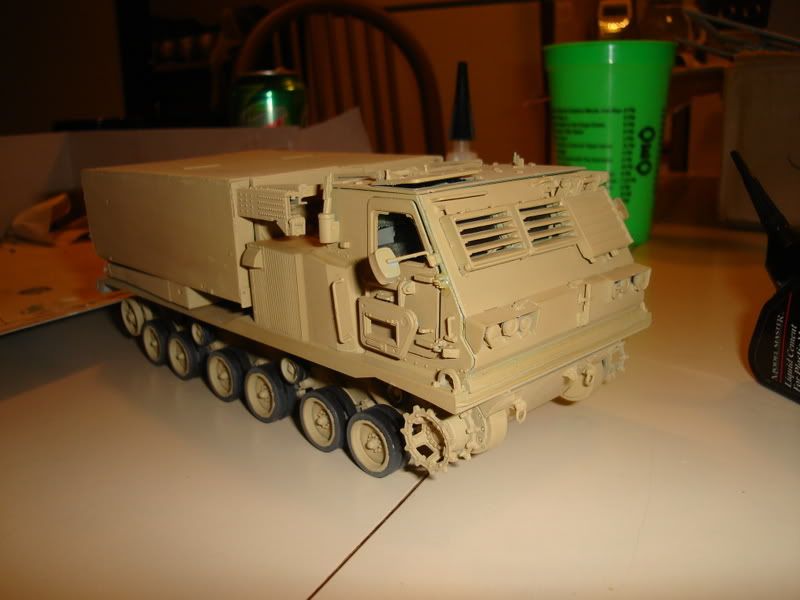
Anyways, I digress. The first few steps of this offering by dragon are somewhat complete; the front plate to the crew cabin, as well as the side/door plates. The chassis and suspension is also complete (they formed the usual first step (which I dread)).
edit Sorry for the low quality of the pics, but its all I got in me right now. I’ve got other events to consider like the MST3K club meeting tonight…
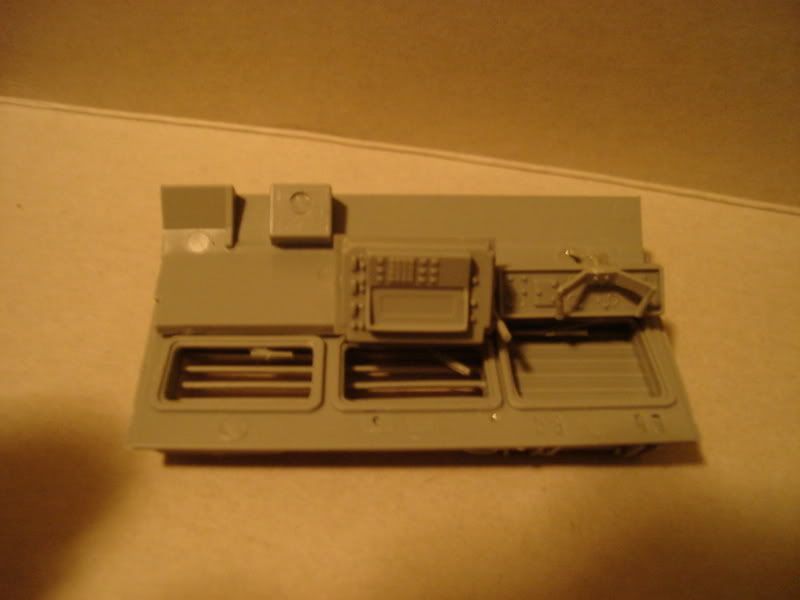
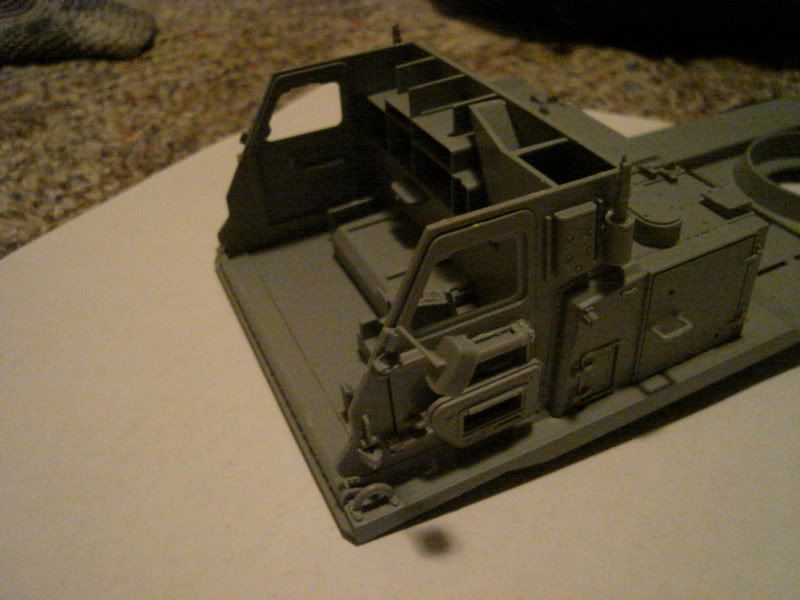
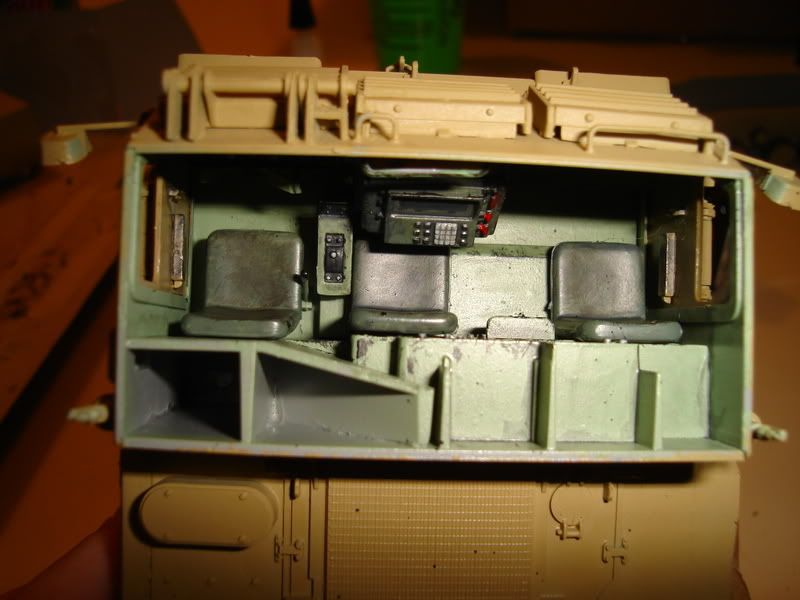
Ok, I’ve some more and better lit? I hope… Pictures. I’ve assembled enough sub assemblies so that the crew cabin is able to be mocked up. I’ve decided it kinda looks like a snowcat from…anyways. Tomorrow, I will be getting the paint I need for the interior, I will paint that, and I will also start priming the chassis as well. I hope to make it as a part of one of the first M270s deployed in Operation Desert Storm (thats how I’m going to mark it anyways, I don’t really feel like researching it to make it accurate.).
I’m also going to begin on assembling the lower bits to my TKS-D which is going to be scratched and kitbashed. But that will be done when the paint is drying this weekend!
edit I already know there is gonna be some fun filling and sanding to remove some of those seams on the box behind the cabin.
I’ll start painting this beast today, however I have several observations about the kit itself.
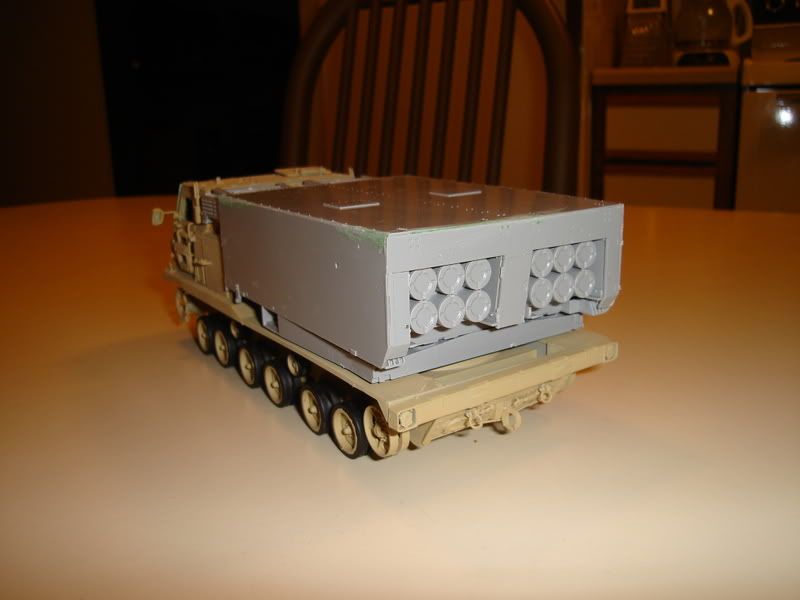
This seems to be an older Dragon offering, and some of the pieces don’t mesh well in practice. The primary problem is the missle box on the back of the track, the instructions aren’t very clear, and many of the parts simply don’t fit where they are supposed to without signifcant modifications. In fact, when I assembled this subassembly, I ended up leaving most of the parts off since they were frustrating and would be impossible to see without the box in either firing or loading position. There are lots of alignment pins and slots that need to be extesively looked at in order to make sure you are putting them together right. Another problem prevalent throughout the model is the heavy connections to the sprue-something that I wasn’t expecting in a dragon kit. Some of the kit pieces are small and thin, and have connections to the spure that are bigger than the diameter of the piece! I broke several parts trying to separate them from the sprue. All in all though it goes together well, there are some fit issues, and some pin marks that need to be removed, but other than that it seems ok. Just be warned, you will be frustrated with the missle pods and their difficulty to put together.
Once I get motivated to paint it, I’ll post some pics. I’m trying out the mm acrylics for the first time on this beast, so we’ll see how far I get with them.
On that note, any opinions on which is better? MM Acrylics or Tamiya Acrylics?
The MM stuff seems pre-thinned ready to shoot out of an airbrush but the Tamiya needs some thinner.
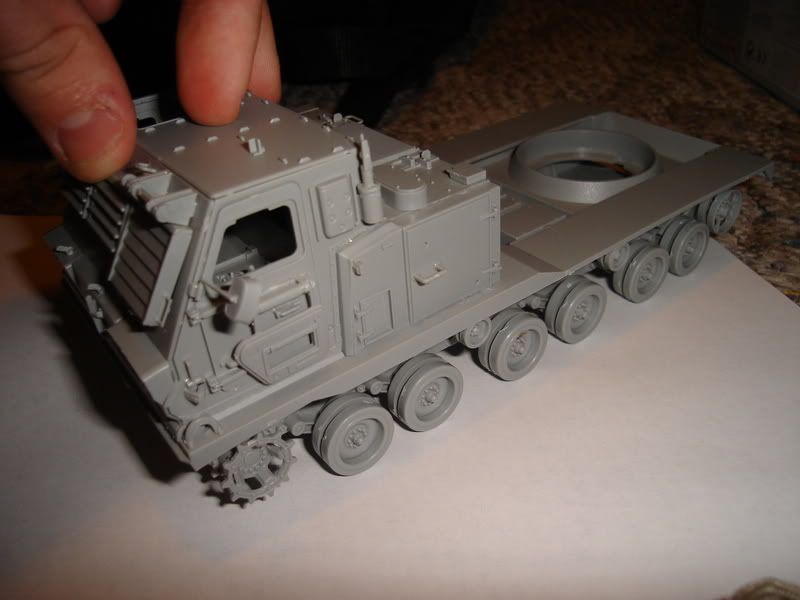
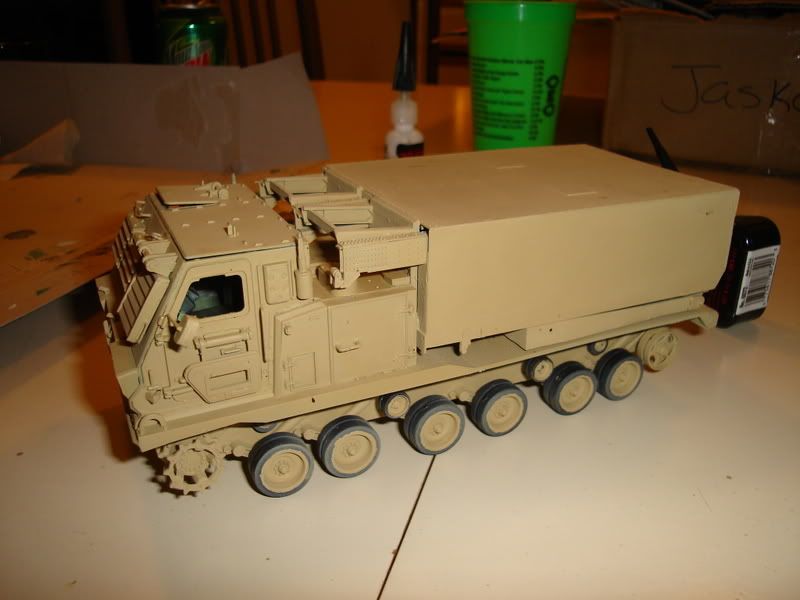
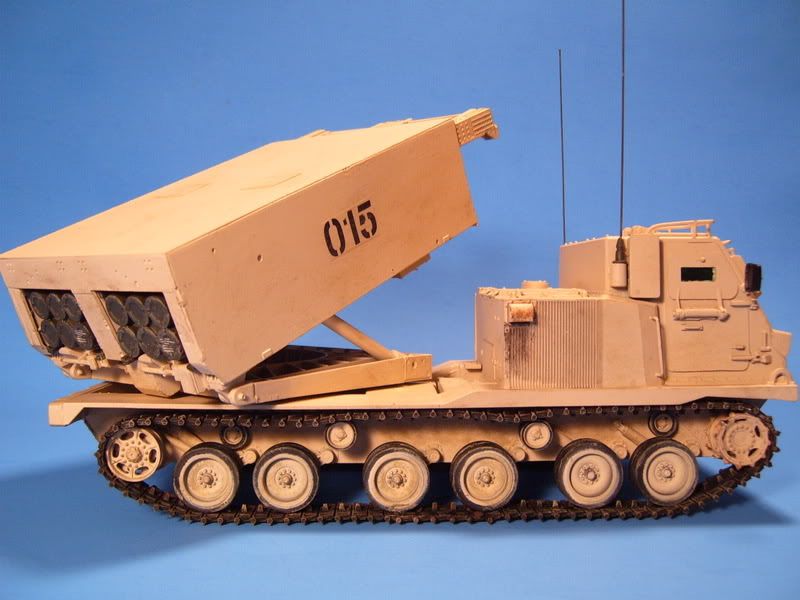
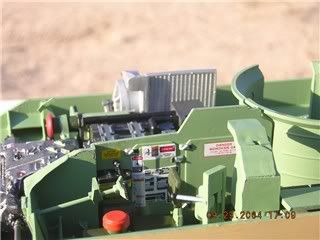
I’ve got almost all the base color painted on. As you will see, I haven’t touched the missle pod with paint yet, but thats because I’m still working with filling gaps. I also haven’t weathered anything yet-and the tracks have yet to be painted, but oh well.
Oh yeah, I know the wheels suck…I hate painting rubber tires, but I’ve found a different way of doing it…so hopefully this is the last time.
Looks like I won’t be going anywhere for a while…it started snowing last night…and I was airbrushing on the porch. Looks like I’ll either have to jury rig a spray booth or wait for the snow to go away and the weather to warm up (in like 5 months).
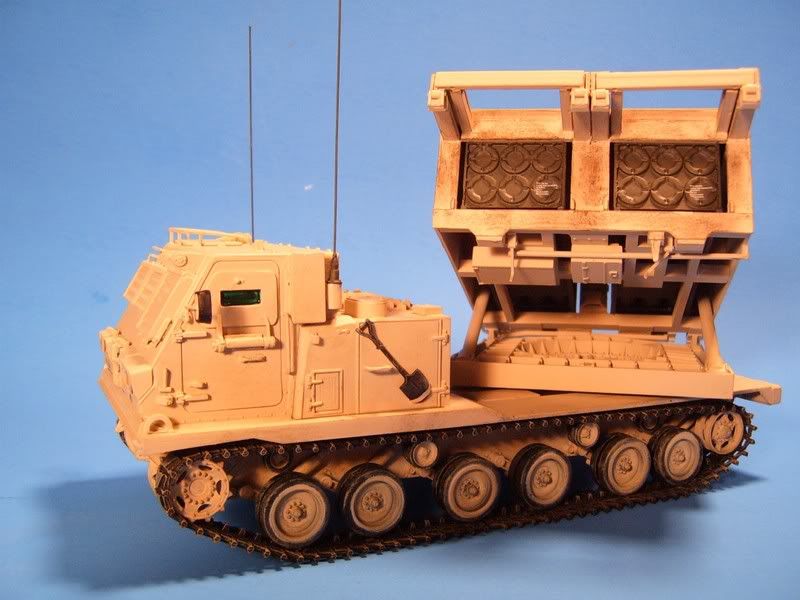
Ok, I’ve got some more pics for you all. There are some issues with the missile launcher box, but I’m rather fed up with it, so I’m just gonna move to complete this model. Got the exterior assembled, and almost all painted. The interior is fully painted. I think I’ll work on it a little more tonight, but I’m done with the airbrush-its difficult to paint in a non-controlled environment like your outdoor porch in Fargo…
I’ve seen several pics where the exterior color has been painted over the doors and window-armor, I decided to go along with this; even if not all of them have it.
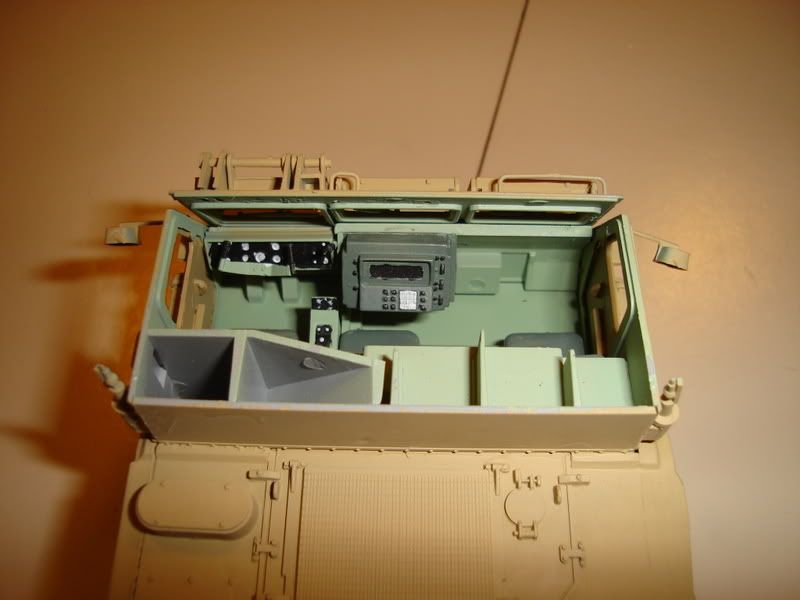
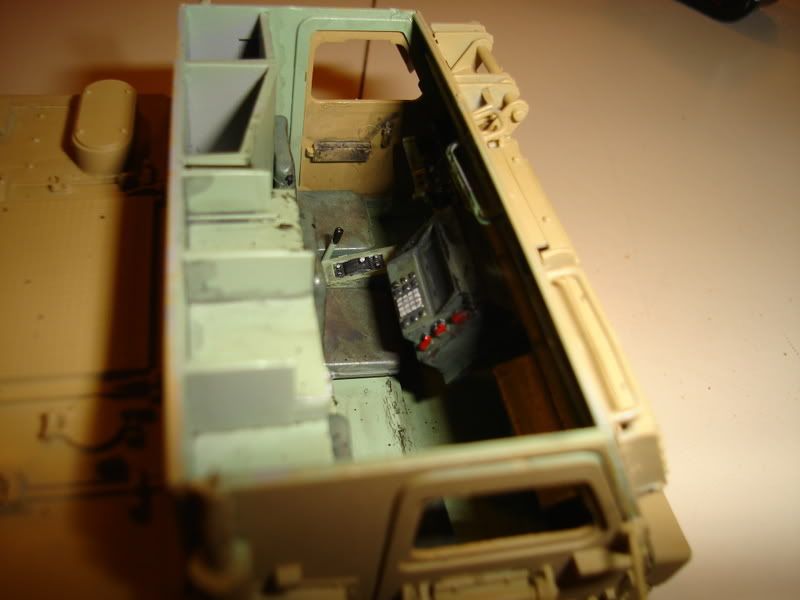
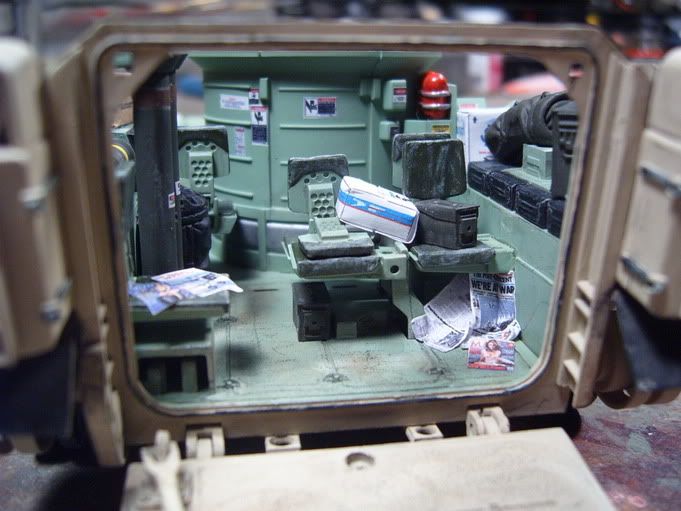
I think I over did the interior a bit, but since even with the windows and hatches open, you can hardly see in, the overexaggeration will work out a bit. Right now I’m trying something different with the tracks, so I won’t have any more progress up for a bit.
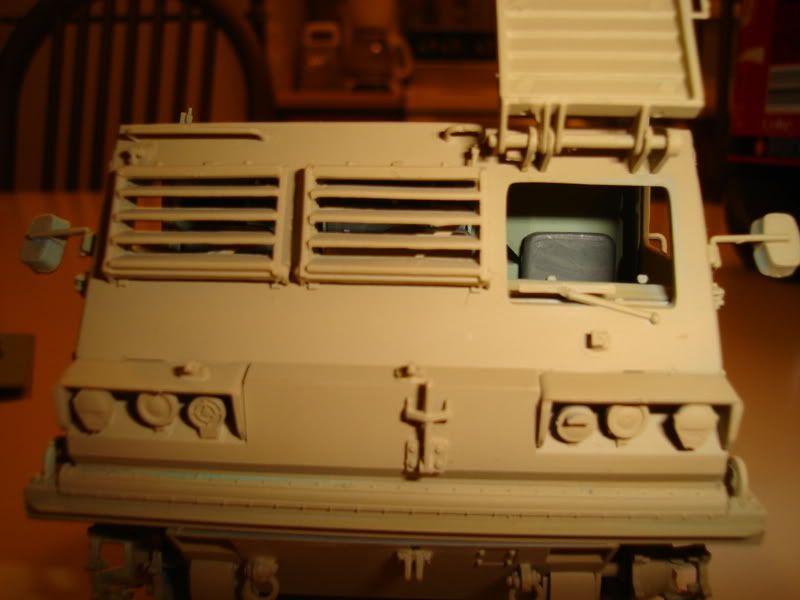
No, the inner surfaces of the top hatch, side doors, louvers, and side door armored window panels are the same as the exterior color of the SPLL (Self-Propelled Loader Launcher). On a NATO camo one, they are green. On a sand one, sand. The interior is painted Seafoam Green, as below.
Also, if you plan on having it in a firing position with the LLM (Loader Launcher Module, the box on back) up, all the doors, hatches, and louvers should be closed. Nothing is open when in the firing position. With the LLM down and/or traversed to the side in a reloading configuration, the doors, hatches, and louvers could all be opened up to show the interior.
Lastly, the M26A1 rocket pods are always a dark green color. Any that are sand are empty training pods and not live rocket pods.
If you need any other info, just let me know. I am an artillery officer in the US Army and have been assigned to MLRS Bns a few times over the years, my last job (still on paper) was the Bn Executive Officer (second in command) of an MLRS Bn; 1-21 FA (MLRS) at Ft Hood, TX. I have been all over these vehicles, from top to bottom. I’ve built a bunch of the DML models of them too.
Here is the last I did for Command Sergeant Major of our sister Bn (2-20 FA (MLRS)) as a farewell gift.
Though it’s too late to detail the interior properly the next time he is going to build the M270 he should get the Eduard M270 Nato interior set which will have lots more detail than what Dragon supplies. Though it would have been nice if someone came out with a resin interior for this kit though.
Voyager does an extensive PE upgrade set that replaces much of the interior. They also do a set for the M26A1 rocket pods too. Someone else does a resin/PE interior/exterior set too. I just can’t remember who (not near home to check; Iraq). It includes heater hoses, seats, radios, and lots of other items missing from the kit. I have it, along w/the Voyager M26A1 Pod PE set for my next build too.
About the rocket pods, I hadn’t yet gotten to them at the time that photo was taken, so I am already working on them.
If I were going to build this to keep, I might have considered doing up the interior with some dodads from the AM producers, and admitedly, the Dragon interior needs some TLC from the AM guys.
I will not be displaying this with the launcher elevated-I’ve observed the other AFV models on display in the ROTC office, and none are in to good of shape, so if I decided that if I kept the launcher stowed, there would be less for loose jackets/backpacks/baggy ACU jackets to grab ahold of. Another reason, I was having problems fitting all of the crap that dragon wants you to put inside the launcher without major surgery. I think I’ve heard of this problem elsewhere on the forum, so I left much of it out.
Prime portal clued me onto the fact the door is not seafoam colored, but exterior colored-from there I extrapolated, and figured that the same applied while in the desert.
I think I’m going to keep weathering way low on this kit, just a medium tan/dark tan wash to bring out details a bit more, and perhaps lightening the base coat a bit with a drop of yellow/white so it has a bit more variation, but not much.
Personally, I would hope that someone would produce a new model of this vehicle, but that might be to much to hope for…along with some other new injection modern era kits, non-M1 Abrams varients…
Helmets you could just set on the seats and the baggage can go on the top but you can set things like canteens on the floor or lean the crews weapons against the back wall etc… But until somebody does a PE modern battle harness and soft BDU’s that you can drape on surfaces all you can do is try to make the harness’s out of lead foil. You can make a simple wood base if you have access to a woodshop and to protect your model from other people touching them make the cover out of plexiglass.
I did consider those things, and even considered picking up one of Tamiya’s kits with the MRE boxes and stuff, but decided against it. It is difficult to see into the interior with the doors shut-albeit much easier to see in than most AFVs that people super detail. I think I’ll just leave it pretty basic though. My passion doesn’t lie in super detailing, but in Polish WWII armor…and I’m anxious to return to my costly mistress (I mean Polish Armor). This was just a project on the wayside that I wanted to do (and I bought it on sale at Squadron for $25). And at the moment, I would just really like to finish this thing and get it off my kitchen table (I have to be very careful, as I don’t have a workbench here at school).
It will probably end up on a base, and if I get my way (which I probably won’t) I would velcro the base down. If this model were something cool, or really expensively done up with AM parts, I would go the plexiglass route.
…it just so happens that I am working on the MLRS too. I am using the Voyager Model P-E for the interior and the rocket pods, and the Royal Model kit which includes the hoses, seats, and other detail. This is atypical of me- I normally build models straight out of the box, with perhaps a few goodies thrown in from my spares box. But I am making a big comeback into modeling after several years and wanted to build this model for a while.
Is there any one here has completed the P-E replacement louvers from Voyager? There are more parts in those things than I can count! I am a bit gun shy to start connecting the major parts as I haven’t fingered out a way to make sure the louvers are parallel to each other and vertical to the support stanchions. Any help, pictures of in-work-assembly would be greatly appreciated.
Any idea on where I can find the interior placards? I’ve searched several boards and came to the conclusion that I am going to have to make my own. I ordered up some decal paper for the ink jet…never tried that route…any forewarnings or sage advice on that?
Anyway…this is could be my best model ever but one thing is for certain- it is going to be the most expensive (if I include the amount of money I spent at Micro-Mark this month to get the tools to work with P-E)
The interior placards wouldn’t be to hard to reproduce on your own-you can either paint straight on the model, or you can use some spare PE or plastic card to imitate it. Have you checked out prime portal for references yet? They’ve got tons of pics of M270s in NATO camo there, as well as a few European owned ones. Let me know how your rocket pods go together-they were a major problem for me, I just don’t think there is enough room inside the launcher for all that suff Dragon wants you to add…
Making interior placards is pretty easy. All you need is white computer printer decal paper. Check out Papilio Art Supply for some, or you can get it from Testors and MicroMark as well. Next, search images on the web for warning labels, placards, data plates, etc. There are lots out there. Copy each one, paste it into a graphics program (I like Power Point), resize and print. They are that simple. Here are some on my M2A2 ODS Bradley and an M7A2 B-FIST. They turn out great. I use this method all the time.