That is an awesome interior! Very good job, and exactly what I needed for a reference. Thanks guys! Can you send more pics of your Bradley? It is a work of art.
A quick internet search turned up all of the labels I could ever want. I even found a site that lets you create your own. I made my first label…it has a pistol as an image, and in big letters it says BE CAREFUL! And then I added text that says “DO NOT POINT YOUR GUN AT YOUR FRIENDS”…lol, I thought it was funny anyway.
Alright, I’m closing in on being finished-the tracks were NOT COOL at all. Dragon should definitely work on updating this kit to the level of some of their current releases, especially the tracks. They are difficult to fit together, and most had to be trimmed down so that they would fit together somewhat-otherwise the were very tight and very difficult to get stuck together.
MajorEET, I would suggest looking at the Fruils or some other AM brand for better tracks (since you are already committed to super detail). These tracks weren’t as bad as some, but they weren’t easy either.
Anyways, got some details on, the kit ones work fine, release well, and for the most part lay flat without to much application of Microsol.
I’ll probably do another wash, somewhat darker, and maybe spray a light coat of paint to simulate dust since I don’t have any pigments/pastels that I can apply at the moment. Then a coat of flat lacquer and its done!
Thanks for the heads up. Your MLRS looks really good. How was the fit of the interior? I have a set of the Big Foot tracks (AFV Club) but I haven’t checked to see if they will fit the MLRS drive sprocket. I really hate the length and link type of tracks- give me vinyl tracks anyday!
Another thing I like are the kits where the rubber on the road wheels is actually rubber. I think painting road wheels is the bane of armor modeling. Are there AM kits for road wheels with the rubber layer? I think the only kit that I’ve built that had these was the special edition of the Academy Merkava 2. They sure are nice.
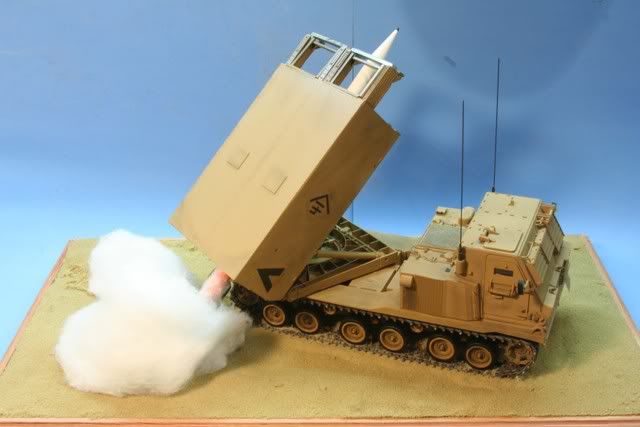
As for the rocket box, I plan on making my model in a diorama with the HEMTT doing a rocket reload, much like the box art. Hopefully that will rid me of the hassle of dealing with the poor fit.
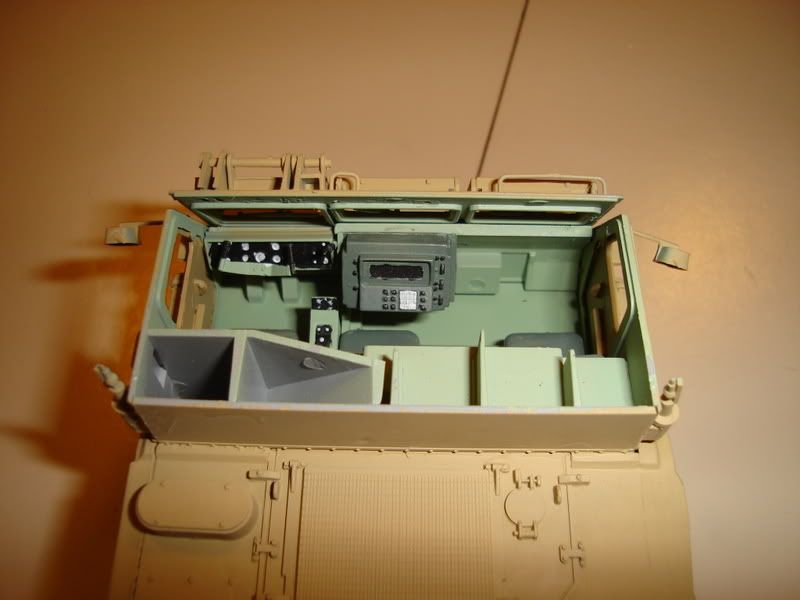
The interior fits together well, I was able to leave mine half assembled through much of the process, leaving the front plate unattached was useful, because then I could take it off, and have easier access to the back panel-it also allowed me to put in the windshields easier as well.
However, there is one major problem, accuracy wise, but if you are headed towards AM I don’t know if you’ll encounter it much. I’ll post some pics describing it.
I have a feeling that the M270 and M2/M3 bradleys share a chassis, so you could swap treads between them.
if you notice, the armrest/control panel thingi on the driver side, it doesn’t extend to connect with the ‘dashboard’.
However, on a real M270 it appears to extend all the way.
That and the fact that much of the interior details are not replicated are the big problems.
the photos of my model come from my photobucket (www.photobucket.com) account, and the other one is from prime portal. you can link photos that are already on the web into your posts by typing
[IMG-] paste the url [/IMG-] (make sure you remove the hypens first otherwise it wont work-I only did it so that red x’s wouldn’t show up.)
There is no way to attach photos from the hard disk?
By the way, I did a trial fit of the AFV Big Foot tracks to the drive sprockets of the M270 and they fit snuggly.
I see what you mean about there being a panel missing in the model. It seems to me that I was told that the photos on prime portal are of M270s being upgraded. The Royal Models AM kit does not directly address this missing panel, but it does add a lot of detail to that console. I think I can scratch up the missing panel with no problem.
Have you noticed in the prime portal photos that the bolt heads and other fasteners are unfinished? Is this normal for the M270, or is that these are new hardware?
Your model looks very nice. I am a long ways from getting into the big parts. Just detailing the doors took me as long as I thought the whole model should have taken…of course, I haven’t done this for a few years so I’ve been going slow.
Thanks for the compliments, I’m sure if you saw it up close you’d notice the wash that I applied is a little sloppy in some places
I think the problem with that panel, is not that it is missing, but that dragon made it too short lengthwise-it sits way to far back in the cabin, something that I didn’t realize until to late.
I unfortunately know of no way to get files online direct from the hard drive.
You have to host your pics on the web for them to be viewable. Your hard drive is not a network drive and is not accessable by the website. Photo Bucket is a good site to use.
The shiney bolts and fasteners you see are new ones. They will be overpainted when the vehicle goes in for a repaint, usaully about once a year.
The M270 is based on a lengthened Bradley chassis. The running gear, road wheels, track, and most of the automotive components are the same as on the Bradley. To make Bradley rubber band kit tracks fit it, you need to add 4-5 links to them.
The center console is too far back in the Dragon kit. Move it forward and it will look fine.
Thanks for the compliments on my interiors. To see more of them and my other models, you can check out my Photo Bucket site at the Showcase II link in my signature block below.
Thank you for the tip on moving the console forward. I would have fell right into that trap too.
HeavyArty- wonderful photos man! You are an awesome modeler. It is models built by people like you that got me into this hobby some 35 years ago. Isn’t this how it usually starts- I was about 8 years old and mom and dad took me to a hobby store. The shop had some built models on shelves and some hanging from the ceiling and I was H-O-O-K-E-D. They looked so cool, I had to build one, or two thousand as it turns out.
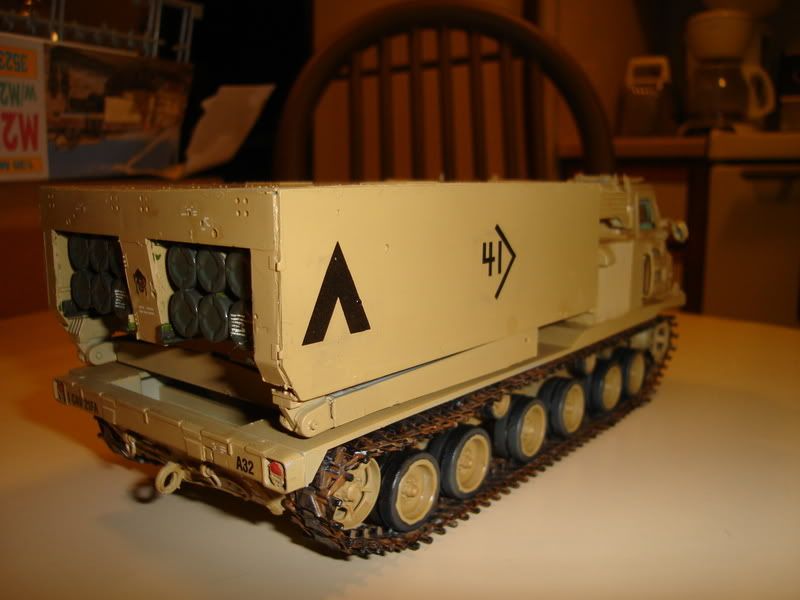
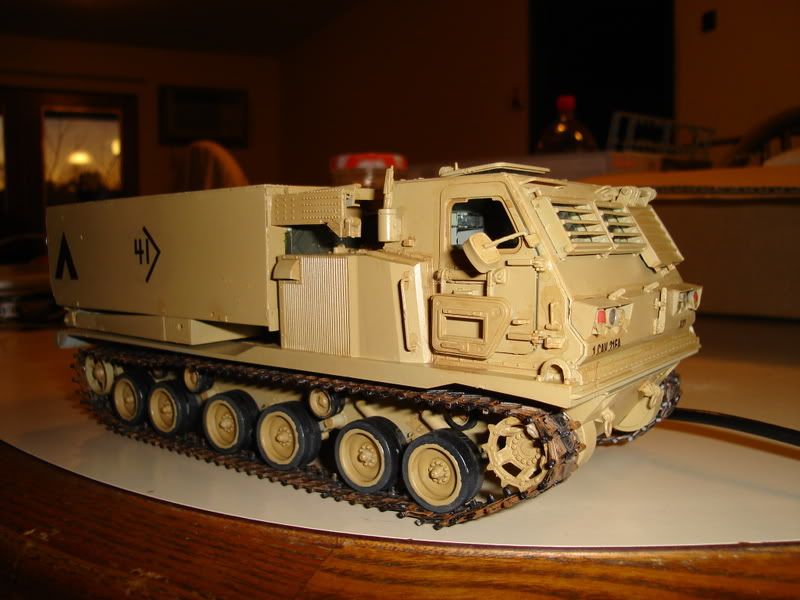
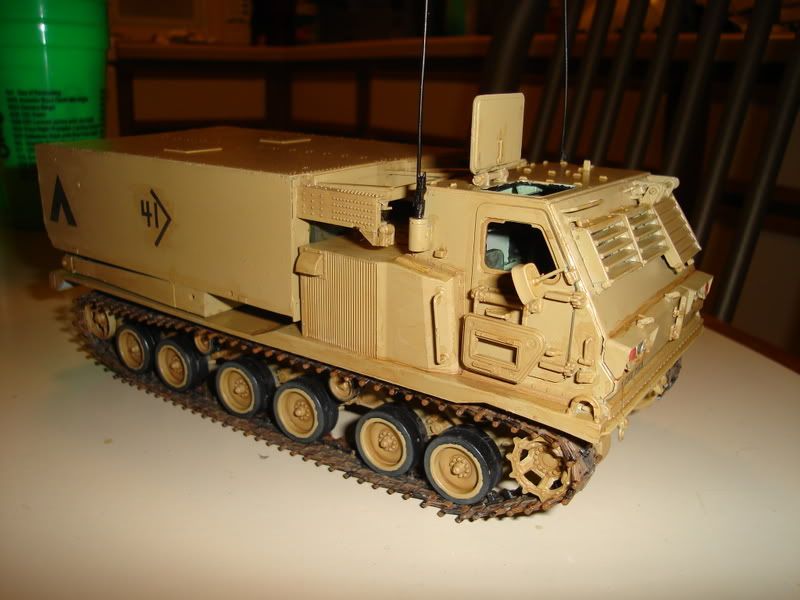
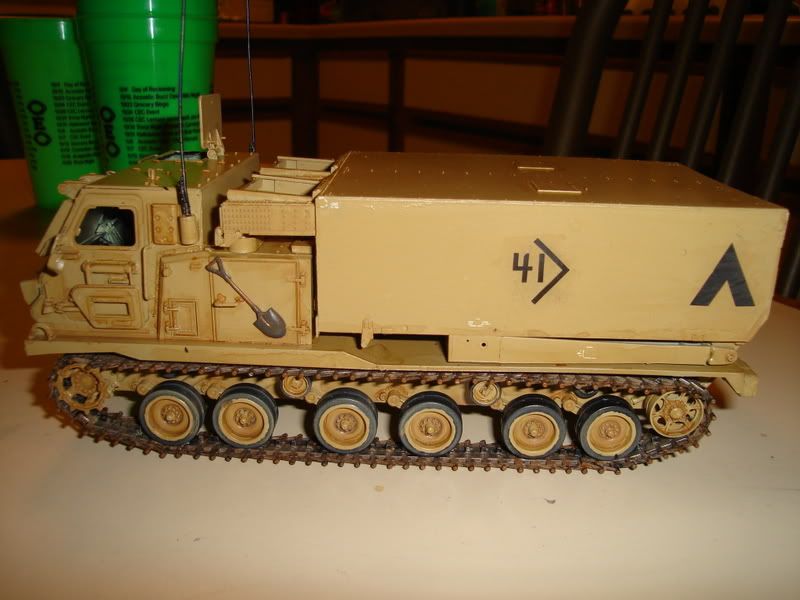
Heavy Arty, something I’ve always been curious about-what is the meaning of the large inverted ‘V’ and the number on the launcher box? I’ve only seen these on vehicles in desert camo-is it some sort of IFF code? Also what are the louvered boxes (I think they’re called CIPs) that they’ve been attaching to everything?
Would an MLRS from Desert storm have a CIP on it? Would it carry one of those large orange signal panels on the roof?
Thanks redleg! I’ll run over that exhaust when I do a dark grey wash, that should pop the grill out a bit more.
Heres a question for either you or Gino, is there a rift (or something similar to inter-service rivalry) in the FA branch, between the tube guys and rocket guys? (not that it matters since ADA is much better :P)
OK…In my day, the rocket guys were on Pershing & Lance Missiles (they were just finishing phasing out the Honest John from the National Guard). They were a different mos and a different world. Officers were training as FA Cannon or FA General (missile and tube). To some extent in those days you were lightining or thunder
As the MLRS came into the system, it phased out the Lance but mainly the M110A2 8 inch SP howitzer. The MLRS is also “deployed” more like cannon artillery. Lastly many of the initial units were old 8 inch units so they were full of tube guys.
We now all coexist as one happy family. We are all the “King of Battle”. Gino was on M109s before he went to the MLRS. We all love the smell of muzzle blast. Some comes out the front…others out the back.
As far as those funny guys with the rocket through the cannon…I will reserve comment [(-D]
As my older brother Redleg12 states, we are all one happy family now. There is no real rift or any issues. FA officers go back and forth between Cannon and MLRS now. No comment on the funny missile and cross cannon guys either (uhm, duck hunters, uhmm [XX]). They were once all part of the FA, then we cast them out. Now they are sort of coming back since their school is being moved back to Ft Sill and combining w/the FA school as the School of Fires. We’ll see how that goes.
The CIPs are Combat Identifier Panels. They show up as a cool square in thermal imagers to ID them as friendly vehicles. They were used in OIF, but were not around in ODS. They were actually developed after ODS due to a high number of friendly fire incidents.
The Numbers are BN ID #s. Each unit has a specific number and then Batteries/Companies have a subsequent #. For example, my Battery number in OIF 1 was 41. My BN (1-39 FA (MLRS) numbers were the 40 series. I was A Btry, so my # was 41, B was 42, etc. Some units used a 3 number system that IDed PLT as well.
The chevrons were used to denote PLT. ^ up is 1 PLT, rt > is 2nd PLT, v down is 3rd PLT, and lt < is 4th PLT. A slash \ meant HQ. The chevron faces the same direction no matter which side of the vehicle it is on as well. So both sides will not face forward, backward, etc. They also rotate around teh # depending on their direction.
So 41> was a vehicle from 2nd PLT, A BTRY, 1-39 FA (MLRS), which was my Battery in 3ID.
First off, I DO NOT miss working with CA glue! I knocked over an open bottle. Fortunately for me and several of my tools I had a bottle of debonder handy. What an ugly mess!!!
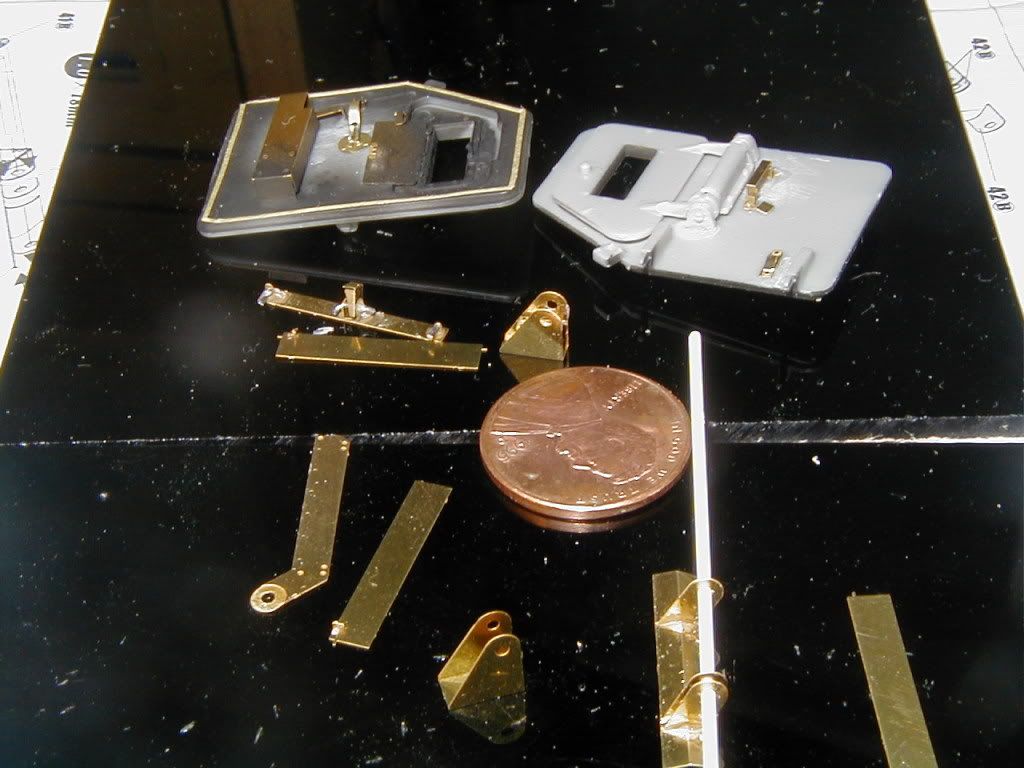
Here are the doors and the unassembled drivers side louver:
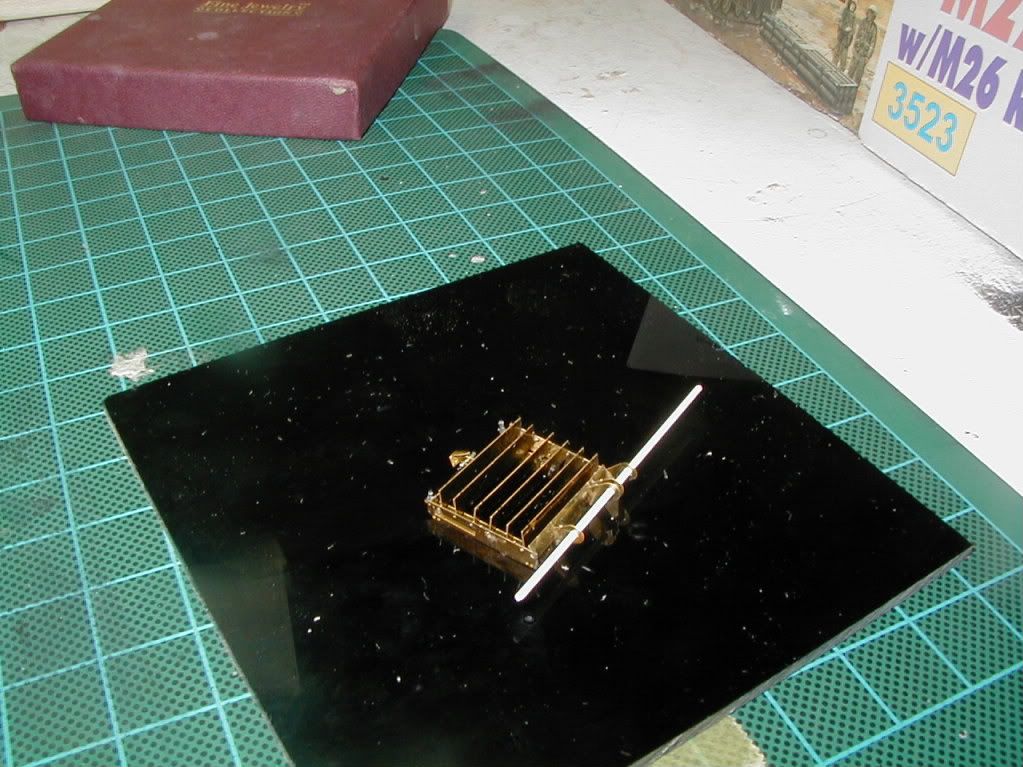
And here is the mostly assembled drivers louver…I hope it is worth the effort it took. The white dots are not lint, but rather x-acto blade indents from me cutting off the P-E.
WOW, that PE update set is already proving its worth. That is one spectacular model you are gonna have once you get all that brass on it. Are you going to do yours loading like the box cover?
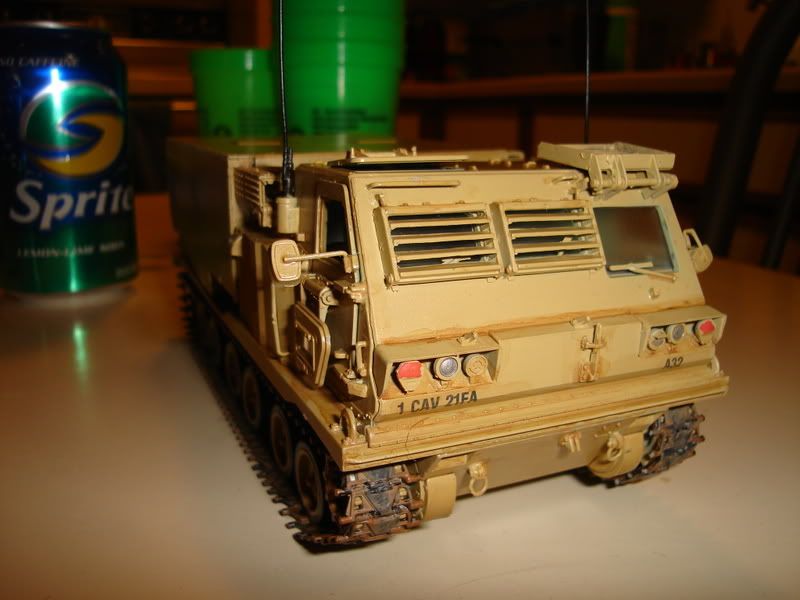
Hey all, heres my last pics of this build; I know the antennas are a bit out of scale, and i’ll replace them once I get access to materials that are a bit more reliable, but my attempts at sprue stretching were thwarted by dragon’s styrene. It’ll end up on a base somewhere hopefully!