M113A1 NASA Rescue "Complete & Mounted"

Space…The Final Frontier!!!

These are the voyages of the NASA Rescue M113. Something different for the old APC.

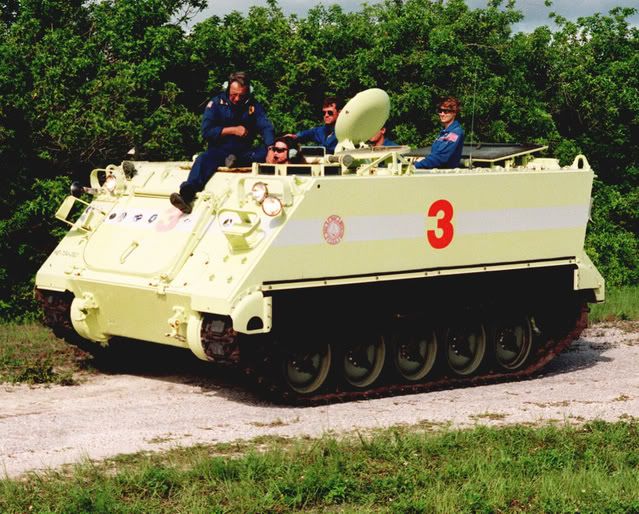
I will use an Italeri M113A! kit. First I assembled the base internals. After, I gave them a coat of Tamiya Cockpit Green (Vomit Green for those who spent time inside one) and the floor plate painted with Alclad Brushed Aluminum.

The kit decals were not correct so the decals on the engine compartment door were custom made.

Next I assembled the internals into the hull section, finished adding the smaller parts, added some scratch wiring and a scratch wall mounted radio switch. The actual NASA M113 has the center post and seats removed for more space to move around in full space suits.

I weathered the internals with Burnt Sienna oil washes and MIG pigment Urban Dust. The compartment latches were painted with Alclad Steel

The roof panel I added the hand straps made from some leftover PH and a cable which runs to the rear. The latches and pull cable on the back rectangle hatch was drybrushed with Alclad Steel. Then the roof was weathered with Burnt Sienna oil wash.

With the interior complete, the top sections are assembled. The M113 panels have a fillet type weld. Where the seams meet I used Mr. Surfacer 500 to lie in the seam and simulate the fillet weld.

Some of the side panels had areas with sink marks which were also filled with Mr Surfacer. All the road wheel axels and front drive sprocket were also assembled.

That’s where I am at for now. Time to put all the little detail parts on the top section, work on road wheels and yes…tracks.

All comments are welcome, thanks for looking.

Rounds Complete!!

Interesting subject. Looks great so far!!

You have a knack for choosing unusual subjects redleg, I’m sure this one will be just as interesting as your past projects. Looking good so far, going to follow this one with interest. [;)]

Hello redleg12,

Interested in the weld seams and how the Mr. Surfacer worked. would it be possible to get close ups of them.

Take it there will be no camo for this unique build![:D]

Best Regards,

Looking great Redleg. Gotta love all the different types of Buckets out there. How about a Police/SWAT one next time? Keep us posted.

Oh Man… Another exciting subject from the Redleg workbench! You’ve sure been busy there Mike! Being a huge bucket fan, I have always wanted to do this version but lack of talents will most likely prevent that from happening and I will certainly be watching this one for sure!

Are you happy with the tamiya cockpit green for the interior? Are the benches (sans cushions?) from the kit? In the 1/1 photo, it appears that the inside face of the cargo hatch retains the original (NATO) color but not sure if that’s what I’m seeing (minor point). I am assuming that you’ll be keeping the driver’s and TC’s hatches open?

All you’ll need now is a 1/35th scale Shuttle Complex. [swg]

Irish - Thanks for your comment and looking

Bill - I guess thats my trademark. Model building is like a buffet. Most people go right to the prime rib. I try to look for the wild game, oysters and caviar.

The challange is the outside decals. Besides the big 3, I have to recreate the NASA Rescue logo and there are numerous Shuttle flight patches on the front and rear. Thank God for AutoCAD and Photoshop!!

There are a thousand M113s. I thought I would make it more interesting to go really different.

Mobious - Next round of photos I’ll try to get a close up and also post a close shot of the real deal. Thanks for asking.

Gino - As always, it’s a pleasure to have you stop in. I went with the NASA M113 since one of my other likes is the classic space flight models of the 60s. Though this would be a good way to combine them and give a different twist to a common build.

Thanks again.

Rounds Complete!!

Kevin - The buket in OD has been done 1 to infinity times. As far as lack of talent…I’m touched and humbled coming from a modeler of your skills.

The cockpit green is not perfect but is close to the vomit green we so loved!!! The kit does come with the seats and cushions…a plus…

I have researched as much as I could. NASA has 4 of these. Some photos look like the cargo hatch with original color…some look like the are also vomit green. The lighter green makes the handles and latches show better soooo thats the way I went.

As far as hatches, I was going to display it in the rescue ready position as it is at the launch pad. The back door is open but the top is closed. The NASA M113 is pretty sparse on the inside as it is laid out to be strictly a rescue bucket. I know…I’m getting lazy…but I wanted to keep most of the attention on the outside…need some interior with the rear open. If I was going nuts with an interior…I would prefer to have plent of meat…The interior on the NASA units are just Spam.

1/35 Shuttle…Hummm scratch building the gantry would be worse than shipbuilding!

Thanks again for looking and as always I appreciate your comments.

Rounds Complete!!

Yeah buddy

Sweet track, bro. Cool subject too. I wouldn’t have known NASA was using M113s. Love the idea, though.

Who’d they get to drive them?

~J

jthurston - Every astrounaut as part of their training has to be trained to drive the M113. If there is an emergency at the tower, prior to launch, they get out of the shuttle, use an emergency slide with a basket on it, which slides down to the parking area for the M113, get in an drive away. Prior to every launch two are kept parked in the ready position at the launch pad.

They have been using these since I think the Gemini program. At first they were all green then all white and now what I have pictured.

NASA maintains a fleet of 4 M113 for emergency and rescue.

Rounds Complete!!

interesting subject and something new for me to learn… look forward to this build!

Well I began putting small details on the front of the M113 based on the photo of the #3 NASA unit.

These include tie downs made from scrap PH above the engine hatch. Ground down the molded in engine hatch handle and replaced with a wire handle and punched styrene mountings. Spare track mounts made from brass wire and punched styrene for the caps and cap nuts. Half round lift hook made from punched styrene. Compartment handle (next to half round) made from scrap PH.

Now the most important…the Italeri kit does not come with smoke launchers but the NASA unit still has the frames and mounts. Thanks to my good friend Gino, he had a spare set and sent them over. Spare parts all the way from Baghdad…a new first…Thanks Gino

Going a little further down I used Archer weld decals to create the welds on the bottom front plate near the drive gear housing. Also better view of the handle and spare track mounts.

On the top, I needed to cap the two antenna mounts. I used punched styrene for the cap and nuts. Also had to make a new front vent…the kit part went to lost parts heaven!!

Here is a close up of the front. You can see the Mr. Primer in the seams as a fillet but the plate edges are still visible. On the side panel near the top is a recess which I drilled out.

I began work on sizing and creating the outside decals. Usually on most models its just lettering. This had some different items for inside and a complicated outside set. Having some engineering programs, I scaled the side drawing using AutoCAD. The top length is a known dimension. By measuring it in the program and then on the model I can calculate the scale factor. Most programs like this allow you to put on the scale factor. Once I did…the top dimension matched that of the model. Now anything I measure is the right size for the model.

You can use this with any software for drawing that allows import of photos, allows measurements and input of scale factor. Save a LOT of time with the ruler and calculator.

I am doing the same with the front photo and a rear photo. This work is for those time when I can’t get to the bench but can do some computer time.

Once I finish the master sheet of decals I will post a copy for your viewing.

Road wheels are painted, track in the booth waiting. Things will stay slow as I will be off to AMPSEast next weekend so my next update may be two weeks out .

All comments are welcome, thanks for looking.

Rounds Complete!!

Making some good progress with the details, very nice. Looking forward to it getting the custom markings, that will really set this one apart. [tup]

Hello redleg12,

The NASA M113 is coming along nicely. The antenna covers look great. The punch set must be real handy for things like that. The comp program looks like it would be real handy too.

Nice to here Gino helped out. Was on Armourama site checking out some of the “Troop Talents”. A lot of neat builds.

Have fun at the AMPS East meet.

Best Regards,

Mo

great build so far, love the story behind the vehicle… looking forward to the rest!

Geez, I go away for two weeks and there you go again! This is just way cool.

I have no experience with the M113 or any of it’s variants, however you seem to be doing it justice. Just what color is it? Looks a little like the yellow green fire apparatus from years gone by.

If you don’t mind I would like to plagerize a little. A previous post mentioned a PD M113, well as luck would have it I discovered an Italeri LAV in my stash…

I’m thinking SLPD, the type of ride I wished I had on some warm summer nights [;)].

Do ya mind?

Bill and JMart - Thanks for looking and your comments

Mobious - The Waldron punch is very handy. Hope you have a better view of the weld fill you were looking for.

AgantG - Not at all, in fact I am humbled. If you do a search you can find some pics of PD M113s and other AFV vehicles. Dragon also has a set of Police figures.

Thanks to all for looking and commenting.

Rounds Complete!!

Looking great Redleg. Glad to help out w/the smoke launchers. They look good on it too. Can’t wait to see the decals and paint on it.

WOW, that looks excellent so far, Mike! I love those decals on the interior! The sceme for this 113 is definitely unique and unusual too!

This will be a fun thread to watch!

Are you gonna do some NASA figures? It would be cool to see some figures like that in blue!

Gino - Thanks and Thank You.

Karl - The decals will be fun to make…may put a quick ho to for those who want to know how to.

Figs…I’ll be at AMPSEast this weekend and will see if I can find something close.

Thanks for looking and your comments.

Rounds Complete!!