Scratch one 1/48 Hasegawa N1K1-J Shiden (George) POW: in US Markings
 captured-kawanishi-n1k1 by Eric Bergerud, on Flickr
 rtfront2 by Eric Bergerud, on Flickr
The Plane
The Kawinishi N1K1 (or N1K2) was a second generation land based fighter employed by the Japanese Navy. It was powered by the Nakajima Homare 21 radial – the biggest engine of this type used by the Japanese that produced 1900 + HP. It was very well armed – but I’m not exactly sure how well armed. There were 1500 NIK (Violet Lightning – I do like Japanese names) models produced – 1000 of the N1K1 and 500 of the N1K2. Kawanishi was famous for its flying boats and the N1K fighters were modified float planes. N1K1 carried 2 20mm cannon on the wings and had attachable pods for mount another two. (The kit advised that the POW version did not mount these or the drop tank.) Clearly there were guns mounted under the engine cowl – I’d guess these were machine guns – perhaps the rifle caliber mgs as carried in the Zero (and the sole armament of the Ki-43 I). The N1K2 was improved. Engineers lowered the wing which allowed for a smaller landing gear and a reduction in weight and part count. The N1K2 carried 4 X 20mm mounted in the wings.
The plane pictured above – apparently the same one that inspired the Hasegawa “POW” boxing” was captured at Clark Field on Luzon in late June 1945. As the war was still going on – and most US leaders believed it would continue into 1946 – American USAAF intelligence was interested in putting the bird through its paces. (After the war American engineers were not very interested in Japanese planes – except the rocket plane. The ME-262 received all of the attention as it was obvious that the jet age was coming fast.) Americans that tested the plane found much to like. It was quite nimble (the N1K2 more so), about as fast as a Hellcat and well armed. Check Wikipedia if you like and you’ll see accounts of successful IJN encounters with US fighters – although they note that the highest scoring “elite” unit was disbanded because it had been shot from the skies. In fact, the N1K fighters – like all of the second generation Japanese planes – were “hangar queens.” Japan lacked the industrial technique to produce a solid 4 bank radial engine (like the PW 2800) and the big Homare radial was seriously prone to over heating. And the very long landing gear found on the N1K1 made the plane tough to land. Add into the equation that Japanese ground crew were never as good as their American counterparts and did not improve as IJ planes became more complex. And, as is very documented, Japanese pilots were being put in the cockpit with fewer and fewer hours as the military situation grew more desperate and fuel harder to find. (Much the same thing took place in Germany after fall 1944.) And it didn’t help that by 1945 Japanese pilots were facing P-51s, the formidable P-47N and the late model Corsairs flown by veteran or very well trained new pilots. It was no accident that the Zero and Oscar were kept in production until war’s end: both planes were proven designs, powered by a simple radial and extremely forgiving to “junior birdmen.” The Japanese were hoping the the powerfully armed Shiden might help defend Japanese cities from US bombers. Unfortunately for Tokyo, the Shiden had a poor rate of climb making it almost impossible to get at the very fast B-29s coming after late 1944. When LeMay ordered the SuperForts to come in at low level at night all Japanese planes were more or less helpless. To put it bluntly, the Japanese were crazy to have gone to war against the USA – their war economy was less robust than that found in Italy. Heaven knows the Japanese had courage – and I suppose some N1K fighters found themselves in “special attack” missions – but that was not enough.
The Kit:
This is a Hasegawa kit introduced in 2000. I’m a Hasegawa liker, but not a Hasegawa lover. But this one worked out pretty well. The fit was good (not Tamiya perfect, but good) – there were seams on the upper and lower fuselage but I was able to eliminate them with CA and my trusty Duplicolor Lacquer primer that’s both sandable and fillable. Highest possible recommendation.
 primed by Eric Bergerud, on Flickr
As noted earlier I chose the “POW” version because it was so much easier to paint. (I might add that the N1K1, for a Japanese fighter, is a tubby and ungainly thing – no better looking than a Wildcat. Of course that might have been an argument to give it a dose of very heavy weathering. Next time maybe.) Indeed, Vallejo’s very good acrylic metallic paints went down very nicely. I was able to search around and find useable decals and got pretty close to what the kit asked for:
 paintedfuselage by Eric Bergerud, on Flickr
There was no reason to do a lot of weathering. I did apply an oil paint wash for panel lines – backed up by color pencils for emphasis. I like this technique. It does not overdo the panel lines – from a distance only the lines separating major parts of the plane are easily visible. Oils also give a little bit of grime which is just what the doctor ordered. In rains a lot on Luzon, I’d guess there were no hangars, and Japanese radials burned a lot of oil.
And, as I expected the cockpit is basically invisible. The clear parts were pretty good. Recently I finished an Airfix Stuka that was marred by miserable clear parts – Airfix had the bracing on the inside of the canopy – try doing that some time. I do wish Hasegawa had added an addition middle section of the canopy that was a little wider so it could have been posed as pushed back. (It looks neat but if a plane was sitting on a field where rain was common, they’d close the canopy.) I had to fight the complex landing gear a little, but eventually it all came together nicely. So it was a kit that worked.
Pics of the finished model below:
Eric
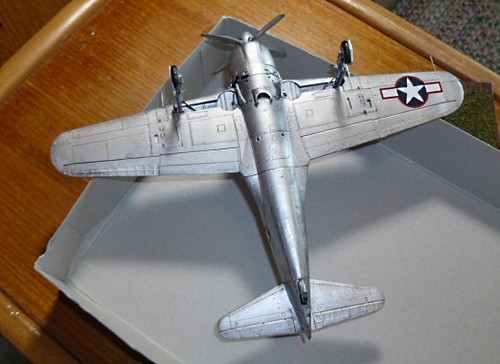 below by Eric Bergerud, on Flickr
 left by Eric Bergerud, on Flickr
 lftfront by Eric Bergerud, on Flickr
 lftrear by Eric Bergerud, on Flickr
 rear by Eric Bergerud, on Flickr
 right by Eric Bergerud, on Flickr
 rtfront by Eric Bergerud, on Flickr
 above by Eric Bergerud, on Flickr


 . The acrylic metallics looks great as well. Nice work on the panel lines.


 .


