Jaguar XJS V12 - Trying again after 50 years

I’m apprehensive about attempting this model using this forum, but I don’t know any other way of using the collective knowledge available on this site. Six years ago I built a subwoofer (never built anything like that before) while using a bass speaker forum. That worked out better than I could have dreamed. Here’s hoping something like that happens again.

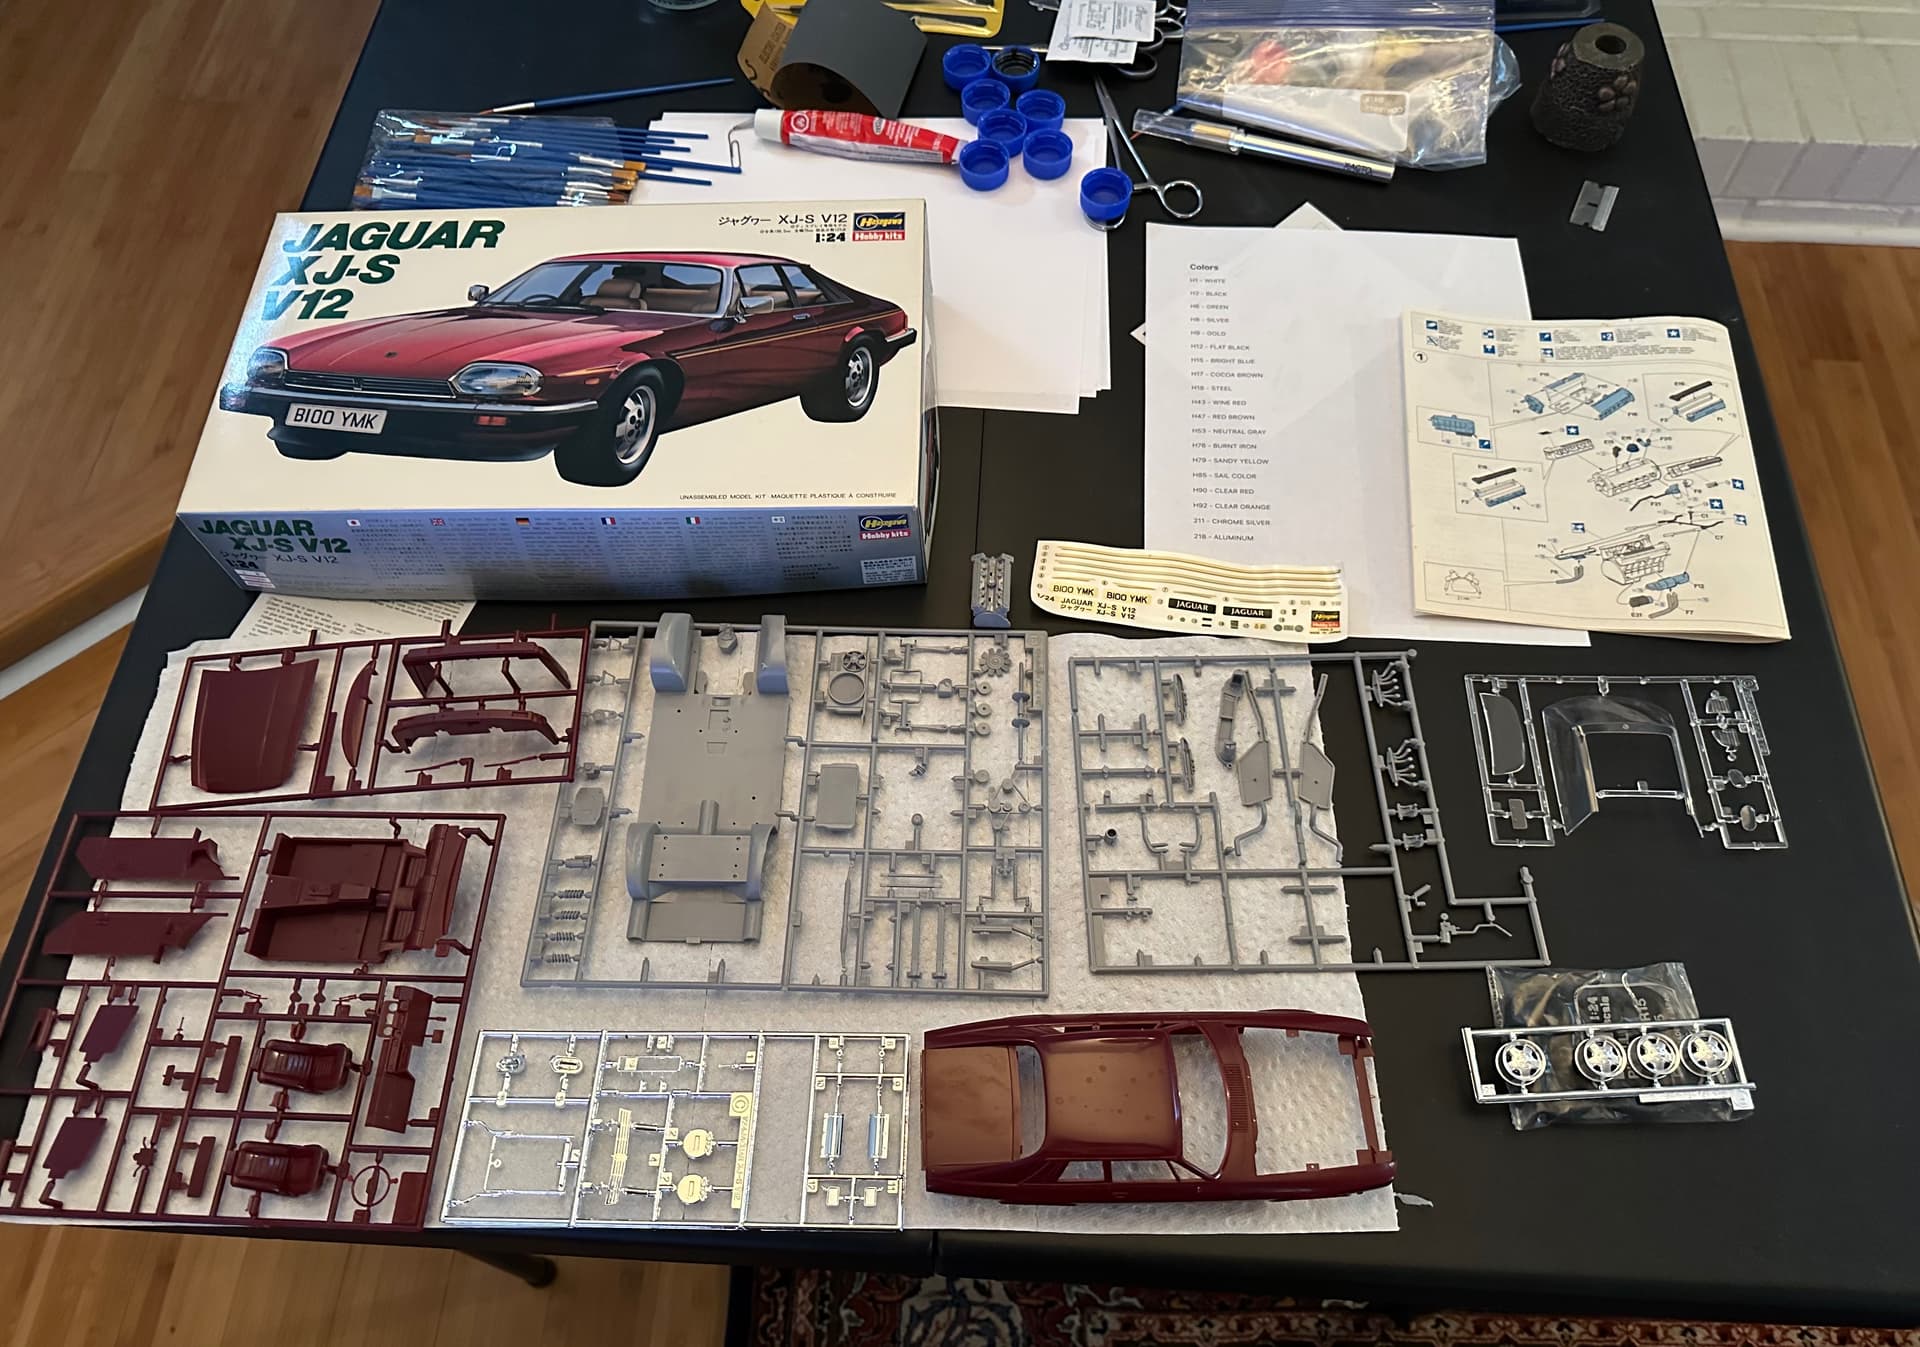
All I have done at this point is wash the parts & let them dry. I thought my first action was to paint the main body parts with primer. Here’s a pic of everything laid out after cleaning.

I recently made a model of a 1969 Pontiac GTO (my first model in 50+ years) & it was pretty bad. I want to do this one better. I owned this car for 18 years, so it’s special to me. Any help and/or advice will be greatly appreciated.

9 Likes

BTW, I want to paint the car white with a tan leather interior - like the car I owned.

1 Like

Looks like a reasonable parts count for your second kit. I would definitely shoot a light color primer over that interior if you want to go tan. Also, looking at your desktop - if you don’t have Tamiya thin cement order some. Tube glue has it’s place but I almost exclusively use Tamiya thin. Also a set of nippers if you don’t have them. What color will the body be? Do you have a picture of your 1:1 car?

1 Like

I don’t have the thin cement. Is it called “Tamiya Extra Thin Cement”? I keep reading comments about how valuable a good Sprue cutter is. I guess I’ll get one of those, too.

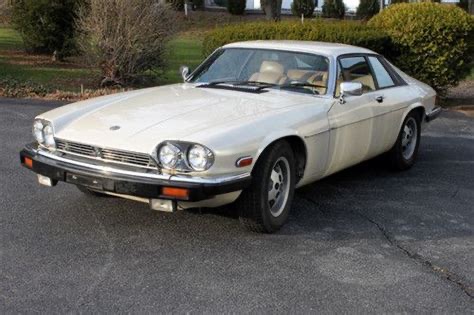
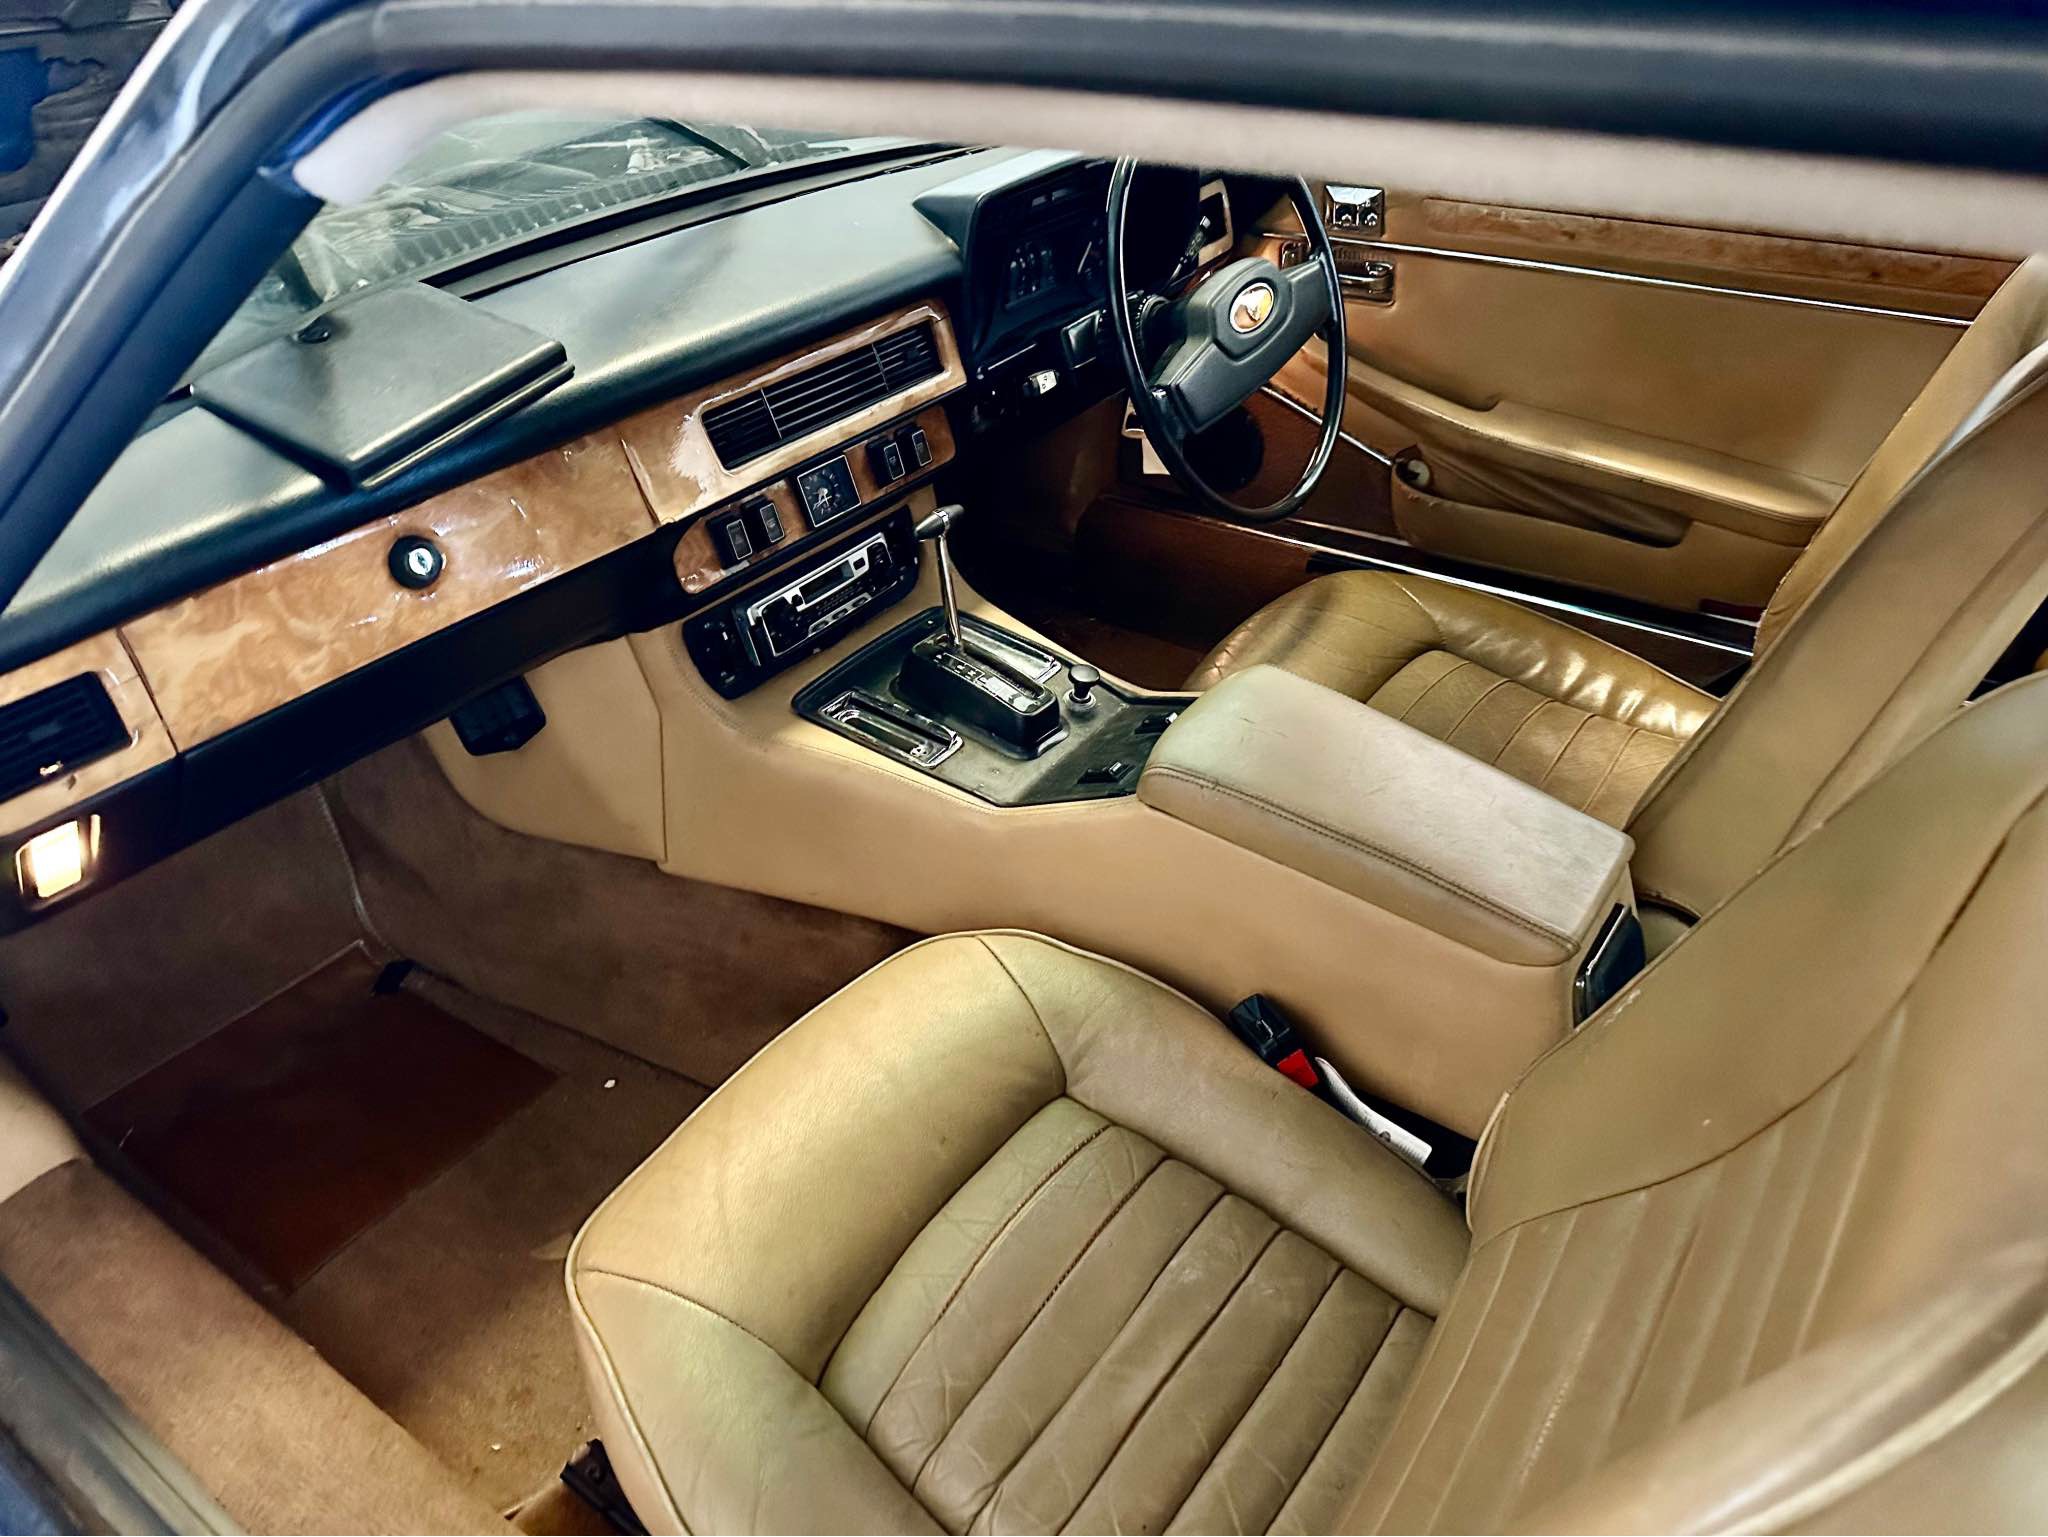
I had my Jag from 1984-2002. I’ve been looking for some pictures I know I have but they’re playing hard to get right now. Meanwhile, I found these pics on DuckDuckGo that look like my car -


My car was left-hand drive, but this interior looks like mine other than that. The model also has right-hand drive, so I guess I’ll live with that. The model also has the “European-style” headlights that I always wanted on mine but never did it.

4 Likes

Correct on both accounts!

That Tamiya Extra Thin Cement comes in a little square glass bottle with a green top. It’s a game changer for the hobby. It is EXTRA THIN and will run everywhere, so less is more on the little applicator brush. If you get some extra on the plastic, don’t try to wipe it off, as it instantly softens the styrene. Just let it air-dry and there won’t be any damage.

Also: become religious about screwing the cap back on after every use. If you leave the cap loose it’ll all evaporate astonishingly fast.

I learned both these lessons that hard way … more than once. Don’t be like me :rofl:

A good set of sprue cutters will save you a ton of time cleaning parts, and prevent damage when removing from the sprue. I really like the ultra fine ones from Stedi.

2 Likes

Welcome Boomer! I recently got back into modeling cars after a long hiatus too. This forum has been a great (and enjoyable) resource. The folks here are very generous with their expertise and encouragement. Best of luck with the Jag!

1 Like

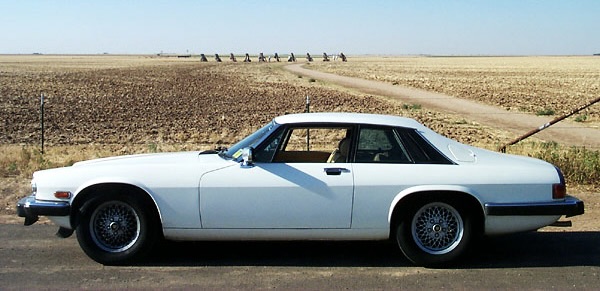
Apparently I don’t have many pictures of my Jag, but I finally found this one from 2001 - on a cross-country drive - parked here with the Cadillac Ranch on the horizon.

4 Likes

It looks pretty much exactly like the stock photo I originally posted.

1 Like

You might also want to get some Tamiya White primer in a spray can - this is one of the best methods to pint stuff white IMO. The plastic in your kit is “funny” colour, so you will probably paint everything one layer of Tamiya grey primer, and then put two coats of Tamiya white primer on top of that - should give you nice, white finish - and then you can put clear coat on top of that to make it slightly more gloss.

Also - if you are in the mood for some science, you might want to buy some lacquer thinner - some of them are exactly the same or almost the same as Tamiya Extra Thin but cheaper - they come in larger cans. I like to put that stuff in small bottles that used to hold nail lacquer - this way I can apply it with the cap brush. Dentist’s microbrush also works very well for precission application of that stuff.

Anyhow - good luck with your build and have a nice day!

Paweł

1 Like

Thanks for the suggestions.

Did you say I should apply a clear coat before the final color?

1 Like

I found this picture on a site that told me that a white 1983 Jaguar XJS came in Tudor White with this interior according to XJSData.com.

I can just barely remember how clean everything used to look. It’s been a long time since I’ve seen that Jag. In 2002 the engine compartment caught fire in the middle of a busy intersection in the San Fernando Valley. I was so distressed to have my 18 year “car-lationship” come to such a sudden end that I asked to have the steering wheel to keep.

Back to the exterior color…
I bought a can of Tru-Color Gloss Off-White Spray hoping to approximate Tudor White. I don’t remember the paint color name for my Jag, but I know it was not bright white. It was slightly off-white - hence, my hope. I haven’t tested this can for color yet. :crossed_fingers:

2 Likes

Further to the Tamiya Extra Thin cement with the green top…..there are two of them. Tamiya Extra Thin QUICK SETTING cement has a green top also, except that it is a lighter fluorescent like (one might say high-visibility) green.
Just an fyi. I made the mistake of buying a bottle once, thinking it was the former. Never actually used so I can’t say how quick setting it is. I should experiment one day.

Looking forward to following your Jag build!

Cheers,
Mark

1 Like

I suggested treating Tamiya white primer as the final coat - you will ike the colour of it, I think it might be exactly what you are looking for - and putting the clear on top of that to make it more shiny.

1 Like

After you build it, put it next to a mirror for display and you will have both left and right-hand versions!

1 Like

Nice car to own and a nice kit to honor it. Solid advice on tools and cement choices. The thin cement works well and is good for capillary action. Meaning, if you hold the parts together and touch the cement brush to the seam, it will draw the cement up and along the seam joining the two together. Test fit prior, if you make a mistake it can be messy to fix it. Post progress and if you have questions please ask. There is usually a pretty quick response.

1 Like

I’ve made a little progress - primer on most of the parts - started painting the smaller parts for the engine compartment. Not much to see yet.


5 Likes

Looking good so far bud.

Great progress! I got a kick out of your rack of old school testors paints in the little bottles. They are great paints.

I had to buy something familiar to get started. I’ve expanded my paint palette now. :grinning_face_with_smiling_eyes:

This was certainly the most detailed engine I’ve tried to build. It was a V12, so being complicated comes with the territory.


4 Likes