Thanks for the comprehensive info on the 3D printed bolts, I look forward to seeing them in-situ.
I don’t expect to use the wheel trims but I’m intrigued as to their purpose. I think they may have been on the car in the 70’s when the model was designed so Protar included them – there don’t appear to be many photographs of the car in that period.
I imagine you could build the exhaust with, or without, the rope lagging and be equally accurate. It probably got changed quite often too. I’ve assembled the manifold and pipe but I won’t cement them together until the time comes to fit them on the car just in case they need adjusting to fit to the engine and the rear bracket. This might complicate the fitting of the rope as I want it to cover the joint, but we’ll see. The end of the exhaust pipe needed a lot of reaming out too.
What I’ve found when removing parts from the long sprue gates is that the actual joint is quite thin and on one side there’s a ‘valley’. If you run a sharp blade along this a couple of times the parts will separate with a gentle folding action. I know it goes against the grain but I’ve removed the sprue from many parts already like this, including the body sections, and they separate very cleanly, requiring only a light sanding to remove the remaining edge.
I’d recommend not using an Excel-type No.11 blade, they break too easily. A Swann-Morton No.11 scalpel works well but I use a Japanese snap-blade knife with 30 degree blades.
Ahhh, the Seventies - muscle cars, the RX-3, the Monaro, the RX-7, the GTHO - those were the days! Actually Nick, my present car sports more chrome than anything I’ve ever driven, let alone owned, in 40-odd years, but I take your point.
I’ve been working on this kit and even though I have complaints, I’m also enjoying it. I’ve been using a razor saw, a JLC razor saw and my trusty, No. 11 knife to cut through the sprue gates. My 3M putty is also getting used for the sink holes. So I’m slowly working through this kit. It’s such a cool car. When I get tired of working on this kit, I look at the various videos of this car on Youtube, and seeing the subject of this kit in action is inspirational!
Glad you are enjoying it. Mine seems to be a bit up and down. Mostly self-inflicted.
For example, I discovered yesterday, that I had put the cross-beam that supports the floor on upside down! As it was all cyano’d on I had to saw through both sides and turn the cross-beam over and then get it all square again. Probably a low point really.
Like you the thing that keeps my interest is the insight into how this fabulous machine was put together. From the glorious engine to the wacky rotary dampers. Great. A bit different from a Ferrari, or Mclaren or Red Bull
I think I put that same crossmember upside down too Nick!
I intended painting the ‘wood’ parts to resemble a woodgrain even though I’ve never been really successful in getting the right effect and then Nick pointed out that the lay of the planks on the firewall was wrong so I had a rethink. I went to a model boat place and purchased a few lengths of 0.5mm thick, 8mm wide strip and experimented in adding a veneer to the floor and firewall parts glued with contact cement. It’s gone quite well I think so now I’m looking for suitable stains to get the colour right, or at least close. The strips are a bit too narrow in themselves but I’ll add a darker line every two strips to represent the original’s planks.
I was going to cut off the three caps on the main floor and glue them on top but it turned out to be simpler to just cut around them. I haven’t drilled the holes for the seat yet.
The firewall is layered on both sides but I’ve only done the top of the floor parts as the bottom of the floor won’t be visible when my model’s done.
That wood looks really neat. There’s a german build where somone used wood that’s worth a look. His build is probably the best I’ve seen. The stage that the built for the car is outrageous.
Before I saw your post I assumed I would use plastic car and paint. I might still do that for the firewall (which will need to be scratchbuilt). The only bit that bothers me is the surround. Don’t feel that confident about cutting to fit but if you don’t try you don’t learn. How hard can it be.
I think you might have persuaded me about the floor. BTW, pictures of the floor show all the fixtures to be recessed so I think your treatment actually makes it better than it was originally, and it’s less work. Bonus!
Sorry you also put the part in the wrong way round. It would not be that difficult to and it so that it only fits correctly. Having sawn the thing off, it’s glued back OK. Scruffy but not visible so it probably does not matter.
I was fortunate in that I noticed the upside-down component before the cement had thoroughly hardened!
I have seen that German site - I thought he’d cut new pieces from solid wood but on closer inspection it appears he may have used veneer in a similar manner to mine. He’s rather over-the-top for me with all the work on the bonnet hinges, rivets etc. but to each his own, we all make our own interpretation of the basic kit I suppose. I couldn’t match his skills in any case.
I don’t know if you’ve been watching the Italian build or not. “Maurillo” has finished his model but though he’s done a nice job I’m not sure I like the artistic wear and tear he’s introduced; again, each to his own.
I’ve stained my wood parts now and I don’t think I’ll do much else to them beyond a coat of gloss varnish. I’m happy enough to use them as they are. The yellowish stain sort of matches the aged varnish on the real thing. By the way, I think you’re right about the three items on the floor, they just looked moulded-on before but now give the impression of separate parts.
Certainly looks a pretty good colour. I’m not quite there yet.
I had seen “Maurillo” and had the same view about the weathering. On the other build, I was awed by the attention to detail, the ambition and the speed (and amount of time he must have available) with which it all came together. It just takes me ages.
Michael, The concern I had was one of fit. Adding a layer to either face would make it thicker and might mess up the fit. So I thought I would build it from scratch and be done with it. However, maybe that was a bit hasty. The only other thing was the flange that allows the bonnet to fit. I did not want it to be flush wiht the surface. After seeing your build though, I think I will revisit that plan and see if there is an easier route. That said I am still not confident in my ability to work plastic car to give a very tidy fit.
I did consider that adding the wood layer might lead to difficulties with fit later down the track but as it’s only about 1mm altogether on the firewall (even less after sanding) and 0.5mm on everything else, I’m confident I can adjust things as necessary. In any case I always was one to charge in bull-headed!
I did the wooden chassis rails last night. I’ve only covered the top and outside as I don’t expect the inner sides to be visible when in place.
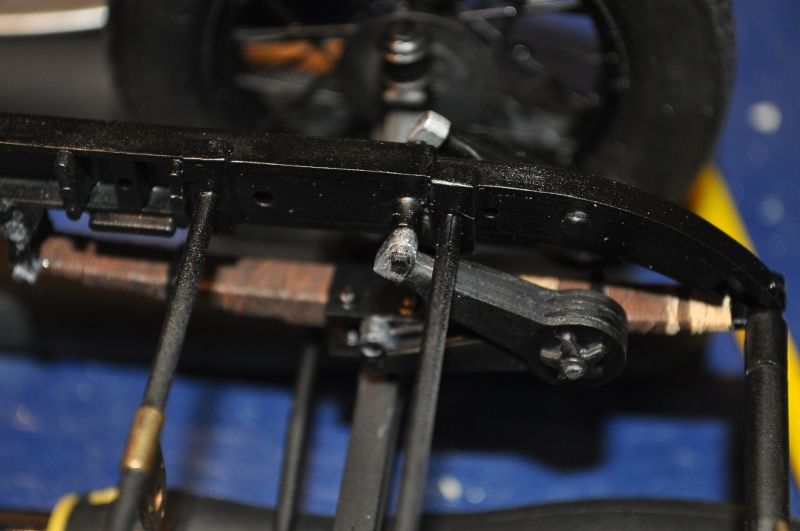
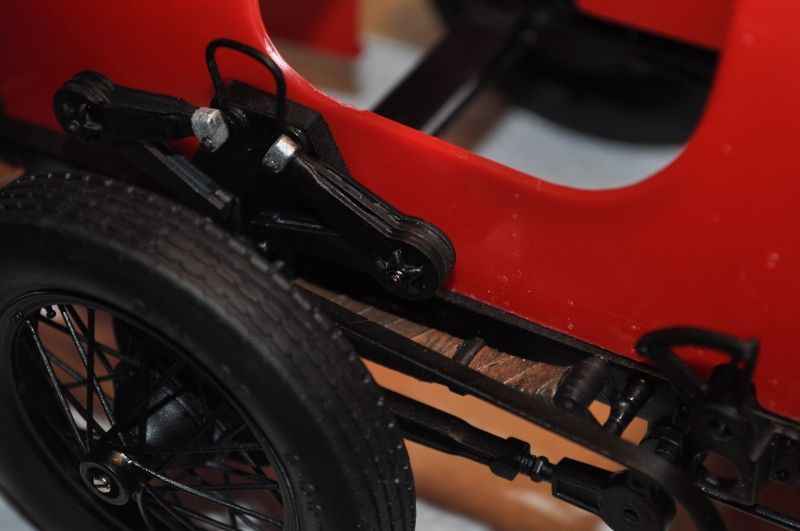
Here’s a couple of pictures of the bolts in position. In the end I replaced all the screws in the suspension.They aren’t as crisp as the bolts moulded to the chassis but are much better than screws, too small if anything. A couple of other things. Tamiya Aluminium is the wrong colour for the damper ends! Needs to be much duller. I used semigloss black for the chassis which still needs a wash of something to break it up. The picture of the front also shows the chassis infill I added. Might still do something with the bottom pickups at the front. Finally The bolts were straightforward to work with. CA seems to work quite well. I guess it could key to the roughness.
Thanks for the kind words. Yes gunmetal or aluminium mixed whith gunmetal would be much better if I can work up the enthusiasm for a rather tricky paint job.
On a different subject, I just had to post this.
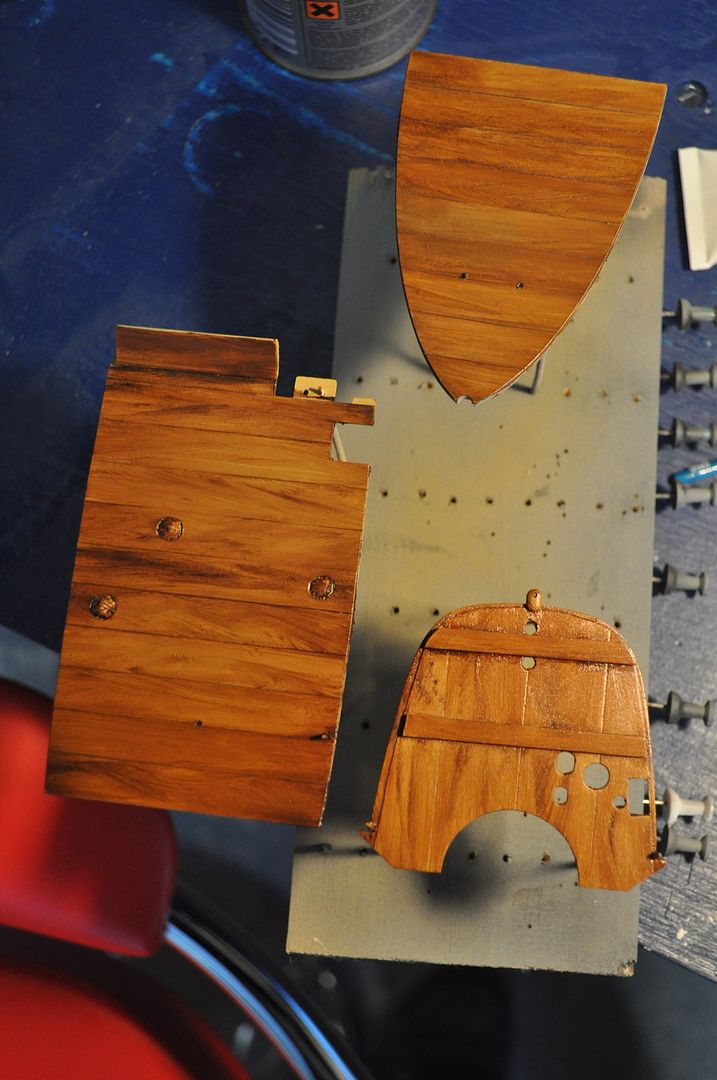
One of my original reasons for wanting to do this model was the wooden bits. Your use of veneer almost changed my mind. I thought it really effective, and very close to the colours you see in the photos. I wasn’t sure I had the skill or courage to do the sort of paint effects I had seen but if you don’t try you won’t know. So today I took the plunge and had a go using the techniques described on this link:www.agapemodels.com/…/simulating-wood-grain.
Clearly the technique is pretty much idiot proof. I have seldom felt so pleased with myself doing modelling than with the results shown below - more typical of me is throwing half a bottle of liquid cement across my bench (yesterday’s drama) - skill.
It worked very well, though the colour is more teak than pine but I’m not going to be that fussy. There’s still a layer or two of varnish to add. Unfortunately it means I there is little more to do (just the other side of the front bulkhead and the two rails). Maybe a WW1 subject beckons or a completely unpainted Mosquito…
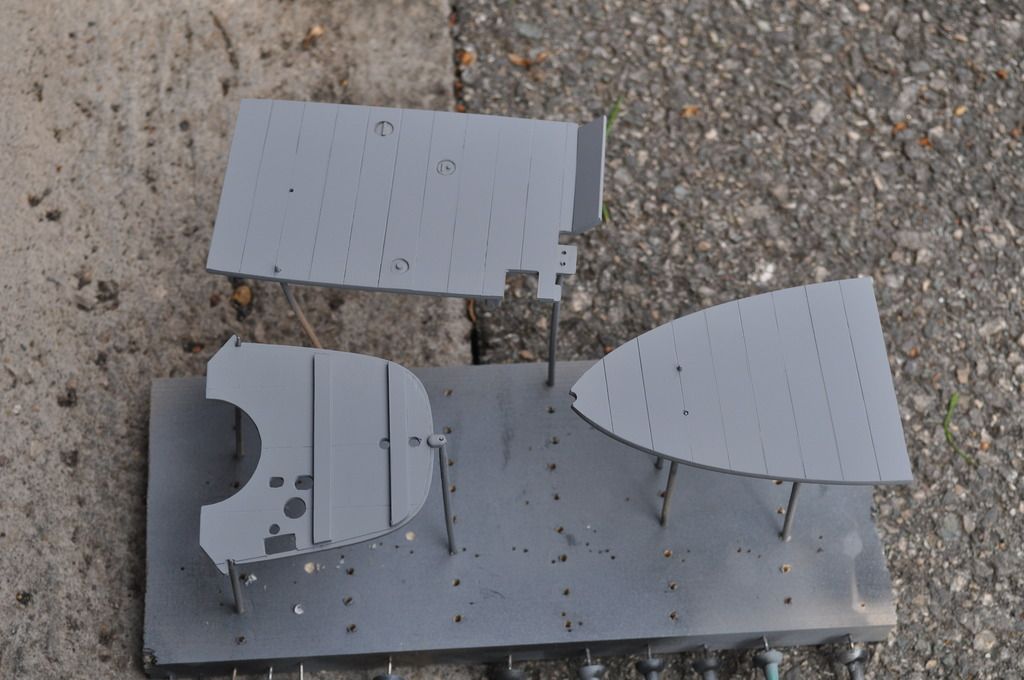
Before (just Halfords primer)…
After X59 Desert yellow and an assortment of Umbra and Sienna oils. Now just need to patiently wait for it to dry…
Very impressive Nick! Are you sure you’ve never done this before? If I hadn’t already used the wood I’d have given that a go. I’ve heard of the technique but didn’t know much about it so thanks for the link. It also avoids any the fit issues that I may encounter - I have to trim a little wood of the edges of the firewall to ensure it mates with the rib inside the body shell for example.
Thanks for the feedback. Yep first go. Clearly a truely idiot proof technique. Now if I could only spray gloss without splats, pools and orange peel, I might be getting somewhere. Needless to say, spraying the gloss coats on the wood effect did not really enhance the surface finish. Good job it is supposed to be a hundred years old
I removed the detail so I would have a nice smooth surface. On the firewall, I scrapped the front face too to try to increase the amount the bonnet flange stood proud. I did not go mad because I still wanted it to be flat.