So these are the front springs, obviously. I have tried to represent the somewhat rusty ancient look of the springs in the pictures. They seem to have been repaired at some point hence the bands of different colours. Colour down the sides (which you can;t) darker to represent dirt and at the back oil pickup. All paints are Tamiya acrylic: chord (brown, yellow and a touch of red); Iron (semi-gloss black). All is brush painted though using several very thinned layers. I’ll try and get a better shot that shows the sides and the rear springs. Next step is to paint the axle auto grey undercoat and semi-gloss top coat. Probably sprayed.
On the rear ride height issue, I found the attached. The model has a very similar stance
My last post would have made more sense if the pictures I had attached had uploaded! There were supposed to be 3. Maybe that is too many. Course it could just be finger trouble.
Good work on the springs, looks quite convincing. What is the material you’ve used to cover the springs? I’m not that au fait with old cars and I haven’t seen springs covered like that - why do they do it?
As for the work-bench, I’ve seen many of the club member’s work areas and yours is pretty normal. I actually don’t have a dedicated work area right now and much construction is done on a small table in front of the TV. I have a shed out the back in which I’m going to build my modelling room - if I ever get started that is… Got all the material, even insulation, just lack motivation.
Haven’t touched my Mefistofele for a few days and I’ve got to get a newsletter produced by the end of the weekend so it’ll have to wait a bit longer.
Thanks for the comments. I think the idea was that the binding protected the springs from water and dirt ingress and stopped them wearing out. Some of the comments I have seen suggest this may be a apocryphal. I guess that’s why it’s not common these days. I used black polyester thread stolen from my wife. Not hairy. Painted up nicely. I used cyano to anchor the thread while I bound it and then more to glue it all in place. Too much probably. Took absolutely ages and used massive amounts of thread. Crazy really.
So in about 2 months I have 4 springs to show for it. It’s going to take a long time I fear!
A while since anyone posted on this. For me, progress has been slow and other things have had to have the attention.
The observation I wanted to make was about the engineering of the model. Sink marks aside, I have been impressed by the fineness of the moulding, particularly as I have not yet broken and of the really fine parts. The bit that’s drivining me nuts are the screws. There are places where the components are screwed on in such a way that location is not guaranteed. A simple lug would do. Instead we have shiney non-scale screw-heads that need gluing anyway. I could understand if there was a strength consideration but this is not the case usually.
This more than anything else slows me down, as I try to find a satisfactory alternative that does not cost a fortune.
I just picked this kit up in Florence and have dragged it thru Italy, southern France, and now Paris. Probably should have waited and ordered it at home but really wanted it as a souvenir of this trip. Totally irrational but it has been fun and I’m really enjoying seeing the various builds of this kit. It really feels “international”
Have to admit mine has hit a wall too (No, I haven’t actually thrown it at the wall![;)]). To be honest I was delaying permanently fixing the suspension with the plastic pins just in case I had second thoughts, or someone came up with a better solution. However, now I’ve had a break I’m happy with it the way it is and will continue.
I take your point about the screws; in my opinion Italeri should have made more of an effort to see how the kit would build up using the original screws with the new plastic parts. I wonder if they even bothered to build a sample to see if there were any problems, they certainly didn’t see the errors in the instructions. I will continue to use the screws where they’re up to the task but I’ll replace any that seem superflous or inadequate.
Speaking of superflous, I have now cemented the rims of all the wheelsand removed the four screws that ‘secured’ them together, but I’ve left the two long screws that hold the hubs together. I know it’s early days but have you thought about using the two silver rims for the back wheels? The instruction book (Italeri’s version - not Protar’s) indicates not to use them and they don’t appear on any photo of the real thing that I’ve seen to date so I wonder what they’re for…
I certainly wouldn’t want to have hauled that big box across Europe! Yes, the original car has an international feel about it (well, Italo-British anyhow) and the kit certainly has been taken up by a variety of builders on the net - French, German, UK, Australia (even if not actually Australian…).
This is my first big car kit for decades, though I have a collection of old Imai kits, including their incredible Bianchi, and also a Bandai Duesenberg Boattail, both of which are slated for building - eventually…
I have to admit to pulling it out and looking at the parts and instructions. It really looks like it’s going to be a fun build. Don’t want to leave Paris yet but at the same time I’m looking forward to getting back to my desk and start it!
Just a quick note. My intention is to 3D print some bolts. Best would be brass but that woudl cost the thick end of 40 Euros so it will have to be nylon. Not ideal. I am not sure either paint or glue will stick. Drawing the bolts should be easy. Just a shaft and a hex head. Proved a bit more difficult. I wanted to do rivets at the same time and in a number of sizes. Seems to be taking a bit more thought than I bargained for. Watch this space…
Wheels. Undo the screws, now that’s a good idea! I ground the ends that protruded off with my Dremel, very carefully. Why are the screws to long in the first place.
Wheel trim. I’d assume discard. They are not shown in the instructions or any photos.
For a bit of light relief I started on the engine!
This is a most frustrating model. I printed some bolts, nominally 1.2mm shaft size in nylon. Came out slightly undersize. 1.4mm would probably have been better. Still they look OK though nothing like as crisply moulded as the ones on the chassis of the model. I have photos but not time to upload yet. Assembly is going to take some thought as it is all a bit floppy with rods rather then screws. But I can see a way to make this work.
So far so good.
Then I tried to push the axle through the hole in the rear spring carrier. 2 layers of undercoat and a couple of topcoat had closed the tolerences down so that it would no longer push through. In trying to work it in I then broke the lug on the spring carrier.
So tonight I repaired the damage. But then took another step backwards.
I seem to have lost the rear spring rear mounting somewhere in the garage. The problem with my printed studs is that they do not retain things like screws. So now I fear I have to make a new rear mounting from scratch but don’t currently have any 2.5mm tube.
Hey ho! and only the other day I was feeling good because I actually managed to get a consistent paint finish on some bits.
Sorry to hear of your difficulties. Can you fix the nylon ‘bolts’ by using epoxy? I don’t know if it will secure nylon. Now that I’ve settled on using the plastic rivets I made I’ll simply cement them in. I’d be very interested in seeing a picture of your 3D printed parts. I don’t have access to a 3D printer but it seems it might revolutionize our hobby.
I know you don’t intend to use the silver rims on the rear wheels but, just for interest, here’s a pic of the original Protar instruction book showing their fitment. One curious thing is the way they distort the rubber tyre’s outer profile in the drawing at centre right. I can’t for the life of me work out what function they’d serve.
I’m really curious to see how the 3D print stuff works out, NickD. Started some work on this kit, and after seeing how clean a build the posted photos showed, I now have a new appreciation for the work. This kit has enormous gates on the parts that need to be sawed rather than clipped which really adds to the part preparation time. That and the pits in the parts really adds to the assembly time!
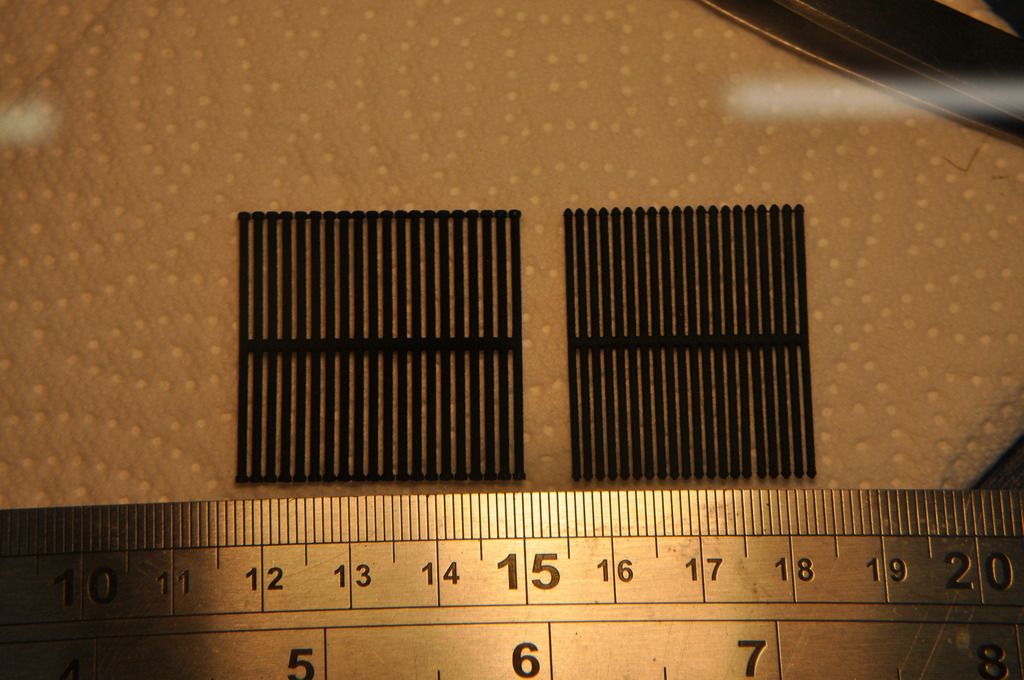
OK so, having perhaps over-hyped the 3D printing, I’d better show you. The picture below shows a set of bbolts on the left and rivets on the right. I drew the shapes in a free but very very versatile package called BBlender (https://www.blender.org). Drawing bolts is relatively straightforward though the interface is really quirky. Still you can do much more than bolts. My avatar was drawn entirely in blender. I drew the bbolts full sized with a nominal diameter of 1mm. I then scaled them to 1.2mm and 1.4mm. The picture bbelow is the set 1.2 mm set. With hindsight probably the 1.4mm would have been better. They were printed by Shapeways (http://www.shapeways.com/). A great service, though for little things the relative cost of the post is a bit steep. So I printed off a selections of bolts and rivets to make it worth doing. One can pick from a wide variety of materials, from nylon to platinum. These, needless to say are black nylon. When printing things there are a number of practical considerations to take into account. These bolts may not be spectacular but one of the things I wanted to explore was the level of definition. Minimum dimension in this material is 1mm and minimum feature size is .2mm. So these are right on the limit. They were produced using a laser sintering process, i.e. using a fine powder. They therefor arrive with a very rough texture. As a consequence, the heads on the fasterners lack definition but they are so small (as the photo, taken through my magnifier, suggests) that that is not surprising. Practically, the technique Michael suggested with rod and a candle probably yields results that are not too dissimilar, are cheaper and probably easier to produce. This is getting a bit long but there are still some points worth noting, so please forgive me. I would like to have printed it them in brass. I think this would have been smoother but the cost is about 5 or 6 times greater so I did not bother. Maybe next time. Main concern with nylon is stickability. The rough surface probably helps. I put auto primer on as a base and then black over. It seems to be OK. So far I have used the time honoured (for this model at least) soldering iron method to fix permanently in place. The only problem is that the undercoat burns off leaving smooth plastic which is not ideal but all the ends are out of sight. so hopefully the poorness of the paint finish should not be too obvious. So thats probably more than you need or even whant to know. If you are interested have a go. It costs very little and is very versatile…
Michael on the subject of wheel trims, There are a few old pictureson the web of the car. None have shiny trims so who knows what they were thinking when they designed the model.
The thing I found interesting was the number different variants of exhaust. The chord seems to have been a modern innovation.
Severall things on this kit are annoying. As you say, cutting from the sprues is a bit time consuming. The ones that worry me are the long thin wires. Breakage looks inevitable. Not happened to me but it’s only a matter of time. My next challenge are the body and simulated wood componts.