Having trouble with clear-coats - durability

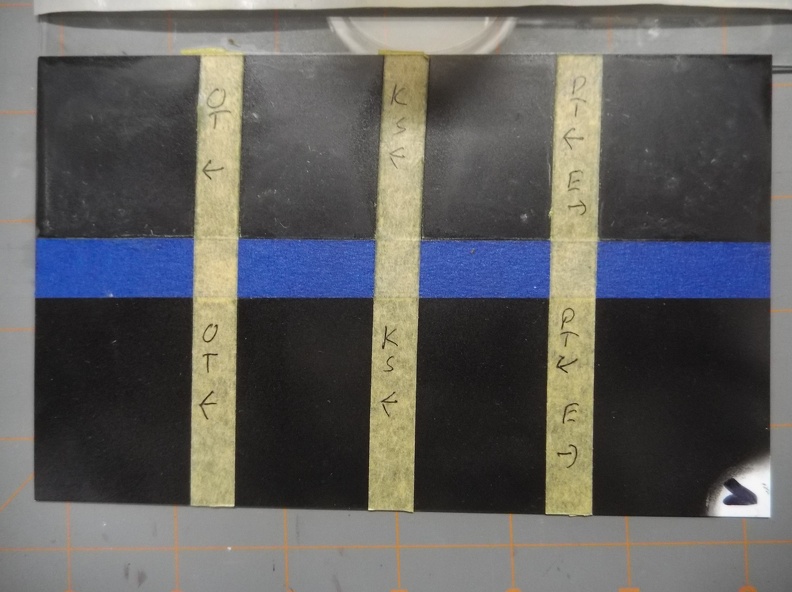
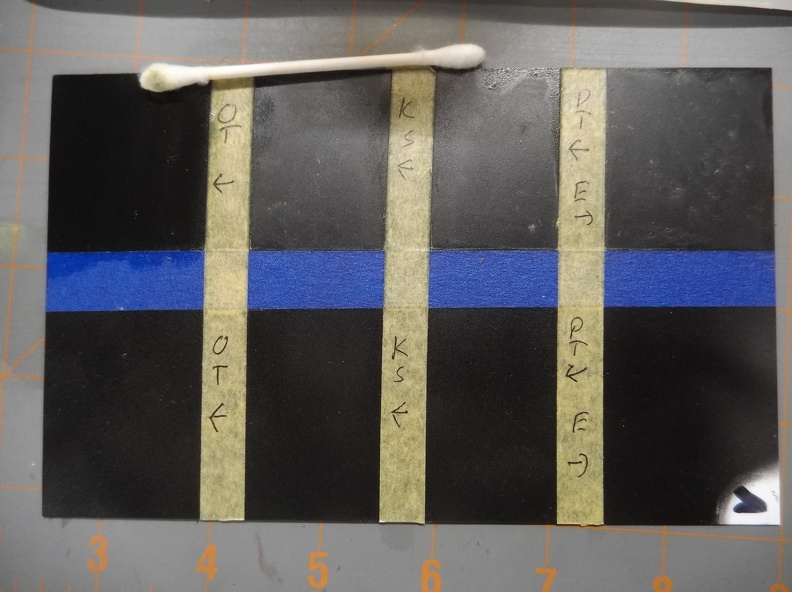
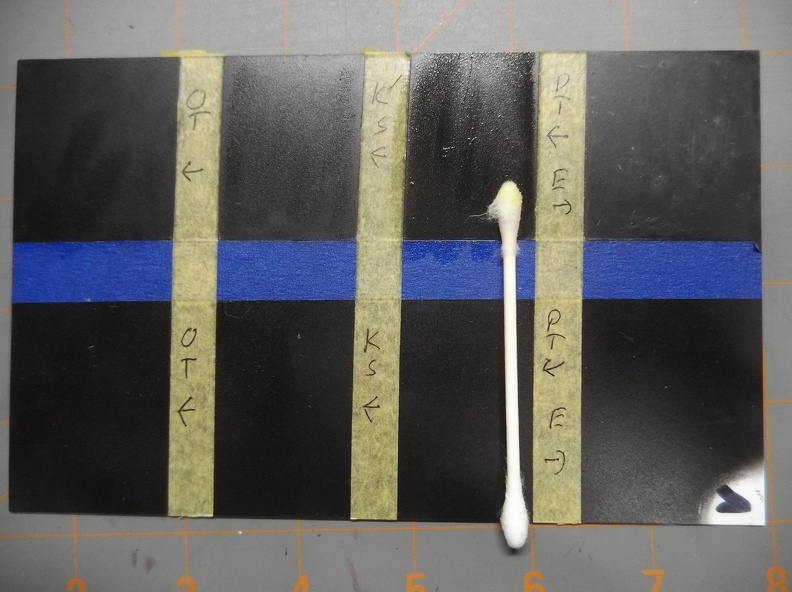
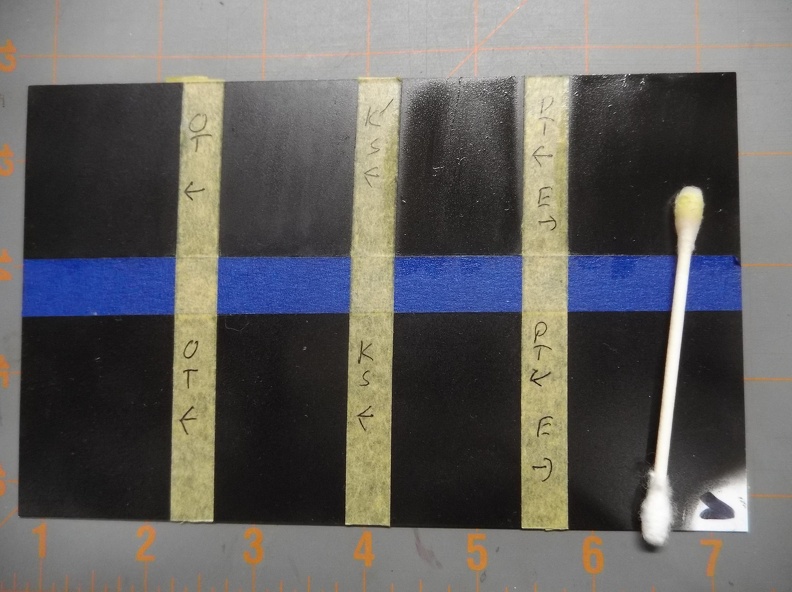
I’ve been struggling to find a formula for applying a gloss clear (for the purpose of panel-lining and/or washes) that will protect the color-coat.

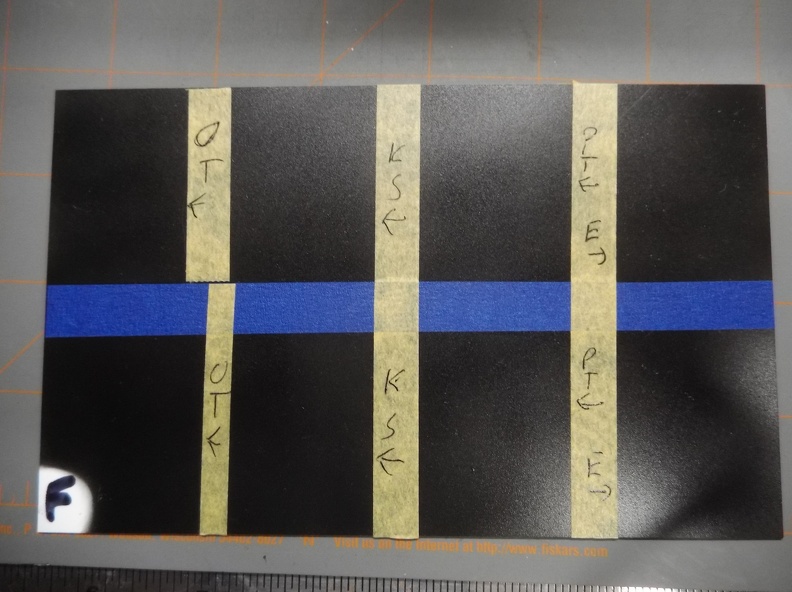
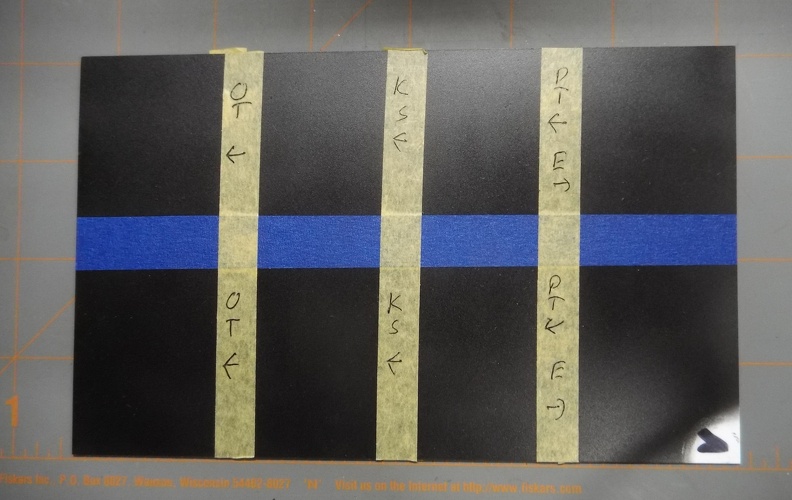
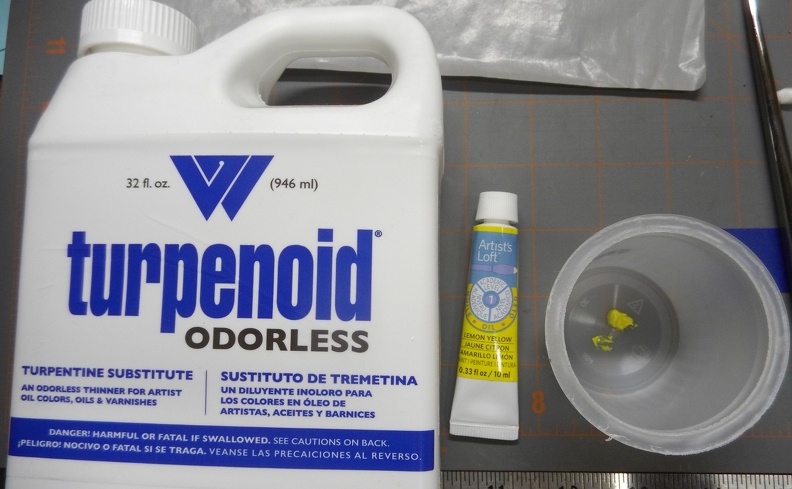
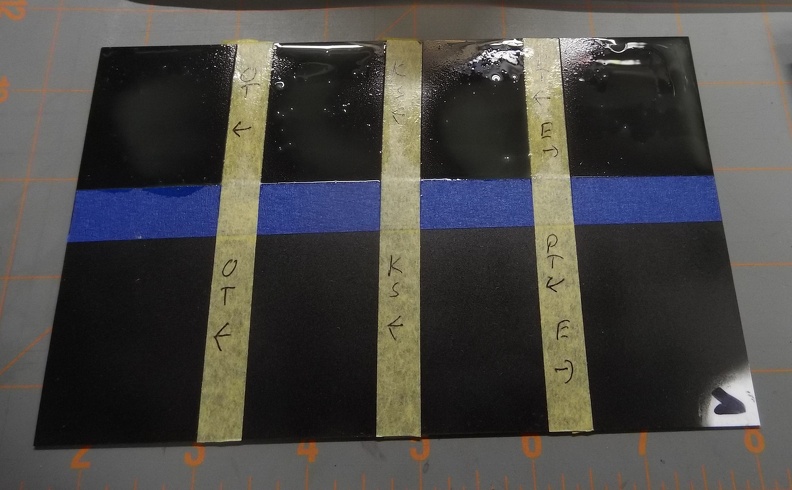
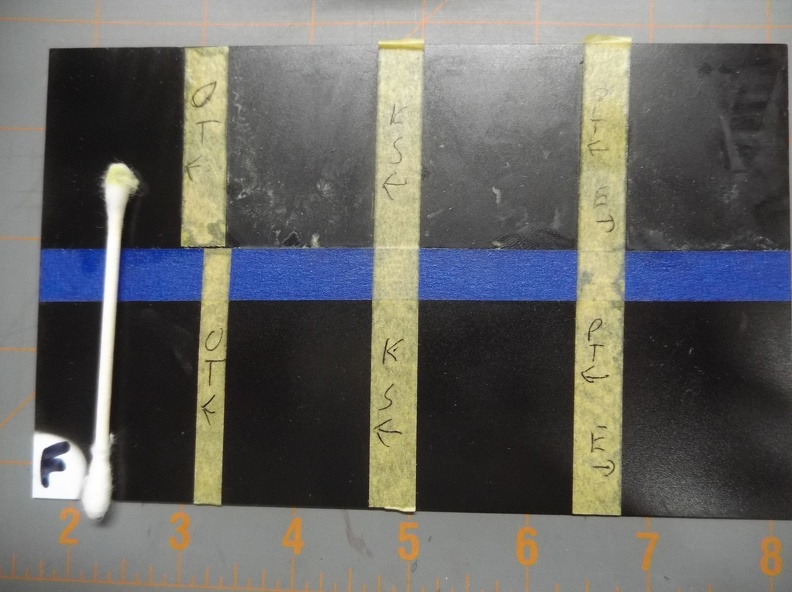
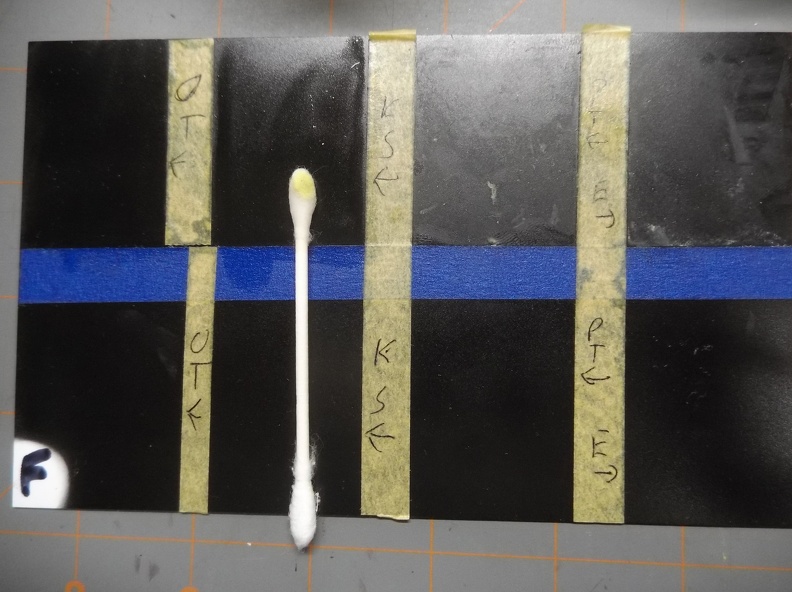
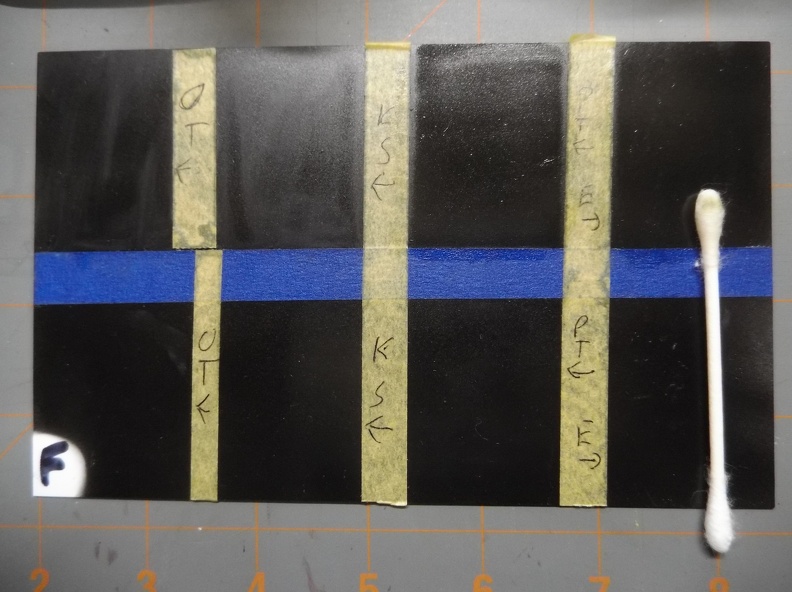
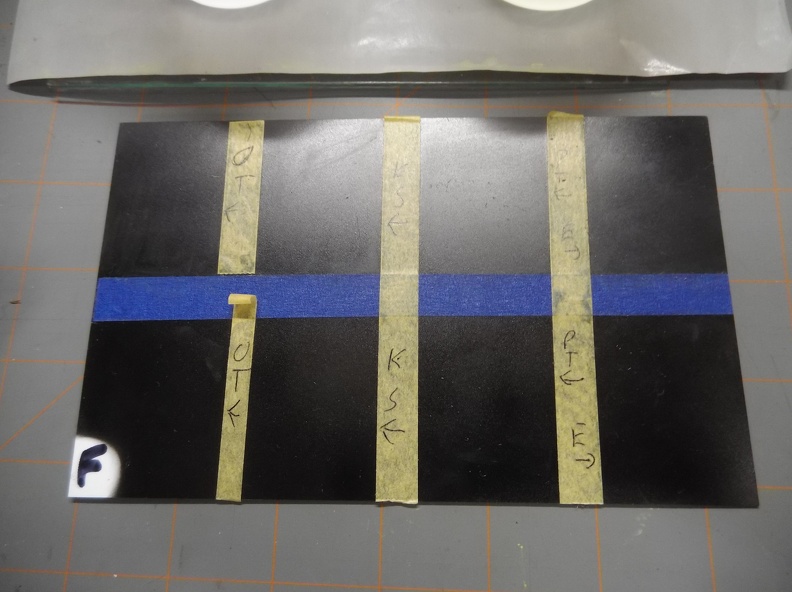
I’ve tried using AK192, tested with three or four different thinners including AK712. It will not stand up to applying Tamiya panel-liner, or artist oils, or Testors enamels. The latter two were tested with Turpentine, mineral spirits, even “white spirits”, but everything I tried would eat right through it ruining the base coat. I think I’ve read that those three thinners listed are essentially the same.

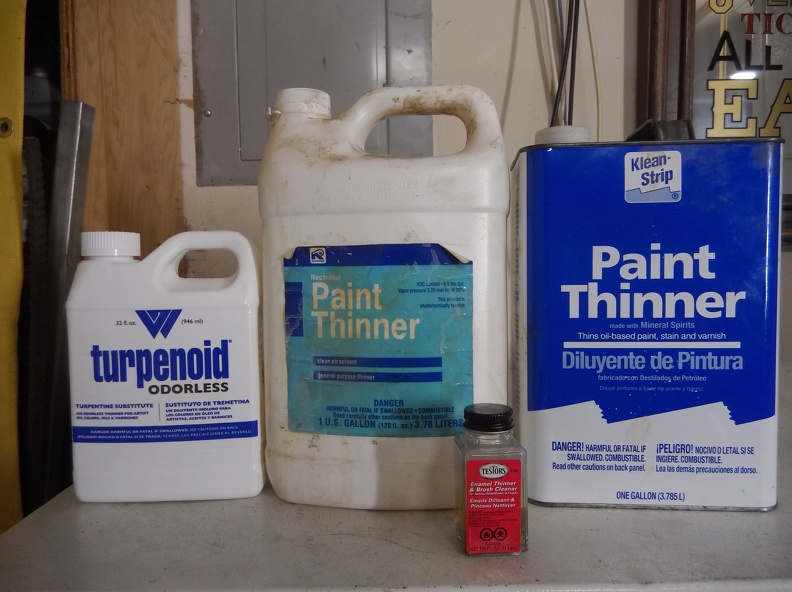
I was just reading the new edition of FSM in which it clearly says to use Tamiya X-22 which I just tried. It was way too think to spray out of the jar, had to thin it with X-20A to roughly 50% to get it to spray right even if bumping the pressure up to 20 pounds. I was able to get a nice smooth finish and allowed it to cure for ~48 hours. But the enamel/oil washed eat right through. I noticed in picture #2 on page 16 shows you are using hardware store type fluid “Klean Strip” which I thought might be too hot.

I’m starting to think it is not the choice of product that is causing my issues. Could it be my airbrush is inappropriate for this use, a 0.35 tip is too small to spray undiluted clears? My “other” brush is 0.18 so I’m, not even gonna try that.

It might be that my color-coats are just too weak but it seems that the clear should be a sealant of sorts. I almost always use Tamiya XF paints and yes I spray it on really thin, generally at least 3 passes/coats, more in some places for post-shading. But I have noticed the color is EXTREMELY fragile until coated, which protects it well from touch, just not turpentine.

So the questions are:
1.) Do I need to find a better (stronger) product to use that will withstand a light brush stroke or a Q-tip without breaking down?
2.) Do I need to get an airbrush with a larger aperture to spray thick undiluted varnishes?

I considered trying a polyurethane clear from Autozone or Home Depot, but cannot afford to plug those rivets or panel lines. What products to you use?

Try future. It’s acrylic and pretty strong in terms of resisting washes etc.

1 Like

Hey Edbert,

I use a .35 needle on my airbrush as well and haven’t had any of the issues you described.

However, I don’t use Tamiya panel liner. I use Vallejo Washes to do my panel lines. With this I can pretty much use any clear coat and it works. It does tend to soften acrylic clear coats and if I’m not careful when cleaning it up, I can rub off the the clear plus some paint.

You said the Tamiya paints are very fragile. I don’t use them but I’ve heard they are quite sturdy. This may be a clue. What’s your normal process for prepping the surface for painting? Do you prime?

2 Likes

Try Flory Washes for panel lines,absolutely foolproof.They work with any clearcoat.

1 Like

And maybe consider using Flory washes. They are basically water and clay - pretty inert and fantastic to use. Slosh it on, let it dry and remove with a damp cloth

5 Likes

Beat me to it Tony!..

I’ll second that, though modify it by noting that Johnson & Johnson’s Future was discontinued a couple of years ago. Some people who used Future are now using another household clear acrylic QuickShine. Their comments are that works the same, just that it’s cloudy white out of the bottle, but dries clear.

Both products can be brushed on by hand, or airbrushed. They are self-leveling and need no thinner, but can be thinned. I have used water to thin Future when I have airbrushed it. But it has been easier for me to apply it by hand. And if I get drips or pooling, it can be reactivated with a weak ammonia solution-I use Windex-the excess wicked away with paper towel, and then left to cure again.

3 Likes

I’ve had the same results if I prime or do not, but before any paint I will do an alcohol (I think 70%, whatever the grocery-store isopropyl is not the stronger stuff) wipe down mainly to remove finger prints but also any release agents that might exist. I do not always do a pre-shade either, but my results are similar regardless.

Maybe it makes sense to show some pictures of a recent disaster I caused…


Surfacer 1500 base coat.


I used Testors MM enamel white highlights, I’m trying to use it up. But I’ve used Tamiya XF-2 as well on other kits.


The blue tape is just there to protect the liquid mask since it is soft.


After clear coat the decals went down, I like to weather them a bit too so they are not so stark. Everything was going well I thought at this point. So I got my artist oil paints out with some turpentine.

I used a very light gray on the darkest color and darkened it up on the other two colors.


When I tried to remove the excess is when I saw I was stripping off the color, right down to the primer!


You can see the worst part right behind the radar dome, and again on the leading edge of the port wing. You can also see I did not remove enough, I needed to keep going but I was already ruining it.


This kit is now my mule, I consider it a total loss. That “paste” like stuff is EZ-Off oven cleaner :frowning:


Not all of my kits are disasters, only if I try to line/wash the entire thing. But I see it done so often (seems most people do this) I just want to get the technique figured out.

2 Likes

I have found that, of the spirits, turpentine is by far the “hottest” — as in it has a tendency to melt and attack stuff unexpectedly. I use odorless mineral spirits now, and have never had an issue with it damaging acrylic paint or a Future/Pledge clearcoat. YMMV, etc.

1 Like

@Edbert

Re-reading your original post plus the clarification on surface prep it sounds like you were taking all the appropriate steps to properly prepare the model for applying the liner.

Thank you for the pictures. It is definitely softening up the acrylic clear and paint underneath. I’ve not done an oil wash before, but from what I’ve read it’s supposed to be quite forgiving and easy to clean off. How long was it left to dry and how much effort was it taking to remove the wash once applied?

I’m suspecting the issue is the thinner that was used to cleanup the washes.

This has sparked my curiousity. If I have the time tonight I’ll setup a test piece of styrene to see how the gloss coats react to the different thinners. I have both Future and Vallejo clear acrylics. For thinners I have Klean Strip, Testors enamel thinner, mineral spirits, and odorless mineral spirits.

It will be interesting to see how it turns out.

1 Like

I appreciate all the help fellas, I cannot over express how nice it is to have such resources!

I’ve been told that the odor-free “turpenoid” is one of the mildest around. But I’ve also been told to try lighter fluid, so I’ll keep experimenting.

I’m also going to try applying multiple thin coats of X-22, I cannot fathom how it is sprayable out of the jar, the entire X & XF line of paint is really thick to me. Then again, maybe it is me spraying watery paint that is part of my problem.

Here’s a WIP currently on the bench, I think it illustrates how thinly I am applying paint. I’m holding off on clear for now until I find something that works better.

3 Likes

With future as a clear coat, how “thin” or how many times do you coat the model? I’m getting a very shiny glow of the models I’ve used it on.

Edbert

I feel your pain, with that F16 that went so well till that final glitch. Ouch!

Regarding Tamiya’s gloss clear, you do need to thin it. Straight from the jar is too heavy. Thinning to about 50% thinner sounds right. Helps to do multiple thin coats too. Let these cure for around 48 hours, as what you are doing.

You mentioned the washes eating through. Did you mean the washes themselves (like Tamiya panel liner) or the thinner for cleaning up the applied wash?

Assuming you meant the thinner for cleaning up, I use Tamiya’s enamel thinner which works well for enamel based washes. Put a couple drops of the thinner on a cotton bud, soak off any excess on a napkin and go slowly and lightly with the clean up.

Hope this helps.

1 Like

Hi @Edbert,

Finished up a round of testing last night.

Setup a test card. A basic sheet of styrene cleaned with rubbing alcohol, primed with Vallejo black primer, and finally a clear gloss coat.

I applied the gloss in about 4-5 thin coats. This is pretty typical for me.

F is for Future, V is Vallejo gloss clears.

Top row of rectangles on the card will have the wash applied. Bottom row is the control group. Nothing is done to it so we can compare against it.

I have all the ingredients for an oil wash, just haven’t done it before now.

Give an idea as to how I applied the wash.

After an hour’s time air drying.

Used a clean cotton swab for each test. The cotton swab was soaked in the thinner and little pressure was applied to it during the cleaning. First set of tests was against the Vallejo Clear Gloss.

Started off by using Odorless Turpenoid. From the cotton swab it looks like a little paint came up. However, that could just be paint that was removed from the edges. .

Next up is Klean Strip. Much to my surprise all that showed upon the swab was the wash.

I had some generically labeled Paint Thinner so figured why not. Again to my surprise didn’t see anything other than the wash on the swab.

Final test was using Testors Enamel thinner. Weirdly enough I think it did the best job of removing the Oil Wash.

Second set of tests was against Future Floor Polish as the gloss coat.

Same order as before.

In this round it looks like most of the swabs picked up a little more color. However, the Klean Strip seemed to do the best of just picking up the wash.

After letting the test card dry thoroughly. I checked how the gloss looked after the wash and thinners.

To be honest I am hard pressed to see the difference. Though I think the Future Floor Polish did slightly worse in terms of losing a little more gloss.

This test failed to produce catastrophic failure of the clear coat. Other than a slight loss of sheen on the Future they look intact. However, there did seem to be some leaching of color. I was more careful on the second card to stay away from the edges yet some color still appeared on the swab. It does imply the clear may have had thin spots or imperfections in which the thinners were able to lift some color from the underlying layer. The primer is on good and heavy so I wouldn’t be surprised if some color could be lifted without a visual change.

I’m thinking of doing a second round. This time with a light color applied in the center. That way it’s easier to see the differences. Additionally, I think I added up to 2 more coats of the gloss than you did Edbert. So I’ll cut it down to 3 and see if that has an impact.

It’s been fun testing this all out. :grin:

2 Likes

Dude! Thanks for taking the time to setup a test like this!! :+1:t2:

1 Like

My dude, you are like Will Pattison without the hate and overall snarkyness and bad attitude.

I think you might have found my issue, it is not the materials, it is the single coat of clear. I’m just too impatient! Grrr.

I cannot thank you enough (assuming I have the answer, if not…grrr again)!

I’m building a Kineitc F-104G that is going very well (so far) so I hope this is my answer. Only time and patience will tell.

2 Likes

Heh, had to look up Will Pattison to get the reference. :slight_smile:

Glad it was helpful! I’ve been meaning to try out oils and this was just the excuse I needed.

1 Like

Since no one has mentioned this, I thought this might be of interest. If you are using artists oils, there is an art thinner called “Mona Lisa” that is very gentle on underlying paint. I have used it for years with no issues with the underlying color coats (which are usually Tamiya acrylic). Being specific for thinning artists oils, it is very effective in creating washes or filters with them.

For me Tamiya clear is more reliable than Future as a barrier, because unlike Future it is relatively immune to decal settings solutions. Mona Lisa has no effect on Tamiya clear.

All of this presumes the clear coat has had at least 24 hours to dry.

Konrad

1 Like

@PhoenixG this testing is awesome! Honestly the clears proved more durable than I would have guessed.

Did you try actual turpentine, by the way? That smelly stuff that art supplies store sell for oil painters? That’s what I started out with when I first tried using oils on my models, and that is what I found would eat right through my clear and paints. After I switched to odorless mineral spirits, no more problems.

If I might add, coming from the woodworking side of this, one of the reasons it is so hard to have a “right” answer to this question that works for everyone is that there is little to no standardization in the industries that makes these thinner/solvent products when it comes to naming or function. This issue is exacerbated by regional/national differences. For example, in the U.S., we rarely talk about “white spirits” while in the UK they rarely talk about "mineral spirits.’

What it boils down to is each modeler must do some of their own testing and experimenting to find which of their locally-available products works for the job they’re trying to do. Not to say, @PhoenixG, that you’re wasting your time – I’m taking notes! Because every little bit of data helps.

3 Likes

@Toimi_Tom I was pleasantly surprised by the results myself. I completely agree with your comments about the lack of consistency across thinners and solvents. Just because two brands label themselves as mineral spirits doesn’t mean you’ll get the same experience.

For ease of reference here are the exact products I used.

I wanted to test turpentine, but didn’t have any on hand.

3 Likes