First try at armor - Tamiya 1/35 M48A3 Finished.

TigerII,

Thank you.

I just rebroke the same wheel trying to get the track on forward instead of backward. It’s now clamped up so I’ll wait until tomorrow before attempting to reverse the other side. Hopefully I’ll get this tank together in the next few weeks and be able to start a new project. So many kits in my stash, so little time…[:)]

Looks great overall - I’ve done a couple armor pieces but I’m far from an expert. Here’s what I see - given the ask for constructive criticism:

  • A bit of silvering on the decals - apply gloss coat first.
  • Seams on the jerry cans, seams in general on small details
  • Bit of inconsistency in sheen here and there
  • Looks like a bit of touchup paint here and there - maybe blend/sand/coat
  • Treat the figure like a small model - seams on the leg, fingers etc. Give him a wash and similar color palette.
  • Someone once told me regarding ordinance on aircraft - everything you put on the model is a model itself. Great advice.

Those points aside, there’s sooo much good stuff here! Great looking kit overall.

The only criticism I have is stop being so modest.Great 1st armor.

She looks pretty darn good to me, love the mud and dirt on the fenders- I always have trouble getting that the way I want it. [Y]

A simple diorama should be easy, just a plaque, add some plaster, and press the model in the plaster while still wet to create tracks. Then paint it with cheap craft store paint, coat with glue and add some static grass and other greenery.

Great first armor build, Mike!

I see a lot of technical errors in the build, but nothing wrong with your skills in painting and finishing.

A little TET will rid the decal silvering, so that’s an easy fix. As far as touch ups go, the Army did a lot of that as routine maintenence, so that’s authentic.

Tracks backwards? Everyone makes that mistake lol.

The searchlight covers had plywood in the face to keep anything from contacting the lense. The cover should be flat in front.

The front drivers periscope would be down if his head was out of the hatch. Otherwise it blocks his vision.

The spare track links were attached to the turret rails with the center guide tooth. Yours is upside down - tie it on with some string and you’ll be okay.

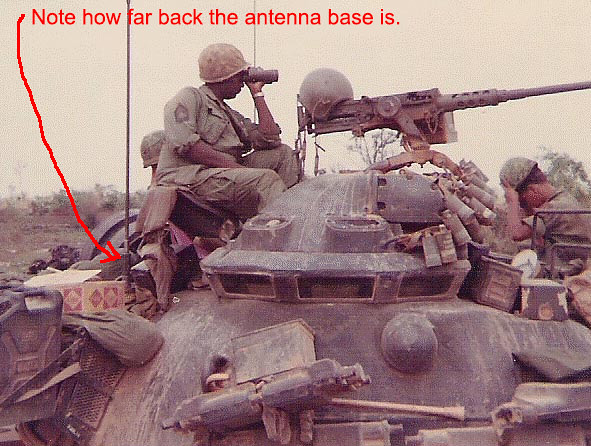
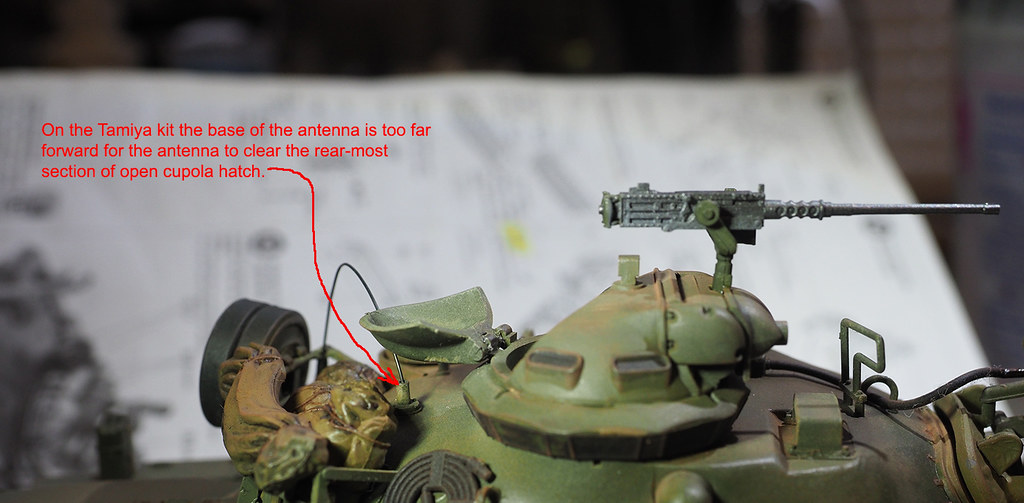
The radio antennae is in the righ place. There is a second one behind the TC’s cupola for the second radio set that talks to command. Only the lead tank would have one.

You have the tank marked with Army markings but as far as I know only Marine units has the -A3’s. The Army had -A2’s A2C’s and a few old converted -A1’s. The main differences being the addition of the cupola riser and the two extra return rollers on the -A3’s. The few converted -A1’s had five rollers as well, but the -A2’s only had three per side.

Lile I stated above, mostly just technical errors. Nothing but hours and hours of research would’ve prepared you for all of that lol. Those are just the things that an Armor Nut can see and the Tamiya instructions don’t point any of that out. Not your fault in the least.

Overall I think you have a solid display piece and I don’t recommend you changing anything but the decal silvering. 99% of those who view this model won’t know what’s technically wrong with it and won’t care anyways.

Your painting and weathering are solid! I really hope you’ll try another armor kit, and soon! :smiley:

Just for the record, this is a very good build, Mike. Don’t let the technical stuff bother you. You did great!

It looks great for a first effort. The others have given you good pointers to improve it or the next one. Keep up the good work.

The model is marked correctly. The US Army used M48A3s as well.

Great first tank!! I’m looking forward to seeing the next one.

Don’t post here very often; but as a former tank commander on M48’s and M60’s, maybe I can clear up the problem with antannas. Only time you would have two antannas would be if you were on the platoon leaders or platoon sargents tank. The second antanna that was mounted behind the loaders hatch was receive only. It was used to monitor the company frequency. It was the loaders responsiblity to monitor. Battalion and higher would have had three. One to transmit, ( behind TC location) , two to receive. One more thing. The bumper numbers you have are for the 9th Infantry Division. As far as I know, they never have an organic tank battalion in Vietnam. The only 77Th tank battalion in Vietnam was the 1/77 which served with the 5th Infantry Division. On a ligher note, the bumper numbers are for my old tank when I served with the 9th Division stationed at Ft. Lewis in the early 70"s. We had M60A1’s.

Keavdog,

I did shoot Future on the whole hull before applying decals but I also saw the silvering after the fact. I used some Solvaset on at least one of them but I think I should have been more meticulous in my decaling prep.

I did do some touchup painting on the rear fenders after I’d already decaled them. I didn’t want to take the chance at sanding on that area any more since I didn’t believe I’d get it right without damaging the decals … I should have been more attentive to the little, but important, details. I also noticed the difference in sheen here and there and told myself (any excuse to not have strip the whole paint job) that the real tank might have had some differences in reflective properties of the exterior :).

You’re absolutely right on with respect to the seams on jerry cans and other small details. Again, I should have inspected all the small areas more closely.

Templar1099,

Thank you sir!

Gamera,

Thanks much!

And, yes, the diorama part, with the exception of painting the figures for the patrol along side the tank, should be relatively easy.

Mike Brindos, HeavyArty, Chad, and M60_tanker,

Thank you all!

Mike B. and M60_tanker,

I’m a little confused as to which antenna should be left in place. I guess not being familiar with terminology regarding armor, I get confused easily. I’ve removed the antenna behind the cupola and left the one between the two hatches on the turret. Is this correct? The one behind the cupola blocks the cupola, with the hatch open, from turning - so I thought something must be amiss anyway.

The main antanna for all US M48 and M60 tanks was located behind the tank commandeers cupola. The other two locations(behind and in front of the loaders hatch) were only used on command tanks. Hopes this helps.

M60_tankier,

Thanks, it clears it all up except how the cupola with the hatch open would be able to turn without hitting the antenna - maybe the antenna was flexible enough to bend and ride under the hatch if necessary?

Antanna was mounted to a spring base and would bend out of the way. Usually it was tied down with a whip cord. Also, on your searchlight cover, it would of had 4 straps that ran fron the cover back to the vertical bars on the back side of the searchlight. Two on top, and two on the bottom.

M60_tanker,

Thanks, I believe I finally understand. Thanks for sticking with me here.

Would the whip cord eminate from around the rail on the rear of the turret about where I’ve placed the spare tires?

I could do that with no problem.

It depended on what the TC wanted. What you show is fine. Also, from that angle, the main gun travel lock would have faced towards the rear of the tank. Their was an actual wire lock that would have prevented it from folding forward.

Actually most Army M48’s in Vietnam were A3’s. I have been searching photos high and low for A2’s and the only Army unit that I came across with M48A2’s was 1/77 Armor, the Steel Tigers, when they first arrived in county. They later received M48A3’s.

On a side note, all A3’s were rebuilds, not new production vehicles. The last original new production model was the A2. The M48A3 and later M48A5 were rebuilds if earlier versions.

The M48A2 had gasoline engine while the M48A3 was diesel powered.

See, now that figures. The only pictures I could find of the 1/77 were from when they first deployed. So no -A3’s. That fills a gap for me just fine. :slight_smile:

Oh, and I got the antennae positions backwards it seems lol.

Now I know.

edit; that also explains why some -A3’s only had three return rollers instead of five per side. I knew the -A3’s were upgraded from -A1’s and -A2’s, but that was a far better explanation than what I said.

Always learning something!

Looking at a picture I found on the 'net it seems to me that Tamiya got the position of the base of the antenna behind the cupola a little off. That might explain why on my model the open cupola hatch bumps into the antenna. I’ll still do what M60_tanker says they did - use a whip cord to tie the antenna to a rail or other protrusion on the turret. It solves my problem.

Note that in the first picture the antenna is placed farther aft - (and maybe farther to starboard) than on the model.

1943 Mike, yes, tied down antennas is pretty standard on US vehicles. At least post WWII.

MB, here is a good website for the M26 thru M60 Patton family with all sorts of good info

http://www.patton-mania.com

and here is a good website for 1/77 Armor

http://www.steeltigers.org/home.php

I see what you mean. The picture shows it farther starboard and aft of the cupola than the model.

Thanks Stik!