Outstanding!! Love what you are doing with this Cat.
Steve
Outstanding!! Love what you are doing with this Cat.
Steve
Looking really good
Fantastic work…
Looking really good Britt! Those insignia came out great…what color did you use for the blue on them?
Thanks guys.
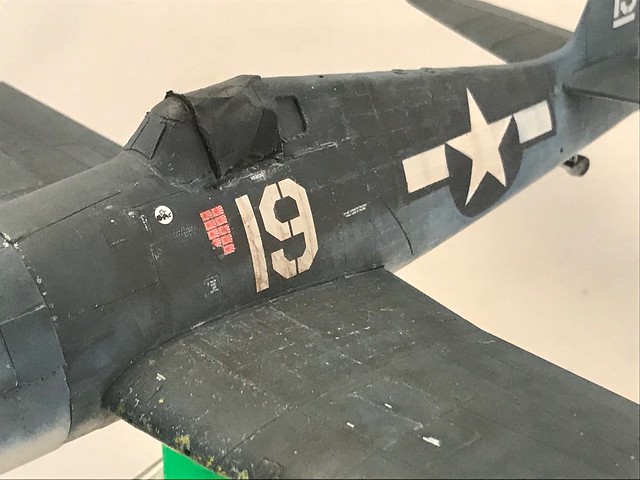
Good question. The simple answer is that I work from FS 35044 Insignia Blue. The two closest mixes I use are Tamiya XF-1 Flat Black/XF-8 Flat Blue 2:1 respectively and XF-1/XF-8/XF-9 2:2:1 respectively. That last option seems to really do it nicely.
I’ll tweak these colors a little bit based on weathering present on the plane I’m modeling. In this specific instance, I’ve got two dark colors next to each other and one needs to be a little darker than the other. So once the paint gets put down and it doesn’t show to be what I need then I tweak it either lighter or darker accordingly with thin layers. With the usage of Montex masks…I’m leaving the mask in place and only pulling up a corner carefully to check my math so to speak.
 Untitled by Britt Vallot, on Flickr
Keep in mind that a severely weathered blue field would need a different mix entirely. It’s not always as simple as adding white to the mix. That would likely waste a lot of paint. =]
Hope that’s of some use.
WOW! WOW! Just speechless.
Your friend, Toshi
That’s very helpful Britt! I’ll give that mix a try on my current build. Thank you!
Beautiful work, so far…looks great.
Cheers [:)]
Many thanks y’all. Andy, I’m happy to help however I can. I’ve got a few other tips I learned the hard way if you’re interested. DM me.
Weathering
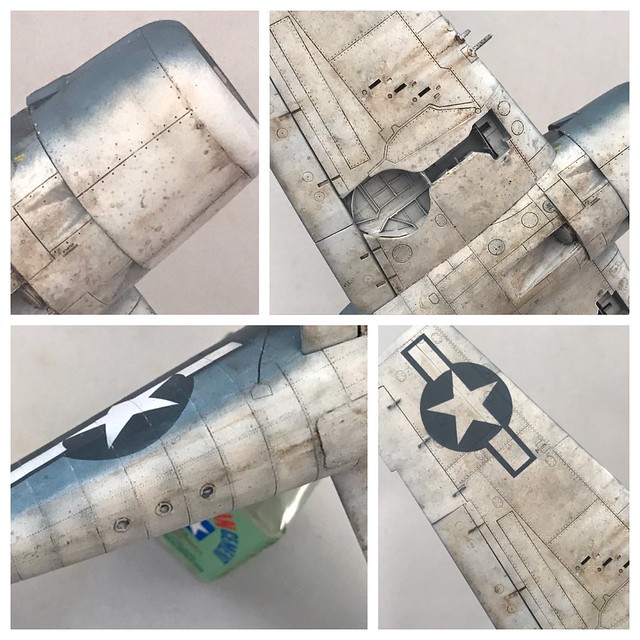
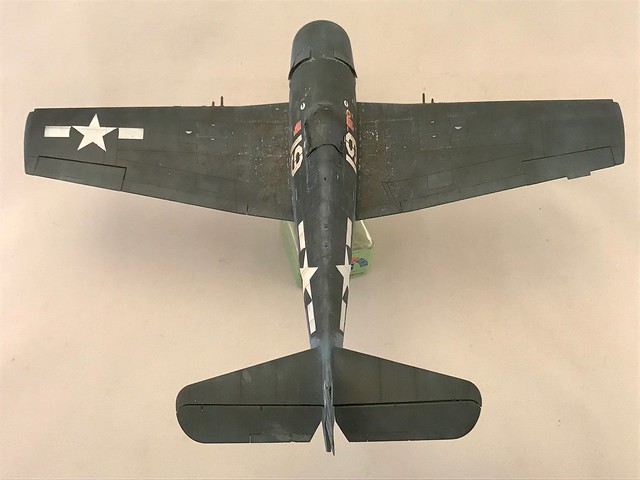
So I moved through this first part a little faster than I thought I would. For me this stage is always up in the air as I never know how long it’s going to take. I know it when I see it…it takes as long as it takes kinda thing. I didn’t want to over weather this hellcat as Vraciu’s plane seemed relatively clean and kept up with for the most part. After careful review of photos of hellcats on the decks of carriers in '42 and '43 I settled for what you see here. The undersurface was my biggest concern. I wanted a typical looking soiled undersurface and not a total mess. There’s all the obvious oil leaks that streak across and spots and such from handling and moving about…this was all done with thinned oils. I have a couple different methods that I get a little better at each plane I make. So here’s that.
 Untitled by Britt Vallot, on Flickr
 Untitled by Britt Vallot, on Flickr
 Untitled by Britt Vallot, on Flickr
 Untitled by Britt Vallot, on Flickr
Some of the weathering is done by dropping a loaded fine tip brush over a few key spots never too far away from the fuselage, and along panel lines to allow for a capillary effect. with a Qtip soaked in low odor thinner on one side (other side dry), I drag out my streaks accordingly. If it gets too heavy, it’s always easy to remove and restart. Common practice, but some times it’s still good to point out for any newcomers to the hobby. One new trick I’ve applied is by making use of an armor trick for weathering tanks and trucks. With a larger brush…mileage may vary but generally wider helps…I load the brush with thinned oil paint and with my airbrush I spray through the brush to deposit a mist over the undersurface of the plane. Practice this on the side to get the desired outcome. Generally, a very thinned brush works pretty well. If you’re looking for a heavily weathered surface in this fashion, I’d recommend doing it in two or so phases. Put down a coat and allow to dry. Come back and hit it again with maybe a slightly different or darker color or what have you. A really nice addition that helps bring out what we really see under these hard working warhorses.
 Untitled by Britt Vallot, on Flickr
 Untitled by Britt Vallot, on Flickr
 Untitled by Britt Vallot, on Flickr
 Untitled by Britt Vallot, on Flickr
 Untitled by Britt Vallot, on Flickr
 Untitled by Britt Vallot, on Flickr
 Untitled by Britt Vallot, on Flickr
 Untitled by Britt Vallot, on Flickr
 Untitled by Britt Vallot, on Flickr
 Untitled by Britt Vallot, on Flickr
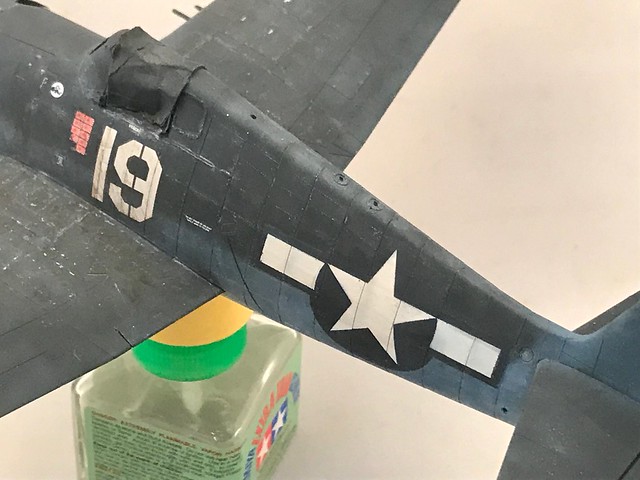
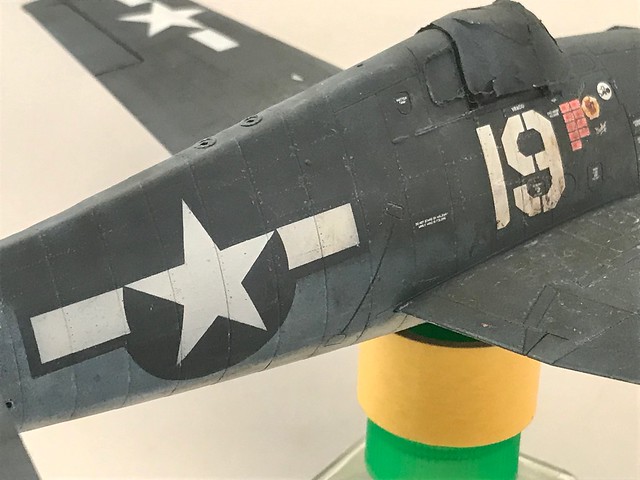
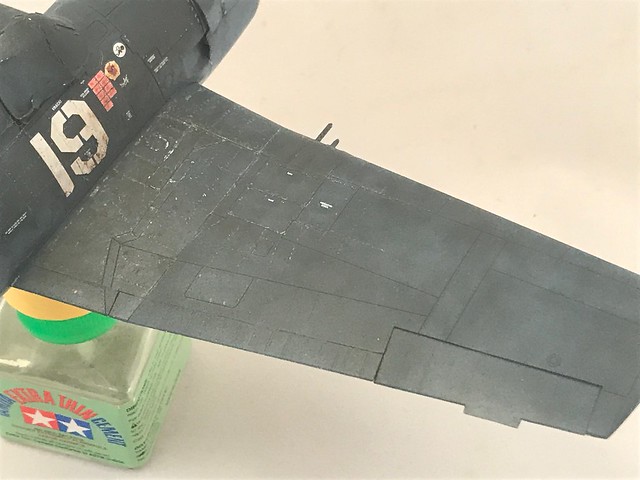
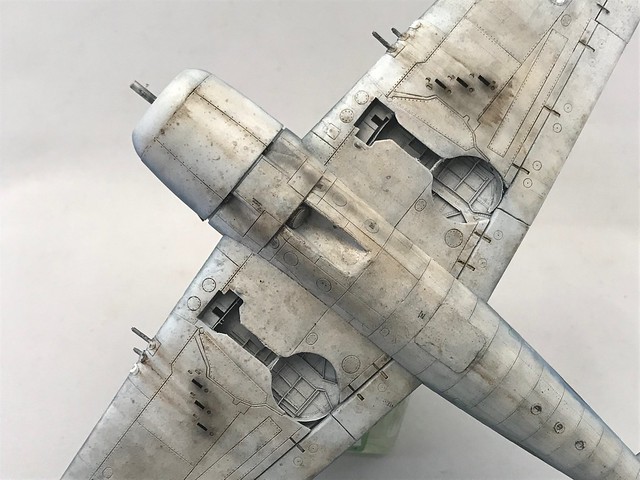
Oils on top are used a little more sparingly. I kept it mostly around the most heavily trafficked areas. I specifically referenced photos for this part. The other notable weathering seen here is all of the tiny micro scratches along the wing walk and leading edges of the wings. For years I scratched my head as to how I’d go about managing this. Now I use a very sharp tip from a watercolor pencil. Faber-Castell is the brand. I currently have a white and silver, but I’ll likely grab a couple more in a color scheme that warrants needing. Very handy for dealing with the very tiny marks that are seen but just can’t be replicated by larger tools or brushes. I used a very thin wash of white oil over the fuselage towards the rear…just enough to bring out some rivets where I need and along the lap joints towards the back. Some of this feels over done on the left side and I may correct with a thin coat of paint to bring it back.
I’ve got the landing gear to tackle next and miscellaneous items to address. Still plenty of little things to get through. They always seem to take the longest…like moving. =]
Back with some more. Just about done tidying up the majority of the weathering for this hellcat.
I’m trying to add a layer of depth that I haven’t as of yet quite captured they way I want in previous builds. Flat coats are appropriate for weathered aircraft such as this, but often times in pictures you can see a sheen to the paint that suggests something more than just flat. When you add in oil slicks and sheens that spread across everywhere it changes reflective qualities along the aircraft. The last couple of builds I’ve experimented with airbrushing Alclad’s Light Sheen across some spots I wanted to highlight as oil leaking/spreading over especially along the bottom. If you have ever walked under some of these planes at airshows you can still see how the undersurfaces have a slick oil sheen across different areas…some broad…some that spread across leaks and along rivets…you get the idea.
After some comparison between builds, I’m of the opinion that I’m going to push the contrast a bit more and add some of the Light Sheen along places of the fuselage and upper surfaces to help suggest this reflectivity where weathering wouldn’t flatten it out (i.e. exhaust stains, severe paint weathering) and bump the contrast accordingly underneath with a light gloss finish over oil slick areas. Here’s how that turned out.
 Untitled by Britt Vallot, on Flickr
 Untitled by Britt Vallot, on Flickr
I’ve also made use of the same armor trick of spraying through a loaded brush to apply this gloss coat.
 Untitled by Britt Vallot, on Flickr
Unfortunately, the diffusion of light in my light box limits how much glare can actually be seen in natural light. At some point down the road, I plan to take a couple of planes out and film in day light with some kind of diorama setup. I’ve done my best to show what’s happening.
Addressing the landing light. Simple enough right. Surprisingly effective. Just be careful not to tear or rip. A q-tip and the bottom edge of a small paint brush are pretty good at smoothing out whatever wrinkles you get from trying to set it in there.
 Untitled by Britt Vallot, on Flickr
I also am finally at a spot to apply the exhaust stains from the shell chutes. I’ve gotten much better at doing this with a airbrush. In the past I’ve tried pastels, but honestly I’ve gotten so good with an airbrush that I use it for quite a lot now…even this. Thin light coats to build up your area…that’s all it takes. =]
 Untitled by Britt Vallot, on Flickr
 Untitled by Britt Vallot, on Flickr
 Untitled by Britt Vallot, on Flickr
 Untitled by Britt Vallot, on Flickr
Back on top, I’ve applied the outboard gun port tape with my trusty white water color pencil. Pretty damn handy! I’ve also begun painting the layers of smoke staining from the exhausts.
 Untitled by Britt Vallot, on Flickr
 Untitled by Britt Vallot, on Flickr
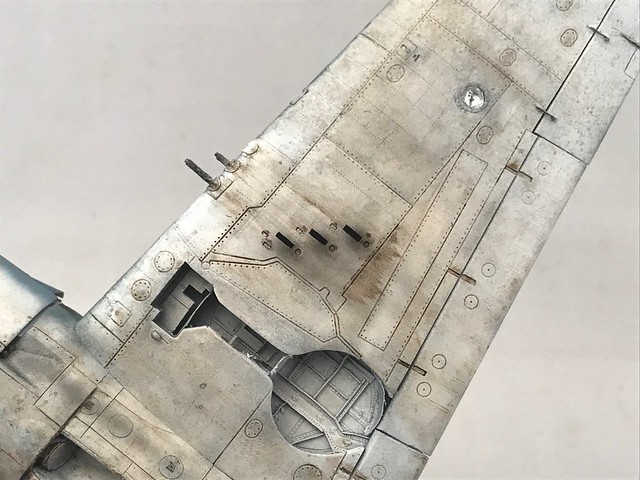
Thanks to some Squadron notes I’ve come to learn that these early(ish) hellcats had only a starboard side pylon attached underwing. In photos of wartime hellcats on carriers, it seems some of the time the center part of the pylon attaching to whatever bomb/etc would be underneath was left in bare metal. I happen to appreciate the look and thought I would keep it on my build. It’s even possible that’s how they all were. This was done in Alclad’s White Aluminum and masked to paint the Insignia White around it.
 Untitled by Britt Vallot, on Flickr
 Untitled by Britt Vallot, on Flickr
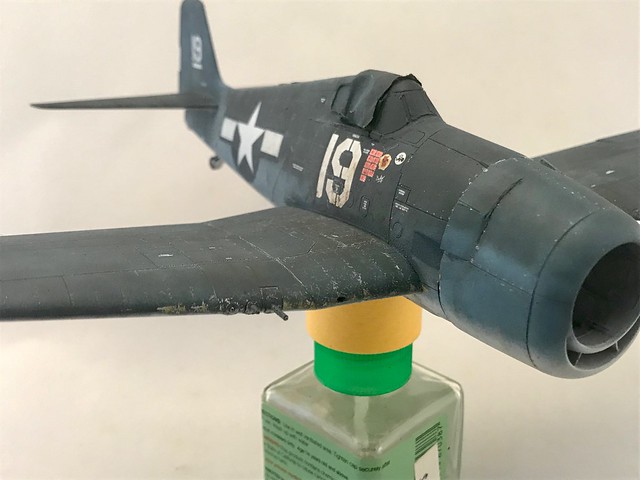
Other noteworthy things to mention here are that the gun barrels were originally painted in the Sea Blue/Field Blue color and just now a thin coat of Gun Metal from Tamiya. Very happy with it.
 Untitled by Britt Vallot, on Flickr
 Untitled by Britt Vallot, on Flickr
That’s where it stands at the moment folks. Wrapping up the landing gear and looking to attach those after the exhaust staining, and taking care of a few knick knacks.
Thanks for taking a look. =]
Very impressive weathering. This build is going to be one of those that is required reading for anyone building a Hellcat
Really nice Britt! I really like the random splattering you get by the airbrush through the loaded paintbrush technique.
Excellent build and gotta love the black basing. I like your color spin on the dark blue base instead of black. Going to do my best to remember the foil in the landing light thing, great idea.
Looking mighty fine!
I’m also impressed with your committment to illustrate the WIP with your exceptionally well done images.
Top notch weathering Britt. I’m thoroughly enjoying your thread.
That’s kind of you to say Chris. I don’t believe I’m quite in that number. Last time I checked there wasn’t any spanish or czech in me. =] I’m at the back of a long line, but I’ll take that compliment, thanks!
Rooster, the splattering happens to be random, but the placement is purposeful. I did this over the clear coat which allowed me the ability to remove it easily if needed. Mostly didn’t need to here except on the undersuface of the cowl as I was more particular about how that looked.
Tickmagnet, that foil trick is one I’ve been refining for a few builds now. It provides a more appropriate looking reflective surface without having to try adding a pigment to do it. Simple and easy…some times finicky.
Mike, I appreciate the hat tip about the photos. They’re not living up to professional slide show stuff, but since I’m not applying for a job or any such thing…I can live with “relaxed-fit proper.” But again, thanks. My pictures from before were pretty lazy. I was taught better so I figure I ought to put in the effort. I’m glad they are making a difference.
Joe, always glad to have you on board. Thanks!! =]
Exhaust Stains
I’m slowly wrapping up the last details for this hellcat. Currently rounding third. =]
I did the exhaust stains in three stages. I first laid down some paint with the airbrush to aid in layering the colors observed for weathering like this. Some of this gets covered and is much less obvious, but due to the lack of control one will see with streaking oils across, some of this will be evident underneath and it’ll make a difference. I started with a darker black lightly painted in as seen above. This is followed by a medium grey tone still some what dark for grey and on top of that is a muddy red color like NATO Brown. This red tone stays within the leading edge of the wing to just past the main wing spar.
On top of this I mix up a few colors to paint on the lead deposits that streak across the fuselage. Basically, white and black and a burnt sienna and a warm yellow (I forget at the moment). With a fine brush I layer these in and with a filbert brush (short wide brush) I load with some low odor thinner and pull the paint across the fuselage. It may take you more than once to get the desired effect. Don’t over commit the streaking nearest the exhaust pipes. Once I get what I’m looking for across the side of the plane, I go back and fix up whatever needs to be address at the beginning of the lead deposits and work to blend this into the streaking.
 Untitled by Britt Vallot, on Flickr
 Untitled by Britt Vallot, on Flickr
 Untitled by Britt Vallot, on Flickr
 Untitled by Britt Vallot, on Flickr
 Untitled by Britt Vallot, on Flickr
 Untitled by Britt Vallot, on Flickr
I let this dry over night and then come back over it with my watercolor pencils. I got away with only needing a black and warm grey. I try to keep a sharp point in the beginning at the start of the streaking. Only after do I come back along the lap joints and drag the pencil in a downward fashion to also help illustrate some of the wearing that happens from the busyness here getting in and out of the cockpit…some of this filth and grime gets worn off as well if you look closely in pictures. To get the pencil to lay down a smooth line like paint I just give it a little lick. Simple. =]
 Untitled by Britt Vallot, on Flickr
 Untitled by Britt Vallot, on Flickr
 Untitled by Britt Vallot, on Flickr
 Untitled by Britt Vallot, on Flickr
Landing Gear
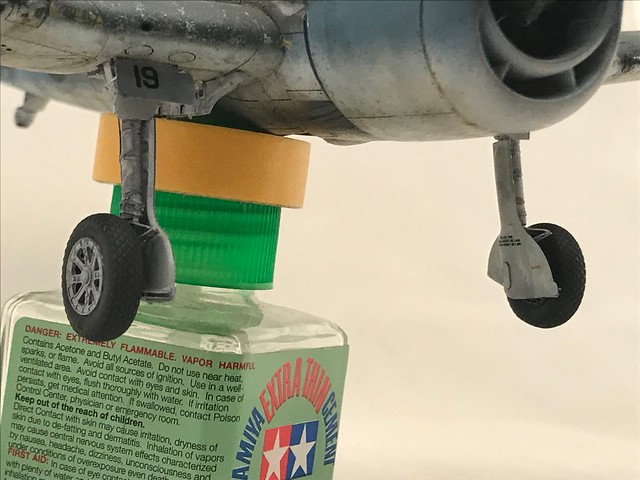
With exhaust stains out of the way, now I can hold this thing and manuever around getting my landing gear secured. The starboard side gear went on with no problems, the port was a real SOB. Mostly self-inflicted. I won’t bore you with details but I had to get real tricky to save it. I truly hate it when these things happen as the thought of a perfect build comes crashing down, but it is always an opportunity to grow and pull a new trick out your @ss to save the day. Anyhow, here’s that. The brassin wheels with the newer kit releases is a nice addition.
 Untitled by Britt Vallot, on Flickr
 Untitled by Britt Vallot, on Flickr
 Untitled by Britt Vallot, on Flickr
Navigation Lights/Canopy details
As you can already see I got anxious and pulled the masking off the canopy and windscreen. A few touch-ups and it’s pretty much good to go. I’m very happy with how this all turned out. It was worth all the fuss.
 Untitled by Britt Vallot, on Flickr
 Untitled by Britt Vallot, on Flickr
 Untitled by Britt Vallot, on Flickr
I was a little surprised with the clear parts that Eduard offers for the nav lights. There is already a bevelled indentation where you can paint just the bulb and leave the rest of the lens clear. A tiny dab of Clear Red and Green and a drop of white glue later. Presto!
 Untitled by Britt Vallot, on Flickr
 Untitled by Britt Vallot, on Flickr
 Untitled by Britt Vallot, on Flickr
That’s a wrap for now. I may go back and touch the exhaust stains some. I’m constantly critiquing this part. It pretty much is what it is. There are some lights to drop in and some cockpit details to add that were too finicky to complete before. Comments, questions…hit me. =] Thanks for watching as always.
Bringing it home
I’ve finally got to wrap this up the other day and put her in the books. I’m much happier with this build over the original one I did about – I had to pause. I was going to say 6 years ago, but it’s actually right at 9. It’s hard to believe I’ve been doing this that long already. It seems like I just got started still. Anyhow, I recall a huge seam line down the front of the fuselage I didn’t know to fill on the first one…some other knick knacks that are more subjective in nature with painting and weathering, but ultimately an okay build from a novice modeler. The kit itself probably helped a good bit as Eduard offers a fantastic hellcat. This one helps me feel redeemed though. I’m glad I got it done.
Here’s a walkaround:
 Untitled by Britt Vallot, on Flickr
 Untitled by Britt Vallot, on Flickr
 Untitled by Britt Vallot, on Flickr
 Untitled by Britt Vallot, on Flickr
 Untitled by Britt Vallot, on Flickr
I’ll take a moment here to discuss some of what is going on here. In photos of Vraciu’s hellcat I noticed what looked like some sort of sheath on top of the antenna mast that may have aided in easy removal of the antenna aerial. Naturally, I aimed to include it. This was made of lead foil from a wine bottle. Cut to fit, embossed with rivets and glued shut with a white glue using the actual antenna mast as a mold. Very easy to do and worth the effort. The radio line itself is EZ line. It’s passed through a small length of albion tube, twisted over itself and glued with CA, and the hook end is small brass wire rod fitted through the tube and bent into shape.
 Untitled by Britt Vallot, on Flickr
 Untitled by Britt Vallot, on Flickr
The tail hook was crudely fashioned by Eduard. One of their rare misteps, but it is easily corrected with a sharp No. 11 blade. I cut a “v” shape into the top of the retracted hook part and worked it into a “u” shape a little at a time. Didn’t take long at all and it makes all the difference. Also, a bit of clear stretched sprue was sanded round and smoothed over to replace the tail light.
 Untitled by Britt Vallot, on Flickr
Stretched sprue makes up the whips.
 Untitled by Britt Vallot, on Flickr
 Untitled by Britt Vallot, on Flickr
 Untitled by Britt Vallot, on Flickr
 Untitled by Britt Vallot, on Flickr
 Untitled by Britt Vallot, on Flickr
 Untitled by Britt Vallot, on Flickr
 Untitled by Britt Vallot, on Flickr
 Untitled by Britt Vallot, on Flickr
 Untitled by Britt Vallot, on Flickr
If you look just aft of the waste gate door that vents the radiator, you’ll see a little nub poking out from the bottom of the fuselage. It’s a nozzle that fits into a recepticle on the 150 gl drop tank. I added it since I’m leaving the drop tank off here.
 Untitled by Britt Vallot, on Flickr
 Untitled by Britt Vallot, on Flickr
 Untitled by Britt Vallot, on Flickr
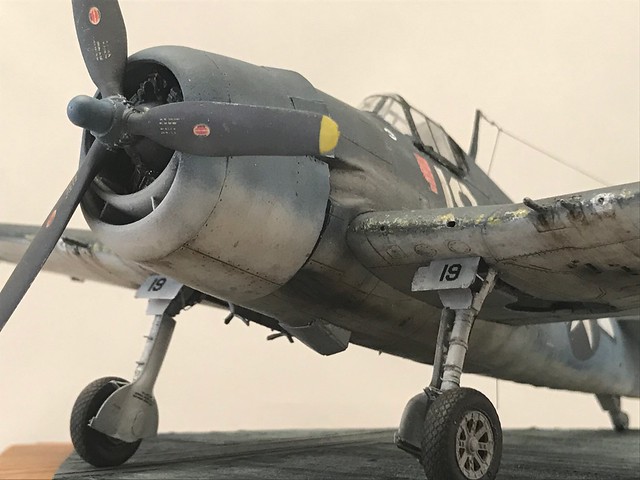
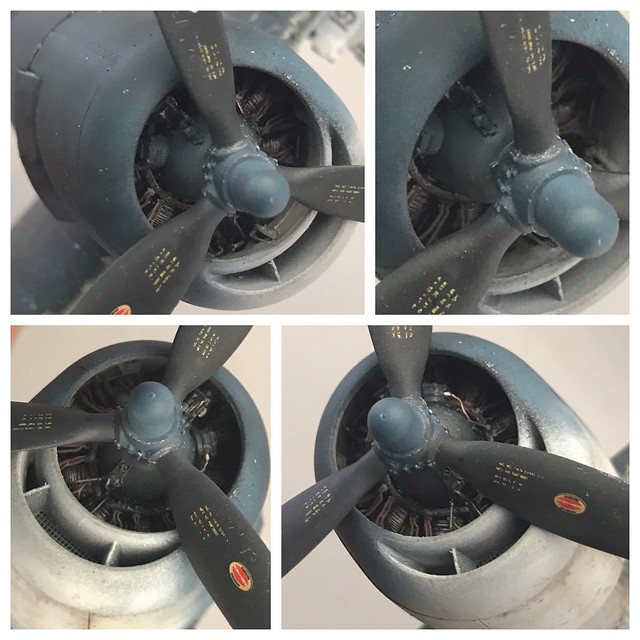
Close up on the prop…I added some bits of stretched sprue and notched them to build up the bolts which Eduard somewhat underdefined here at the hub. A simple thing to beef up the detail. The prop was also sanded thinner to bring it closer to scale. When I paint these nowadays I start with a metal color base (Alclad Aluminum) and follow up with a slightly lighter Flat Black which also gets covered up with a more “faded” looking black. The follow up is done in a non-uniform fashion to allow some darker values to show through. I usually just add a bit of grey to my eye’s liking based on how weathered a look I’m going for. When the decals go on (and after some Detailer weathering around the hub) I will seal everything with a flat coat to allow for a light dusting of paint over the decals. It tones them down a bit to keep them from appearing so stark bright over a weathered prop. It’s resealed after completing. Here I resealed it with a Light Sheen from Alclad again in a non-uniform fashion but unfortunately my lighting is too difused to show it well. I’ll be working on getting some addtional lights to help with that one day soon.
 Untitled by Britt Vallot, on Flickr
 Untitled by Britt Vallot, on Flickr
 Untitled by Britt Vallot, on Flickr
 Untitled by Britt Vallot, on Flickr
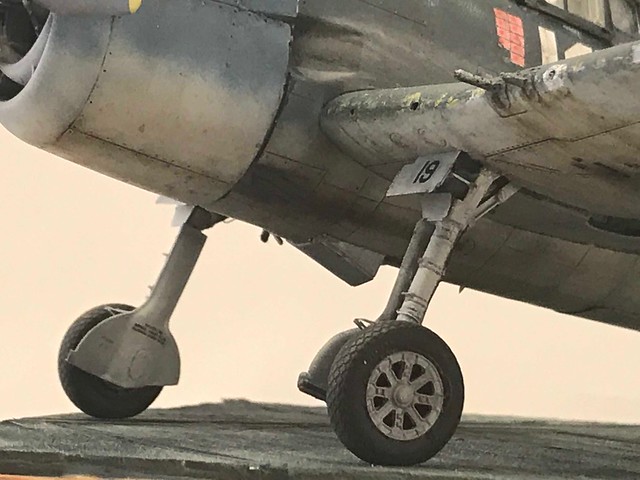
A few close ups of the landing gear. Eduard did a great job OOB to render this area and their PE detail set is even better. There are still a few spots where detail can be added. they left out a few parts that are readily seen when looking directly into this area. I found some fantastic pictures of this area on a refirb of one of these hellcats. DM me if you’re looking for some.
 Untitled by Britt Vallot, on Flickr
A few cockpit pics. This is always a dark area to try to shoot. One day I’ll come up with a better way to show it.
 Untitled by Britt Vallot, on Flickr
 Untitled by Britt Vallot, on Flickr
I even put the salt shaker in. =]
 Untitled by Britt Vallot, on Flickr
 Untitled by Britt Vallot, on Flickr
 Untitled by Britt Vallot, on Flickr
That’s a wrap folks. Questions are welcomed. Thanks for following along. =]
What a well thought out and very well executed build. I took a break from aircraft for the last few years switching gears to automotive builds so I could work on my painting skills and observe / learn new techniques in aircraft painting and weathering. This whole thread here is laced with “how to’s” and very good information pertaining to paint and weathering. I’m on my phone right now but when I get the chance over the weekend I’m going to print this entire thread out and study it. Thank you for not only sharing your build here but also the techniques you used along the way. This is definitely a true contribution to the modeling community. Again, thanks Britt. Hats off to you 
absolutely beautiful build thank you for sharing so much info in how you paint.