I’d like to attempt dot filtering after re-reading Bill Plunk’s article on his Marder. I would probably test it out on an old King Tiger or car that I’ve got. Anything I need to know, experiences, favortie technique etc? What are some basic colors, and what are some tools that I would need? Thanks for looking.
Make sure your clear coat is full cured BEFORE trying this technique. Ask me how I know. [:-^]. The paints I use are Windsor & Newton oils. The colors I have are white, black primary colors (blue,red,yellow), and a couple of ochre and umber tubes. The brushes are a synthetic called Taklon. I use several types round( to apply the oils and streak the oils in tight places), flat, and taper. The flat and tapers are used to streak the oils). When I streak the oils I load up the brush with mineral spirits and make 1 to 2 passes, and then wipe the brush on a lint free rag. As for loading up the brush with mineral spirits, sometimes I leave the brush “heavily” loaded, other times I slightly unload the brush by lightly and quickly touching the side of the brush to the rag. It depends on how heavily streaked you want it to be.The mineral spirits used are the cheapest I could find at my local hardware store. The technique is pretty simple really, it just takes practice.
While Bill did a fine article, Doog’s is more inline with what the rest of the world does as far as a dot filter. I have several foreign armor mags from UK, Japan, and others. Alot of them have a dot filter technique that is pretty much the same and differs alot from Bill’s article. You just have to decide which look you are going for.
As fatacmet mentions, the technique is very versatile and can be applied in a variety of ways. Depending on the effect you are looking to achieve with the filters, primary colors used in combination with each other (blue, red, yellow, white) and with the base coat colors can produce subtle shades of variations. You can also use shades of the same color to introduce a similar but more subtle fading effect. I’ve actually “stacked” both approaches in some cases, especially a single-tone scheme and have been pleased with the results. I don’t actually use oil paints for my approach but employ enamels even though it’s often called the “oil dot filter” approach.
The technique in doog’s article is pretty much the accepted method, small dots of paint applied and then blended together with downward strokes of a thinner dampened brush. Varying the thinner amount varies the blending and dilution. The desired end result is to achive a very subtle tinting of the base coat, so the process will remove almost all of the oil paint (or enamels in my case).
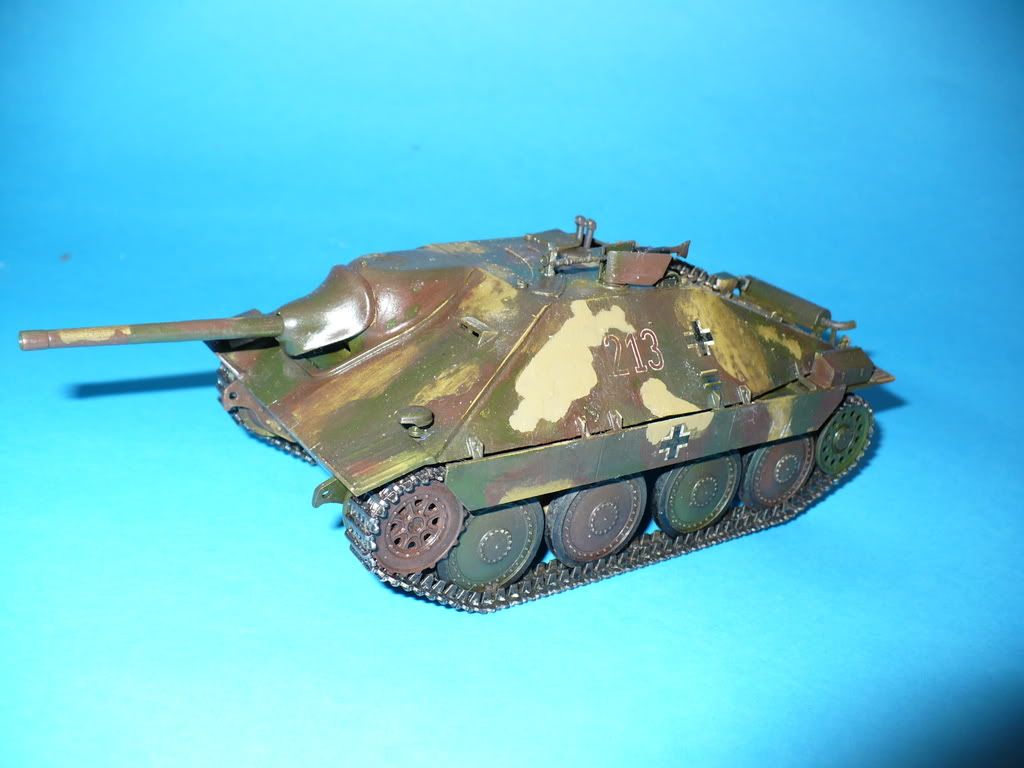
Thanks for the post, I would have never seen the Doog’s Hetzer and his dot weathering. It looks good and Doog explains it pretty straight forward. I’ll have to give it a try. Thanks again for the link.
I think Bills tut is more in line with an actual filter, for weathering, while Doogs, as the more accepted method is mroe inline with replicating rain streaks. I think Doogs also works best on things like the Hetzers, Brummbars, Sturmtigers, etc. The big slab sided things mostly. The nice thing about Bill’s method is it works and looks fine on horizontal surfaces.
Sorry I didn’t get to this post earlier–been busy with the band, but I just wanted to say that it looks like y’all have got everything covered here, so I can only add that if you need any advice or help with my oil dot method, don’t hesitate to email or PM me! [:D]
Thanks for the tips everyone. I may go out tonight and pick up some brushes and paints if I can find them. If not its still a good excuse to go to the hobby shop. [:D]
with apologies to the OP, I would like to piggy back couple questions for Bill (or any other enamel user).
My base is enamel, then I coat with Future (few thin coats), let cure for at least 2 days, then weather. Do you use your enamel “dot” on top of enamel-future? I assume that the Future is left to cure for a long time. Do you then “future” again post-streak, before you add the other weathering (pin wash, pastels/pigments).
Another assumption— the thinner is NOT lacquer (too hot), but “regular” mineral spirits will work?
Anyone has a suggestion as to the best brush to use, ie soft vs hard bristles? synthetic vs natural hair? (the brush, not a hairpiece
Again, thanks to all the experts and good people in this forum for taking the time to share and teach us your techniques. Bears repeating, you guys increase my hobby enjoyment by leaps and bounds, cheers.
If your base coat is enamel, you would be far better, IMO, to seal with a Flat lacquer, like regular dull coat, than a high-gloss coating like Future. The reason? The Future’s smooth gloss coat will not allow the paint to “grab” the oils, but will cause them to mostly slough off the surface by gravity effect. This is NOT the method of the “oil dot method”. You will NOT get the effect that I got in my Hetzer tutorial with a smooth glossy coat–as I believe T-Rex found out?
You DO want the base coat to be flat, to provide “teeth” for the paint to “catch” the oil paint, and let it lay on the base coat. I use simple “low odor mineral spirits” to do mine–but don’t forget, I use acrylics exclusively for armor. It’s one good reason to switch from enamels–makes weathering a LOT easier, and really reduces the error risk factor to almost nothing.
Any soft-bristle brush would work. Take a look again at my tutorial–the link is posted above there.
Sorry to disagree here doog, but this is a recipe for disaster when working with straight enamels. Regular dull coat will lift up and/or fog when exposed to thinner or mineral spirits no matter how long it has set (I’ve had this happen to me personally, it’s actually a neat way to try to get a white wash finish, but I digress). The interaction of the thinner or mineral spirits will cause the very fine powder particles that produce the dullcoat to come back out of suspension and when the thinner or mineral spirits dry, the powder will be left on the surface. It’s this powder that produces the “tooth” of the flat finish. But once it’s out of its suspension medium, it behaves very differently.
I’ve also found, when using regular enamels for the dots, that I’ve no problem working on the Future finish with gravity taking over and the paint running off or pooling, even on a horizontal surface. When it does happen it’s because the brush was too heavily loaded with thinner and it “flooded” the surface, causing it to work more like a wash than a filter. If the brush is only dampened with thinner and repeated strokes are used to remove the paint, the same effect is possible. It’s all in the control of the brush and the amount of thinner. I’m guessing that T-rex ran into trouble because he applied too much paint and/or too much thinner in the result he achieved.
Yes. I apply a Future layer barrier between the enamel basecoats and the decals. I actually don’t leave the Future to cure for an extended period of time, usually just a few hours, sometimes overnight, but I live in a very dry climate so more humid areas may require a longer cure time. Leaving it to cure overnight should be sufficient in any area though. On my Pz III N build, because I was experimenting with fading the basecoat first before doing the “traditional” primary colors, I did seal the initial variations on the basecoat dot filters first with another light Future coat to protect it. It works but you have to be very sparing with the Future in every instance. You want very very light mist coat applications, not heavy wet thick applications.
I use regular Testor’s “Universal” thinner because I apply my dots using enamel paint, not oil paint. For oil paints, the almost universal recommendation is turpenoid (odorless) or standard mineral spirits.
I use a round, 0, sable brush. You definitely want soft, not stiff, bristles. Natural sable always works better than synthetic for this type of work IMHO because of how it handles pigments and interactions, but that’s more a stylistic preference and what I’m comfortable with vs. a “scientific” finding. [;)]
Always a pleasure to share with others. It’s how I learned, and continue to learn, everything I know about this hobby. [tup]
According to your article of dot filter, you applied on color once at a time starting with the darker color down to the light, but the doog says this shouldn’t be done, all the colors must be applied at once.
The answer is both. [:D] It all depends on how you want the effect to turn out. If you apply the primary colors as dots, this is best done all at once to allow for them to blend and create subtle tonal variations as an overall effect. If you are looking to produce subtle shades within the same color range, then applying them one at a time and blending them together into a single layer gives you more control and also allows you to overlap the colors more due to the limited space for the dots to be applied all in one shot. It’s an extremely versatile technique and both paths work but for different results/effects.
Actually there is no right or wrong way. Though the application method is similar, it depends on what effect you want to achieve.
The method Bill described works in a similar way to a wash, layering single colours to blend and shade the underlying colours. Applying multiple layers will have a slight muting effect on the underlying layer but the colours are similar and will blend together nicely.
The other method described by Karl uses quite dissimilar colours. The point of using dissimilar colours is to create multiple highlight points of varying shades and tonal variations. If you were to do each colour individually, it would have a similar effect to applying an overall wash in one colour, then the next, then the next. You wouldn’t have the subtle blending of the colours (tints really, you shouldn’t be able to see discrete colour variations if it’s done properly) that the method produces.
If I recall correctly, the problem you had with your Hetzer was that you tried using Tamiya acrylic thinner to spread your oils. Tamiya acrylic thinner isn’t compatible with oils, as you found out and the result was that it didn’t thin the oils at all, rather, you just ended up pushing the paints around on the surface. The other problem is that Tamiya acrylic thinner is alcohol based, and alcohol is death to Future and to Tamiya paint, hence the effect on your underlying paint.
Ah I see, well no offense doog but I prefer bill thecnique because if I had use it on the hezter I wouldn’t had the problem, let me explain.
See, the problem wasn’t tamiya thinner, but it was a good thing I put a futur coat (or it would have been worse, much worse) but as I keep rubbing and the futur coat came off, exposing the arylic paint. But the problem in the first place was that I applied too much dots, this cause is to cover the entier tank and covering the camo, rader than wipping the artise paint off, I was Spreading it around. If I applied less and practice more this would have work.
Its dosen’t matter now the hezter oven clean solution is working and the paint is gone, only bad news is the decals and Camo (which I work really hard) is gone, but we all had our unsucceful build.
T-Rex, I’m a little confused how you can say that you prefer one technique over the other if the steps you took would have caused your disaster n*o matter whether you had used Future or not–*you yourself just said that you put too many dots on, and rubbed through the finish!
I would recommend that if you are using acrylics, read my tutorial once more, slowly, and then DO NOT APPLY FUTURE. Then, add LESS “DOTS” and do it exactly the way I did it in my tutorial. It is pretty evident and clear that if you follow the steps exactly as I did, AND DO NOT USE TAMIYA THINNER, NOR FUTURE, you should have no problem.
I’m only pointing this out to you because as I understand your post, you are making a decision based upon false information and erroneous conclusions. You did not use the correct thinner, ratio of oil dots, nor did you aply them over the acrylc base coat.
In my opinion, all of those ommissions are enough to explain your misfortunes, and would not reoccur if you folllow my tutorial exactly!
ANd by the way–that second Hetzer looks like it has absolutely no weathering at all–a pretty flat finish if you ask me. Not much pf an improvement, don’t you think?