Ben you are not wasting any time with this one are you.[;)] Looking’ good!
Good evening gents,
Indy-like a plonker I missed the link that you very kindly provided at the bottom of your thread (doh), I’ll check that out tomorrow.
Wing nut-this kit does build itself. It’s a great build and a lot of fun. It’s just what the doctor ordered after building that mind-bending DML Brummbar!
The build itself won’t take long now but I’m really going for heavy stowage on this one, it’s something I’m yet to try.
Goodnight all,
Ben [t$t]
Good evening guys,
Good progress made today after a week at work. Made my first attempt at an all-over oil paint wash using Raw Umber and white spirit. I followed advice given to me on here, I don’t know if I’ve done it right but it looks VERY effective. I took the photos of the vehicle while it was still drying so it may look a little ‘damp’ in the photos but now dry it’s left behind a nice finish-almost pigment like? Either way, it looks good.
The decals went on ok APART from the air recognition star on the turret-trying to get that looking half real was particularly hard!
I’ve also made some bed/tarp rolls using Milliput which look good. I’ve made up some netting from an old handkerchief cut into very fine strips & tied with braid. I’ve used some fuse wire to loop between the four points on the turret-I’ll hang the netting from them. I’ve also got a couple of crates and jerry cans-not exactly sure where I’m going to put the extra stowage yet thoughthere aren’t any other proper anchor points to tie it down.


Thanks for looking guys-hopefully she’ll be looking superb this time tomorrow!
ATVB
Ben [t$t]
Coming along Ben. Keep it up.
Well, Ben, I’m going to go against the grain here and say that I’m rather disappointed that you didn’t seem to try even a hint of pre- or post-shading at all? Hmmm; all those questions and help offered in graphic detail and you’re only sticking with a bland monotone finish?
IMHO, this would have been the perfect model to try something that would have seriously advanced your finishing skills. No guts, no glory! I’m sure you’ll put out a decent enough model that will satisfy you and most of the posters here, but I wish you went for it a little harder with something daring.
I hope you don’t take it personally–not trying to do anything but help you improve, and sometimes the biggest impediment to that is getting stuck in a finishing “rut”.
Good evening folks,
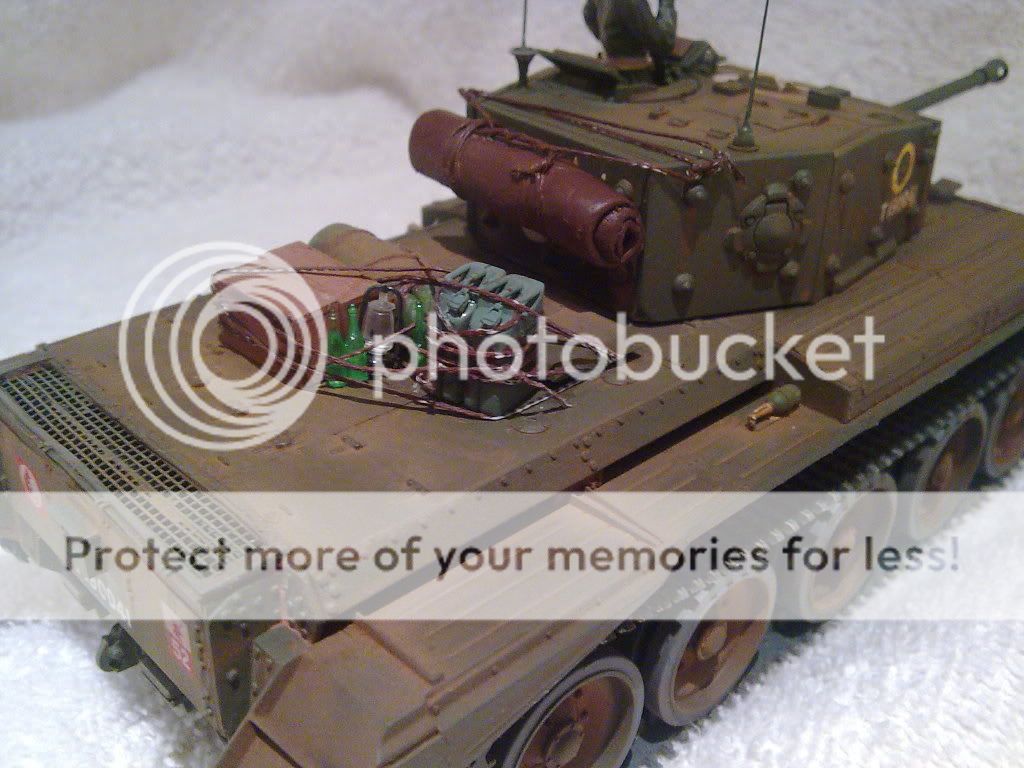
I’ve just been putting the finishing touches to the Cromwell and am happy to say that she has turned out really well!
The Umber oil paint wash worked really well, it’s the first piece that I’ve made using an AB to paint it and what a difference it makes-especially with Tamiya acrylics! It’s nice not having to worry about damaging the base coat when doing washes etc.
I’ve tried some stowage this time and that worked well too. I made a couple of bed/tarp rols from milliput and used a couple of Jerry cans from a stowage set along with some crates, bottles and an oil lamp from the spares box. I used some 12ib breaking strain fishing braid that I had as rope-scale wise it seems spot on.
Happy with the Commander figure too-he’s better than my last attempt! I’m still struggling to paint on any real ‘features’ though, they seem to stark so I’m just applying flesh shades and giving a light drybrush to highlight the raised areas of the face-it seems to work. In the meantime I need to practice some more!
A light dusting with some MIG light earth and I’m happy to say she’s my best so far (imo) so I’m going the right way!
I did make up some cammo netting but it didn’t look right at-all, I think it would be better off bought-I know Verlinden do some; anyway, it hid some nice streaks that I’d made down the turret sides!
Before it get’s mentioned, I’ve removed the little sprue nub on the LHS fender and the driver has had a spray of flat now.
Sorry about the photos, usual story; no light & rubbish camera-I’ll take some better ones in the daylight tomorrow!
As usual all comments and critiques welcome…


Thanks for looking guys,
ATVB
Ben [t$t]
Hinksy, you did not waste any time on this build! Well done, she looks great. I would suggest taking an xacto and hollowing out the muzzles of the hull and co-ax machine guns. Then a very light drybrush of a light steel around the rim to accent it. On the figure, a light wash of burnt sienna before you do the highlights will make the facial details pop out even more nicely. Good job![t$t]
Fair point Doog,
I did ask about pre-shading and was going to try it on this build - I’ve no excuse buddy, I get a bit carried away sometimes and I didn’t even give pre shading a thought before I loaded the AB with OD!
Saying that, I was planning on a quickie build with this one-I’m going on holiday for 2 and a bit weeks next Weekend and wanted this one done. I’ve got a couple of superb kits on order with my LHS which I will be trying pre shading on (amongst other things) so your advice wasn’t wasted buddy-the next build is going to be a stonker!
Tbh when I bought this kit I didn’t know just how easily it would build up! I do love the Cromwell though and had to have one.
When I get back from my holiday I’ll show you what I’ve bought; both are 1/35, one Tamiya, one DML, one German and one Allied and both WWII!
Cheers matey,
Ben [Y]
Cool, Ben. I’ll be eager to see what yuou do then with the new technique!
Have a good trip!
Thanks Doog,
No doubt I’ll be tapping you up for more information before I actually try them! The oil wash works lovely doesn’t it btw?
I might put that little Panzerjager together before I go-actually I’ll probably take it with me? Hmmmm? LOL! The missus would kill me! [:D]
Stikpusher-thanks for that little gem of advice, I’ll go and do that right now!
I’ll take some better pictures in the daylight tomorrow with the better camera too.
Off to bed now-cheers guys!
Ben [t$t]
You banged this one out pretty quick Ben and looks like you got to try out some new techniques as well before you left for your vacation…the sign of a true addict in that you’re squeezing all you can in before you go! By the sound of it you enjoyed it immensely and that’s what matters the most in the end. I can see a progression from your previous build in terms of the finish, keep working with those techniques and experimenting and you will only improve. Hope you have a great time with your family and look forward to your next effort. [B]
Hi Ben,
Good effort for your first attempt at oil washes. The subsequent dusting with the pigments integrates it nicely.
Single-colour schemes can be difficult to make look interesting, and pre/post shading and varying the tones of the base colour can certainly help, but I wiould have been a bit hesitant to try these techniques with the airbrush setup you’ve got. (The Humbrol A/B with canned air isn’t it?)
If I can make a few suggestions / observations:
Go a little lighter with the wash/pigments on the turret sides, as it 's harder for dust to settle on vertical surfaces. Those areas are crying out for some vertical streaking though.
Perhaps a litlle more accumulated dust on the sloped rear fenders, particularly above/ahead of the brackets, and on the lower rear panel (between the idlers) - this looks a little clean at the moment?
It may be the pics, but it looks like the gun barrel escaped any weathering.
On the whole though, she came up pretty nicely, you’re still learning and applying new techniques, and this is only number 6. [:D][B]
Hello Ben,
First of all my hope is that you take this feedback with grace, and as it is intended which is to improve your approach here on the forums and ultimately the quality of your final output.
I have watched and read your posts from the beginning and I was very surprised how willing you were to ask questions and in some case demand answers when all this information is readily available here and quite frankly everywhere. I have also seen people I respect and admire be very patient and go to great links to advise and provide detailed directions which in many cases they were ignored and rebuffed.
All I am trying to communicate without causing any hurt or confusion is that I would stop buying kits and start buying technique and skill set books and sloooooow down this isn’t a race! They are well worth the investment!
I have been in the hobby just over a year and I have found the following books very helpful in creating depth and range. Also when I first joined this forum I inhaled the Tools and Techniques section as far back as the beginning in order to educate myself so that when I did ask a question is was not from lack of self feeding.
Recommended Reading List:
F.A.Q Frequently Asked Questions of the AFV painting techniques - MIG Jimenez
F.A.Q Frequently Asked Questions about paining figure techniques - Andrew Miniatures Team
Armor Modeling -John Prigent
How to Build Armor Dioramas - Lynn Kessler
How to Paint Realistic Military Figures - Lynn Kessler, Don Winar
Modeling Panzer Crewman of the Heer - Mark Bannerman
Calvin Tan Blog
Must Have DVDs
Realistic Armor Finishing Techniques - Marcus Nicholls
F.A.Q. Modulation Style - Night Vision
F.A.Q The Pigments - Night vision
Ben if you knew me you would know how difficult is for me to be this straight forward and honest with you because i do not want to hurt anyone’s feeling or be a “bad” guy but your model reflects your lack of depth and experience which can be corrected by slowing down and learning and practicing techniques. Go look at my last 11 builds and you will see slow steady progress and every build was chosen to acquire and reinforce skill sets so I could develop a full rounded toolkit.
My Hope is that you take this post in the light it was given and if you are only in this hobby for the fun and are happy with your progress and output I sincerely apologize. I also do appreciate your enthusiasm and obvious enjoyment of hobby which you and I share.
Warmest Regards,
Well said my friend, very well said indeed. I must say that I do agree with all of the above, I 100% do not rush my models, because of that and a lack of time, I only finished three models in 2009. With all due respect, builders like Schnobs, the doog, scratchmod, Hans, and manny (just to name a few) are very skilled and should be listened to. As stated above I hope that you take all of this in step and know that I am very much not trying to be the big bad meanie.
Thanks, Jim
~Hey Ben~ Buddy, I’d like to try and encourage you, and not the opposite, and not to make you feel ganged-up on,but, I really wish you wouldn’t try to rush things. Schnobs has taken a bold step here to try to say something importaint, for you to really get something out of your endevours in modeling, you are going to need become adept at finding techniques, experimenting with them and integrating them as you go. Asking for help will take you only so far, and when people see that you aren’t taking away much from good advice offered, they feel a bit cheated. You admited you didn’t even notice that I’d takin my time to give you the ideal link to an ideal process for a customization that was on the table at that time–Doog likewise took his time to offer his hard-won knowledge and that was also bypassed, and for what? As said, if you are truelly happy with your results than, sorry for this , and good luck out there, I’d rather work on my own things or help someone who’s receptive. I don’t want to be unkind here, and don’t want to point out all the things where I see room for improvement, I’d just like you to ask yourself if you’re truely happy with what you are doing…
Slow down…do your own research,fact-finding & experimentation…strive toward perfection
Very cool! I’m always happy to see Allied armour that’s not a Sherman or a T-34!
I’d just mention though that you might pick up some of the reference material Schnobs listed and with the advice of him and others do a Bronco Comet. Since it’s basically a lengthened, up-gunned Cromwell you could use your experience from this kit and apply their advice to take the next step up.
Just my two cents of course, she looks good.
I know you said the kit builds itslef… but come on now… that was quick. And nice too.
Your progressing along Hinsky, and thats what is important. I too would say take your time. I fell into the trap of cranking out as fast as I could any and every model. I still shudder at the disgraceful job I did to a 1/48 Tamiya Sherman Dragonfly after cranking it out in one weekend. Can it be done in a weekend? Sure, but I learned that it requires having your technique down PAT, which I am still not yet at. So I just kick back and enjoy the experience. And no one says you have to do just one build at a time. While something is drying on one project you could always be starting another.
I will also throw a suggestion out. I look at the close up of the figure and I can tell you used your Tamiya acrylics for it right? Tamiya is tough to brush paint with, but is very doable if you know a few tips. 1) wet your brush before you dip in the paint (Tamiya paints will stick to dry bristles and case gooey globs in short order). 2) Thin the paint. Just take a small plastic cup or somthing, put a little paint in it, and then mix some water in. You don’t want it too watery (so that it goes into places you don’t want), but thin enough that it does not dry on you so quickly. If you have to do multiple light layers making sure to let each layer dry a bit before adding another (this is how the really good figure painters do things, though to be fair they tend to NOT use Tamiya acrylics). Heck, you can even use your airbrush to at least paint the face and hands. 3) While working dip the brush in water and give a quick swipe on a towel every so often. This keep the brush moist and helps prevent the gooey globs from building up.
Have a great vacation (hollidays as you Tommies say! [;)] ) mate and hope to see you back in good health!
Brian
That’s cool chaps,
You guys have been superb in helping me get going in my new hobby. I love it! Unfortunately apart from the guy up the road who I rarely see I do not know anyone who is into modelling so apart from what information you guys pass on and what I find on the net and in books I’m totally on my own. I’ve just joined MAFVA and am going to my first meeting in February so that’s a start. In June when I bought my first kit I’d never even heard of sable brushes or washes or ejector pin marks! PLEASE do not think that I am ignoring any advice given to me-it all gets printed out and put into my file. Spare time isn’t something I have a lot of so I perhaps feel obliged to rush things-perhaps I need to rethink that attitude!
You have all made me feel very welcome on here and I appreciate it IMMENSELY!
One thing I do not want any of you to do is feel that your advice is wasted on me as it isn’t. I’m learning all the time and it’s thanks to the links and tips you chaps give to me. When I’m back from my hols I get my annual pay rise so the first thing I’ll be able to afford (at long last) is my AB. Then I can really start modelling!
It was a cheap kit and yep-I rattled it out a lot quicker than I should have BUT I wanted it done before I go away, I tried my first oil wash on it, made my first attempt at stowage and various other things & tbh I’m very happy with it.
Yep, I’m keen, perhaps too keen but as I said in a previous post when I’m back from my hols I’ll have a lot more time to spare and have a couple of super kits on order which will have some serious time expended on them.
Schnobs-thanks for the references, I need some DVD’s definately, they would help me no end.
I’ll post some decent pictures in the morning too!
ATVB and thanks everyone!
Ben [t$t]
Good afternoon folks,
As promised I’ve taken some better pictures of my Cromwell seeing as the last lot were pretty dismal. My new phone arrived today so hopefully 5 Megapix should be better than 3!


At least the camera works better than the old one!
As I said, off on my hols to Ireland at the weekend so I might make a start on the little Panzerjager before I leave but that will be all.
Take care guys.
Ben [t$t]