I’ve just been to the LHS to stock up. I’ve picked a big can of AB propellant, some Milliput as I’m planning some stowage and a 1/72 Italeri Panzerjager from the bargain bin for £3 (I thought it might be good to mess about with). I also picked up a pot of EVERY colour of Tamiya Acrylic that I haven’t already got so I’ve got the full XF range now and most of the metallics. Got a very nice discount too [;)]
The Cromwell looks like a very simple build but I think with the right weathering it could be a winner. Build wise there is very little to it and I’m pretty sure I’ll have the main hull and turret built by the end of tomorrow. I leave the running gear off until I start the weathering to ensure I can get full acess to the rear of the road wheels etc.
Colour wise I’ve opted for a simple Olive Drab (XF-74).
It comes with an optional hedge cutter and ‘Normandy Cowling’. Not sure about using these-the hedge cutter looks pretty cool but I wouldn’t use the cowling as it means leaving off the mesh at the rear over the engine deck.
Hi Hinsky. I’m near the end of my Cromwell. It’s a great build,especially if you want to clear your mind after say a Dragon mega-kit. No problems. My suggestion would be to probably replace the string with some sort of wire. I myself still need to look into that. I chose a Tamiya khaki-drab after a recommendation by another member. Cheers.
Heh heh, good luck with the Italeri kit. You’ll get great practice sanding, removing and filling alllll those wonderful ejector pin marks. [:D] I don’t know how Tamiya and Dragin can prodice perfect, ejector pin free molds, while Italeri is peppered with them like swiss cheese!
It’s no problem Brian-the main reason for buying it was to have a spare little piece kicking around to try paints and washes on, I’m not going to go to town on it!
Cromwell pretty much built itself yesterday. I’ve got the hull built and the cases attached to the sides. I’ll be doing the turret shortly then laying down some base coats.
While they are drying I’ll be hand painting all the tools and the Commander figure.
As I say, EASY build but lots of scope for weathering.
I should have added that I did not intend to denegrate Italeri. They actually have some decent kits at a fair price. I am building an Italeri 1/72 A-6E intruder right now, and in the past built an Italeri Marder. Decent kits with fine fit that just require the caveat that you will be filling quite a bit of ejector pin marks, usually in annoying places. In fact, I had to break down and finaly order a micro punch set to start filling all the holes in the A-6 kit because it was much easier then filling them all with Mr. Dissolved Putty. I still have yet another Italeri kit in my stash for some future date. As long as your having fun (and the time spent filling will test that concept [:D] ) it is all good!
I think we knew that Brian - don’t worry mate [;)]
I’ve just had a look at the kit and, by God, it does have a LOT of EP marks!!!
I’m going away on a course with work for a fortnight at the end of the month and I’m thinking of packing that Italeri kit, some cement, basic tools and and a few colours to keep me occupied at night-what a plan!
Cromwell wise, as I prdected the build is complete and the hull and turret have had a few layers of OD from the AB-it’s looking a beauty!
I sprayed the wheels (centres) last night so I’m going to brush paint the rubber on them shortly. I’ll also paint the tools and Commander then next week I can get weathering.
After that DML Brummbar that I built something like this is just what the doctor ordered!
Hinksy, you are dead on in your analysis of the Tamiya Cromwell. It practically falls together and will build in to a winner with the right weathering quite easily. I added some figures from Tamiya’s Churchill, stowage from Tamiya and Verlinden, and it took 1st place in the local IPMS Chapter in the Advanced catagory. The only chage I made to the kit was to use brass screen for the exhaust instead of the kit supplied mesh.
Wow, she really is a beauty Stikpusher. It’s a shame Tamiya only supply 1 figure with this piece, I’d liked to have had another guy popping out the other turret hatch like yours.
Like your Cromwell I’m planning on keeping mine pretty simple too, no heavy weathering-just some light dusting with pigments and drybrush and a simple oil wash.
The cheapy single action AB worked like a charm and laid the paint perfectly.
I’m going to add some stowage next weekend. I’m thinking of a few Milliput rolls on the back deck and another hung off the two loops at the rear of the turret. There’s also the clear plastic parts that I’d like to use like the Tilly lamp and bottles. I’ve got some green clearcoat for the bottles and I’ll drill out the centre of the lamp and paint the centre orange to look like a flame.
I really recommend this kit-it’s a beautiful looking machine and is so simple to put together. The possibilities for extras are endless!
The only thing I didn’t like is the piece of braided string that they give you to make tow lines with! It’s hardly going to bankrupt them to supply some proper wire like DML do. I’ve still used it, painted it and gave both lengths a shot of hairspray, they didn’t turn out too bad as it goes-not sure if I’ll use them yet though.
More WIP next week as back to work tomorrow (God these weekends go sooo quickly)!
EDIT: Ive now just noticed that gap at the front in the first photo, you can hardly see it with the naked eye! Have to get that sorted!
Thanks for looking guys-as always, helpful pointers, advice and tips are VERY welcome…
Beautiful work so far Hinksy! My only advice on the finish is use lots of decal solvent on the turret top air recognition star. And beware on the tracks. They are a bit on the delicate side. It did not happen on my Cromwell, but on my Centauar they broke within a short time of installation.
That looks fantastic! dont you just love the tamiya paints? This is probably so far your best build, and once you put a drybrush and a wash on there, itll look fantastic. Top shelf work.
It’s been said the Tamiya Cromwell is perhaps the best plastic model kit ever designed. It is a fantastic build by all accounts. I chose it for my first tank build in near 30 years, and for my 1st Dio build ever , which was printed in FSM Readers Gallery July '09
“Various British Elements Between Caen & St. Lo, France, July, 1944”
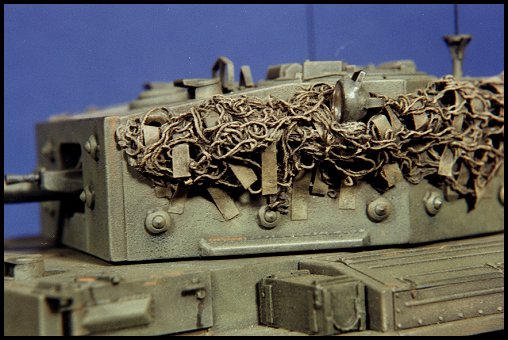
oh yeah it’s there… isnt it amazing how quickly one can spot flaws from a digital photo that are easily missed by the Mk I eyeball? Below the grenade port and behind the right front lifting lug. Looks like a good spot for some stowage or a camo net layed out…[I]
That’s a great suggestion Stik(I like yout Cromwell BTW) a very smart and likely addition to this medium tank is camo nets, particularly those braided with Hessian Tape
Fantastic tutorial for this on Missing Lynx by Eric Mac Intyre HERE I didn’t make it for mine, but I swore I’d do it next time!
She looks great for your first serious airbrushing attempt. Even the most basic of airbrushes excels at laying down a very thin layer of paint without obliterating moulded details. She’ll really come alive with a bit of weathering. [Y]
If I may make an observation, you have a sprue nub or two and a moulding ridge which need attention on the left fender, but these should be easily fixed.
The left Fender-arrgh that is BAD! I’m better than that now and am annoyed I let that slip through. I’ve got that gap to sort out anyway on the RHS so the fenders will still need some work. I think I might fit that RHS front fender properly and rub down them nubs on the LHS fender and lightly respray them.
It’s amazing just how much you don’t notice with your normal peepers-a digital photo and the thing looks awful (in places)!
As for stowage I’ve made some super bedrolls and tarps from Milliput which I’m planning to have stacked on the back, the lack of anchor points isn’t helping though. I’m going to have a roll hanging from the rear of the turret too, it will be tied on via the two loops at the rear sides of the turret.
I do like that scrim/cammo netting that was posted by Indy, that will cover the fingerprint perfectly-has anyone made anything like that before or is that better left purchased? I’ve seen it for sale in several magazines but there must be a recognised way of making netting?
Hey Ben, yeah that’s exactly what I was talking about–not only is that a proper stowage choice, but it will cover your flaw too. Did you read Eric’s tutorial on making it? his opinion is :
""To begin, your vehicle should be painted and weathered. Next, you should find some kind of commercially available netting such as the one offered by Verlinden. Other kinds can be used from other manufactures, as long as the netting is colored. I do not recommend making your own from gauze because it is very messy to dye the material yourself . Furthermore, unless you use a non water soluble dye, the color will run all over your model when you apply the netting. This is not the time to get cheap folks “”
The Verlinden camo nets are not alot of $$. I got some cheap , I don’t remember where now,sorry. I’ve never seen anything about ‘making’ your own-though you can often ‘source’ netting very cheap at fabric stores or maybe even your wife’s stocking drawer[:P]