Bandai 1/72 Defender Destroid

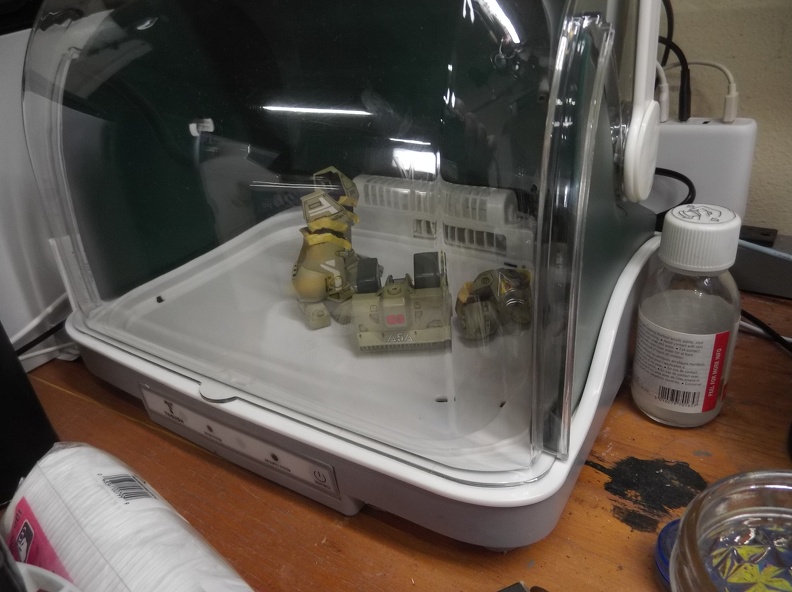
The holidays and requisite obligations and celebrations have subsided. The counting of the loot has been completed and so a little time at the bench was made available. Partially spent cleaning up the mess I’d left from my last time there. :wink:

Back to the always entertaining topic of pin/panel line washes.

I’m pretty happy with Vallejo’s line of washes. My only complaint about them is they do a very good job of softening the gloss coat and the layer of paint beneath it. This of course makes it easy to take off wash plus a layer or two of paint. Even when gently cleaning. This can make it a delicate dance between waiting long enough to cure so as not to rub off the lower layers, and not so long that it becomes challenging to remove the wash.

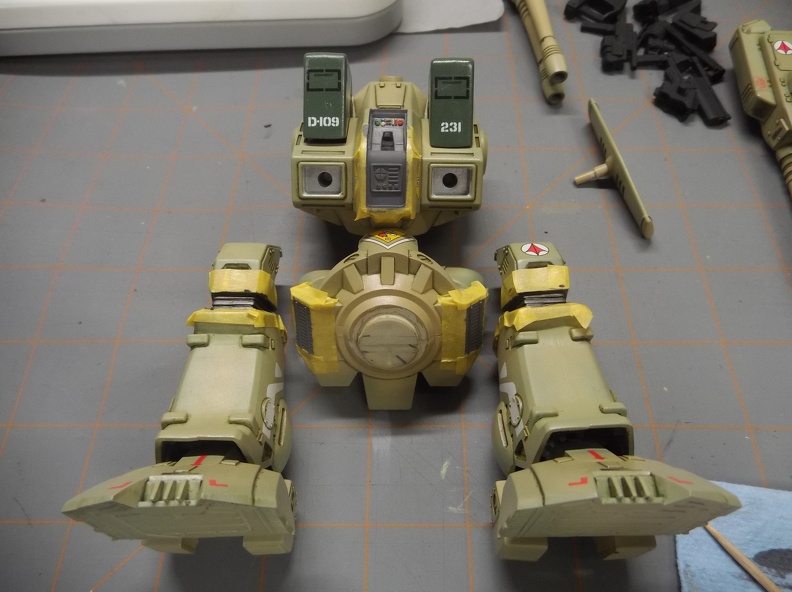
As I mentioned earlier I’ve been using a two part process. Starting with green and then going over it with a brown. Thought it might be handy to demonstrate what it looks like at each stage. That way you can judge for yourself.

Looking at the riveted plate you can see I’ve already added the green wash to it. Nothing else has been done to it except a little cleanup.

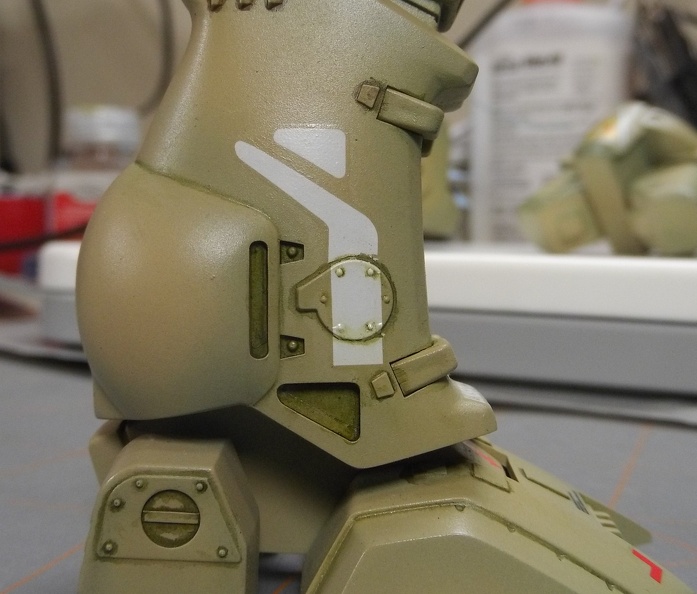
Applying the brown wash on top of the green presents this.

At this point it looks like the brown has overpowered the green, but the cleanup is still pending.

When cleaning up the wash I try to wipe towards the raised edge not along it. Less likely to completely remove the wash that way.

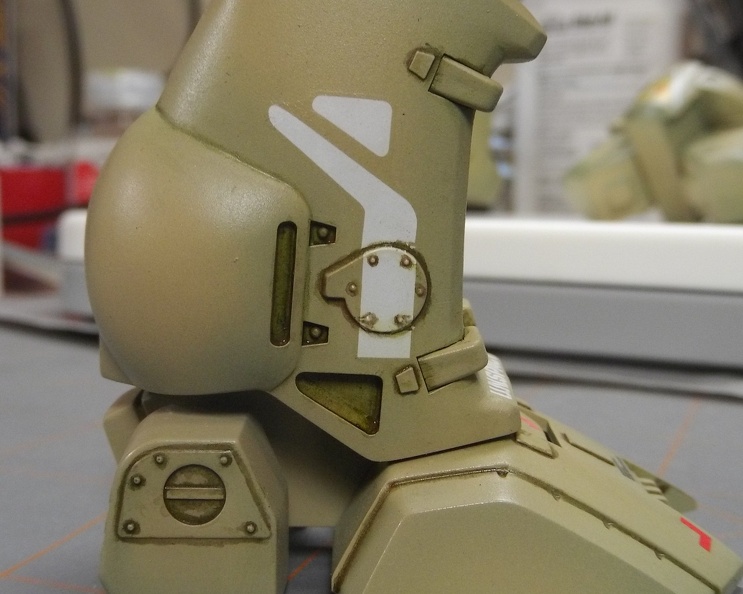
After the cleanup it is much easier to see that both colors are present. It now has a more variegated look. However, at this level of closeup the intended effect of the wash is diminished. Let’s take a step back a little and compare the look between the pure green wash to the green+brown.


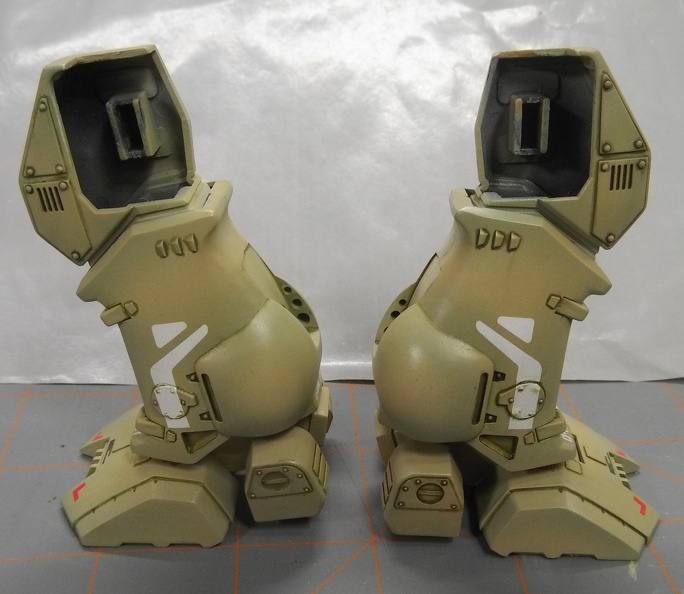
Which do you like better? Let’s try the polling function of the new forum to find out!

Select the look you like best. (results will be shared after the poll closes)

  • (left leg) plain green was perfect!
  • (right leg) green+brown is better!
0 voters

I’m curious to find out which look people like more.

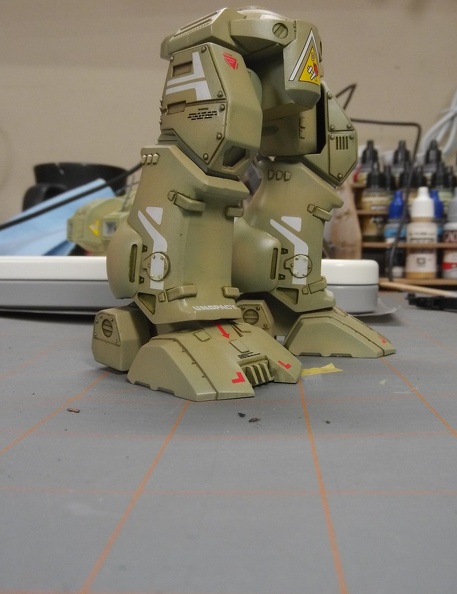
Finally, here’s how the legs look after completion.

This is the last post about washes, for real this time. Promise!
Hopefully with the end of the holidays I’ll be able to blast through the remainder of the work and share the finished product before too much longer.

3 Likes

Got some time at the bench the other day. It continues to progress. No new major milestones achieved. will have something more substantial to share in the near future.

1 Like

Quick progress shot.

The tape around the knees is because the knee joints need to be repainted. They are supposed to be a dark grey/black but it was lost due to overspray while doing the rest of the body work. At the waist there are some intake vents that are going to be a dark grey. They’ve been masked as well in preparation for getting their color.

I probably should have painted those vents first, but excitement always gets the best of me and I jump ahead. I’m used to having to take a couple of steps back to recover from my over eagerness to see the next stage. :)

4 Likes

I’ll be taggin’ on to this one here as well Phoenix. The paint and weathering you’re putting into this one is over the top. I may have to start using this whole Vallejo wash idea.

1 Like

Glad to have you here too.
This is the third time I’ve used that method. All with essentially the same color schemes.
I’ve got a Ma.K. Falke that I’d started working on, but set aside to start up this build. The Falke will have a very different color scheme. Not sure what it will be, but it will require some exploration. All good in my book.

Let me know if you give the method a try.

1 Like

I believe the poll closed on the look of the panel lines. Results should be displayed for everyone to see in the original post.

Not a very large sample size, but it was unanimous. The two color panel lines were preferred.

Thanks to those who put in a vote, much appreciated!

I’d like to make this conversational, but so far every attempt to write it up turned into a dry recitation of steps. Not exactly engaging.

Perhaps by typing out everything that comes to mind, inspiration will strike like lightening. Not a direct strike mind you. I’d like to survive the event. :D

Be warned. What follows is a random stream of consciousness post. It may not be for the faint of heart or serious of mind.


Chapter One

… When we last left off our hero was valiantly masking sections of the build in order to paint the forgotten realms. Did they finish or did the cruel monster obligation force them back. Lets look in on our intrepid builder.

There is clearly evidence of a battle upon the field, but who was the victor?

Oh my is that, yes it is. It’s St. Nick’s gift. The relic named “paint dryer”.

The hero was victorious over the beast obligation! Praise to St. Nick and all his little helpers for distributing relics of power to the struggling builders of the world!


Chapter Two

It was a gruesome sight. My job exposes me to the darker side of life and none of it prepared me for the carnage that lay before me now.

What kind of creature could do this? Creature, not a human. To tear apart then neatly lay the pieces back again. How could anyone willing to do this claim to be human anymore? This scene had all the marks of the recent string of crimes. The press had taken to calling them the “builder”. Pieces of the poor being were still strewn about. The creature may have been interrupted. Could there be a witness…


Chapter Three

It was bad. Real bad. The pilot had been through a lot. He was looking rough. Real rough.
I’d tried to patch him up, but I’m no medic. His only hope lay in my unskilled ministrations allowing him to survive long enough for the real help to arrive. Soon.


We now return you to your usual experience with reality.

3 Likes

You had my curiosity. Now you have my attention. :nerd_face:

Love it Phoenix! Keep it up.

re: Vallejo washes. I use their Game Color wash and Model Wash ranges quite a lot painting 40K minis, and I too really like them – maybe the best of the acrylic washes. It seems to me like the Model Wash acts as if it’s “pre-thinned” whereas the Game Wash seems more viscous out of the bottle – but I generally thin it pretty heavily and use multiple applications.

They do tend to flood on and stain matte finishes if you’re not quick with the cleanup, like you said – I think that’s an acrylic wash Achille’s heel. I’ve had success with Vallejo’s “glaze medium” to slow the drying time a bit.

In the end nothing seems to beat oil washes. I recently bit the bullet on some Abteilung502 sets (not washes, just paints, for making DIY oil washes) and the difference is incredible. Of course, the major downside is a long, long drying time. Speaking of that… Tell us more about that paint dryer – or did I miss a discussion about it already?

1 Like

[quote=“PhoenixG, post:25, topic:261687”]
Glad to have you here too.
This is the third time I’ve used that method. All with essentially the same color schemes.
I’ve got a Ma.K. Falke that I’d started working on, but set aside to start up this build. The Falke will have a very different color scheme. Not sure what it will be, but it will require some exploration. All good in my book.

Let me know if you give the method a try.
[/quote] It’s a very convincing method to me and I’ll sure let you know bud.
Had a good chuckle over your story. lol

1 Like

Glad you enjoyed the alternate universe descriptions of the build. :grin:

The model wash is definitely thinned. One of the reason I originally procured some was to reduce the time spent making my own washes. The challenge I have with washes in general is the need to constantly mix them or the pigments start to settle out. If you don’t, the next thing you know your next application is super dark because your brush picked up all the pigment that had been settling. I don’t think anyone really talks about that.
Sounds like you’ve been practicing some glazing as well washes. It’s not uncommon for me to apply an overall glaze to a build. Give it a unifying color filter. It also reduces the brightness of decals so they age along with the model.

I do have some of the Vallejo glaze medium I’ll have to give that a try.

LOL, I recently purchased some cheap oils myself to give them a test run. At this point I’m trying to learn more about the properties of oils. I don’t expect much from them color wise since they were cheap. If I like it well enough I may invest in some Abteilung oils.

This was actually the reveal of the paint dryer. The family was very kind and gifted it to me this Christmas. It’s some Chinese knockoff. It has a single temperature, airflow, and timer.
It’s a 45min cycle at 45C (about 113F) with slightly more air pressure than a gentle breeze. It has an exhaust vent so moisture can escape. So far it seems to work faster than the passive heat of the dry box I made. I just started using it so my testing is very limited. So far 90min in there seems to do the trick for setting the washes. Looking forward to seeing how well it works when priming and applying base coats.

1 Like

:+1:

Mission accomplished. :grin:

1 Like

I said in my early post the pilot was looking rough and that was no joke. Since he’s going to be in the center of the model he needs to at least give the impression that he got a similar amount of work as the rest of the model.

As I was going to take him back to plastic it occurred to me that I could at least practice painting him the way I intended. So last night I started to fill him out some more and you know what. He’s actually starting to look pretty decent. I may not take him back to plastic. A bit more work and he could be good enough.

The little pilot was a good reminder to me that every piece has it’s ugly phase. Just because it looks awful in the moment doesn’t mean it’s a fail. Sometimes it’s the chrysalis and just needs a little more work before the butterfly emerges.

And no, the pilot still isn’t a butterfly. Maybe a moth… :laughing:

3 Likes

Right you are Phoenix. Sometimes all it takes is taking a step back and re-approaching with a different mindset. It’s not about the mistake at that point…it’s alllll in the recovery. :wink:

1 Like

Speaking of steps back. Testing the lights today revealed they no longer work. :sob:
The most likely reason is the switch. Which is mounted inside the torso.
I’m guessing paint or clear coat got into it since my last test. Nothing I can do about the lights now. Win some lose some.

1 Like

Sorry to hear that @PhoenixG . Looking forward to the rest of the build man. oalmwN

1 Like

Used Testors Dullcote for the matte and started in on the pastel weathering Working on the look of dirt and grime and maybe a hint of possible rust here and there.

Did low angle shots to give it a new perspective. Seeing the weathering on camera it looks like I may need to go a bit heavier in places.

I’m using Pan Pastels dirt and rust set. I usually due chalk pastels, but I picked this up a while back and should really try to use it more. It has a nice color range. Including a green that’s a slightly darker shade than that of the model. I used that to add some shading around the decals on the upper leg.
For the feet, started with dark earth on all the edges. Then transitioned to dark rust. There’s places where it looks like it it will need more of the dark earth to move it away from rust and back to dirt.

It’s coming together nicely

4 Likes

Using pastels for weathering is something that I do as well and it’s working out just great for you here @PhoenixG .

1 Like

Weathering looks great @PhoenixG. All depends on the look you’re going for I suppose – and I always have to remind myself, especially with pigments, that the matte coat will tone it back.

1 Like

Pastels are great because they just work. My first time trying them out just blew my mind as to how easy they were. And how easy it was to go over board. :laughing:
Thanks!

:100:
Absolutely. There were more than a couple of times I spent hours getting subtle effects to my liking, only to have them utterly disappear under a coat of matte.
Lately if I’ve used pastels I’ve been skipping the final clear. These don’t get handled a lot, so it’s less of a concern they will rub off.

2 Likes

I found that fact out too with going overboard. lol