So I’ve decided to try something I’ve never done before. A kit bash. So this could turn out pretty cool, or in failure. or a pretty cool failure.
I had this old Monogram 59’ Cadillac that I built when I was a kid. It was in pretty bad shape and I’ve almost tossed it a couple of times over the years. It had also been sitting in a box tucked away in some newspaper for the last 10 years or so. so instead of spending the money on a kit to do something I’ve never done before I decided to recycle this old kit and make the best of it. And what better way to combine something from my childhood that I loved along with something that I built?
The idea is to take the chassis and undercarriage and stretch them to the same dimensions as the AMT kit. then raise the floor in the cabin to allow for the rear axle. and possibly make a roof rack out of brass strips and discard the plastic one. I’ve got some other ideas up my sleeve but those will come sooner or later.
I want to start all my cutting and hacking on the old monogram kit before I even touch the Ecto kit. that way if I screw up too much with my plastic scratch building skills I can still build the Ecto as an out of the box build.
so here it is in all its glory. first up, stripping the 20+ year old paint off the old “pink” Cadillac kit.
I’ll be watching this. I have a Ecto in my stash, and plan to do my own rendition of the Thundertaker, adding a drivetrain, and maybe even chopping it a bit. Haven’t started that yet, because of too many projects in the queue, but will be watching this WIP.
Exactly what I thought about after unpacking the ECTO, just that I don’t have the Caddy to borrow parts from (not counting a cheap chinese '58 - that could do for the engine and front suspension at least). I went for an extensive rebuild of a model from long ago in another thread - here:
Pawel, I actually blame you for inspiring me to take on this hair-brained idea in the first place [:D]
Parts have been soaking in degreaser on and off all weekend, with some scrubbing in between. I’m almost ready to start cutting away. once I get going on that, more pics will be coming. soon I hope.
Well, now, I didn’t expect that! Let me say two things: It’s an honour and I’m sorry! [:D]
I tried both brake fluid and drain cleaner for paint removers - but some paint I put on the Mack back in the nineties was resistant to everything, so I had to sand it off. Hope your paint won’t do that to you. I look forward to the pictures - good luck with your project
Well I’ve been following you build for years and because of it I’ve always wanted to try some scratch building with plastic. This project felt like a perfect opportunity to try something new. I figure if I can build a model ship out of wood, I should at least be able to try something in plastic.
The degreaser worked OK. flat black and silver came right off no issues. The blue on the motor took some time. Gold and red won’t budge and gloss black needed some scrubbing to get it to lift.
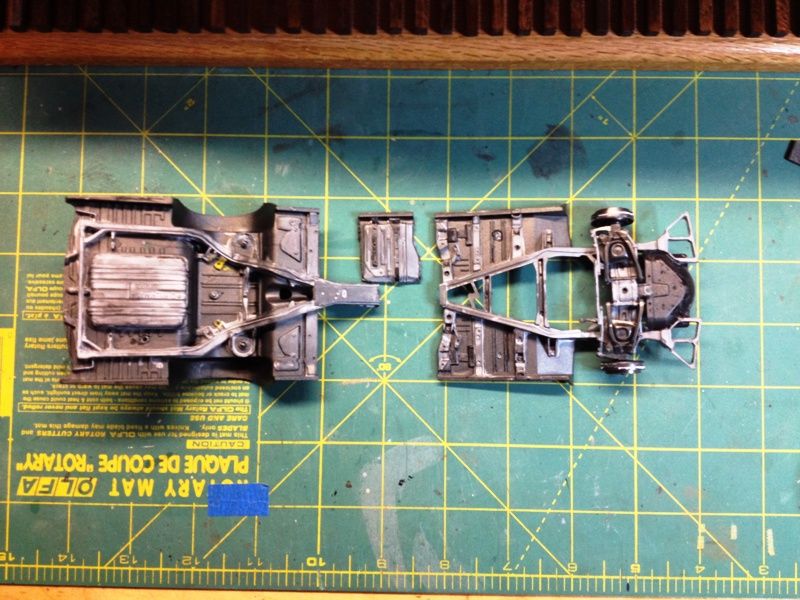
I started making the first cuts to the chassis. i removed rear driver side floor pan as it won’t be needed and Ecto only has the jumper seats in the back on one side, or at least this model does. Also the floor pan needed to be repositioned under the seats to the correct location, which is why i cut it out. overall the center of the chassis has to be stretched an inch to meet the axles center to center distance.
Styrene sheets are on the way so not much I can do until they arrive.
I downloaded the 59 Cadillac manual for mine and realized that there was a lot of parts missing out of the engine bay and interior. It was something to do with a younger brother and him systematically removing all the engines from my model collection at the time… Funny enough the new 59 Cadillac came faster than the styrene.
So I ended up buying another model kit to use for spare parts. and some extras in case I mess something up along the way. I would just use the new kit but, there is some sentimental value with the old kit.
enemeink - sounds just like what I was doing! I also finally had to get another Superliner kit for some parts, all of the time trying to use as much of the old styrene as I could. Good thing you got some nice reference material. Good luck with your project and have a nice day
I considered doing this swap as i also had a monogram 59 convertible but decided against it, so i’m interested to see where it takes you. I did steal it’s wheels and rear bumper as i built my ecto as movie version 1 (not 1A)
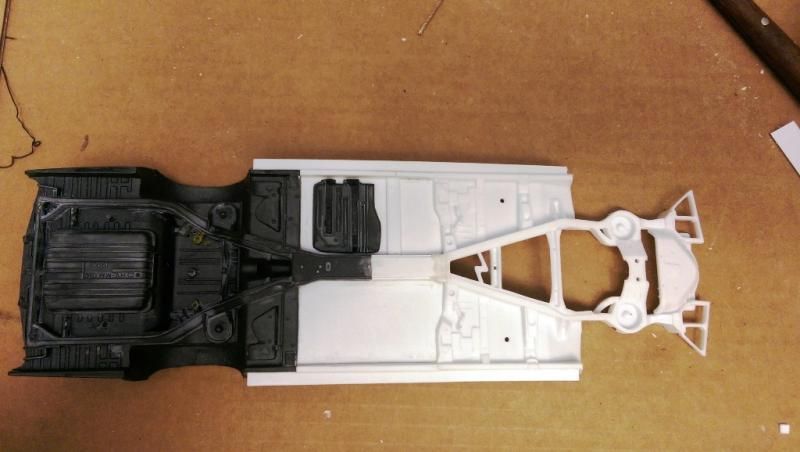
The sheets finally came in. So here is the rough-in on the stretched chassis and frame. I need to do some filling and sanding. I also need to add some cross braces and frame detail.
Also the added plates show how wide the I will need to make everything so it will accept the body of the Ecto. there is lots of work ahead on this.
My progress has been pretty slow now that it’s warming up. I haven’t been able to put very much bench time in since the start of this project. so I think this one is going to take some time to get done. or even momentum for that matter. It’s not for a lack of wanting, but more of a lack of time.
So the undercarriage is about 60% finished. I need to sand down the joints some more and add more filler, but it’s coming along. I also need to add some support braces and the floor pan that I cut out.
Well the summer is winding down and now I’m back at the bench, part-time anyway. some quick updates on what I’ve been working on.
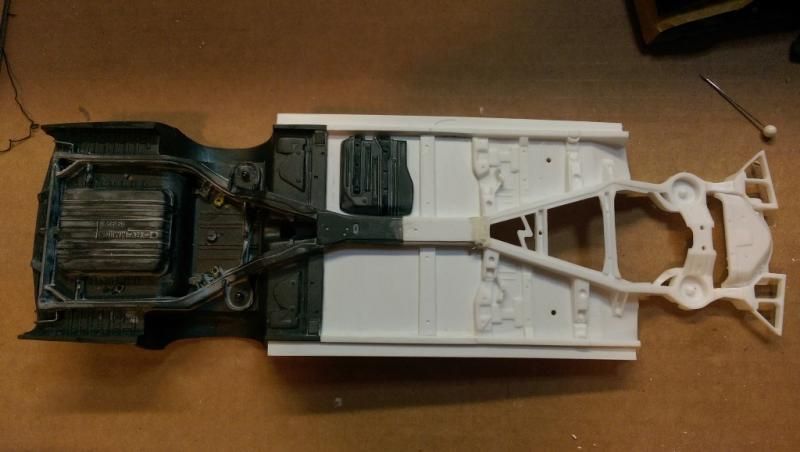
the floor paneling is coming along. I’ve been less than succesful in finding any good pics of the floor paneling on one of the actual cadillac, so I’m just winging it.
I’m hoping to get primer on it this weekend to do a second round of gap filling and sanding all the joints.
That’s okay. I haven’t actually looked at the underside of a 1:1 vehicle of this vintage, but have seen the underside of 70’s-era and up stretched limousines. Some coachbuilders do little more than adding flat sheet steel and square bar between the cut factory panels. While I would hope the coachbuilders in the past did a better job, it wouldn’t surprise me if those had flat panels and square tubing, too.
I had no idea that I’ve been absent from the forums for 6 years. 6. Years. Who would have thought that having kids would take up the vast majroity of my free time. So naturally my account was deactivated and I wasn’t able to successfuly recover it, so 2.0 account is here.
So with Covid keeping me home I figured I would find the box I packed this kit away in and pick up where I left off. 6.Years. Ago. I’m sorry, it just doesn’t feel like it’s been that long…
I’ve actually finished this but I have all the photos ready to share. So sit back and hopefully enjoy my first ever kit bash.
This was one of the main reason for starting the kit bash. There was little to no chassis detail or engine detail.
You can see the middle section I grafted in to extend the monograms 59’ Cadillac Eldorado’s frame.
To make the Ecto interior compartment fit the chassis I had to cut out the part of the flooring and raise it up to fit the rear suspension. I also cut the space under the computer keyboard to make it look a little more visually apealing.
Next up was time to upen the hood on the Ecto as it was molded shut. I cut out the Engine compartment from the 59’ Eldo and fit it into Ecto. it actually fit quite well and I didn’t need to a whole lot of modification to make it fit to be honest. I orginally thought about taking the whole front end and trying to make it fit, but the body lines were off and the windshield fit was an issue. I was pretty happy with this a approach.
Sde by side comparison of the stock chassis vs. the new one I created. I also had to stretch the exhaust pipes and drive shaft. I did that with some 2mm round styrene stock. the wheels and tires were all from the 59’ Eldo kit.
I ended up etching all the door panels and body lines to give some extra depth and to add a wash later to make the lines pop. Weirdly enough the kit called for the red fins to just be red decal.