Oh my! That gun is BIG! I count only 6 cleaning rods… I think you need to make another 6. LOL Looking real good!
Guys, thank for all the [Y]'s and comments!
Gotta love your million-and-one Smileys for every occasion, Steve!
Mike, I thought really hard about the “candy canes”, but my gut tells me that this vehicle would have been utilized primarily in a panzerjager role. When you think about the time frame and the state of the war then, I think that it would have been put to use in a defensive role, and I’m not convinced the crew would’ve had the luxury of having the time to lay down coordinates and distances. Great minds wonder alike though, I guess? [;)]
Thanks too, Bill, Ernest, and Terry! Terry, yes, the vehicle would definitely “fall over” if you turned the barrel 90 degrees. I’ll be capturing that big barrel in the travel lock, however, so it’ll be pretty stable. [:)]
Thanks, too, Andy–I made sure to “scale” out the cleaning rods–put together, they’d span the length of the gun tube. [:)]
Working away here; should have the thing ready for paint by tomorrow with the next and last update on construction…stay tuned! [:D]
Karl
Really impressive scratch building there. This thing is truly a conceptual behemoth!
I’d agree with you on the candy canes - to me, this has the look of something used in a direct fire, primarily anti-tank role as opposed to indirect.
Having said that, since it is all ‘made up’, the candy canes might make for an interesting splash of color and suggest a dual purpose mission for this big monster.
If Karl wanted to satisfy both crowds, he could take advantage of the fact that the Germans often had the ranging poles do double duty as cleaning rods…so some of the rods he’s already built would be candy-striped (4 of the 6) and the others not. [;)] Even the Jagdtiger had ranging poles and it mounted the same gun.
!(http://i170.photobucket.com/albums/u244/heydoog/misc unrelaed photos/deer-in-the-headlights.jpg)
Uhhhhhhhhhhhhh… [:|]
Good Grief, Bill! Don’t get me confused now! lol! [:D]
Actually, it’s an excellent suggestion–I just don’t know if I’d be able to pull off the painting requirements of masking, etc, with them glued on already like that.
Oh hell, who am I kidding? Of course I would–I just don’t know if I’m too lazy too at this point?! [whstl]…[;)]
Boyd – thanks for looking in as well, and for the comments and suggestions! [:D]
Sorry for stirring up a hornets nest mentioning the aiming posts [:O] … The aiming posts would add a splash of color, just the artilleryman in me!! Now as far as easy…we would not be the modelers we are if we did easy [;)] Good luck
Back to my PE pnematic hoses and fittings on my 8 inch howitzer[:O] Details…you have to love them!
Rounds Complete!!
He’s gone “Von Hammer” on us…very cool. Maybe those spades that late in the war were manually put into place and then manually removed and stowed when on the move??? Anyways—your taking the basic model and adding your own what-ifs makes it more your creation and has the bonus of noone telling you its wrong!!! Too cool for school, my friend…
…can’t wait to see how you color her up…keep in mind that barrels were in a greyish primer…I could see this thing in part red-oxide primer, part dark yellow and maybe part in grey barrel primer…!!! maybe some camo to boot…what a canvas to work with…
I hereby crown Karl the Paper-Panzer King.
Love this write up. Gotta say my favorite part is the no BS honesty. I like to see how someone as accomplished as we all know you are has a run in or two and still puts it out there for all to see. I get the feeling a lot of the WIP write ups are touched up slide shows that just show off the successful steps on route to a finished project.
Its great to see the obstacles you run into and better yet how you conquered them. Lost to be learned here for sure. No doubt this one will be as great as your other masterpieces.
Ha ha, Thanks, Manny! [:D]
Man, I would think that those spades would have been HEAVVVV–VEE! I dunno if you could actually pick 'em up without breaking your back? But hey, who knows? Like you said, that’s one of the joys of “Paper Panzers”—the possibilities! [:P]
You’re tuned right into my way of thinking with the painting! I was thinking of a primer red vehicle with a gray primed barrel, and “inside white” paint on the breech/gun mount, as if it would have extracted from an existing vehicle? I was also throwing around the idea of some hard-edged DY camo over the shields? Maybe some DY wheels…honestly, it’s scary how close to my thinking you were on this! Great minds…lol? [whstl]…[t$t]
ColdSteel, hey thank you, that’s a nice comment, and something I’ve never heard before. I like to think that anyone can make a model look unique, and some of the best “tricks” and ideas I’ve had have truly come from “accidents”. I try to document them so that others can be inspired to never give up and to soldier on even after something that you might ordinarily think of as “disastrous” happens.
Thanks for the sincere compliment, and I’m happy to know you’re tuned in!
Hey, I think it could be the “great minds” thing. I’m with you on all but the white breech and mount—I mean what other vehicle carried this mutha? The only thing I know would have been the Jagtiger, but I dunno if it had the exact gun or mount (but both are 12.8 cm)…???
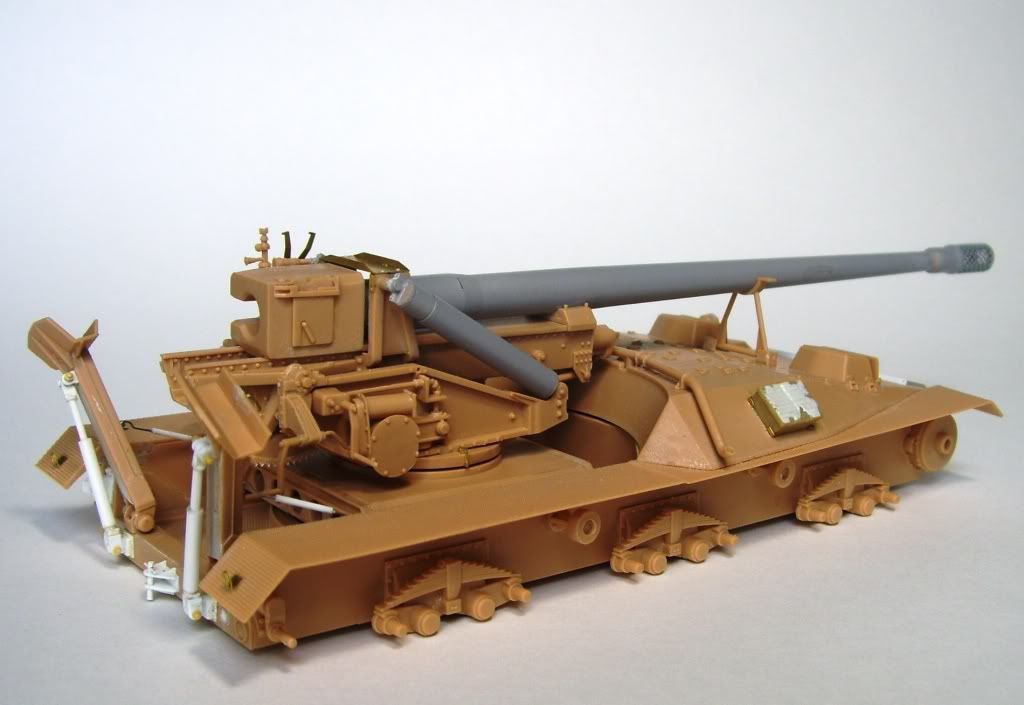
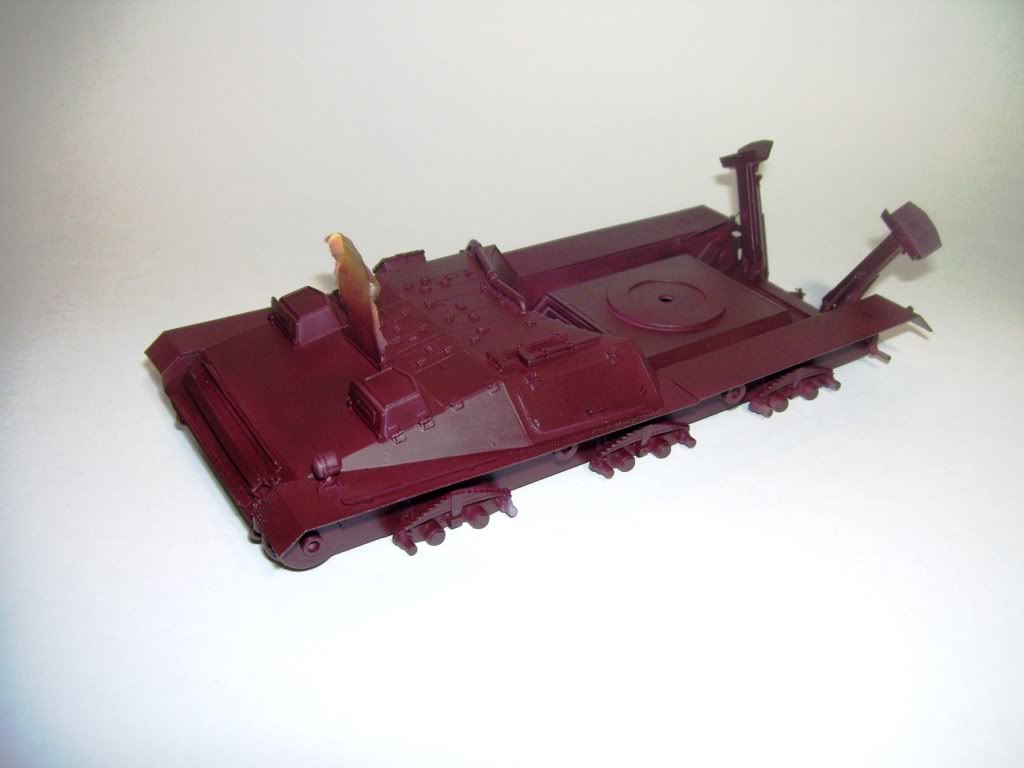
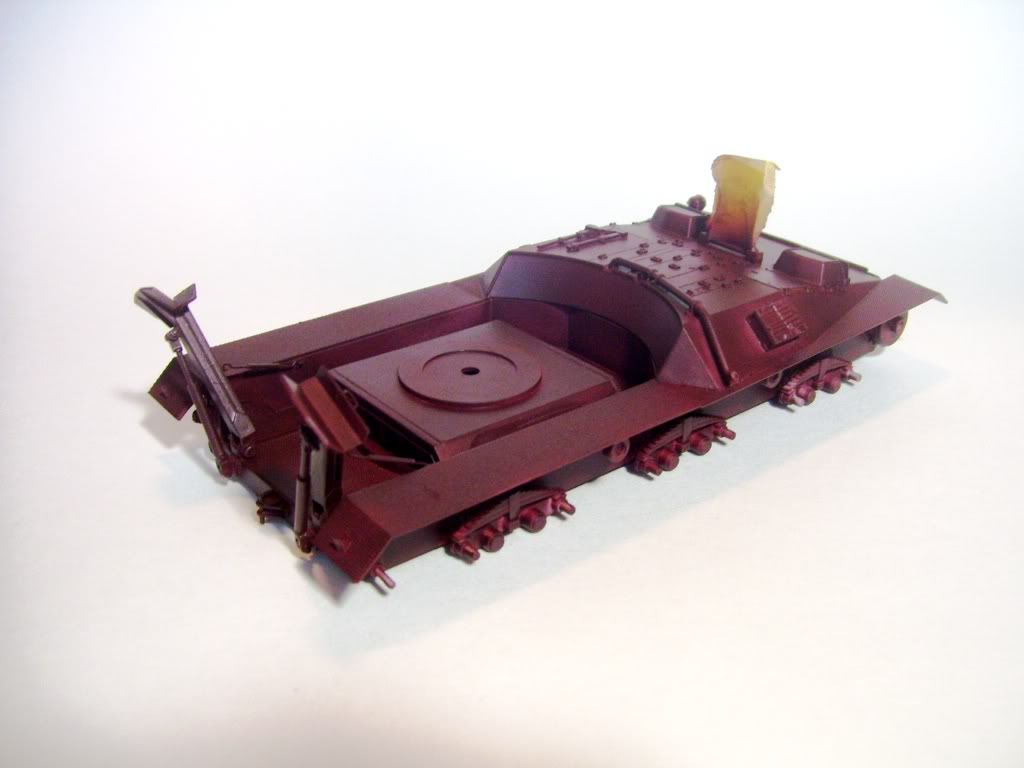
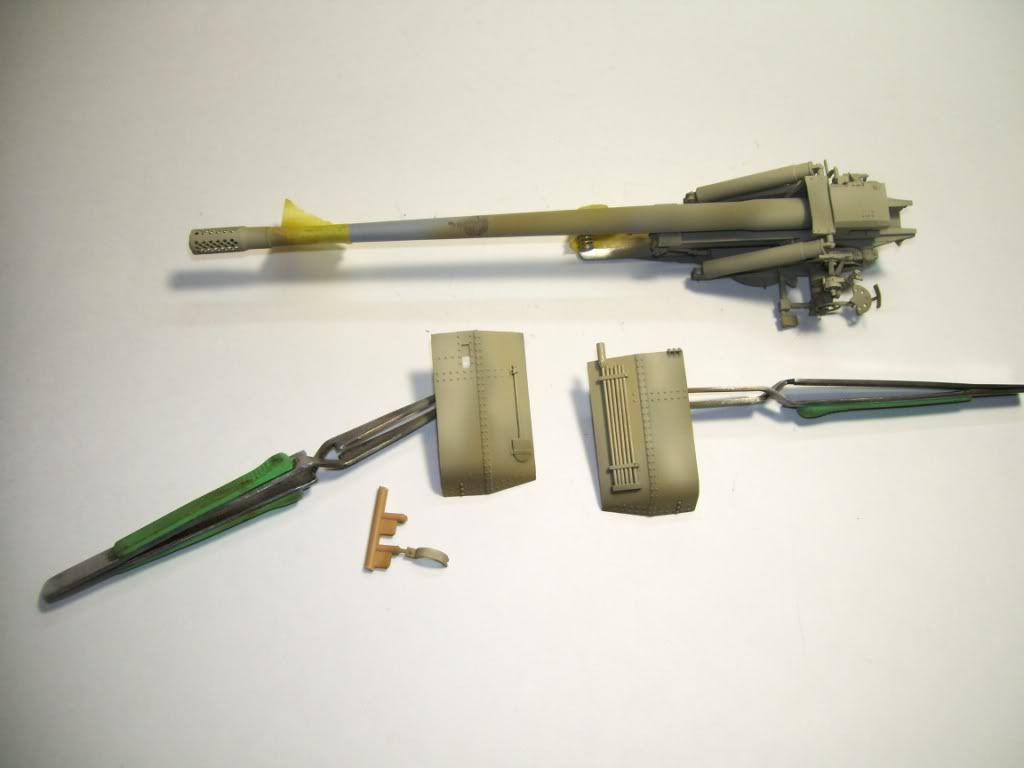
OK, well the beast is ready for painting–this is the last construction update.
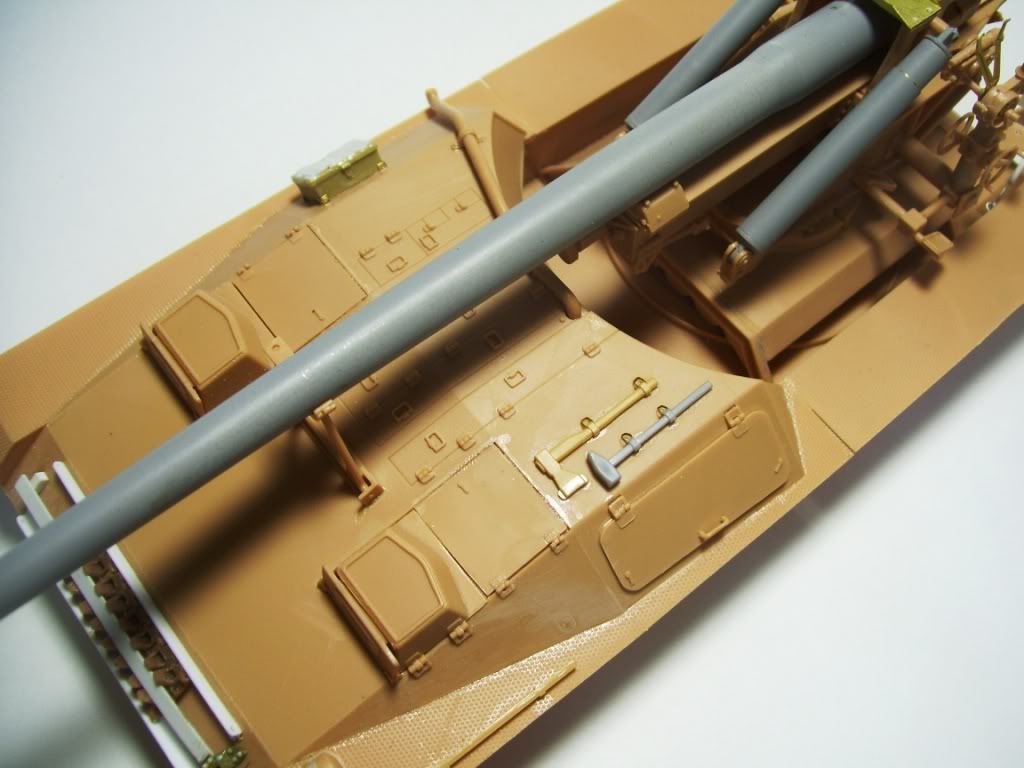
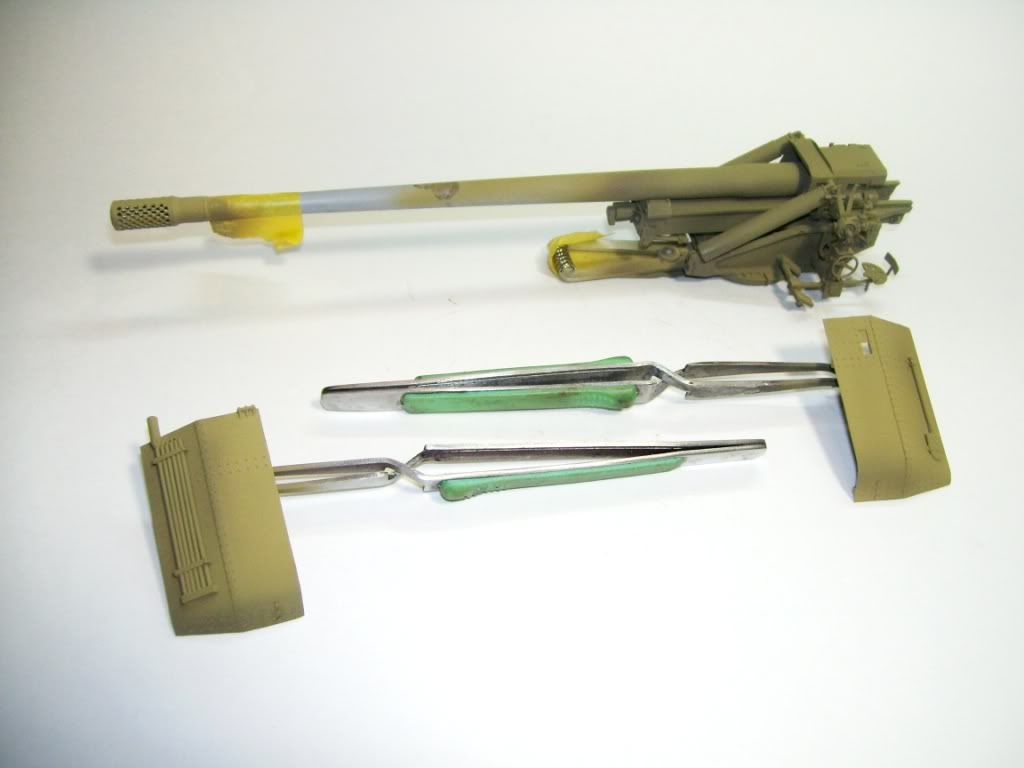
I’ve added some more small details–here’s a look at the rear of the vehicle. I’ve added a central towing pintle, some handles to help raise the big spades, and some hooks to secure them, and some small details to the shields.
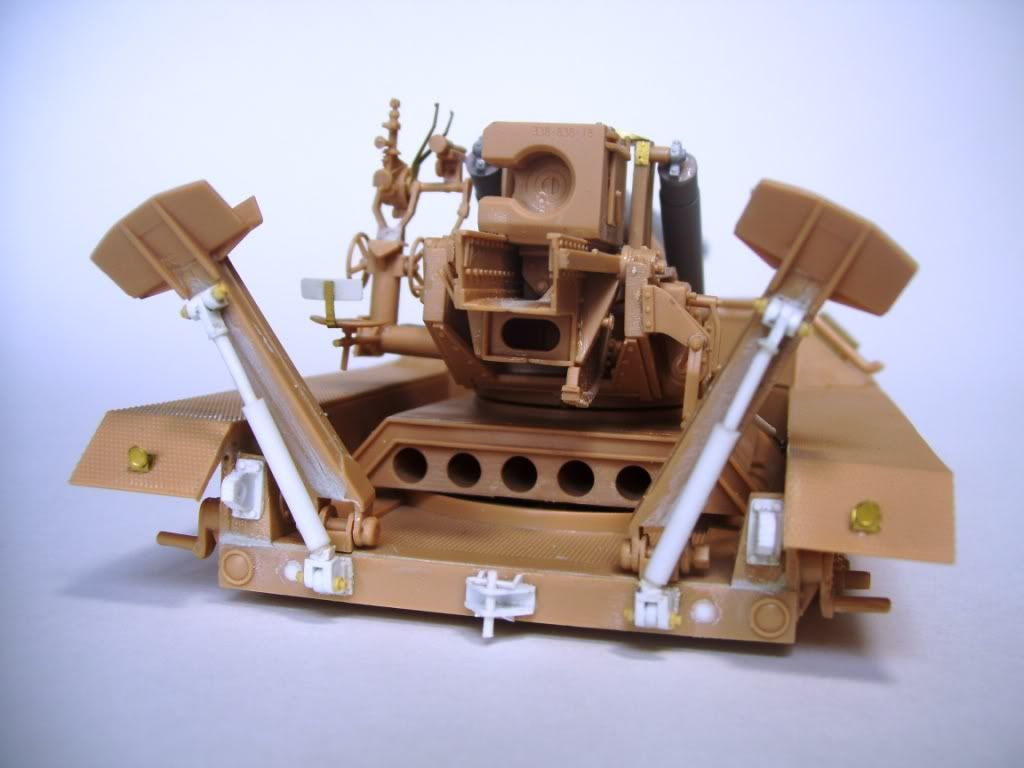
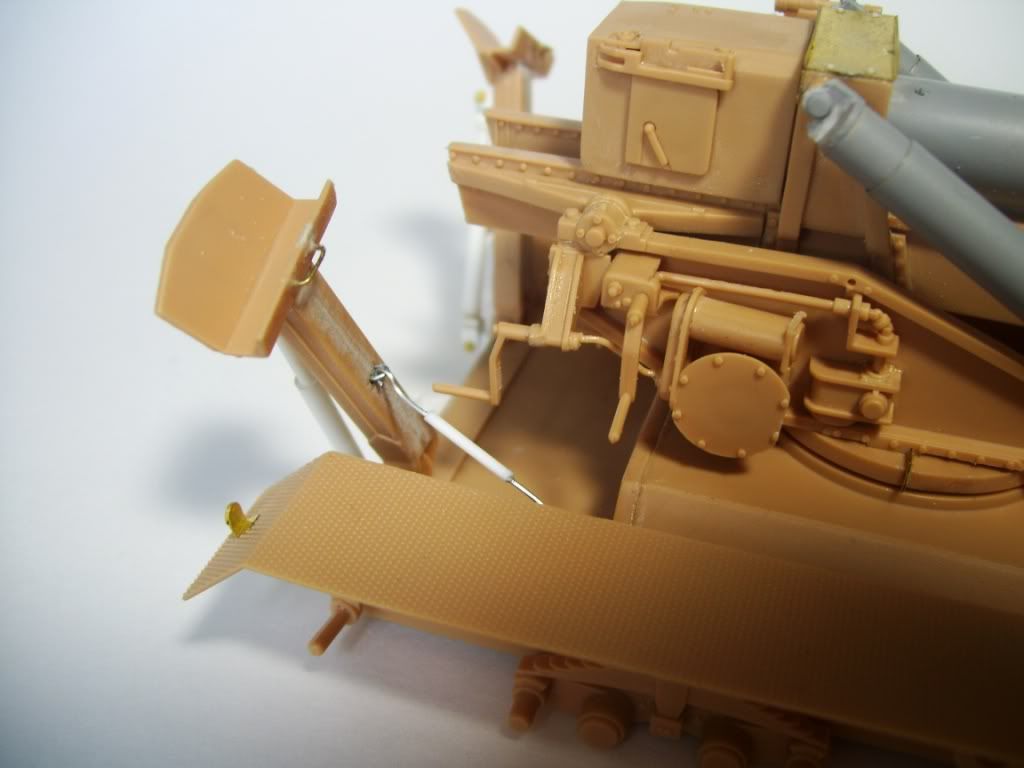
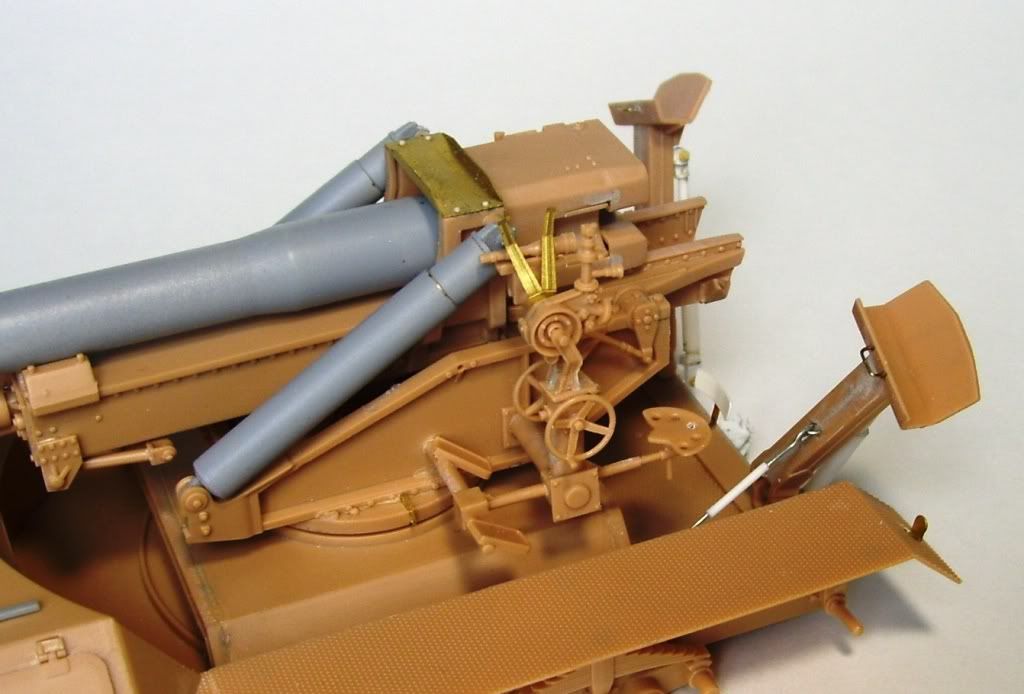
I also added some inside detail–a gas canister container her inside. I also put that cleaning head on one of the rods for added visual interest, and added some small detailed simulated-threaded ends to the rods.
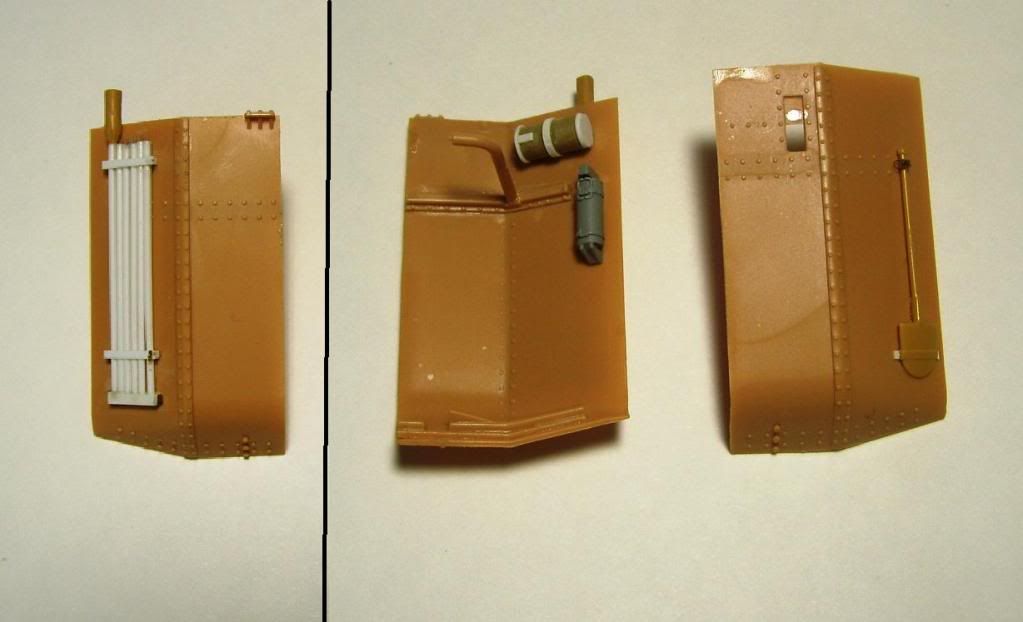
Here’s the clips on the tool holders too…
I haven’t even started the tracks yet–ugh, I tool a look at wbill76’s website to see what I was in for with these MK tracks, and it looks like it’s going to be a task to get them all cleaned up and assembled. Got some work there…but for now, I’ve lightly primed the model with Tamiya Gray and will be putting a base coat of Red Primer on it soon.

That’s all for now! Should have an update in a day or two when I get some proper paint down!
Stay tuned!! [:D]
Manny, you’re correct–the Jagdtiger would have had this gun too. I think it’s add some visual interest, and a bit of “story” to it. The muzzle brake, of course, will not have been used on it in the JT, but that will be cool as well; it can be painted either DY or red, as an add-on piece!
I’ll do some research to be sure; that may change in time…
My My Karl that rig is going to be BOSS[t$t]
Katy Bar the Door here comes the judge,here comes the judge.[H]
Tony lee[:)]
I love this model and want to marry it…
That travel lock sure looks flimsy for that mutha of a canon!!!
Very nice work on the additional details Karl, really dressing this one up in style! [B]
The best advice I can give you on the tracks is to work on them in stages while watching TV or other similar activity…it helps break up the monotony! Depending on the track type I usually create an “assembly line” type of process that helps move things along and work with sections of 10 or so links at a time…that way you feel like you’re making progress and it’s not so much of a slog. [;)]
Thanks, Tony! Hey, don’t go singing “Here comes da judge”, or you’re going to have me thinking about going back to the garage for a GTO fix! lol!
Thanks for the [Y]!
Manny, ha ha; consider yourself “betrothed”! [ks] Hey, I DID research that idea I had about the white gun mount, et al, and you were right–the mounting for this gun in its “field gun” role was not the same as a JT. So I went back to the idea of a field gun mounted on a primer-red testbed vehicle. Good call!
Bill, thanks for the advice! I looked at your blog and got that impression; that “Patience” counts! (I think you’d said as much in one post!) I"l get to those tracks one of these nights after I get some paint on it. I"m about halfway through the shading coats now…thanks for “following” my build here!
[:D]
Is Polygamy allowed in the Fatherland? Der Fuhrer is making phone calls…
Karl, I see you made it to Prime Time!!! Just as a note, in the future as an /acrylic lover, you may want to try the Vallejo primers. I tried the OD primer and I am hooked. Right from the bottle to AB, lays down and covers well and not too thick to cover details. Price is also good
Rounds.Complete!!
Thanks for the recommendation, Mike! I’ve picked up some Vallejo paints, but you know what I absolutely HATE about them? Those crappy little bottles! I just can’t work with them. What do you do with the paint if you put too much out of the bottle? You’ve wasted it? Drives me crazy. Alas, with the limited availability of my favorite Tamiyas, I may have to start looking at them for future use!
----------------------------------------------------------------------------------------------------------------------------------------------------
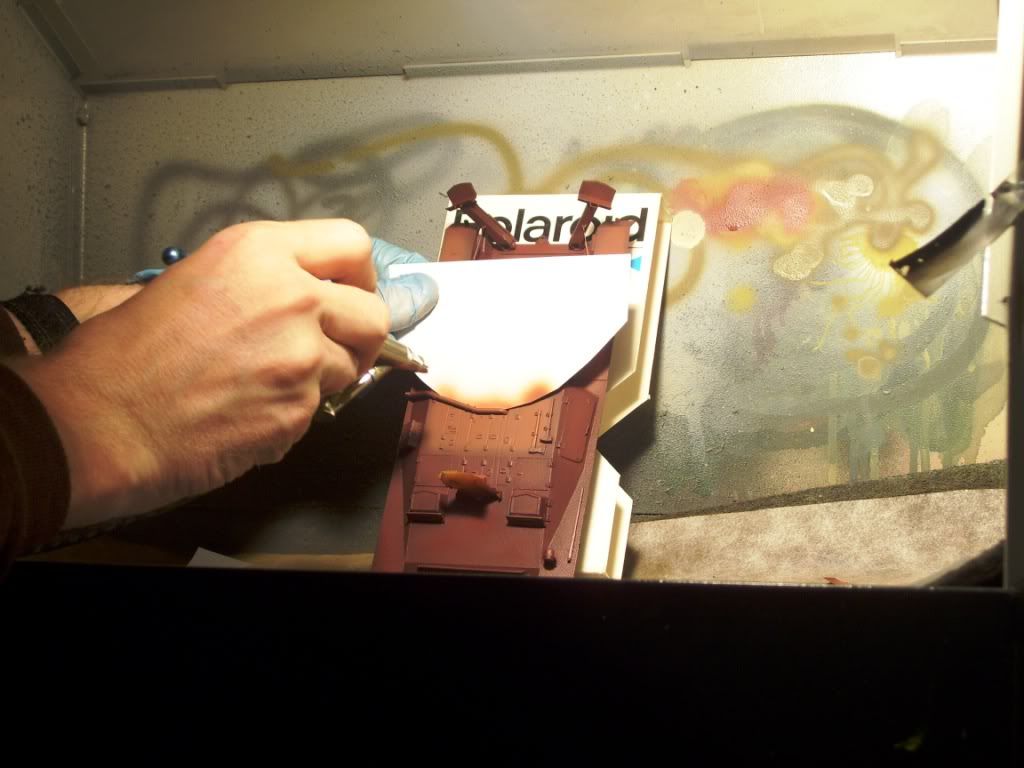
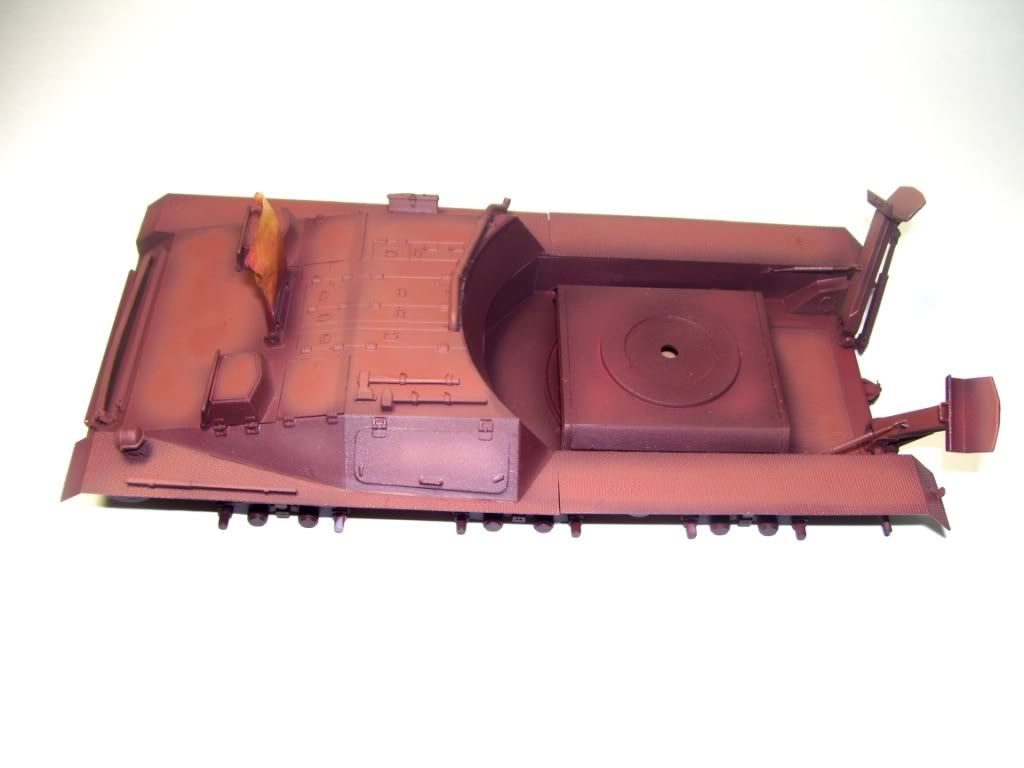
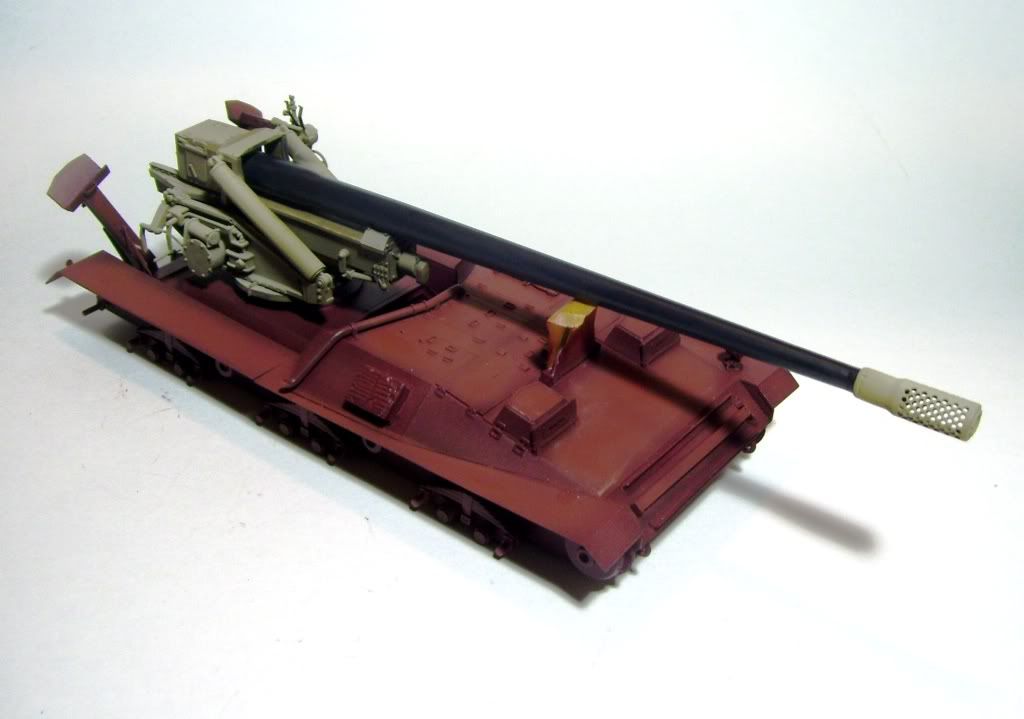
OK–paint update! [:P]
I started out with a dark red primer–this is Tamiya’s Hull Red with a smidge of Red and some Black added. I painted the hull and wheels in this color. The travel lock is masked-it’s going to be DY.
Next, I sprayed some straight Hull Red. It’s hard to see, but it grades the finish a little lighter…

A rare action shot from the dooghouse! I’m using mask templates to block off sections that I don’t want covered, and I’m now spraying a lighter Primer color that I have added some Buff to…
Here’s the shading result.
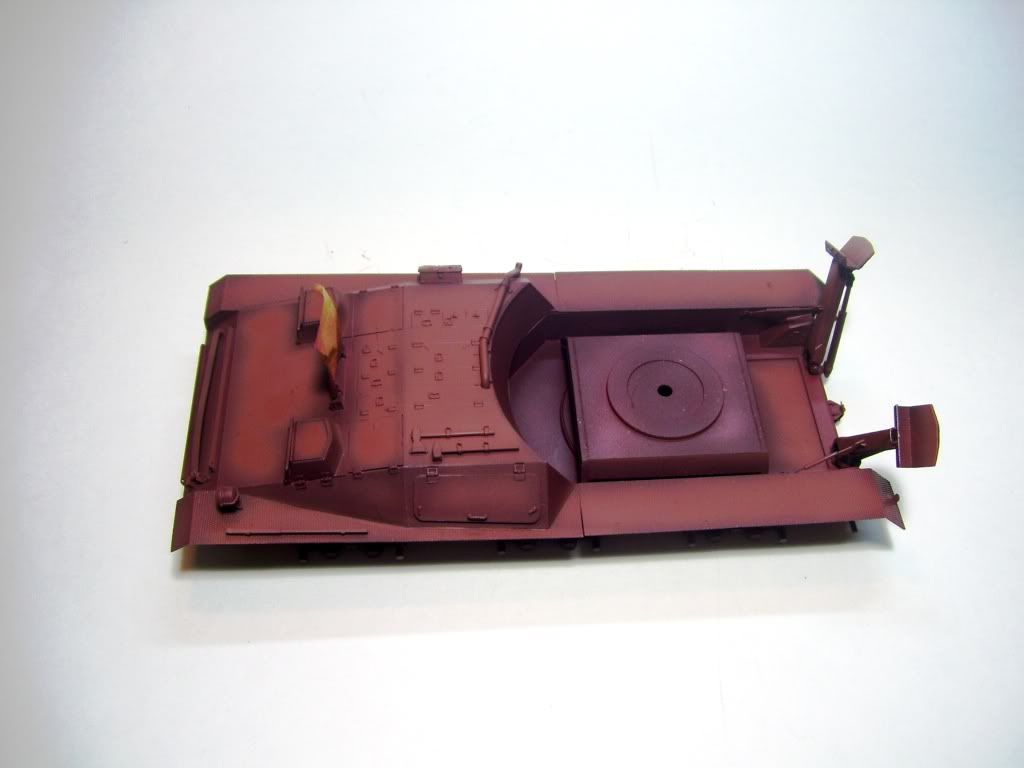
In the flash, it really looks glaring, but those of you who know my usual methods know that this is what I like to do, the better to tone it down and use the harsh gradient to my advantage when weathering and finishing. Note that the “tub” is a lot darker, because it would be more in the shadows.
I was going to paint the gun white as if it were used in a previous vehicle, but thank to Manny, I re-checked my references and realized that that would be unrealistic, so I started the DY coat with a dark DY to which I had added some dark Grey. I had already painted a base coat of DY before I realized that I’d forgot to do a dark coat…hey, it’s late…[|-)]
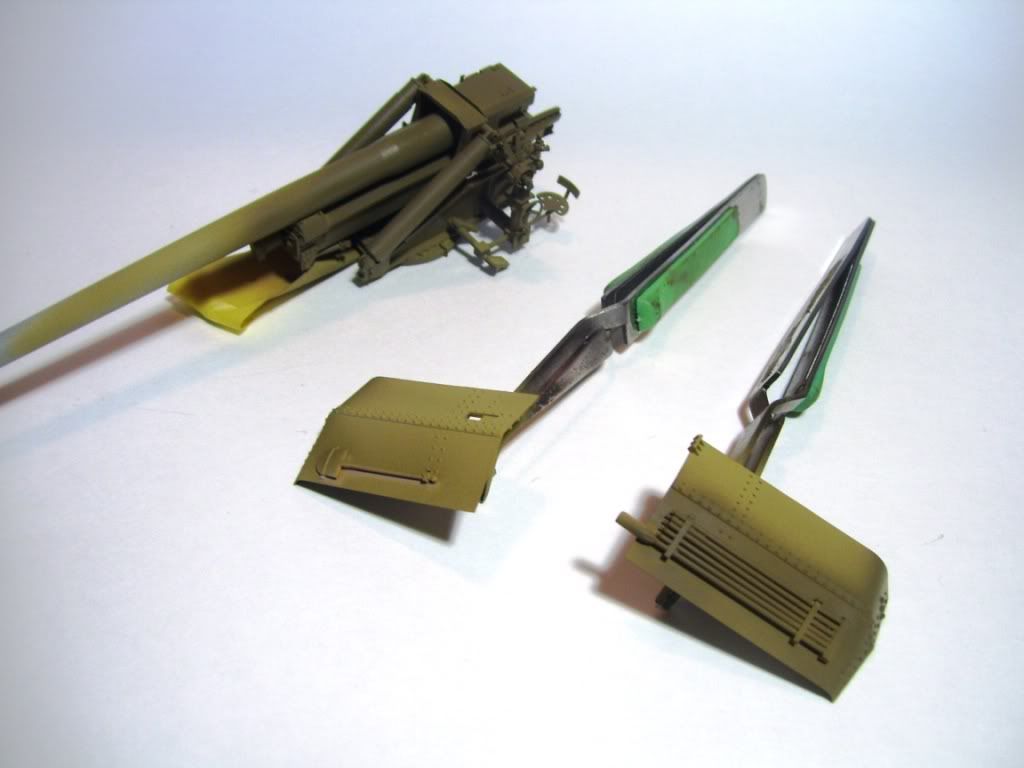
Next, I graded the lightness with a standard coat of DY.
And then added some white and added a highlighting coat.
And a teaser—the gun has been painted the dark grey primer that was used on barrels–it looks nearly black here, but I will mitigate that with filters when the time comes.
And that’s the end of “phase one”–there’s still more masking and careful painting tomorrow before I start the weathering…tune in tomorrow night for more!
Thanks for looking in, guys!
Karl the doog…