uhhhhh…excuse me while I pick my jaw up from the floor…!
Thanks guys,
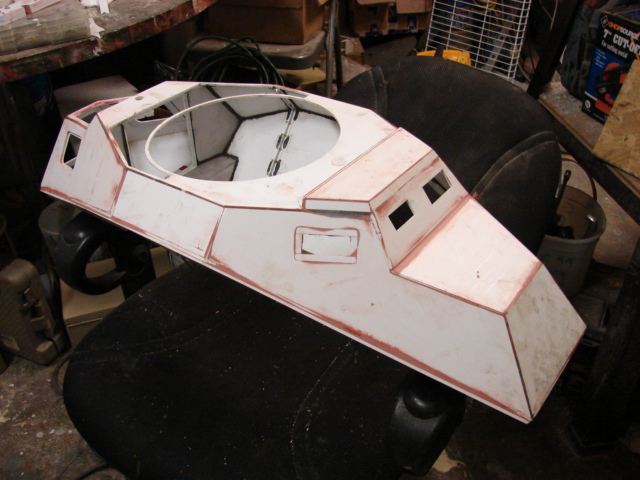
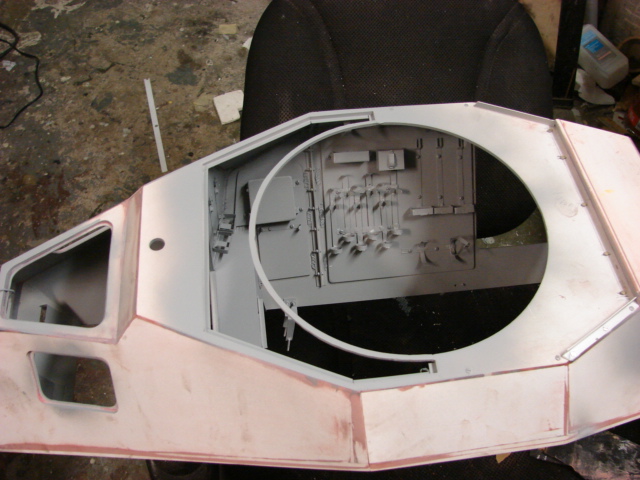
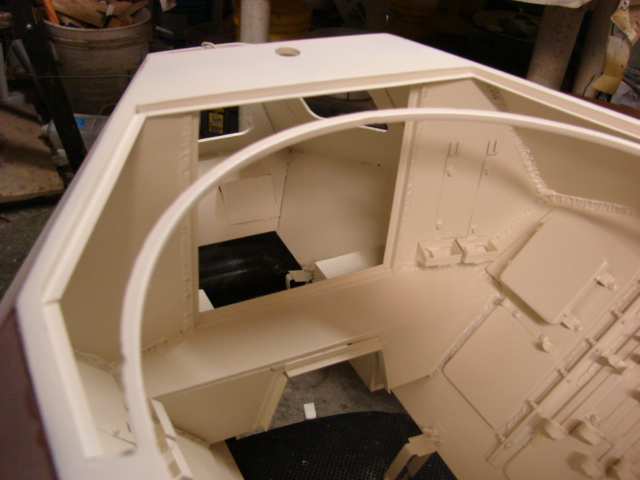
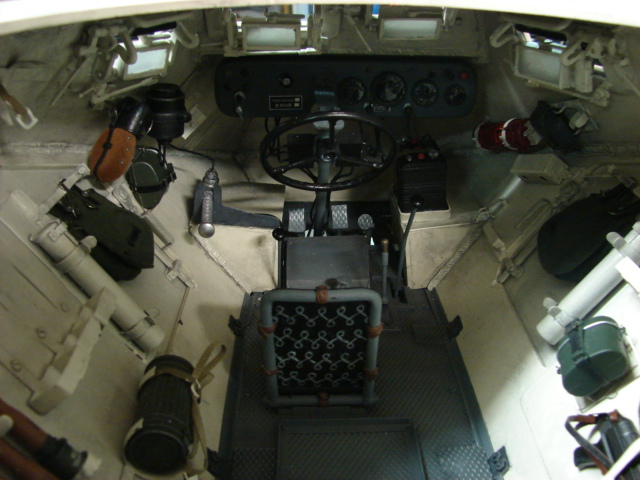
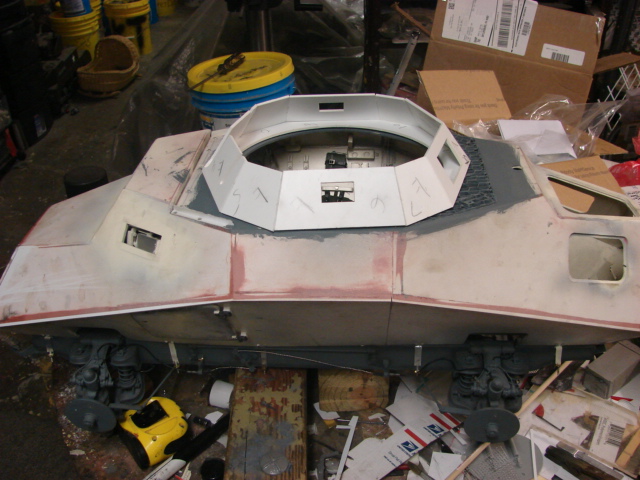
It’s been awhile but I have been working on the 222’s interior cabin detailing.
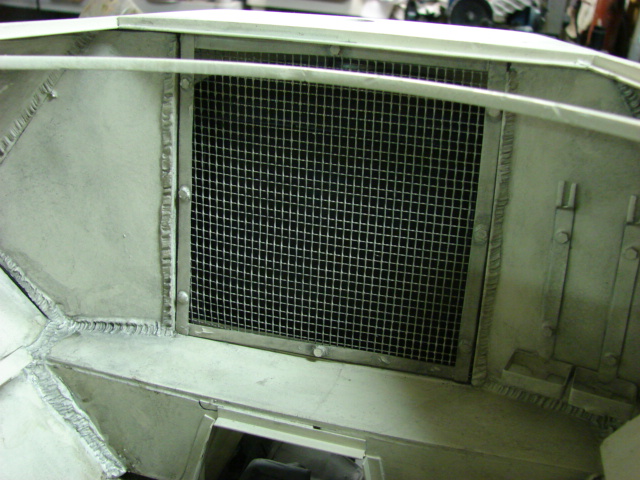
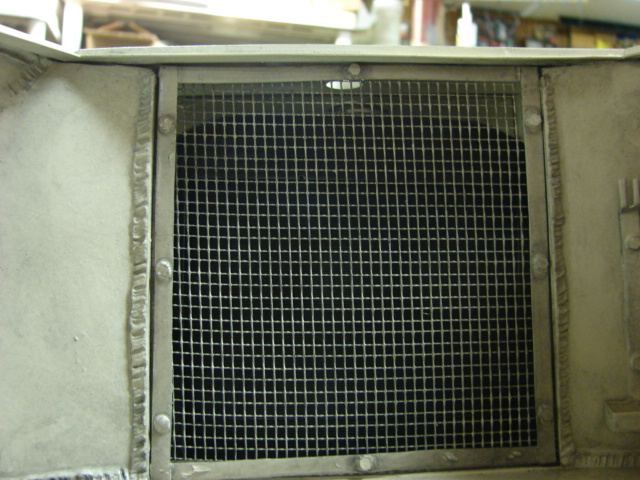
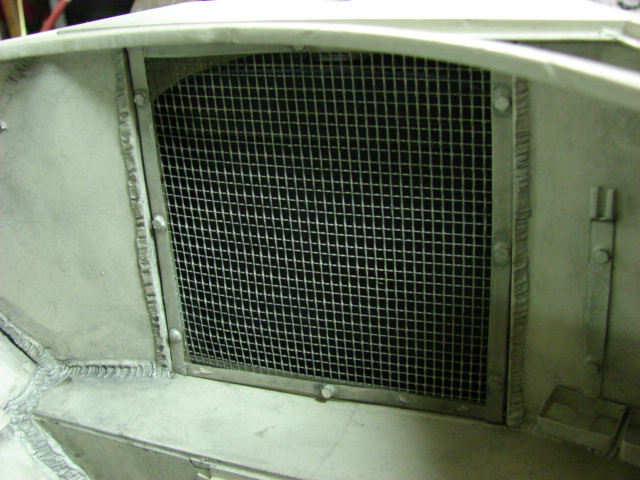
The rear firewall was fabricated out of lexan and mounted. The center of the firewall is the grill work for the radiator. This will be fabricated after the body is mounted to the frame.
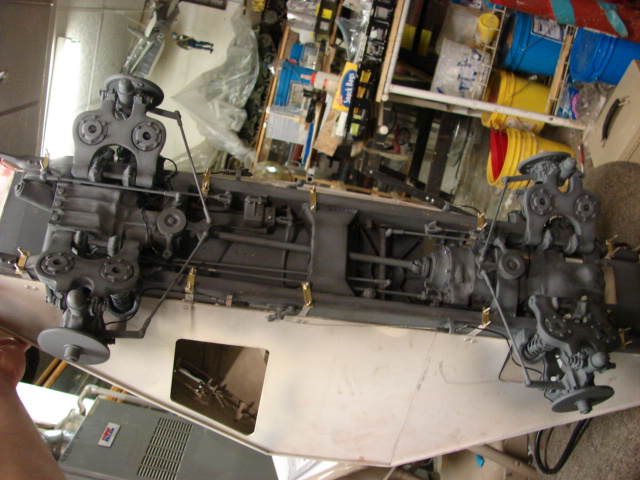
While on the radiator I fabircated the radiator mount and affixed it to the frame.
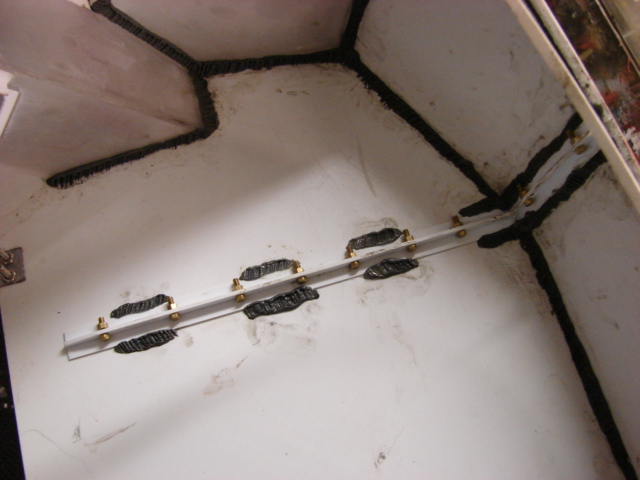
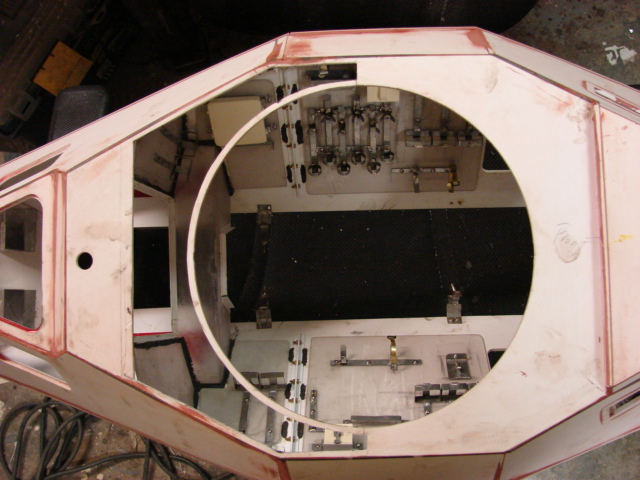
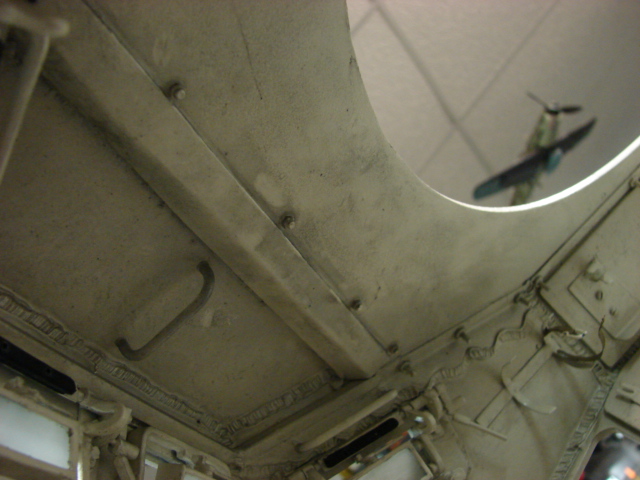
All of the interior joints had their weld bead details epoxy sculpted on. This not only gives detail, covers up any seams, but also gives a little strength to the body.
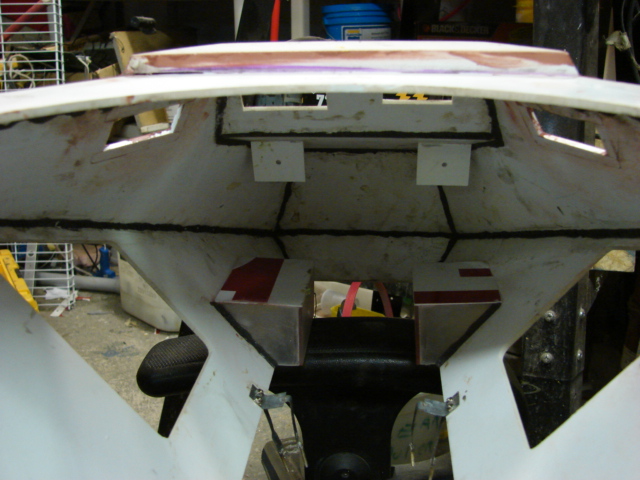
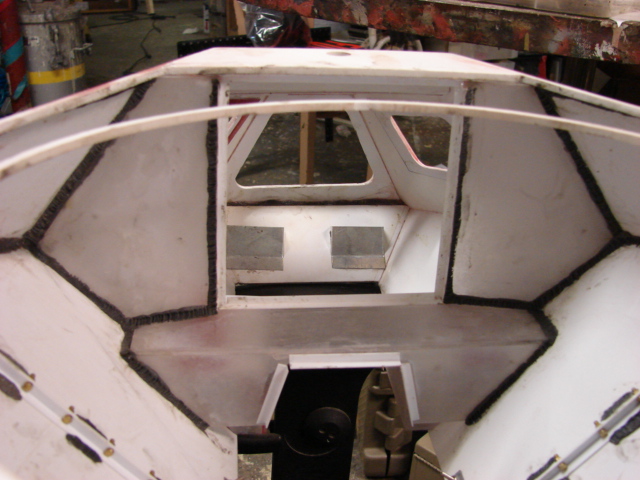
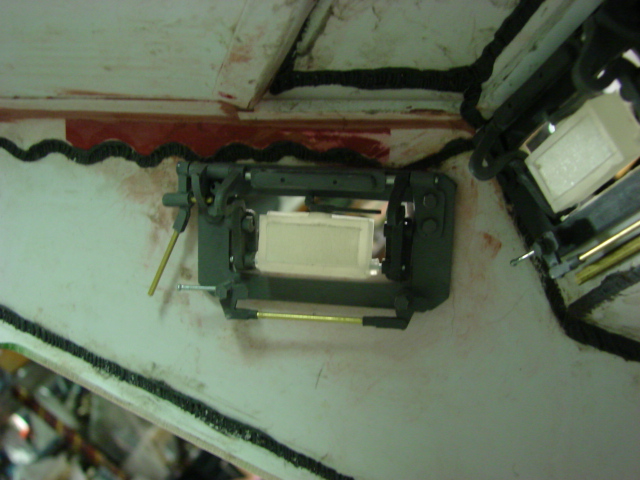
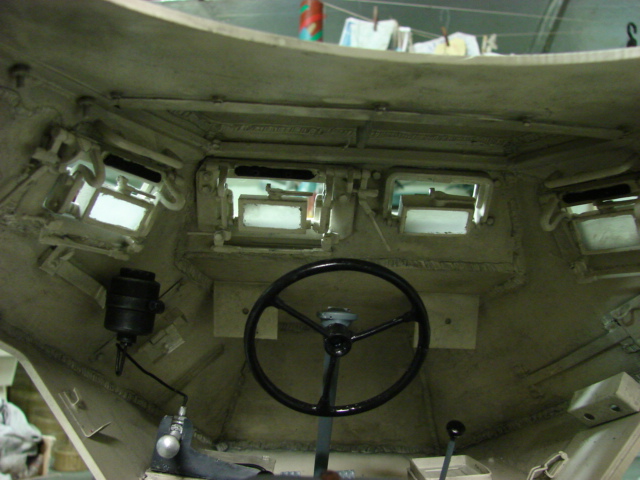
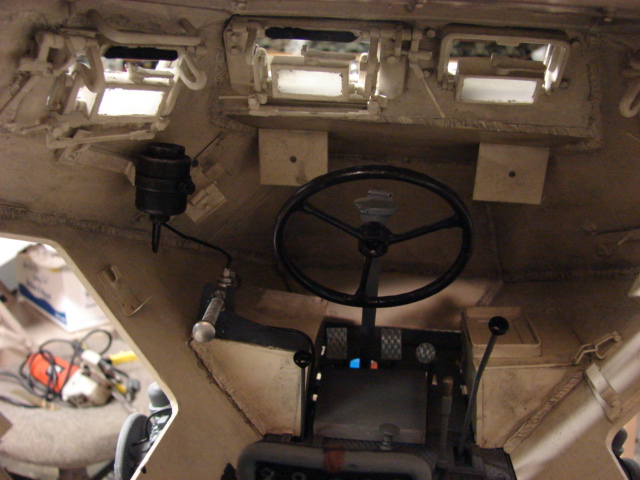
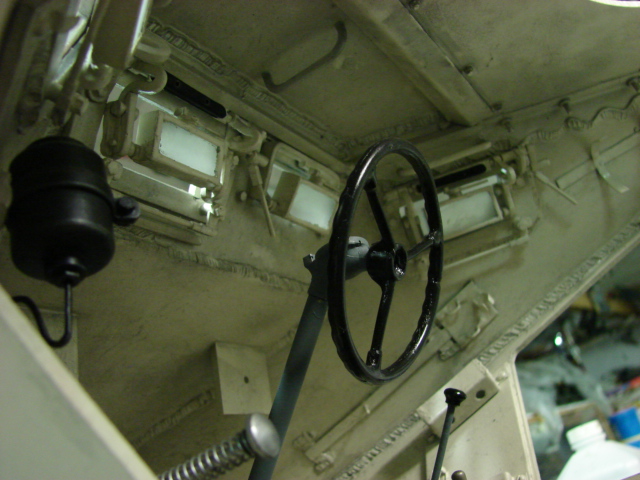
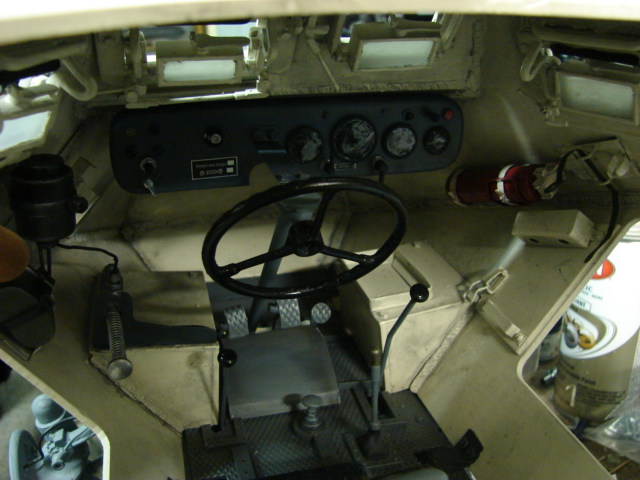
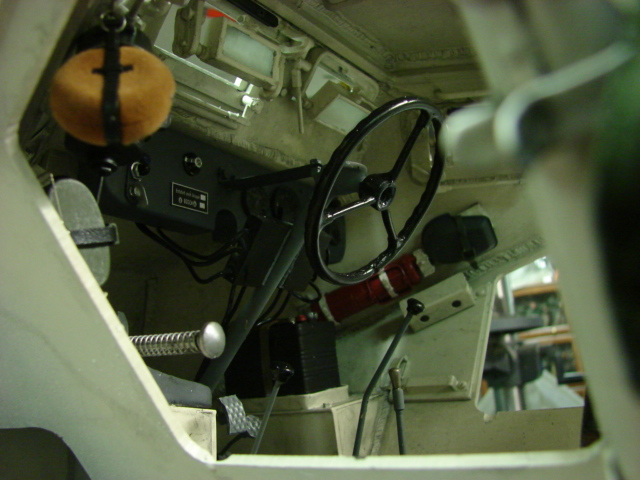
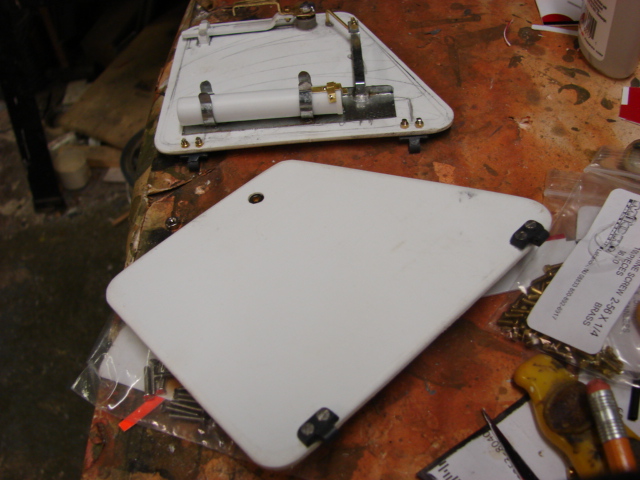
Towards the front of the hull I fabricated the mounts for the dash board / instrument panel. The instrument panel master has been completed and will soon be going into mold. Once complete it will be added to the product line.
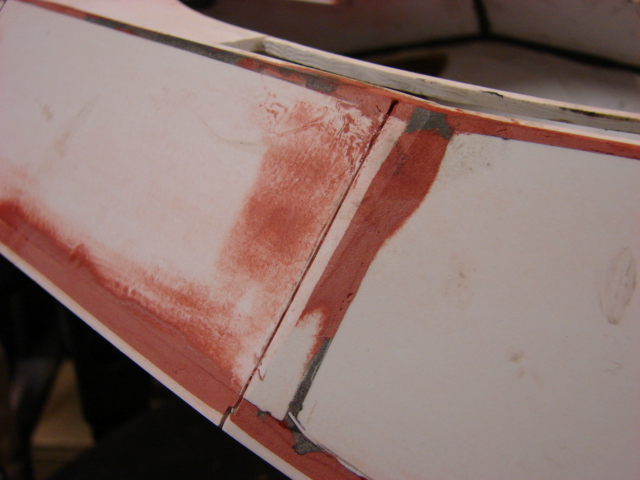
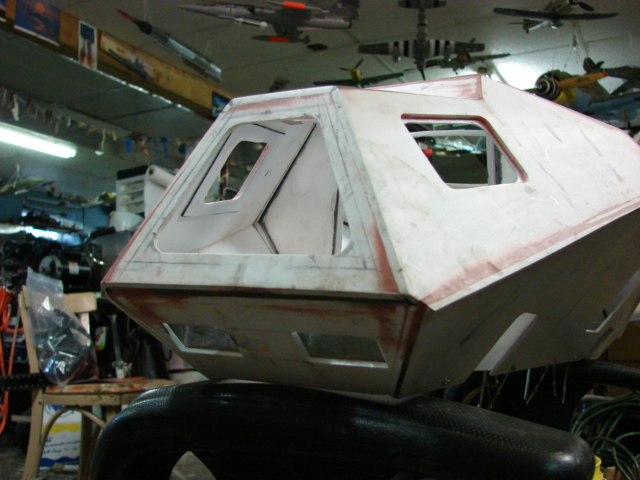
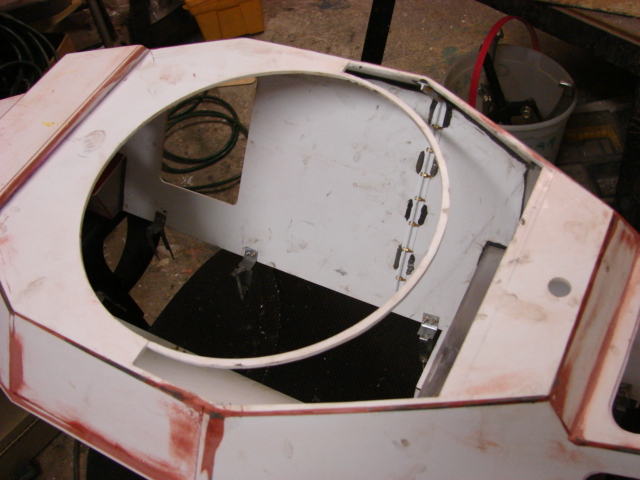
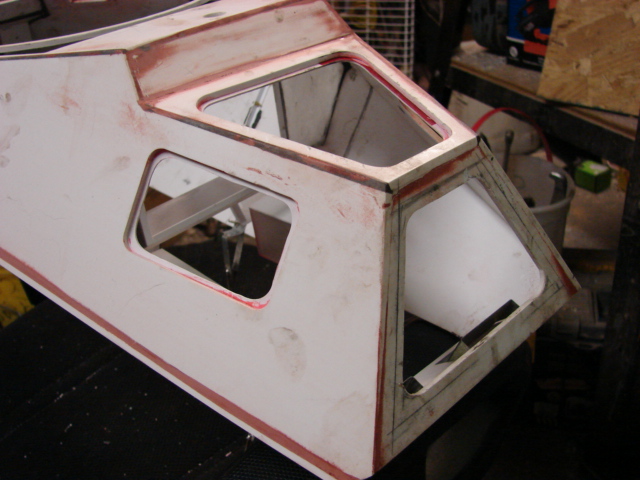
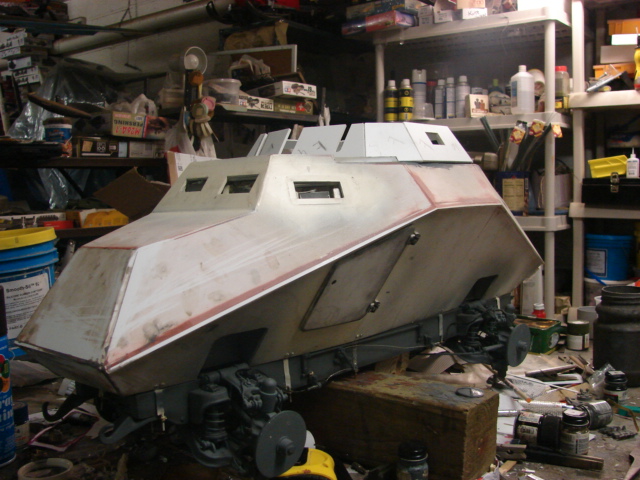
The 222’s body was unique in that the body was comprised of two halves, the first half comprised of the fighting compartment, while the other comprised of the engine room. The two halves were joined by a flange towards the rear of the fighting compartment.
To replicate this on the model I glued together two plastic angles and added brass micro bolts and nuts to them. Once the flanges were ready they were installed to the hull interior.
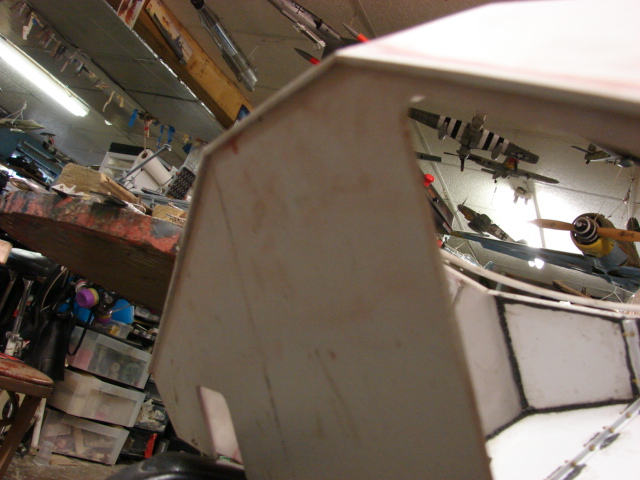
Because of the two halves there is a seam line visible on the exterior of the body. To replicate this I scribbed the lines with the Dremel multimax.
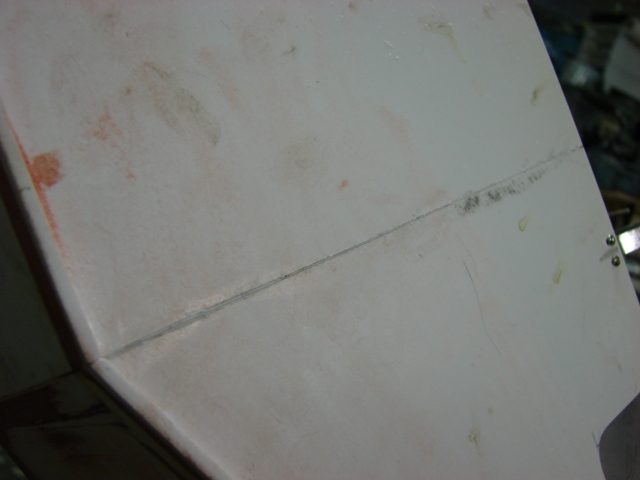
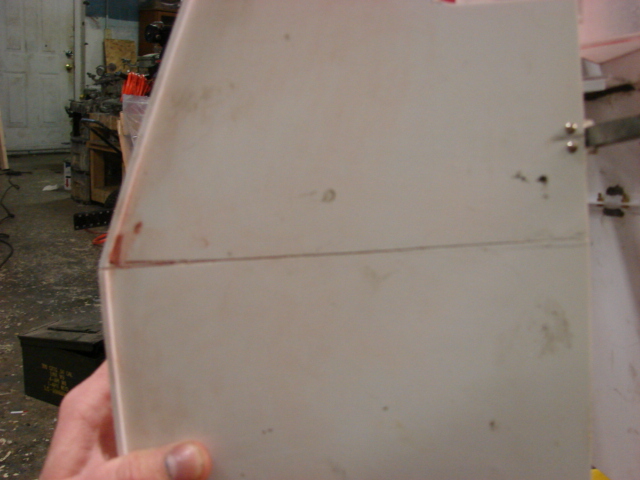
Also on the hull of the 222 had an overhang where the upper hull angles meet the lower hull angles, to replicate this on the model I added a styrene square stock to run along the top panel of the body. The square was then blended in to the body via body work.
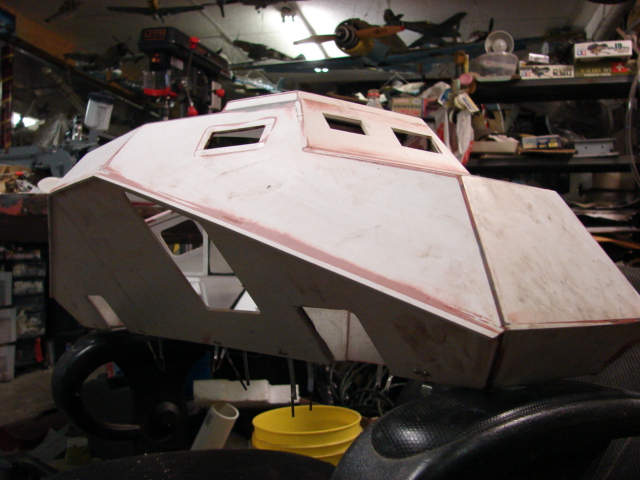
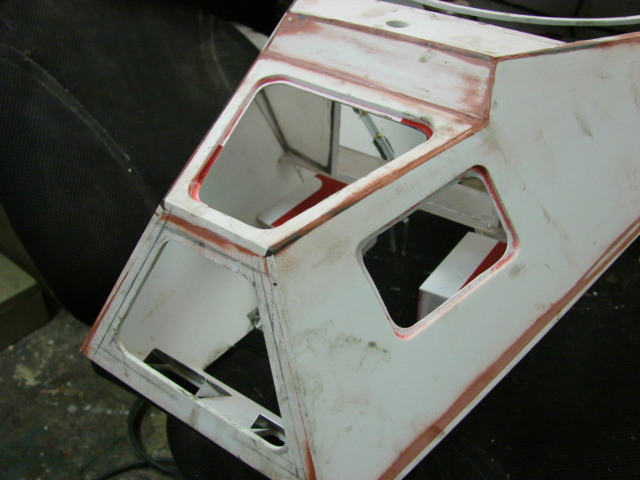
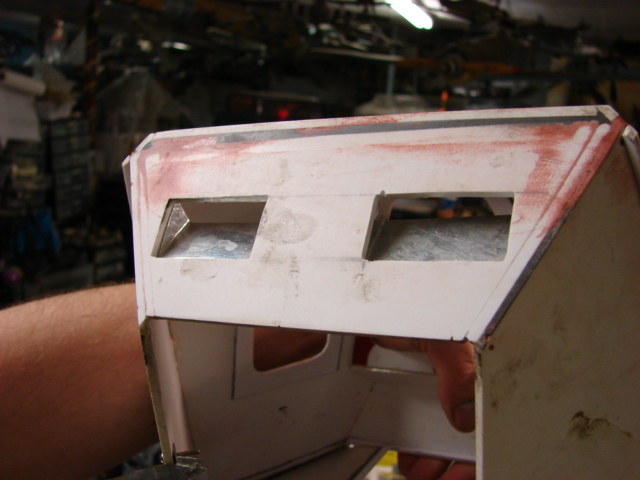
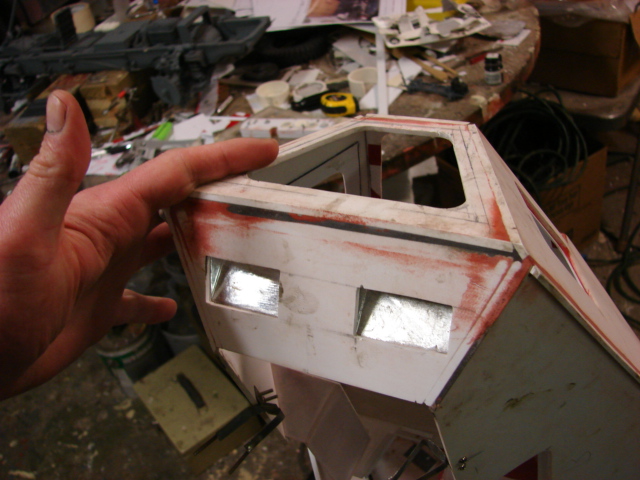
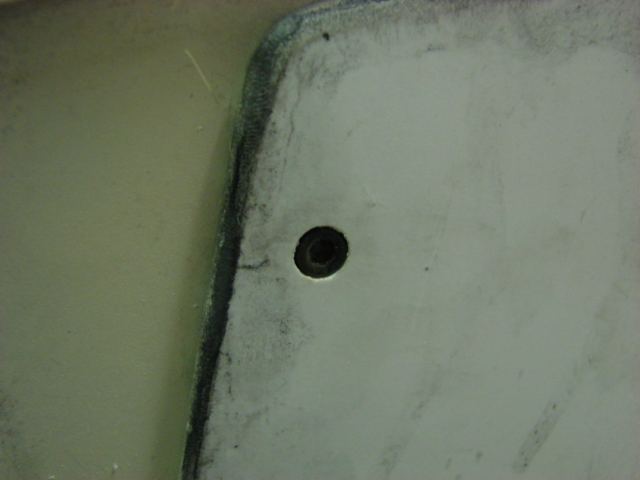
On the front sides of the body the kit has two cut outs for the armored visors. The cut outs for the visors are too large though, to reduce their size I added 1/8 inch thick styrene bar stock to the cut outs. Because the stock was the same thickness and material as the body plastic it was easy to mount and to blend in. Now with the holes adjusted I can fabricate the interior visor detailing.
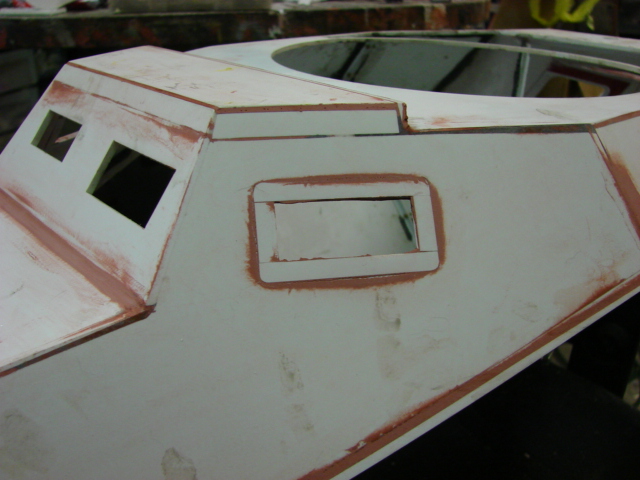
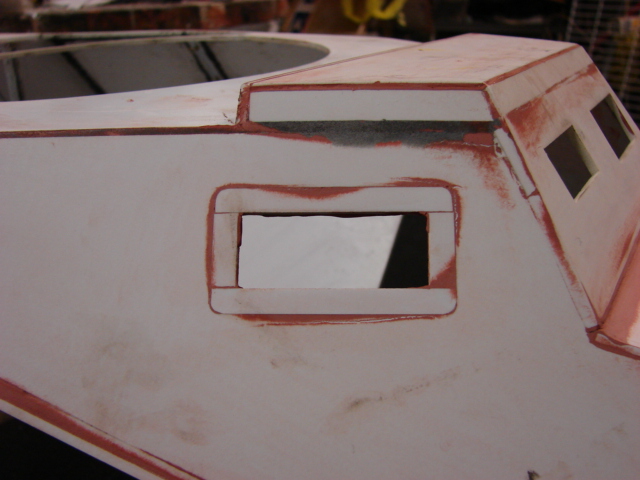
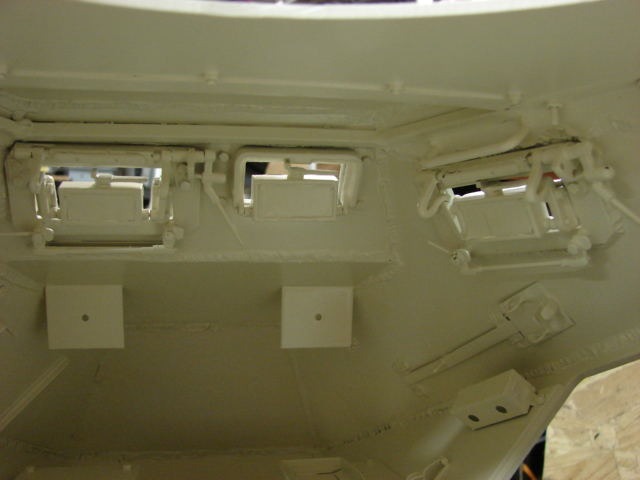
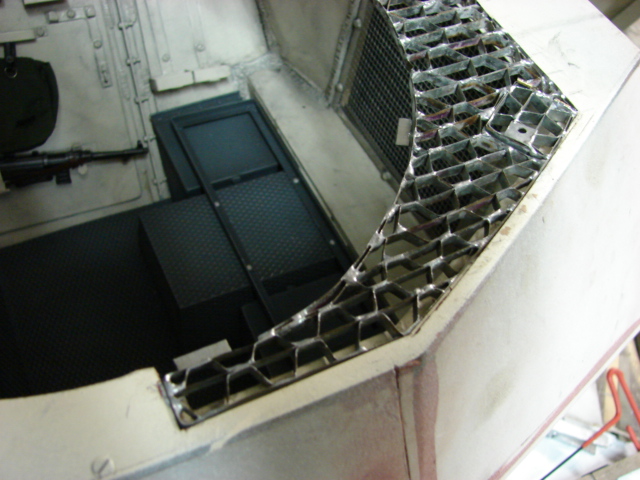
In addition to the detailing I have also made the cuts for the grill work and the engine hatch. These cut out required very accurate cuts and were performed with the Multimax and dremel.
The grill work will be fabricated out of sheet metal after the body is mounted to the chassis.
The engine hatch and the engine access hatches have their hatch wells added.
I also made a quick youtube tutorial on how to fabricate the hatch wells,
On the lower rear portion of the body I cut out the lower air intakes, in addition to cutting them out I added the armored ductwork to them. The ducts are fabricated out of sheet metal.
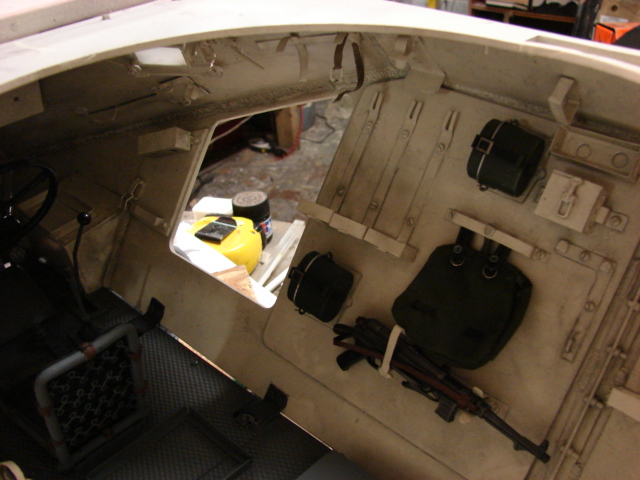
I will now be focusing on the interior mounting detail for the grenades, and other accessories.
Once compete I can paint the interior and start with the mounting. More to come!
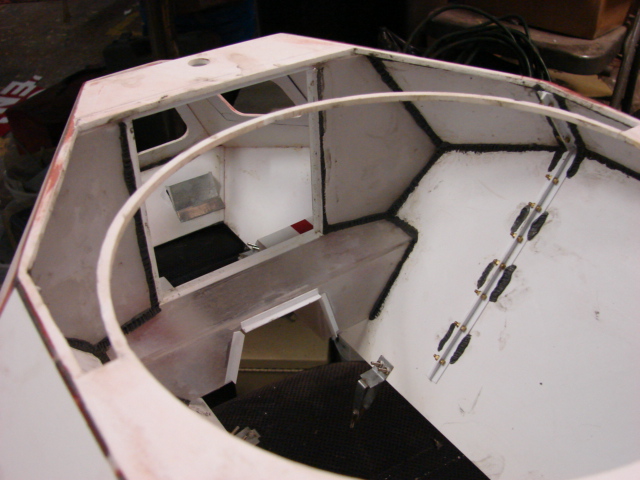
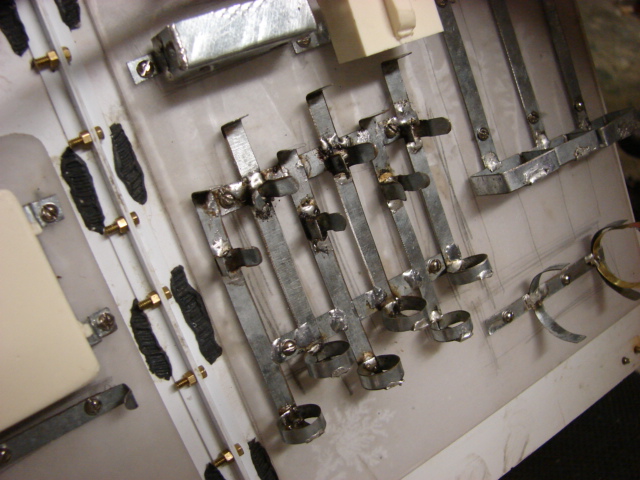
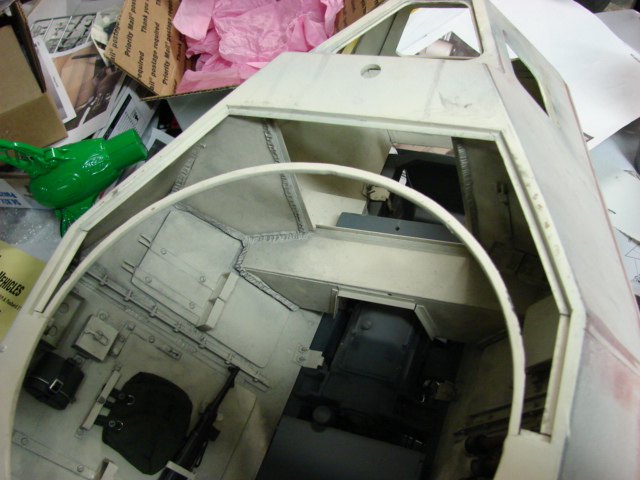
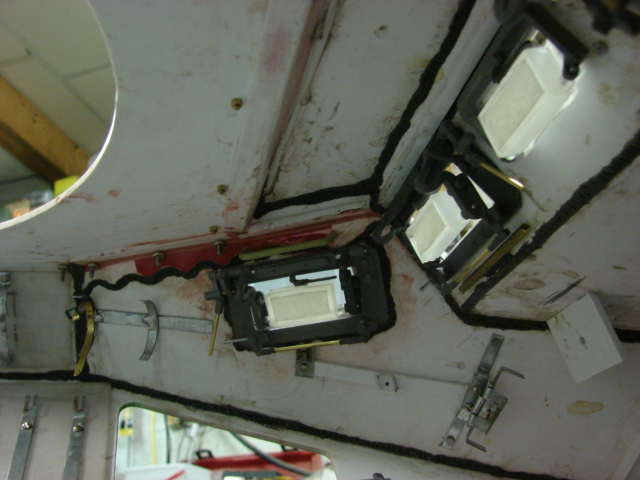
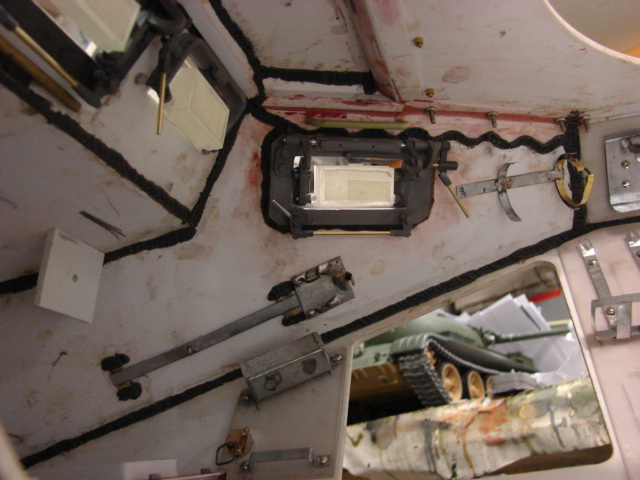
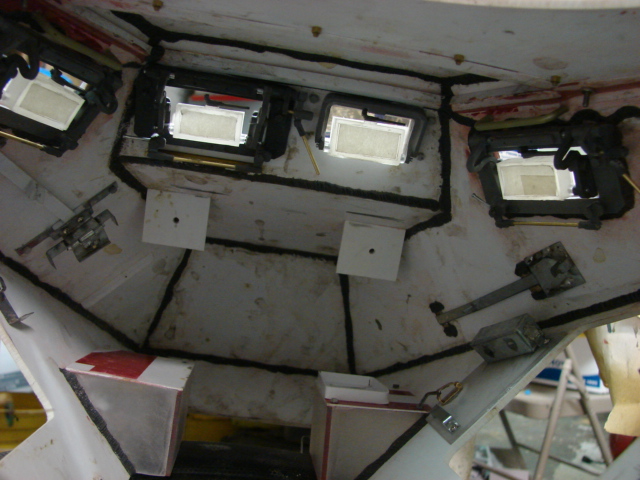
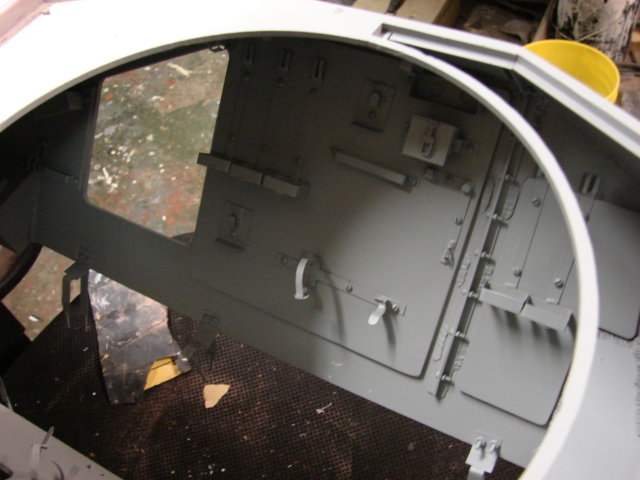
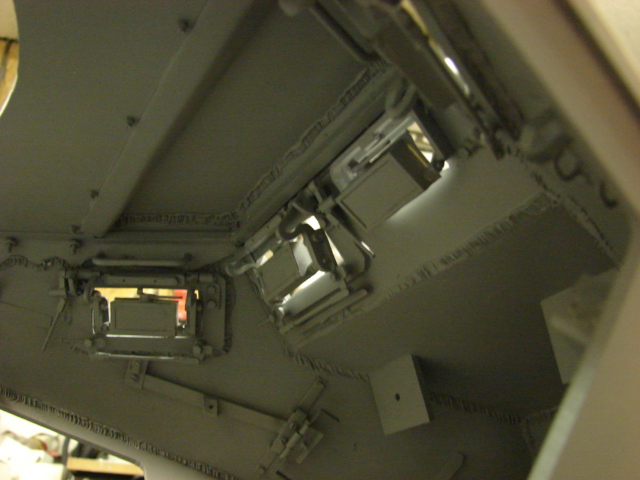
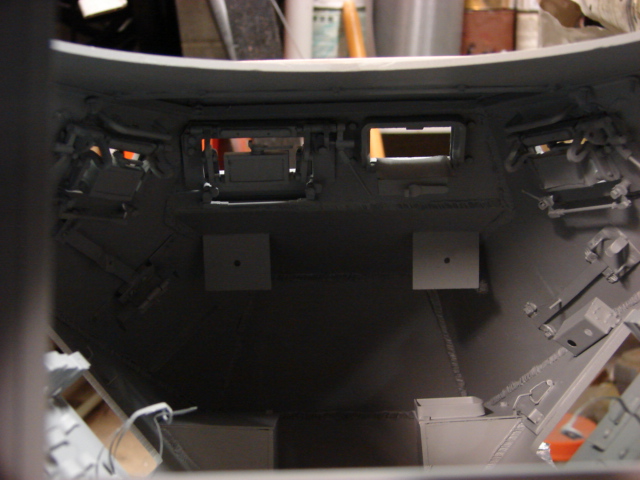
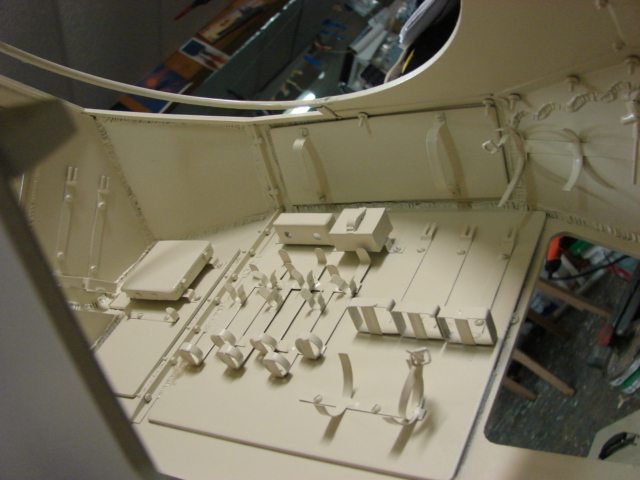
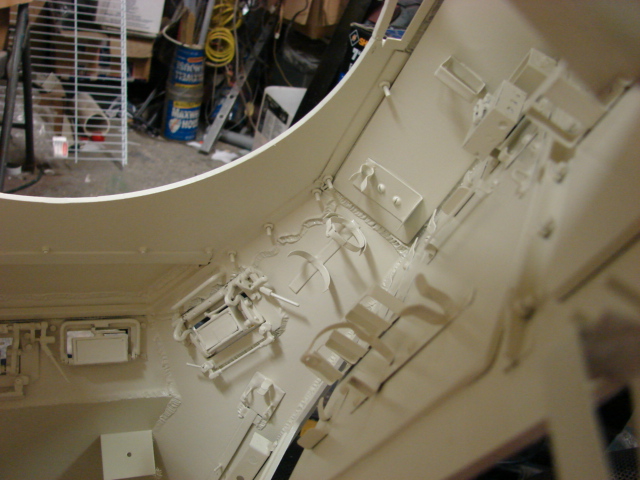
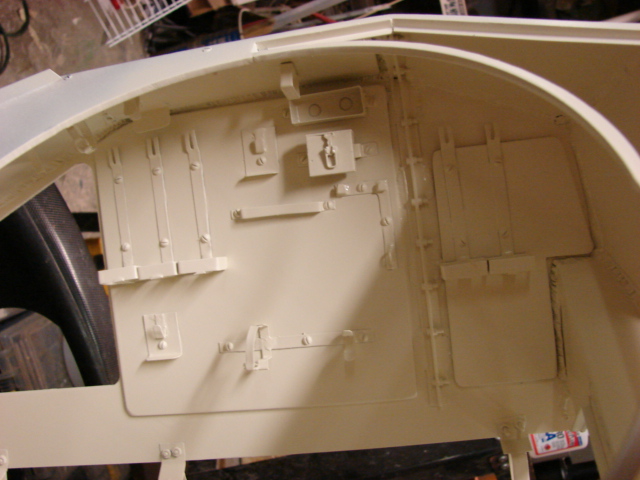
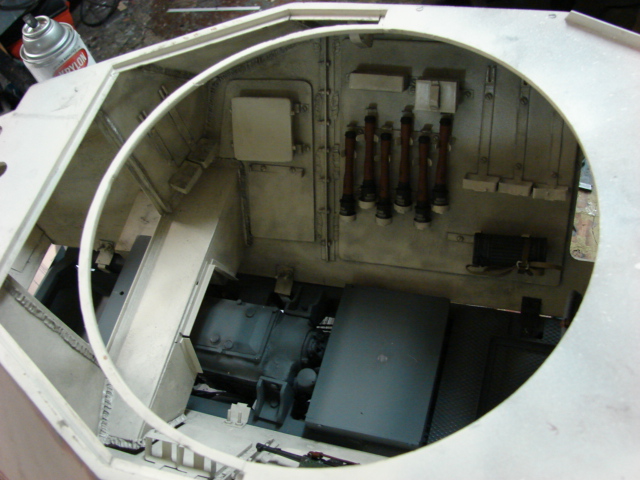
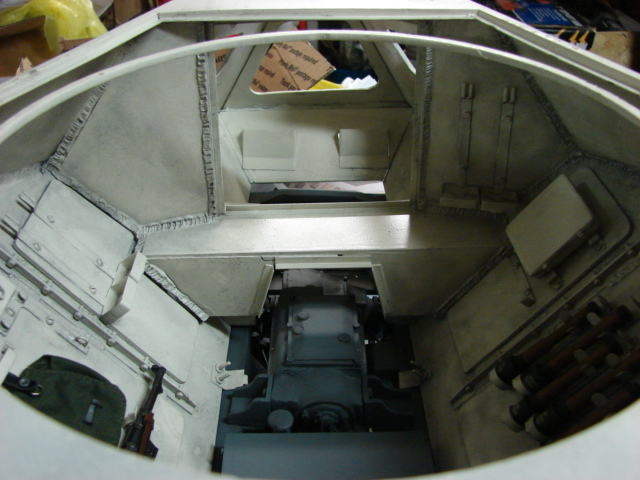
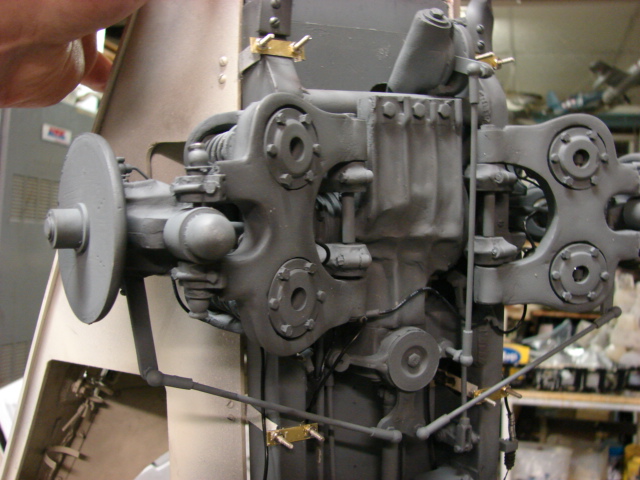
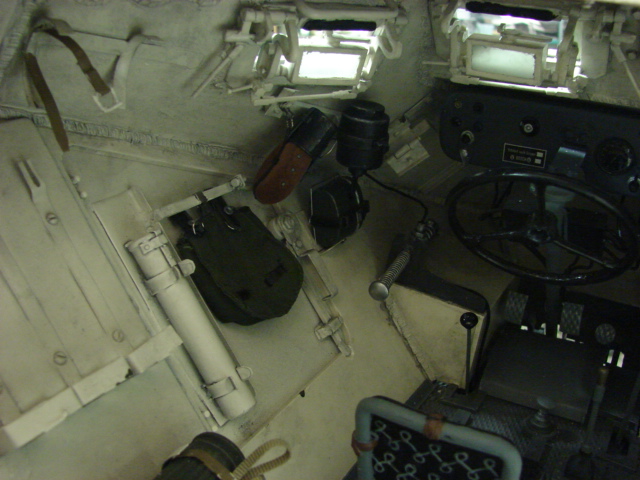
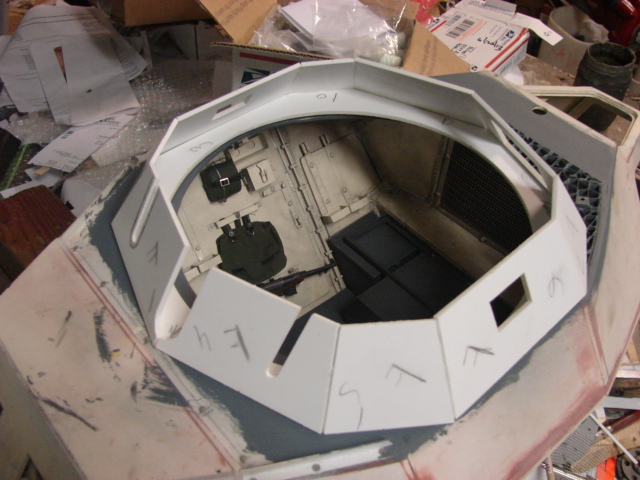
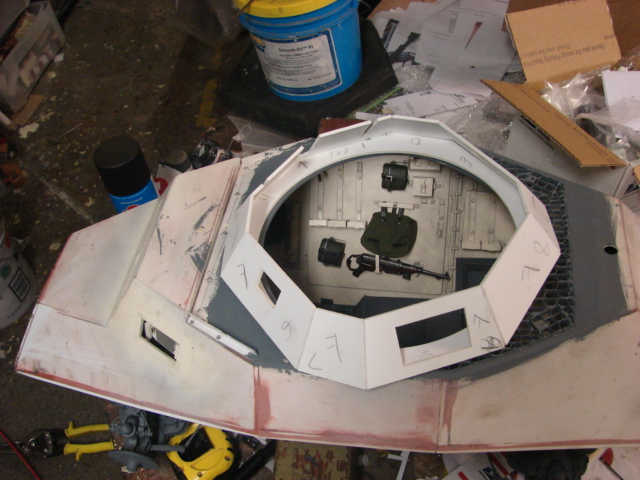
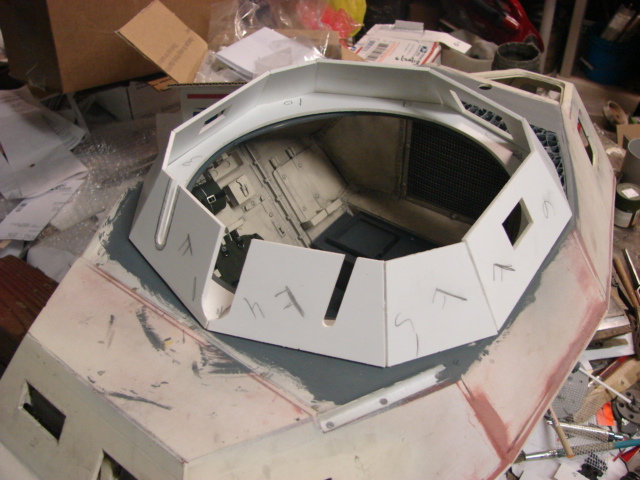
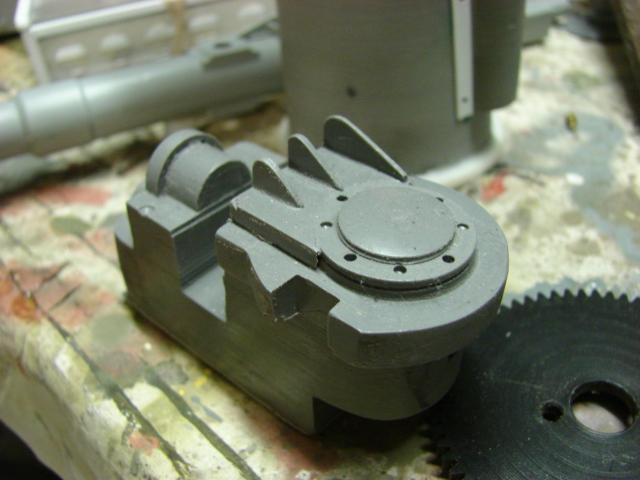
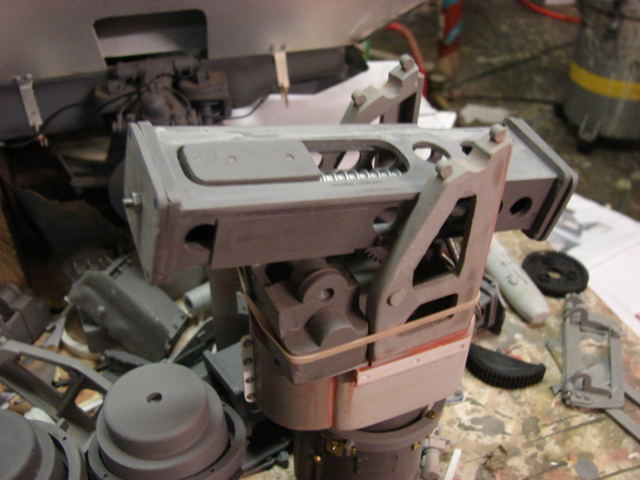
I made some progress on the fighting compartment interior detailing.
All of the interior details were scratch built, and most of the parts are all fabricated out of sheet steel.
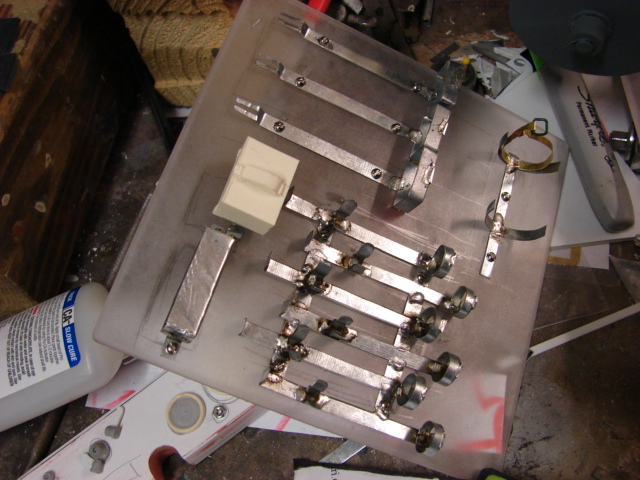
One thing that I noticed on the real vehicle is that the interior detailing is not mounted directly to the body, rather they are mounted to elevated plates. These large plates made it easier to scratch build in that I add the details to the panel and then mount the whole panel to the interior.
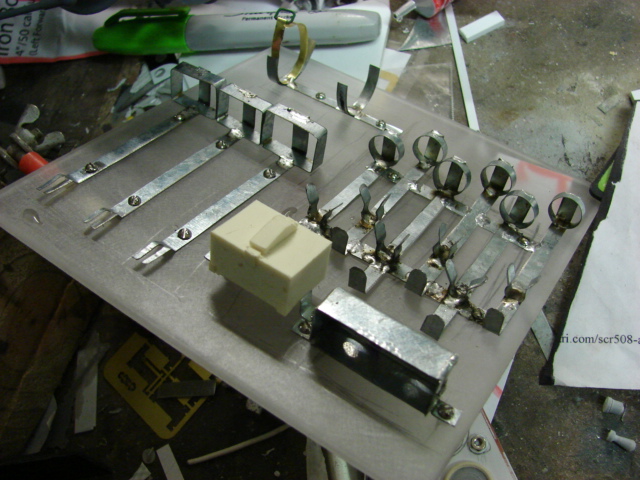
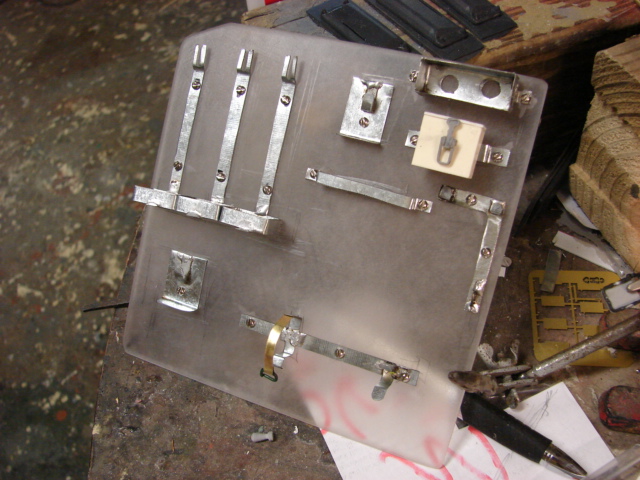
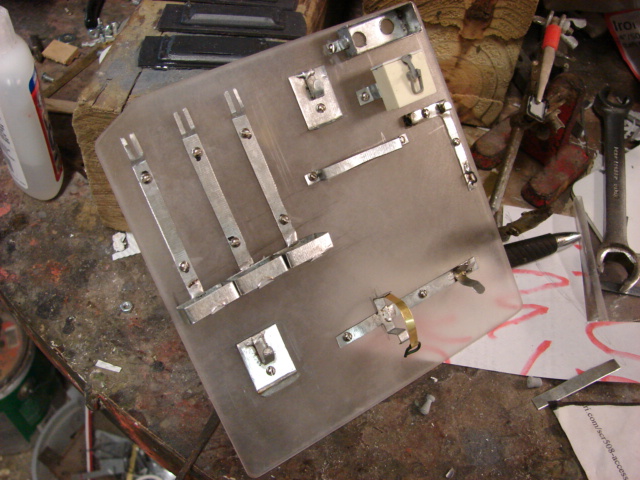
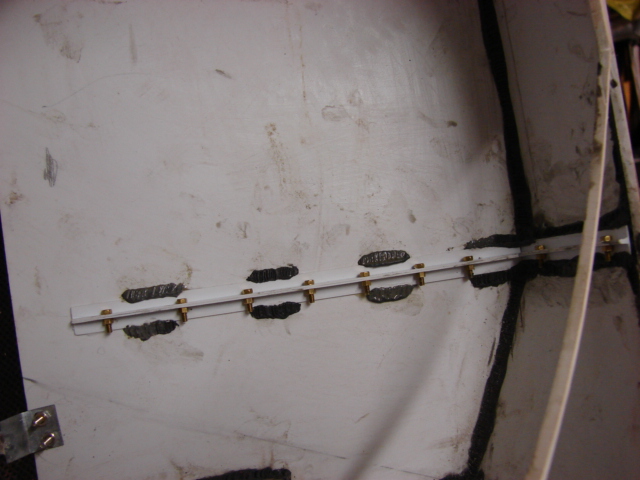
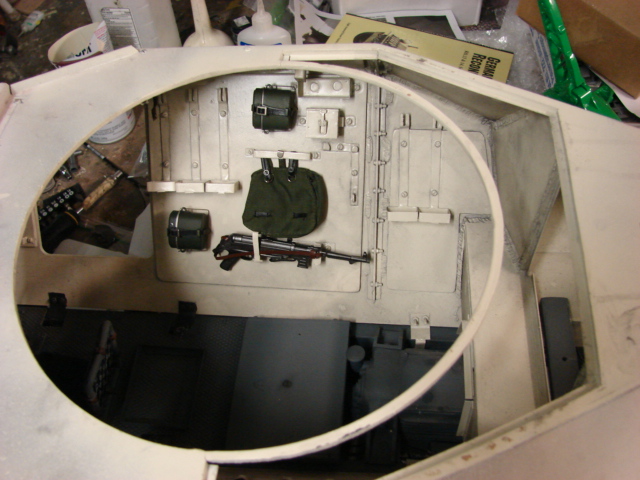
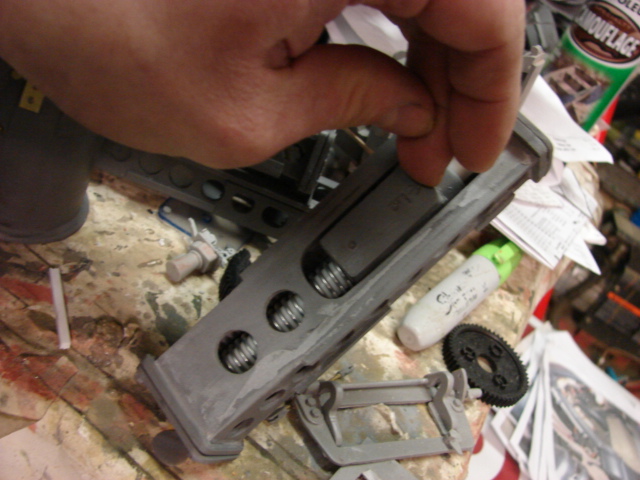
The interior detailing is mainly made up of mounts for crew equipment, weapons and ammo cases for the MG34.
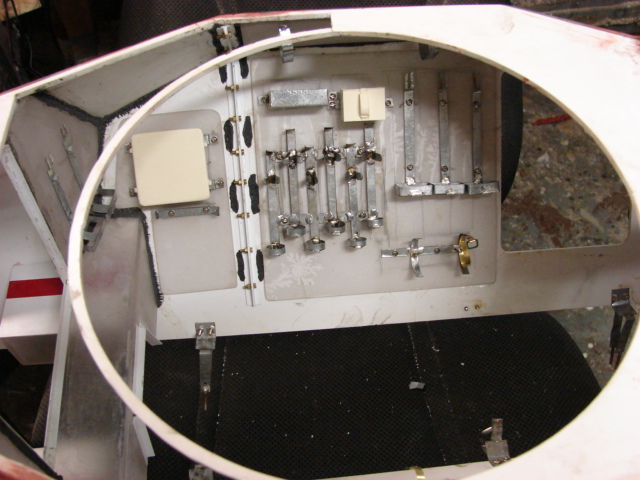
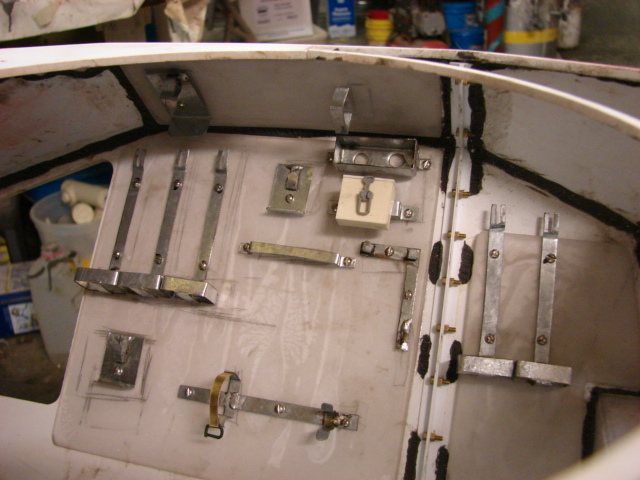
Both the left hand and the right hand have different mount layouts, and are not symmetrical.
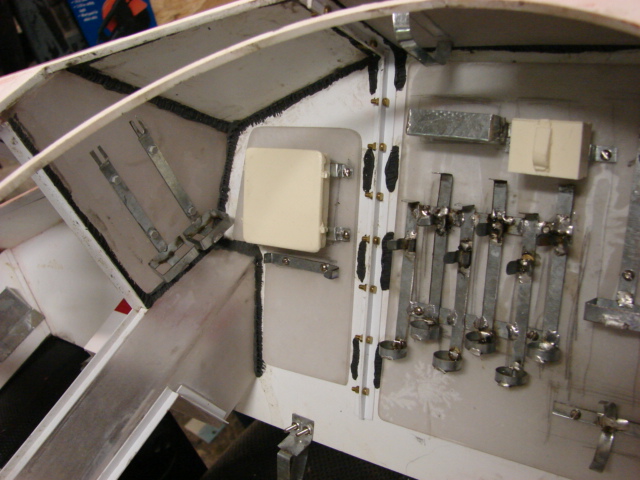
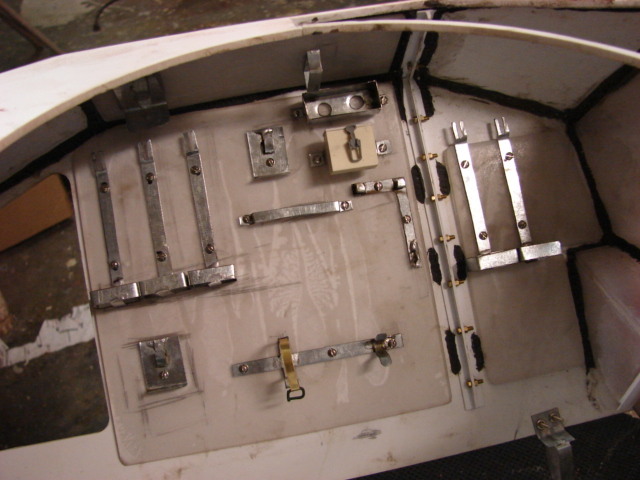
Even on the upper panels of the body there are racks for the MG 34 barrel cases and the a wire cutter.
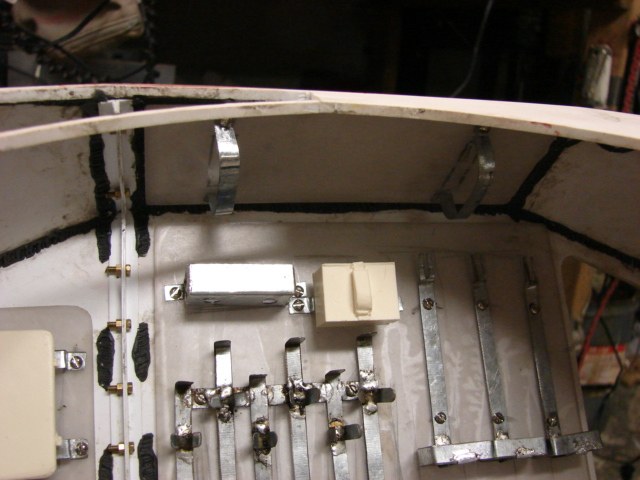
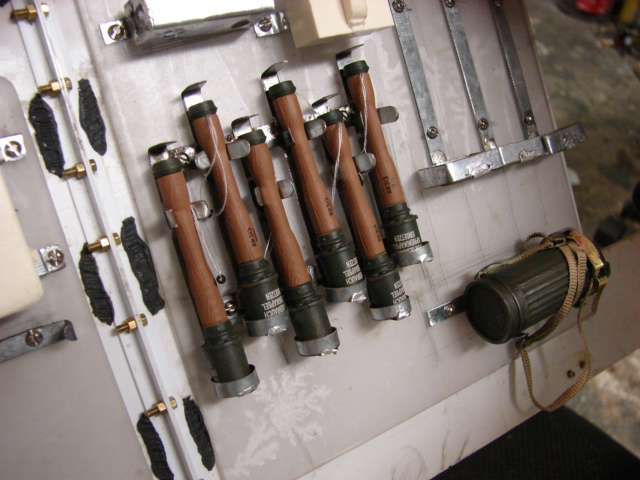
I have stocked up on most of the crew equipment and weapons needed for this build. All of the mounts are functional and will mount the parts when added. Of all of the mounts I fabricated my favorite is the grenade ready rack.
It holds 6 potato mashers in the rack in a staggered layout. (when they are mounted for real in the model I will tuck in the fuse string…would be bad to have one get snagged [:$])
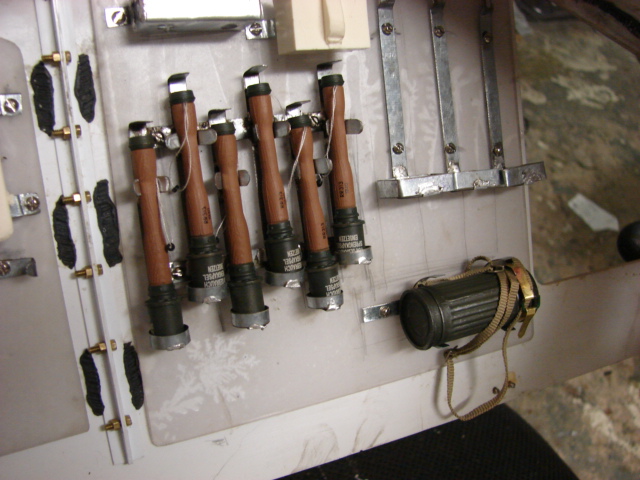
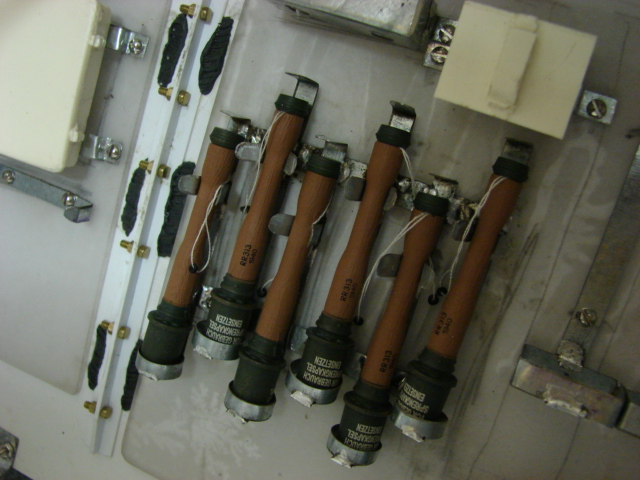
All of the equipment will be added to the interior after the interior is painted and weathered.
A youtube update video was also created explaining the mount detailing further.
As well as more images were posted to the facebook page
https://www.facebook.com/EastCoastArmory
I will now focus on the front portion of the cab detailing. More to come!
More progress has been made on the 222.
I tooled up come more interior components and added them to the catalog East Coast Armory – 1/6th scaleSDKFZ 222 armored car detail upgrades
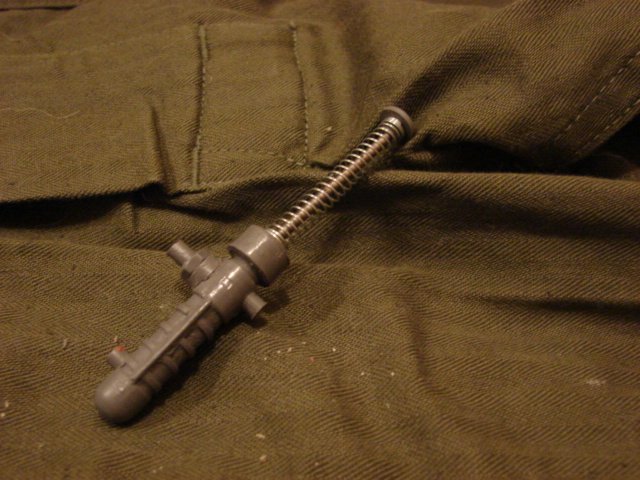
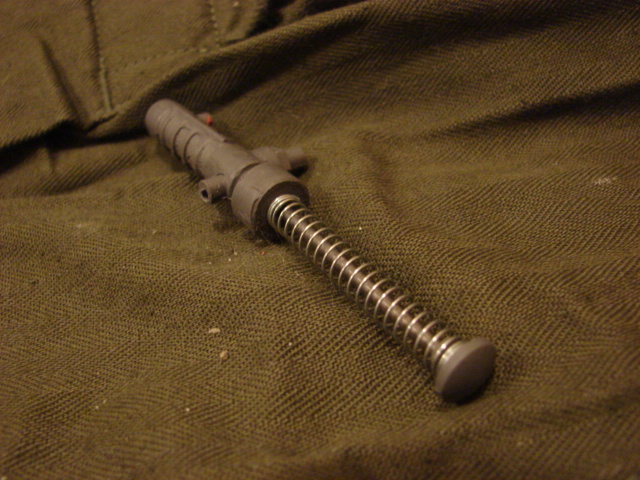
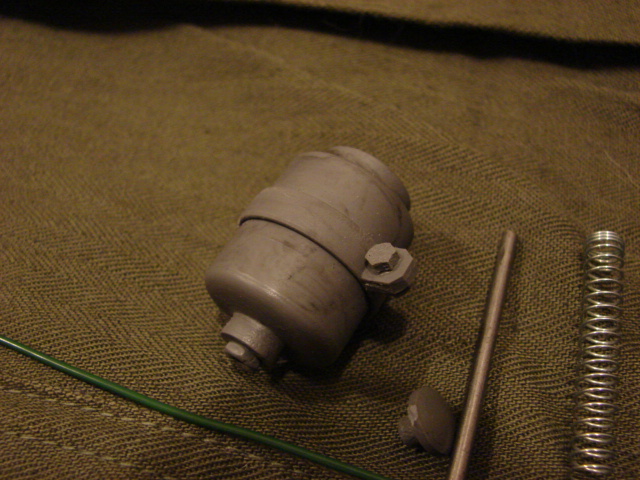
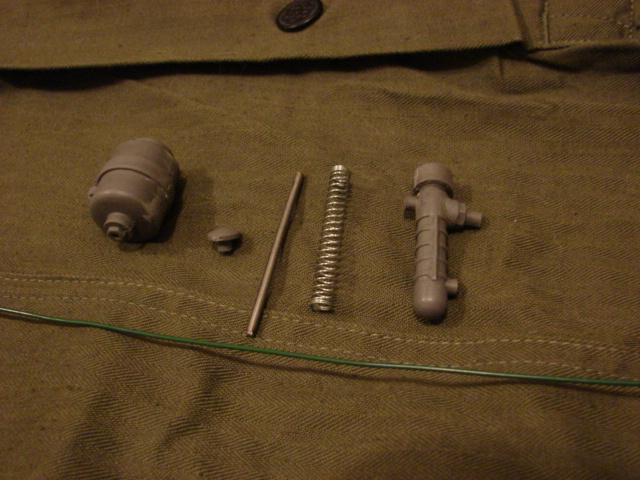
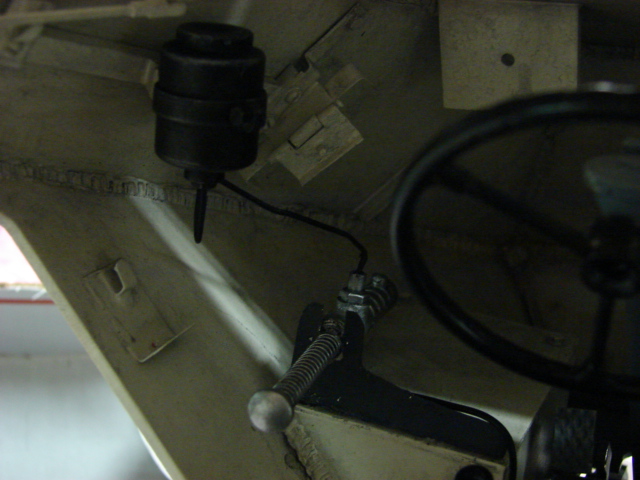
222 interior hand pump set.
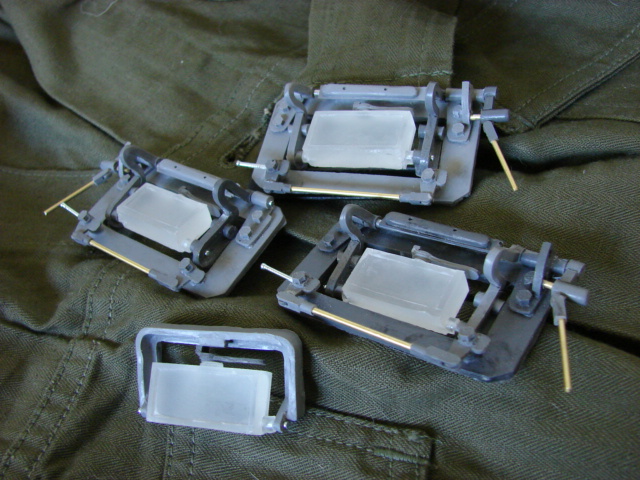
German AFV interior non hinged periscope detail set.
Resin German AFV interior right hand hinged periscope set.
Resin German AFV interior left hand hinged periscope set.
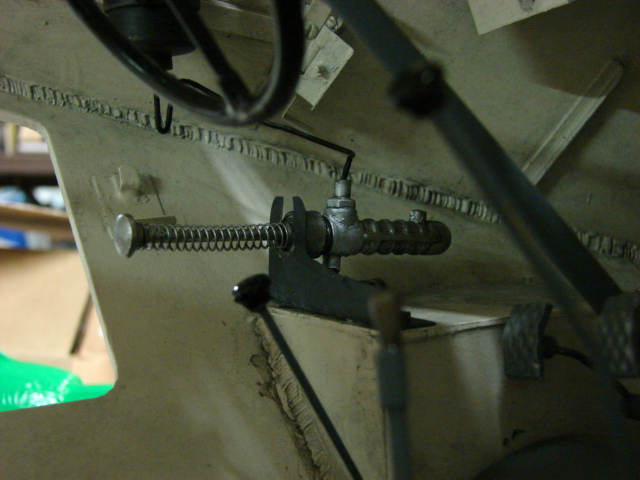
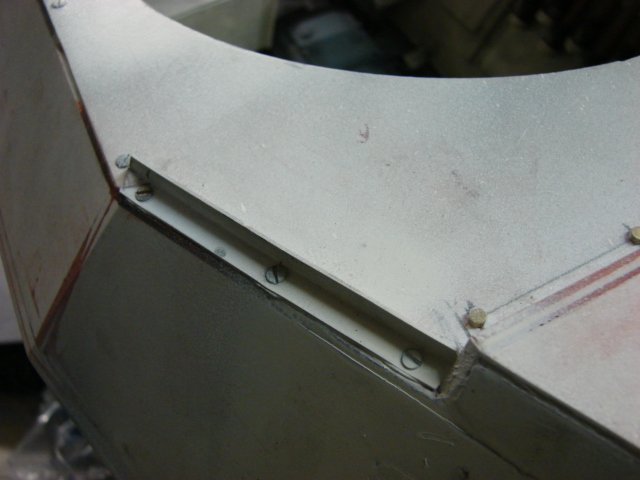
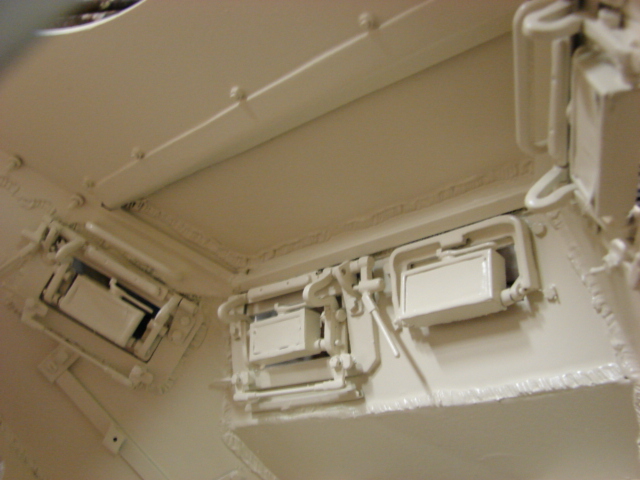
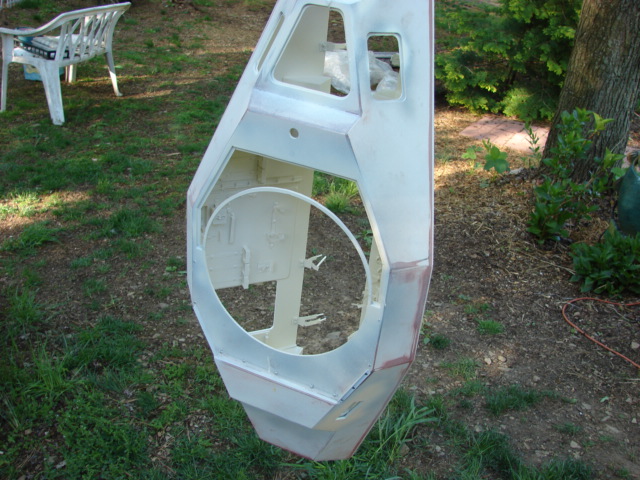
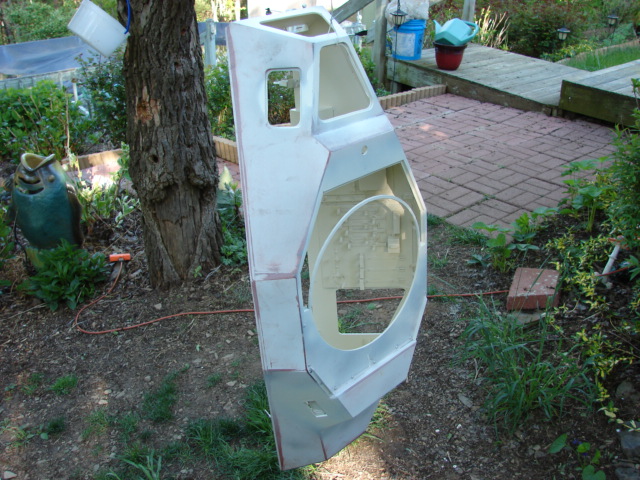
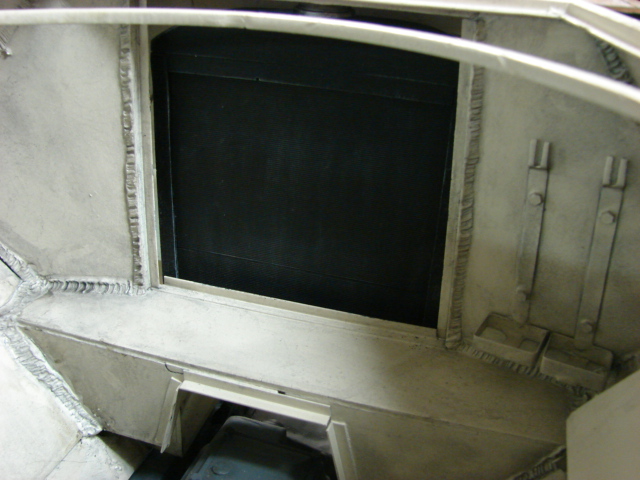
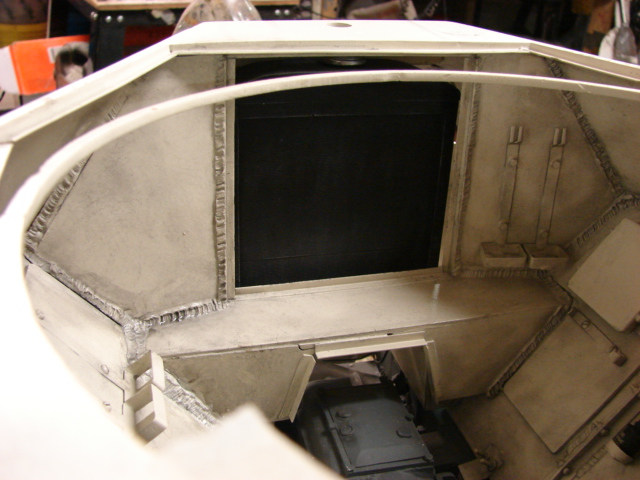
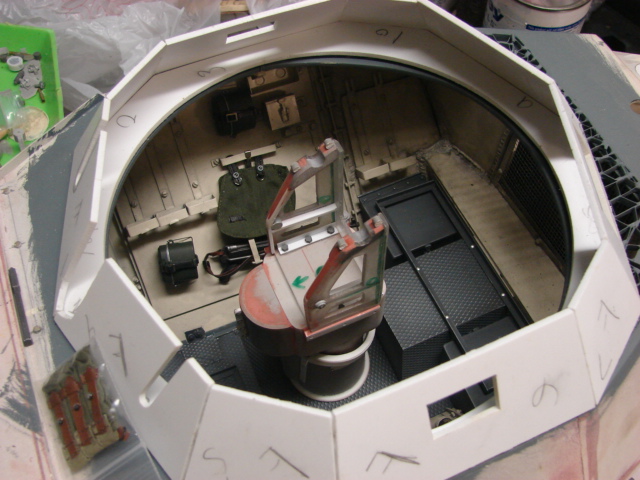
Before I was able to get the body to paint I had to first fabricate the mounts for the rear grill work, and the counter sunk fastener detail. These fasteners had to be added now because of the exposed nut and thread detail that is exposed in the interior.

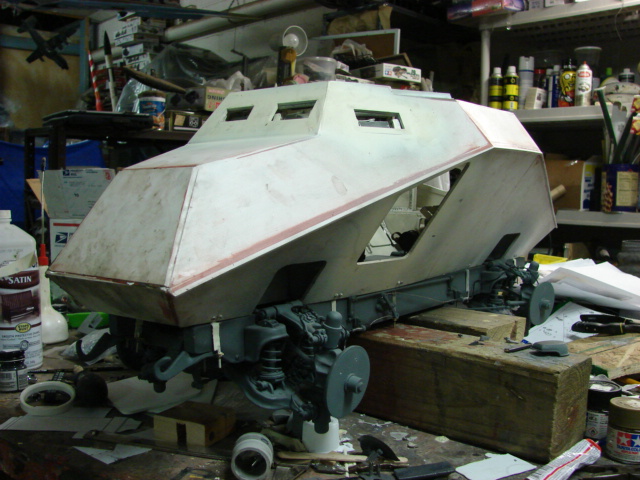
After the last of the interior mounts and visors were added the clear resin visors were masked up and the body interior went into paint.
Starting with the primer.
For the interior base coat color I used a cream colored off white color as, that is the color that I have seen on many WWII german AFV including the resorted 222 in the littlefield collection.
To best paint the body I tied the rear portion with a wire and suspended the body on a clothes line.
After the base coat was dry I added the weathering. After the weathering was added the body was mounted to the chassis. In addition to the mating of the hulls I began to add some of the crew equipment. More will be added as the build continues.
As I mentioned in an earlier post the body mounts to the chassis via fastener straps like the real vehicle. No glues were used in this procedure.
More images were posted on the facebook page, https://www.facebook.com/EastCoastArmory?fref=ts
I will now be focusing on the remainder of the floor boards, the dash board, and the radiator details. More to come.
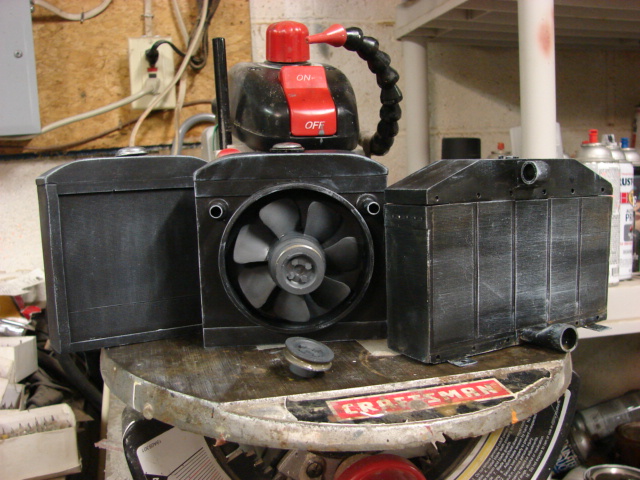
More progress was made to the model’s interior
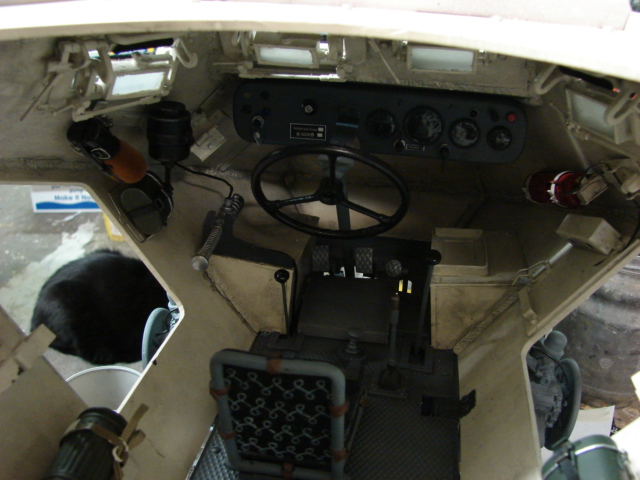
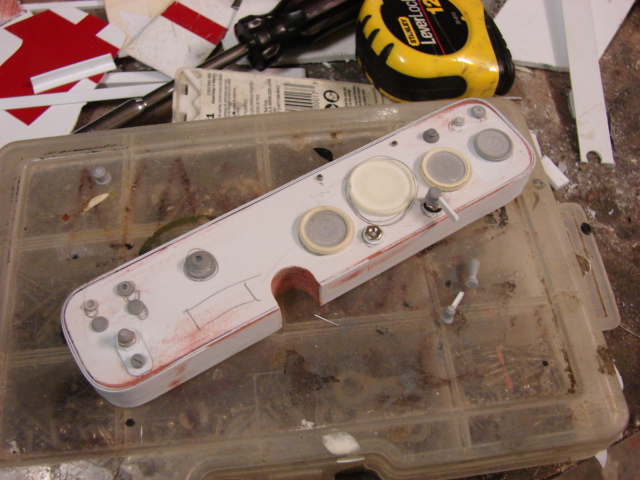
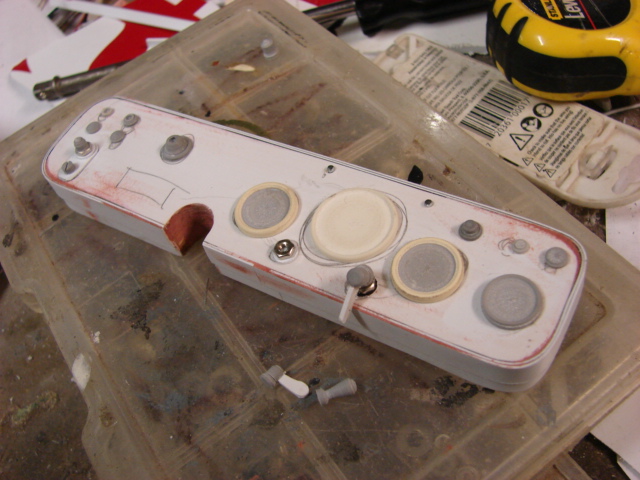
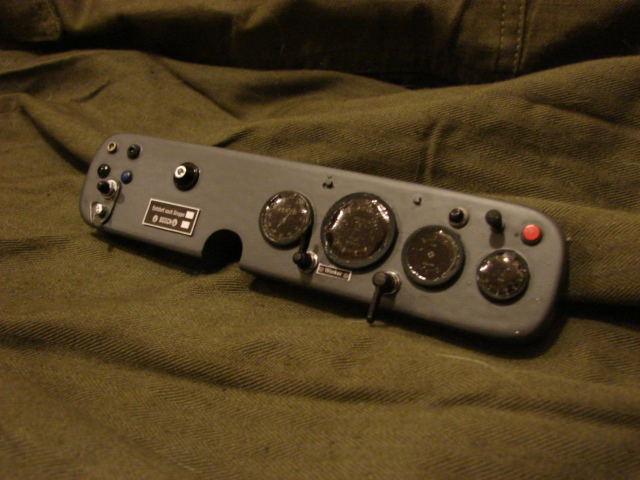
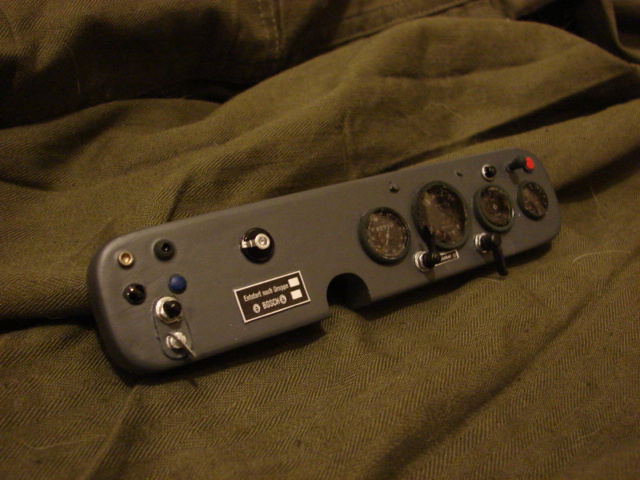
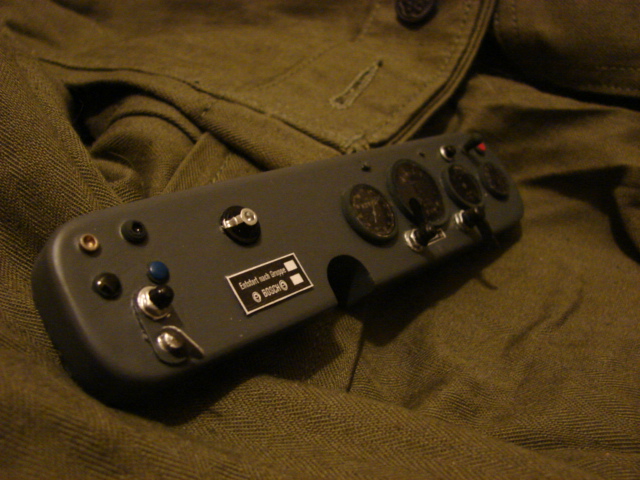
I completed the instrument panel, and the radiator. Both of these new components were added to the catalog.
http://eastcoastarmory.com/222.htm
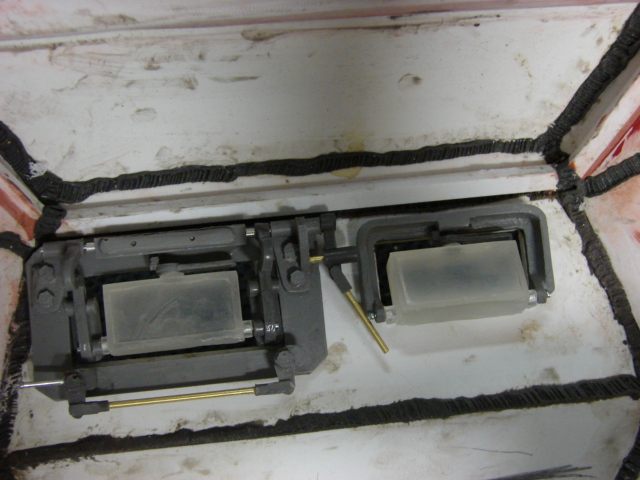
SDKFZ 222 Instrument panel set.
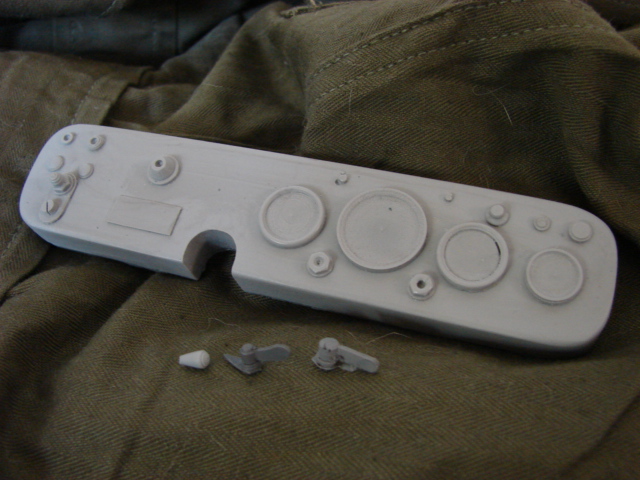
The set also comes with the labels and the gauge faces. All of the gauges were recreated and scaled down from the real 222 gauges
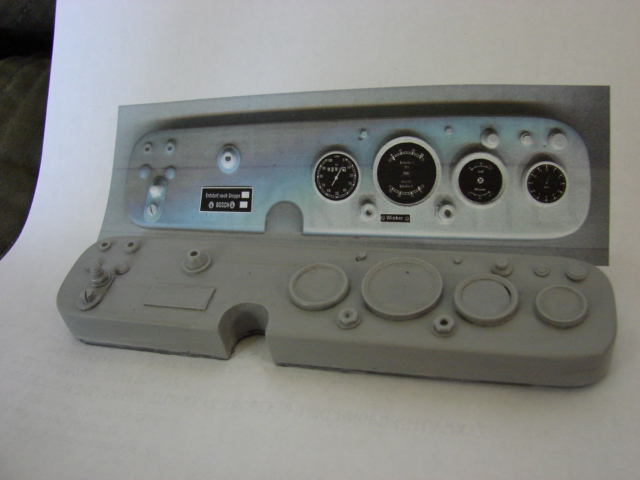
After the panel was painted I added the clear epoxy to the gauge lenses and mounted the panel to the model.

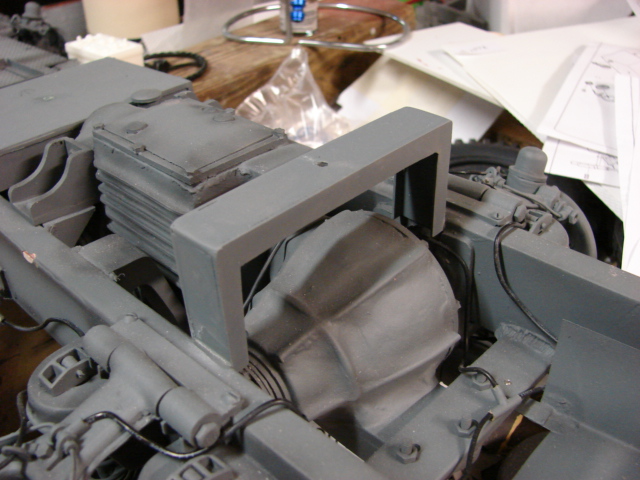
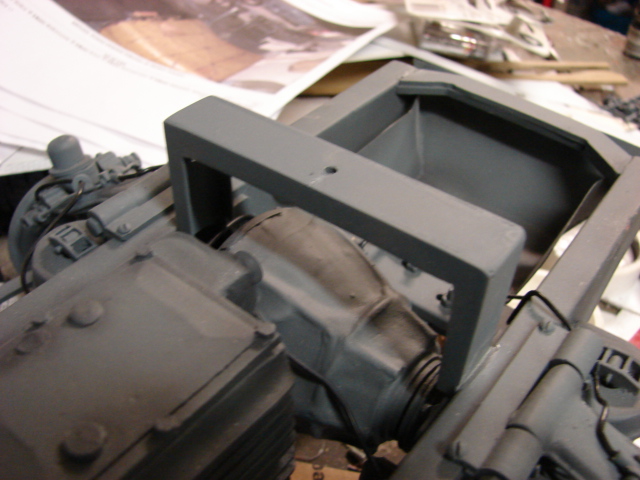
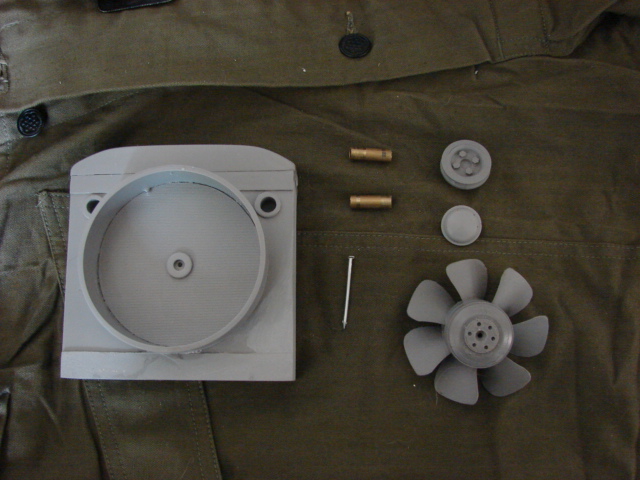
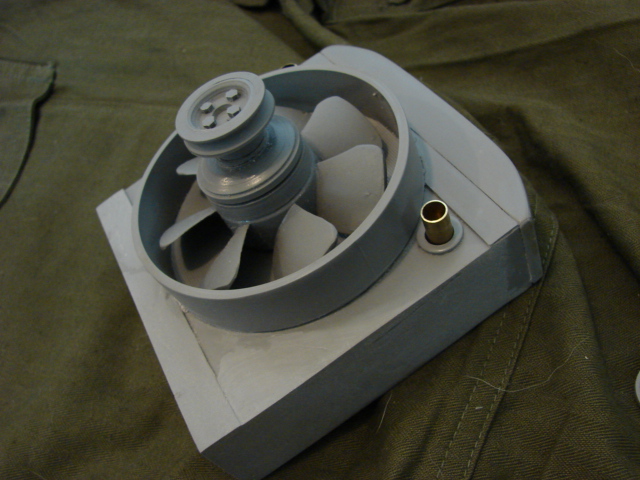
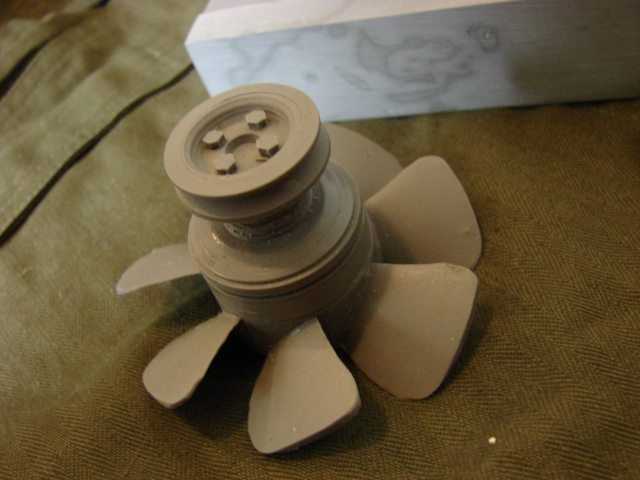
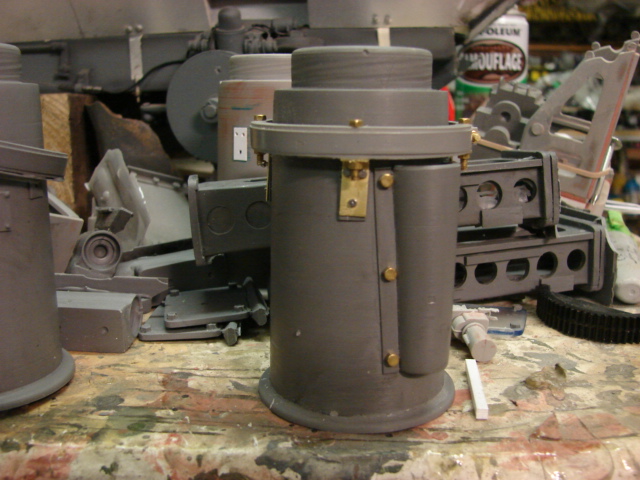
SDKFZ 222 radiator / cooling fan set.
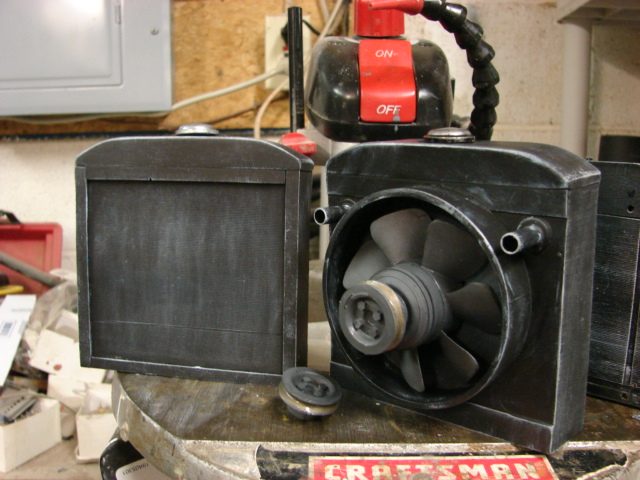
The set includes both the radiator and the cooling fan. The fan can also be made to spin.
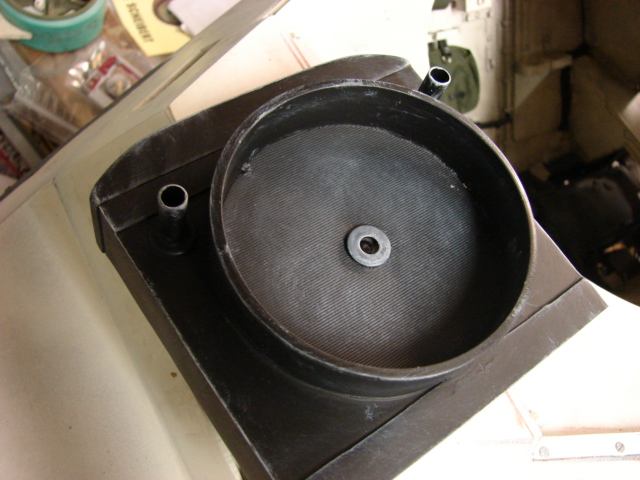
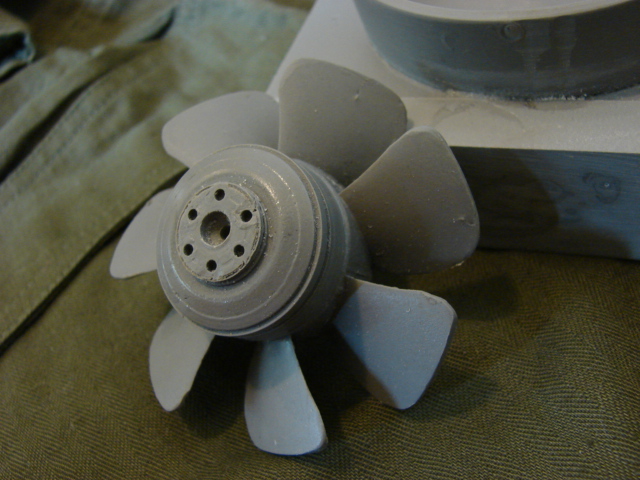
On the 222 the radiator fan was spun by a pulley wheel that connected to the engine’s out put shaft.
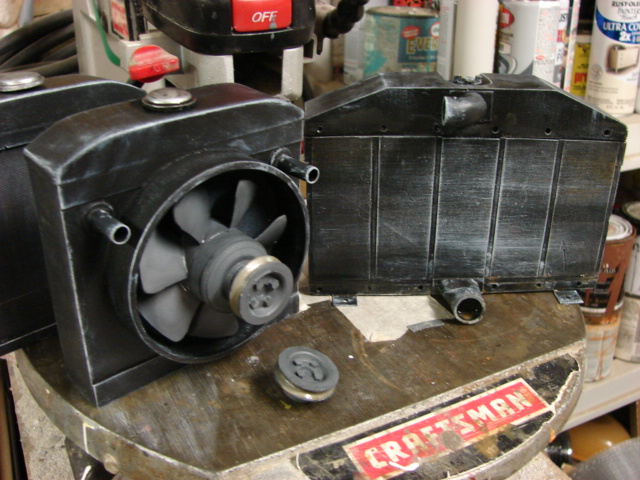
After the radiator was painted the radiator was mounted into the model
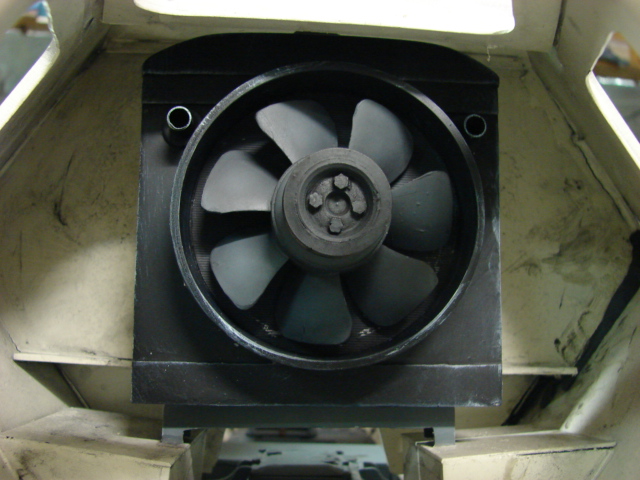
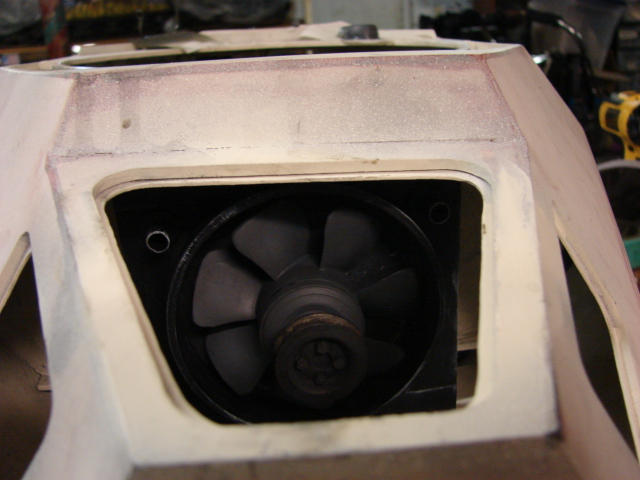
In the fighting compartment the radiator has a protective grill mounted to the firewall
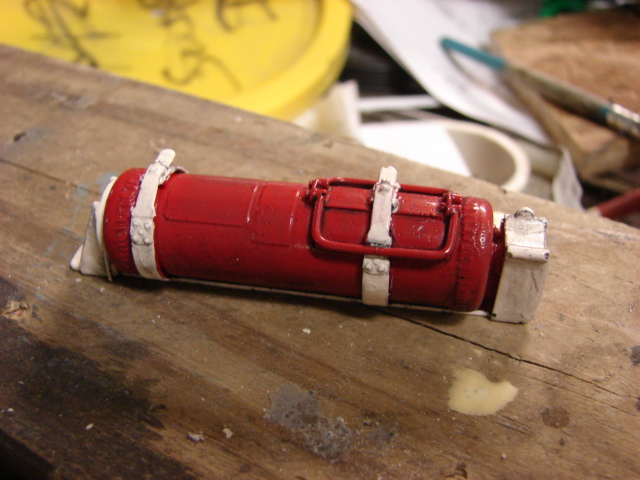
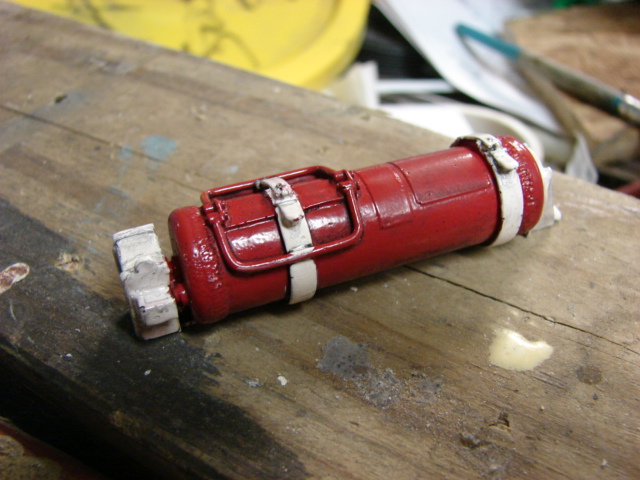
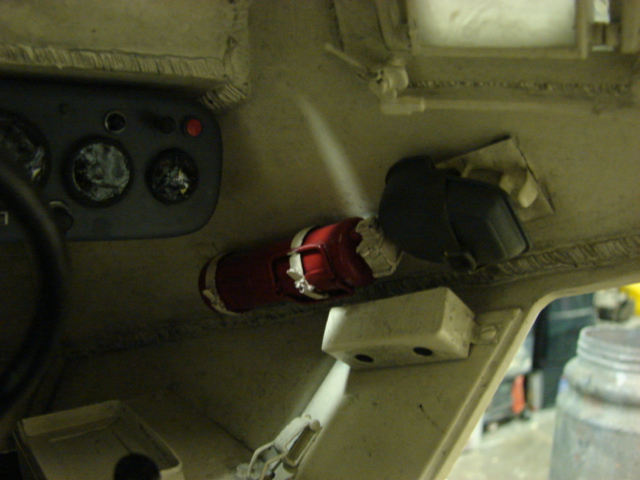
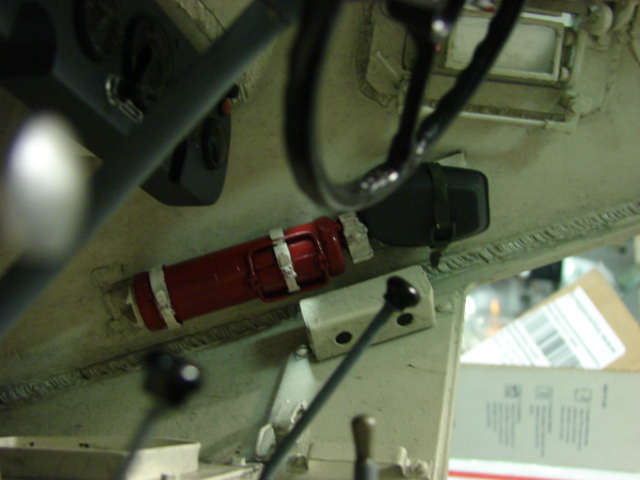
On the model’s front portion I also added a armorpax german tetra fire extinguisher and a spare Notek light. The Notek light is a spare I had on hand from the DML schwimmwagen kit. From what I’ve seen on the restored 222 in the Littlefield collection, the internal fire extinguisher is painted red.
A video update was added to youtube, and more images were posted on the facebook page.
https://www.facebook.com/EastCoastArmory
I will now be focusing on the the last of the floor boards and will then be able to turn my attention to the doors and the gun / gun mount. More to come!
armourguy
Your work is just simply AMAZING! The pictures look like a full scale vehicle and not a 1/6 scale model. Attention to detail is just mind blowing. I can just imagine how thwe engine compartment will look like. You sir are a master builder! [t$t]
Thanks, but due to time constraints…and lack of any good references on the Horch engine I will not be going with the engine bay details on this one.
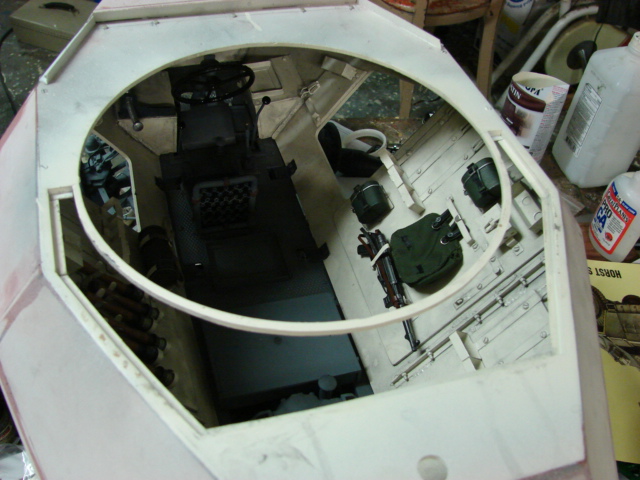
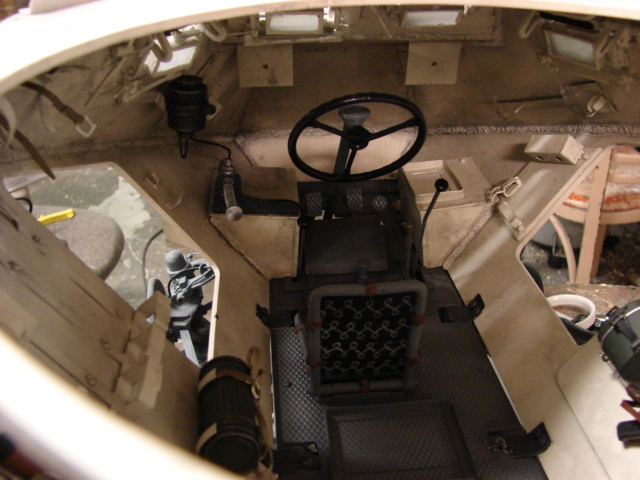
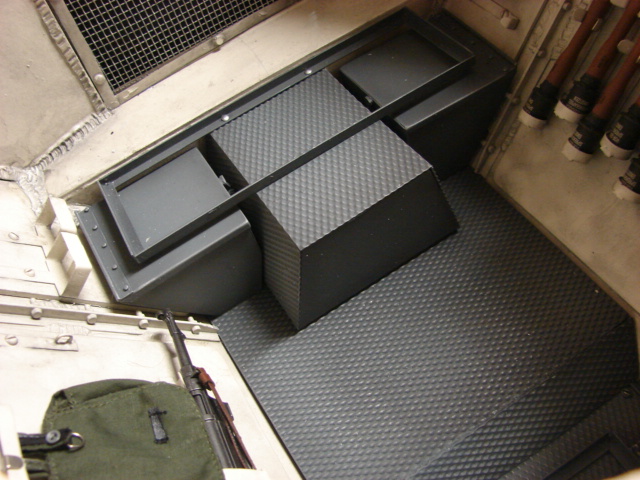
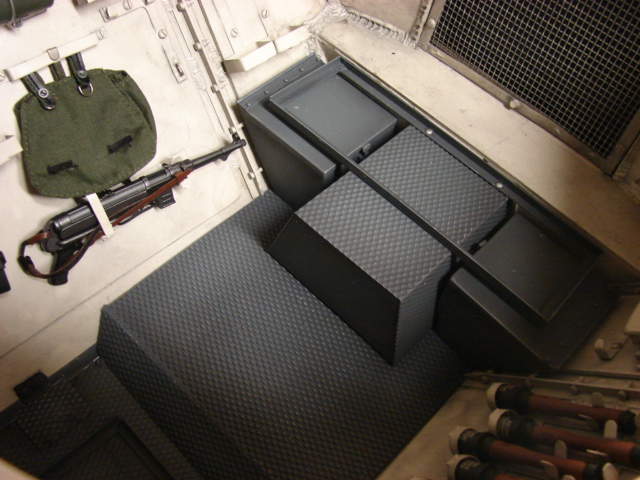
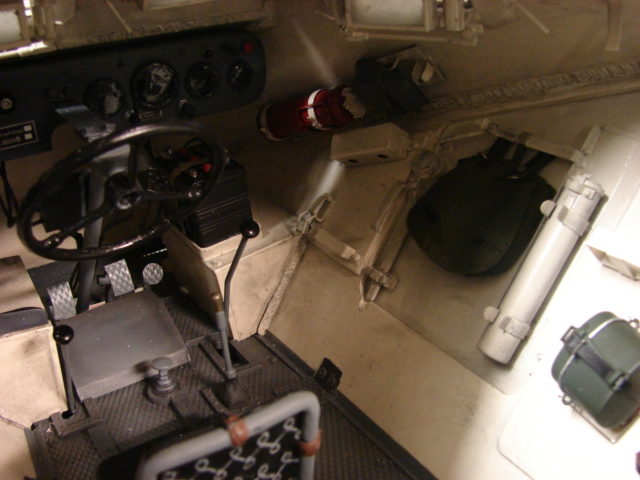
I made more progress on the model’s interior basically completing the hull portion of the interior.
The rear floor boards were added. Along with the floor boards I fabricated the transmission cover, and the rear storage boxes.
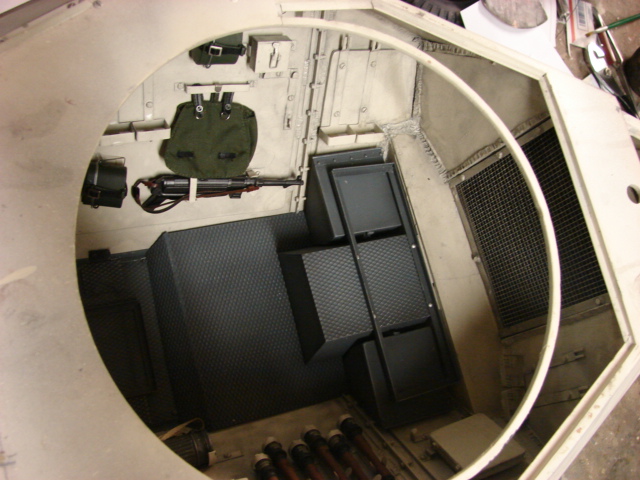
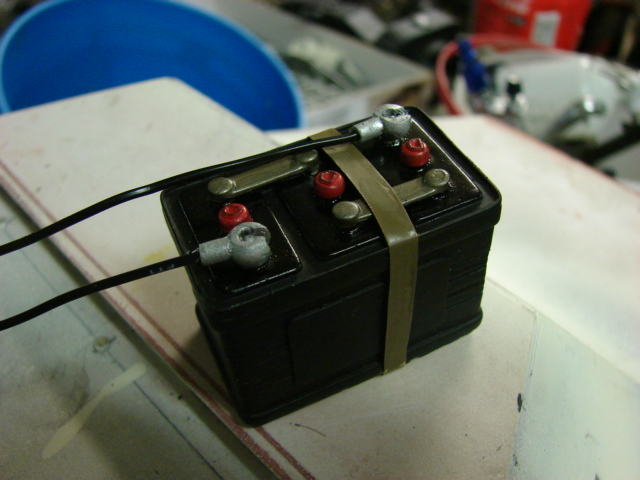
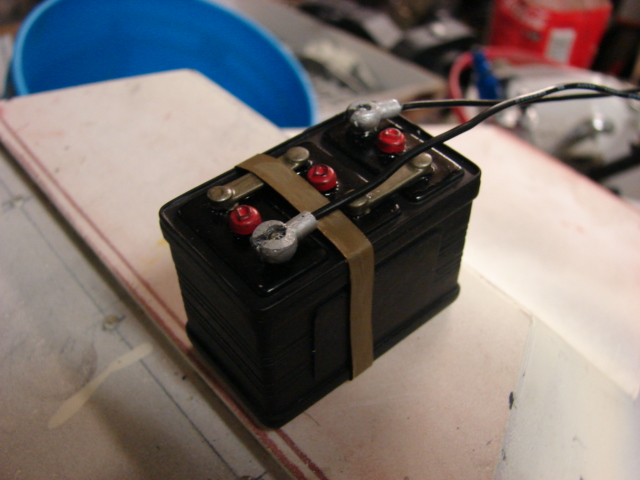
On the car’s front I added the last of the electrical details. This would include the Battery and the steering column fuse boxes.
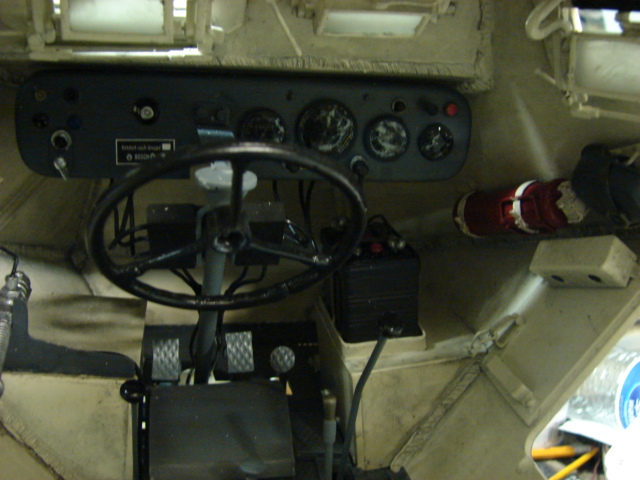
For the battery I used a resin battery from armorpax. The battery casting is very nice and saved alot of fabrication time. The only details that I added to the battery was the mounting strap, and the battery terminals.
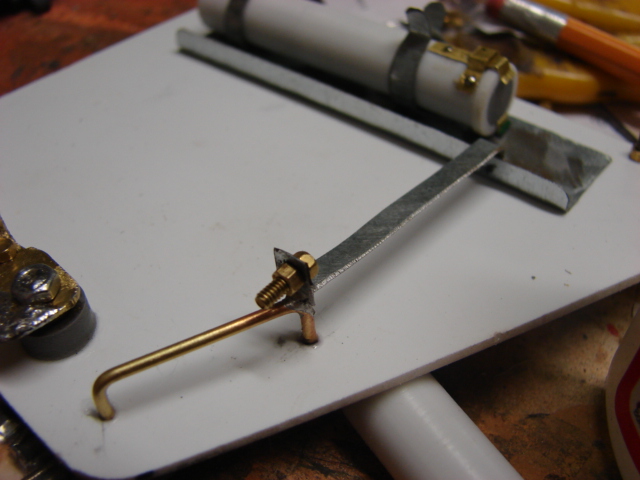
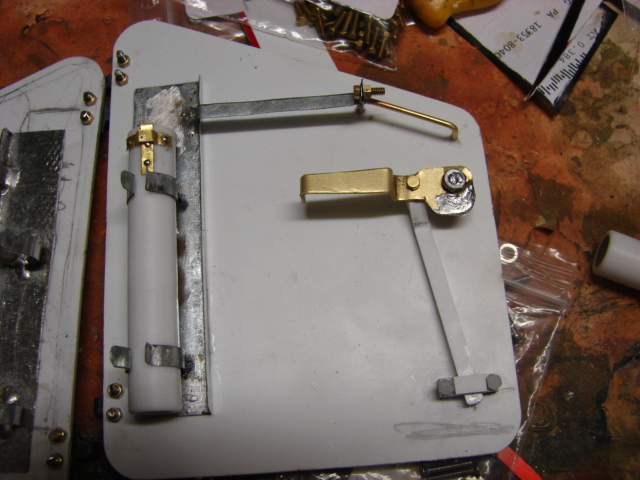
The model’s doors were also completed. For the doors I used the kit supplied versions. The kit doors were the correct size and shape.
To make the hatches functional I used a set of functional resin German AFV hatches from Panzerwerk. The Panzerwerk hinges are pre drilled and are nicely detailed. To fit the doors I needed to drill out the molded in fasteners and replace them with metal fasteners (because of the weight of the doors they needed extra strength)
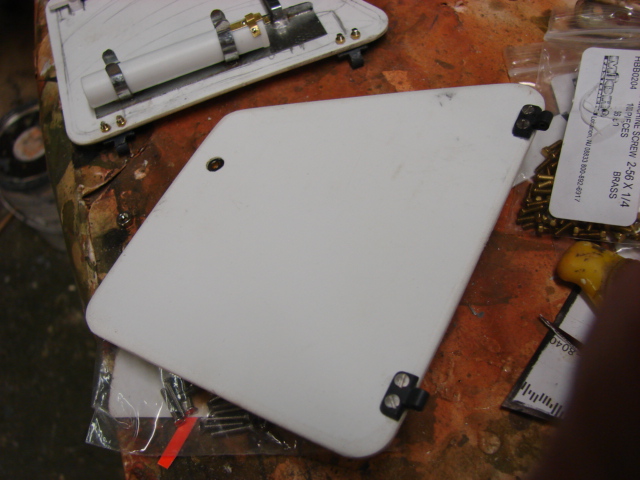
On the hatch interior I added all of the details. These would include the handles, bread bag mounts, storage canister / mounts, and the locking mechanism.
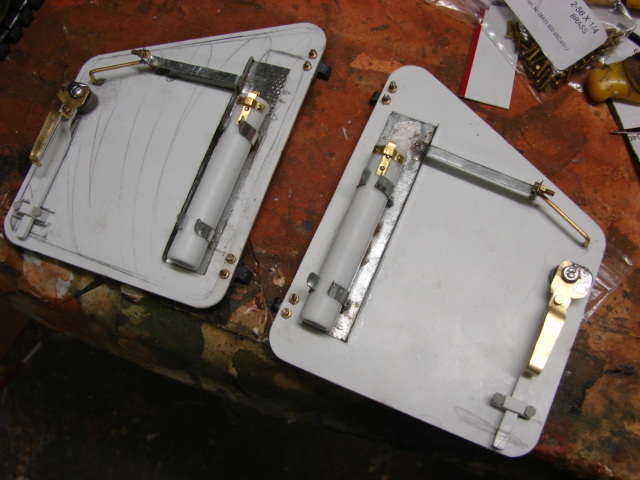

On the 222 the bread bag mount, storage tube mount and handle were all connected to each other by both welds, and a fastener.
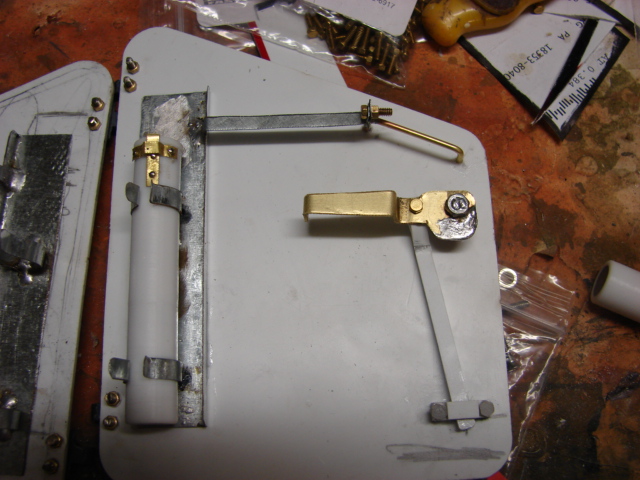
On the model I assembled it the exact way it was on the real vehicle by fabricating all the parts out of metal that was soldered together and bolted.
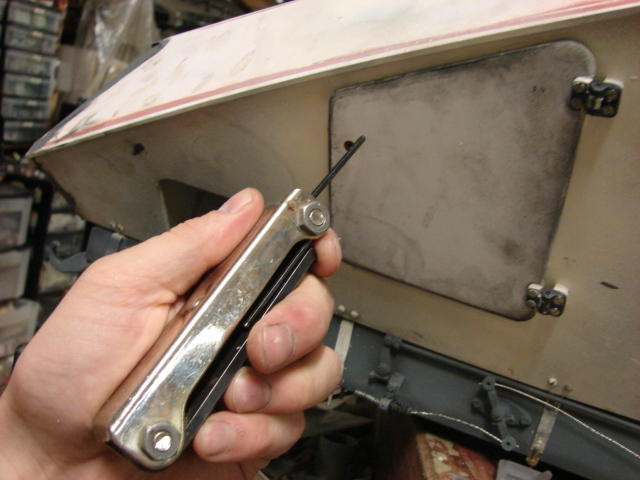
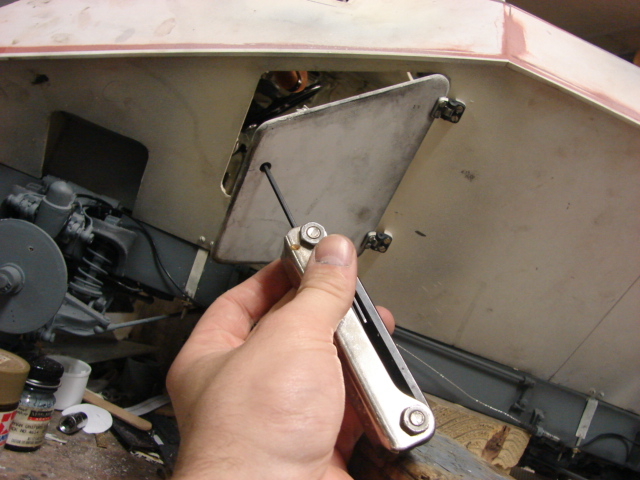
Because of the hull angles on the 222 gravity would pull the side doors open. To solve the issue I had to make the latch system functional.
To open the hatch from the inside you rotate the handle…
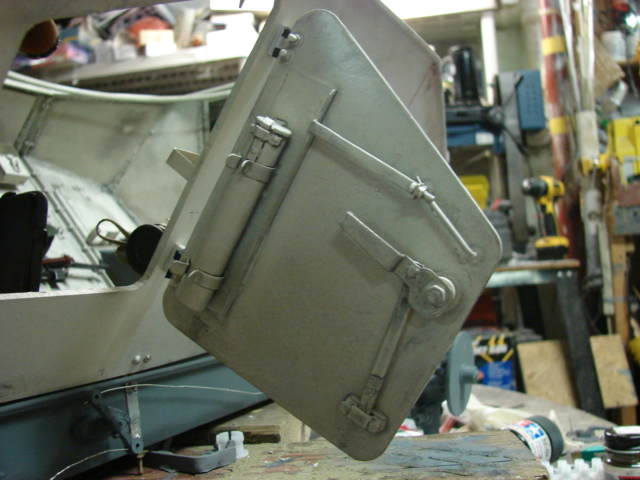
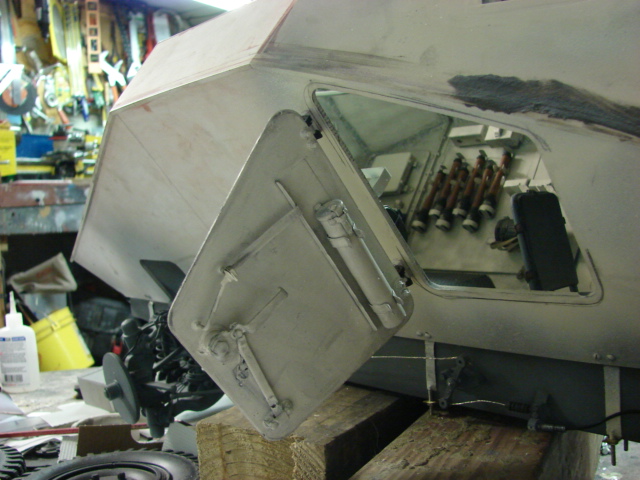
but because of the gun and turret getting access to the hatch from the outside will be very difficult… so Like the real vehicle I had to design the system to be operated from the exterior of the vehicle with a key.
For the model I use an Allen wrench to operate the lock. The system works very well. and looks very similar to the type of lock on the real vehicle.
After the hatches were mounted a DML bread bag was fitted to each door.
A video update was added that shows the functionality of the door mechanisms further. http://youtu.be/Kdu6gNxpKPY
Also more pics were posted on the facebook page: http://www.facebook.com/EastCoastArmory
these details were the last things holding me back on the model before I could start on the gun. With them out of the way I can now focus on mocking up the turret and tooling up the gun mounting system. More to come!
I made more progress to the model.
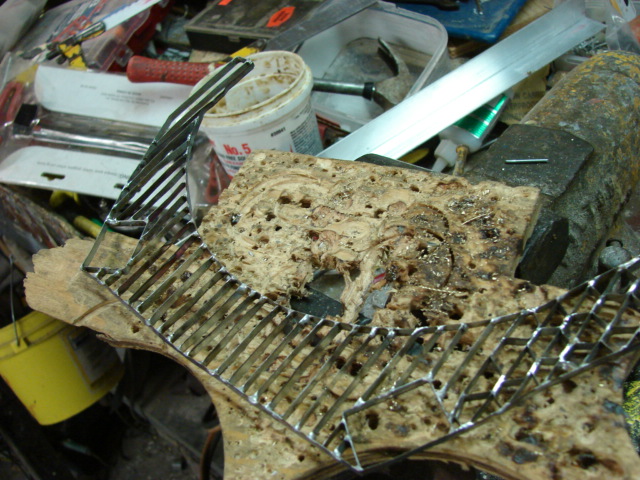
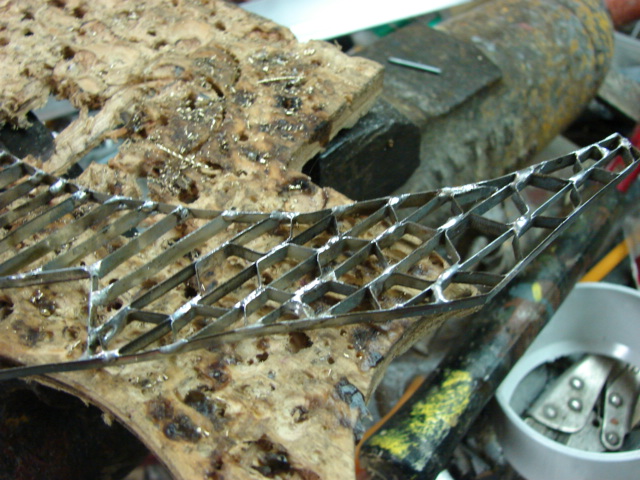
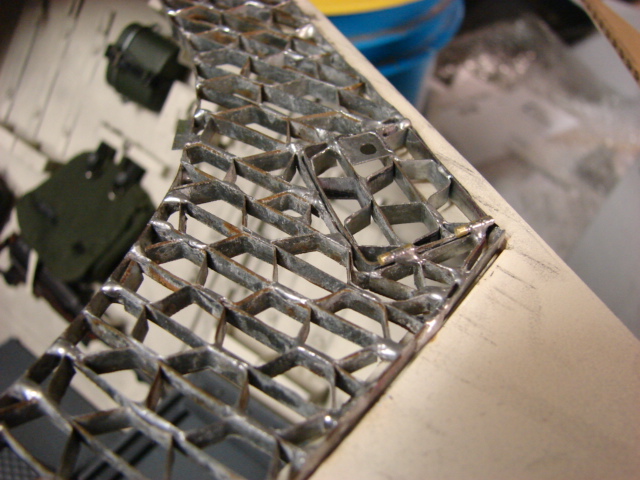
I was able to complete the grill work.
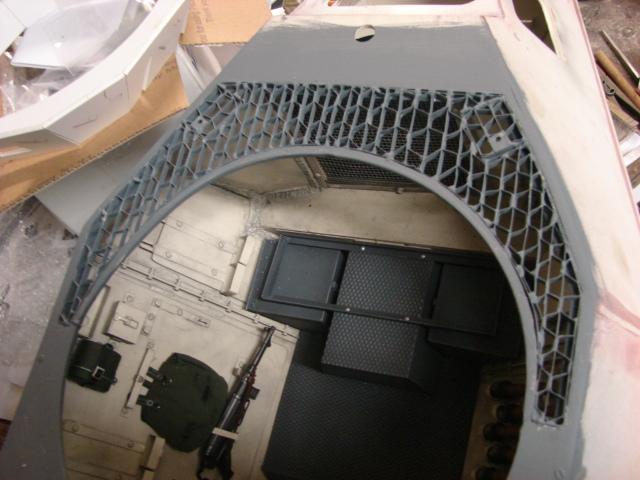
The 222 featured a very complex grill work that was unique to the 222. The grill work was comprised with a honey comb style pattern.
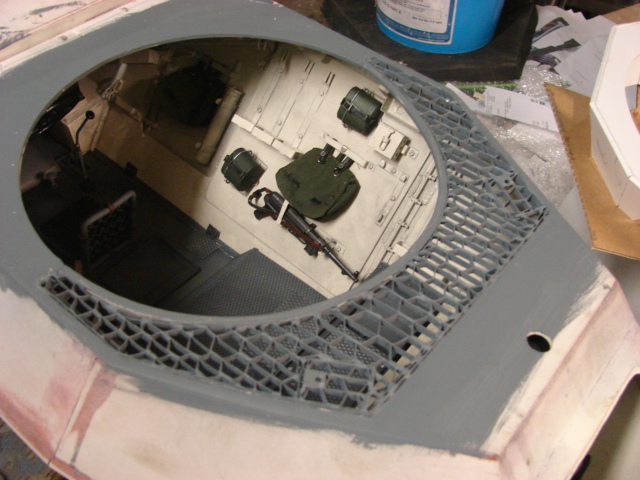
The grill work is all scratch built out of sheet metal that was all cut, shaped, and fitted by hand.
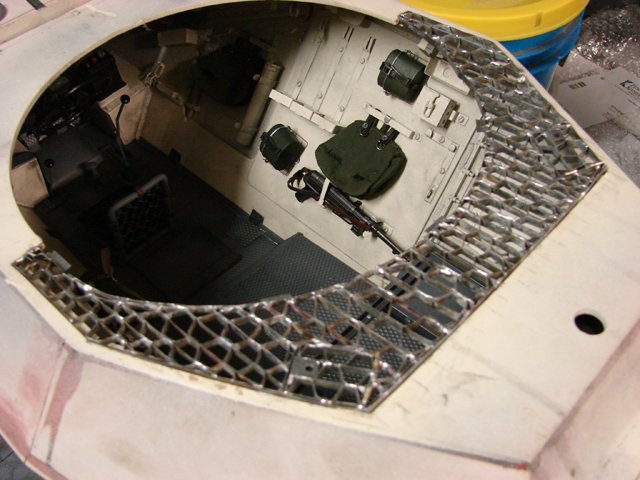
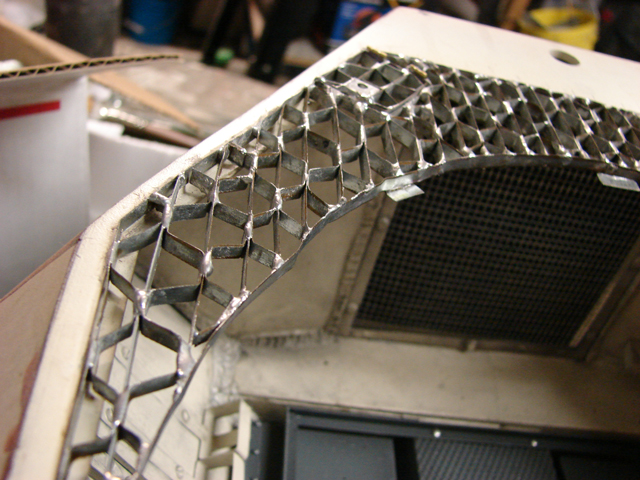

The whole fabrication was very time consuming and tedious, and is one of those parts that once complete is something that I don’t want to go through again.


On the corners of the grill are two access hatches. These hatches are non functional on the model, but have all their detailing present.
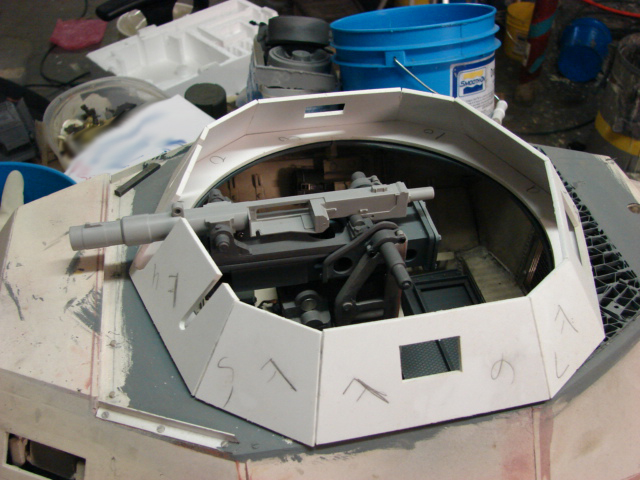
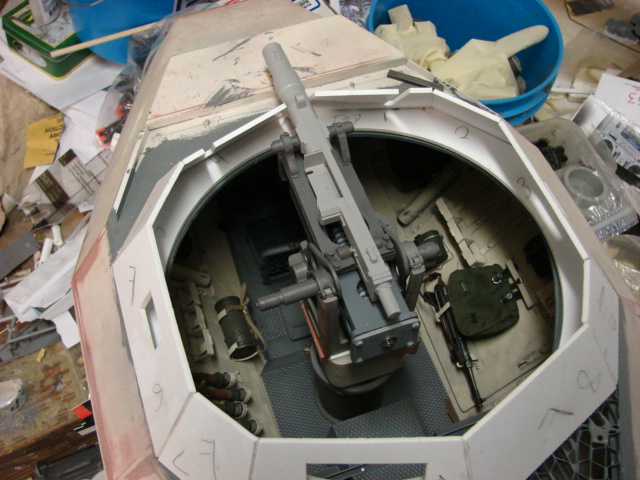
After the grill work was completed / mounted I then turned my attention to mocking up the turret.
The turret is assembled out of the kit supplied turret panels. The turret was very straight forward, but to help out it is a good idea to label the panels as to prevent from getting confused.
More work will be done to the turret, which will be added as the build progresses.
a quick video update was added to youtube: http://youtu.be/swFzTCuBd1M
Also more pics were added to the youtube page.
http://www.facebook.com/EastCoastArmory
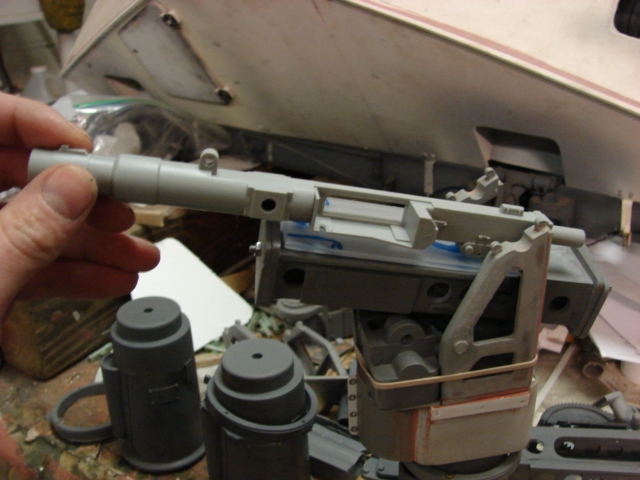
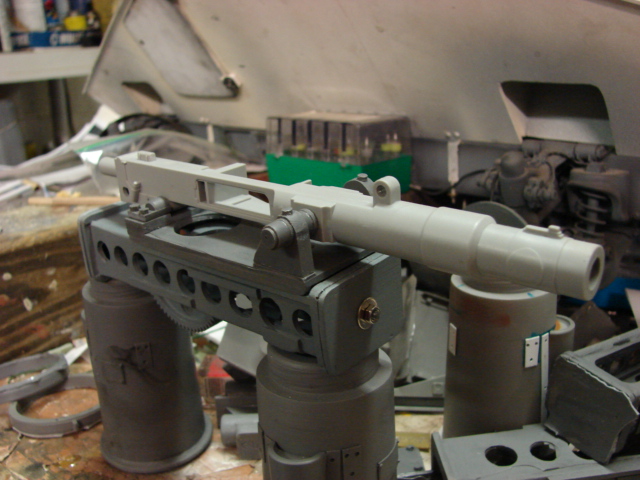
I will now be focusing on the fabrication of the gun and gun mount. More progress to follow!
Ok, You can stop now. You’ve finally killed me.
[:D[[:D[[:D[[snWow]
Thanks guys, It has been a long time since I had any updates and I didn’t forget about this build. I have been working on tooling up the gun carriage and mount. Here are some sneak peak images of the masters.
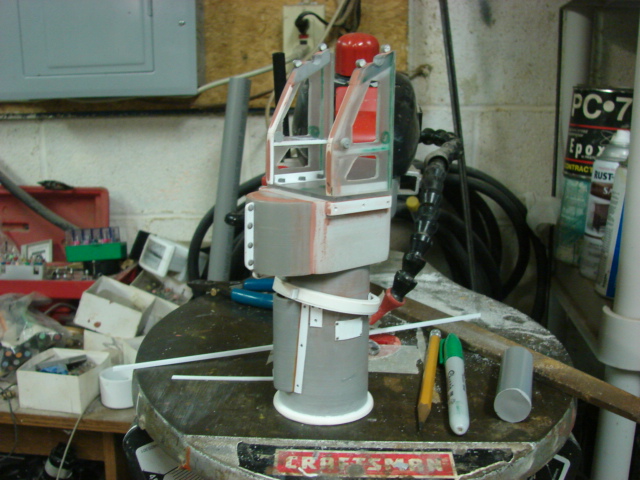
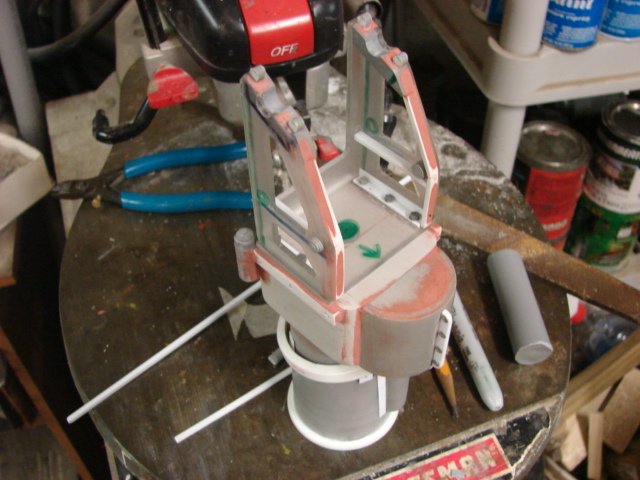
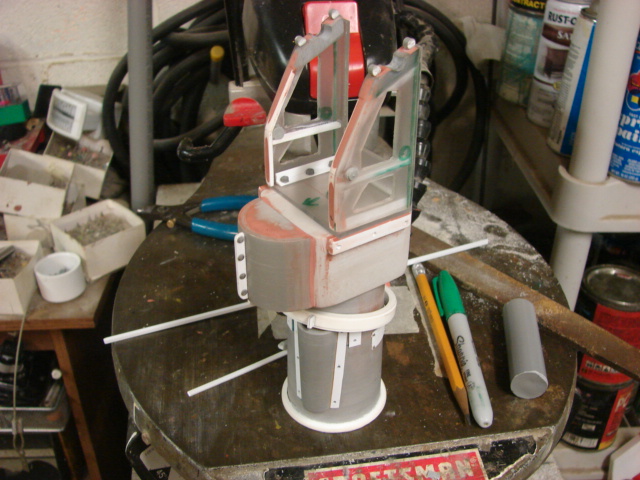
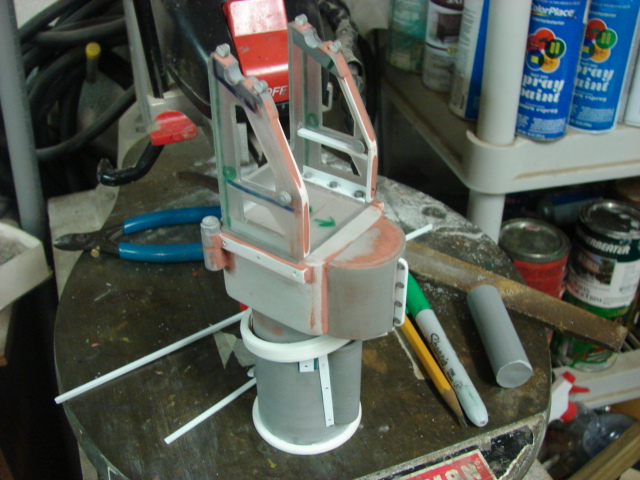
Once I have some more masters ready the parts will go into molding. Also after all the parts are completed I will add the mount to the parts catalog. More to come!
recently I’ve gotten lots of PMs about this project status. It has been a while since I had any news on this build, but the project has not been forgotten about or put aside for the sherman and the tiger.
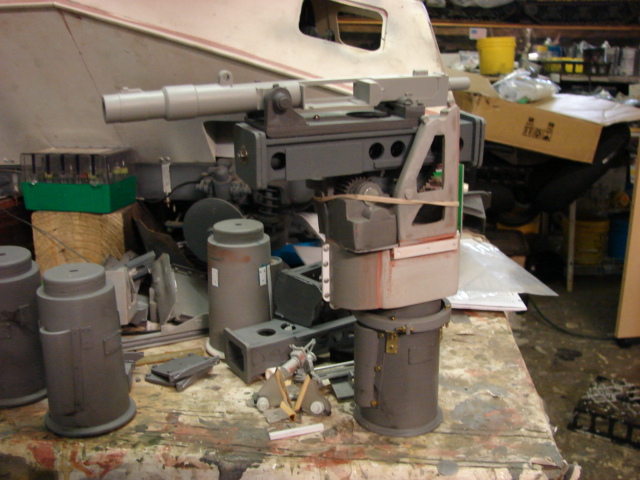
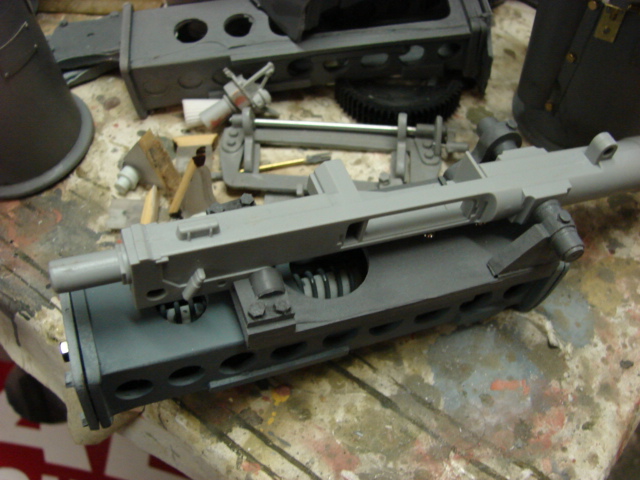
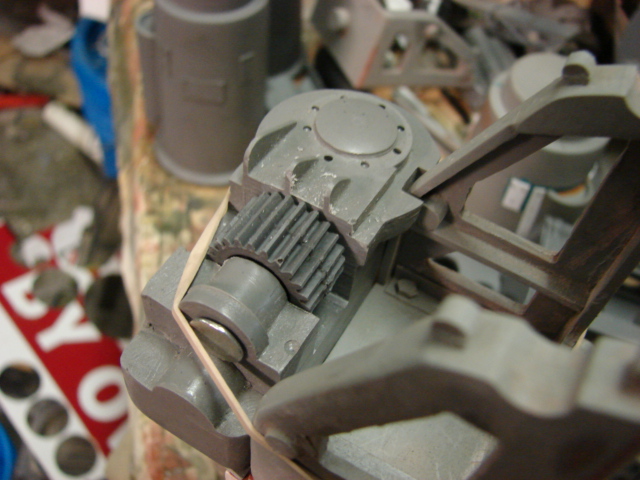
engineering / and fabricating the masters on this kit is very meticulous and takes lots of time. I completed the molds for the carriage assembly, and the elevation mount base.
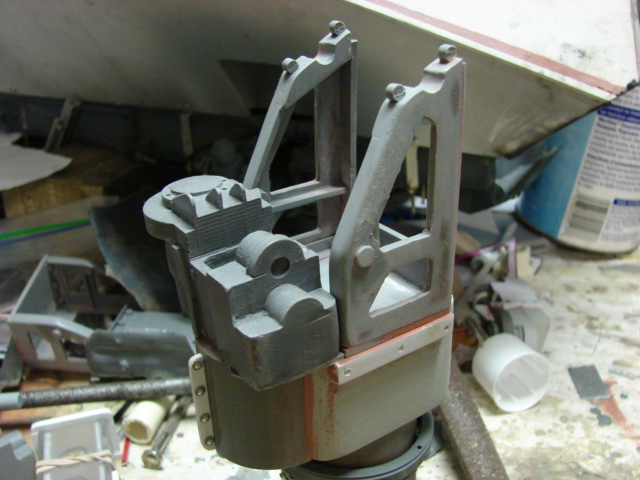
I’ve also been working on the gun mount / carriage assembly. This part will mount the gun to the carriage, The gun itself will be fitted to a sliding mount that will go over the box assembly and will have a compression spring that is for reducing the recoil. this feature will be functional on the kit.


I should have some more masters ready for mold by next week and once casted I will be able to move on to the next gizmos that are on the gun mount. More to come!
Hi Guys, due to my heavy commission and part order load taking up most of my time, I haven’t had a whole lot of time for personal R&D work. That combined with the complex nature of this gun mount makes for a long term project. I have been able tom complete some more components and some more molds for the mount. 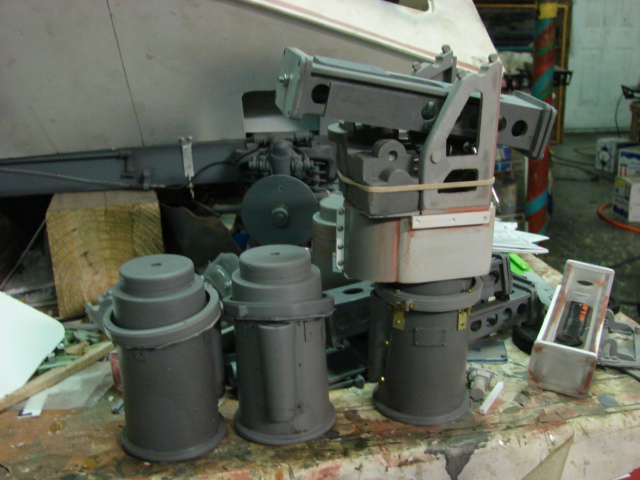 Like with the Maybach engines that I completed last year I will be building a few of these kits for use in the model and for display use. These units will progress as more parts are fabricated / molded.
 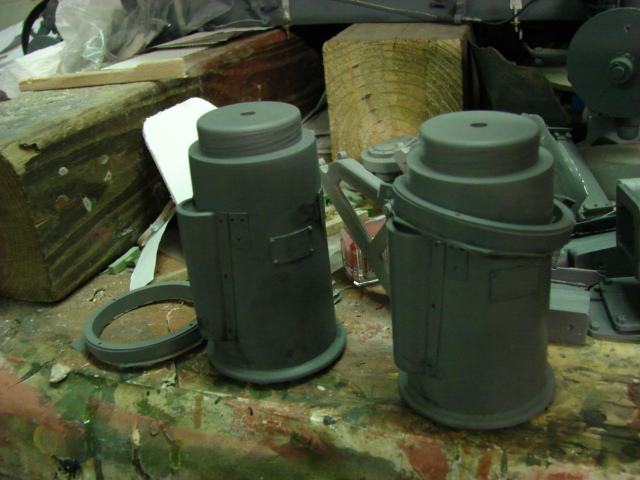 Some of the new molds that have been completed are the bottom bases and the gun mount chassis. On the bottom base I added the brass fasteners and the ring mounts. These fasteners will be included with the kits once complete.
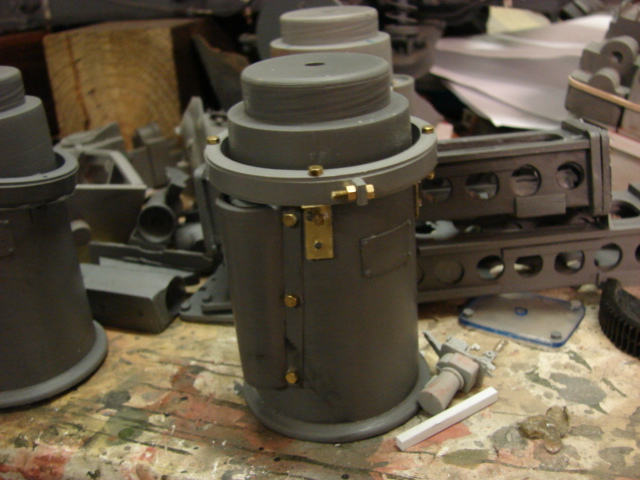
 On the gun mount chassis is a single casting and has all molded in lightning holes and guide rail details molded in.
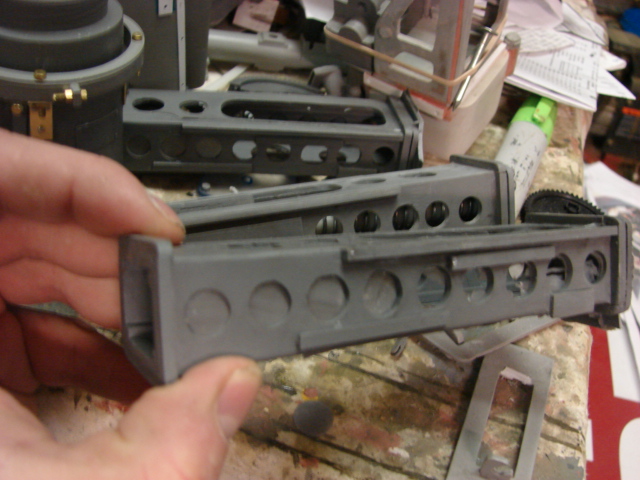
 Many functionality features have been designed and built into the kit.
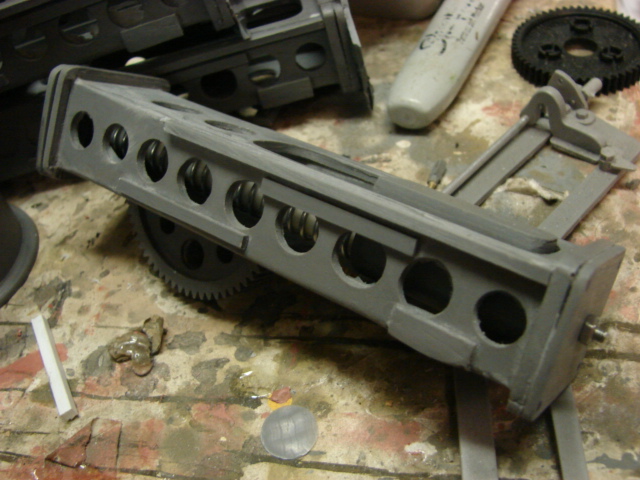
 Like the MG34 lafette mount the gun carriage is deigned to recoil with the gun to minimize the recoil stress that gets absorbed into the 222 chassis. I designed this recoiling feature into the kit.
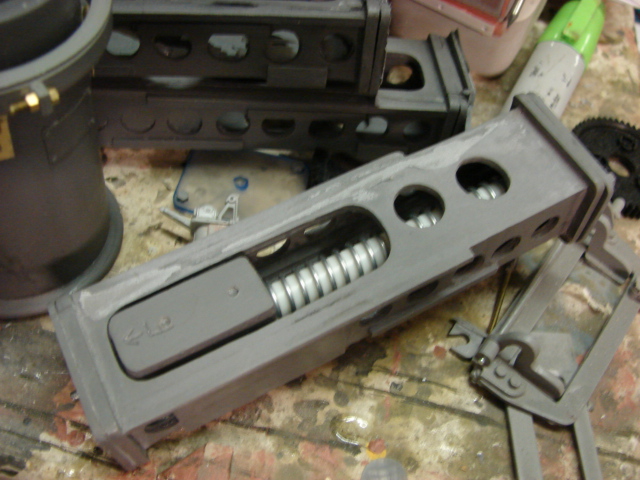
 I will now be focusing on the chassis’s swivel points, and gun mount shelf, Once complete I will then be able to focus on the gun counter weight feature… More to come!
 more pics have been posted to the ECA facebook page http://www.facebook.com/EastCoastArmory
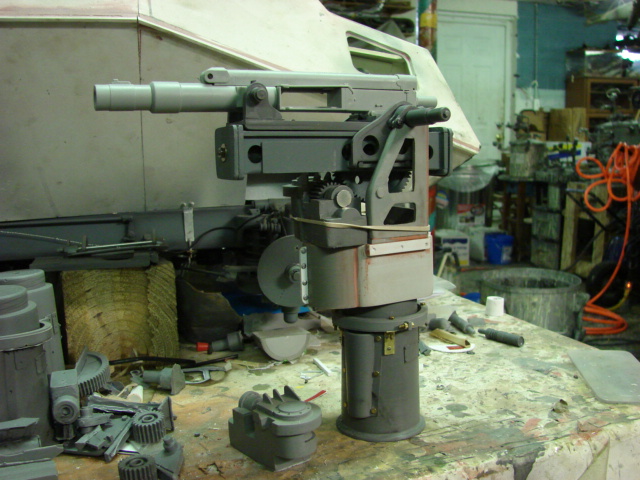
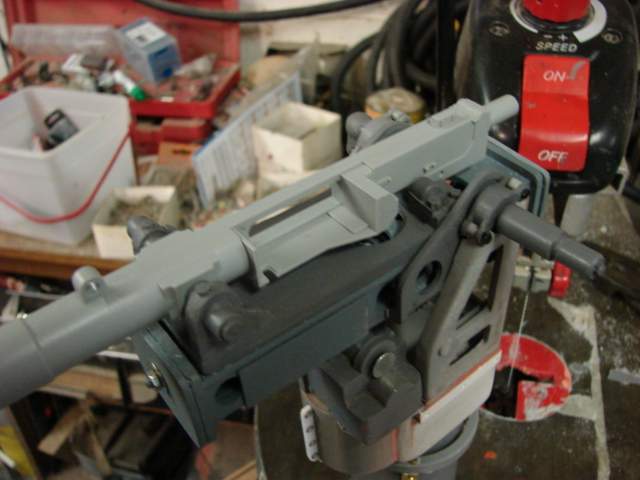
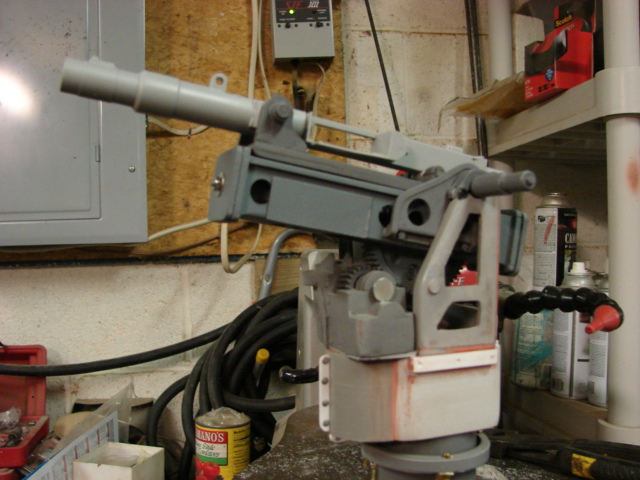
Slowly but surely the gun mount is moving along.
The Gun mount shelf has been completed and mounted to the carriage.
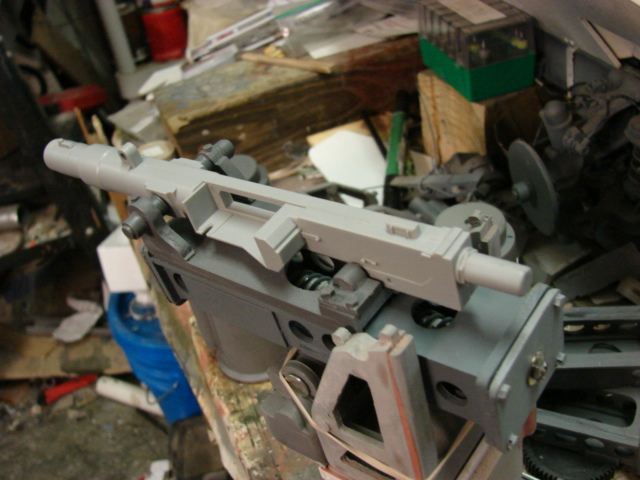
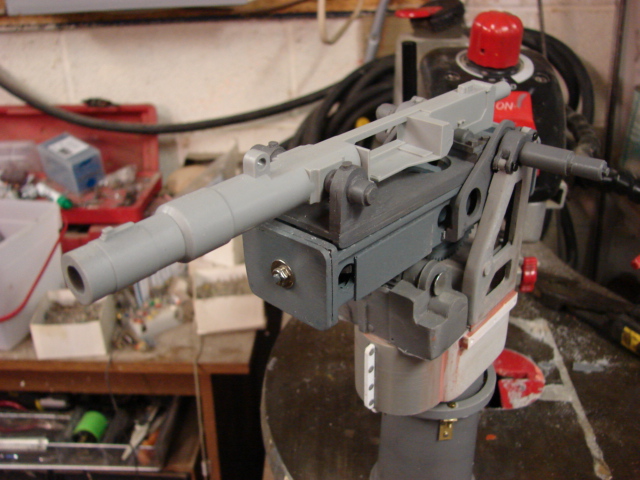
For the gun I used the DML plastic Flak gun kit. The resin mounts are designed to fit the DML gun with no mods needed.
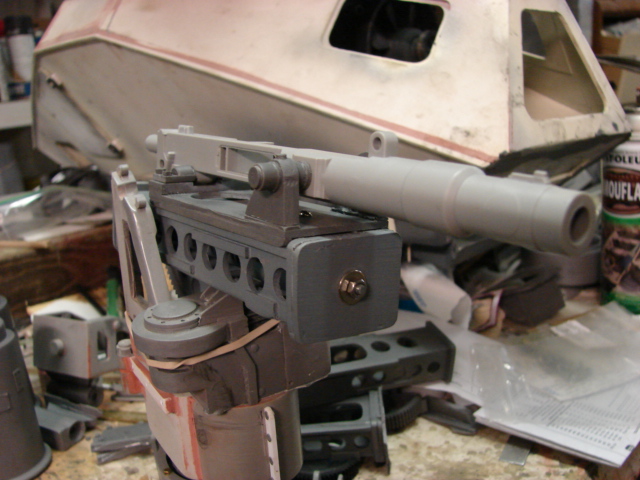
Like I mentioned earlier the shelf which mounts the gun is designed to recoil. This was done to minimize the amount of recoil that gets absorbed by the 222’s lightweight suspension.
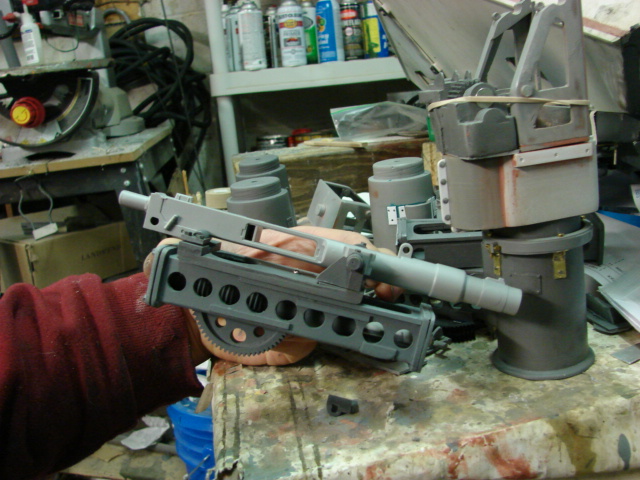
The design is very similar in concept of the mg34 lafette mount
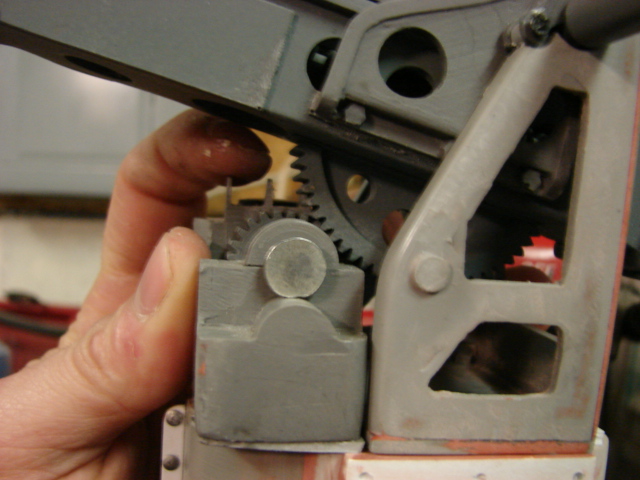
In addition to the mount I was also able to tool up the elevation gear, which is also functional.
With the shelf now out of the way I can now focus on the carriage swivel mounts… More to come!
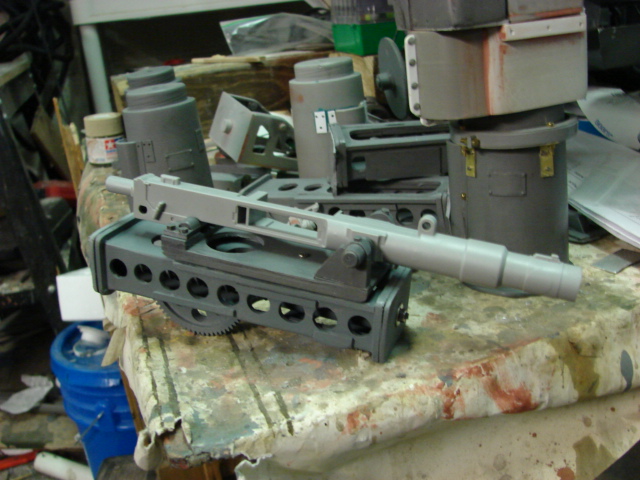
I made more progress on the gun mount.
the mount is now 40% complete.
The pivots were competed and mounted. Now the gun carriage can be fitted to the mounts.
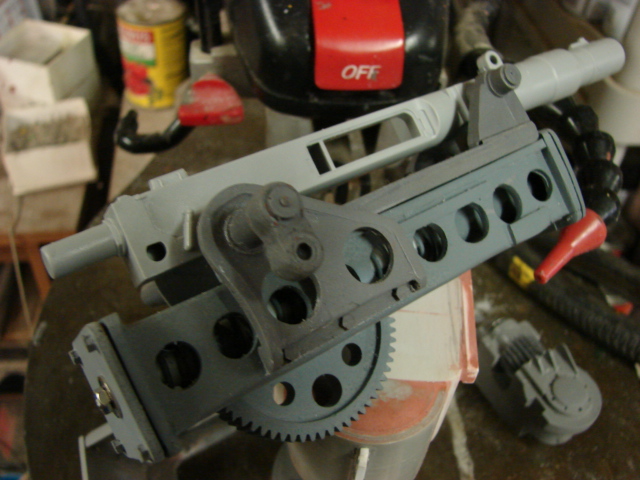
The mount locks were also fabricated. They are mounted to the mount via pins and can hing outward like the real unit.
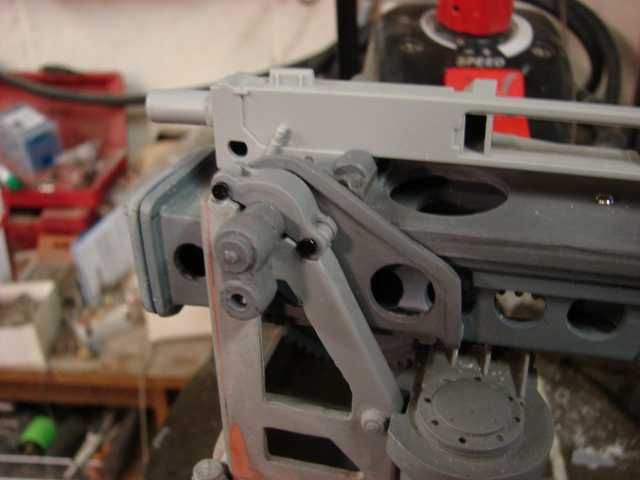
with the carriage fitted to the mount the elevation gear is functional and moves with the carriage
More pics were posted onto the facebook page.
http://www.facebook.com/EastCoastArmory
A youtube video was also created showing the progress on the gun and showing the features.
I will now be focusing on the mount carriage / counter weight system. More progress to follow!
It’s felt like eons since I posted last on this build, but with the commission work out of the way time opened up again to get back on it again.

The time off was actually beneficial as the pause gave me some time to regroup and tackle the project again with a fresh mind. Since the completion of the tiger I picked up again on the gun carriage where I left off

Since my last update the carriage body master was completed as was the mold. With the large casting out of the way I then turned to the seat mounts and counter balance mechanism.

Starting with the seat mounts the 222 gun carriage had adjustable seats that were on arms that would pivot by loosening a lever… much similar in the way large drill press tables are adjustable. The seat master is complete and will be entering into mold along with the next batch of parts,

One of the other more difficult parts to the gun to engineer was the counter balance mechanism. The gun carriage featured a hinged cylinder which contained a large spring.

This cylinder would connect to the carriage via a roller chain. The chain would run up into a hooded receptacle that would be on the upper carriage. The spring pulls the chain taught which gives resistance to the carriage.

It sounds simple, but to fabricate the parts, and make them work in 1/6 took some time to tool / engineer. Because of the importance of these parts the gun would be unable to elevate or depress if modeled static, so for the chain I used a real small scale roller chain,

Since the chain had to be articulated the cylinder also needed to be functional as well because if the gun were elevated the chain would slack and would hurt the look of the model, so I designed a real spring buffer system for the model.


The system works very well, and not only animates correctly, but also holds up the gun preventing it from drooping and making it easier to elevate / depress the gun

In addition to the chain animation the spring pressure allows the elevation gears to mesh properly and they rotate with each other when the gun is elevated / depressed

The whole setup still fits into the tight space of the 222 interior, although it is a tight fit… as was the case with the real vehicle


More pics were posted on the ECA facebook page,
https://www.facebook.com/EastCoastArmory
Lots of more parts still need to be fabricated and molded bu it looks like I will be about 60% with the gun after the next update… more to come!
O_____o WOW
Amazing work man~! How do you remember where you are from a year ago?
Posts like this helps, before I restarted on the build I went over what I did from the project start so picking up where I left off was not too hard.
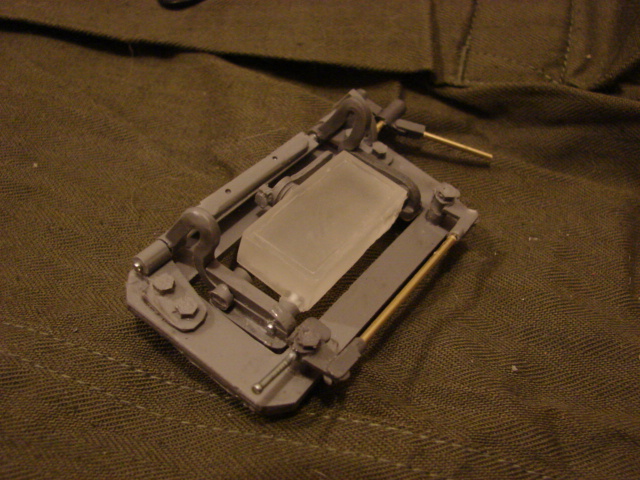
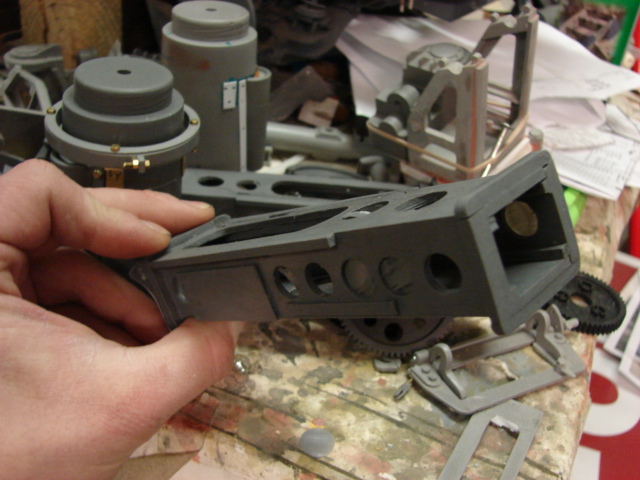
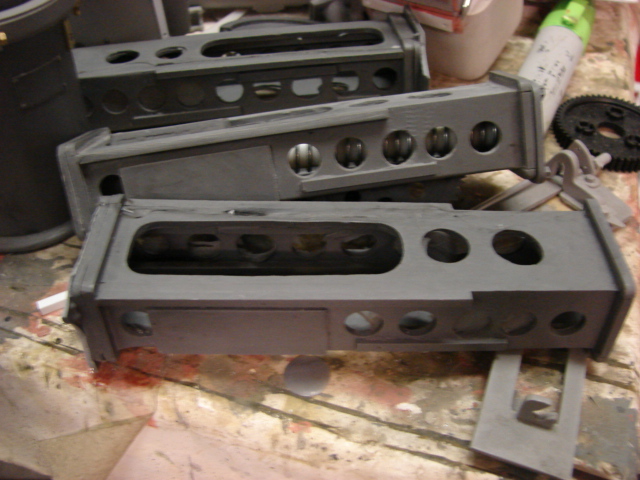
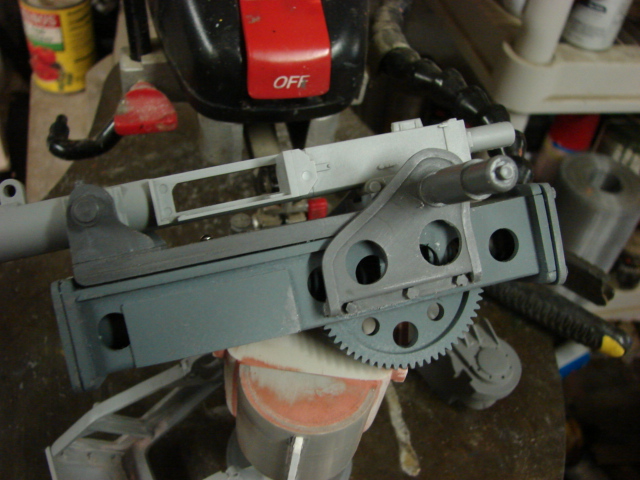
More work was made to the gun mount and the lower portion is now all done!


The whole bottom portion of the gun mount serves two purposes, it acts as a place for the crew to place their feet, and it is also where the gunner fires the guns.


The gunner has two pedals, one for firing the main gun, the other for firing the coax MG34

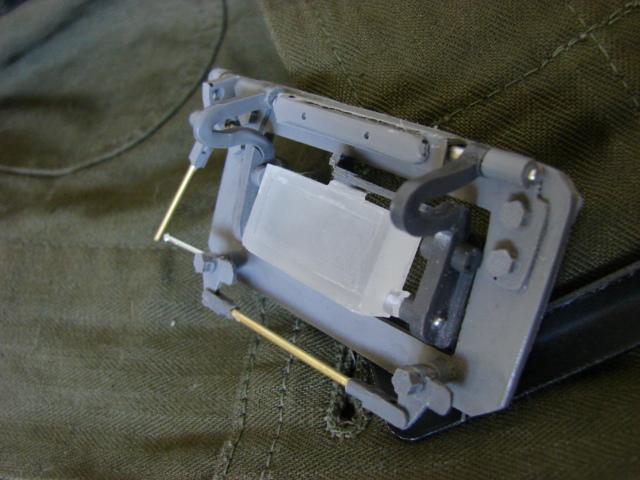
The entire harness is supported by tubes, that connect to the rear portion of the mount, there it is connected to a complex support system that connects to the seat mounts.


On the front portion for added support there is a segmented strut that emerges from the bottom of the mount that connects to the front of the harness, with this design the mount can fully rotate as the entire harness is only connected to the top mount and not the base

on the model I fabricated this portion out of segments of brass tube with nuts and bolts soldered to it. with this method I assembled and adjusted the parts like the real one.

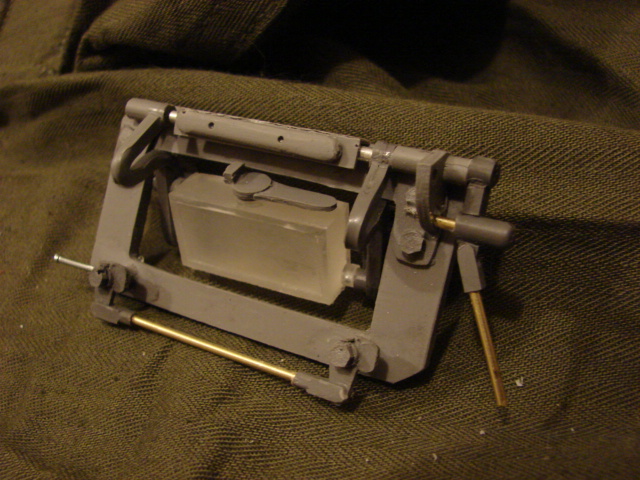
As for how the pedals connect to the triggers is another very elaborate setup. The pedals connect to linkages, these linkages run along the foot rest of the harness, they then engage two clevises (one for each gun). To prevent damage or injury to the gunner there is a guard on the footrest that covers up the linkage system (something like you see on a old tractor)


The clevises then enter into a tube that is mounted on the harness support. They run through to the other side where two smaller clevises then run linkages into the hollow seat support tube to the top side of the mount. There they run upwards to the two guns (more on that to come)


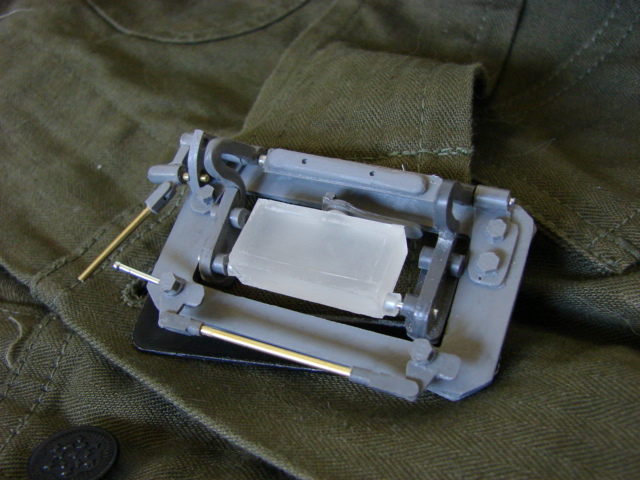
As for the seats the seats are fully adjustable, they are found on swing mounts that are fixed to the two tubes that emerge from the rear of the mount. They use tightening levers to set them to the proper place for the crew member, this system is very similar to the adjustable table you see on Drill presses.

on the gunner seat the seat can also be raised and lowered by a crank on the bottom of the seat mount. There was also a different style of seat used for the gunner which was a bucket type seat. More info will follow on the next update.

Currently I’m now moving up to the mid section of the mount which will include work on the crank wheel, and turret mounts.
more pics were posted on the ECA facebook page, https://www.facebook.com/EastCoastArmory
More to follow!
More progress has been made to the carriage,

The gunner’s seat was changed since the last update, For the seat I modded a spare armor hobbies SDKFZ 250 seat as that seat is very close to the bucket seat which is found on the gunners side. Now because the seat is not mine I didn’t make a mold for this part. If / when the carriage is complete and gets listed on the catalog it will come with two of the stool seats (like it did in the previous images)


Once the chair was out of the way I worked on the crank wheel housing. With the column out of the way I will soon fabricate the crank wheel.


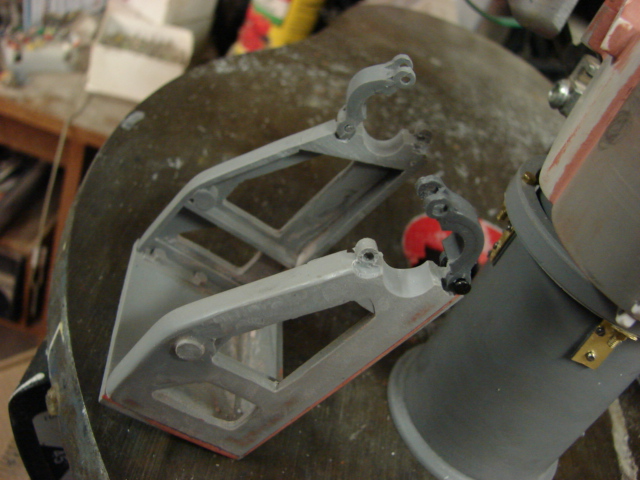
Once the column was completed I moved to the turret mounts. Unlike on most tanks where the gun is mounted to the turret, the 222 has the turret mounted to the gun. This is done via two connecting points. On the front there is a large brace that bolts to the carriage, from here it connects to the turret via linkage system.


On the rear the turret connects to a hardpoint mount. The mount is secured to a large U channel type guard that bolts to the top of the cradle.


Just like with the front turret mount the rear mount is attached with real fasteners.

A video update was posted on youtube, where I go more into detail on the mount’s functions.
And more pics were posted on the ECA facebook page
https://www.facebook.com/EastCoastArmory
With these parts all complete I’m now working on the firing system, and the MG34 coaxial MG mount. More to come!
You ARE a Master. This is beyond phenominal. 1/6th scale and every nut and bolt in its exact lacation, with all of that functionality… OMG. [][][][][*]