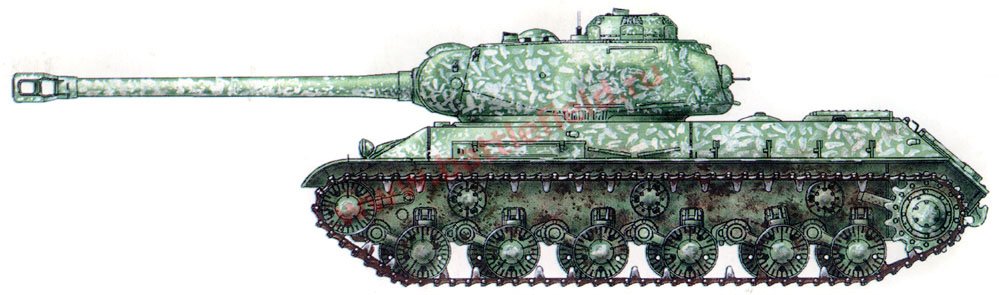
Alright, here’s my build for the Winter Warriors GB, that I just finished. It’s a 1/35 Cyber-Hobby “Orange Box” JS-II, the build was relatively straight-forward, but the paint scheme…now that was the test. I did some research and stumbled upon this camo scheme, and it all seems to point to this vehicle serving in the 29th Guards Heavy Breakthrough Regiment, Poland, in January 1945(though this is questionable.)
Only had one pic to base it off of(seen above), but I made do with what I had. It’s painted in MM Acryl Russian Armor Green, with the white ‘squiggles’ done in MM Acryl Flat White. The camo scheme was hand-painted over three days, with a size 6, 855 round brush. Scratched parts include the towcable, grab handles on the turret, seams on the turret, and the headlight lens. Enjoy!
Wow, what an effective scheme and kudos for the excellent execution! The over head view really shows how well the camo distorts the shape of the tank. ANy chance you can take a picture or two in front of a white background?
wbill76- Thanks for the comments, patience…nah, it probably had something to do with the open thinner jar I had beside me for almost three days straight.[;)]
detailfreak- Tough on the eyes…I’ll take that as a compliment.[:P]
Pvt Mutt- LOL…banana boat.[:)] Glad I made you speechless.
Geist- Thanks for the comments! White pics eh? I’ll see what I can do.
disastermaster- Thanks for the comments, glad the camo is unique!
anthony2779- Glad you like it, thanks for the comments!
wingnut- You got that right, I’d hate to stumble apon this tank while walking in a forest. Thanks for the comments!
Gamera- Thanks for the comments! Actually the camo was nice to do for a change, since I usually stick with the one tone paint scheme.
That’s pretty cool Mikael. I admire your patience. It certainly make an effective camoflage. I think the hairspray method or some wear would have really put this over the top. Non-the-less, inspiring job.
tigerman- Thanks for the comments! As for weathering, I was going for a relatively clean and new-ish look(thus I went really light on the weathering), evident in the fact I only did two washes on the upper hull.
Wow that’s one heck of a camo scheme. I think you nailed it for sure. My hat goes off to you for attempting ( and pulling it off too) such an awesome looking scheme. The ight weathering is perfect, no sense in covering a great paint job like that. [Y][Y][Y]
scratchmod- Thanks for the comments, you’re too kind![:$]
M1Carbine- Thanks for the comments! How did I do it…I guess maybe it has something do with the paint fumes.[:P] Honestly though, it’s just practice and patience. One thing I learned, clean the brush throughly every 5 minutes or so. Leave the paint on the brush too long and the ‘sqiggles’ become rough instead of slick & smooth.
Whoa MG!! That’s a really cool camo scheme on that JS-2!! Looking at your ONE reference plate I’d say you definitely nailed it!! You finished it super fast!! How was the assembly of the kit?
Hat’s off to you, my friend. These type of schemes are a real bugger to pull off convincingly.
If I could make one small suggestion…in keeping with your intent to show limited weathering I wonder if there might be some advantage to brightening up some of the squiggles on the upper surfaces. Just a light pass with a little extra white on the paint marks might add just a little more visual interest (as if it needs more!).
FastEagle1- LMAO…wheaties. Thanks for the comments!
bufflehead- Thanks for the comments! As for construction this kit did build up fast, because it’s a pretty nice kit. In the box you get a set of bonus figs, a small sheet of cartograf decals, and magic tracks. As for construction it’s simple(not alot of parts), only a few fit problems with small parts, and only one major problem that needs to be fixed. That would be the fender area, since the fenders don’t reach entirely to the hull. I fixed the issue with basswood and putty, but styrene would work too.
Schnobs- Thanks for the comments! Your head hurts…I guess that’s a good thing.[;)]
RickLawler- Thanks for the comments! I see what you mean, I had orginally done that when painting the squiggles before the weathering, but I think the weathering made that effect less noticable. I’ll keep the tip in mind, thanks again!
