1/200 Trumpeter Titanic

Started this close to one year ago.
I have a much more detailed build log on Model Ship World, for anyone interested. Same handle as here. MisterMeester

There are many aspects to Trumpeter’s mold of the hull that are inaccurate. Therefore, there are quite a few corrections to do to the hull, if one cares about accuracy. Most of them, I’ve taken care of.

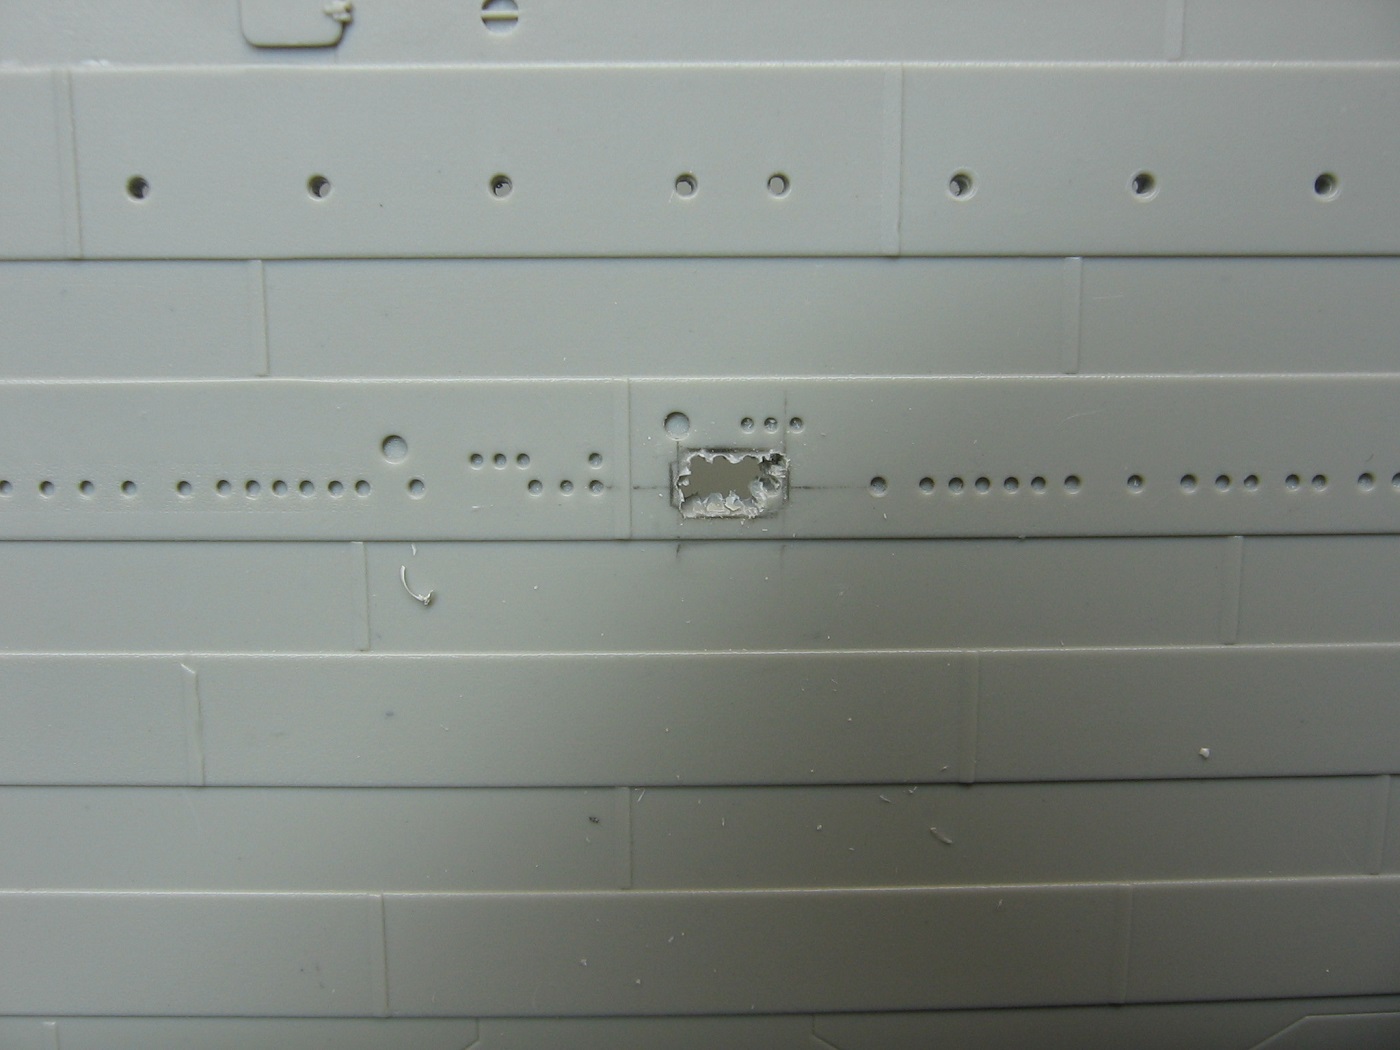
I do not plan on lighting the model, however I do have an aftermarket kit for the portholes “glass”. Having said that, all the portholes have been drilled out.

Most of the portholes were molded correctly, but some were missing altogether and others (about 50) are in the wrong location and require a slight repositioning. Again, for accuracy.
I added the missing portholes, but did not trust my skill set to reposition 50+ portholes and get each one EXACTLY correct, so I did not do that.

As well, some doors on the hull were incorrectly molded. Removed.

As well, parts N2 and P2 (Superstructure) had inaccuracies that I’ve corrected.

I’ve also accomplished a scratch build of shutters for the washports for the forward and aft well decks.

I purchased and applied an aftermarket kit for the missing stern plating. I had to do this twice. First time, I misunderstood the instructions and applied the guide template incorrectly. It turned out better though, nonetheless, as in my opinion the styrene provided in the aftermarket kit was too thick. It wasn’t to scale. So I scratch built the stern plating with thinner styrene. I used the leftover scrap styrene from the original aftermarket kit as a template, cutting each new piece from the negative spaces of that.


Also completed is an underhull plating aftermarket kit from Woody’s Model Works (aka Maritime Models) in the UK.

And this is where I’m at with it now…

The plating at the Stern Frame is scratch built. I know of no aftermarket kit that exists for that.

Lost more on the hull to do before it’ll be ready for paint. The coaling doors; condenser discharge ports; lifting pad eyes; rudder; prow hawse; bilge keels; propeller shaft housings; safety bars; a few more corrections; and dealing with rivets that have been damaged.
Hoping to get all that done by June, as I can’t paint it indoors. That has to be done outside.

Cheers,
Mark

11 Likes

That’s quite a bit of work already! Looking forward to this. I’ve got the Minicraft 1/350 deluxe kit I started ages ago and stalled (back in 2019!)

1 Like

In case you need distraction, Ben at Midwest Modelworks put out about 30 videos on the two he built (one was a commission build). He goes through virtually all the various aftermarket available for this kit.
Which is interesting for comparing how, say, the bridge add-ons work.

His shop has some specific 3d prints, too.

2 Likes

Thanks for the heads up. 49 videos, actually. Watched them all and will watch each one again, as I progress.

Cheers,
Mark

1 Like

The fact that you and others can just scratch build and modify like that is crazy! Nice job.

1 Like

Oh HELL yeah!! I’ll be in on this one Mark!!

Bed time for me but I’ll be back to this one tomorrow morning to catch up on what you did. Glad you started a thread bud. :+1:

Edited a few hours later…

That’s quite a bit of work that you’ve pulled off on this one so far and this is just the hull portion of the build. I don’t blame you for not adding the other 50 ish portholes. I’d be “out” on that as well. Will be watching this one. Bookmarked!

2 Likes

Thanks. Since I’m essentially new to the hobby as of 14 months ago, I’m surprising myself at what I can do. Not to say I haven’t made mistakes, I have. But I’d be lying if I said it hasn’t crossed my mind that I found something (model building) later in life that maybe I’m not so bad at. Kind of a shame I gave it up 51 years ago. Oh well, trying not to get too overconfident with it and trying to stay humble and continuing to learn. I’m sure there will be more mistakes to come.

Cheers,
Mark

2 Likes

@mustang1989 Thank you so much. It’s nice to know there’s interest.
I haven’t worked on it much in the last little while. More interested in procuring more equipment and supplies and continuing with establishing my workspaces lately, it seems. I’ve also got two other projects on the go that I decided to dust off.
Anyhoo, as I mentioned upthread, I want to get the hull ready for painting by June (July at the latest) so I need to get back at it soon.
I’m a golfer and come May that will be taking up quite a bit of my time.
As well, it’s often windy where I live so days available for painting outside might be few and far between. Need to get that done before next winter sets in and there’ll be more than a few coats to do.

Cheers,
Mark

1 Like

Hey Mark, kind of a sad thing there are that many errors in the kit.

I will for sure watch your progress on this.

1 Like

Looking forward to seeing this one back in progress when you get back to it Mark. Windy where you live and golf. Now THAT outta be fun on the drives. lol

1 Like

@mustang1989
Yes, I HAVE to get back onto it soon.

As for golf, the course I play on doesn’t have much for trees that provide a windbreak. When the wind comes from the West, which is most common, or the East, almost every hole has a crosswind. It can be challenging. A running joke is that we forget how to play when it’s NOT windy, as it’s windy more often than not and it’s what we are mostly used to.

Cheers,
Mark

Continuing with hull corrections.
Missing double strakes added…

Port forward…

Port Aft…

Starboard Forward…

Starboard Aft…

And a couple of missing panel lines added…
Port Aft…


Starboard Aft…


Thanks for looking and cheers,
Mark

4 Likes

Next, I decided to start attaching some of the PE I purchased for the hull.

This is one of two aftermarket sheets I purchased from MiniBrass. This is the Hull Details sheet.


This is my first time ever working with photo etch. I started with the Condenser Discharge Ports and I’m very pleased with how it went.

I did the Starboard side first…


On the Port side, I decided to utilize the provided template for positioning.


I’m looking forward to attaching the rest of the sheet.

Thanks for looking. Suggestions are welcome.

Cheers,
Mark

2 Likes

That is some real impressive work there Mark. Especially the styrene scratched details. Hard to grasp the scale from just the pics. How long is the hull in real life inches?

@Toimi_Tom
Thanks Tom. 53” length overall (LOA).

Cheers,
Mark

1 Like

Loving this! Avidly watching the work your doing. While I have picked up some PE kits I have yet to try my hand at it. The work you’re showing iooks superb.

@PhoenixG Thank you so much. I’m taking the time (maybe too much) to learn and it appears to be paying off. My learning method is mostly to self educate myself through articles and videos, but I’m loving this forum and beginning to feel more comfortable here to ask more questions of you all.

Cheers,
Mark

Not to mention “How To” references.


Upper right is an index of the FSM Scale Model Basics Videos. I’m creating a separate comprehensive index, in the form of a word document, as I watch each video, with notes. This comprehensive index will eventually go into the adjacent FineScale Modeler binder, which already contains many select FSM articles.
I’m sorry to AK interactive (if you’re here) but I can not recommend the publication referenced upper left “Beginners Guide to Modelling”. The translation to English (for us whose first language is English [or American English]) is ridiculously lacking. Very disjointed language, IMO.
Further,…admittedly, I have not yet thoroughly perused the AK Interactive publication “Photo Etched Parts”, lower row, second from right. Therefore, I stop short of saying I expect the same.
The other two Vallejo publications are recent acquisitions and I have yet to find the time to delve in.
As for the FSM Essential Skills for Scale Modelers book, … what can I say other than this is gold. Not sucking up. For me, FSM has been, hands down, the primary tutor in my scale model learning journey. Be it articles or videos. (BTW, still watching, reading and learning). With the overwhelming amount of information via internet, I found it to be too much. Hence, stick primarily with one tutor.

Cheers,
Mark

3 Likes

And back on topic…my little Titanic reference library…

More updates soon.

Thanks for looking and cheers,
Mark

3 Likes

The same is true for me. At the time I resumed building models FSM had starter kits available. Each kit included a model, tools, paints, a specific guide for doing a complete build with that model, and the FSM Essential Skills for Scale Modelers. The kits were like mana from heaven for me.
This is my build of the kit they supplied. All brush painted, except the flat coat which is rattle can. The FSM Essential Skills showed me how to use pastels to do the weathering on it.

Early on the FSM Essential Skills book was my primary source. It’s a great book. I still refer back to it periodically.

3 Likes