Tread , it seemed like it was a while for what i got accomplished . Thanks again !
TomZ2 , white headliner ? [^o)] Who’d of thunk it ! I see where Eduard makes a p.e. set for this truck . Those pics will really help . Thanks .Their from Sprue Bros ? Off of their new site ?
Hey man, intresting project you have going on, dont see a lot of these here. The frame is quit impressive and your plumbing is comeing along very nice. From those pictures it looks as if there is plenty you could still add. Will be waiting to see what you do. With that high part count, misleading instructions and soft plastic sounds as if you have a little challenge on your hands. I know your handy work will breeze right through as always. Are you planning the hood open or some way to see the details? Look forward to the next update.
Rob goood to hear from you ! I’m planning on having the hood open to show the engine detail . I dont know yet if the kit plastic hood can be posed open . Its a bi-fold arrangement on the realski. Eduard makes a p.e. hood for this kit that can be bi-folded …i may have to get it .
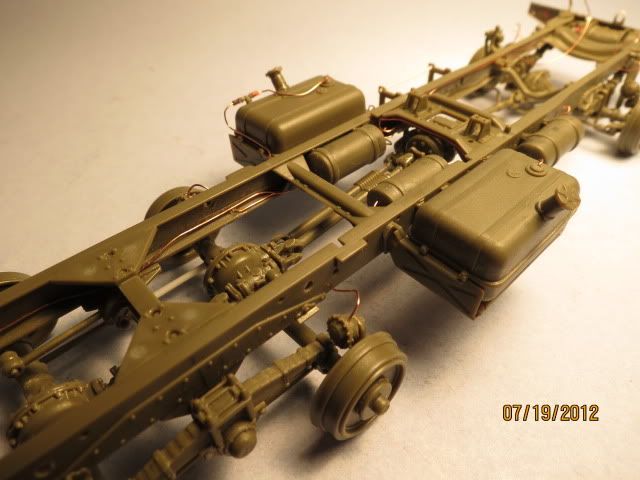
This time i have done some plumbing . I ran the lines for the air brakes and the fuel lines . I’m not saying that the lines are exactly correct in their positioning . I did do research on the web and this is the i came up with .It looks like 99 % of this will be covered up on the completed model but the effort was enjoyable . The pe set from Eduard i cant find at Sprue bros or Squadron . According to the kit instruction the plastic hood parts can be bi-folded so i will go with that idea . Probably scratch build a lot of the under hood detail that kit leaft out .
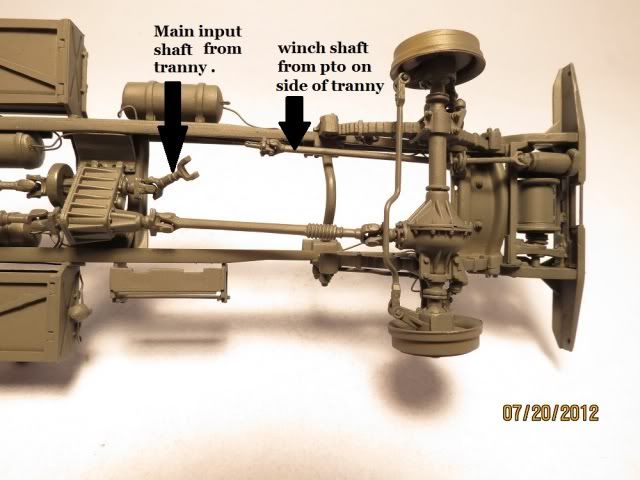
Sweet work. I have a question: The prop shaft off the front of the transfer case, looks like it could be the PTO (power take-off) for a front winch, that’s dangling so realistically…did Trump mold it that way or do the U-joints actually flex like the realski (good word, btw) and the shaft is actually dangling?
Andy , less than 15% complete me thinks . A cup holder…[^o)]…good idea , maybe up on the dash ?
Pawel , thanks for looking .[Y]
RBaer , the u-joints snap together but its not a tight fit so i glued mine , except for that shaft that is dangling . I will hook it up to the tranny when i install the engine later . Here’s a pic to explain the shafts up front . I put a coat of dark gray primer on it last night .
The important thing is that you know it’s there! Sometimes the most enjoyment from detailing comes from things that get hidden away…but are your “little secret” all the same. [:)]
RBaer , i figured if i showed a complete pic of the front end you’d figure it out but i added the text for anyone else who might be wondering . This kit could be modified to show a vehicle setting on un-even terrain . It’d take some patience but i think it could be done with some interesting results …[^o)] hmmmmm…nope not this one .[whstl]
Bill , thats so true isnt it . Its the fun of doing the research also isnt it . I went out and crawled under my 4x4 pickup so i could get a hands on look . No cats under there though …[:P]… LOL
I see that you have been plugging away, your detailing work so far is first rate, it’s only a matter of working out what does what, fuel lines , brake lines, etc, etc. you can have more fun with a couple of feet of copper wire than an expensive etch set.
Terry , true about the copper wire . At least its round like the real thing . I’ve seen some of the p.e. sets represent hydraulic lines with flat etch . Ok in 1/48th but it would stand out in 1/35th .
Marc , hope you have patience , this may take a while to build .
Tread , i found the bent line your referring to …so i re-bent it the other way [:P] Sorry you had to do that , i know how you dislike critique-ing …[whstl]