So tonight I started on my next aircraft project. This time around I’m goin for the big black one, an SR-71 Blackbird. I was suprised at how large the box is when I got it in the mail. Anyway, its one of those Testors brand kits that comes complete with everything you need, which is pretty convienient I’d say. Even came with a nice book “SR-71 Blackbird In Action” from Squardon/Signal Publications.
Anyway I was inspired to do this kit after seeing a flash video someone sent my mom on someone’s personal history with this aircraft, so after browsing eBay I found two pretty cheap and now I have two.
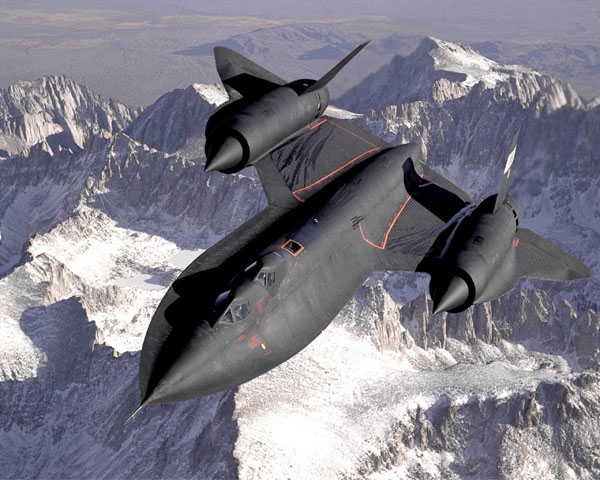
The one I’m doing now will be like this one:
And the other I’m going to do like this one:
Since one of the kits has parts for the A-12 variation.
Here’s pics of what I’ve done so far. The bulkhead’s between the seats glue into the roof of the aircraft, not the cockpit peice so they’re not shown. I did the detail as well as I could from internet and the book that came with it. It’s not super detailed, but I did a test fit and you can’t even see the detail so I just left it with the colors as they are without tryin to paint each and every button.
I’ll be watching as well. I have the same kit along with the True Detail cockpit aand wheels. I didn’t have the chance to get the Cutting Edge air doors and burner cans before they went tits up.[banghead]
[#ditto]It’s a shame that Testors is the only option for 1/48, but it looks like you are off to an outstanding start! I do love those skunkworks planes!!![8D]
Good luck on your Blackbird builds. One point to keep in mind is that the kit comes with decals for the M-21 drone carrier, but that version has several significant differences from the SR-71. The A-12 was the first Blackbird. It was a single seat version with the area immediately behind the pilot, (the Q-bay), housing the cameras. The M-21 was an A-12 with the camera bay modified to hold the second crewman, Launch Control Officer, and the plumbing and physical mountings for the D-21 drone. The SR-71 was the same basic airframe, but had several significant internal changes including housing the cameras in the chine bays and nose section. The SR-71 nose had an entirely different shape as did the tail cone. The Testor’s 1/48 kit is a fairly good kit as far as accuracy, but the seams where the various sections go together have canyons that will need to be filled and sanded.
I tried building one of these. I still have another one in the box (my wife had a little trouble with the on-line order for Christmas and I ended up with two).
It was huge, but I gave it a shot. My limit was when I was bringing it in after painting and slipped. I never did find all of the pieces and I haven’t had the courage to try the second one yet.
As Yardbird said, there are signinficant differences between the SR-71 and the A-12. There has never been a kit of either the A-12 or M-21 ever made. Testors/Italeri released their SR-71 with the drone in 1/72, but the SR-71 never carried the D-21. ONly the M-21 did, and only two were ever made. One crashed in a midair with the D-21, and the second one now resides at the Boeing Field musuem near Seattle. You can convert an SR-71 into an A-12, but it’ll take moderate to major work.
Maybe it’s just the decals that it comes with then, because one of them says “Kit includes markings for the SR-71 A, B, and CIA A-12 Versions”. Oddly enough even though they’re both Testors kits, they’re in different boxes.
Is the one I’m doing right now, and
is the one I was thinking of doing in the silver and black markings, but after reading the instructions it does say it’ll need a conversion kit added to it. After reading your post and going to Kiwi Resins it says that that kit isn’t in production anymore. Maybe I can find it online somewhere else to grab. Otherwise I may end up just leaving it in my stash for some other time, or go for the SR-71 B.
Thanks for all the info and support everyone. In a way it does look daunting with all the peices but I hope I can get it to turn out good. So far I’m only up to step 3 (sandwiching the cockpit in between the upper and lower halves) but theres so much puttying to do its not a suprise. [xx(]
Both the 1/72 and 1/48 versions of the Italeri/Testors Blackbird were issued in several different boxes. They are exactly the same kits. I think that the 1/48 decals varied slightly, but not much. The advertising on the box is misleading as to the A-12. The decals are included for an M-21, but the plastic won’t work for that bird. If you want two very different looking Blackbirds, I would suggest doing the A model in the later, low visibility scheme with almost no markings and the other one as the B model (17956) with the high visibility markings. The B model carried the high vis markings through out it’s Air Force career. Your lead-in picture is of the B model after NASA obtained it from the USAF in 1990 and removed most of the high vis markings. Your second picture is of A-12 number 06924, which was the very first Blackbird ever built or flown. It now resides in Blackbird Park between Palmdale and Edwards AFB with an all black paint job.
Testor’s, later Italeri, most definately DID produce a 1/72 SR-71 as well as the YF-12A. They are significantly different from the Revell molds, as well as the Academy and Hasegawa versions.
These are the 1/72 Testor’s and Italeri and Italeri/Tamiya kits in order of appearance on the market.
These are the 1/72 Hasegawa versions of the SR-71. The third kit pictured has a large decal sheet with markings for the NASA birds during the 1990s as well as the USAF birds during their reactivation in 1995-1997.