Looks really good. That’s been a kit I have been tempted to pick up.
1 Like
Thanks @GreySnake01. I have only good things to say about the kit, as long as one views the absurd invisible undercarriage and engine detail as a positive! Which I definitely do.
Been working on the colors for this – no photos. I found the brown basecoat didn’t work out very well under my Vallejo 4BO color – it came out really desaturated and greyish looking. So I re-basecoated in black and warmed the 4BO up a little bit. It’s curing now, and then I’ll begin working on highlights.
After my last post, I still wasn’t happy with the green shade I’d achieved. The plain Vallejo Russian 4BO is rather grey and desaturated to my eye, and I’ve been messing with various adjustments.
This morning I finally got a satisfying green color laid down. Of course the “correct” shade is totally up for debate – it’s even amazing how much the type and temperature of lighting in my workshop can change how a color looks – and then how it looks on my screen vs. your computer or phone screen… the point is, it doesn’t really matter. It just has to look right to me. I just kept slightly adjusting and testing it out on my paint mule.
In the end, I went with the Vallejo 4BO with a few drops of VGC sun yellow and one drop of Vallejo express color lizard green.
And on my screen now it still looks too grey. ![]() In person it looks right to me. I’ll do a couple rounds of increasing spot highlights, and then it’ll be time for varnish.
In person it looks right to me. I’ll do a couple rounds of increasing spot highlights, and then it’ll be time for varnish.

By the way, if you’re thinking to yourself “pretty nice build, but what is with that huge uneven gap between the fender and side armor plates!?” then in my defense, I’ll refer you to the source material:


It looks like even a nearly imperceptible deformation in the fender will lead to a big gap there. So I’m okay with it. Further my final display will likely hide that joint altogether underneath some snow. Do I wish I would have caught it before I started the painting process? Yeah…
4 Likes
Completely true. To avoid being driven nuts by the color of my paint changing depending upon which lights were on, I setup all my work bench lights so they would be the same color temp and then verified it.
Wonderful reproduction of the detail with the fender. ![]()
Had to look up the color at Vallejo just so I’d have something to reference. Regardless of color accuracy of the photo, I’m liking how it looks. ![]()
1 Like
I’ve tried to do this, but neglected to factor it into my airbrush booth. So I’m constantly struggling with that on projects like this. For airbrush booth 2.0 (which I do need to do) I’ll be a lot more intentional about it.
But where does it end? One should really match the light color temp of one’s bench to one’s spray booth, to one’s display case, to the lights in the convention center where the model show is… etc. etc. etc. …
It’s nice when talent is recognized. ![]()
Thanks – me too. Got some color modulation/highlighting airbrush work in this afternoon and that really goes a long way to bringing it to life. More photos to come.
Short answer. It ends wherever you draw the line. Otherwise it just keeps going.
I’m into amateur photography and have friends who work in digital art. The rabbit hole is deep. Very deep. ![]()
Can’t wait to see the next set of photos post modulation/highlighting.
Indeed. I too am a bit of a photog and work really hard to keep my white balance settings in Lightroom consistent for these threads. That helps to alleviate the lighting color issue. Of course, sometimes I just want to use my phone, and then who KNOWS!? ![]()
![]()
When I first started taking progress shots I used to work on white balance, exposure, and all that to create the most consistent shots possible. That persisted until I realized I was spending almost as much time on prepping the photos as I was on working on the model! After that realization hit, I took a more laissez faire attitude with the progress shots. Saved the effort for the final beauty shots.
1 Like
I’m pretty spartan with it, to be honest. And I use presets and the copy/paste function in LR a lot, and the integrated focus-stacking tool in Photoshop.
Anyhow, based on this convo, I took a little extra time with the photo setup this time. From putting the camera on the tripod to posting here probably took me 20-25 minutes – which is honestly a nice break from hunching over the bench with my magnifiers on. ![]()
Here’s how the armored car sits at the moment. Highlighting done by adding small amounts of VGC Goblin Green and Dead Flesh. The first to keep the green warm, and the second to desaturate some of the very highest highlights to keep it from looking too yellow.
Currently formulating next steps.

6 Likes
This thing is just sick!! Such good work going into this ride Tom. Still blown away by painting a build that’s all built up already.
Like you, I spend a good amount of time in the photography and editing of my builds. Sometimes it’s a great tool too because the camera doesn’t lie about mistakes and I have to go back and fix the problem with any given build that I would’ve missed without the pictures,
1 Like
To be fair, the turret of course is just sitting in place. And the dual rear axles makes for a handy place to grab the model for painting without risking any damage. To my amazement, I’ve only broken off those little foot steps once each so far!
And thanks for the boost of confidence! I’m a little concerned that the mottling is a bit subtle, and might disappear once the other weathering steps start going on top of it. We shall see.
Oh my. You and me both, Tom. I have a SF Cable Car sitting on my desk and I’ve been fretting over whether the paints I have are close enough to the red and green I’m seeing in pictures (which of course look different depending on the lighting).
1 Like
4BO looks really nice.
I pretty much have to resign myself to never knowing if some things look right since I deal with some red/green colorblindness.
1 Like
The trick is to just be decisive and go for it. I know this. Doesn’t make it easier ![]()
Oof. Do you find that this determines what subjects you choose?
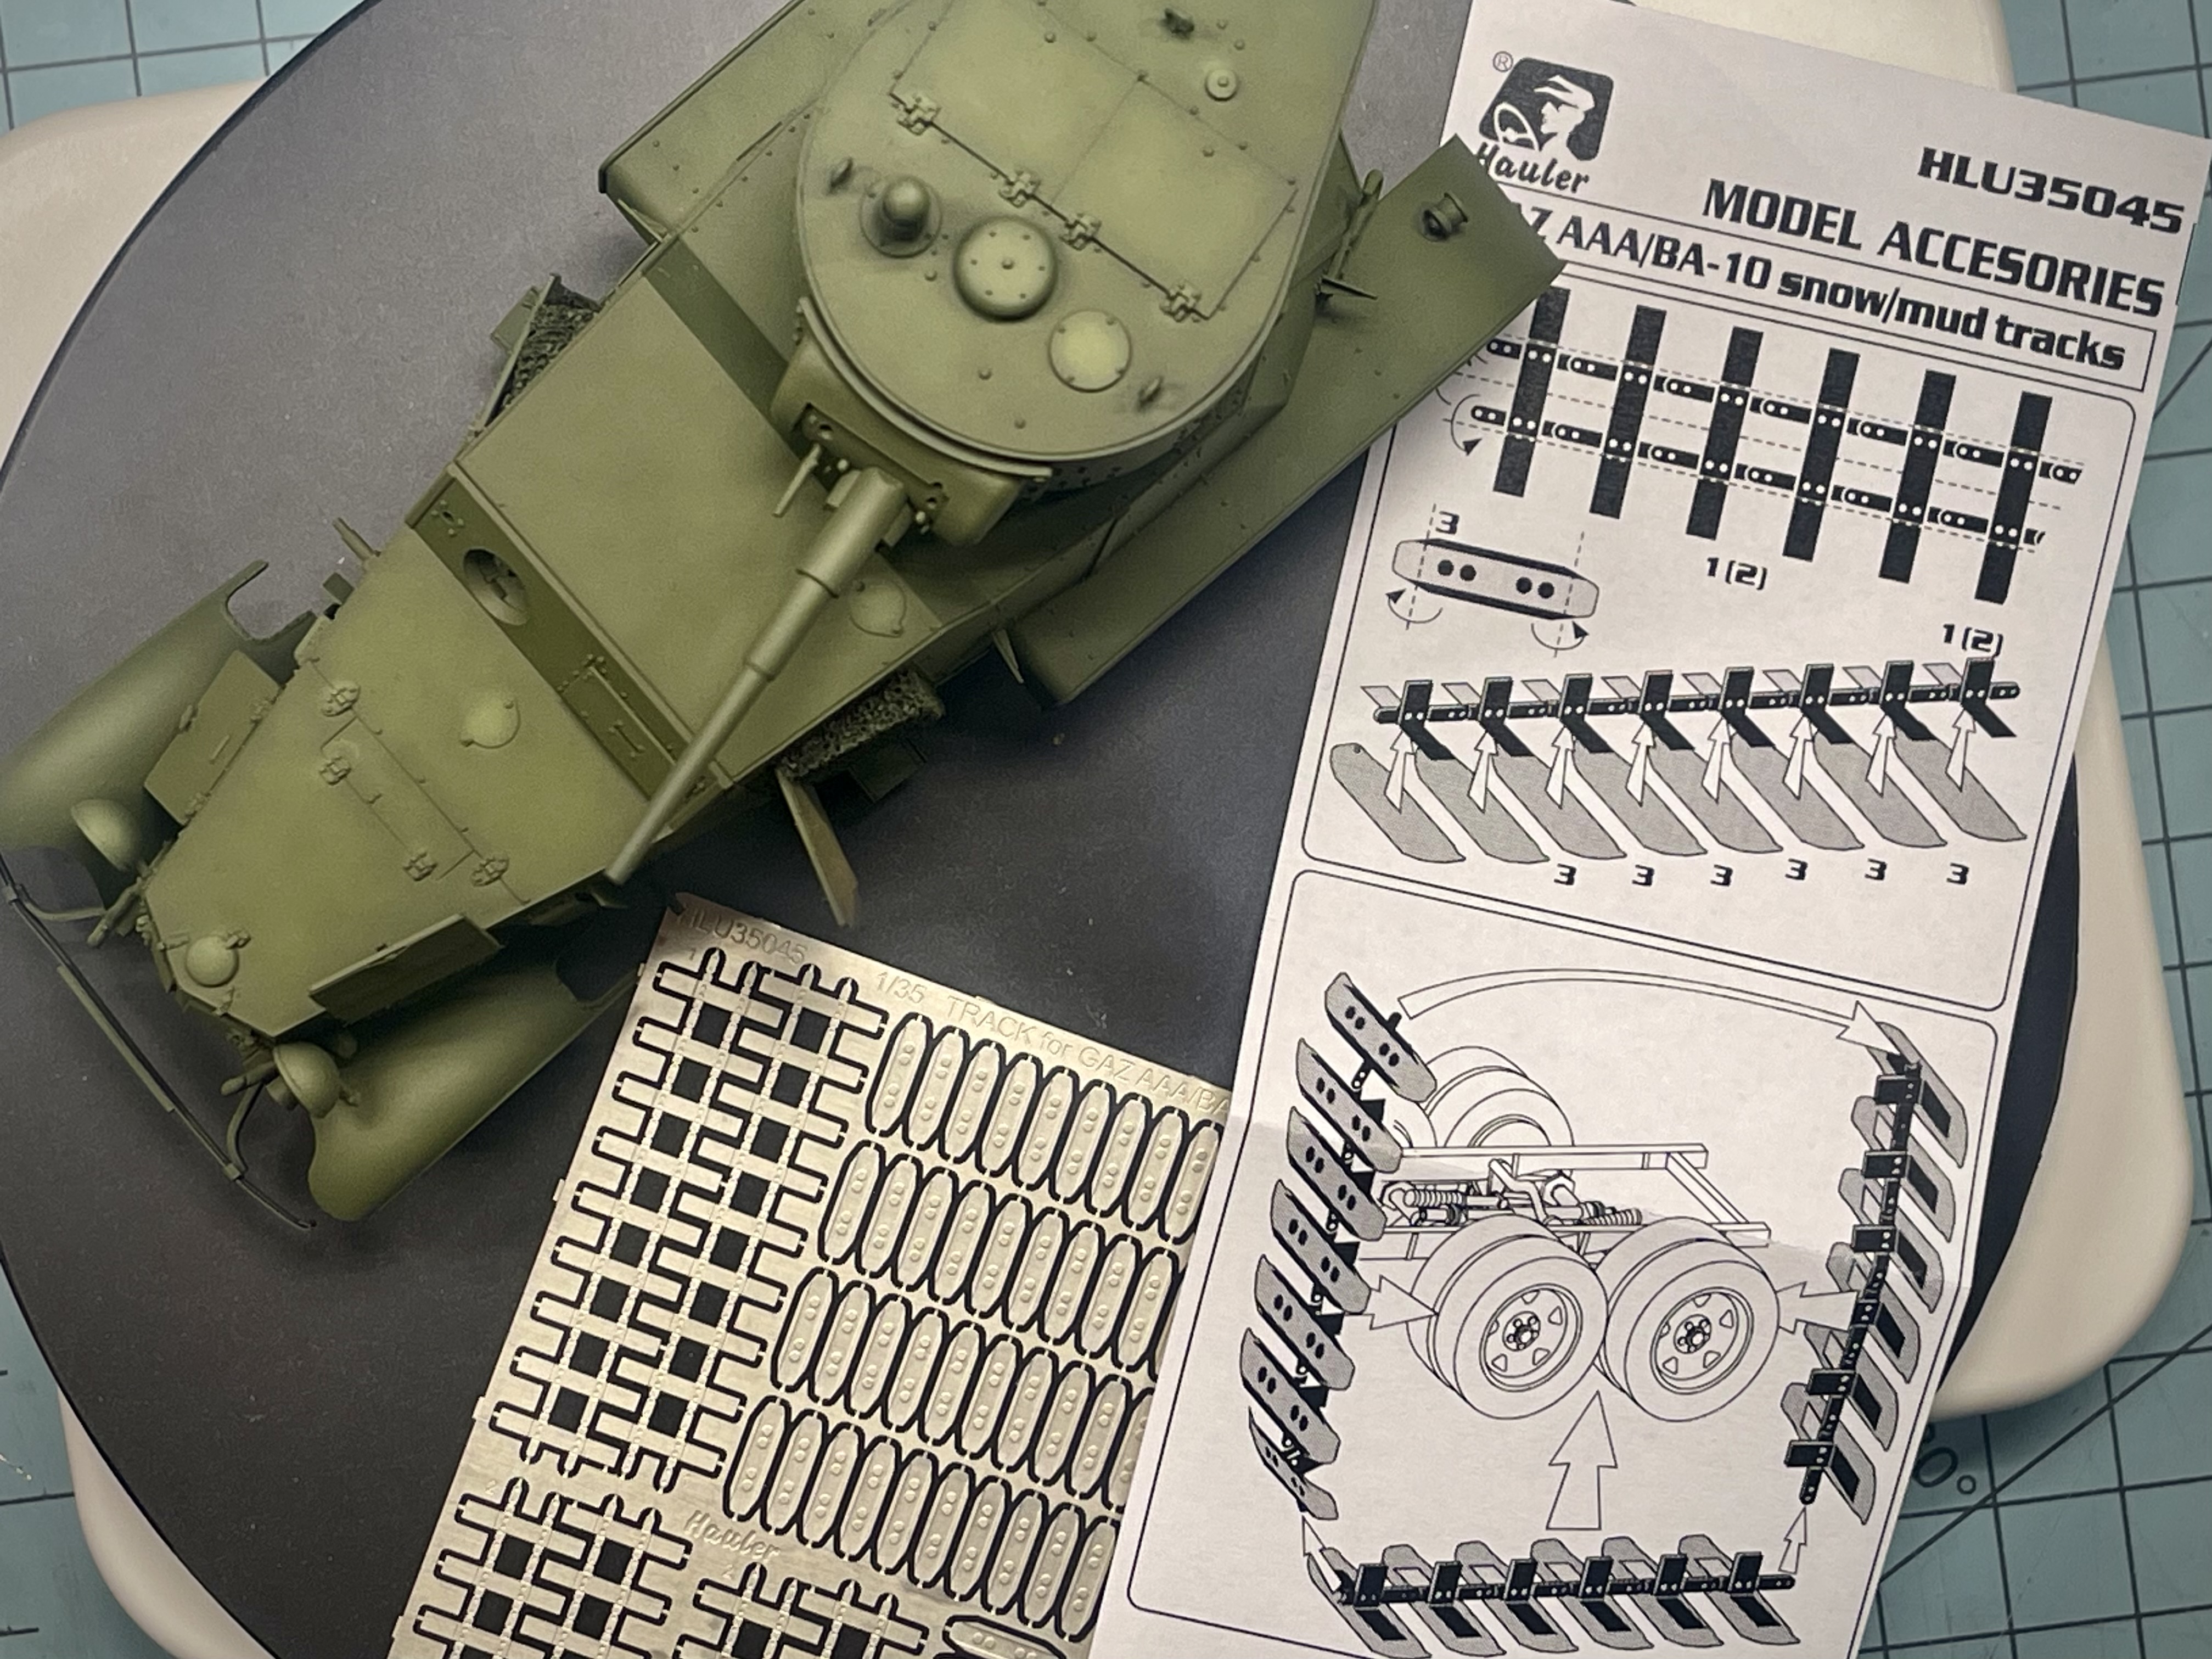
As for the BA-6, I’ll be working on chipping and detail touchups. Also, I got a special delivery from Poland yesterday. Thanks to SuperHobby, I now have a weekend project. PE tracks. Wish me luck! ![]()
4 Likes
Pretty much no NATO painted tanks. I can’t tell the difference between NATO brown or green.
1 Like
Small update on the ol’ armored car here. Progress slows down at the end of any build, with lots of drying time, tedious but high-stakes work, etc., and it becomes a mental challenge to sit down at the bench instead of digging through the stash for that next dopamine hit.
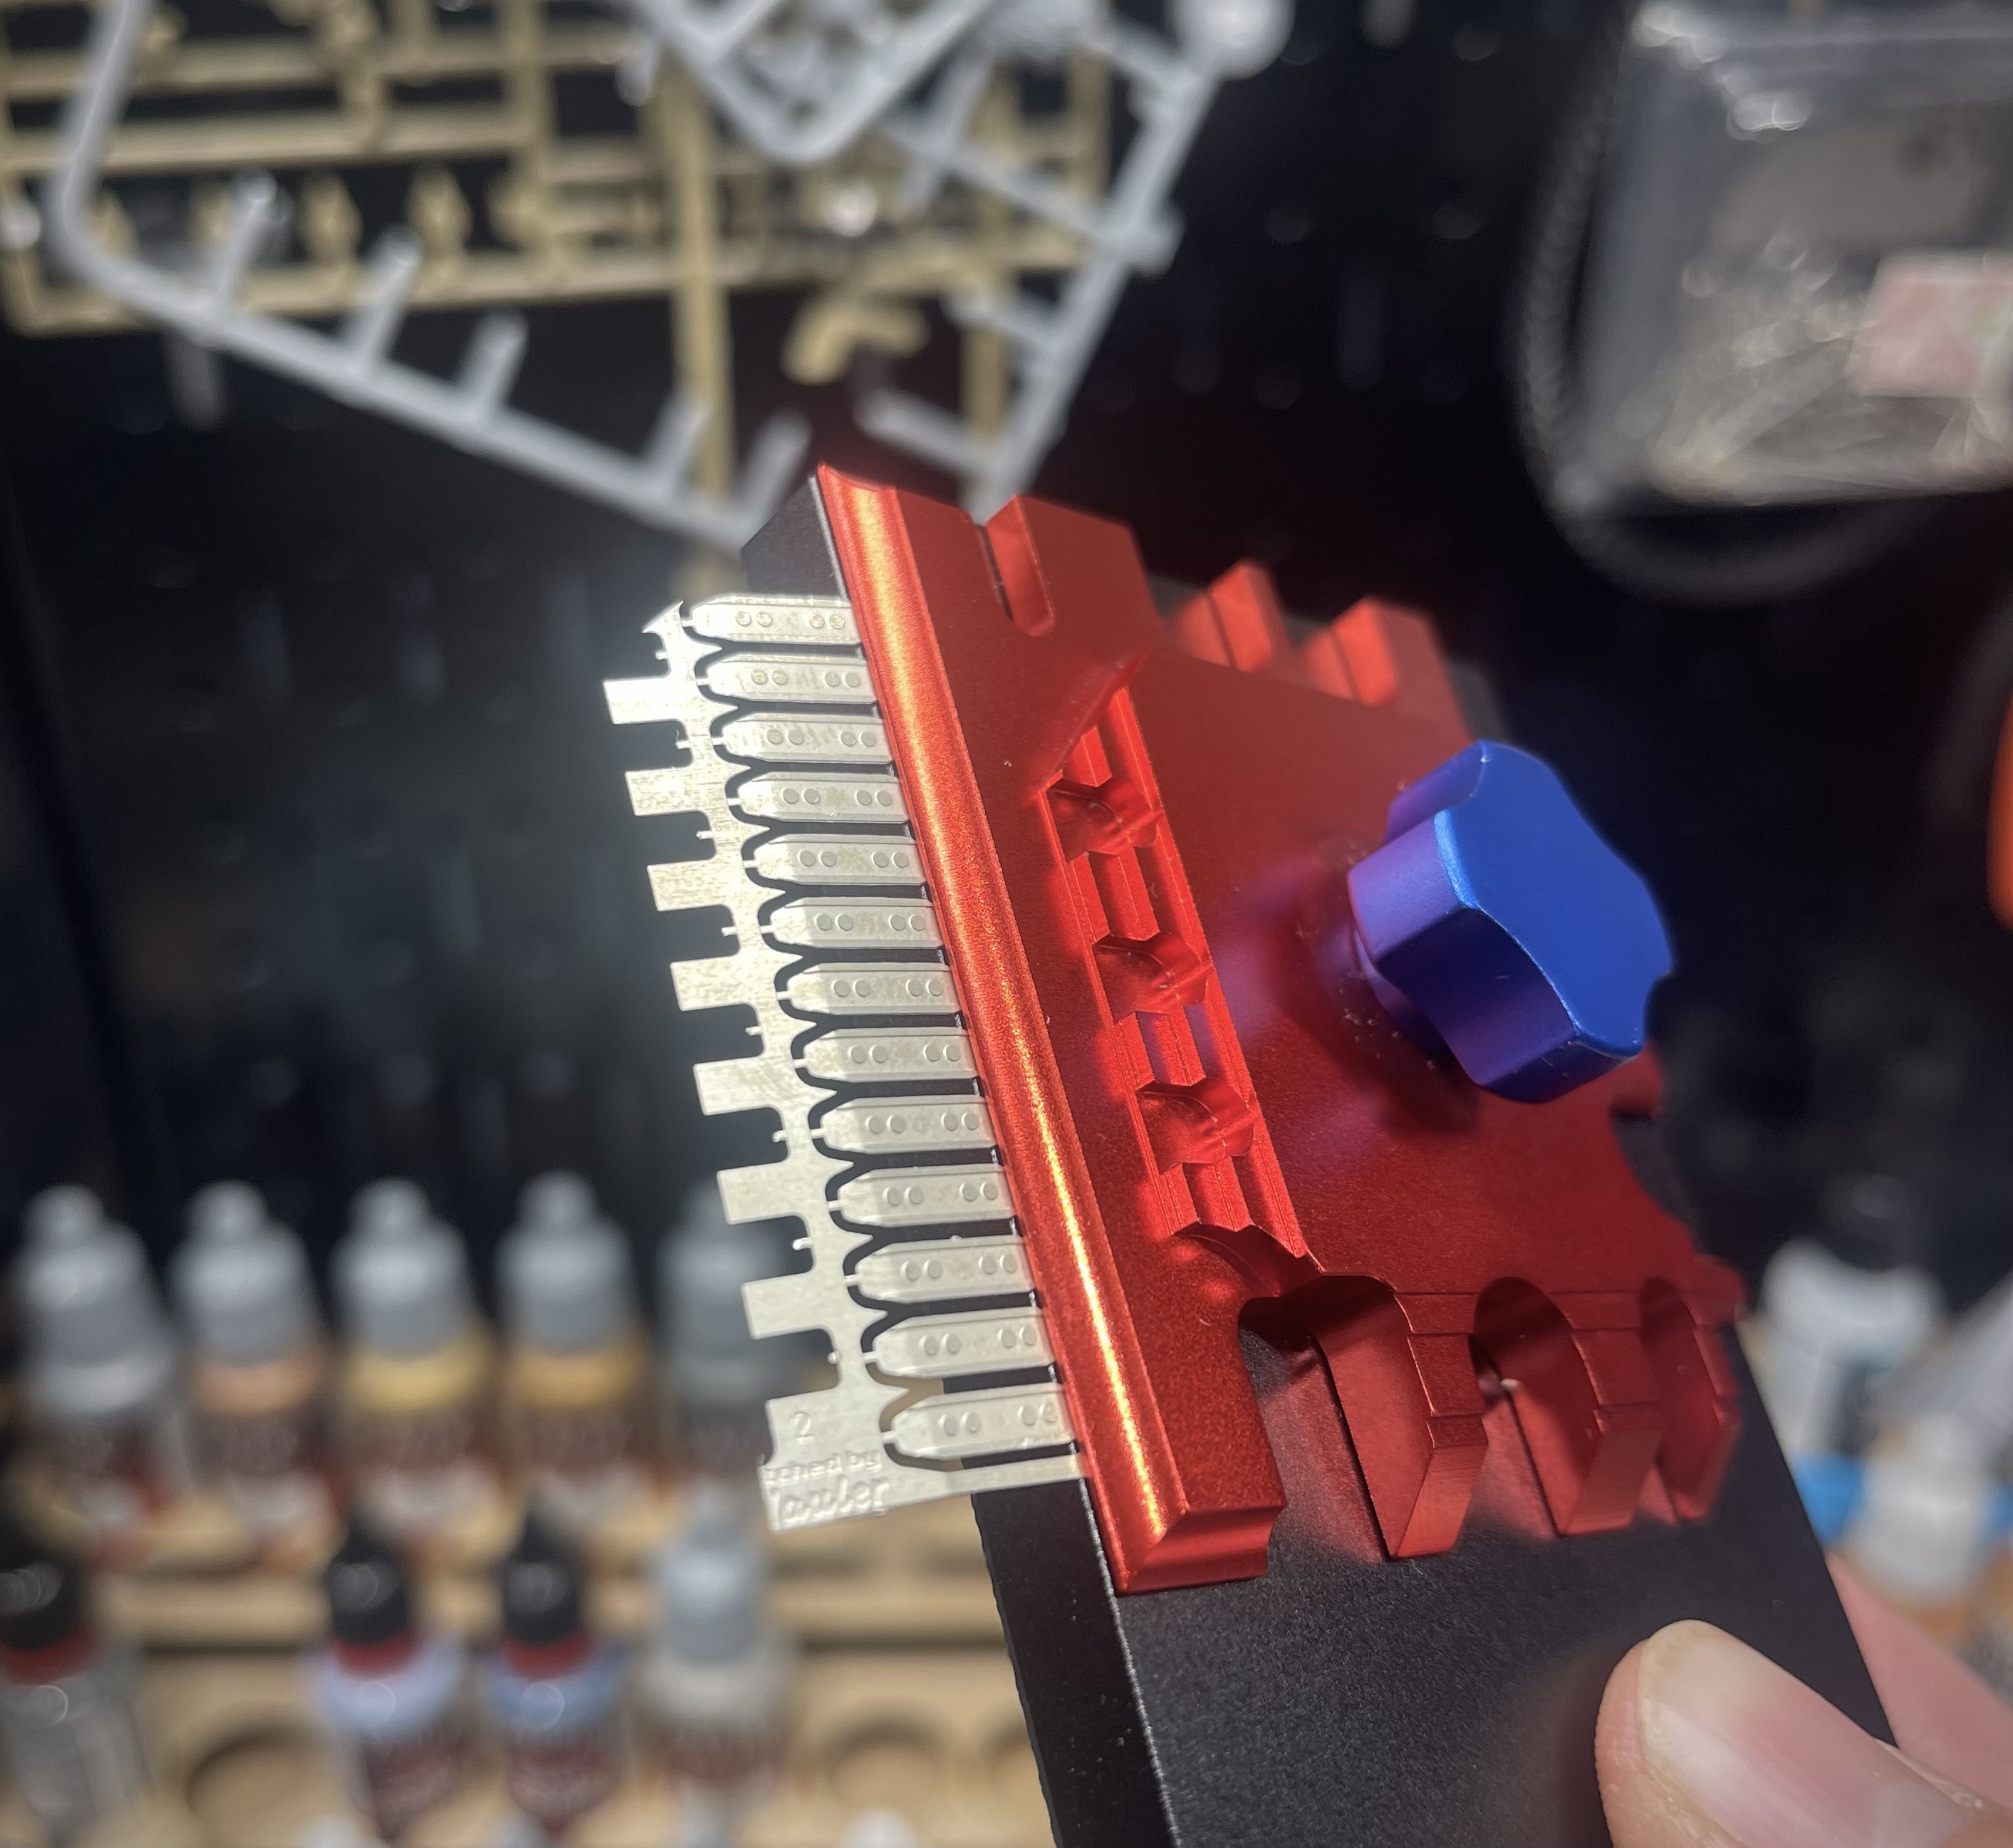
I used this cheap PE bending tool to get the track treads bent properly. I can see why it’s cheap: it’s very hard to align perfectly. Despite its precision-machined feel, it’s actually quite sloppy, and that little knob always sticks once you get it tight enough to hold the metal securely. Still, bending this PE set would have been nearly impossible, or at least would have taken a week, without it.
Then after watching this handy FSM video I got brave enough to bust out the soldering kit. I’ve had enough of superglue failing and losing PE parts at critical moments, and I knew I’d be manipulating these a lot, so I needed the extra strength.
It really wasn’t that hard. I used an old brush to paint the flux onto the flats of the track, and then tinned each section by touching the iron and the solder wire to it at the same time. In this pic you can see the solder flows nicely to fill the flat space (the three on the left were still untinned).

Then it was just a matter of painting flux on each individual tread, setting the track part solder-down onto the tread, and touching each side with the iron tip until I saw the solder squeezing out at the edges a bit. They cooled instantly and were permanently attached.
It still took me several evenings of work to get it all done – tracks are tedious, in general. But as far as solder: I’ll be using this method whenever possible for PE from now on.

Last night I sat down and did some chipping on the vehicle itself. I spent some time studying the reference photos, and couldn’t find much indication that these were very heavily chipped, like tanks tended to be – I guess that makes sense, since they were largely used on-road, and not for direct combat roles. Still, I needed to add some interest, so after a bunch of practice on my paint mule over the last few days, I settled on some colors, tore a bit of sponge, and went to town. The method I used is the same as Uncle Night Shift and Panzermeister – a first sponge-chipping pass of a lighter version of the basecoat (I desaturated it a bit with some grey as well, or it was looking way too yellow), then refining with a 000 brush, and then touching it up with a dark grey/iron/steel in the larger chipped areas.

Reference photos showed most chipping on the headllight housings and fender edges, of course. Since my fenders are plastic and I can’t really bend or dent them up, I can’t go crazy here, so I held back. After a day or two of thinking about it I might go for another pass, but I am happy with the effect.
I also removed the masking tape and sponges from the openings and am glad to report that only a small amount of touch-up is needed.
As for next steps: I have a few small details to paint/weather, like the headlights and inside door handles, and then I can begin the pin wash and oil weathering: rain streaks, grease stains, rust. In other words, the fun stuff!
P.S. I still have to decide what to do with the undercarriage. Right now it’s unweathered green. I fear that the tedium of weathering such a detailed area – that won’t show anyway – might be too much of a momentum killer. Time to ruminate.
4 Likes
Text heavy update incoming!
I spent a lot of time brainstorming how I was going to get these tracks bent and fit to the wheels with the wheels installed, but I couldn’t come up with anything. If I’d bought em earlier in the build I could have done it before the fenders were on, but that just wasn’t the case.
Luckily it was one of those ideas that comes to you while you’re doing something totally different – for me I was working in my wood shop, where jigs rule the world. It occurred to me that the critical measurement that I needed to maintain was the distance between the axles.
So I used some lacquer thinner to rub some paint off the inside of the brake drums, stuck the wheels onto the axles, and cemented some bits of sprue with them in position. I used a glass file (dead flat) to hold the wheels in the proper plane while the cement set up.

Left them overnight, and then slid them off the axles. I also marked which one was driver’s side just in case there were any differences.
They slide on and off the hubs smoothly now, and I can fit the tracks to them before installing them onto the car as a complete assembly, after which I’ll just snip the white sprue pieces off.

As you can see the tracks fit naturally on the wheelsets, and bend nicely around the curve. I did find that those little joints between the tracks, though, work-harden like crazy. You get one bend and unbend – the second bend breaks them. I probably should have annealed them before beginning assembly I guess? Lots of solder repairs later, I had them mostly bent and ready for primer.
I degreased them with a blast of straight acetone from my airbrush, and then gave them a shot of Tamiya fine surface primer from a rattlecan and let them sit for a full day. That was followed up by a black basecoat, a layer of Vallejo model air “rust.” I was surprised at how … rusty it made the tracks look.

It was so convincing that I next gave it a coat of Vallejo chipping fluid, and then the 4BO green. A little work with a scratch brush had them looking pretty dang rusty and worn, though the effect is subtle and so hard to see at scale that it might have been a waste of time. In any case, some satin varnish locked it all in, and any glaring problems will be covered up by weathering.
After plenty of time for this to cure, I sat down today to attempt to assemble them onto the wheelsets. It worked – but it was about one of the most shakey-hands hope-you-don’t-screw-up jobs I’ve done on a scale model. In the end, the thing that worked was a third-hand alligator clamp set to hold the assembly, a hobby knife point to hold the track in place, water-thin CA glue wicked beneath the tread, and then CA accelerator applied via pipette with a tiny applicator tip.
There’s some shine from the CA glue and the varnish, but it should tame down under the imminent flat coat.

P.S. That pipette/applicator trick is one of those light bulb moments that makes you feel clever for devising it, yet dumb for not having thought of such an obvious solution earlier. I have always struggled with CA accelerator. The stuff I have comes in a small pump-spray bottle which of course is totally inappropriate for this kind of work; I’ve tried using an old 000 brush, but the fibers just gum up with hardened glue instantly; I’ve tried using an old airbrush needle, but the fluid is so thin and without surface tension, so it barely sticks to the needle and doesn’t like to run off once it does. The applicator tip on the pipette allows you to give your join just the right amount of kicker without it running all over the paintwork.
6 Likes
Wow! So cool. I don’t know if I’d have the patience for something like this. Pretty sure mine would end up in the “tracks stowed” configuration. haha
1 Like
The tracks loook amazing. A nice unique touch for a uncommonl build.
1 Like
Hey @PhoenixG, do you have a time and temp combo that worked for you with the Vallejo primers? I just got my hands on a cheapo food dehydrator that has a temperature control.
Edit, I just found the thread! I’m giving it a try at 104F on some test pieces. Gotta love a new gadget.