WIP: Hobbyboss 1/35 BA-6 Soviet Armored Car

I figured I’d branch out of my comfort zone a little and join the Cars & Trucks group build.

Just a little bit outside my comfort zone, though. :wink: I chose an armored car – so that I could still fit it on my 1/35 shelf with my other Finnish/Soviet armor, yet still do some “car” related building to stretch my skills and fit into the group build’s rules.

The BA-6 armored car was built upon a Soviet-made 6X4 version – the GAZ AAA – of the Ford AAA truck. Its inline 4-cylinder gas engine made a modest 40hp. (EDIT: Another source suggests that the BA-6 had more powerful 60hp engine.) It shared a turret and main 45mm gun with the T-26 tank, for which it carried 60 shells. Unsurprisingly these cars struggled in any off-road application, although the spare-tire placement was cleverly designed to help prevent bottoming out or high-centering. The kit didn’t include them, but most of the period photos show some kind of field-mountable track system, surely an attempt to improve the car’s cross-country performance, mounted on the exterior hull (one photo shows them mounted inside the hull as well, so…?).

For some more background on the BA series of armored cars, within which the BA-6 fits, and a bunch of photos of burned-out wrecks, check out this neato video I stumbled across:

The BA-6 (and its successor, the BA-10, with which my HobbyBoss kit shares most of its parts) was used extensively in the 1939 Soviet invasion of Finland, where their thin 1930s-style 0.9cm armor proved useless against anything bigger than small arms. Here’s a couple period photos of wrecks – there are many, many more – from the Finnish army photo archive, SA-KUVA.

The Finns captured dozens of them during that conflict and the subsequent advance in the early days of the Continuation War (parallel with Barbarossa). Some records are missing, but about 10 BA-6s were accepted into Finnish service and were used in recce/combat roles during the Continuation War. These BA-6s, or "BAF B"s – the Finnish designation – have been re-marked with the Finnish hakaristi (swastika) which, of course, predated and was not related to the Nazi emblem.


I’ll be building mine as one similar to the above photos, in Finnish service. I have some decals on hand already, but what I’m still very unsure of is: did the Finns repaint these, or simply slap their markings on top of the Soviet green? I know both methods were used on other captured vehicles, but it depended largely on urgency – a case by case kind of thing. I’ll keep researching, but this might be a best-guess scenario, unless I can find some records of a specific machine.

Anyway, on to the model! The kit appears to be well-molded, with only a little flash, nice detail and texture for the most part. I have run into a few parts with pretty bad seam lines/registration issues, but oddly, they aren’t across an entire sprue, just single parts. Nothing too terrible and certainly nothing that will show.

Being my first “auto” kit, building up a frame, suspension, and engine are all new to me – a fun challenge! Pretty straightforward so far:


And there was the end of the “straightforward” part. Axle assembly wasn’t bad, but once the shackles, tie rods, and assorted suspension parts came into play, I really had to slow down and think about each move. Some parts had nice locating pins that almost had a snap-fit feel, while others didn’t even have a reference mark – and the instructions were only somewhat helpful. See parts C7 and C6 for example.

“Fiddly” isn’t really the right word for some of these tiny parts – and I’ve built 1/72 aircraft cockpits WITH photo etch!! :rofl: In the end I managed to get everything glued on – and if some bits are a little out of square, well, I’ll just have to hope that no GAZ mechanics ever flip my model over.

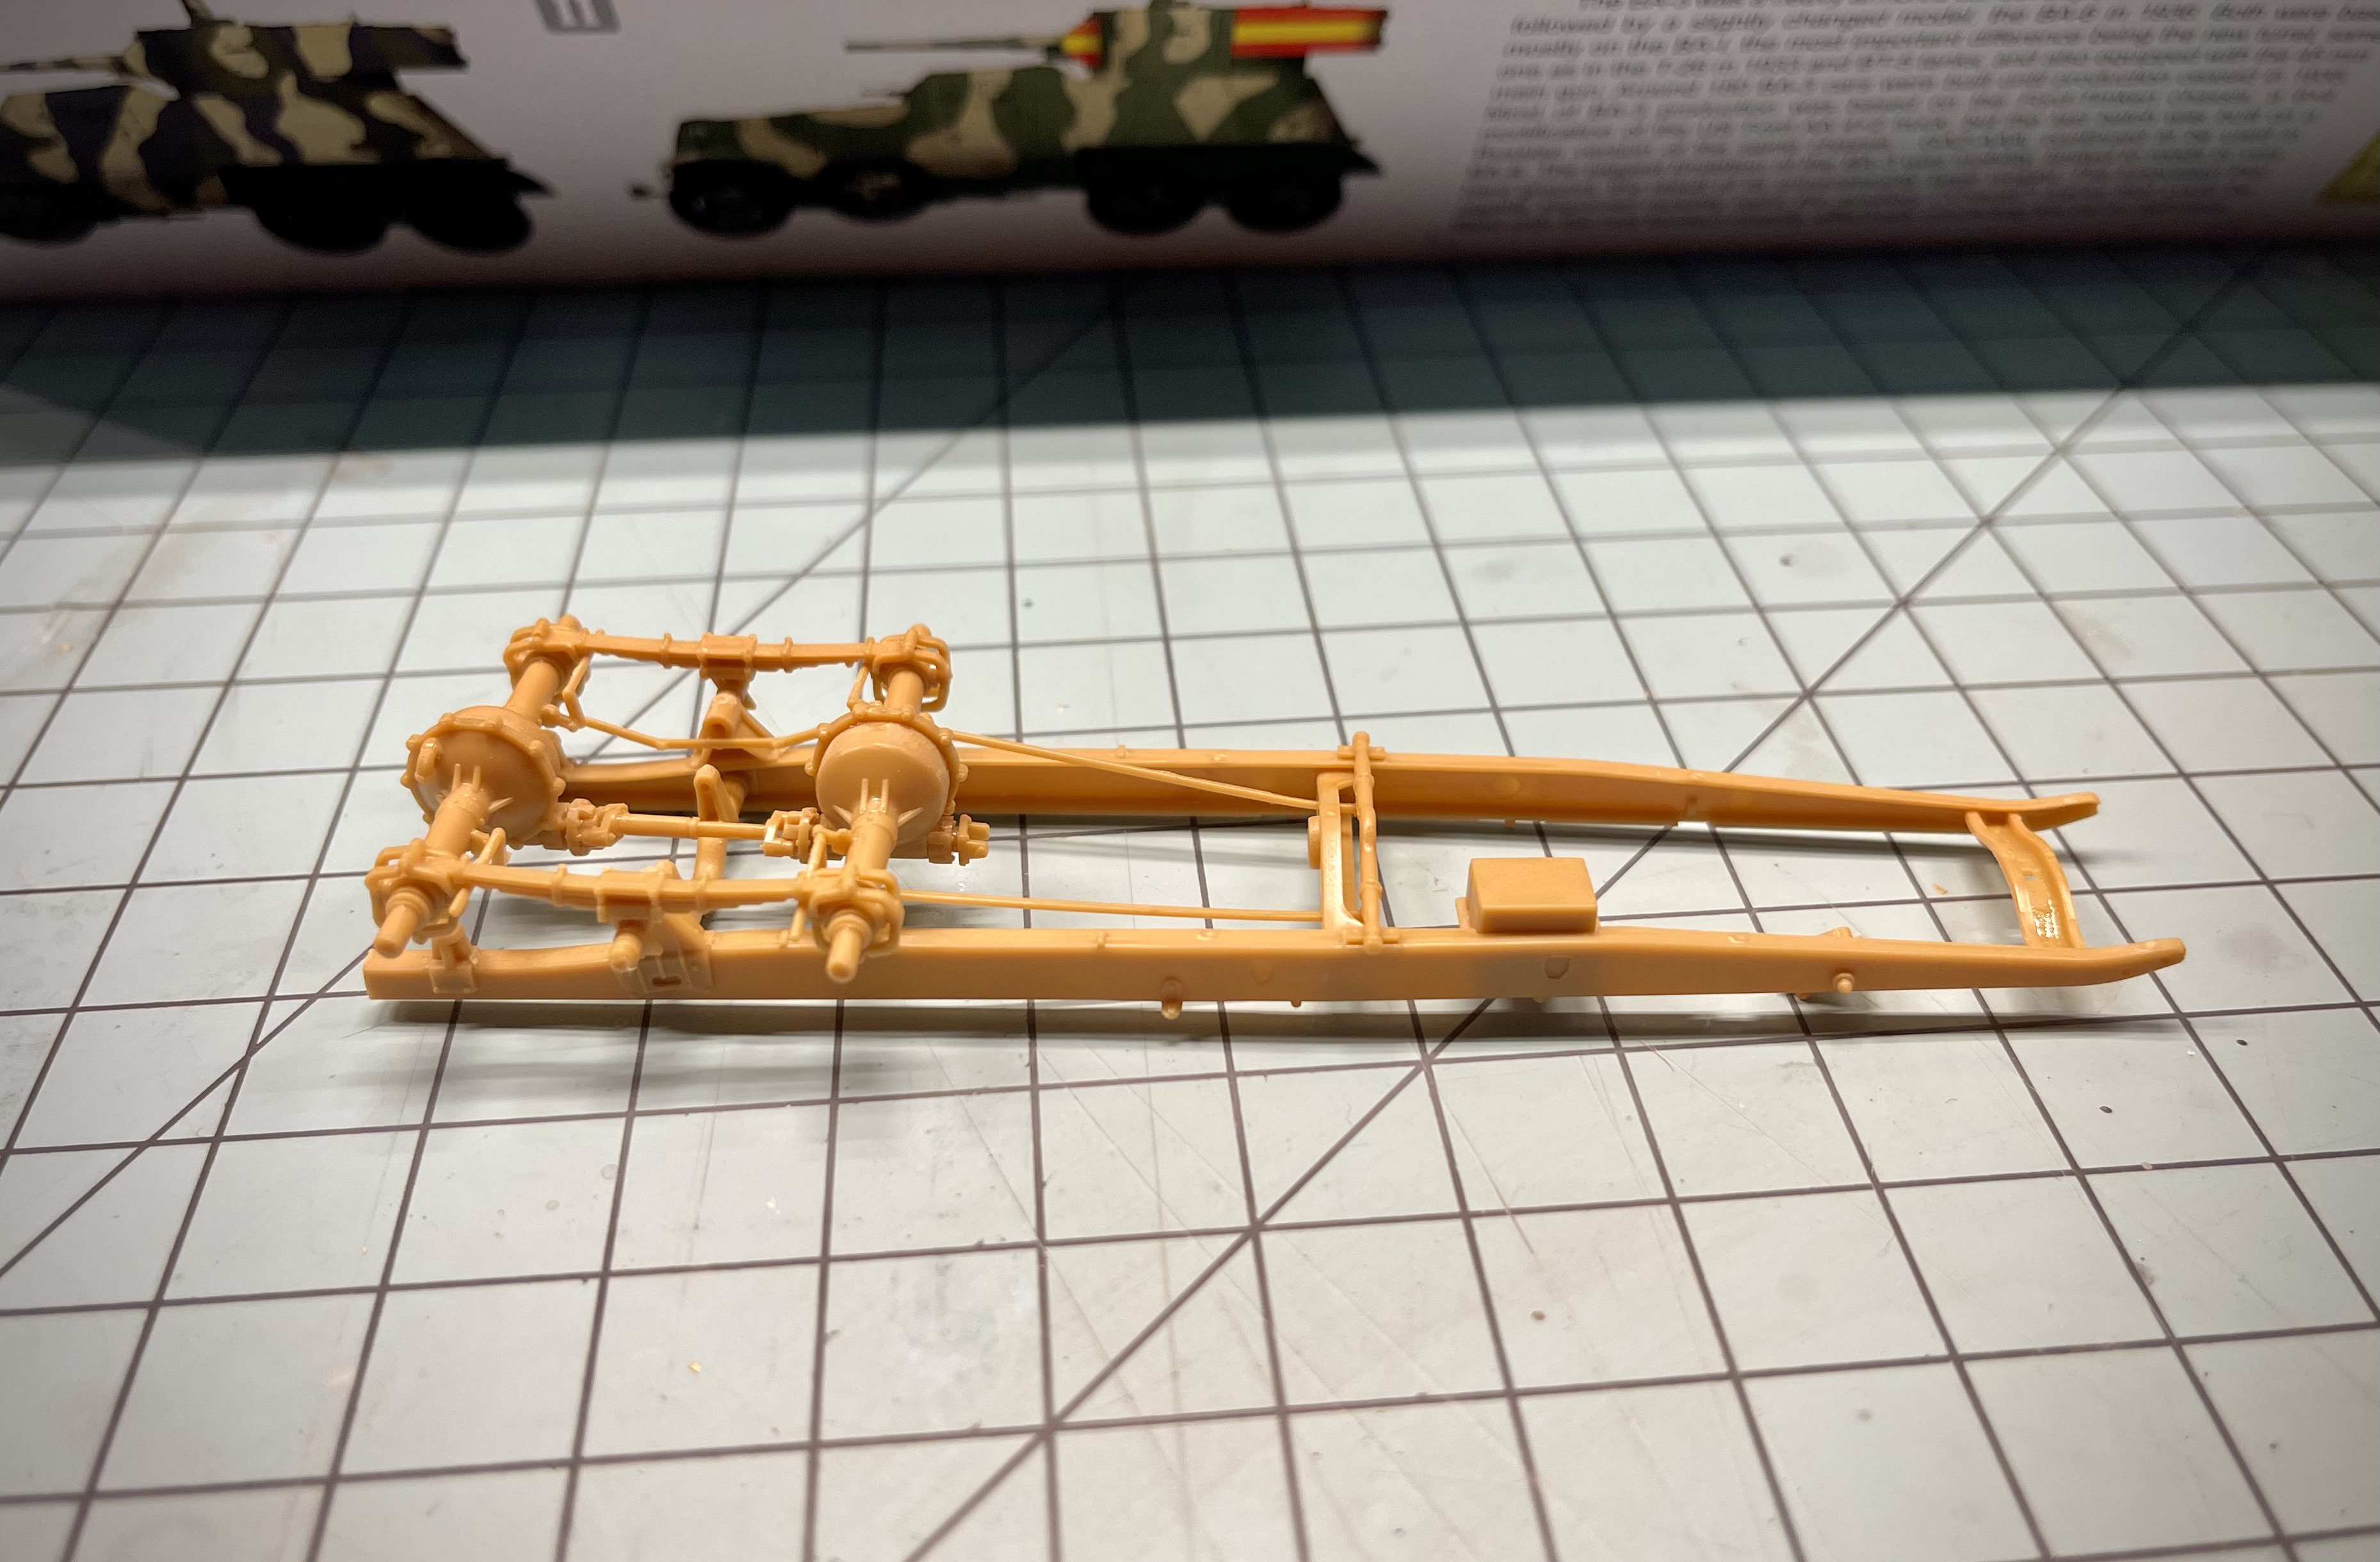
The biggest challenge really was that some parts had ambiguous placement, but then later parts relied on those first parts for THEIR placement. The trick was to actually rush along a bit so that the cement was still soft enough for adjustments as you went.

This worked fairly well for the powerplant, though I won’t know if some of those coolant hoses are angled correctly until much later in the build, when the radiator gets dropped in.

As I was struggling to decipher some of these parts placements I remembered seeing a photo in the Finnish archive of the engine compartment – so I pulled it up:
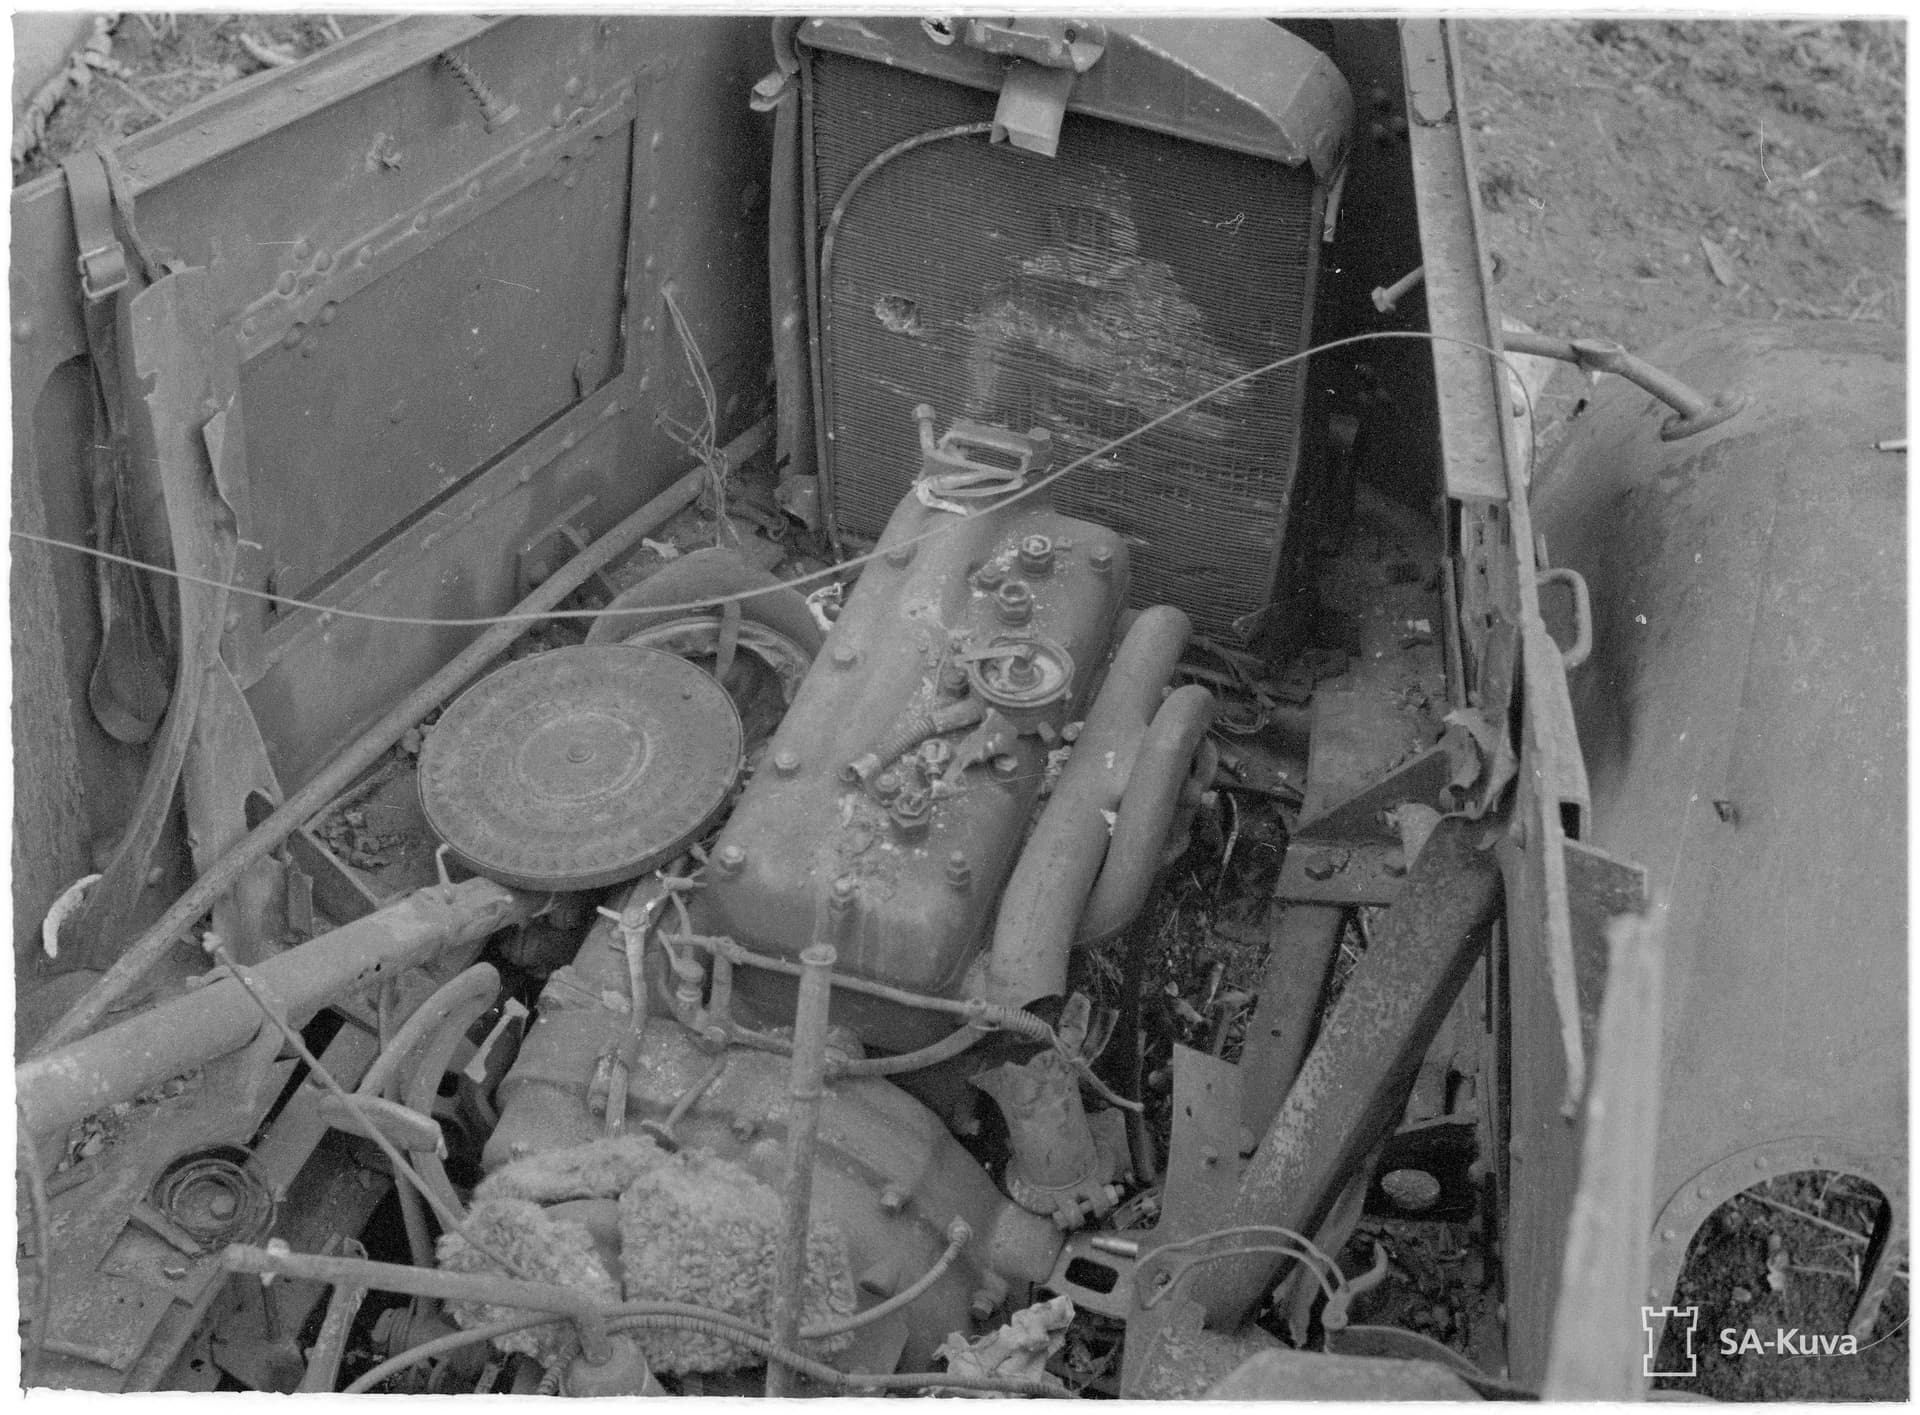
… and it wasn’t much help. :sweat_smile: It looks like this one’s already been cannibalized for parts, and/or burned out. Also visible in the photo are what looks like a Soviet M43 helmet, a pan magazine for a DP-27 “record player” machinegun, a Finnish fur hat, and at least one empty 7.62x54R casing. Pics like this that tell a human story with unanswered questions… are good reminders of what these little plastic kits represent.

Next up is assembling the rest of the chassis and suspension, and then installing the motor and the firewall/dashboard, cab, and deck. And I have to figure out what colors to use on the motor and interior before I get too far ahead of myself.

Research time! Any advice on color choices would be welcome. Thanks for looking!

6 Likes

I thought that fourth ref picture had an A-boom on the front. Still interested in watching this

1 Like

I had to look up what an “A-boom” is… and I’m still not sure! :smile:

Hoping to get the rest of the suspension assembled this weekend, but we’ll see. I did find some reference images for the engine by searching for “GAZ AA” instead of BA-6. Quite a few in fact. I gotta say, building that little engine was fun.

I just meant this thing mounted to the front of this REME M5 :grin:
https://hmvforum.s3.amazonaws.com/monthly_2011_03/DSC02596.jpg.fc75f7aabbe607d09562184391be2653.jpg

1 Like

Just continuing construction here. The chassis, drivetrain, suspension, and motor are all assembled. I kept asking myself if all that fiddly detail work is worth it, given it won’t be visible in the finished model… but then I realized that I was having fun, so what the heck? Isn’t that the point? I’ve left the deck plate off for now to allow for better painting of the undercarriage.

By expanding my search terms out from BA-6 to include the GAZ-type trucks that this car is based on, I was able to find some good reference photos that did help with how the suspension and engine components should be situated, since the instructions were kind of hard to follow – though once I had the second angle, I was able to see what the instructions meant to show.

Course, these engine pics are not military – so the paint color probably won’t help, but knowing which parts are plastic/rubber/etc. will definitely help. I do plan to model this with one access panels open so it the engine will be at least partially visible.

Lastly, I filled some ejection pin marks on the floorboard, and did primary assembly and fitting on the turret (the swiveling base of which was WAY too big for the hole in the car body – reused asset from another kit with some stacked tolerance issues, perhaps?).

With as fine as the detail is on this kit, I’ve been extra careful to not squeeze joins or let cement run out onto the surface, where it can be avoided, by applying cement to closed seams from the inside of the hull, for example. Which works great… except for when a big rivulet of cement leaks out through the seam and wicks between my thumb and the gun mantlet! :face_with_diagonal_mouth: I have learned at least to let such mishaps completely cure before attempting to scrape or sand the damage; it’s definitely fixable.

Having fun with this; the real trick is going to be not breaking anything as I prime, paint, and weather. I’m also finding myself thinking about small diorama options. Been seeing some neat 35th scale Finnish soldier resin figures out there; getting the wheels turning.

EDIT: Just discovered this link from an old Britmodeller thread that has answered a bunch of my painting questions. The BA-3 pictured was the precursor to the BA-6 I’m building, and they were almost identical.

7 Likes

Been there, done that more than once :grin:

Looks like you’re about ready for primer.

1 Like

Great thread mate - I’m just starting out and going through everything well done!

3 Likes

Weekend plans changed and I was able to sneak a few extra hours of bench time this afternoon.

First I was faced with a research issue. The kit instructions and parts show the turret lift rings as posed vertically.

This felt wrong, especially since I recalled having done research on this exact issue when I built the T-26B (which shares the turret design with the BA-6) a couple years back (which to my shame remains unfinished). On that kit, the parts allowed builder’s choice with regard to the rings, and I settled on modeling them laying flat(ish).

Some specific google searching even led to a post from another modeler making a modification on his HobbyBoss T-26 (which certainly shares the turret sprue from this kit) in order to get the lift rings to lay flat. And in the drawings from a Russian armor museum also showed the rings laying flat.

But before I busted the knife out, I decided to double check my source photos just in case the rings were visible… and whammo!


So it appears that at least some of the time, the rings were welded in the vertical position. Phew.

Lastly, a few PE parts would finish up the turret’s construction. Recently in another thread I was mentioning how I hate when PE parts go flying off into the never-never, and @Edbert mentioned that some kits are coming with PE frets encased in plastic film to prevent just such problems. I’d never seen such a thing, but HobbyBoss has apparently gone this route – much to my relief! So much easier to work with.

Lastly on the turret: the barrel. I found that the metal barrel I’d received didn’t match the real deal’s profile, so I tossed it into the spares bin and was glad to find the plastic kit barrel cleaned up great. I decided to sand off the flared muzzle to match the period photos.

And the turret is ready for primer (after I blow the dust off!):

I’ve never built a kit that came with a PE fret before, so I thought it was neat that the metal parts are used as structural components, not just added detail. Check out these cool seats – I used Tamiya cement to soften the pins on the top part enough to “rivet” the PE part in place.

Believe it or not, I still have quite a bit of construction remaining on the interior, to include the dashboard and instruments, the shifter and brake levers, etc. Then, maybe, I can think about primer. Phew!!

5 Likes

The worst example of this issue turned out to be the steering gear box. They want you to install its round peg in a round hole on the left frame member way back in step 4. Then it’s not until the end of step 9 that you actually have to thread the steering shaft through the dashboard, between the extreeeemly delicate pedals, only to discover that you invariably guessed wrong about at which angle to position the steering gearbox.

Luckily, a little cement softened the gearbox peg enough to rotate it to fit, with the loss of a little surface detail to melting.

But, how to affix part WH2? It slides down the steering shaft and spins around freely. What even is it?

Russian museum pics to the rescue again. Steering shaft mounting bracket!

It mounts to the underside of the dashboard, which doesn’t go in until the next step. I’m glad I had time to do all of this at once, or that bracket might have cured in the wrong position.

Anyway – I don’t have any better engineering ideas than what HobbyBoss has presented here, given the level of detail they’ve packed into this tiny car. It’s been fun.

And now I think this subassembly, at least, is ACTUALLY ready for primer. :laughing:

EDIT: looking at the photo, I’m now certain that I’ve got the pedals glued to the wrong side of their mounting post. Way too late to fix that!

5 Likes

You’re most certainly right about the level of details in this kit @Toimi_Tom . Just HEAPS of it and it’s not only in one or two areas either. Your making good progress on this one and although I haven’t chimed in until now…you can rest assured that I’ll be here for the rest of the ride.

1 Like

Hey, thanks @mustang1989. I do sort of wish they had some more (well, any) detail for the interior of the turret and rear armored compartment, but I get that the chassis and engine are shared between a handful of kits that this is mostly a rebox of. Still, like I said, having a blast with it.

1 Like

Microdesign is coming out with something pretty soon for this ya know. Just sayin. 6LnXAP

The link: BA-3/BA-6 interior detail set

1 Like

I’m rushing to finish this up before that hits the market, just to avoid temptation. :expressionless:

1 Like

Thats the name of the game, cause if your not having fun then you need to move on to another kit or another hobby.

2 Likes

Now THAT’S funny!!! Looking forward to the next update Tom.

1 Like

Sorry for the lack of updates on this – I have been poking away at it off and on the last week or so, adding little bits here and there. Last night when I looked up at the instruction book I realized the only parts left were the clear headlight lenses.

I hate masking. For me it seems to be the riskiest part of any build, whether due to paint lift or just accidental rough handling. So I tend to engineer my build process to avoid it as much as possible.

So I figured out a way to build this into major subassemblies that will allow me to airbrush the interior and the exterior without much if any masking, by seeing how best to attach fenders and armor panels to either the chassis or the upper shell. I’ll wait to cement the whole thing together until just before the exterior weathering steps. Surely a little touch up will be required – but the overall fit is pretty nice!

And of course I had to do a complete mock-up with the wheels on, just to see. (I see now I forgot to press the turret all the way down into its ring! ) No, I did not make any “vroom vroom” noises for fear of the sound vibrations knocking some of these tiny PE parts off. :laughing:

You can see I had a small issue with some CA glue debonder that flowed a little too freely from the brush I was using to try and adjust the latch handle. It’s primarily an issue of shine, so we’ll see how it looks under primer, and address it with a sanding sponge as needed.

As shown I’ve posed some of the hatches open, as if it might look if the crew were attempting some field repairs. Also, I’ve only done a tiny amount of scratch building – the inside of the engine compartment hatch, and replacing the MG barrels with brass tube. I found some more excellent reference photos online of examples in Russian museums, which helped a LOT in figuring out exactly how these exterior bits are supposed to fit.

And now, the entire thing is actually, really, truly, ready for a shot of Stynylres.

I do have a diorama/base idea floating around in my head, depending on how some testing goes. This thing may end up in “Soviet green” paint after all, with a dusting of snow.

4 Likes

That figure looks cool. I may have to pick up this set.

I like the way you built it with all of the doors and hatches open. That is a lot of visual interest.

1 Like

Sorry if I was confusing – I seem to have left out a paragraph. :person_facepalming: The ski trooper is from ICM’s “Finnish Riflemen 1940” set. The detail is really impressive for an injection molded set of figures.

If I can get the idea to gel, I’d like to depict a scene of Finnish troops coming upon the BA-6 abandoned in the forest.

2 Likes

No worries, I figured (haha) it was from that kit. And it does look good for an IM kit.

1 Like