I’ve decided to do a build log: can’t promise daily reports because I’m not used to recording what I do. I’m looking for a serious project that I can finish before early January. That leaves ships out. Instead, I’m going to try a serious airplane. I have an Accurate Miniatures TBM-1C that should fit the bill. I know when it came out a few years back it got very good reviews. It will be the most complicated aircraft I’ve ever done.
Examining the parts I can see the kit is very nicely made and has a hefty part count along with an internal structure that will raise it considerably on the complexity level from a fighter. There is, however, a problem. I got AM’s last version (should have waited and gotten Italeri’s rebox with better decals) and it has markings for the poor guys that got lost in the Bermuda Triangle. I like Steven Spielberg, but I really want something with a little more history behind it. More to the point, I want a neat plane and the late war US Navy blue ain’t it - at least on planes stationed in Florida. So instead, we’re going to ship this guy via Lend Lease across the pond and give it to Fleet Air Arm. This will require a couple of modifications. This kit doesn’t have guns in the wings - that should be easy enough. But I’m thinking of a U-boat hunter, so that’s going to mean rockets, depth charges and I think some kind of camera. Fortunately AC made an armament accessories set for their TMB and SBDs so I’m fixed for rocks and depth bombs. Frankly the Avenger is not my idea of a lovely plane. But if you’ve got an ugly duck, might as well give it pretty feathers. And that’s one thing the Brits did - they painted up neat planes. So we’ll be thinking of sky, gray, blue or green or who knows. Judging from the pics online and my Osprey TBM book, there were several patterns. Something along this line.
If there are any FAA junkies that know of anything that absolutely must be avoided or best included I’d be glad to hear about it.
I’ve got this kit in the stash, so I’ll be following your log closely, no doubt I’ll be able to pick up some tips. I agree, the gloss navy blue is pretty bland, I think I’ll try some heavy weathering when I get around to mine, just to add some character.
I built the very same kit a couple years ago, and I agree with the color scheme. I should have done something different with it. I believe Accurate Miniatures also offered a version with colors and markings of the plane George Bush Sr. flew. It was much more attractive.
You may have trouble finishing it by January, though. It is not a quick and easy build. Good luck!!
hang on a second–you mentioned wing guns. The most numerous variant that the FAA used was the Avenger Mk. 1–which was their designation for the TBF-1 model. This model was the original production model of the Avenger and it did not have wing guns installed. The TBF-1C came next, and it introduced provisions for a .50cal machine gun in each wing. The -1C also carried increased fuel, but that would not create a visible change in the model. The FAA accepted 400 TBF-1 models as Mk. 1’s. Also, FAA took delivery of 334 Mk. 2’s, which were TBF-1C and TBM-1C models(identical, just built by two different plants). These had the provision for wing guns. So you really need to pick a particular plane you wish to model in order to really be accurate on this.
They also used 222 Avenger Mk. 3’s, which was the TBM-3 model. The -3 was the same as the TBM-1C, but used a 1900 hp R2600 engine and had two cooling intakes installed in the cowling. Of course, these had the wing guns as well. So you really do need to rely on the specific decals you plan to use.
Also, do not forget the basic differences, such as the bubble windows in the sides of the fuselage in place of the flat ones that USN aircraft used.
But I teach college and semester break is coming soon: nearly a month off. I’ve looked through the kit and checked a lot of reviews - the thing that looks tricky is the turret.
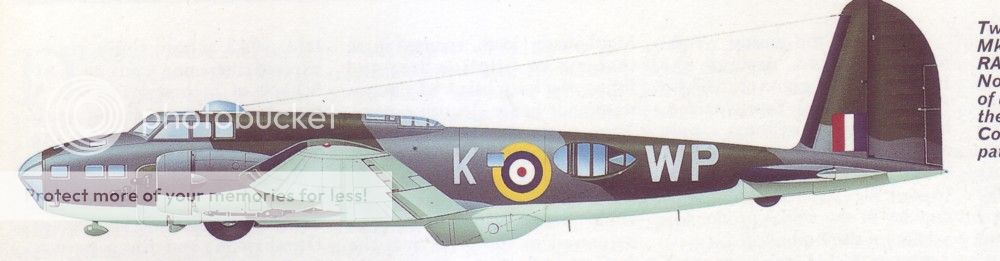
Having some second thoughts about the colors. The ones that exist and their decals are lame. Out. And I’ve got a load of PTO US planes so I’d really like to skip blue - there will be lots of that. (A Corsair, Wildcat, Hellcat and SBD - at minimum. Might pick up an extra SBD to give to the Australians. We won’t count three US warships that will be basically one shade of blue or another.) I was checking into the FAA Avengers and they do have very neat color schemes. But, as luck would have it, the last kit I bought was an Italeri B-17 MKI - which was the Brit version of the B-17 B/C. The early 17s were very poorly defended so proved inadequate as bombers. They did have knock-out lines though: much better to my eyes than the later versions. So because they were bad bombers, the B-17 MKI ended up with Coastal Command and got the full treatment. How about this?
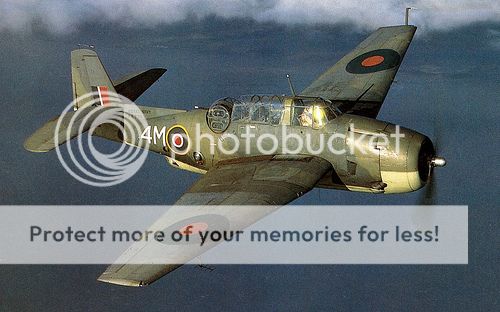
I’ve also got four British aircraft and a P-40C going to the Western Desert. So it’s not that I’m ignoring them. But while researching the FAA Avengers (or Tarpons) I learned that the Brits used the Swordfish on their CVEs to hunt U-boats and Avengers for mostly patrol and anti-shipping near the channel. (They did have several squadrons of TBMs on their CVs late in the war in the PTO. Almost tempting to give them a Hellcat.) Then I started reading about the USS Bogue and other US “hunter-killer” groups that made life hell for U-boats in 1944. Bogue and its escorts were credited (postwar confirmation) with 17 kills - most via Avenger. U-boat.net gives US Avengers the credit for 35 U-boats sunk - almost all done by a very small number of ships. The CVE Guadalcanal was the heart of the group that captured U-505, so you can add that one. And, best of all, they flew in an Atlantic color scheme which was gray and white. I think it looks really sweet and will cause some interesting weathering problems. As near as I can see, barring replacement planes (pretty rare in the Atlantic I’d guess: losses must have mostly been due to bad weather and crashes) any carrier wing that saw continious action was flying heavily weathered aircraft. That will happen if you put you planes on deck in salt water and fly them frequently. Anyway, below is a comparison of an FAA Avenger and one that flew off Bogue and sport Atlantic dress. I think I like the Bogue color scheme. And 17 U-boats: that’s a good case of tax-payers money very well spent.
Anyway, the cockpit is the same and I’ll have some pics of that up soon.
This is just about my all time favorite kit, actually feeling the need to search out another one and put it together. The thing with this kit, even with the turret, is not so much that it is too hard. You just really need to take your time and be patient with it. I first built one of these back in the late 1990s and it was the most complex kit I had ever taken on up to that point. And the turret went together very well. I have never seen an Avenger kit anywhere that replicates the turret so nicely as this one. Man, now I need to go check out ebay and the like…time for me to get my hands on one of these again!
Anyways, the atlantic planes no doubt took a real beating. The FAA would not have used these so much as anti-sub planes–the FAA planned an Avenger Mk. 4, which was their version of the TBM-3S anti-submarine conversion, but the Mk. 4 was cancelled. FAA did later operate the Avenger AS4, which was basically the same plane as the Mk. 4, but they did not get any of these until after the war.
The Atlantic birds were very hard fought and their exploits never got the press that the pacific war did. That camo scheme would make for one very awesome weathered example IMO…will be following this one with much interest
Thanks much for the video tip. Answers one question - unless told otherwise I’m going to call gull gray a neutral gray: if there’s any green or blue in it I can’t see it. Raises a question though. The Bogue has a website and a list of crewmen on several of the squadrons - by the end it was 14-18 TBMs and maybe 4 FM-2s. Several of the planes only list two crewmen. The Osprey Avenger book is a cut above the average and notes that a few of Atlantic sub-hunters took out the rear turret and the stinger so they could carry more fuel. (Some brave souls flying at night and keeping a kind of standing patrol knowing that’s when subs would be on the surface.) Not likely they’d run into a fighter near the Azores. Removing the turret was not the norm, but I wonder if some of the Atlantic Avengers were flying without a stinger. The Coastal Command Brit Avengers didn’t fit them. The only plate shown in the Osprey book shows a stinger on a Bogue plane but it’s not clear from the photos. Don’t think there’s any advanced radar option, but that was not the norm anyway. I get good vibes for this build: probably time for me to run over a mostly completed plane with my computer chair. It’s almost happened before.
I got things underway with no disasters. I am not a cockpit guy because nobody ever sees the ones I’ve built. But because so much effort was put into detailing the inside of this kit, I thought I’d do my best. Because I’ve decided to use the US Atlantic gray/white scheme, I’ll do the plane with water based acrylics - that will be mostly Golden Fluids with Vallejo Model Color for detail. Golden’s white and black are the most opaque colors I’ve seen for their respective hue - of course I can always screw things up. I’m being helped by a fine log build on Aeroscale. When Accurate Miniatures was still in business they had a web page with instructions and a photo build by a professional modeler. The instructions are long on text but very crude on diagram - this would work, but AM’s site is kaput. The gent on Aeroscale did follow the original AM build and it has already been of great help. I’ve pretty much copied his treatment of detail painting.
Did some interesting reading on US interior colors done by Martin Walikorsky for IPMS Stockholm a few years back. http://www.ipmsstockholm.org/magazine/2004/01/stuff_eng_interior_colours_us.htm Turns out that “interior green” came in many a size and shape but the USN by midwar was using an opaque green zinc chromate. (Some earlier Avengers had a bronze green in parts of the cockpits but not the GM made planes.) The color is believed to have been very close to FS595B 34151. According to a very nice paint comparison gadget I bought, Model Air and Model Master “Interior Green” are spot on. I bought Robert Archer’s huge book on more than any human wants to know about USAAF colors and markings and it comes with high quality color samples. His rendition of ANA 611 Interior Green shows a kind of combination olive drab and apple green. It does not look at all like the kind of yellow green you find with Tamiya XF4. (It’s not clear to me that the interior colors should be flat anyway. The kit specifies flat black for the instruments but not for the interior: gloss might have been more wear resistant.) According to my chart both Tamiya XF5 and XF58 are closer.
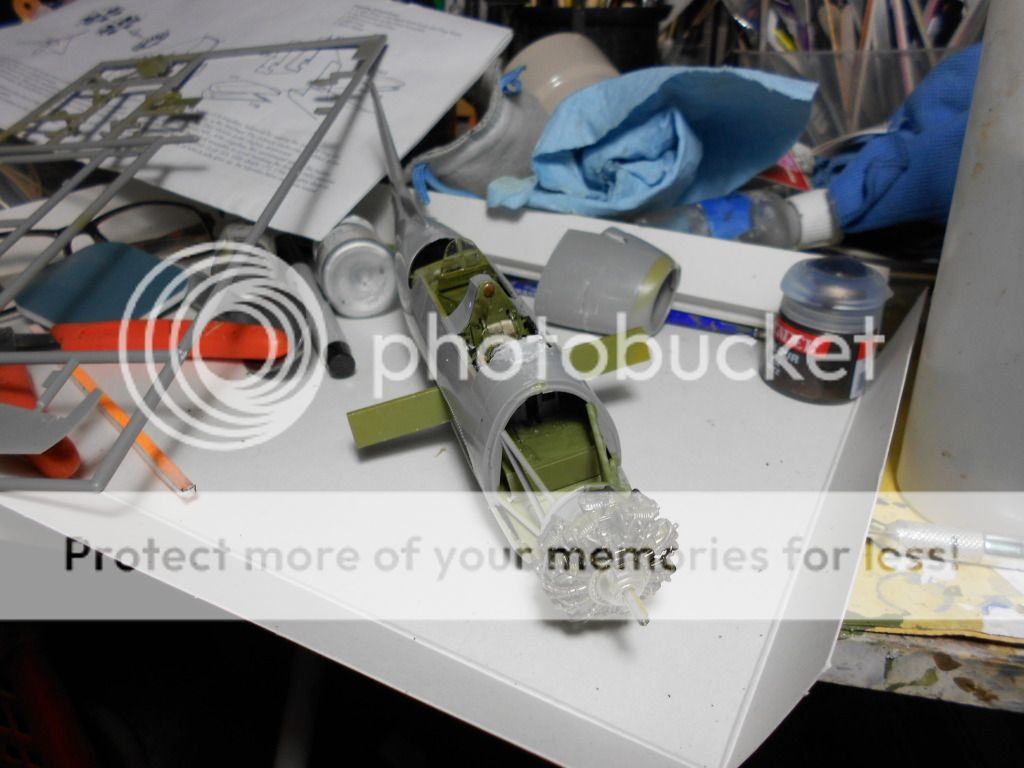
I made my own brew using Golden green chromium oxide, ochre and some carbon black. Ochre and black make olive drab and the green oxide is very bright so it matches the chemical description given by Walikorsky pretty well. More importantly it matches Archer’s sample for ANA 611 nicely. (If you look you can detect the artist acrylic layered look to the side of the fuselage: it looks more like a layer of paint on plastic than a different color of plastic. I like the effect but it becomes muted after weathering.) I used Model Color black and other colors for detailing. Some of AM’s Avengers had a decal that you would put on the back on the instrument panel and that you’d apply after putting white glue in the instrument holes and painting only the front black. But not with this guy. So I did some detail work in white, a few bits of red, yellow, oily steel and dry brushed a bit with Vallejo silver. I also made seat belts. I’ve never made seat belts because nobody has ever looked in my cockpits. They’re too thick, but I think they look sort of like seat belts. Close enough.
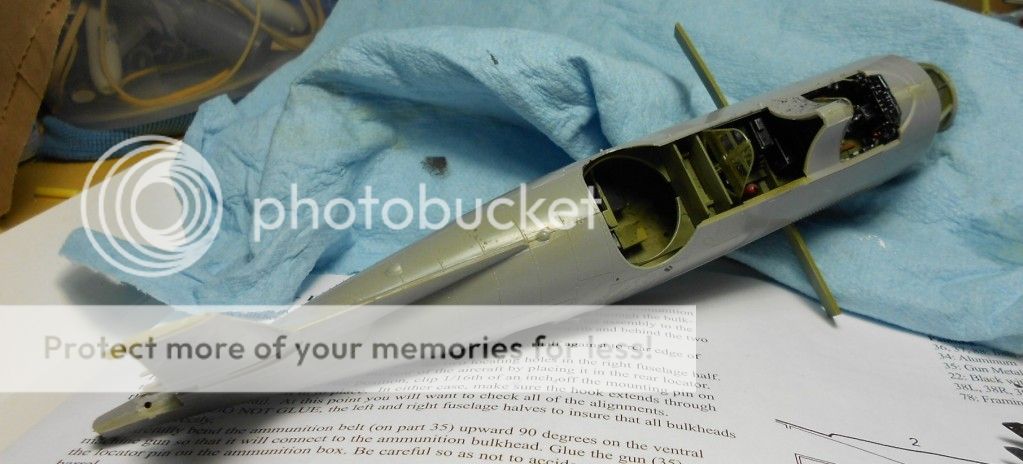
There’s a lot of detail on these parts. The fit is, as advertised, quite good, but because the instructions try to weave through various options but going from one section to another, you have to be careful about putting things where you think they belong. And dry fitting was definitely a good idea. The first pics are of the upper cockpit. The last one shows one side with the panel attached and the bomb bay floor which, if you turned it over, would have the cockpit glued to it. I did put in the bomb racks. I’m not sure whether I’ll show them. You have to cut the bay doors to do that and I’ll want to paint the plane first. But in case I have the nerve for surgery I’ll have to arm the plane now. As luck would have it, AM sells a weapons collection for its WWII aircraft and it includes rockets (a must for a sub hunter) and depth bombs. I’ll make and install a couple of the later and maybe we’ll see them at the end of the build. I also gave the thing a coat of pledge because the interior is going to want some proper weathering. A wash, maybe two. Perhaps some chipping - maybe with a silver pencil. And I think I’ll use a new found toy - Art Com paints that are normally used for airbrushing textiles but railroaders use for weathering. They’re like a combination of an acrylic wash and a liquid pigment. You’ll see them in several places.
Looks like a solo build here. First pic is all the interior stuff after weathering. The camera doesn’t pick up the odd texture given by Art.Com weathering washes - it really does a good job of emulating major smudging and a fluid/dirty look. This plane was on a CVE and will be heavily weathered as they were in the air a lot and stored in about the worst possible conditions. There is also Swanny’s Sludge Wash and Vallejos Acrylic Washes both black and brown. There’s a lot of detail in this kit and I suppose I could have employed more artistic license, but all the data that I have indicates that most of the stuff was interior green or flat black. Little dry brushing thrown in.
The interior was very complex and frankly I was expecting some ugly problems when it came to getting the sides together. Actually, the join was quite easy and very clean. The photos show the kit right after gluing and before the seams were tended to. Can’t claim I’ve ever built a seamless model, but this one was very close after sanding.
The wings and tail pieces went on very well. The pic below shows the plane after the base coat has been laid. It was primed with Vallejo gray primer and covered with Golden Fluids. I made dark gull gray and insignia white myself from Dr. Albert’s megabook on the subject and if his paint samples are right so are the colors. Or so they look to me. I can see white is going to be an ugly color to photograph correctly. Insignia white is a very bright titanium white tinted with buff - the color sample shows a very noticeable “unbleached” look to it. There are three shades of both white and gray on the plane but it’s only evident on the gray wings. It was also preshaded with carbon black. I was surprised how easily the white covered the preshade that I repainted very thin lines after the first pass. The panel lines are about where I want them. It looks a little klutzy now but I’m hoping that the uneven shading of the base coat will pay off after dot fading and washes. As noted, this plane will not be tidy.
This is a very good kit marred only by miserable instructions. Thank the heavens for the Aeroscale build.