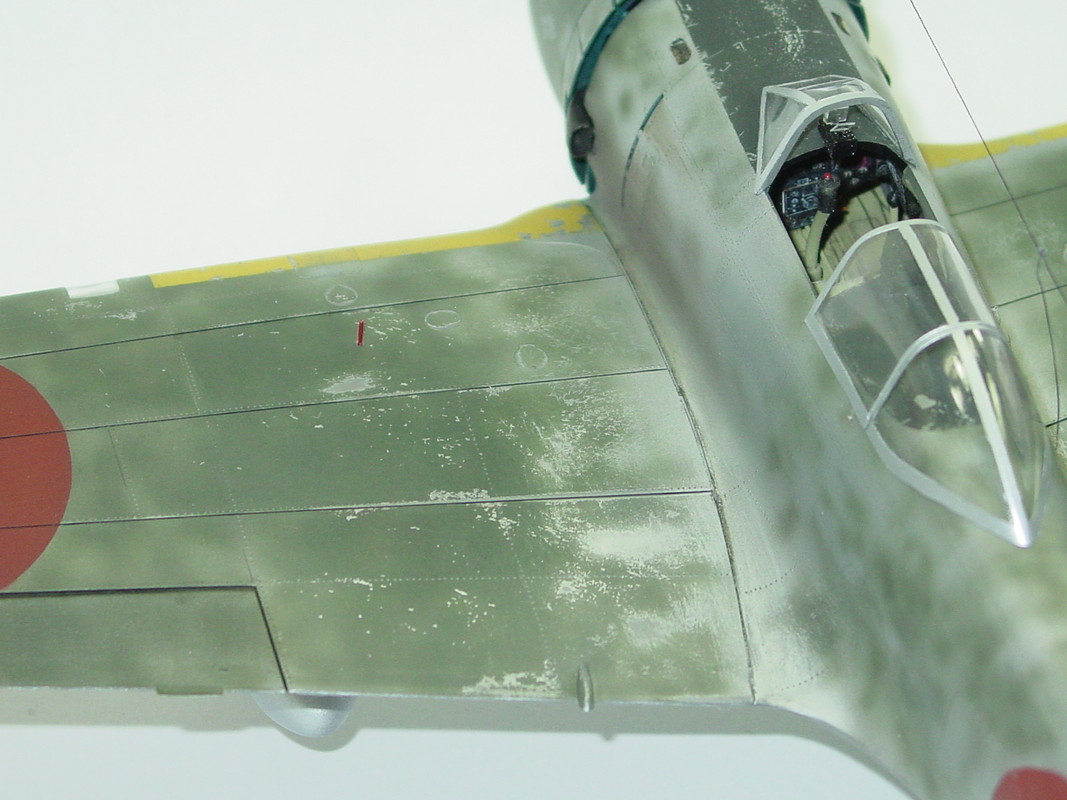
In photos, you see a lot of scuffing of the paint and even wear down to the metal on WW2 fighter aircraft, where the pilots and maintenance crew walk on the wing root to gain access to the cockpit and sometimes it even extends somewhat out to the wing gun access panels.
I’ve tried dry brushing, pencils, and also tried spraying layers of aluminum and primers then lightly sanding, sometimes in combination with salt as a mask. I’m just not able to get it to look realistic, compared to photos.
I bought some AK chipping fluid to try (or maybe hairspray), but I don’t use acrylic paints, instead preferring lacquers and enamels, so I’m not sure if those will work.
I drybrush a sliver or aluminum color, for larger patches of wear. I’ll use a fine brush and thinned paint or ink, for smaller flakes or spots of wear.
I use acrylics, eg, Tamiya’s flat aluminum, and enamels, like Model Master or Testor enamels. They absolutely work.
I tried the salt technique to beat up the finish on a Zero, but it was more effort than I felt necessary.
your Comment reminded me, I dabbed the sponge off pretty good. think of it as dry brushing with a sponge almost. Wasted lots of paint on the paper towel but hey, it’s all about the end result!
All of the methods previously described can work well. It all depends on the scale and the amount of wear you want to replicate.
I use the salt or hair spray for larger scale chipping and more on armor. The hair spray works very well when trying to simulate a worn white wash of winter camoflage. Dry brushing work on most any scale for a even type of worn look.
I have seen a metallic enamel base coat, then hair spray followed by an acrylic top coat, then light sanding (I do not have an example of my own to show).
Another method not previously mentioned which I have used successfully in larger scale WW2 era aircraft is the round / pointed toothpick and chrome silver method. It works particularly good in grooves between panels to replicate the chipping or wear on the edge of a panel. That works well for gun bays, radio or maintenance access doors, cockpit / canopy access areas, etc.
My number “go-to” choice for wing worn areas is a combination of dry brush and toothpick followed up with a panel line wash.
I’m sure there are other techniques too. I think they all work well, but again it depends on the scale, subject, and desired effect.
I use different methods, dry brushing, hairspray, salt and sanding the paint. Here I shot aluminum then shot the top coat over it. Next day I used several grit pads to scuff the top coat and expose the metal paint.
Ditto- I use Testors flat aluminum, sometimes I mix medium gray and aluminum half and half for a more weathered look. I also use end of toothpick to make small chips.
Thanks dmk. Let the aluminum cure several days then spray the topcoat and when dry to the touch carefully scuff the area. You want the undercoat fairly cured and the top coat to be fresh for easier scuffing.