Welcome to my nightmare

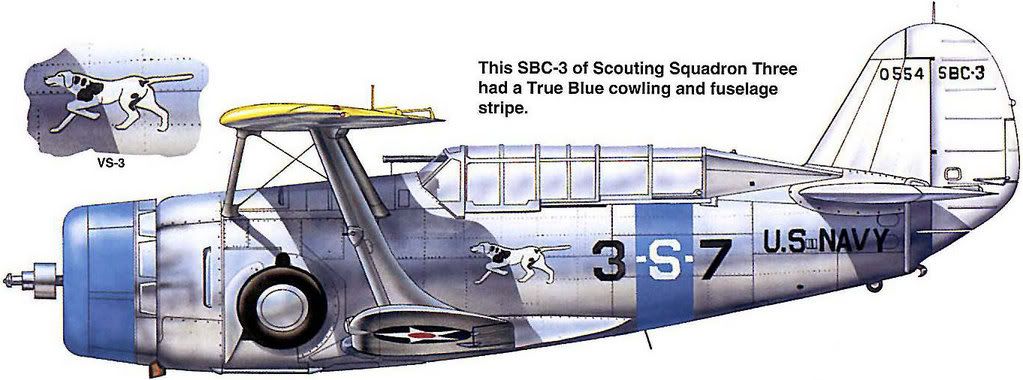
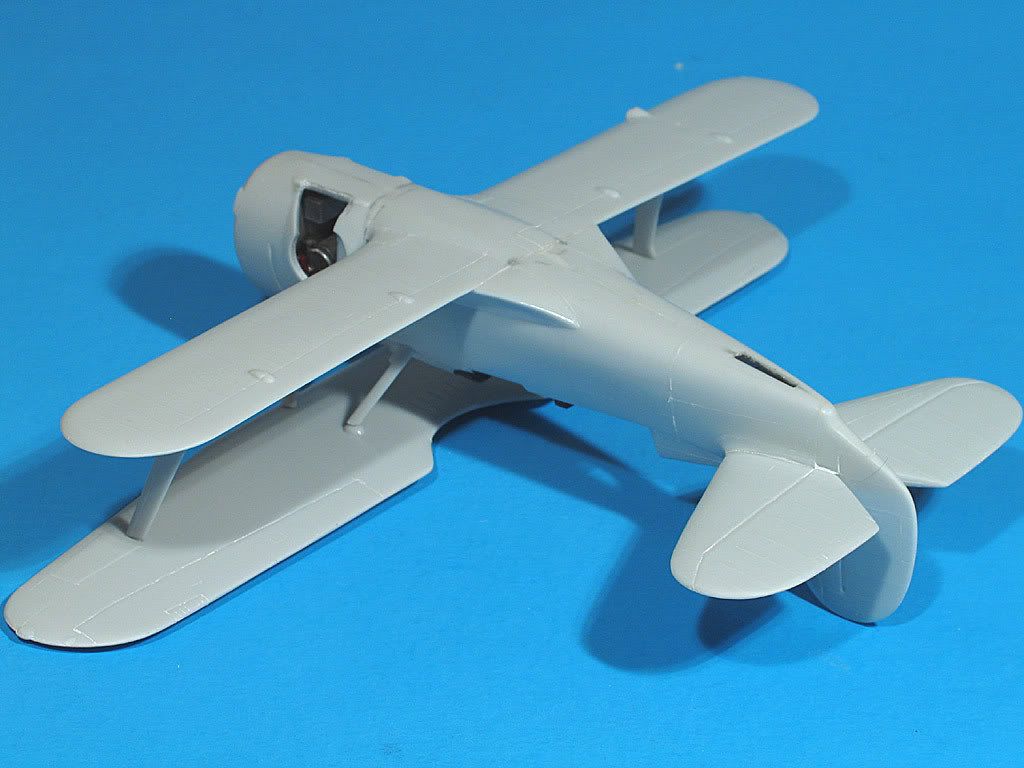
I’m building Classic Airframe’s 1/48 Curtiss SBC-3 Helldiver for a customer. This is, by far, the most challenging kit I’ve ever tackled.

After many days work, I have the airframe assembled and almost ready for painting.

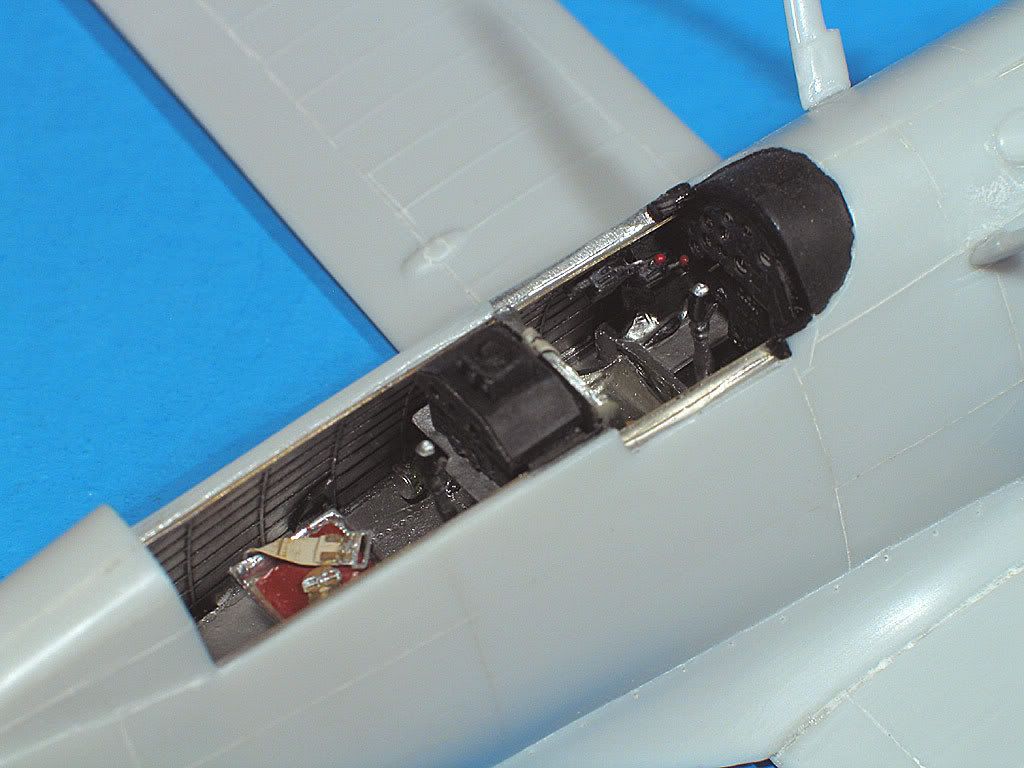
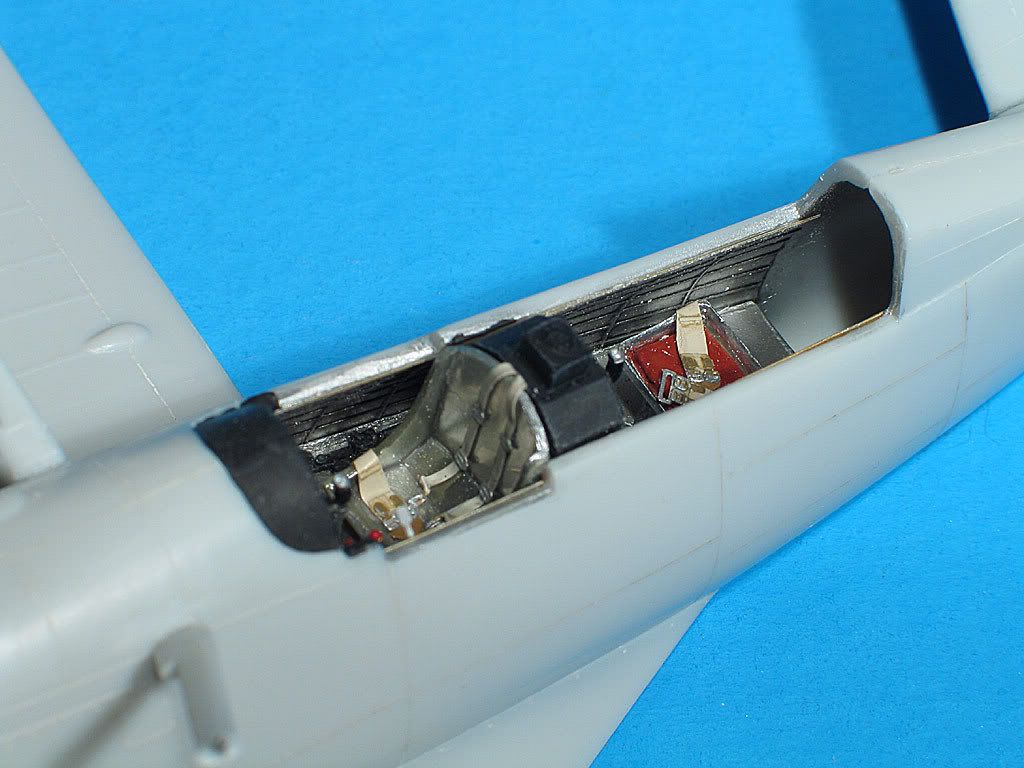
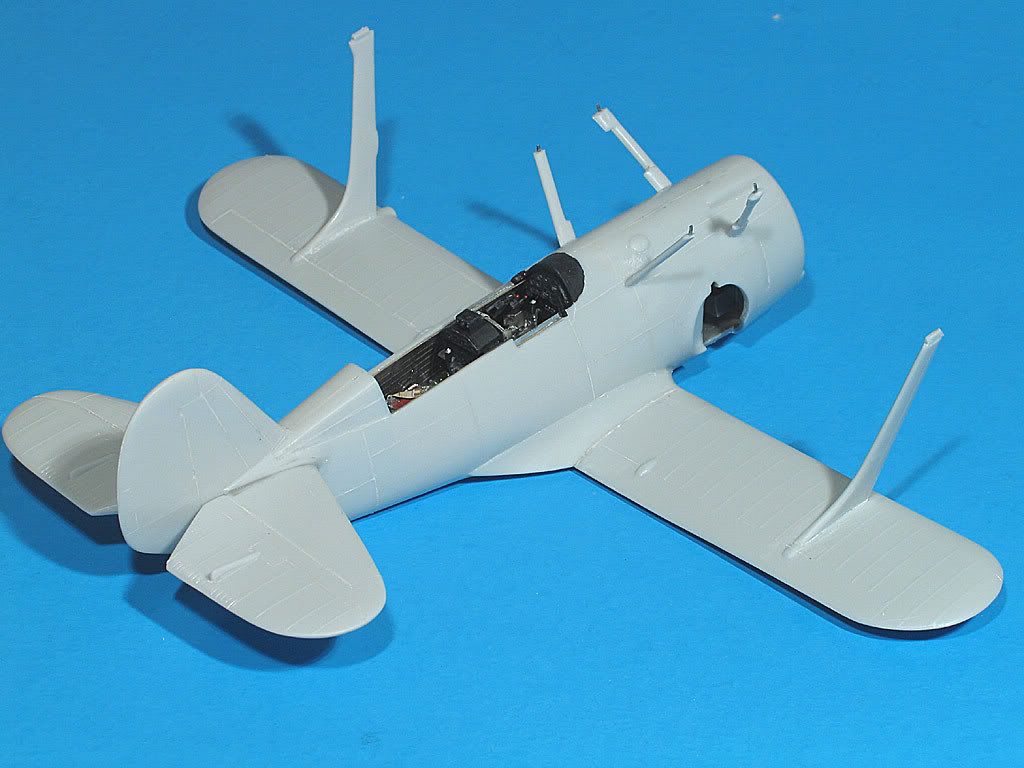
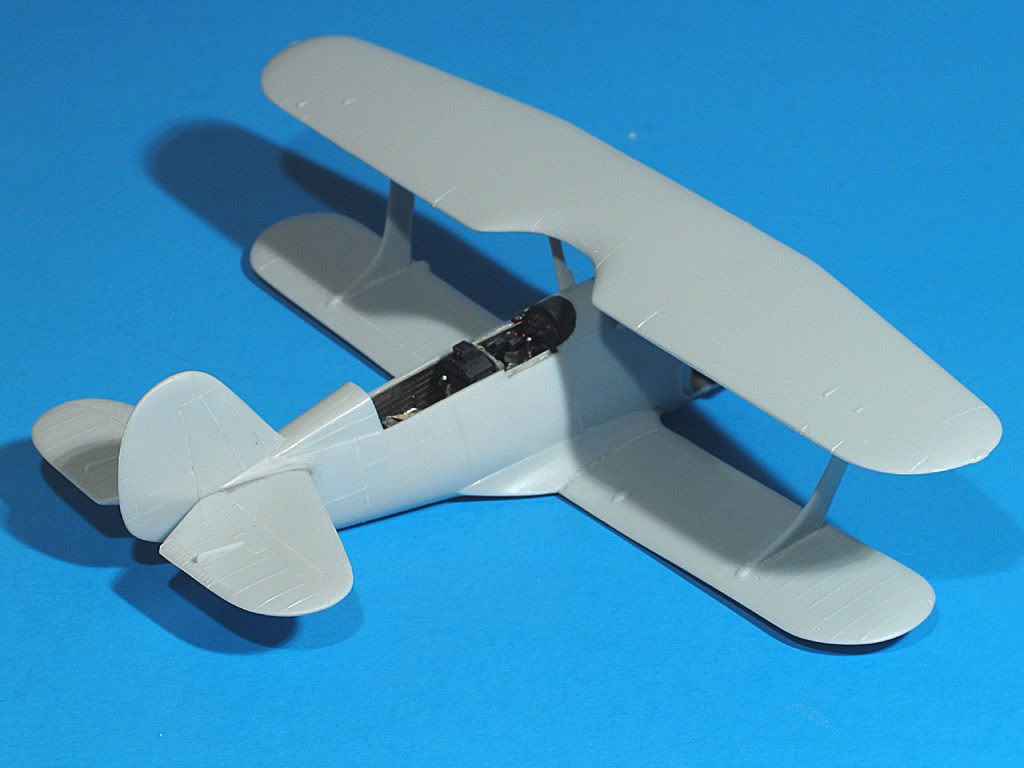
The cockpit floor is too narrow for the fuselage, so I cut styrene strips, glued them to the edges, and sanded them until I achieved a snug fit. This is one of CA’s early kits, and the plastic really reminds me of an MPM kit. Lots of flash and thick sprue attachment pionts. MPM and CA, along with Eduard and (I believe) Aires, sprang from the same well. There are no locating pins, and the tailplanes are butt-joints. Careful trimming is needed to align them, and all seams required filling (I use Zap-A-Gap CA). The panel lines are fine but faint, so I rescribed them. I then sanded and polished the fuselage, wings, and tail. There are shallow slots in the lower wing for the interplane struts, so I drilled a line of holes and cleaned out the opening with a #10 (curved) blade. The top wing is one-piece, so I drilled out the openings for the struts before gluing the halves together.

The most difficult part of this build (so far) has been adding the cabane struts, which are the ones between the fuselage and top wing. They are all about 1/8" too long. I cut off the tops of the rear ones, filing and test fitting until I had the proper length and angle at both ends. I then drilled holes in the ends to accept pins. The forward cabanes were more work, since there is a fairing at either end. I cut the strut above the lower fairing, and repeated the trimming process until I had the proper length and angle. I attached the strut to the fairing with pins also, with more pins at the ends. Sizing and attaching the cabanes probably took four to five hours. Very labor-intensive, but rewarding when the wing can be dryfitted in the proper alignment.

If you don’t like to do anything with a part after removing it from the sprue, besides gluing it, this kit is not for you. You gotta like the work, and I enjoy it. This kit fights back, but it’s rewarding when you defeat it.

Pix: You excel at “modelling” where I struggle with “assembly”. What you’ve posted looks like it went together with ease…you’re definately winning this fight!

Can’t wait to see more.

Looks like you’re winning the war Bill. Very nice work.

Regards, Rick

Looks like your winning with a Tko. -3 is going to have w tween wars paint scheme?

Biplanes are always a challenge because of that extra wing, and that gets multiplied significantly when the kit has major fit issues, which is just one more reason why your skills continue to impress the [censored] outta me, pix! [tup]

Looking great so far Pix can’t wait to see it completed. I’ve got that kit in my stashed but I heard it’s one of the hardest CA kits to build so I’m holding off till I’m ready for a fight. looks like you’vr beaten it into submission.

Bill-

Looks great! You are definately very talented!

Looks great, Bill. I can see why you feel “vindicated”, as in that other 1/48 Vindicator kit before Accurate Miniatures di one for us.

You had me there for a moment - I thought you were opening a discussion about Alice Cooper.

Well the plane looks good from here. The issues you described are why I haven’t started my Classic Airframes Boeing F4B-4 or my Special Hobby Ju87-A… I’m chicken!!

Looking real good!

Looking good Bill. I have a love hate relationship with CA kits - they have really interesting kits that no one else makes, but boy do they make you work to get good results. But I still build them!

Bill-1 Kit-0 [:D]

Nice work Pix!

Nice job I have this one in my stash also. I recently build the Classic Airframes Cr 42 Falco and it was not an easy build at all. I am very happy with the end results except for the outer wing struts. The fit was bad some were to short some were to long. I ended up breaking about three of them then I just parked it for now. I plan on reconstructing them out of flattened brass tubing in the near future. If the rest of the kit was not so beautifull I would not even bother.

Soulcrusher

It seems you are whipping this kit, despite the fight it is putting up.

Thank you very much mucker, Rick, Wayne, Mike, mkhoot, Frank, John, ModelNerd, waikong, Darren, Soulcrusher, and cassibill !

mucker - if you take your time with limited-run kits : dryfit, trim, file, and sand, they will eventually fit. Patience is the most valuable skill to have.

wayne - this is the scheme I’ll be using:

mkhoot - I’ve built a few of the early CA kits (Macchi 200, MiG 3, Whirlwind, He 112, P-43 Lancer, etc.), and this one is by far the most challenging. There is always much to learn from building a kit that tests your skills.

ModelNerd - I thought the title was better than using “Billion Dollar Babies,” which wouldn’t be appropriate for this kit. I’ve been eyeballing that Ju87A, though. I’ll have to get one.

Soulcrusher - nice Falco ! Is that the original release, with the all-PE cockpit? CA’s kits have become much more refined over the years. Their early Bf 109 kits are almost like the mainstream kits available today. The old kits used low-pressure molding, and they now have hardened steel molds.

I have more “Yellow Wings” kits to come in the near future. These are the ones my customer sent me to build for him:

Lots of fun in those boxes !

I built a Classic Airframes Kit of the Meteor F8 last year, so I know what you’ve been through!

They take up a lot more time and effort than your average kit, and they’re certainly not for the faint-hearted. I won’t be doing another for the simple reason that life’s too short!!!

I admire your work - and your patience!

Bill,

I feel your pain! I am still working on that F.M. PV-1 - it has taken several weeks of cut, sand, fit, etc. just to close the fuselage, and you are so right, the satisfaction is well worth the effort. Your work here is phenomenal, as always, I wish mine looked that nice! I do agree that CA kits can be a “challenge”! Thanks for sharing and keep the prog reports coming!

Brian [C):-)]

Make sure you post some pics when you get some paint on it. That paint scheme is going to look great. You sure have your work cut out for you with that stack of kits. I currently have 17 CA kits in my stash. I do not think I would dare to build even two of them back to back. The Falco was my first. Just like you said they just need alot more fitting and sanding to go together. With some patience they do turn out beautiful as your pictures prove. I do not know if the Falco is the early one the interior was resin with alot of photo etch parts. It is a shame you can not see alot of it through the small cockpit opening. Looking foward to seeing progress.

Soulcrusher

Pix, completely off topic, but how do you send your completed builds back to a customer? What’s the best way to protect our far-to-fragile models in a shipping box? I’ve thought about fashioning a styrofoam support for the aircraft (upside down?) and surrounding it with packing peanuts. Or is there a better way?

Thanks! Oh yeah…

[#offtopic]

Nice progress on the build.

Thanks Spurdog, Brian, Soulcrusher, and arki !

Spurdog - building the more challenging kits are a great way to sharpen your skills. It’s easy to become complacent, and stagnate by building the “same old same old.” I’m sure you’ll find time in the future, when you feel you could use it.

Brian - regardless of the looks of the outcome, I consider challenging kits to be the most valuable ones on the shelf. I put very little worth on ones that are easy.

Soulcrusher - I believe you have the reissue. The original was one of CA’s first kits. I’m working on two other kits at the moment in addition to this one and the SB2C-1. A 1/48 ProModeler Bf 110G-4 with Verlinden’s update set for another customer, and Eduard’s Fw 190A-8 (additional PE, placards, tool set, ground crew - my first dio) for myself. I can find something to do that fits my mood that way. If I can’t figure out how to make something work on one of the CA kits, I can switch to another build. This gives me a fresh approach when I get back to the CA kits.

arki - I usually ship them inverted in a box thats just a little larger than the kit. Many times, the kit box is perfect for this. I buy a few large foam spunges at my local Home Depot, and cut them to shape to hold the finished model without movement. The model’s finish won’t be damaged if it rubs against the sponge. Styrofoam is too coarse for this. I also add more cut foam spunges and place them above the model, making sure that the landing gear won’t come in contact with the top of the box. I sometimes cut extensions for the sides of the box from foam board. This is like a box without top or bottom that fits in between the box top and bottom. With the separate top, it’s much safer to protect it from above. Lowering it into a corrogated cardboard box and filling all the space above it leaves a lot of room for it to move. This box is then placed in a larger corrogated box, with packing material in between. Since these are biplanes, I can’t ship them inverted. They will travel well, it will just require more sponges and imagination.

Thanks again !