Hey fellas,
I really admired those who can create weathered and faded decals. I’ve read some posts but I didn’t found any information about a decals that appear to look worn through. Decal solvents? Sanding? Washes? Topped with base coat? Are there any FSM articles on this extreme weathering approach? I would very much a like to hear your techniques.
I’m still kind of muddling my way along, figuring out what works as I go, but here’s what I did for this Dauntless:
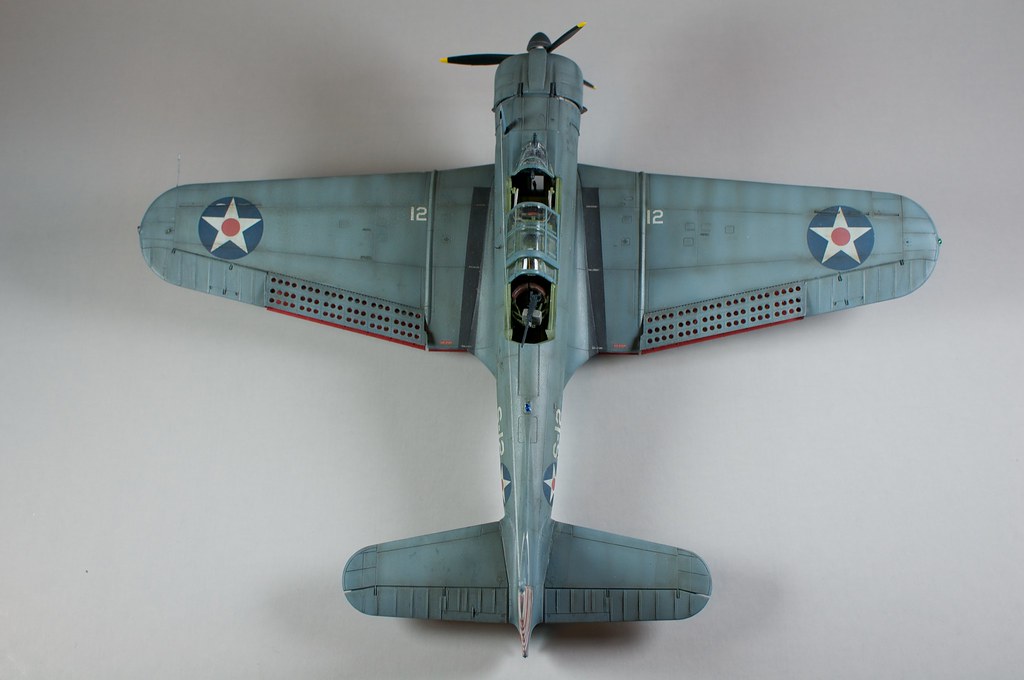
1 - Gloss and apply decals after principal painting. In this case it was blue grey, lightened blue grey, and then a thinned blue grey blending coat.
2 - Once the decals were set and sealed, I hit them in quick passes with the thinned blue grey. Have to be careful here not to overdo it.
3 - I then weathered the plane with 50/50 Tamiya Flat Black/Brown thinned 90% with denatured alcohol. Did the post-shading thing along panel lines, then hit it with random swipes in the direction of airflow (and a few in direction of gravity on the fuselage).
4 - Another pass of the thinned base color to calm the weathering down and blend everything together a bit.
5 - Spray a bad bottle of Polly flat and spit white flecks all over the place. Swear profusely for ten minutes.
6 - Carefully wet-sand the kit with (at least) 1000 grit sandpaper. In my case I was trying to get rid of the flecks, but not break through the Testors Dullcote underneath. The sanding actually improved the finish in the end, I think. And it seemed to thin down the really thick national insignia markings, but I don’t know if that’s more perception than reality.
So yeah…I tried a little bit of everything with this kit. I think the key is, once you’re dealing with finished paint and decals, proceed slowly and exercise caution. You can always step up to a coarser sandpaper or more potent paint mix, but you can’t step down.
Looks very nice. Did you apply the thinned base coat over the entire model or just the decals?
Nice Dive bomber ,pal… Keep the good work going.
I’ve tried both pigments and overspray. Both work to some extent, however mine have never come out like that dive bomber. Nice build there.
With the first pass (post-decal, pre-weathering), I focused on just the decals. Very, very light application. They really don’t need much at all to give that worn look.
The second pass was more general, but I made sure to keep it light around the decals.
Here’s a photo of a type of flat bed rail car. Notice the letters “E” & “Y” in the word/decal “Valley”. The letters are disappearing. How is this achieved? And thanks for all the advice.
I overspray with the color the decal is applied over. This has to be done with an airbrush and takes a very light coat. You can build it up, the heavier the coat the more faded the decal looks. If you are using a flat paint it also takes the gloss off the decal, though I usually overcoat with dullcoat before I start the weathering coat anyway.
Now that’s a very good and obvious technique. Thank you.
You can also scuff them while they’re still on the backing paper, using an extra-fine sanding film. A few passes will start to fade the top color, but be careful, the white underlay will show up quicker than you think… Pratice on some old ones you don’t care about in order to see the effect take shape and get an idea of how to do it…
I also hit glossy decals with a pencil eraser before I cut them from the paper to remove the gloss…
I think the implementation depends on the scale. Too subtle and they looks like a modeling flaw but too large makes them look overdone. For me it is imagine, study and plan, then go at it; X-acto slicing or shaving, small sanding, rubbing the decal with paper, toning down the vivid decals with intentional and strategic overspray in layers and slightly different colors does the job. Don’t overdo it but OTOH don’t be bashful. It just doesn’t make sense to have a weathered model with vibrant decals. I am fond of weathering the decals, even slightly. They just finish the model.