How do you apply wash on raised panel lines and rivets? It will be my first build with this kind of detail and I am apprehensive about the thought of sanding and rescribing all the lines and rivets, since it is a 1:32 scale F-86F. [*-)] Thank you all for whatever advices and tips you can give.
One article in FSM describes painting the plane the base color of the panel lines first and lightly sanding off the color coat to reveal the panel lines. For darker aircraft paint the plane silver first, for lighter aircraft paint it black or dark grey so the panel lines stick out after the origional color is exposed. Another way would to be highlight the rasied panel lines after its painted with dry brushing or useing a fine black felt pen, seal with clear coat after as many permanent markers are not so on paint. Use a tape guide and be pacient as this will take a long time. If dry brushing swipe towards the tape to avoid sloppy lines.
SuppressionFire: Thank you very much for the info. Looks like a very laborious effort, not much easier than sanding and rescribing. Which process do you recommend which will highlight the details better? Wash the raised lines or sanding and rescribing it? Thanks again.
Basically a brand of artist’s pencil crayon. They can be bought individually at any art store. Crayola is the old standard yet a bit to hard to work really well on painted surfaces. Make sure the surface is flat clear coated as the crayon needs a rougher surface to ‘bite’ to.
Han’s suggestion of pastelles is good as well. A flat clear coat helps the pastelle stick but the down side is any corrections will be harder to remove. Always wear a clean glove handeling the model at this point and clear coat after you are satisfied with the results. A clear coat will soak up the pastelle to a degree so a bit darker than you figure may be needed. Some modelers don’t spray flat clear after pastelles which is fine if you have a base where the model is finished being handeled.
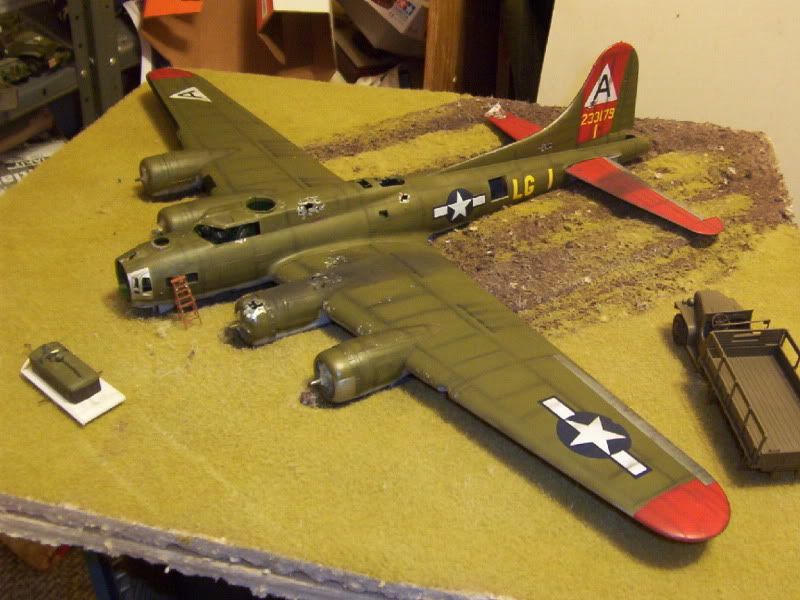
Hans von Hammer: Now that is a great looking B-17 with very nice paint job and the wash really highlights the details. To tell you the truth, this will be my frist time to do wash, since this is my first build. Thanks Hans, I appreciate the tips from you guys.
You’re welcome, and thanks fer the kudos… Sadly, the Fort never made it to completion due to a young tomcat The cat decided one day that the shelf (where the Fort was waiting for me to finish it) was the only place in my War Room that would suit his need to perch… He jumped up there and catapaulted the Firt, dio & all, about 3 feet out & five feet down… The Fort didn’t survive the second “crash-landing”… The cat dame-near didn’t either…
A little background on the pastel work… Rather than a wash, it’s a post-shading technique (You’ll see both “post-shading” and “Pre-shading” around here. P-re-shading is done before the color-coat is applied.) Like JM pointed out, they need to be applied over a flat finish so there’s something to grab onto… Most pastels though will wipe off fairly easily with a damp tissue if you screw them up (there will be a trace, though not enough to matter, but black (which is actually charcoal, rather than chalk) will be more or less permanent, although somewhat subdued… Also, they’re can’t be oversprayed with any fixative. You’ll end up making it all disappear if you do…
I apply the charcoal by using an old 1-zero red sable brush that I can’t use for detail painting anymore… I cut the bristles off at about the 1/16th mark so they’re a little stiffer, and rather than make a powder, I just rub the brush on the stick, then “paint” along the line with a scrubbing action. There is very little color deposited this way, but that’s a good thing, since a little black can go a long way and there’s no turning back once you start.
You can buy a starter set of artist’s pastels at any art & crafts store (Hobby Lobby is my source) for about 12 bucks… You don’t want colored chalk though… Those are too hard to grind into a good powder and don’t stick well. The artist’s pastels are softer. Likewise, don’t buy oil pastels either… They’re more like a crayon (although the black, grey & brown have their uses)…
SuppressionFire - I think I saw a variation of what you describe in a FSM article where the author lightly painted all the raised panel lines a dark color before applying the true paint color, but I don’t remember any sanding to bring out the panels, only that shading. Is that right? [:^)]