I know there are dozens of model car websites, forums and FB groups out there, but I thought I would start with y’all first.
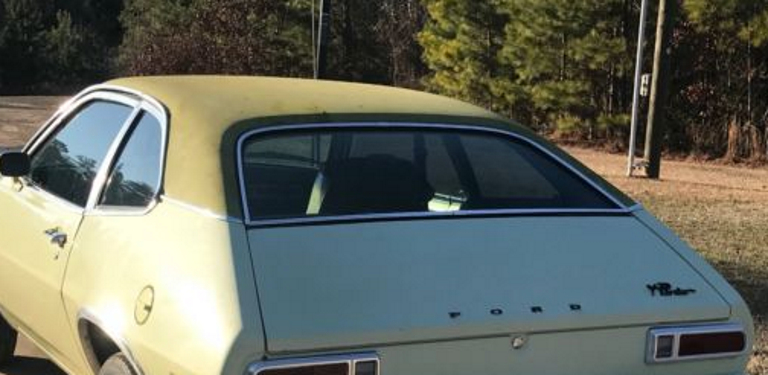
My next project is a model of the first car my wife bought, in 1/25 scale. I know the GM cars with vinyl had an overlap seam right above the door line, but the Pinto Runabout with Sport Accent Package had a one-piece deal. Considering the curves in different directions, not to mention the size, I don’t have any great ideas for getting that vinyl surface effect.
I would do it with paint. Build up light dry coats to create the texture in the color you want the top to be. Be sure to mask off the trim first so it stays smooth.
I guess I didn’t make it clear enough - it appears this beastie doesn’t have any seams, overlapping or otherwise. Every photo I have seen appears to show a one piece vinyl part.
What I do is this. I select my color in either Semi-Gloss or Flat. I decant paint into a small container and expose it to air. When it starts to glaze over I stir it because it has started to thicken. I then apply it with a “Stippling Brush”( A brush, usually round with short stiff bristles) AFTER the first smooth coat or the paint in a regular pattern.(Windshield to RearBacklight). Then stipple the paint in rows starting from either side. Horizontally on the “C” pillar and front to back on the top. Keep these rows as straight as you can.
When the paint is dry you will have a textured Roof. If you want the dual seams many have do this. I use Regular Thin Auto striping tape close to the color I want my top. I apply two stripes to the top in the right areas(On a Model car this is 3/64" or 1/8" From the widest point on the side Of the roof from the drip rail to the roof centerline). Then just paint over the tape. Now, when you do this Make sure to cut your tape at the outside edge of the Window trim so you can apply Foil Chrome or Alclad. If you want generic texture just “Stipple” in a random pattern all over the roof and “C” pillar. NOTE. When using the tape stripe method, Keep That Tape in a Straight Line Front to Back!!
Around 1972 a popular deal was “Spray on “Vinyl” Tops”. I was one of the few that told the wifey (I was still on Active Duty,) Do Not! sell that out of our shop! It turned out I was right! It was a passing Fad! I did not build the shop with the idea of responding to fads. I wanted it to be well entrenched in the community by the time I got out. I needed the income to finish our educations!
Some of the dealers got into it and one of the Body Men said it was a pain in the Wazoo! The equipment was cranky and very high maintenance!
In 1974 I bought a very beat up and rusty old '56 Chevy 4 door hardtop. It had a spray on “simulated vinyl” roof. I started to sand it off but it was rock hard and required an actual grinder. Got the drivers side cleared before I gave up with a nice neat line right up the center of the roof. It stayed that way until the car broke in half going over some railway tracks a few months later.
As far as different methods go I use Tamiya extra thin cement and the stipple method mentioned above. Brush liberal amount of cement on about a square inch of roof and stipple with a stiff brush. Overlap and repeat for whole top. Give a light sanding to knock any peaks off and paint as per normal.
I think I am getting the picture now. It sounds like for this case only, I want a liquid that will have the greatest effect of softening the plastic, and then doing the stipple effect while the plastic is still a bit gooey. I will try Tamiya Extra Thin as you suggest, although I didn’t think it was particularly brutal on bare plastic.
And it sounds as if the stippling brush will be a one-time use, as there should be a bunch of plastic residue left on it. I can live with that.
The Extra thin works well becuase it does only impact the top layer so there is little risk of ectching the plastic too deeply. You have to brush a fair bit on and work quickly. Make sure you do the whole surface and then go over again in a random pattern. The vinyl tops had very little uniformity or pattern to them so you want to avoid things being perfectly even. I tried the over spray method on the weekend and found it to be far too consistent for my liking and cleaned it off and went to my old ways.
I have used the same brush for years. The stiffer and more splayed out the bristles get the better the effect.

.jpg.6a938e1eea5d6023b325a668ea0dd457.jpg)