I was fiddling around at the bench this past weekend and had a thought. I took some lengths of different diameter brass rod and bent one end around a PE rolling tool, giving me CA applicators of different sizes. Cost is next to nothing, just spare brass rod on hand, and you can clean up the loop with a lighter, burning off the dried CA, the cleaning off the soot with some sand paper. You can make the tools as short or long as you need and bend them to whatever angle you may need at the time, just bending them back straight after you are done. Simple idea but it works as good as any CA applicator I’ve used or seen.
This also works as an applicator for CA kicker - just don’t try to use the same tool for both CA and kicker. Make sure you keep the CA applicators separated from the tool or tools you use for the kicker or they can set up your CA by mistake.
I made a couple of similar applicators about a year ago, and use them frequently.
I took a couple of the larger needles from a package of assorted sewing needles. I stuck their points into the ends of a couple of lengths of 5/16 inch dowels. I ground off about half of the eyes on the other end, leaving forks. These forks are about a sixteen wide and about an eighth inch long. Surface tension holds a drop of glue or accelerator in the fork. I use one of these for applying CA, the other for applying CA accelerator.
I drilled the end of the dowels with a small drill and pin vise, and put a drop of glue on the needle tips so they would stay in.
I just tried this with a package of large needles I got at Michael’s today. This worked excellent and I had great control over the CA, laying it down in a nice bead right in the seam. Cleaning up the needle eye of CA was also easy, I just ran it over the burner on the stove and burned off the remaining CA.I’m going to make a handle for it tomorrow.
Those “forks” also make great diorama tools for installing tuffs of grasses, shrubs, etc. into blue insulation foam. Just find the midpoint of the grass length, put it into the fork, push in down into the foam and pull out the fork, the grass stays behind, add a drop of glue.
Here’s an easy way to remove the CA. Take an empty, clean paint bottle, but a little CA Debonder in it. After using the applicator, just set the tip of it in the bottle. Let is sit for a few hours, overnight, whatever. Then, just wipe off the residue with a paper towel and you’re ready to go.
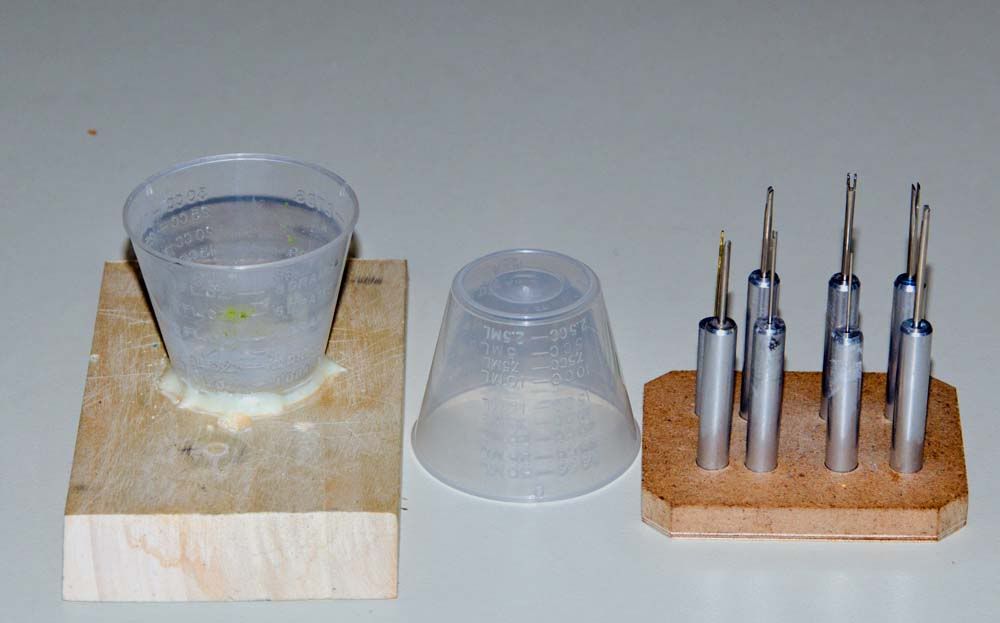
I’ve been using home made CA applicators for years - particularly for stick’n’tissue models but now use them in my styrene builds. I grind half the eye off of various sized needles and put them in handles. I ‘hot melt glue’ a dosage cup to a small block of wood (keeps from spilling contents) and fill it with acetone. I use another dosage cup inverted and place CA in the little depression in the bottom. I choose the appropriate sized needle for what I want, dry the acetone off the needle on a cloth, dip the needle in CA, apply, then return the needle to the acetone. The acetone dissolves any remaining CA from the needle. The CA sitting in the dosage cup doesn’t harden for several hours. When done for the day, I wipe off the needle(s), use left over acetone on a cloth to clean the CA from the cup and ‘presto’ ready for the next session. Here’s a pic of what I use (yeah, I know, aluminum handles - too much time on my hands)
I hadn’t thought of using a cup of acetone to dip the applicator in as I go, but its a great idea! Much better than waiting until it builds up on the tip and then burning it off and having to sand off the soot that leaves. Thanks for sharing.
Here is something interesting I’m going to try. I watch a TV program where they were showing how custom hand-made jewelry is made. The person was using a pen nib to dab on droplets of color enamel onto the jewelry. I got to believe this would work for applying CA and also doing detail painting in a place like a cockpit.
Sweet set-up there Bick. I haven’t got dosing cups, but someone gave me a stack of those plastic cups they dispense pills with at the hospital…the bottom dimple isn’t as pronounced as yours look, but they’ll do the job a lot better than the piece of glass I robbed from a portrait frame that I have been using.
That and the acetone are great tips…now I just need to make the different sized applicators, I’ve been making due with one size.